# unplugin-svg-component
[English](./README.md) | **中文**
[![NPM Version][npm-image]][npm-url]
[![Downloads Stats][npm-downloads]][npm-url]
> unplugin-svg-component 启发于[vite-plugin-svg-icons](https://github.com/vbenjs/vite-plugin-svg-icons),它将本地的svg文件生成为一个 vue/react 组件, 通过该组件结合svg文件的名称使用svg图标。
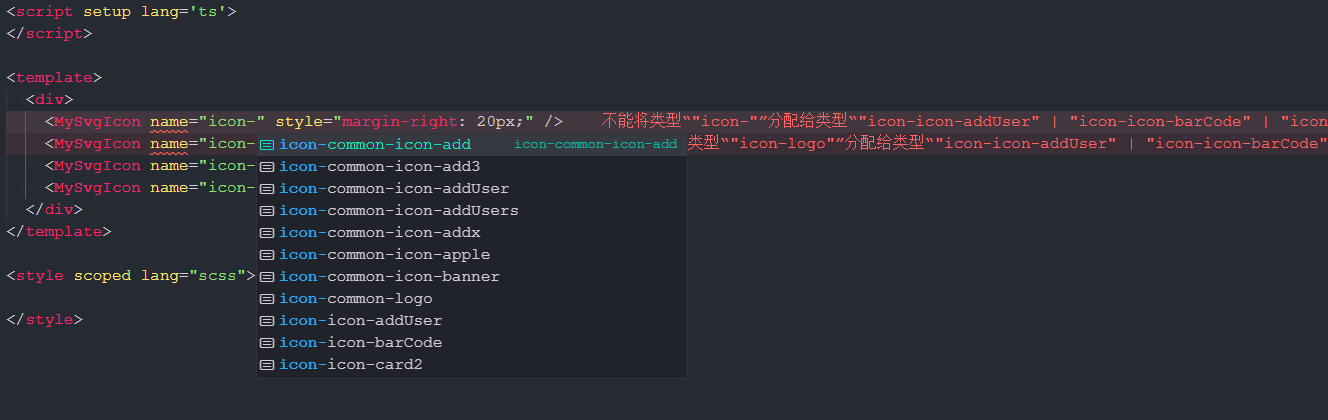
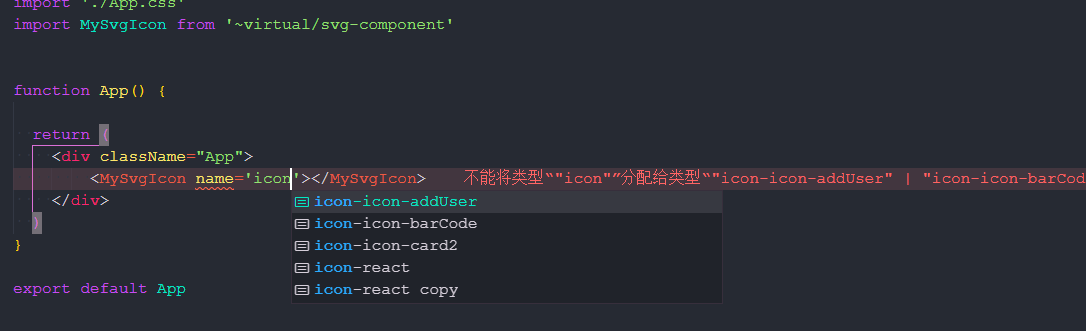
## 智能提示效果
### Vue
### React
## 功能
* **智能提示**: 使用组件时, 配合 Typescript 会提示出 svg 文件名称
* **热更新**: svg 文件的增删改操作, 都会实时显示于页面上, 无需刷新浏览器
* **Vue & React 支持**: 自动检测项目类型
* **Tree-shaking**: 从**v0.5.0**版本开始, 生产环境只会打包你用到的 svg 图标
* **SSR**: 通过开启 `option.domInsertionStrategy = 'replaceHtml'` 这个选项(默认开启)支持SSR.
## 安装
```shell
yarn add unplugin-svg-component -D
# or
npm i unplugin-svg-component -D
# or
pnpm install unplugin-svg-component -D
```
## 使用
Vite config
```ts
// vite.config.ts
import UnpluginSvgComponent from 'unplugin-svg-component/vite'
export default defineConfig({
plugins: [
UnpluginSvgComponent({ /* options */ })
],
})
```
Vue-cli config
```js
// vue.config.js
const { defineConfig } = require('@vue/cli-service')
const UnpluginSvgComponent = require('unplugin-svg-component/webpack').default
module.exports = defineConfig({
configureWebpack: {
plugins: [
UnpluginSvgComponent({ /* options */ })
]
}
})
```
Webpack config
```js
// webpack.config.js
const UnpluginSvgComponent = require('unplugin-svg-component/webpack').default
module.exports = {
/* ... */
plugins: [
UnpluginSvgComponent({ /* options */ }),
],
}
```
Rollup config
```js
// rollup.config.js
import UnpluginSvgComponent from 'unplugin-svg-component/rollup'
export default {
plugins: [
UnpluginSvgComponent({ /* options */ }),
],
}
```
Esbuild config
```js
// esbuild.config.js
import { build } from 'esbuild'
import UnpluginSvgComponent from 'unplugin-svg-component/esbuild'
build({
/* ... */
plugins: [
UnpluginSvgComponent({
/* options */
}),
],
})
```
### Vue
```ts
// main.ts
import SvgIcon from '~virtual/svg-component'
app.component(SvgIcon.name, SvgIcon)
```
### React
```tsx
// App.tsx
import SvgIcon from '~virtual/svg-component'
function App() {
return (
)
}
```
### 获取`svgNames` / 类型 `SvgName`
```ts
// all svg icon name
import { svgNames } from '~virtual/svg-component'
// type SvgName = "icon-icon-addUser" | "icon-icon-barCode"
import type { SvgName } from '~virtual/svg-component'
```
## 插件配置
| 属性 | 类型 | 默认值 | 描述 |
| ----------- | ---------------------- | --------------------- | ------------ |
| iconDir | `string \| string[]` | - | 图标文件夹位置 |
| projectType | `vue \| react \| auto` | auto | 项目类型, 默认会自动检测 |
| dts | `boolean` | - | 是否生成d.ts文件 |
| dtsDir | `string` | - | d.ts文件位置 |
| prefix | `string` | - | 给每个svg name加上前缀,使用时记得加上这个前缀 |
| componentName | `string` | SvgIcon | 生成的组件名称 |
| componentStyle | `string` | width: 1em; height: 1em; fill:currentColor; | 组件的行内样式 |
| preserveColor |`RegExp` | - | 通常, 插件会把svg标签内的fill, stroke属性替换成currentColor, 此属性会对每个svg路径进行正则匹配, 匹配成功的svg则不会替换currentColor, 而是保留原有的颜色. |
| symbolIdFormatter | `(svgName:string, prefix: string)=>string` | [code](./src/core/utils.ts/#L33) | 可以通过这个参数来设置symbolId的格式 |
| optimizeOptions | `SvgoOptions` | - | [svgo 的优化参数](https://github.com/svg/svgo) |
| svgSpriteDomId | `string` | __svg_sprite__dom__ | 自定义生成的svg元素的id |
| vueVersion | `2 \| 3 \| auto` | auto | Vue 版本, 默认会自动检测 |
| treeShaking | `boolean` | true | 是否开启tree-shaking |
| scanGlob | `string[]` | [code](./src/core/utils.ts/#L41) | 用于 tree-shaking 的模式匹配路径 |
| scanStrategy | `text \| component \| (code: string[], options: Options)=>string[]` | component | 用于 tree-shaking 的模式匹配策略, 未匹配成功则不会打包到最终的产物中去, `text`选项表示按图标名称匹配, 所以你应该保证你图标名称的唯一性(可以考虑用`symbolIdFormatter`选项定制),以此避免错误的tree-shaking, 而默认值`component`表示的是按组件这一整体进行匹配, 此外你也可以通过传递函数的方式来实现 tree-shaking 策略, 函数的返回值表示用到的 svg 图标合集。|
| domInsertionStrategy | `replaceHtml \| dynamic` | `replaceHtml` | 控制注入SVG元素的方法,`replaceHtml(默认)`:在服务端通过替换HTML字符串来注入SVG元素; `dynamic`:在浏览器端,通过JavaScript动态地注入SVG元素。**警告:如果您处于服务器端渲染(ssr)模式,您应该使用`replaceHtml`策略**。|
## Typescript 支持
```json
// tsconfig.json
{
"include": ["svg-component.d.ts", "svg-component-global.d.ts"]
}
```
## 最佳实践
可以根据需求参考[examples](./examples), 注意 examples 中的配置都是默认配置.
## Contributing
1. Fork ()
2. 新建一个分支 (`git checkout -b feature/fooBar`)
3. 提交你的代码 (`git commit -am 'Add some fooBar'`)
4. 提交到你的远程分支 (`git push origin feature/fooBar`)
5. 提交PR
## License
MIT License © 2022-PRESENT [Jevon617](https://github.com/Jevon617)
[npm-image]: https://img.shields.io/npm/v/unplugin-svg-component.svg?style=flat-square
[npm-url]: https://npmjs.org/package/unplugin-svg-component
[npm-downloads]: https://img.shields.io/npm/dm/unplugin-svg-component.svg?style=flat-square
[travis-image]: https://img.shields.io/travis/dbader/node-datadog-metrics/master.svg?style=flat-square
[travis-url]: https://travis-ci.org/dbader/node-datadog-metrics
[wiki]: https://github.com/yourname/yourproject/wiki