![]()
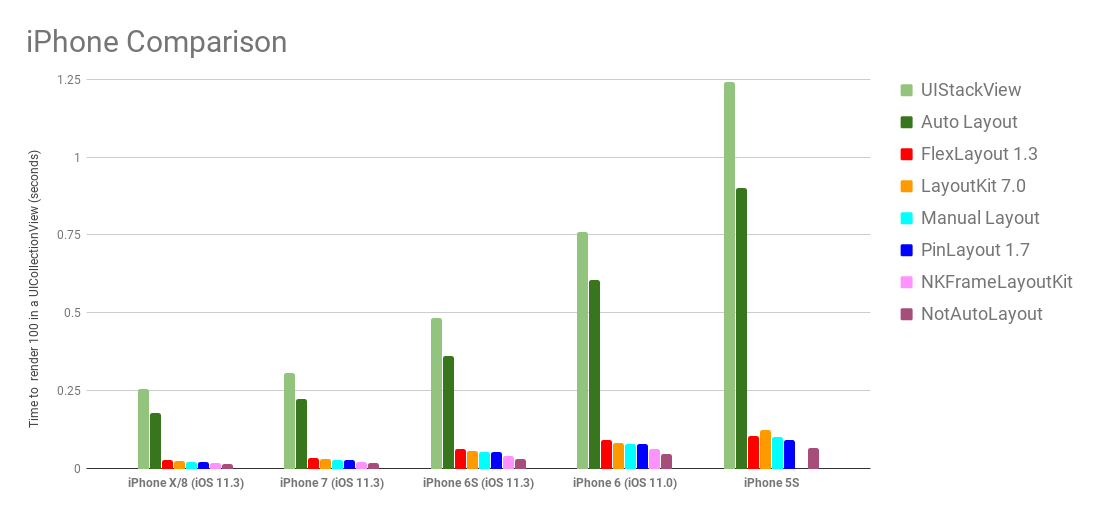 See [Layout Framework Benchmark](https://github.com/layoutBox/LayoutFrameworkBenchmark) for complete details and benchmarks charts for iPhone X/8/7/6S/...
## Code source comparison
This section shows the benchmark layout code for each type of layout framework.
Remark how PinLayout and FlexLayout code is concise and clean compared to Manual Layout and Auto layout source code.
### PinLayout source code
[PinLayout benchmark's source code](https://github.com/layoutBox/LayoutFrameworkBenchmark/blob/master/LayoutFrameworkBenchmark/Benchmarks/PinLayout/FeedItemPinLayoutView.swift)
```swift
override func layoutSubviews() {
super.layoutSubviews()
let hMargin: CGFloat = 8
let vMargin: CGFloat = 4
optionsLabel.pin.topRight().margin(hMargin)
actionLabel.pin.topLeft().margin(hMargin)
posterImageView.pin.below(of: actionLabel, aligned: .left).marginTop(10)
posterHeadlineLabel.pin.after(of: posterImageView, aligned: .center).marginLeft(4)
posterNameLabel.pin.above(of: posterHeadlineLabel, aligned: .left).marginBottom(vMargin)
posterTimeLabel.pin.below(of: posterHeadlineLabel, aligned: .left).marginTop(vMargin)
posterCommentLabel.pin.below(of: posterTimeLabel).left(hMargin).marginTop(vMargin)
contentImageView.pin.below(of: posterCommentLabel, aligned: .left).right().marginTop(vMargin).marginRight(hMargin)
contentTitleLabel.pin.below(of: contentImageView).left().marginHorizontal(hMargin)
contentDomainLabel.pin.below(of: contentTitleLabel, aligned: .left)
likeLabel.pin.below(of: contentDomainLabel, aligned: .left).marginTop(vMargin)
commentLabel.pin.top(to: likeLabel.edge.top).hCenter()
shareLabel.pin.top(to: likeLabel.edge.top).right().marginRight(hMargin)
actorImageView.pin.below(of: likeLabel, aligned: .left).marginTop(vMargin)
actorCommentLabel.pin.after(of: actorImageView, aligned: .center).marginLeft(4)
}
```
### FlexLayout source code
[FlexLayout benchmark's source code](https://github.com/layoutBox/LayoutFrameworkBenchmark/blob/master/LayoutFrameworkBenchmark/Benchmarks/FlexLayout/FeedItemFlexLayoutView.swift)
```swift
flex.addItem(contentView).padding(8).define { (flex) in
flex.addItem(contentView).padding(8).define { (flex) in
flex.addContainer().direction(.row).justifyContent(.spaceBetween).define { (flex) in
flex.addItem(actionLabel)
flex.addItem(optionsLabel)
}
flex.addContainer().direction(.row).alignItems(.center).define({ (flex) in
flex.addItem(posterImageView).width(50).height(50).marginRight(8)
flex.addContainer().grow(1).define({ (flex) in
flex.addItem(posterNameLabel)
flex.addItem(posterHeadlineLabel)
flex.addItem(posterTimeLabel)
})
})
flex.addItem(posterCommentLabel)
flex.addItem(contentImageView).aspectRatio(350 / 200)
flex.addItem(contentTitleLabel)
flex.addItem(contentDomainLabel)
flex.addContainer().direction(.row).justifyContent(.spaceBetween).marginTop(4).define({ (flex) in
flex.addItem(likeLabel)
flex.addItem(commentLabel)
flex.addItem(shareLabel)
})
flex.addContainer().direction(.row).marginTop(2).define({ (flex) in
flex.addItem(actorImageView).width(50).height(50).marginRight(8)
flex.addItem(actorCommentLabel).grow(1)
})
}
}
```
### Manual layout source code
[Manual layout benchmark's source code](https://github.com/layoutBox/LayoutFrameworkBenchmark/blob/master/LayoutFrameworkBenchmark/Benchmarks/ManualLayout/FeedItemManualView.swift)
```swift
override func layoutSubviews() {
super.layoutSubviews()
optionsLabel.frame = CGRect(x: bounds.width-optionsLabel.frame.width, y: 0,
width: optionsLabel.frame.width, height: optionsLabel.frame.height)
actionLabel.frame = CGRect(x: 0, y: 0, width: bounds.width-optionsLabel.frame.width, height: 0)
actionLabel.sizeToFit()
posterImageView.frame = CGRect(x: 0, y: actionLabel.frame.bottom,
width: posterImageView.frame.width, height: 0)
posterImageView.sizeToFit()
let contentInsets = UIEdgeInsets(top: 0, left: 1, bottom: 2, right: 3)
let posterLabelWidth = bounds.width-posterImageView.frame.width - contentInsets.left -
contentInsets.right
posterNameLabel.frame = CGRect(x: posterImageView.frame.right + contentInsets.left,
y: posterImageView.frame.origin.y + contentInsets.top,
width: posterLabelWidth, height: 0)
posterNameLabel.sizeToFit()
let spacing: CGFloat = 1
posterHeadlineLabel.frame = CGRect(x: posterImageView.frame.right + contentInsets.left,
y: posterNameLabel.frame.bottom + spacing,
width: posterLabelWidth, height: 0)
posterHeadlineLabel.sizeToFit()
posterTimeLabel.frame = CGRect(x: posterImageView.frame.right + contentInsets.left,
y: posterHeadlineLabel.frame.bottom + spacing, width: posterLabelWidth,
height: 0)
posterTimeLabel.sizeToFit()
posterCommentLabel.frame = CGRect(x: 0, y: max(posterImageView.frame.bottom,
posterTimeLabel.frame.bottom +
contentInsets.bottom),
width: frame.width, height: 0)
posterCommentLabel.sizeToFit()
contentImageView.frame = CGRect(x: frame.width/2 - contentImageView.frame.width/2,
y: posterCommentLabel.frame.bottom, width: frame.width, height: 0)
contentImageView.sizeToFit()
contentTitleLabel.frame = CGRect(x: 0, y: contentImageView.frame.bottom, width: frame.width, height: 0)
contentTitleLabel.sizeToFit()
contentDomainLabel.frame = CGRect(x: 0, y: contentTitleLabel.frame.bottom, width: frame.width, height: 0)
contentDomainLabel.sizeToFit()
likeLabel.frame = CGRect(x: 0, y: contentDomainLabel.frame.bottom, width: 0, height: 0)
likeLabel.sizeToFit()
commentLabel.sizeToFit()
commentLabel.frame = CGRect(x: frame.width/2-commentLabel.frame.width/2,
y: contentDomainLabel.frame.bottom,
width: commentLabel.frame.width, height: commentLabel.frame.height)
shareLabel.sizeToFit()
shareLabel.frame = CGRect(x: frame.width-shareLabel.frame.width, y: contentDomainLabel.frame.bottom,
width: shareLabel.frame.width, height: shareLabel.frame.height)
actorImageView.frame = CGRect(x: 0, y: likeLabel.frame.bottom, width: 0, height: 0)
actorImageView.sizeToFit()
actorCommentLabel.frame = CGRect(x: actorImageView.frame.right, y: likeLabel.frame.bottom,
width: frame.width-actorImageView.frame.width, height: 0)
actorCommentLabel.sizeToFit()
}
```
### Auto layout source code
[Auto layout benchmark's source code](https://github.com/layoutBox/LayoutFrameworkBenchmark/blob/master/LayoutFrameworkBenchmark/Benchmarks/AutoLayout/FeedItemAutoLayoutView.swift)