### 1.Generator与其他异步处理方案
以前,异步编程的方法,大概有下面四种。
#### 1.1 回调函数
JavaScript 语言对异步编程的实现,就是回调函数。所谓回调函数,就是把任务的第二段单独写在一个函数里面,等到重新执行这个任务的时候,就直接调用这个函数。它的英语名字 callback,直译过来就是"重新调用"。
读取文件进行处理,是这样写的。
```js
fs.readFile('/etc/passwd', function (err, data) {
if (err) throw err;
console.log(data);
});
```
上面代码中,readFile函数的第二个参数,就是回调函数,也就是任务的第二段。等到操作系统返回了 /etc/passwd 这个文件以后,回调函数才会执行。
一个有趣的问题是,为什么Node.js约定,回调函数的第一个参数,必须是错误对象err(如果没有错误,该参数就是 null)?原因是执行分成两段,在这两段之间抛出的错误,程序无法捕捉,只能当作参数,传入第二段。
#### 1.2 事件监听
在DOM监听中比较常见。
#### 1.3 发布/订阅
也就是常说的[观察者模式](http://www.tuicool.com/articles/mqANjiR)
#### 1.4 Promise 对象
回调函数本身并没有问题,它的问题出现在多个回调函数嵌套。假定读取A文件之后,再读取B文件,代码如下。
```j
fs.readFile(fileA, function (err, data) {
fs.readFile(fileB, function (err, data) {
// ...
});
});
```
不难想象,如果依次读取多个文件,就会出现多重嵌套。代码不是纵向发展,而是横向发展,很快就会乱成一团,无法管理。这种情况就称为"回调函数噩梦"(callback hell)。
Promise就是为了解决这个问题而提出的。它不是新的语法功能,而是一种新的写法,允许将回调函数的横向加载,改成纵向加载。采用Promise,连续读取多个文件,写法如下。
```js
var readFile = require('fs-readfile-promise');
readFile(fileA)
.then(function(data){
console.log(data.toString());
})
.then(function(){
return readFile(fileB);
})
.then(function(data){
console.log(data.toString());
})
.catch(function(err) {
console.log(err);
});
```
Promise 的最大问题是代码冗余,原来的任务被Promise 包装了一下,不管什么操作,一眼看去都是一堆 then,原来的语义变得很不清楚。
#### 1.5 Generator的方式
ECMAScript 6 (简称 ES6 )作为下一代 JavaScript 语言,将 JavaScript 异步编程带入了一个全新的阶段。关于异步编程可以查看下图:
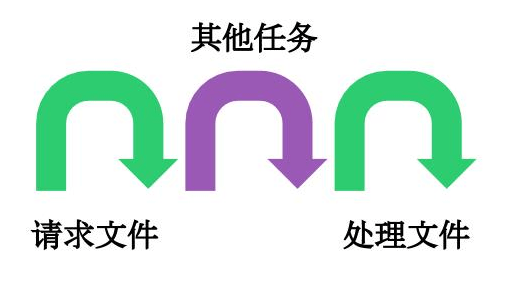
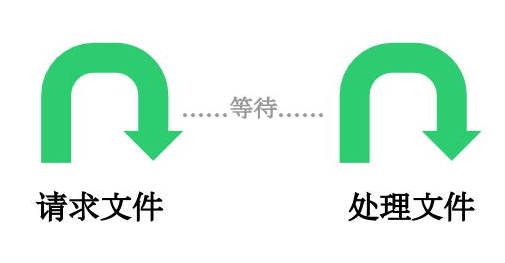
而下面这种连续的执行过程叫做同步的。
Generator 函数是协程在 ES6 的实现,`最大特点就是可以交出函数的执行权(即暂停执行)。Generator 函数可以暂停执行和恢复执行,这是它能封装异步任务的根本原因。除此之外,它还有两个特性,使它可以作为异步编程的完整解决方案:函数体内外的数据交换和错误处理机制。`
next 方法返回值的 value 属性,是 Generator 函数向外输出数据;next 方法还可以接受参数,这是向 Generator 函数体内输入数据。如下例:
特性1:暂停执行与恢复执行
```js
function* gen(x){
var y = yield x + 2;
//(1)每次调用next只会执行yield后面的代码
//(2)第二次调用next的时候可以将上一次调用yield后的结果返回给下一次的调用
return y;
}
```
也就是通过yield来暂停执行,通过next来恢复执行
特性2:函数体内外的数据交换
```js
function* gen(x){
var y = yield x + 2;
return y;
}
var g = gen(1);
g.next()
// { value: 3, done: false }
g.next(2)
// { value: 2, done: true }
// 这里的g.next(2)相当于向我们的generator函数传入值(即表示我们上一次调用g.next得到的值为2),作为上一个yield的返回值,所以得到的结果为2
```
通过调用next方法获取到的value代表函数体向外输出的数据,而调用next方法传入的参数本身代表向Generator传入数据。
特性3:错误处理机制
```js
function* gen(x){
try {
var y = yield x + 2;
} catch (e){
console.log(e);
}
return y;
}
var g = gen(1);
g.next();
g.throw('出错了');
// 出错了
```
上面代码的最后一行,Generator 函数体外,使用指针对象的 throw 方法抛出的错误,可以被函数体内的 try ... catch 代码块捕获。这意味着,出错的代码与处理错误的代码,实现了时间和空间上的分离,这对于异步编程无疑是很重要的。
下面是Generator处理实际任务的一个例子:
```js
var fetch = require('node-fetch');
function* gen(){
var url = 'https://api.github.com/users/github';
var result = yield fetch(url);
console.log(result.bio);
}
```
具体的执行过程如下:
```js
var g = gen();
var result = g.next();
//(1)第一步调用g.next表示从服务端获取数据,即得到yield fetch(url)的结果
//(2)第一个then方法表示将yield的结果转化为json
//(3)第二个then方法表示将json传回到我们的generator方法,此时可以打印result.bio的值
result.value.then(function(data){
return data.json();
}).then(function(data){
g.next(data);
});
```
### 2.thunk函数
#### 2.1 thunk函数基本概念
编译器的"传名调用"实现,往往是将参数放到一个临时函数之中,再将这个临时函数传入函数体。这个临时函数就叫做 Thunk 函数。
```js
function f(m){
return m * 2;
}
f(x + 5);
// 等同于
var thunk = function () {
return x + 5;
};
function f(thunk){
return thunk() * 2;
}
```
上面代码中,函数 f 的参数 x + 5 被一个函数替换了。凡是用到原参数的地方,对 Thunk 函数求值即可。这就是 Thunk 函数的定义,它是"传名调用"的一种实现策略,用来替换某个表达式。
#### 2.2 javascript中的thunk函数
JavaScript 语言是传值调用,它的 Thunk 函数含义有所不同。在 JavaScript 语言中,`Thunk 函数替换的不是表达式,而是多参数函数,将其替换成单参数的版本,且只接受回调函数作为参数。`
thunk函数的实现机制还是通过闭包来完成的。其调用分为三步,首先是传入一个函数,接着是传入该函数的所有除了callback以外的参数,最后是传入回调函数callback
```js
function thunkify(fn){
//第一步:传入函数
return function(){
//第二步:传入除了callback以外的参数
var args = new Array(arguments.length);
var ctx = this;
for(var i = 0; i < args.length; ++i) {
args[i] = arguments[i];
}
return function(done){
//第三步:传入回调函数
var called;
args.push(function(){
if (called) return;
//回调函数只会运行一次
called = true;
done.apply(null, arguments);
});
try {
fn.apply(ctx, args);
} catch (err) {
done(err);
}
}
}
};
```
### 3.thunk与Generator强强联手将程序执行权交还给Generator函数
#### 3.1 Generator的yield返回的必须是thunkify的函数才能递归
你可能会问, Thunk 函数有什么用?回答是以前确实没什么用,但是 ES6 有了 Generator 函数,Thunk 函数现在可以用于 Generator 函数的自动流程管理。
以读取文件为例。下面的 Generator 函数封装了两个异步操作。
```js
var fs = require('fs');
var thunkify = require('thunkify');
var readFile = thunkify(fs.readFile);
var gen = function* (){
var r1 = yield readFile('/etc/fstab');
//1.交出执行权
console.log(r1.toString());
var r2 = yield readFile('/etc/shells');
//1.交出执行权
console.log(r2.toString());
};
```
上面代码中,yield 命令用于将程序的执行权移出 Generator 函数,那么就需要一种方法,将执行权再交还给 Generator 函数。这种方法就是 Thunk 函数,因为它可以在回调函数里,将执行权交还给 Generator 函数。为了便于理解,我们先看如何手动执行上面这个 Generator 函数。
```js
var g = gen();
var r1 = g.next();
//2.查看这里的程序你可以清楚的看到,这里是将同一个回调函数反复的传入到g.next返回的value中。但是这个返回的value必须是thunkify过后的函数,这样它只会接受一个参数,那么就满足这里的定义了
r1.value(function(err, data){
if (err) throw err;
var r2 = g.next(data);
r2.value(function(err, data){
//2.value必须是thunkify的函数才会只接受一个callback参数
if (err) throw err;
g.next(data);
});
});
```
上面代码中,变量 g 是 Generator 函数的内部指针,表示目前执行到哪一步。next 方法负责将指针移动到下一步,并返回该步的信息(value 属性和 done 属性)。
仔细查看上面的代码,可以发现 Generator 函数的执行过程,其实是将同一个回调函数,反复传入 next 方法的 value 属性。这使得我们可以用`递归`来自动完成这个过程。
#### 3.2 使用thunkify来自动执行Generator函数从而将执行权交还给Generator
```js
function run(fn) {
var gen = fn();
//获取到generator内部指针,这里的next就是thunk函数的回调函数
function next(err, data) {
var result = gen.next(data);
//获取generator内部状态
if (result.done) return;
result.value(next);
//Gnerator的value必须是thunkify函数,此时才会只接受一个回调函数
}
next();
}
run(gen);
```
下面是一个读取多个文件的例子:
```js
var gen = function* (){
var f1 = yield readFile('fileA');
var f2 = yield readFile('fileB');
// ...
var fn = yield readFile('fileN');
};
run(gen);
```
上面代码中,函数 gen 封装了 n 个异步的读取文件操作,只要执行 run 函数,这些操作就会自动完成。这样一来,异步操作不仅可以写得像同步操作,而且一行代码就可以执行。
Thunk 函数并不是 Generator 函数自动执行的唯一方案。因为自动执行的关键是,必须有一种机制,自动控制 Generator 函数的流程,接收和交还程序的执行权。回调函数可以做到这一点,Promise 对象也可以做到这一点。
### 4.co函数库实现Generator函数自动执行
co 函数库是著名程序员 TJ Holowaychuk 于2013年6月发布的一个小工具,用于 Generator 函数的自动执行。
#### 4.1 co函数库自动执行Generator,但是yield后必须是promise或者thunk函数
比如,有一个 Generator 函数,用于依次读取两个文件。
```js
var gen = function* (){
var f1 = yield readFile('/etc/fstab');
var f2 = yield readFile('/etc/shells');
console.log(f1.toString());
console.log(f2.toString());
};
```
co 函数库可以让你不用编写 Generator 函数的执行器。
```js
var co = require('co');
co(gen);
```
上面代码中,Generator 函数只要传入 co 函数,就会自动执行。co 函数返回一个 `Promise 对象`,因此可以用 then 方法添加回调函数。
```js
co(gen).then(function (){
console.log('Generator 函数执行完成');
})
```
上面代码中,等到 Generator 函数执行结束,就会输出一行提示。相对于thunkify,我们的co的yeild后可以是promise或者thunk函数,其中后者是通过递归来实现的
#### 4.2 co函数库自动执行Generator的原理
为什么 co 可以自动执行 Generator 函数?
前面文章说过,Generator 函数就是一个异步操作的容器。它的自动执行需要一种机制,当异步操作有了结果,能够自动交回执行权。
两种方法可以做到这一点。
(1)回调函数。将异步操作包装成 Thunk 函数,在回调函数里面交回执行权(见第3部分)。
(2)Promise 对象。将异步操作包装成 Promise 对象,用 then 方法交回执行权。
co 函数库其实就是将`两种自动执行器(Thunk 函数和 Promise 对象),包装成一个库`。使用 co 的前提条件是,Generator 函数的 yield 命令后面,只能是 Thunk 函数或 Promise 对象。
下面展示如何使用Promise来交还执行权:
```js
var fs = require('fs');
var readFile = function (fileName){
//这里new Promise导致我们的readFile本身返回的是一个Promise
return new Promise(function (resolve, reject){
fs.readFile(fileName, function(error, data){
if (error) reject(error);
resolve(data);
//then方法的回调函数中会得到这里的data数据
});
});
};
var gen = function* (){
var f1 = yield readFile('/etc/fstab');
//这里返回的是一个Promise对象,所以通过g.next().value获取到的对象可以继续调用then方法
var f2 = yield readFile('/etc/shells');
console.log(f1.toString());
console.log(f2.toString());
};
```
下面我们手动执行上面这个Generator函数
```js
var g = gen();
//g.next()开始执行第一个readFile方法,g.next().value表示执行第一个readFile返回的promise对象
g.next().value.then(function(data){
//g.next(data)表示将上一个yield的执行结果交还给Generator,相当于将结果赋值给变量f1
g.next(data).value.then(function(data){
g.next(data);
});
})
```
注意:如果是下面这样,那么f1最后将会是undefined(toString报错),因为第一个yield执行结果并没有交还给Generator,所以无法获取到内容:
```js
var g = gen();
g.next().value.then(function(data){
//下面不是g.next(data),所以第一个读取文件的结果没有交还给Generator的f1
g.next().value.then(function(data){
g.next(data);
});
})
```
而下面展示的就是一个通过Promise来自动执行Generator的实例:
```js
function run(gen){
var g = gen();
//获取指针
function next(data){
var result = g.next(data);
if (result.done) return result.value;
//result.value此处返回的是Promise对象
result.value.then(function(data){
next(data);
//将data交给上一个yield执行结果
});
}
next();
}
run(gen);
```
### 5.async对于异步的终极解决方案
#### 5.1 Generator函数的async表达
一句话,async 函数就是 Generator 函数的语法糖。
前文有一个 Generator 函数,依次读取两个文件。
```js
var fs = require('fs');
var readFile = function (fileName){
return new Promise(function (resolve, reject){
fs.readFile(fileName, function(error, data){
if (error) reject(error);
resolve(data);
});
});
};
var gen = function* (){
var f1 = yield readFile('/etc/fstab');
var f2 = yield readFile('/etc/shells');
console.log(f1.toString());
console.log(f2.toString());
};
```
写成 async 函数,就是下面这样。
```js
var asyncReadFile = async function (){
var f1 = await readFile('/etc/fstab');
var f2 = await readFile('/etc/shells');
console.log(f1.toString());
console.log(f2.toString());
};
```
一比较就会发现,async 函数就是将 Generator 函数的星号(*)替换成 async,将 yield 替换成 await,仅此而已。
#### 5.2 async函数的优点
async 函数对 Generator 函数的改进,体现在以下三点。
(1)内置执行器。 Generator 函数的执行必须靠执行器,所以才有了 co 函数库,而 async 函数自带执行器。也就是说,async 函数的执行,与普通函数一模一样,只要一行。
```js
var result = asyncReadFile();
```
(2)更好的语义。 async 和 await,比起星号和 yield,语义更清楚了。async 表示函数里有异步操作,await 表示紧跟在后面的表达式需要等待结果。
(3)更广的适用性。 co 函数库约定,yield 命令后面只能是 Thunk 函数或 Promise 对象,而 async 函数的 await 命令后面,可以跟 Promise 对象和原始类型的值(数值、字符串和布尔值,但这时等同于同步操作)。
#### 5.3 async的用法
同 Generator 函数一样,`async 函数返回一个 Promise 对象,可以使用 then 方法添加回调函数`。当函数执行的时候,一旦遇到 await 就会先返回,等到触发的异步操作完成,再接着执行函数体内后面的语句。
下面的例子,指定多少毫秒后输出一个值。
```js
function timeout(ms) {
return new Promise((resolve) => {
setTimeout(resolve, ms);
});
}
async function asyncPrint(value, ms) {
await timeout(ms);
//遇到await了,所有先返回,得到异步操作完成,执行后面的代码
console.log(value)
}
asyncPrint('hello world', 50);
```
上面代码指定50毫秒以后,输出"hello world"。
#### 5.4 async自动执行器的实现
```js
//genF是Generator函数
function spawn(genF) {
//返回promise和co一样,但是co只能是promise和thunk函数
return new Promise(function(resolve, reject) {
var gen = genF();
//得到Generator内部指针
function step(nextF) {
try {
var next = nextF();
//next获取到第一个await返回的结果
} catch(e) {
return reject(e);
}
if(next.done) {
return resolve(next.value);
}
//如果done为true那么我们直接resolve
Promise.resolve(next.value).then(function(v) {
//第一个await返回的对象的value表示结果{value:'',done:false}
step(function() { return gen.next(v); });
//调用gen.next()获取到下一个await的结果并传入上一次的await调用后得到的value
}, function(e) {
step(function() { return gen.throw(e); });
});
}
step(function() { return gen.next(undefined); });
//首次执行的时候传入第一个await的data为undefined
});
}
```
### 6.promise函数深入理解
每一个promise对象都会提供一个then方法或者是catch方法:
```js
somePromise().then(function () {
// I'm inside a then() function!
});
```
在then方法内部,我们可以做三件事:
1. return 一个promise对象
2. return 一个同步的值或者是 undefined
3.同步的 throw 一个错误
理解这三种情况之后,你就会理解promise了。
#### 6.1 返回另一个promise对象
在有关promise的相关文章中,这种写法很常见,就像上文提到的构成promise链的一段代码:
```js
getUserByName('nolan').then(function (user) {
return getUserAccountById(user.id);
}).then(funcxtion (userAccount) {
});
```
这段代码里面的return非常关键,没有这个return的话,getUserAccountById只是一个普通的被别的函数调用的函数。下一个回调函数会接收到undefined而不是userAccount
#### 6.2 返回一个同步的值或者是 undefined
返回一个 undefined 大多数情况下是错误的,但是返回一个同步的值确实是一个将同步代码转化成promise风格代码的好方法。举个例子,现在在内存中有users。我们可以:
```js
getUserByName('nolan').then(fcuntion (user) {
if (inMemoryCache[user.id]) {
return inMemoryCache[user.id];
// returning a synchronous value!
}
return inMemoryCache[user.id];
// returning a promise
}).then(function (userAccount) {
// I got a user account
})
```
第二个回调函数并不关心userAccount是通过同步的方式得到的还是异步的方式得到的,而第一个回调函数既可以返回同步的值又可以返回异步的值。不幸的是,如果不显式调用return语句的话,javaScript里的函数会返回 undefined 。这也就意味着在你想返回一些值的时候,不显式调用return会产生一些副作用。
因此,我们要养成了一个个人习惯就是在`then方法内部永远显式的调用return或者throw`
#### 6.3 抛出一个同步的错误
说到throw,这又体现了promise的功能强大。在用户退出的情况下,我们的代码中会采用抛出异常的方式进行处理:
```js
getUserByName('nolan').then(function (user) {
if (user.isLoggedOut()) {
throw new Error('user logged out!'); // throwing a synchronous error!
}
if (inMemoryCache[user.id]) {
return inMemoryCache[user.id]; // returning a synchronous value!
}
return getUserAccountById(user.id); // returning a promise!
}).then(function (userAccount) {
// I got a user account!
}).catch(function (err) {
// Boo, I got an error!
});
```
如果用户已经登出的话, catch() 会收到一个同步的错误,如果有promise对象的状态变为rejected的话,它也会收到一个异步的错误。 catch() 的回调函数不用关心错误是异步的还是同步的。
在使用promise的时候抛出异常在开发阶段很有用,它能帮助我们定位代码中的错误。比方说,在then函数内部调用 JSON.parse() ,如果JSON对象不合法的话,可能会抛出异常,在回调函数中,这个异常会被吞噬,但是在使用promise之后,我们就可以捕获到这个异常了。更多关于promise的内容请查看[谈谈使用promise时候的一些反模式](http://www.tuicool.com/articles/FvyQ3a)
下面是摘抄自这个文章的几个例子,弄懂了这几个例子有助于深入的理解Promise。
例子1
```js
doSomething().then(function () {
return doSomethingElse();
//undefined
}).then(finalHandler);
//finalHandler会接受到前面then指定的函数的返回值,因为它明确的return了,注意return不可少
```
答案如下:我们的then方法中没有形参接受到doSomething返回的值,所以为undefined
doSomething
|-----------------|
                  doSomethingElse(undefined)
                  |------------------|
                                     finalHandler(resultOfDoSomethingElse)
                                     |------------------|
例子2
```js
doSomething().then(function () {
doSomethingElse();
}).then(finalHandler);
```
答案如下:finalHandler也会接受到undefined,因为前面的then中的函数没有明确的return值
doSomething
|-----------------|
                  doSomethingElse(undefined)
                  |------------------|
                  finalHandler(undefined)
                  |------------------|
例子3
```js
doSomething().then(doSomethingElse())
//doSomethingElse()返回了Promise的情况比较特殊,finalHandler接受到doSomething的值
.then(finalHandler);
```
答案如下:因为我们的then方法中的doSomethingElse()返回的是一个Promise对象,即typeof doSomethingElse()为"object",所以finalHandler会接收到doSomething返回的值。
doSomething
|-----------------|
doSomethingElse(undefined)
|---------------------------------|
                  finalHandler(resultOfDoSomething)
                  |------------------|
比如下面的例子依然输出的为"qinliang":
```js
var f=function(result){console.log(result);}
Promise.resolve("qinliang").then(f);
```
和下面的代码输出结果完全相同:
```js
Promise.resolve('qinliang').then(function(result){console.log(result);})
```
其实他们的then方法传入函数签名完全一致。
例子4
```js
doSomething().then(doSomethingElse)
//doSomethingElse会接受到doSomething()的结果
.then(finalHandler);
//finalHandler会接受到doSomethingElse的结果
```
答案如下:我们的doSomethingElse只是一个`函数句柄(如const doSomething=function(){})`,通过调用这个函数句柄doSomethingElse()会得到我们的Promise对象。
doSomething
|-----------------|
                  doSomethingElse(resultOfDoSomething)
                  |------------------|
                                     finalHandler(resultOfDoSomethingElse)
                                     |------------------|
需要说明的是,在上述的例子中,我都假设 doSomething() 和 doSomethingElse() `返回(注意是返回了,即return的情况下,而不是第一个例子的方式)`一个promise对象,这些promise对象都代表了一个异步操作,这样的操作会在当前event loop之外结束,比如说有关IndexedDB,network的操作,或者是使用 setTimeout 。这里给出 JSBin 上的示例。
参考资料:
[Generator 函数的含义与用法](http://www.ruanyifeng.com/blog/2015/04/generator.html)
[Thunk 函数的含义和用法](http://www.ruanyifeng.com/blog/2015/05/thunk.html)
[co 函数库的含义和用法](http://www.ruanyifeng.com/blog/2015/05/co.html)
[async 函数的含义和用法](http://www.ruanyifeng.com/blog/2015/05/async.html)
[async库](http://caolan.github.io/async/docs.html)
[co库](https://github.com/tj/co)
[node-thunkify库](https://github.com/tj/node-thunkify)
[谈谈使用promise时候的一些反模式](http://www.tuicool.com/articles/FvyQ3a)
[关于Promise:你可能不知道的6件事](http://www.tuicool.com/articles/6fqQ3aB)