{children}${data[j].children[i].value}
` } row+="warning.js:33 Warning: setState(...): Can only update a mounted or mounting component. This usually means you called setState() on an unmounted component. This is a no-op. Please check the code for the ExposeCrowd component.其中解决方法如下: ```js componentWillUnmount() { this._isMounted = false; } componentDidMount() { this._isMounted = true; IO.get("/rule/listByIds.json", { ids: this.props.exposureCrowd }) .then(res => { if (res.success) { const {data} = res; if (this._isMounted) { const map = {}; for (let id in res.data) { map[id] = res.data[id].ruleName; } //只有在组件没有被卸载的时候才能setState this.setState({ selectedRuleMap: map }); } } else { message.error('获取已选规则列表失败:' + res.message); } }) .catch(e => { message.error('获取已选规则列表失败,请稍后尝试'); }); } ``` 就是通过_isMounted来记录该组件是否已经被卸载了,如果卸载了就不再执行setState,导致出现这种问题。 其实React官方网站提供了isMounted方法去避免在组件卸载后重新调用setState方法。因为在卸载的组件上调用setState方法意味着你的应用或者组件没有清理已经不需要的属性,这也意味着你的应用一直保存着对于这个卸载的组件的引用,这可能会出现内存泄露。可以使用如下的方法来解决: ```js if (this.isMounted()) { // This is bad. this.setState({...}); } ``` 这种方式虽然可以取消React的警告信息,但是不是好的方法,因为它并没有解决对于卸载组件的引用问题。因此,我们可以使用上面我的那个例子,使用_isMounted属性来达到效果。在componentDidMount中设置为true,而componentWillUnmount设置为false,通过这种方式来检测组件当前的状态。而且在ES6的class类型的组件中,我们的isMount方法已经被禁止使用了。原理请[点击这里](https://reactjs.org/blog/2015/12/16/ismounted-antipattern.html)。 最后采用的是如下的[makeCancelable](https://github.com/facebook/react/issues/5465#issuecomment-157888325)方案: ```js import React from "react"; import ReactDOM from "react-dom"; export default class Texst extends React.Component{ promise = new Promise((resolve,reject)=>{}); //默认Promise makeCancelable = (promise) => { let hasCanceled_ = false; const wrappedPromise = new Promise((resolve, reject) => { //(1)直接为原来的promise添加then方法 // promise.then( // val => hasCanceled_ ? reject({isCanceled: true}) : resolve(val), // error => hasCanceled_ ? reject({isCanceled: true}) : reject(error) // ); // (2)上面这种模式如果success回调函数抛出了错误,那么第二个error函数是不能捕获到的 // https://www.tuicool.com/articles/6fqQ3aB // promise.then((val) => // hasCanceled_ ? reject({isCanceled: true}) : resolve(val) // ); // promise.catch((error) => // hasCanceled_ ? reject({isCanceled: true}) : reject(error) // ); // One of the changes in node 6.6.0 is that all unhandled promise rejections result in a warning. The existing code from @vpontis had separate then and catch calls on the same base promise. Effectively, this creates two promises, one which only handles success, and one which only handles errors. That means that if there is an error, the first promise will be viewed by node as an unhandled promise rejection. // (3)在nodejs中上面这种方案相当于创建了两个promise,一个处理success,一个处理error。当抛出错误后,第一个promise将会被看做是unhandled project rejection,从而抛出UnhandledPromiseRejectionWarning。 promise .then((val) => hasCanceled_ ? reject({isCanceled: true}) : resolve(val) ) .catch((error) => hasCanceled_ ? reject({isCanceled: true}) : reject(error) ); // 这种方式 }); return { promise: wrappedPromise, cancel() { hasCanceled_ = true; }, }; }; /** * 如果组件已经卸载就直接将hasCanceled_设置为true * any callbacks should be canceled in componentWillUnmount, prior to unmounting. * 任何的回调应该在componentWillUnmount中被取消,同时要早于组件被卸载! */ componentWillUnmount(){ this.promise.cancel(); } /** *模拟ajax请求,我们在回调中不是立即setState,而是根据条件判断是否应该使用setState。而是在this.makeCancelable *产生的回调then中进行判断 */ componentDidMount(){ this.promise = this.makeCancelable(new Promise((resolve,reject)=>{ setTimeout(()=>{ const random = Math.random(); if(random<0.7){ resolve('success!'); //模拟ajax请求成功了 // this.setState({ // name:'覃亮' // }); }else{ reject('reject!'); //模拟ajax请求成功了 // this.setState({ // name:'Not found!' // }); } },0) })) //(1)如果成功,那么我setState,否则不做处理,打印组件已经被卸载。 //此时,我们知道组件并没有被卸载掉,所有可以直接setState this.promise.promise.then(() => { this.setState({ name:'覃亮' }); console.log('resolved') }) .catch((reason) => { //如果reject就会进入这里的逻辑 //(2)此时我们知道组件已经被卸载,不再调用this.setState,因为this表示的组件已经被卸载掉了 //但是,componentDidMount中打印this还是可以获取到组件实例的。在componentWillUnmount组件将会被卸载,因为没有引用他的任何方法 // this.setState({ // name:'1' // }); // console.log('this--------->',this); console.log('组件已经被卸载,不能调用setState', reason.isCanceled) }); } render(){ console.log('render'); //后面的四次渲染因为是key变化,所以每次组件都是不一样的实例对象,总共执行5次 return
onCreate:当script标签被创建的时候调用
onError:script加载异常时候触发
onLoad:script加载完成触发,如果该URL已经加载完成了一次,那么下一次直接执行该方法而不是重新加载
url:要加载的链接地址
attributes:添加html5自定义属性或者id等,不做区分s
比如有一次在页面中接入高德地图,需要保证当其依赖的js都加载完毕以后才渲染地图,所以有如下的方法: ```js handleScriptLoad = value => { ++this.scriptLoaderCount; //两个js脚本 if (this.scriptLoaderCount == 2) { this.map = new AMap.Map("my__amp--container", { resizeEnable: true, zoom: 13, center: [116.39, 39.9] }); window.AMap.plugin("AMap.Geocoder", () => { this.geocoder = new AMap.Geocoder({ //city: "010" //城市,默认:“全国” }); this.marker = new AMap.Marker({ map: this.map, bubble: true }); }); render(){ return
1.父组件的componentDidMount在子组件componentDidMount之后调用(可以在子组件挂载后为当前的组件添加特定的值)。
2.组件更新时候必先调用componentWillReceiveProps然后调用SCU,因此可以在这个方法中判断是否要修改组件的state(这样可以控制
UI组件是否重新渲染)
3.运行时候组件的props发生变化会触发componentWillReceiveProps,否则不会触发该方法。但是props和state任意一个变化,那么都会触发shouldComponentUpdate!
4.只要父级组件被重新渲染了,不管该组件是否有props,比如Child2,都会触发该组件的componentWillReceiveProps方法
具体可以参考下图: 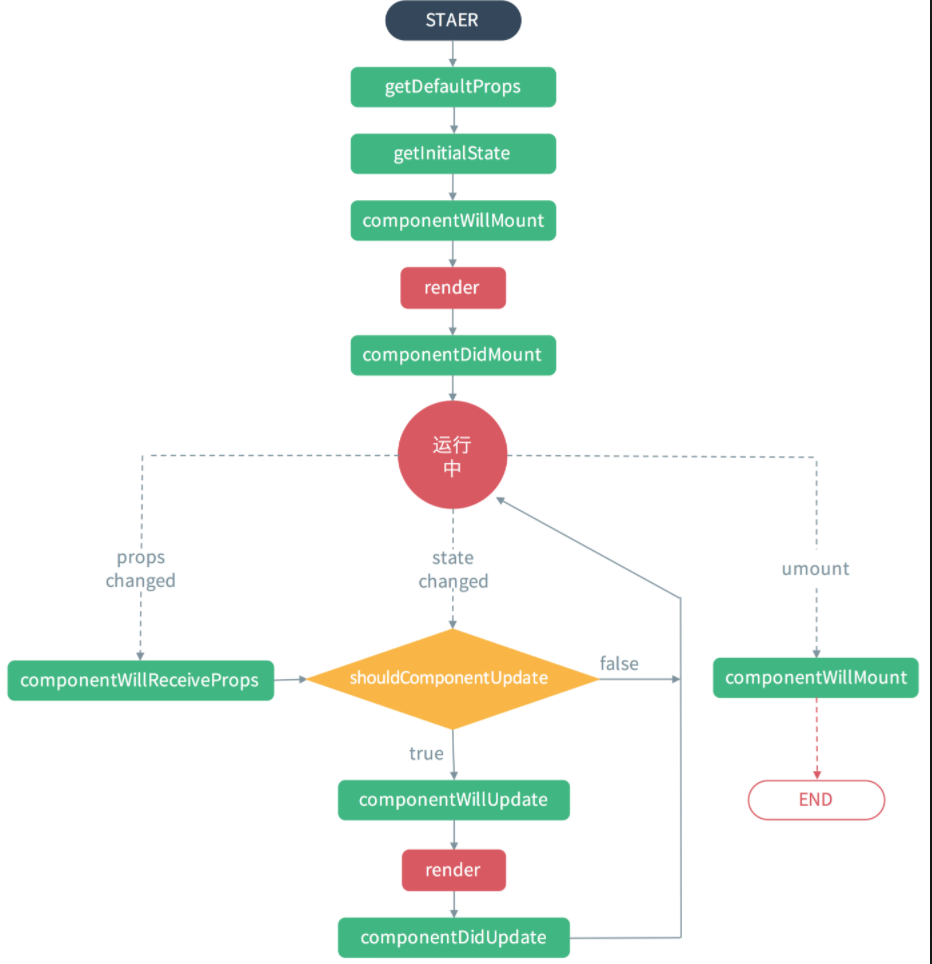 上面的第一种情形还是很有用的,比如: ```js import Script from "react-load-script"; class Parent extends React.Component{ // 1.当前组件可以获取到子组件挂载完成后为当前组件实例设置的值。此处因为采用异步加载AMap.Geocoder模块,所以让地址的获取尽快执行! // 2.当前组件挂载后,可以根据特定的省市区更新一次地图的位置 componentDidMount(){ //3.等待Script脚本加载完成并实例化this.geocoder,因为此时setTimeout也是macrotask,所以 // 会等待window.AMap.plugin("AMap.Geocoder")加载完成 setTimeout(() => { this.geocoder && this.geocoder.getLocation( `${provinceName}${cityName}${areaName}${address}`, (status, result) => { if (status == "complete" && result.geocodes.length) { this.marker.setPosition(result.geocodes[0].location); this.map.setCenter(this.marker.getPosition()); } } ); }, 0); } handleScriptLoad = value => { ++this.scriptLoaderCount; if (this.scriptLoaderCount == 2) { const _onClick = evt => { console.log("点击的对象为:", evt); const { lnglat } = evt; const { lat, lng } = lnglat; }; this.map = new AMap.Map("my__amp--container", { resizeEnable: true, zoom: 13, center: [116.39, 39.9] }); window.AMap.plugin("AMap.Geocoder", () => { this.geocoder = new AMap.Geocoder({ //city: "010" //城市,默认:“全国” }); this.marker = new AMap.Marker({ map: this.map, bubble: true }); }); window.AMap.event.addListener(this.map, "click", _onClick); } }; render(){ return