By using the Import and Export feature, you can quickly replace entire lookup tables no matter how large they are:
Importing Lookup Tables
The .csv file you import must contain column headers, and the column headers must match (case-insensitive) the names of the columns defined in the lookup table. The columns in the .csv file do not need to be in the same order as those in the table.
If the first row of the imported data matches the column headers, then the row is not imported as data, and the columns in the existing table and imported table are matched up even if they are in a different order. If a row in the imported data has too many values, then the extra values are silently ignored. If a row in the imported data has too few values, then the additional values are assumed to be empty strings. If the imported data is malformed, Rhapsody prompts you with an error message.
Importing CSV files with very high row counts into lookup tables will not be successful if the client PC has insufficient memory, or the Rhapsody engine has a small heap size. Depending on the hardware configuration, there is a practical limit of approximately 600,000 rows.
To import a .csv file that contains your lookup table data:
- Navigate to Management>Lookup Tables. The Lookup Tables list page is displayed.
- To display the Import Values dialog, choose one of the following methods:
- Select the the appropriate table to display the lookup Table details page and click the Import link.
Hover your mouse over the icon and click the Import Values link in the popover.
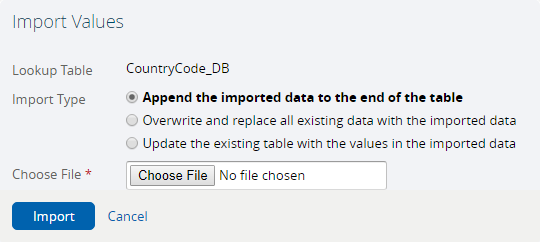
- Select the appropriate option:
- Append the data you import to the end of the table as new entries, or
- Overwrite the existing data in the table with the data you import, or
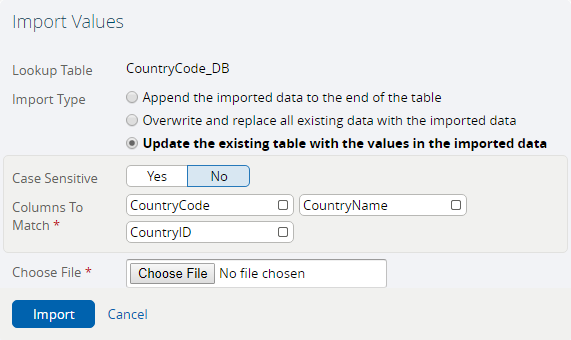
- Update the existing table with the data from the
.csvfile. If you select Update the existing table with the values in the imported data:- And if you want the match to be case-sensitive, select the Case Sensitive button.
Select the appropriate columns listed next to Columns to Match. Rhapsody then uses the columns you select to match the rows in the existing table with the rows in the imported data.
You must select at least one column to match.
- Select the Choose File button for the Choose File field to locate the
.csvfile. This file must be UTF-8 encoded. Select the Import button to import the data. If you have not checked out the table, Rhapsody automatically checks it out for you.
When importing data into an existing table, Rhapsody prompts you if it detects differences between the two tables, and does not proceed with the import until you rectify the errors.
If a row is matched, then it is replaced with the imported data. If a row is matched using a case-insensitive match, then the update will change the case. If a row in the imported data is not matched, then it is appended. Existing table rows that do not match the imported data are left unchanged.
- Select the Save button.
Exporting Lookup Tables
To export your lookup table data:
- Navigate to Management>Lookup Tables. The Lookup Tables list page is displayed.
- Choose one of the following methods:
- Select the the appropriate table to display the lookup table details page and click the Export link for the Lookup Values or Lookup Failures table.
- Hover your mouse over the icon and click the Export Values or Export Failures link in the popover.
Save the
.csvfile to a convenient location. The.csvfile is UTF-8 encoded and, by default, has a filename that matches the table ID.The format of the file name of an export values file is
LookupTable-<id>-values-<date of creation>-<time of creation>and for an export failures fileLookupTable-<id>-failures-<date of creation>-<time of creation>, for exampleLookupTable-22-values-20110908-092341.csvandLookupTable-22-failures-20110908-092341.csv, respectively.


