Sizing and positioning
How does the programmer specify where each component appears, how big each component should be, etc.?
- Absolute positioning (C++, C#, others):
- Programmer specifies exact pixel coordinates of every component.
- "Put this button at (x=15, y=75) and make it 70x31 px in size."
- Layout managers (Java, Android):
- Objects that decide where to position each component based on some general rules or criteria.
- "Put these four buttons into a 2x2 grid and put these text boxes in a horizontal flow in the south part of the app."
- More flexible and general; works better with a variety of devices.
ViewGroup as layout
ViewGroupsuperclass represents containers of views- layouts are described in XML and mirrored in Java code
- Android provides several pre-existing layout managers; you can define your own custom layouts if needed
- layouts can be nested to achieve combinations of features
- in the Java code and XML:
- an
Activityis aViewGroup - various
Layoutclasses are alsoViewGroups - widgets can be added to a
ViewGroup, which will then manage that widget's position/size behavior
- an
XML, in brief
- XML: a language for describing hierarchical text data.
- Uses tags that consist of elements and attributes. Tags can be nested.
- Some tags are opened and closed; others self-close.
<element attr="value" attr="value">  ...  </element>
<element attr="value" attr="value" />    (self-closing)
Example: (case-sensitive)
<!-- this is a comment -->
<course name="CS 193A" quarter="16wi">
	<instructor>Marty Stepp</instructor>
	<ta>none</ta>
</course>
Changing layouts
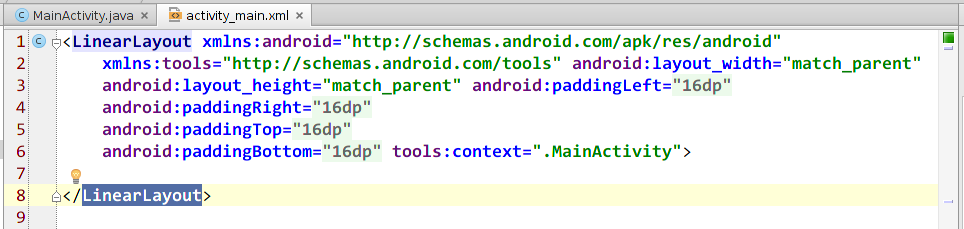
- go to the Text view for your layout XML file
- change open/close tags to new layout type, e.g.
LinearLayout - now go back to Design view and add widgets
LinearLayout
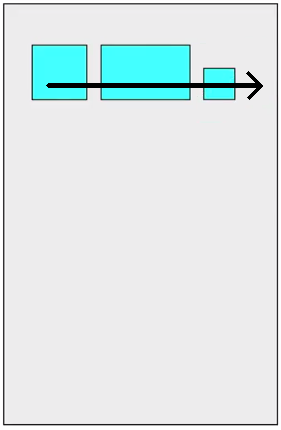
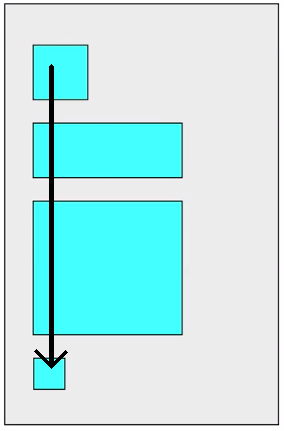
- lays out widgets/views in a single line
- orientation of horizontal or vertical
- items do not wrap if they reach edge of screen!
LinearLayout example 1
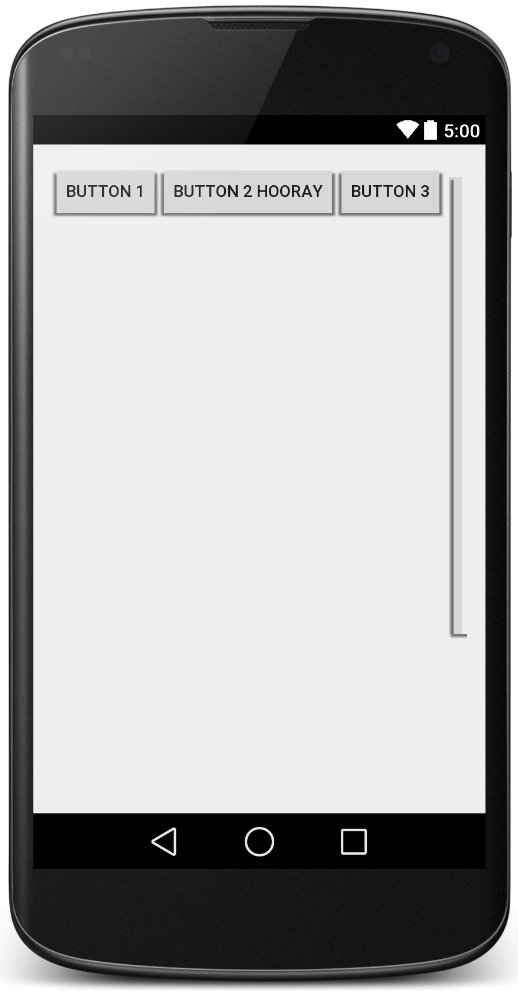
<LinearLayout ...
		android:orientation="horizontal"
		tools:context=".MainActivity">
	<Button ... android:text="Button 1" />
	<Button ... android:text="Button 2 Hooray" />
	<Button ... android:text="Button 3" />
	<Button ... android:text="Button 4
						Very Long Text" />
</LinearLayout>
- In our examples, we'll use ... when omitting boilerplate code that is auto-generated by Android Studio and not relevant to the specific example at hand.
LinearLayout example 2
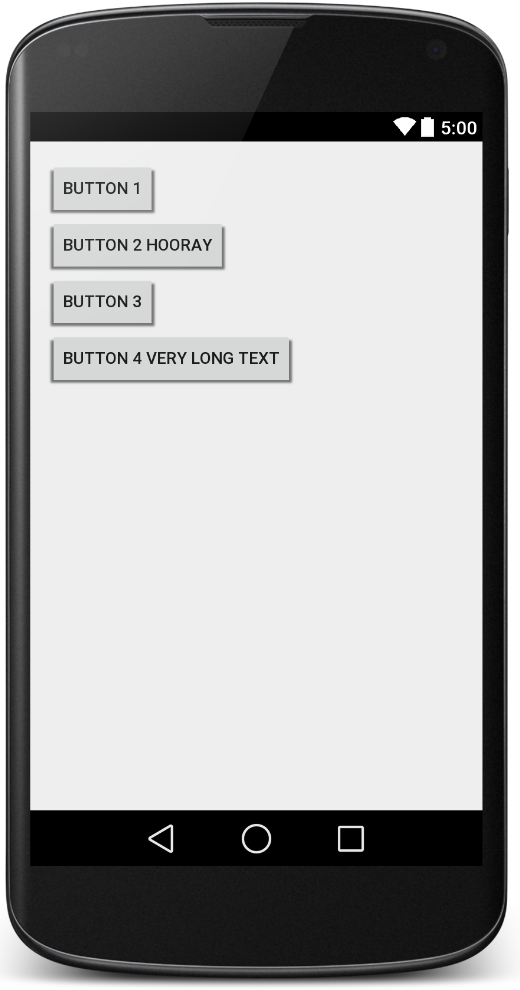
<LinearLayout ...
		android:orientation="vertical"
		tools:context=".MainActivity">
	<Button ... android:text="Button 1" />
	<Button ... android:text="Button 2 Hooray" />
	<Button ... android:text="Button 3" />
	<Button ... android:text="Button 4
						Very Long Text" />
</LinearLayout>
Gravity
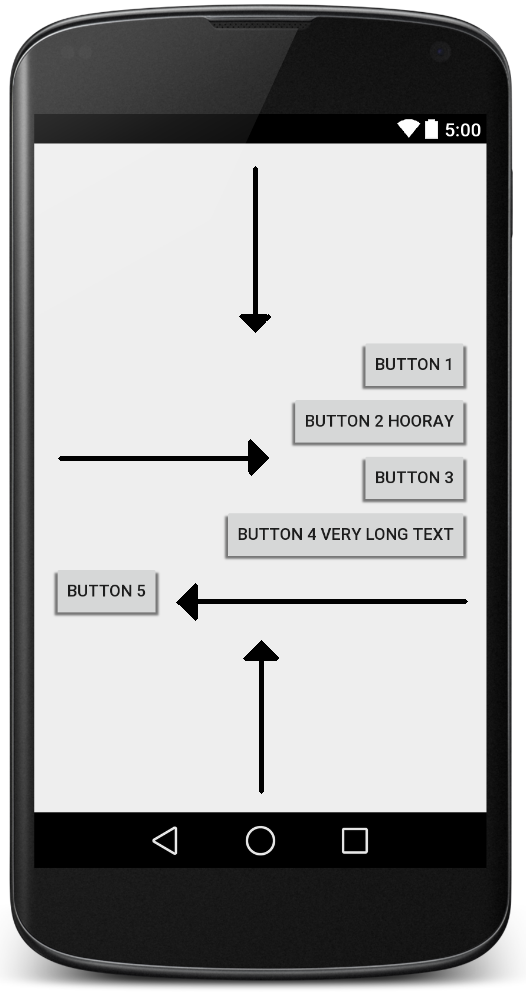
- gravity: alignment direction that widgets are pulled
top,bottom,left,right,center- combine multiple with
| - set
gravityon the layout to adjust all widgets; setlayout_gravityon an individual widget
<LinearLayout ...
		android:orientation="vertical"
		android:gravity="center|right">
	<Button ... android:text="Button 1" />
	<Button ... android:text="Button 2 Hooray" />
	<Button ... android:text="Button 3" />
	<Button ... android:text="Button 4 Long Text" />
	<Button ... android:text="Button 5"
				android:layout_gravity="left" />
</LinearLayout>
Weight
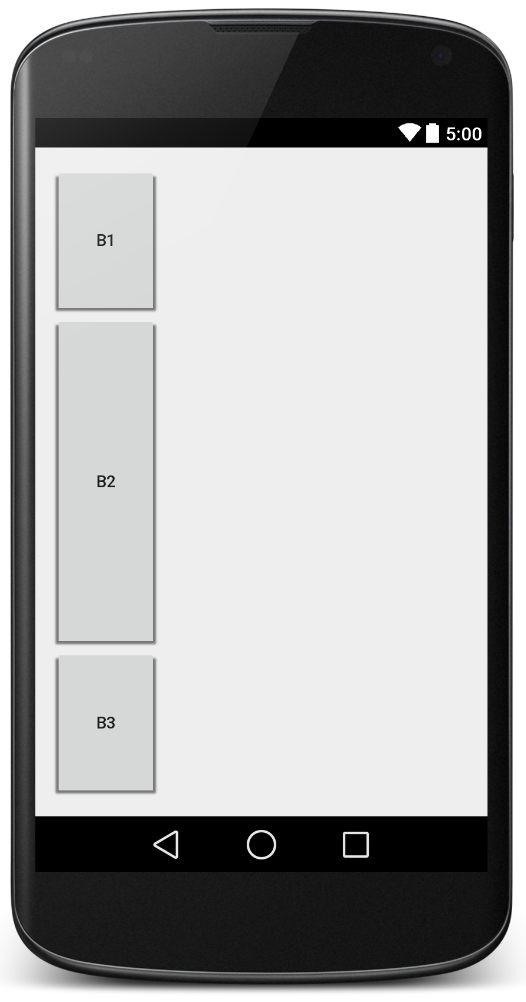
- weight: relative element sizes by integers
- widget with weight K gets K/total fraction of total size
- cooking analogy: "2 parts flour, 1 part water, ..."
<LinearLayout ...
		android:orientation="vertical">
	<Button ... android:text="B1"
				android:layout_weight="1" />
	<Button ... android:text="B2"
				android:layout_weight="3" />
	<Button ... android:text="B3"
				android:layout_weight="1" />
</LinearLayout>
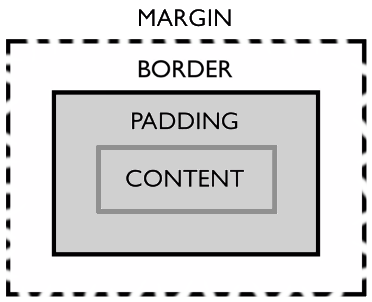
Widget box model
- content: size of widget itself
- padding: artificial increase to widget size outside of content
- border: outside padding, a line around edge of widget
- margin: invisible separation from neighboring widgets
Sizing an individual widget
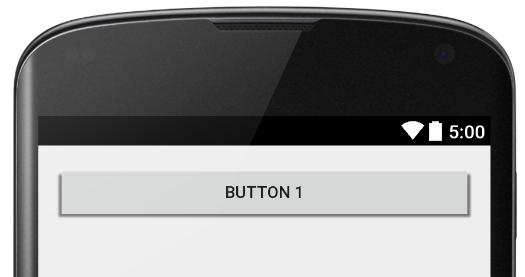
- width and height of a widget can be:
wrap_content: exactly large enough to fit the widget's contentmatch_parent: as wide or tall as 100% of the screen or layout- a specific fixed width such as
64dp(not usually recommended)- dp = device pixels; dip = device-independent pixels; sp = scaling pixels
<Button ...
		android:layout_width="match_parent"
		android:layout_height="wrap_content" />
Padding
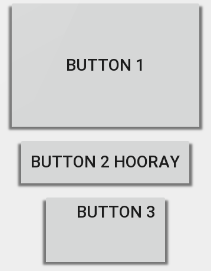
- padding: extra space inside widget
- set
paddingto adjust all sides;
paddingTop,Bottom,Left,Rightfor one side - usually set to specific values like 10dp (some widgets have a default value ~16dp)
- set
<LinearLayout ...
		android:orientation="vertical">
	<Button ... android:text="Button 1"
				android:padding="50dp" />
	<Button ... android:text="Button 2 Hooray" />
	<Button ... android:text="Button 3"
				android:paddingLeft="20dp"
				android:paddingBottom="40dp" />
</LinearLayout>
Margin
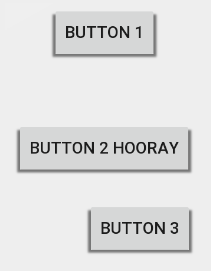
- margin: extra blank space outside widget
- set
layout_marginto adjust all sides;
layout_marginTop,Bottom,Left,Right - usually set to specific values like 10dp (set defaults in res/values/dimens.xml)
- set
<LinearLayout ...
		android:orientation="vertical">
	<Button ... android:text="Button 1"
				android:layout_margin="50dp" />
	<Button ... android:text="Button 2 Hooray" />
	<Button ... android:text="Button 3"
				android:layout_marginLeft="30dp"
				android:layout_marginTop="40dp" />
</LinearLayout>
GridLayout
lays out widgets/views in lines of rows and columns
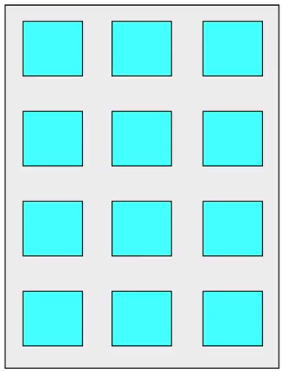
grid of 4 rows, 3 columns
orientationattribute defines row/column-major order- introduced in Android 4; replaces older
TableLayout - each widget placed into "next" available row/column unless given a
layout_rowandlayout_columnattribute
GridLayout example 1
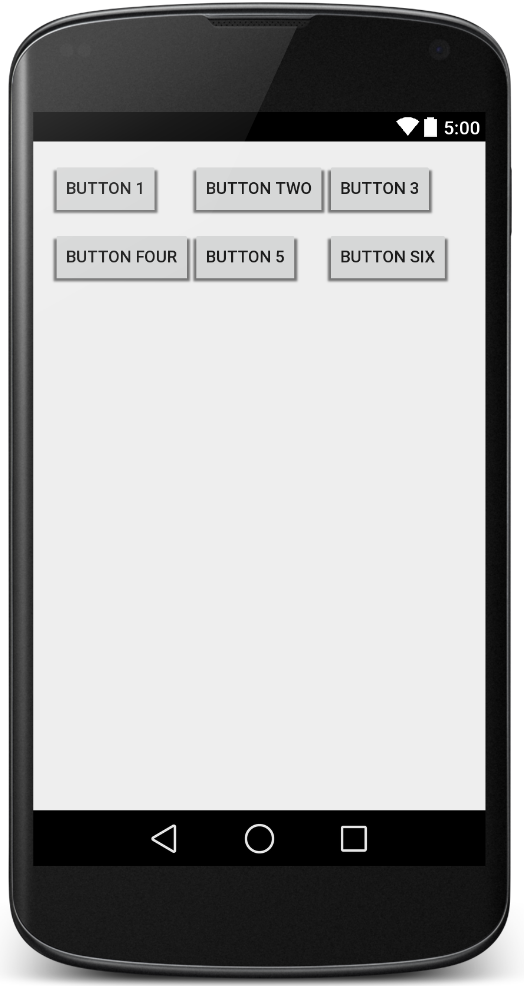
<GridLayout ...
		android:rowCount="2"
		android:columnCount="3"
		tools:context=".MainActivity">
	<Button ... android:text="Button 1" />
	<Button ... android:text="Button Two" />
	<Button ... android:text="Button 3" />
	<Button ... android:text="Button Four" />
	<Button ... android:text="Button 5" />
	<Button ... android:text="Button Six" />
</GridLayout>
GridLayout example 2
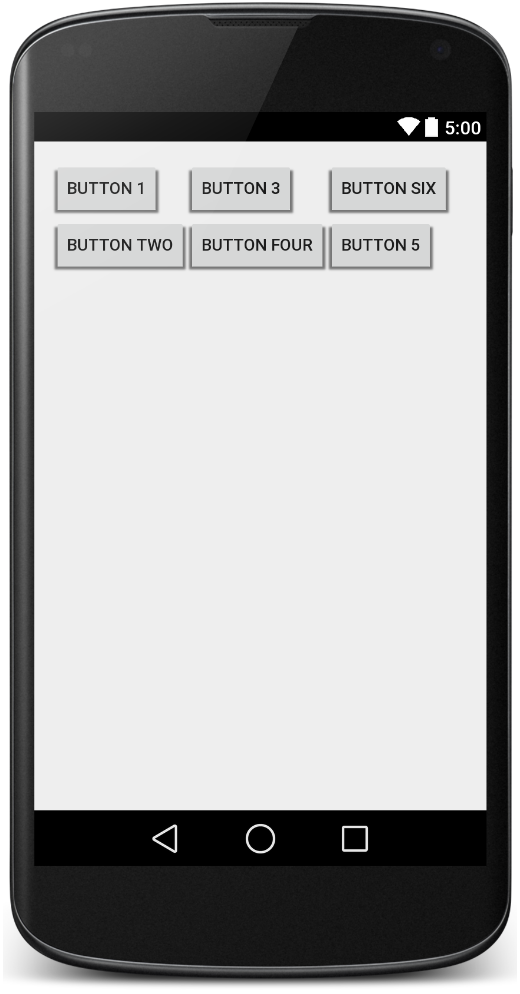
<GridLayout ...
		android:rowCount="2"
		android:columnCount="3"
		android:orientation="vertical">
	<Button ... android:text="Button 1" />
	<Button ... android:text="Button Two" />
	<Button ... android:text="Button 3" />
	<Button ... android:text="Button Four" />
	<Button ... android:text="Button 5"
				android:layout_row="1"
				android:layout_column="2" />
	<Button ... android:text="Button Six"
				android:layout_row="0"
				android:layout_column="2" />
</RelativeLayout>
GridLayout example 3
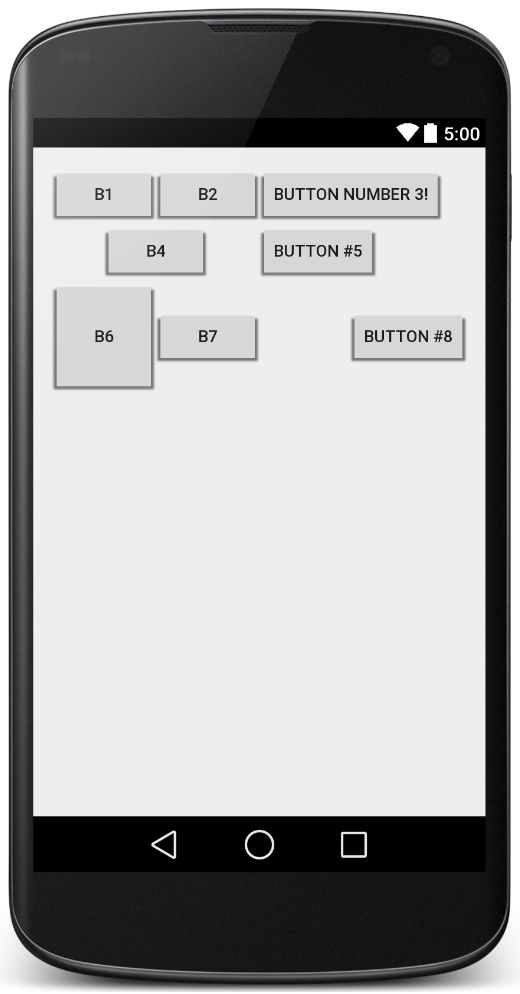
<GridLayout ...
		android:rowCount="2"
		android:columnCount="3">
	<Button ... android:text="B1" />
	<Button ... android:text="B2" />
	<Button ... android:text="Button Number 3!" />
	<Button ... android:text="B4"
	   android:layout_columnSpan="2"
	   android:layout_gravity="center" />
	<Button ... android:text="B5" />
	<Button ... android:text="B6"
	   android:layout_paddingTop="40dp"
	   android:layout_paddingBottom="40dp" />
	<Button ... android:text="B7" />
	<Button ... android:text="Button #8"
	   android:layout_gravity="right" />
</RelativeLayout>
TableLayout
Similar to GridLayout, but each widget must be put into a row
<TableLayout ...
		tools:context=".MainActivity">
  <TableRow>
	<Button ... android:text="Button 1" />
	<Button ... android:text="Button Two" />
	<Button ... android:text="Button 3" />
  </TableRow>

  <TableRow>
	<Button ... android:text="Button Four" />
	<Button ... android:text="Button 5" />
	<Button ... android:text="Button Six" />
  </TableRow>
</GridLayout>
Nested layout
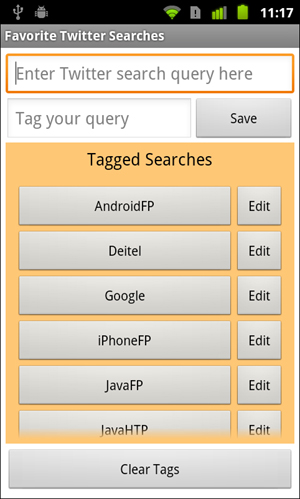
- nested layout: layouts inside other layouts
- useful to produce more complicated appearance
<OuterLayout ...>
	<InnerLayout ...>
		<Widget ... />
		<Widget ... />
	</InnerLayout>

	<InnerLayout ...>
		<Widget ... />
		<Widget ... />
	</InnerLayout>
</OuterLayout>
Nested layout exercise
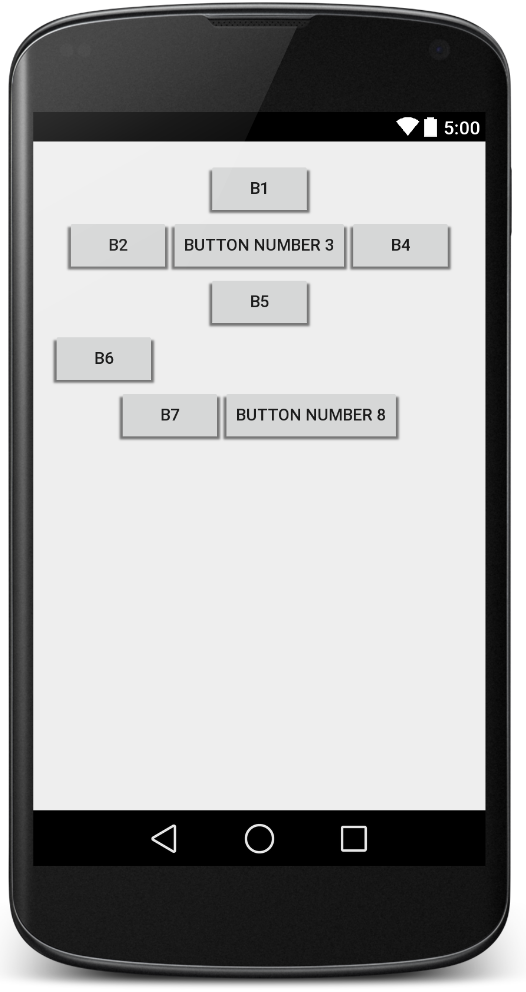
- Write the layout XML necessary to create the following app UI.
- How many overall layouts are needed?
- Which widgets go into which layouts?
Nested layout solution
<LinearLayout ...
		android:orientation="vertical"
		android:gravity="center|top">
	<Button ... android:text="B1" />
	<LinearLayout ...
			android:layout_width="match_parent"
			android:layout_height="wrap_content"
			android:orientation="horizontal"
			android:gravity="center|top">
		<Button ... android:text="B2" />
		<Button ... android:text="Button Number 3" />
		<Button ... android:text="B4" />
	</LinearLayout>
	<Button ... android:text="B5" />
	<Button ... android:text="B6"
				android:layout_gravity="left" />
	<LinearLayout ...
			android:layout_width="match_parent"
			android:layout_height="wrap_content"
			android:orientation="horizontal"
			android:gravity="center|top">
		<Button ... android:text="B7" />
		<Button ... android:text="Button Number 8" />
	</LinearLayout>
</LinearLayout>
RelativeLayout
intended to reduce the need for nested layouts
- each widget's position and size are relative to other views
- relative to "parent" (the activity itself)
- relative to other widgets/views
- x-positions of reference: left, right, center
- y-positions of reference: top, bottom, center
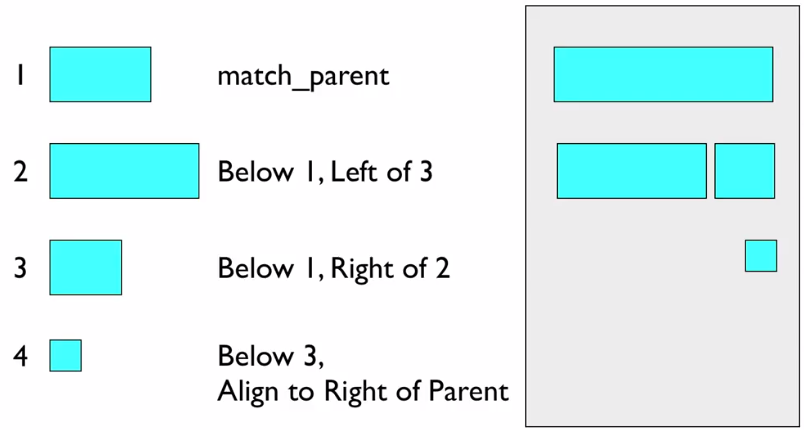
Relative anchor points
- properties for x/y relative to another widget:
layout_below,above,toLeftOf,toRightOf- set these to the ID of another widget in the format
"@id/theID"(the given widget must have an ID for this to work)
- set these to the ID of another widget in the format
- properties for x/y relative to layout container (the activity):
layout_alignParentTop,Bottom,Left,Right- set these flags to a boolean value of
"true"to enable them
- set these flags to a boolean value of
layout_centerHorizontal,Vertical,InParent- set these flags to
"true"to center the control within its parent in a dimension
- set these flags to
RelativeLayout example 1
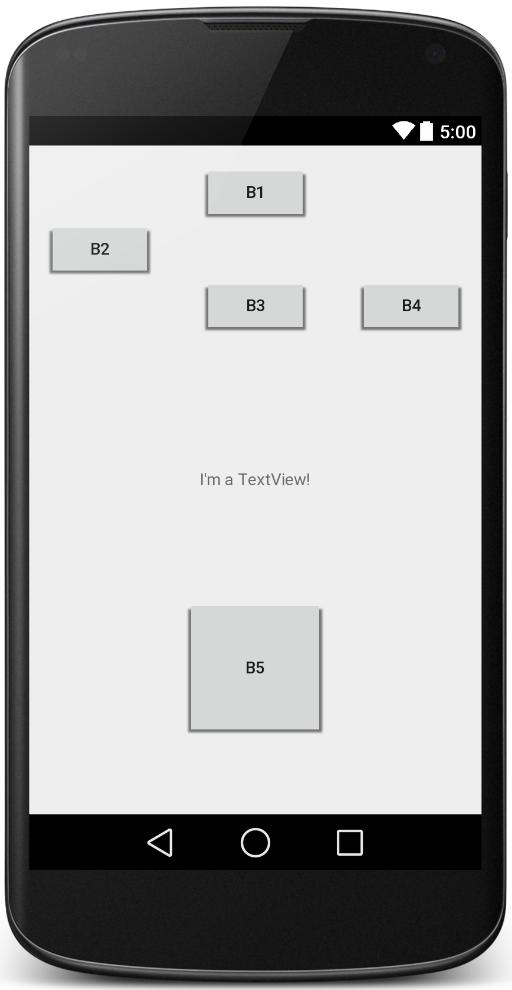
<RelativeLayout ... >
	<Button ... android:id="@+id/b1" android:text="B1"
		android:layout_alignParentTop="true"
		android:layout_centerHorizontal="true" />
	<Button ... android:id="@+id/b2" android:text="B2"
		android:layout_alignParentLeft="true"
		android:layout_below="@+id/b1" />
	<Button ... android:id="@+id/b3" android:text="B3"
		android:layout_centerHorizontal="true"
		android:layout_below="@+id/b2" />
	<Button ... android:id="@+id/b4" android:text="B4"
		android:layout_alignParentRight="true"
		android:layout_below="@+id/b2" />
	<TextView ... android:id="@+id/tv1"
		android:text="I'm a TextView!"
		android:layout_centerInParent="true" />
	<Button ... android:id="@+id/b5" android:text="B5"
		android:padding="50dp"
		android:layout_centerHorizontal="true"
		android:layout_alignParentBottom="true"
		android:layout_marginBottom="50dp" />
	</RelativeLayout>
FrameLayout
- meant to hold only a single widget inside,
which occupies the entirety of the activity
- most commonly used with layout fragments (seen later)
- less useful for more complex layouts (can put in multiple items and move them to "front" in Z-order)

<FrameLayout ... >
	<ImageView
	 android:src="@drawable/jellybean"
	 ... />
</FrameLayout>