# DX Manager User Guide
## 1. Requirements
### PC
- 64-bit Windows 7 SP1, 8.1, 10, or 11 (32-bit Windows is not supported)
- .NET Framework 4.6.2 or later
- Windows 7/8.1: Universal CRT updates required by the bundled legacy ADB
- Enough disk space to extract the complete release archive
- A user-writable extraction folder; DX Manager stores config, logs, and
screenshots beside the executable
DX Manager intentionally targets .NET Framework 4.6.2 as its minimum runtime
to support Windows 7 SP1 and offline or closed-network PCs. Windows 7 SP1 does
not include 4.6.2 by default. If it is missing, download the runtime from the
[official Microsoft .NET Framework 4.6.2 page](https://dotnet.microsoft.com/en-us/download/dotnet-framework/net462).
For an offline PC, download the offline installer on another computer and
transfer it before setup. If .NET Framework 4.7.2 or 4.8 is already installed,
do not downgrade it or install 4.6.2 separately; later .NET Framework 4.x
versions satisfy this requirement.
### Phone
- A Samsung Galaxy device that supports Samsung DeX
- Developer options enabled
- USB debugging enabled
- A data-capable USB cable
The currently verified phone baseline is Android 16 with One UI 8.x. One UI
7.x and earlier have not been confirmed to work reliably and may show a black
DeX window. Samsung firmware and device-specific behavior may still differ.
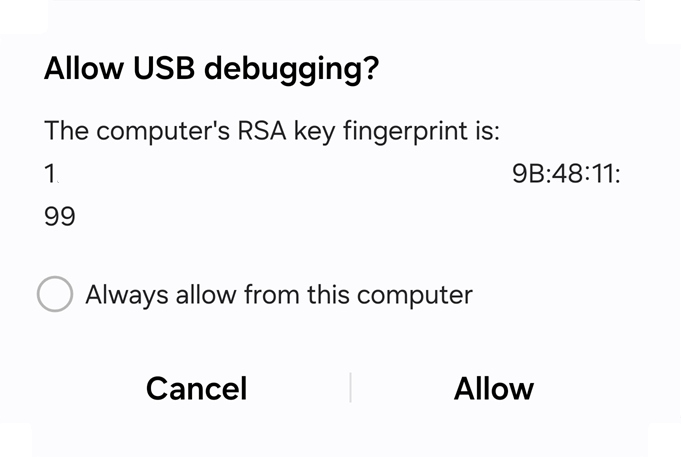
Approve the RSA debugging prompt shown on the phone during the first
connection. You may select **Always allow from this computer** on a trusted
PC.
## 2. Installation and First Run
1. Extract the complete release ZIP to a folder your account can write to.
Avoid protected locations such as `Program Files` unless write permission
has been configured.
2. Run `DXManager.exe`.
3. If Windows displays a security warning, verify the file source before
allowing it to run.
4. Connect the phone over USB and approve the RSA debugging prompt.
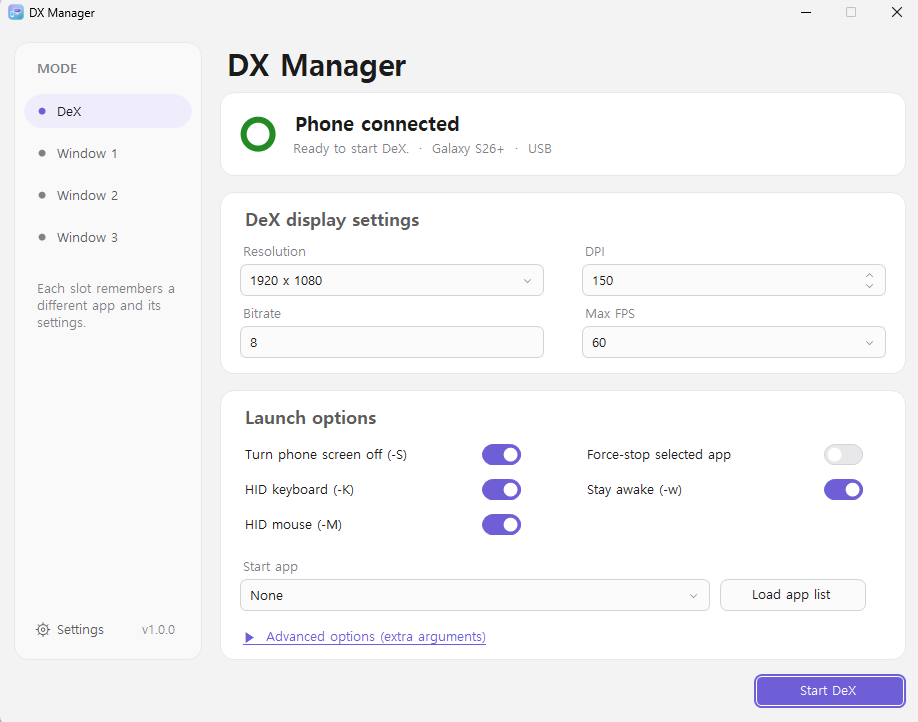
5. Wait for the device-connected status.
6. Select **Start DeX**.
After detecting an authorized USB or wireless device, DX Manager waits for
the configured device-start delay before sending session start commands. The
default delay is one second and helps newly connected devices settle before
scrcpy starts.
Do not copy `DXManager.exe` by itself. Keep the complete distribution,
including the `tools` directory, scrcpy DLLs, `scrcpy-server`, and license
files. Version 2.0.0 bundles scrcpy 4.1.
> [!IMPORTANT]
> Keep the phone connected and use **Stop DeX**, press `Left Alt+F8`, or
> right-click the DX Manager tray icon and select **Exit**. Wait for cleanup
> to finish before disconnecting USB or wireless ADB.
> If USB/Wi-Fi is disconnected first, Android may leave the simulated display
> visible on the phone.
To remove a display that remains on the phone, open **Developer options >
Simulate secondary displays**, select any resolution once, open the same menu
again, and then select **None**. Selecting **None** first may not clear a stale
display. See [FAQ Q1](FAQ_EN.md#q1-a-small-screen-secondary-display-remains-on-the-phone)
for screenshots.
### Using multiple phones
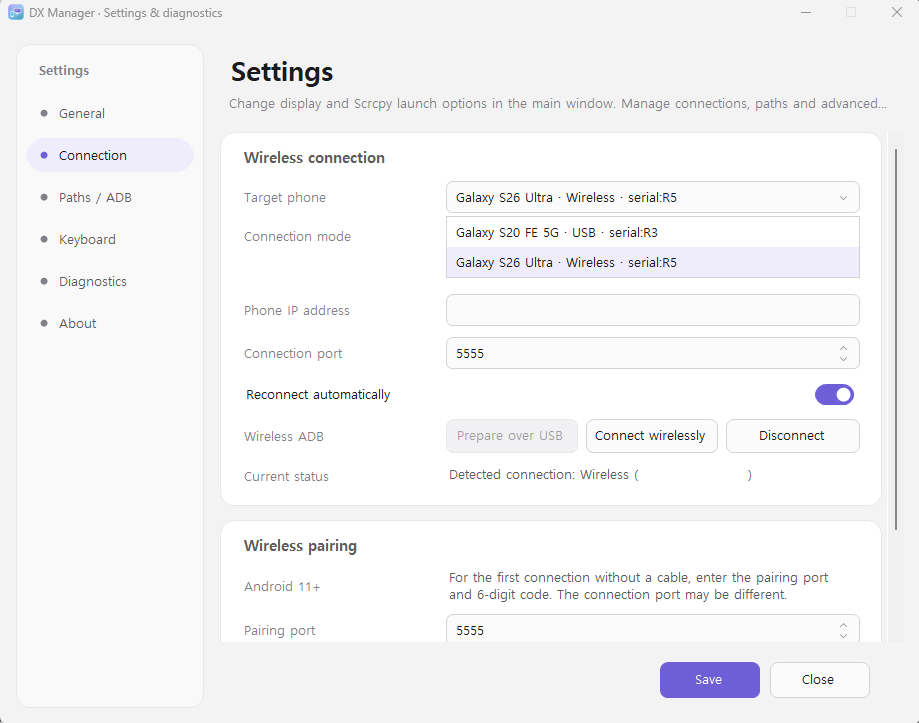
DX Manager 2.0 can manage multiple physical Galaxy phones simultaneously.
When only one phone is known during the current run, the device selector is
hidden. It appears after a second phone is detected and remains available for
that run so disconnected sessions can still be identified.
Select a phone in the left device list before changing settings or starting a
session. Each phone keeps its own DeX and three Single-Window settings, app
profiles, selected USB/Wi-Fi policy, DX Companion session, and bidirectional
file-transfer state. A USB and wireless ADB connection belonging to the same
physical phone are merged into one device entry. DX Manager uses only the
connection method selected for that phone and does not silently switch to the
other transport.
Scrcpy window titles include the phone display name. Files received from DX
Companion are stored under a phone-name subfolder inside the configured PC
destination.
## 3. DeX Mode
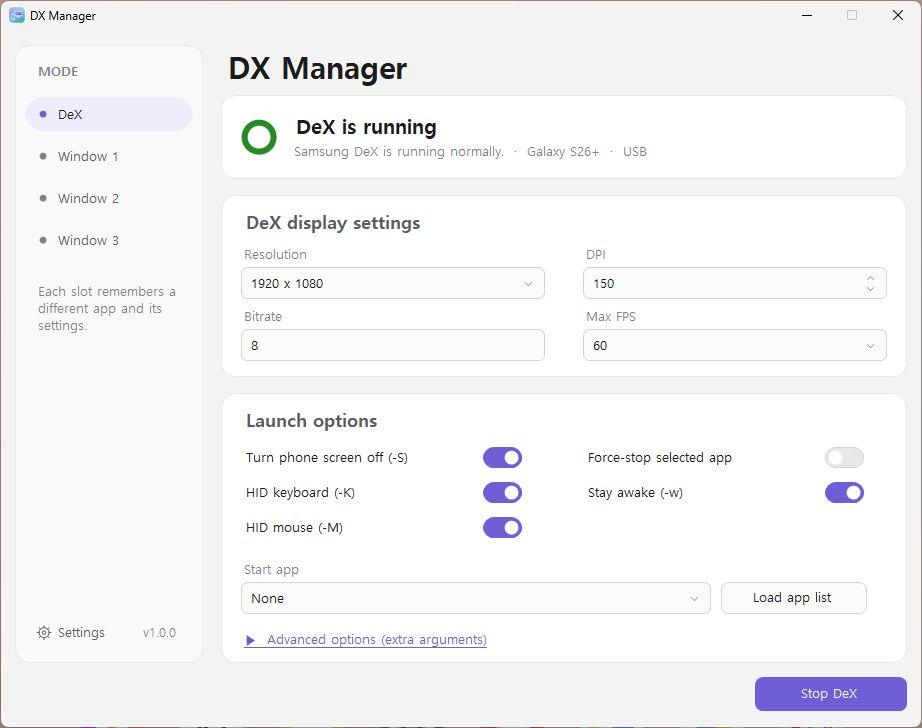
Select **DeX** in the left navigation.
### Display Settings
- **Resolution**: select a preset or enter a custom size
- **DPI**: controls Android display scaling
- **Bitrate**: controls video quality and network usage
- **Maximum FPS**: select 30 or 60fps
A lower DPI value makes Android UI elements smaller, allowing more information
to fit on the screen.
Custom resolution values are stored separately from the presets. Selecting a
preset does not overwrite the last custom width and height.
scrcpy automatically scales the video to fit the PC monitor and current window
size. The visible scrcpy window size therefore does not change the actual DeX
resolution configured in DX Manager. Custom width and height values may each
be set up to 4096.
### Run Options
- **Turn phone screen off (`-S`)**: turns off the physical screen while
scrcpy is running
- **HID keyboard (`-K`)**: sends the keyboard as an Android input device
- **HID mouse (`-M`)**: sends the mouse as an Android input device
- **Force-stop selected app**: stops the existing app process before launch
- **Stay awake (`-w`)**: keeps the phone awake during the session
Turn phone screen off (`-S`) does not lock the phone. It only turns off the
physical panel while the device remains active. Touch, long-press, and
fingerprint input may still work with the screen off, so take care to avoid
unintended settings changes or app actions.
When HID keyboard and HID mouse are disabled, scrcpy uses its non-HID input
mode. Mouse input is sent like direct touchscreen input, and holding a mouse
button acts like a long press.
Non-HID keyboard behavior differs slightly from HID mode. English input is
available, but the Korean/English key may not work. Use left Shift+Space to
switch the input language. This shortcut may also depend on the Android
keyboard and system configuration.
When settings have changed, selecting the run button cleans up the existing
DeX session when necessary and restarts it with the new values.
## 4. Single-Window Mode
Select **Window 1**, **Window 2**, or **Window 3** in the left navigation.
Each slot stores its own resolution, DPI, bitrate, FPS, app, and run options.
1. Select **Load app list**.
2. Choose the app to launch.
3. Configure the display and run options.
4. Select **Start window**.
Choose **None** at the top of the app list to start without automatically
launching an app.
Apps that were launched successfully are kept in a shared recent-app list.
They can be selected in another slot or after restarting DX Manager without
loading the complete device app list first.
### App profiles
Single-window mode can save one profile for each selected Android package.
Configure the display and run options, open **App profile**, and select
**Save current settings**. The profile stores resolution, DPI, bitrate, FPS,
screen-off, Stay awake, HID input, force-stop, flex-display, and additional
arguments. Selecting the same app in any of the three slots automatically
applies the saved profile to that slot.
Use the same menu to overwrite or delete a profile. Deleting a profile does
not change the settings already loaded into the current slot, and DeX mode is
never affected by single-window profiles.
Single-window mode does not reuse the DeX overlay display. Each slot uses
scrcpy's new virtual display feature, so DeX and three app windows can run at
the same time.
- **Flex display (`-x`)**: adjusts the virtual display when the window changes
size
- Single-window title: `DX Manager - App name`
- DeX window title: `DX Manager - DeX Station`
For some games, disabling HID keyboard and HID mouse and using single-window
mode may provide better input compatibility.
## 5. Drag-and-Drop File Transfer
Drop one or more files, or a complete folder, onto a running DeX or single-app
scrcpy window. DX Manager file transfer is enabled by default and uses a
Windows 7 SP1 through 11-compatible path to preserve Korean, Japanese, and other Unicode
names. The default phone destination is `/sdcard/Download/`; change it under
**Settings > Paths / ADB > Programs and storage paths**. A changed destination
applies to newly opened DeX and single-app windows. For safety, the destination
must be below `/sdcard/` or `/storage/emulated/0/`. Use **Browse** beside
**Capture destination on phone** or **Dropped files destination on phone** to
select an existing folder on the connected device. Android paths use `/`
separators rather than Windows backslashes.
When a folder is dropped, its top-level folder, subfolders, files, and empty
folders are preserved. Junctions, symbolic links, and other reparse points are
skipped to prevent following a folder outside the selected tree. A standalone
APK drop keeps scrcpy's install behavior, while an APK contained in a dropped
folder is copied as a regular file.
The independent, movable status window initially opens beside the scrcpy
window. It shows the active item and up to four waiting items, file size,
elapsed time, and completed/failed/waiting counts. It intentionally does not
show a percentage or ETA because reliable byte progress is not available on
every supported Windows/ADB combination. Select **Cancel** to stop all active
and waiting transfers for that scrcpy window and attempt to remove their
temporary phone data. Cancel is disabled during the brief final commit step so
an already completed move cannot be reported inconsistently.
Existing phone files and folders are not overwritten. DX Manager uses
`name (1).ext`, `name (2).ext`, or `folder (1)` when a name already exists.
To use scrcpy's original file-drop behavior, open **Settings > Paths / ADB >
Programs and storage paths** and turn off **Use DX Manager file transfer
(Unicode-compatible)**. The setting is applied when a DeX or single-app window
starts, so already open windows keep their current transfer mode. APK install
drops and ADB commands unrelated to managed target-folder pushes continue to
use scrcpy's normal behavior.
## 6. USB Connection
USB is the default connection mode.
1. Enable USB debugging on the phone. If the option is unavailable or shown
in gray, check **Settings > Security and privacy > Auto Blocker** on the
Galaxy device. After disabling Auto Blocker, USB debugging can be enabled.
If its automatic re-enable option is active, Auto Blocker may turn on again
after about 30 minutes and disconnect USB debugging. Menu names and
locations may vary by One UI version.
2. Connect the phone to the PC with a USB cable.
3. Approve the RSA debugging prompt.
4. Confirm the connected status in DX Manager.
If the device does not appear, check the cable, USB port, Samsung USB driver,
and RSA authorization. Then run
**Settings > Diagnostics > Run environment check**.
## 7. Wireless Connection
### Prepare Wireless ADB over USB
This is the simplest method for the first connection or after a phone reboot.
1. Connect the PC and phone to the same local network.
2. Connect the authorized phone over USB.
3. Open **Settings > Connection** and select **Use wireless ADB**.
4. Leave the phone IP address empty to let DX Manager detect the Wi-Fi
address.
5. Confirm the connection port. The default is `5555`.
6. Select **Prepare over USB**.
7. After the wireless connection succeeds, disconnect the USB cable.
If automatic address detection fails, find the phone's IPv4 address in its
Wi-Fi details and enter it manually.
### Android 11+ Pairing
1. Enable **Developer options > Wireless debugging** on the phone.
2. Open **Pair device with pairing code**.
3. Enter the phone IP address, pairing port, and six-digit code in DX Manager.
4. Select **Pair**.
5. After pairing, enter the separate **connection port** shown on the main
Wireless debugging screen.
6. Select **Connect wirelessly**.
The pairing port and connection port may be different. The pairing code is
not stored in settings or written to the log.
### Wireless Troubleshooting
- Devices using the same Wi-Fi name may still be unable to communicate.
- Check guest Wi-Fi, AP/client isolation, VLAN rules, and corporate firewalls.
- USB preparation may be required again after the phone restarts.
- If the first connection fails on 5GHz, check the router configuration or
initialize the connection on 2.4GHz before retrying.
## 8. Capture
The capture hotkey only works while a scrcpy window is active.
1. Press `F8` to bring the scrcpy window forward and show the capture hint.
2. Press `F8` again to capture only the scrcpy client area.
3. Drag the mouse to capture a selected region.
4. Press `Esc` to cancel.
Drag capture is not limited to the scrcpy window. You can select an area from
a webpage, document, or another PC application and send the captured image
directly to the phone.
Captures are saved to the `screenshot` folder by default. Enable
**Send captures to phone** to also transfer them to the configured phone
folder.
The screenshot button on the DeX taskbar does not work on the virtual DeX
display created by DX Manager. Use DX Manager's `F8` capture feature instead.
## 9. Keyboard Correction
Keyboard correction is only applied while a scrcpy window is active.
- **Korean/English key correction** sends the key as Android Shift+Space.
- **Right Windows key correction** improves Android input compatibility.
- When enabled, Enter conversion starts in normal Enter mode.
- `Scroll Lock` toggles between normal Enter and Shift+Enter while Enter
conversion is enabled.
- Direct Shift+Space input can optionally be ignored (off by default).
On Windows, the physical right Shift forwarding problem was reproduced with
scrcpy 4.0/SDL3 even though Windows detected the key. For compatibility with
SDL3-based scrcpy 4.x clients, DX Manager maps right Shift to left Shift only
while such a scrcpy window is active. Normal Shift typing is preserved, but
Android cannot distinguish the left and right Shift keys in that session.
The default capture shortcut is `F8`, and the default exit shortcut is
`Left Alt+F8`. To change one, select its field under **Settings > Keyboard**
and press the desired key or key combination.
### Useful scrcpy shortcuts
These are scrcpy-window shortcuts, not Samsung DeX shortcuts. The examples
below use left `Alt`, one of scrcpy's default shortcut modifiers.
| Shortcut | Action |
| --- | --- |
| `Alt+F` or `F11` | Toggle fullscreen |
| `Alt+G` | Resize the window to the video's 1:1 pixel size |
| `Alt+P` | Press the phone's power button |
| `Alt+O` | Turn the phone screen off (`O` is the letter O) |
| `Alt+Shift+O` | Turn the phone screen on |
| `Alt+V` | Synchronize the PC clipboard and paste |
| `Ctrl+V` | Send Ctrl+V to the active Android app (app-dependent) |
Other [official scrcpy 4.1 shortcuts](https://github.com/Genymobile/scrcpy/blob/v4.1/doc/shortcuts.md)
may work, but some Android system shortcuts can do nothing or act on the
phone's primary display instead of the simulated DeX display.
### Mini control bar
When **Settings > General > Show a mini control bar beside scrcpy windows** is
enabled, each DeX and single-app window has its own narrow control bar. It
follows the associated scrcpy window and provides phone screen off/on, power,
fullscreen, 1:1 window size, capture, and **Open DX Manager** actions. Hover
over a button to see its description and matching shortcut.
The control bar may be placed on the left or right under **Settings >
General**, and its bottom button collapses or expands it. It follows the
associated window's activation, minimization, and stacking order, so a bar
from a background session should not cover the active session.
## 10. Automatic Hiding and System Tray
When automatic hiding is enabled, DX Manager hides the running scrcpy windows
and its own UI after the configured idle period, then remains in the system
tray.
Keyboard or mouse activity does not automatically restore the windows. Click
the scrcpy window on the Windows taskbar, double-click the tray icon, or select
the open command from the tray menu to restore them.
The window close button hides DX Manager to the tray. To terminate it
completely, press `Left Alt+F8`, or right-click the tray icon and select
**Exit**. Keep the phone connected until session cleanup is complete.
## 11. Logs and Diagnostics
### Session Log
The log contains only the current program session. Select **Save log** when a
copy is needed.
The log may include:
- Selected ADB path and version
- Device connection state
- DeX and single-window launch results
- Display ID detection results
- scrcpy output and errors
ADB prints the common protocol banner `Android Debug Bridge version 1.0.41`
for multiple platform-tools releases. DX Manager displays the actual build
from the following `Version ...` line, such as `37.0.0-14910828` for the
bundled scrcpy ADB or `34.0.1-9979309` for the bundled legacy ADB.
### Environment Check
Use **Settings > Diagnostics > Run environment check** to verify ADB, scrcpy,
Windows, device connectivity, and important folders.
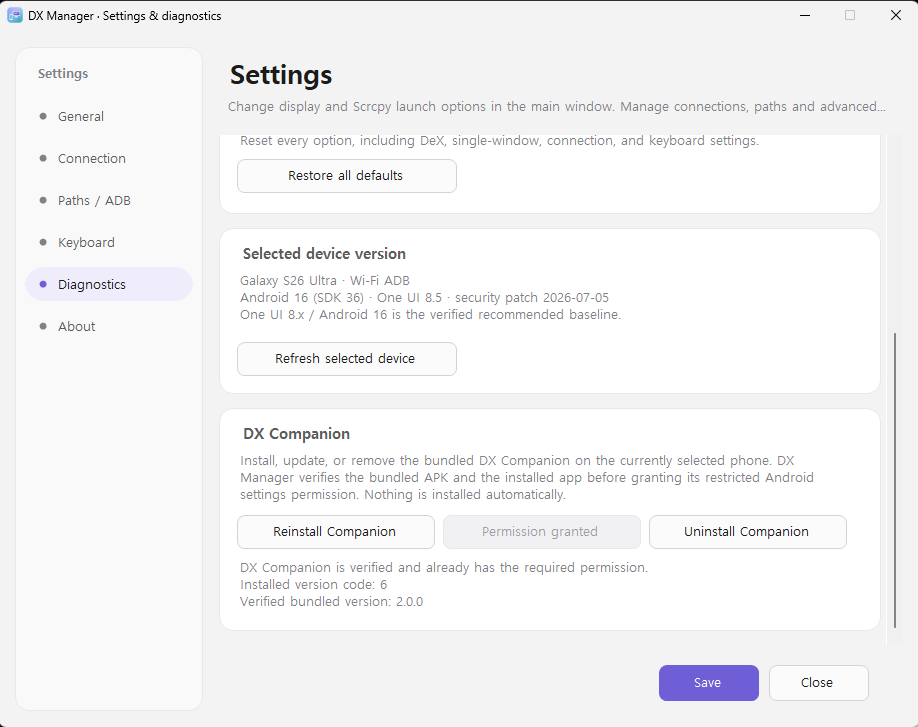
The **Selected device version** card shows the currently selected phone's
model, transport, Android version, SDK level, One UI version and security patch.
Its compatibility result is informational and does not block launching. Select
**Refresh** after a firmware update or transport change.
Select **Save diagnostic report** to create a privacy-redacted text report.
Device names, serial numbers, IP addresses, tokens and local paths are masked.
Review the file before sharing it because third-party ADB/scrcpy messages may
still contain environment-specific details.
Select **Show advanced options** on the Diagnostics page to access device
monitoring intervals, virtual-display detection timeout, ADB wake-up settings,
process timeout, and capture selection timeout. These recovery and timing
values normally do not need to be changed.
Use the **DX Companion** card on the Diagnostics page to install, update,
reinstall, grant permission to, or uninstall the bundled companion on the
currently selected phone. None of these actions starts automatically. Before
installation DX Manager verifies the exact APK hash and official signing
certificate. It rechecks the installed package, version, certificate, and
permission afterward and never grants the permission to another app.
The button remains disabled with a status explanation when no authorized phone
is connected, the app is absent, or its signature does not match. It displays
**Permission granted** when setup is complete. The permission lets the companion
app delete Android's virtual-display setting; it does not provide arbitrary ADB
command access.
Before sharing a saved log, verify that it does not contain private network
information or other sensitive data.
### App security and multiple-display limitations
Some banking, game, streaming, and security-sensitive apps may refuse to run
when USB debugging or Developer options are enabled. Protected or DRM-controlled
content may be black, and an app may disallow virtual or secondary displays.
DX Manager does not bypass these app and Android security policies.
An app that does not fully support multiple displays may open on the phone even
when launched from DeX. Close it completely on the phone or enable **Force-stop
selected app**, then try again.
## 12. DX Companion (Optional)
**DX Companion 2.0.0** is an Android recovery and file-transfer utility. It can
remove a simulated secondary display left on the phone, turn off Developer
options **Stay awake**, and send selected files or folders from the phone to DX
Manager. Normally, keep the phone connected and use **Stop DeX**, `Left Alt+F8`,
or the tray **Exit** command. Use the recovery actions when cleanup must be
performed without reconnecting the PC.
### Installation and one-time permission grant
1. Enable USB debugging, approve this computer's RSA prompt, and connect the
target phone to DX Manager.
2. Open **Settings > Diagnostics > DX Companion**.
3. Select **Install DX Companion** and approve the confirmation. DX Manager
installs only on the currently selected phone and also grants the required
protected permission after verification.
4. If the official app was installed manually, select **Grant permission**.
Use **Update** or **Reinstall** when shown for the bundled version.
5. Confirm that the status shows the installed and bundled versions and
**Permission granted**.
The signed APK remains visible as `tools\companion\DX-Companion.apk` in the
portable folder. Copying or installing it separately is possible, but it cannot
grant itself Android's protected permission. DX Manager does not install it
until the user presses the installation button.
DX Manager checks that the installed package ID is
`io.github.mazemei.dxdisplaycleanup`, pulls the installed APK from the phone,
and compares its v2 signing certificate with the pinned official certificate.
The button is enabled only when the connected device, package, and certificate
all match. DX Manager verifies the app again immediately before and after the
grant, and revokes the newly granted permission if post-grant verification
fails. It never grants this permission to an app with another signature.
The grant survives phone restarts and updates signed with the same certificate.
**Uninstall DX Companion** first stops that selected phone's receiver, removes
its ADB reverse connection, and uninstalls the app. Android then removes the
permission and the app's tile, widget, and settings. Android cannot present this
protected permission as a normal runtime-permission dialog inside the app.
### Main app, Quick Settings tile, and home-screen widget
- **Main app**: inspect both states and run **Clean virtual display**, **Turn
off Stay awake**, or the combined cleanup action.
- **Quick Settings tile**: add **DX Companion** from Quick Settings edit mode
for one-tap cleanup from anywhere on the phone.
- **Home-screen widget**: add the compact 2 × 1 DX Companion widget for status,
cleanup, and refresh.
- **Tile and widget settings**: both targets are enabled by default. In the
main app, choose whether the tile and widget clean the virtual display,
Stay awake, or both.
### Automatic cleanup after a connection loss
DX Companion can wait before cleaning up after its authenticated guardian
connection to DX Manager is lost. The choices are **Immediately**, **1 minute**,
**5 minutes**, **10 minutes**, **30 minutes**, and **Never clean up
automatically**. The default is **5 minutes**. Reconnecting the same authenticated
session before the delay expires cancels the pending cleanup.
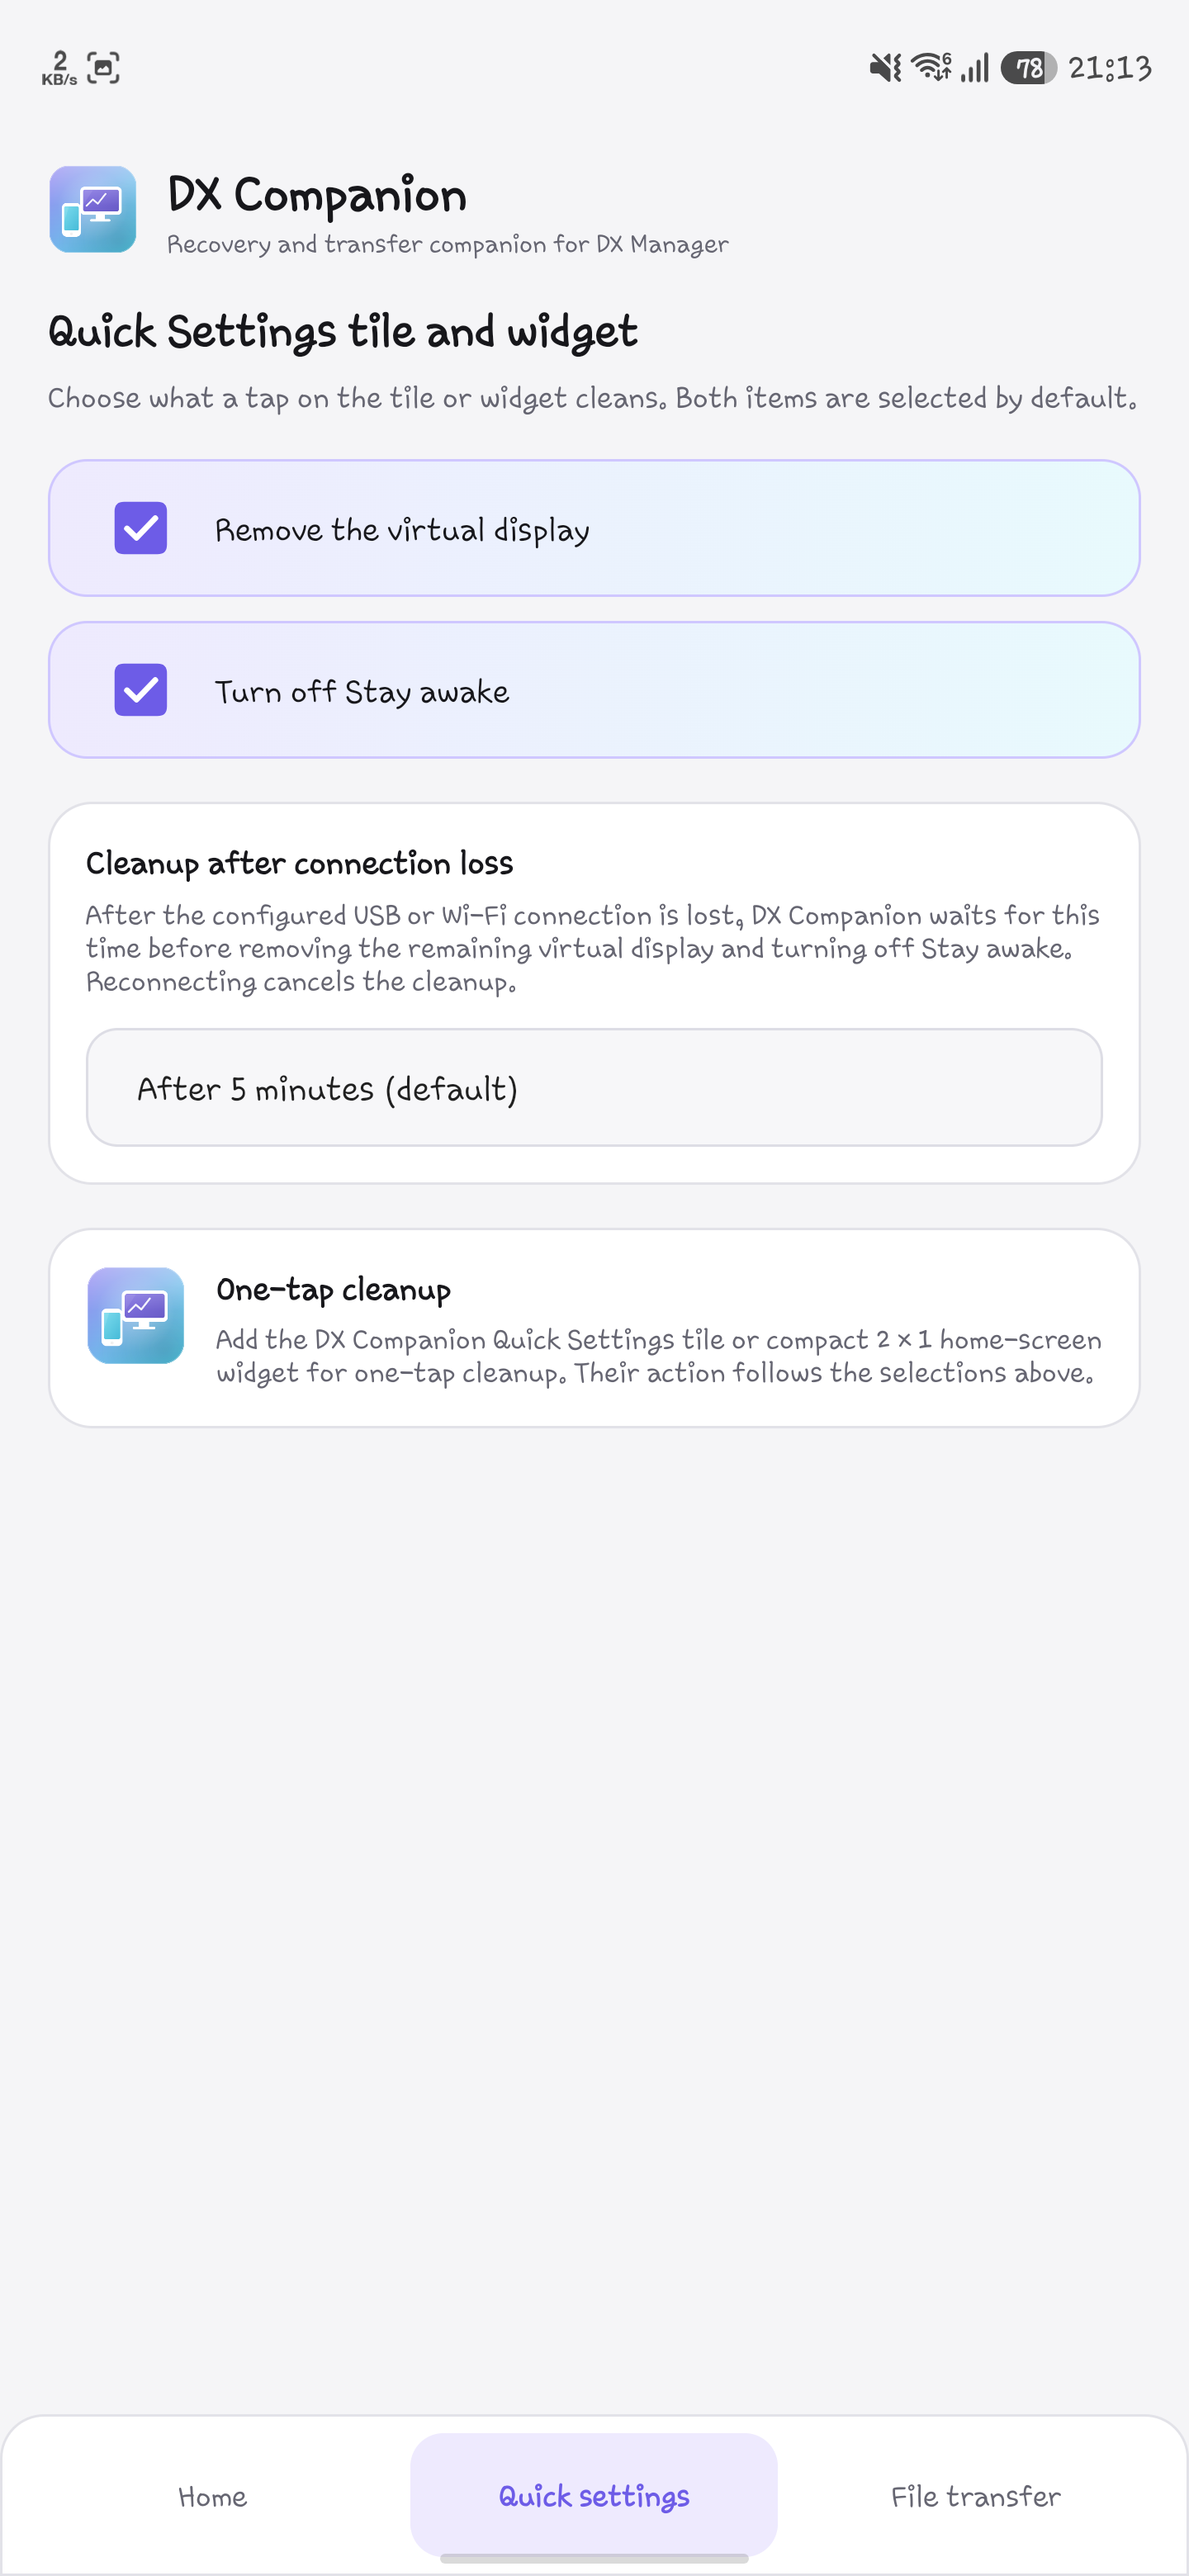
A temporary USB or Wi-Fi interruption therefore does not have to destroy the
existing virtual display. During Windows shutdown, DX Manager does not start a
new ADB helper; it asks an already connected and verified Companion session to
clean up immediately when one is available. This is a best-effort safeguard, so
normal DX Manager exit remains the recommended method.
The indicators mean:
- Color DX icon: at least one configured cleanup target is active
- Grayscale DX icon: the configured cleanup targets are already clear
- Warning indicator: permission is missing or status inspection failed
Cleanup deletes Android's global `overlay_display_devices` setting and reads it
again to verify the result. Android provides only one such global setting, so
the app cannot distinguish a display created by DX Manager from one selected
manually in Developer options. Cleanup removes every currently configured
simulated secondary display.
The protected `WRITE_SECURE_SETTINGS` access is limited to the simulated-display
setting and Android's Stay-awake developer option. Network permissions are used
only for authenticated local transfer and guardian sessions with DX Manager;
the app contains no analytics, cloud-transfer, or arbitrary-shell feature.
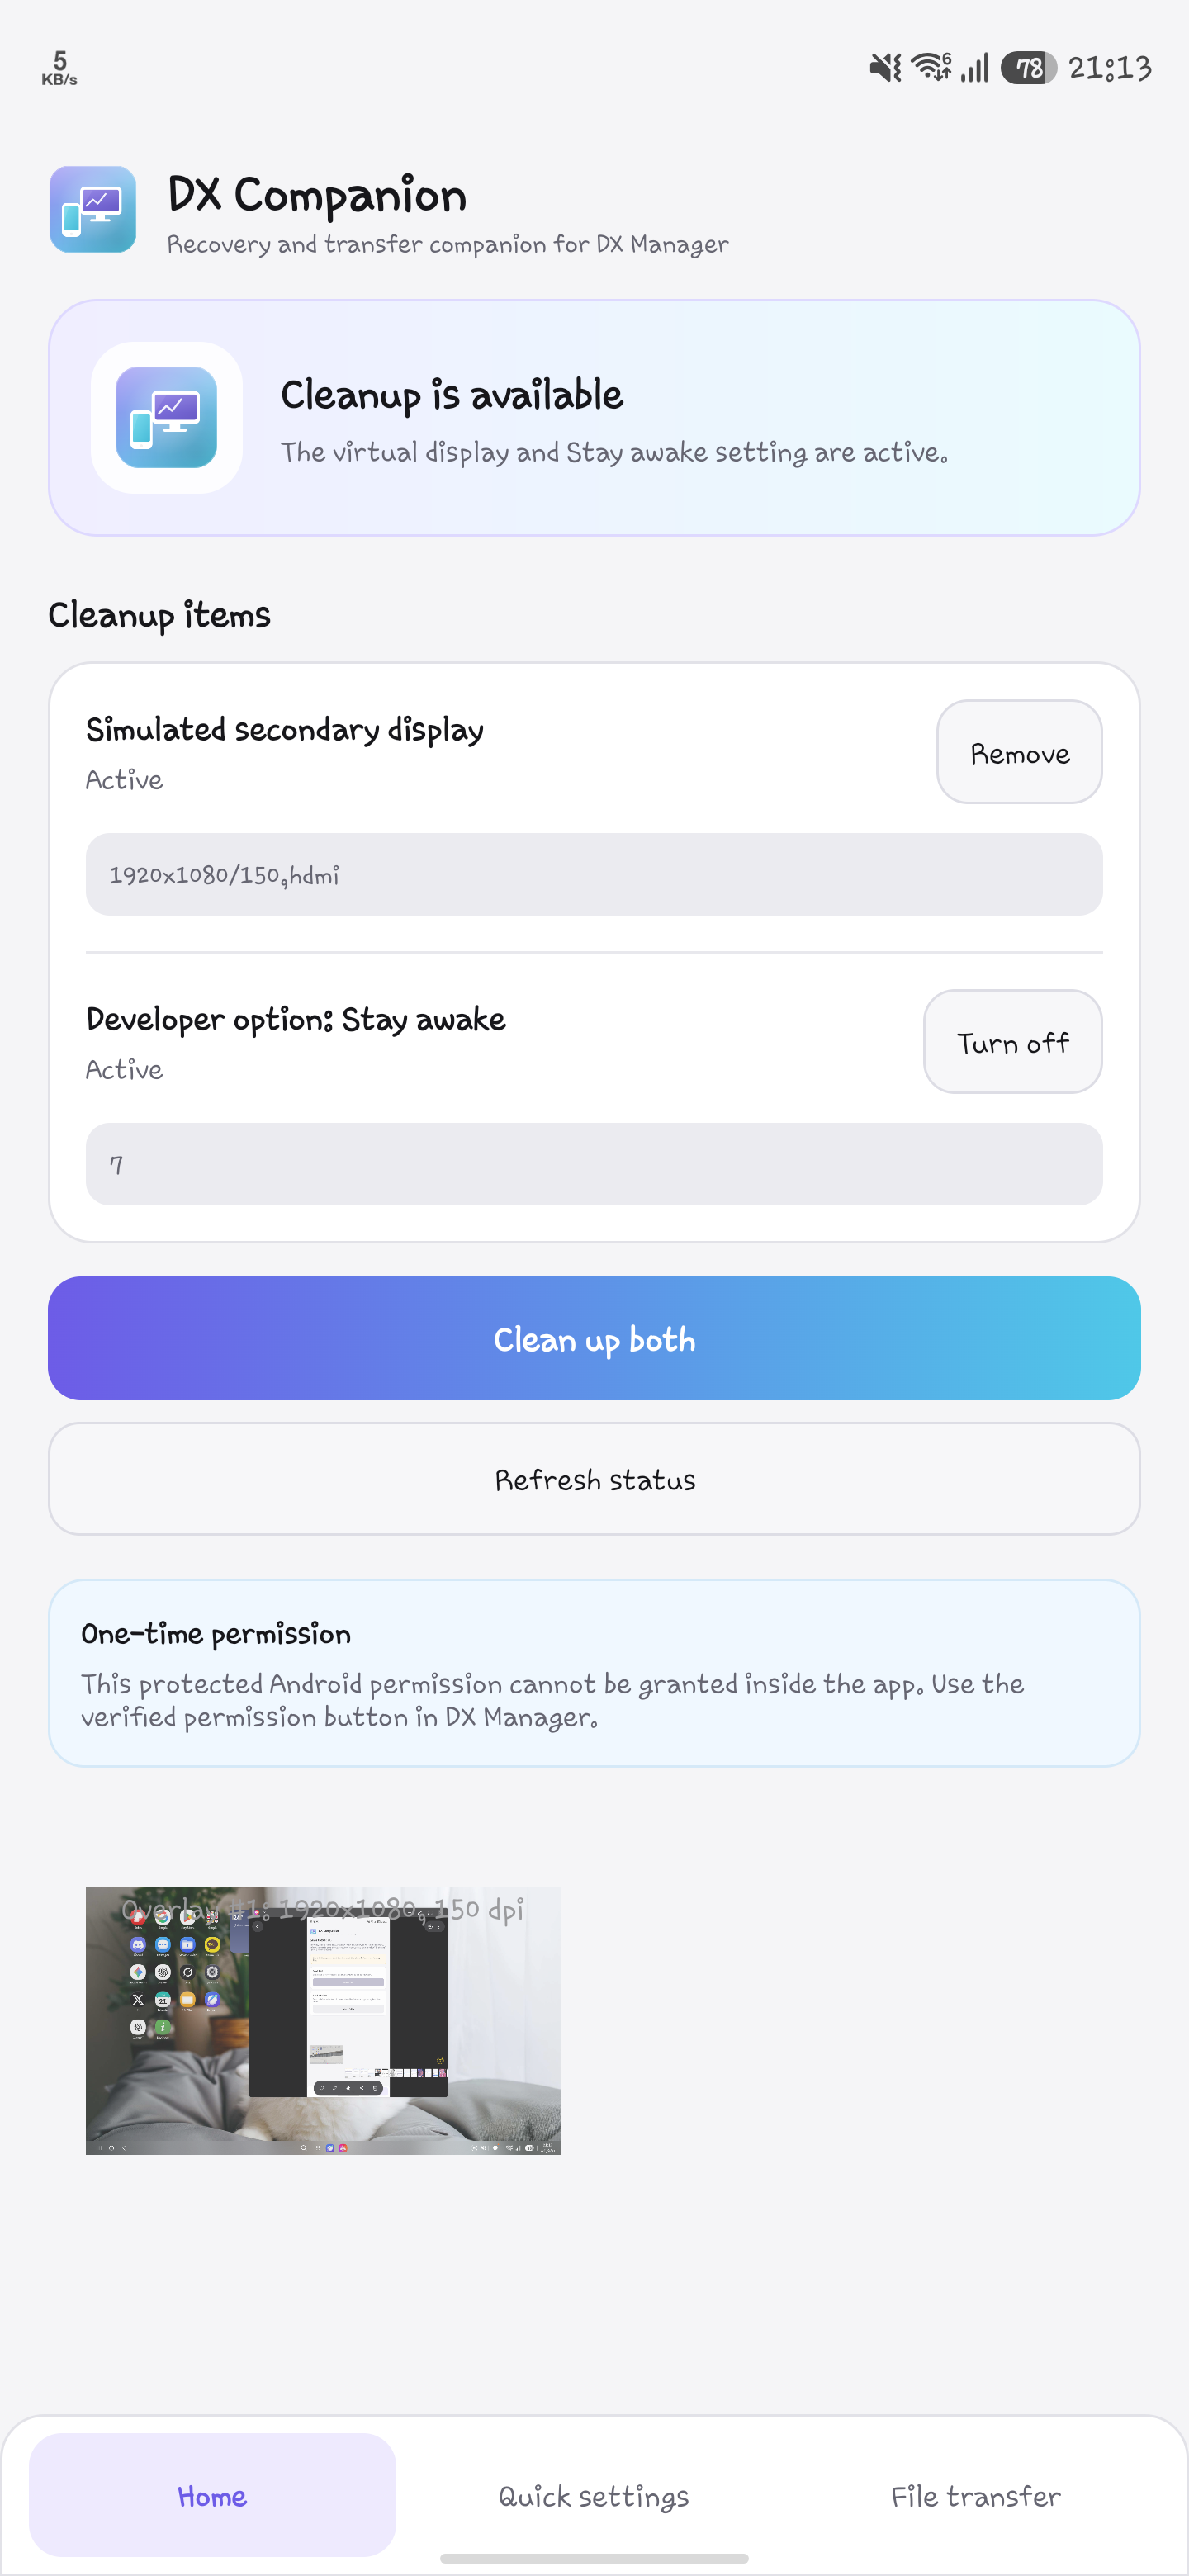
You can remove the same display without the app by following the
[manual FAQ procedure](FAQ_EN.md#q1-a-small-screen-secondary-display-remains-on-the-phone).
### Sending files and folders from the phone to the PC
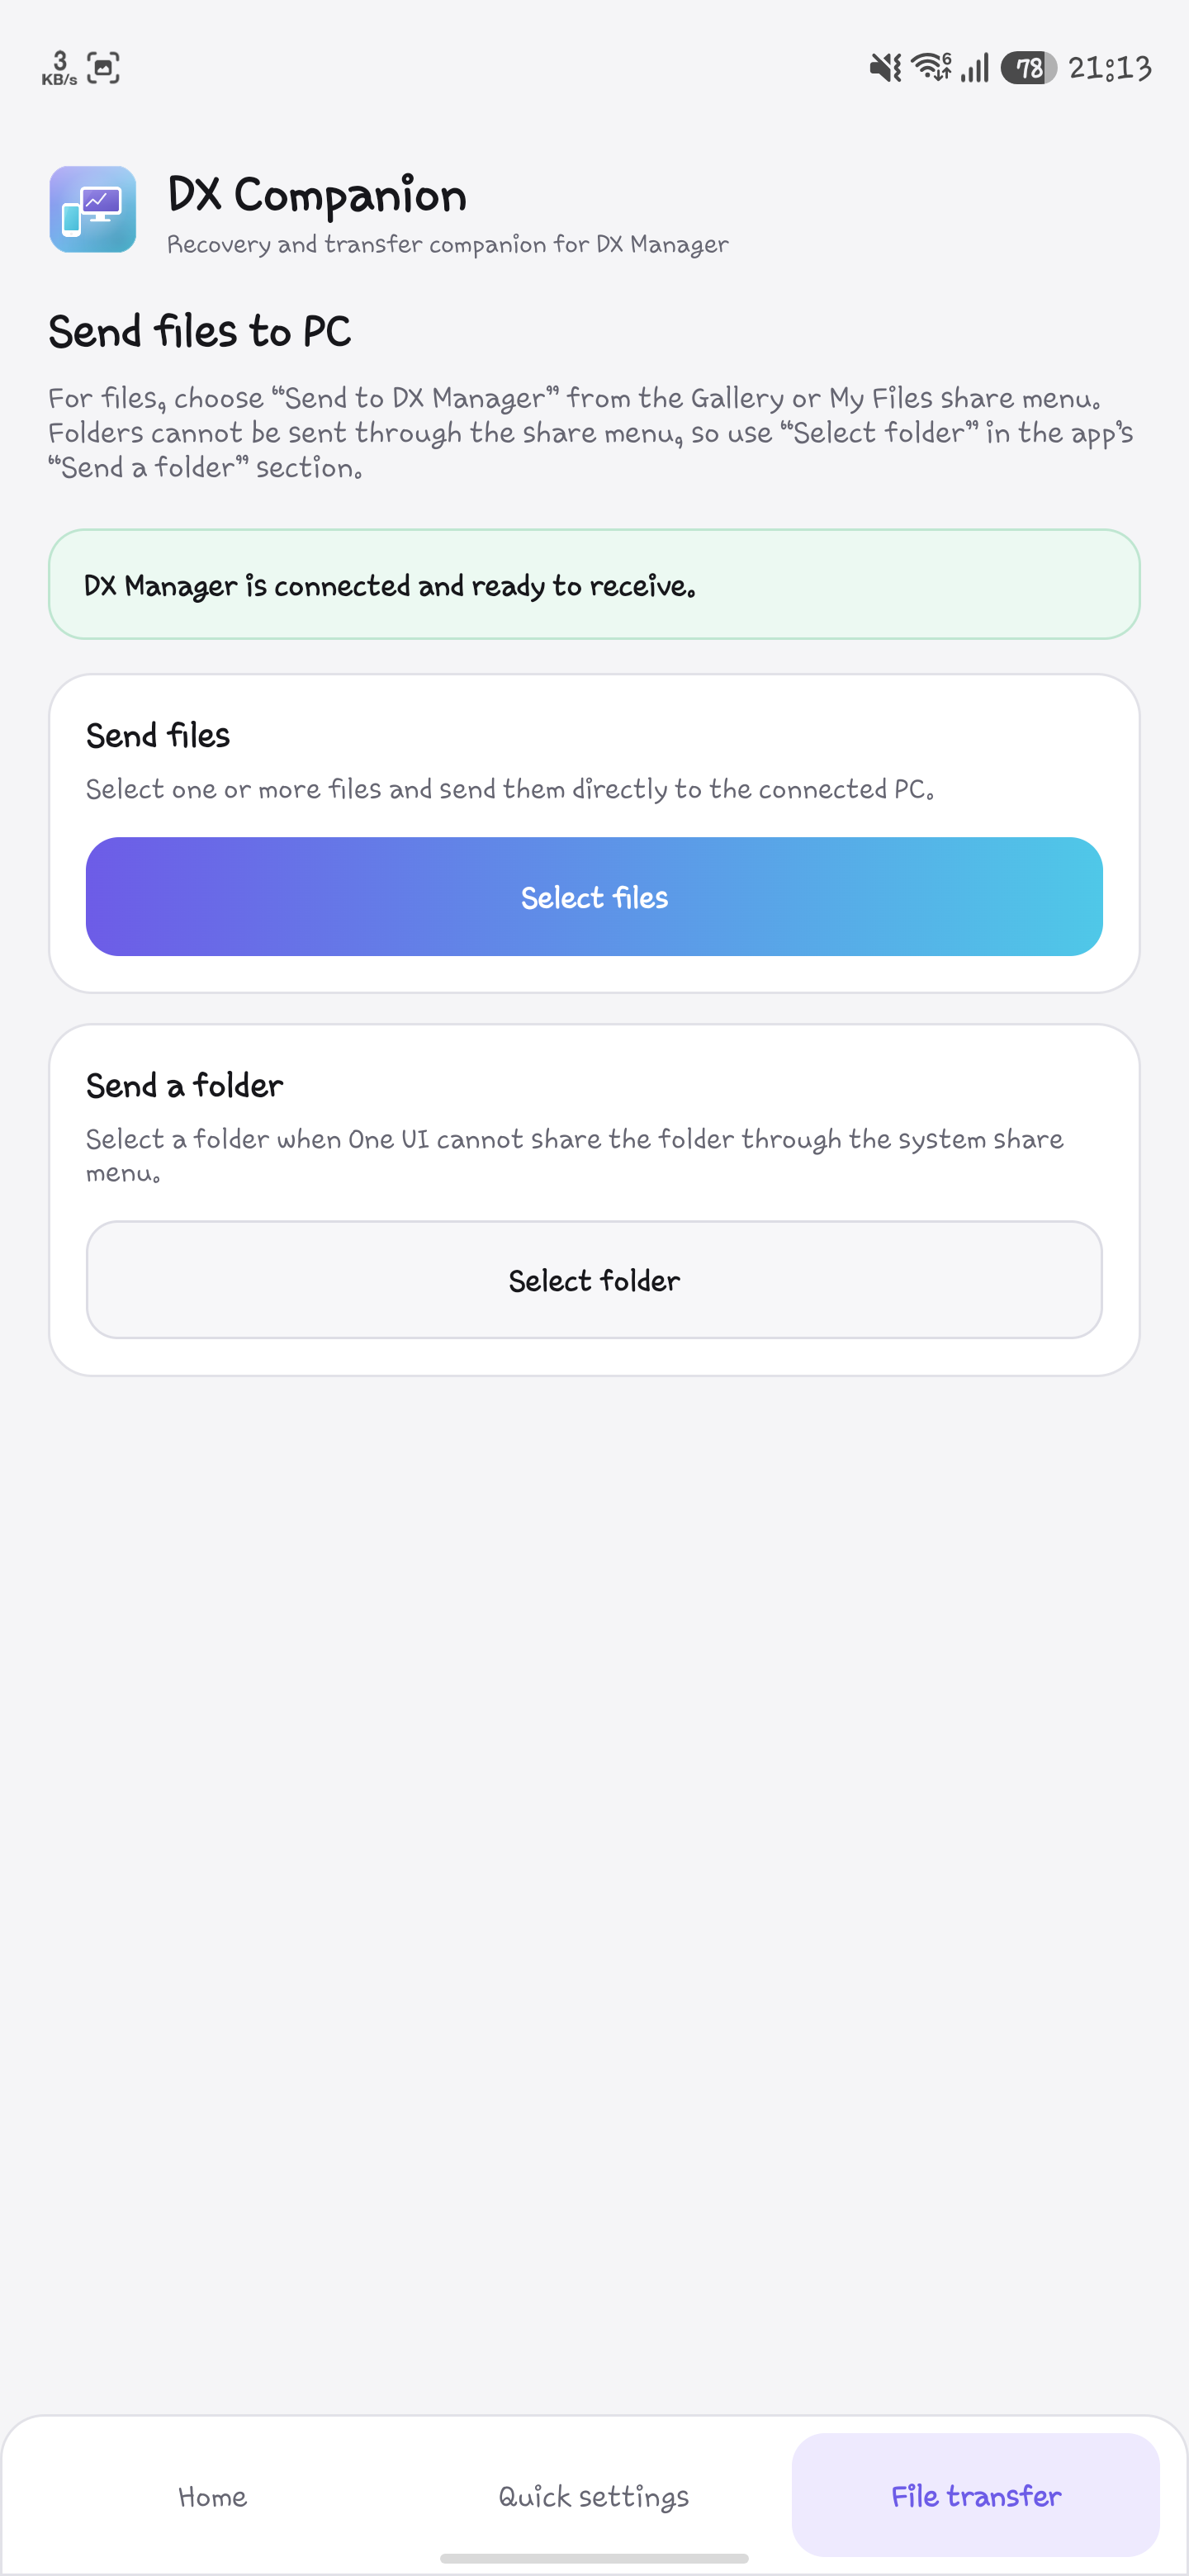
1. Start DX Manager and connect the target phone through USB or wireless ADB.
2. On DX Companion's **File transfer** tab, confirm that it says **DX Manager
is connected and ready to receive files**.
3. For files, select them in Gallery or My Files and choose **Send to DX
Manager** from Android's Share menu.
4. Android's Share menu does not provide folders. To send a folder, use DX
Companion's **Send folder > Select folder** action instead.
Change the destination under **Settings > Paths / ADB > Phone-to-PC destination
folder** in DX Manager. Data is streamed directly to the PC through an
authenticated ADB reverse session for the currently selected phone; no
temporary copy is created on the phone. If a name already exists at the PC
destination, DX Manager preserves the existing item and saves the new one as
`name (1)`, `name (2)`, and so on.
The companion remains in the waiting state and does not start a transfer when
DX Manager is not running, the selected phone is disconnected, or the verified
companion is unavailable. Multiple shared files are supported, and folder
transfer preserves subfolders and empty folders.
## 13. Language, Theme, and Reset
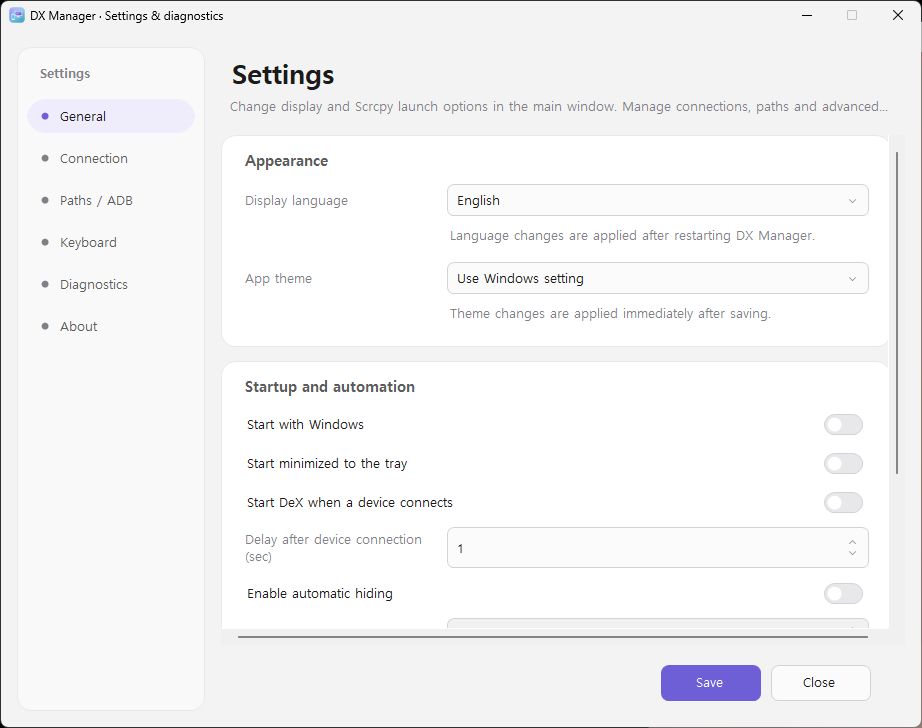
- Display language: automatic, Korean, or English
- App theme: follow Windows, light, or dark
- Theme changes are applied as soon as they are saved.
- Some language and path changes may require a restart to apply everywhere.
Use **Settings > Diagnostics > Restore all defaults** to reset all profiles,
connections, and keyboard options.
Settings are stored in `config/settings.json` next to the application.
## 14. Frequently Asked Questions
For common questions and troubleshooting steps, see the
[Frequently Asked Questions](FAQ_EN.md). A [Korean version](FAQ_KO.md) is
also available.
## 15. Removal
DX Manager does not use an installer.
1. Exit DX Manager completely.
2. Back up any screenshots or logs you want to keep.
3. Delete the extracted DX Manager folder.
Disable **Start with Windows** before removal if it was enabled.
## Trademarks and Third-Party Components
DX Manager is independently developed and is not affiliated with, sponsored
by, endorsed by, or distributed by Samsung Electronics or Genymobile.
Samsung and Samsung DeX are trademarks of Samsung Electronics Co., Ltd.
scrcpy and bundled dependencies remain under their respective licenses. See
[`THIRD_PARTY_NOTICES.md`](../DexManager/licenses/THIRD_PARTY_NOTICES.md).
## Developer and Project
- Developer: [maze](https://github.com/maze-mei)
- GitHub: [maze-mei/DX-Manager](https://github.com/maze-mei/DX-Manager)
- License: [MIT License](../LICENSE)
- Copyright © 2026 maze
DX Manager is a personally and independently developed project.