# Course Setup
## Introduction
This lesson will cover how to run the code samples of this course.
## Join Other Learners and Get Help
Before you begin cloning your repo, join the [AI Agents For Beginners Discord channel](https://aka.ms/ai-agents/discord) to get any help with setup, any questions about the course, or to connect with other learners.
## Clone or Fork this Repo
To begin, please clone or fork the GitHub Repository. This will make your own version of the course material so that you can run, test, and tweak the code!
This can be done by clicking the link to fork the repo
You should now have your own forked version of this course in the following link:

### Shallow Clone (recommended for workshop / Codespaces)
>The full repository can be large (~3 GB) when you download full history and all files. If you're only attending the workshop or only need a few lesson folders, a shallow clone (or a sparse clone) avoids most of that download by truncating history and/or skipping blobs.
#### Quick shallow clone — minimal history, all files
Replace `` in the below commands with your fork URL (or the upstream URL if you prefer).
To clone only the latest commit history (small download):
```bash|powershell
git clone --depth 1 https://github.com//ai-agents-for-beginners.git
```
To clone a specific branch:
```bash|powershell
git clone --depth 1 --branch https://github.com//ai-agents-for-beginners.git
```
#### Partial (sparse) clone — minimal blobs + only selected folders
This uses partial clone and sparse-checkout (requires Git 2.25+ and recommended modern Git with partial clone support):
```bash|powershell
git clone --depth 1 --filter=blob:none --sparse https://github.com//ai-agents-for-beginners.git
```
Traverse into the repo folder:
```bash|powershell
cd ai-agents-for-beginners
```
Then specify which folders you want (example below shows two folders):
```bash|powershell
git sparse-checkout set 00-course-setup 01-intro-to-ai-agents
```
After cloning and verifying the files, if you only need files and want to free space (no git history), please delete the repository metadata (💀irreversible — you will lose all Git functionality: no commits, pulls, pushes, or history access).
```bash
# zsh/bash
rm -rf .git
```
```powershell
# PowerShell
Remove-Item -Recurse -Force .git
```
#### Using GitHub Codespaces (recommended to avoid local large downloads)
- Create a new Codespace for this repo via the [GitHub UI](https://github.com/codespaces).
- In the terminal of the newly created codespace, run one of the shallow/sparse clone commands above to bring only the lesson folders you need into the Codespace workspace.
- Optional: after cloning inside Codespaces, remove .git to reclaim extra space (see removal commands above).
- Note: If you prefer to open the repo directly in Codespaces (without an extra clone), be aware Codespaces will construct the devcontainer environment and may still provision more than you need. Cloning a shallow copy inside a fresh Codespace gives you more control over disk usage.
#### Tips
- Always replace the clone URL with your fork if you want to edit/commit.
- If you later need more history or files, you can fetch them or adjust sparse-checkout to include additional folders.
## Running the Code
This course offers a series of Jupyter Notebooks that you can run with to get hands-on experience building AI Agents.
The code samples use either:
**Requires GitHub Account - Free**:
1) Semantic Kernel Agent Framework + GitHub Models Marketplace. Labelled as (semantic-kernel.ipynb)
2) AutoGen Framework + GitHub Models Marketplace. Labeled as (autogen.ipynb)
**Requires Azure Subscription**:
3) Azure AI Foundry + Azure AI Agent Service. Labelled as (azureaiagent.ipynb)
We encourage you to try out all three types of examples to see which one works best for you.
Whichever option you choose, it will determine which setup steps you need to follow below:
## Requirements
- Python 3.12+
- **NOTE**: If you don't have Python3.12 installed, ensure you install it. Then create your venv using python3.12 to ensure the correct versions are installed from the requirements.txt file.
>Example
Create Python venv directory:
```bash|powershell
python -m venv venv
```
Then activate venv environment for:
```bash
# zsh/bash
source venv/bin/activate
```
```dos
# Command Prompt for Windows
venv\Scripts\activate
```
- .NET 10+: For the sample codes using .NET, ensure you install [.NET 10 SDK](https://dotnet.microsoft.com/download/dotnet/10.0) or later. Then, check your installed .NET SDK version:
```bash|powershell
dotnet --list-sdks
```
- A GitHub Account - For Access to the GitHub Models Marketplace
- Azure Subscription - For Access to Azure AI Foundry
- Azure AI Foundry Account - For Access to the Azure AI Agent Service
We have included a `requirements.txt` file in the root of this repository that contains all the required Python packages to run the code samples.
You can install them by running the following command in your terminal at the root of the repository:
```bash|powershell
pip install -r requirements.txt
```
We recommend creating a Python virtual environment to avoid any conflicts and issues.
## Setup VSCode
Make sure that you are using the right version of Python in VSCode.

## Set Up for Samples using GitHub Models
### Step 1: Retrieve Your GitHub Personal Access Token (PAT)
This course leverages the GitHub Models Marketplace, providing free access to Large Language Models (LLMs) that you will use to build AI Agents.
To use the GitHub Models, you will need to create a [GitHub Personal Access Token](https://docs.github.com/en/authentication/keeping-your-account-and-data-secure/managing-your-personal-access-tokens).
This can be done by going to your Personal Access Tokens settings in your GitHub Account.
Please follow the [Principle of Least Privilege](https://docs.github.com/en/get-started/learning-to-code/storing-your-secrets-safely) when creating your token. This means you should only give the token the permissions it needs to run the code samples in this course.
1. Select the `Fine-grained tokens` option on the left side of your screen by traversing to the **Developer settings**
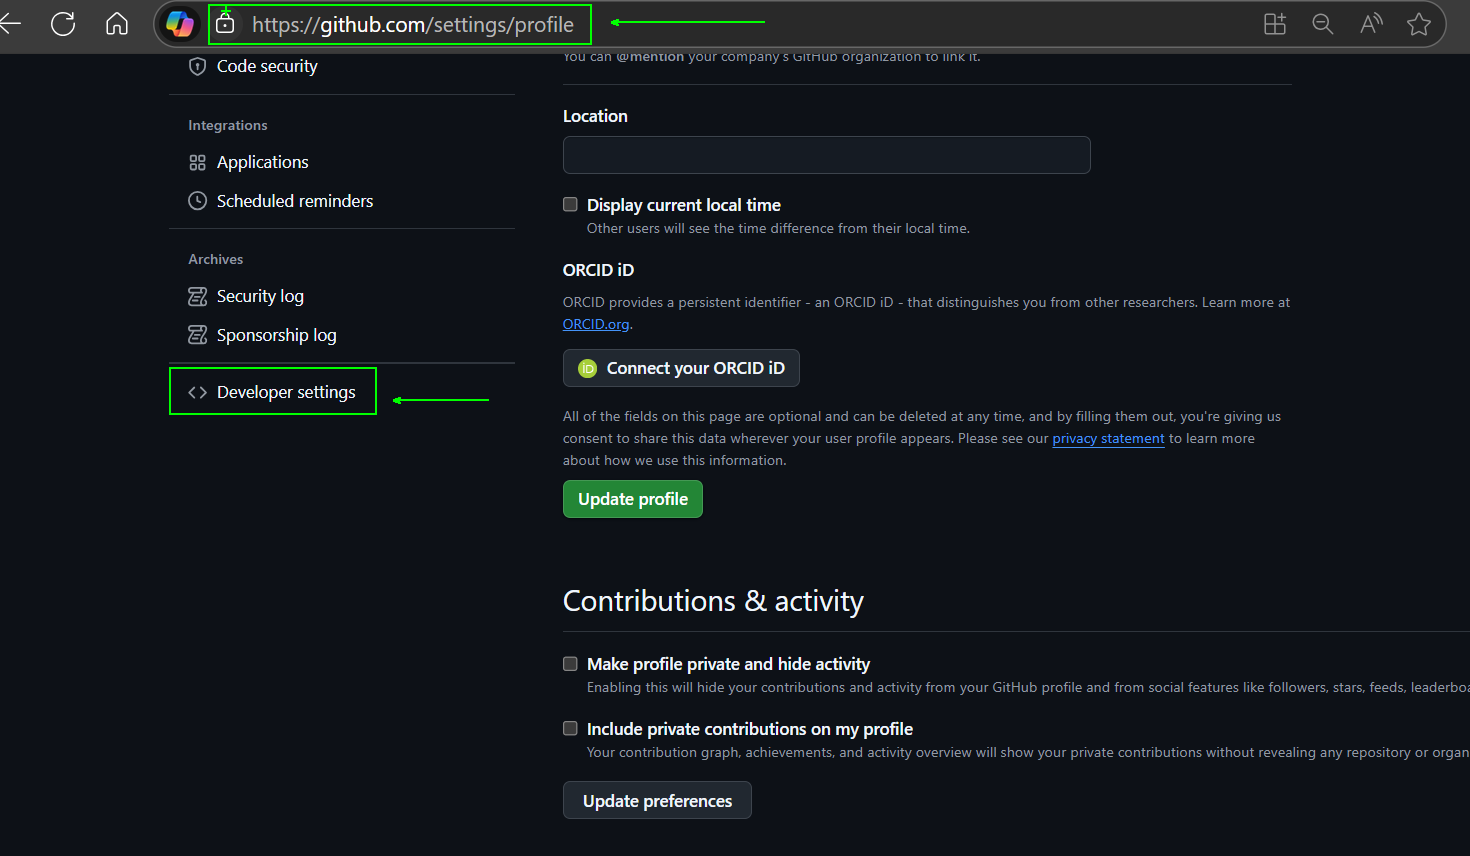
Then select `Generate new token`.
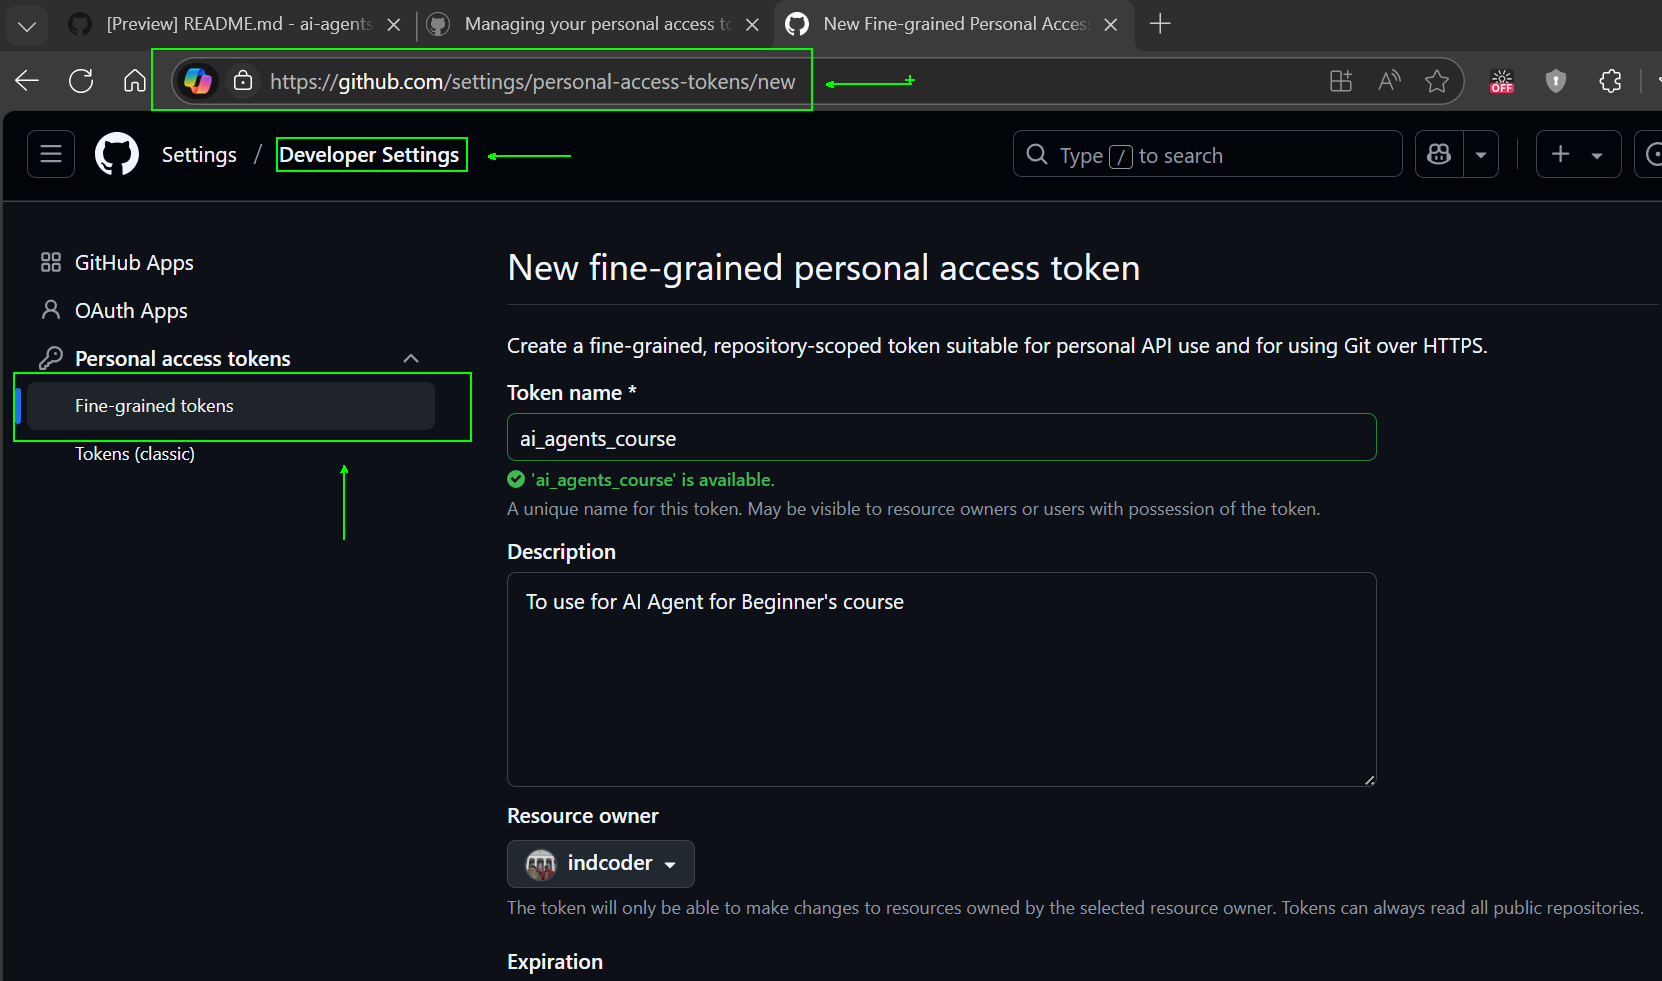
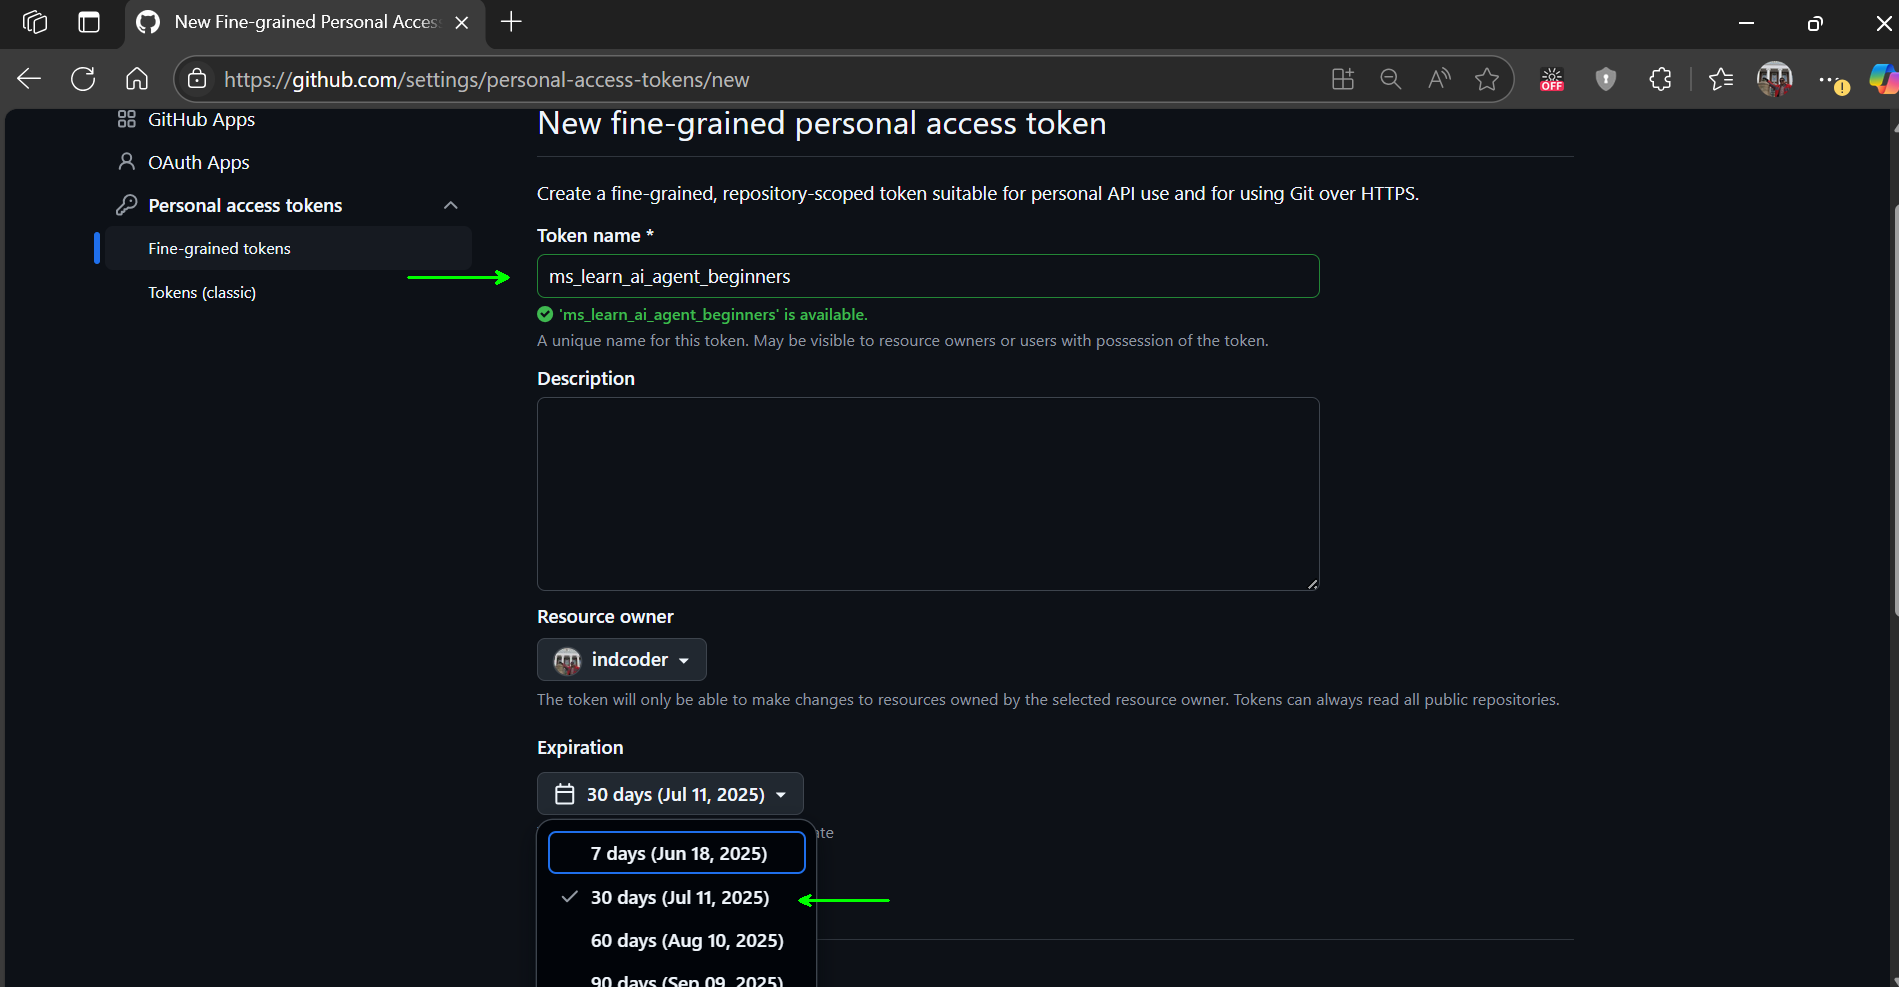
2. Enter a descriptive name for your token that reflects its purpose, making it easy to identify later.
🔐 Token Duration Recommendation
Recommended duration: 30 days
For a more secure posture, you can opt for a shorter period—such as 7 days 🛡️
It’s a great way to set a personal target and complete the course while your learning momentum is high 🚀.
3. Limit the token's scope to your fork of this repository.
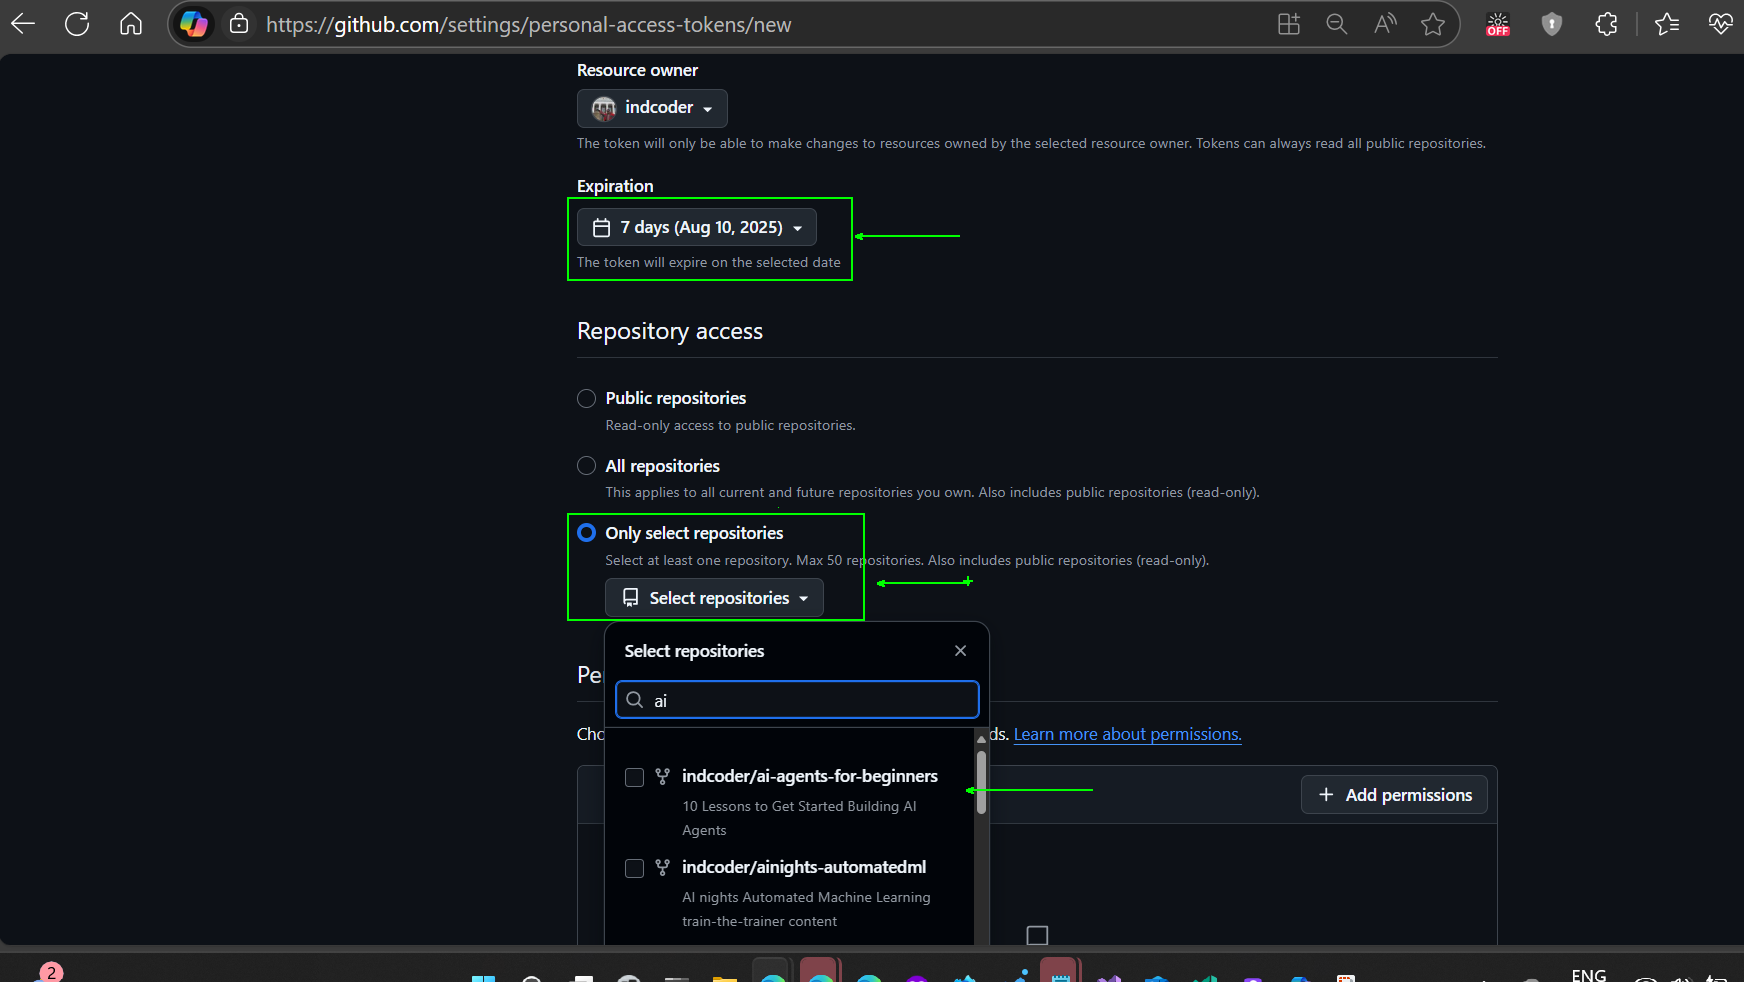
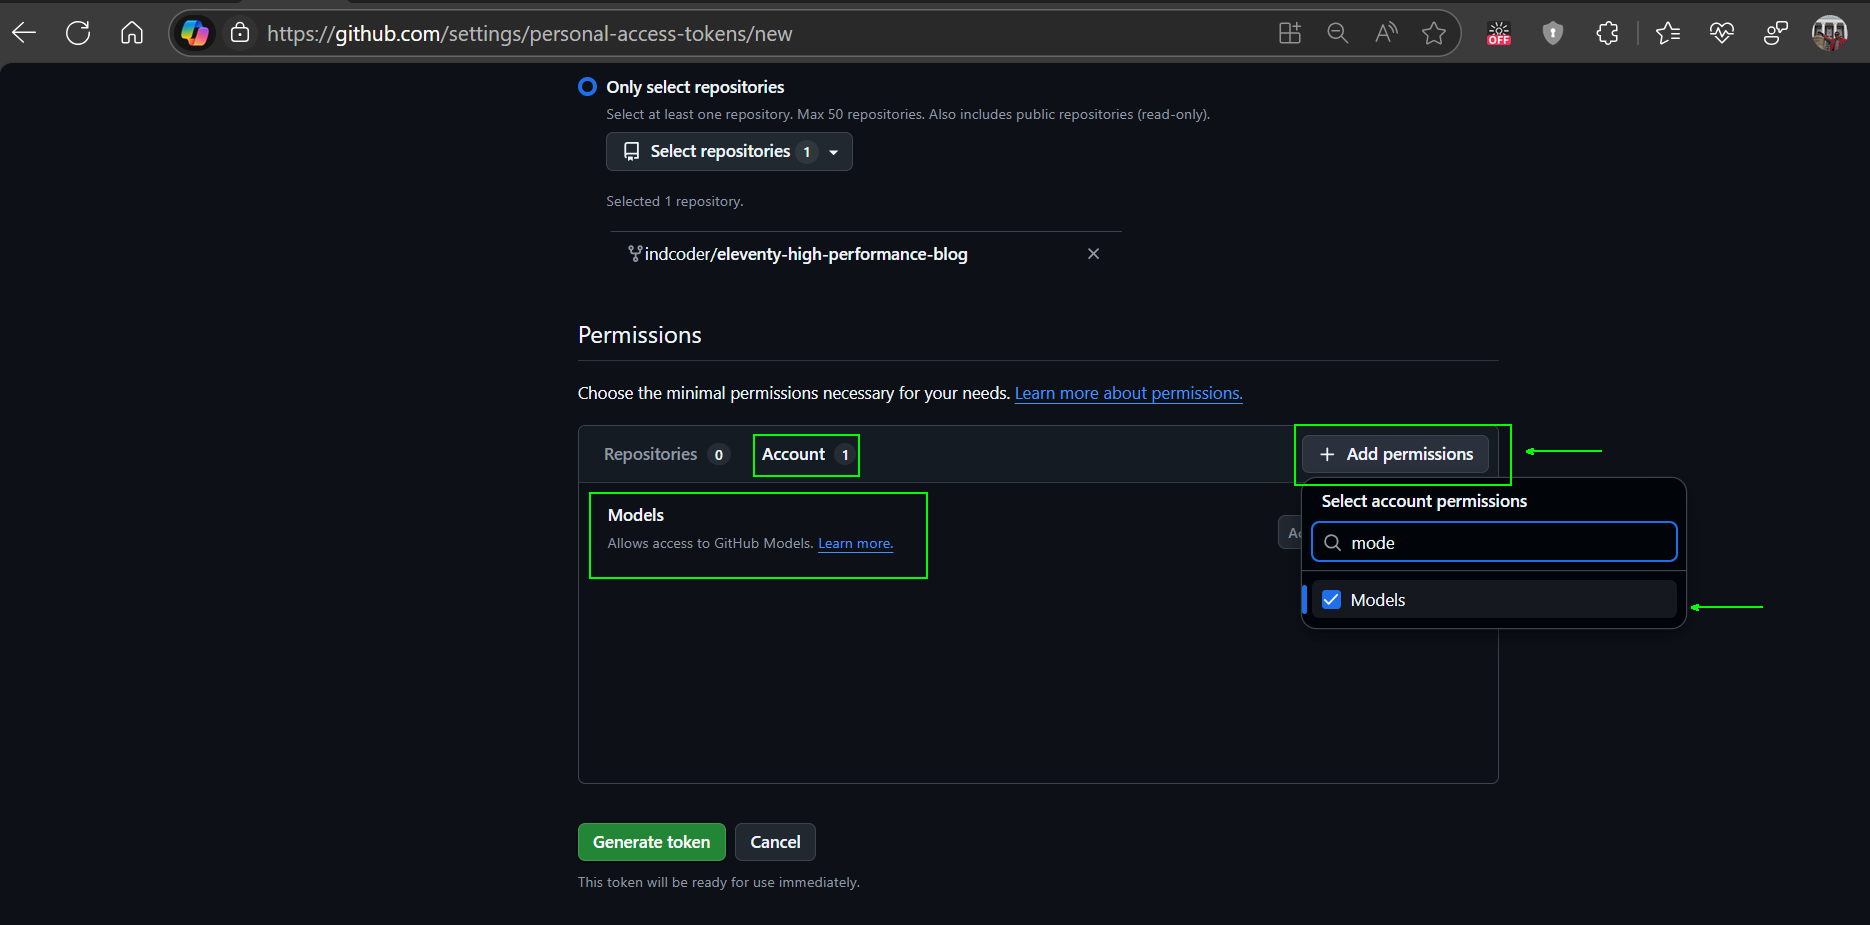
4. Restrict the token's permissions: Under **Permissions**, click **Account** tab, and click the "+ Add permissions" button. A dropdown will appear. Please search for **Models** and check the box for it.
5. Verify the permissions required before generating the token. 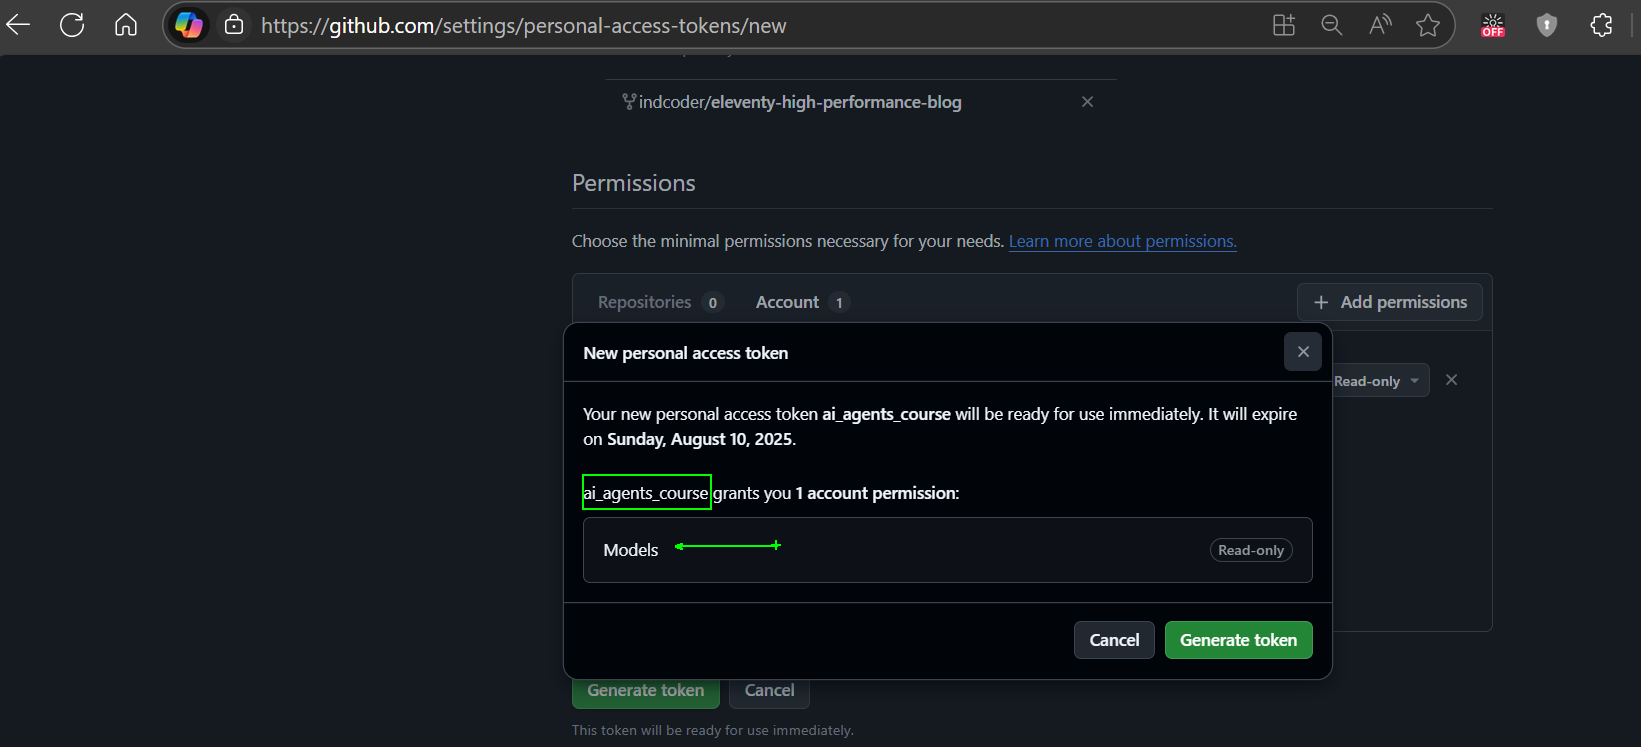
6. Before generating the token, ensure you are ready to store the token in a secure place like a password manager vault, as it will not be shown again after you create it. 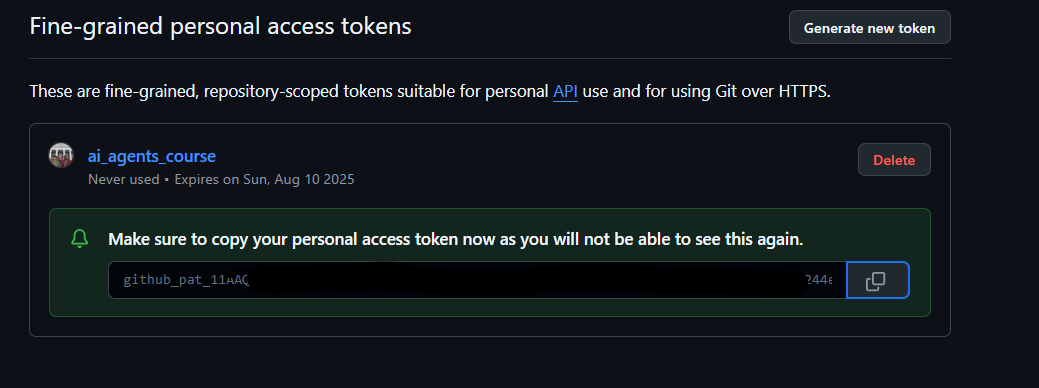
Copy your new token that you have just created. You will now add this to your `.env` file included in this course.
### Step 2: Create Your `.env` File
To create your `.env` file run the following command in your terminal.
```bash
# zsh/bash
cp .env.example .env
```
```powershell
# PowerShell
Copy-Item .env.example .env
```
This will copy the example file and create a `.env` in your directory and where you fill in the values for the environment variables.
With your token copied, open the `.env` file in your favorite text editor and paste your token into the `GITHUB_TOKEN` field.
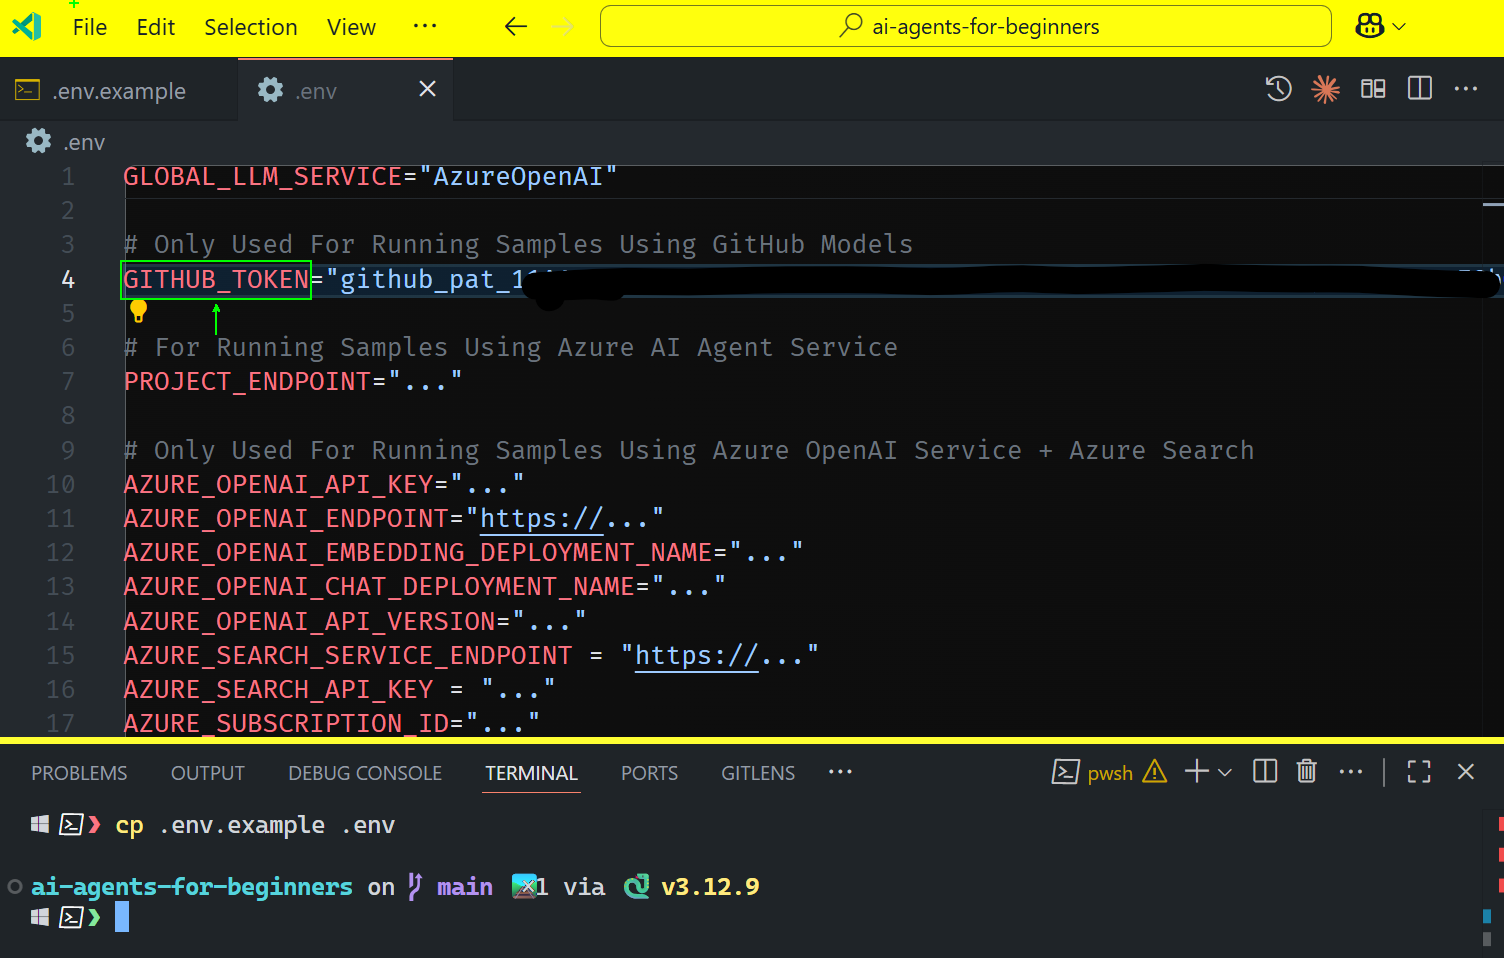
You should now be able to run the code samples of this course.
## Set Up for Samples using Azure AI Foundry and Azure AI Agent Service
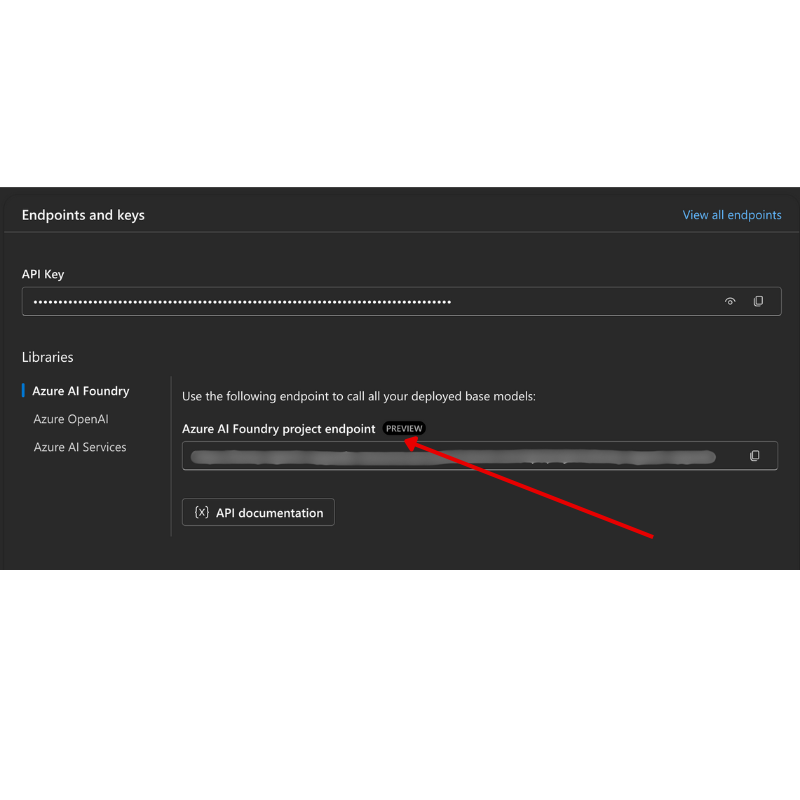
### Step 1: Retrieve Your Azure Project Endpoint
Follow the steps to creating a hub and project in Azure AI Foundry found here: [Hub resources overview](https://learn.microsoft.com/azure/ai-foundry/concepts/ai-resources)
Once you have created your project, you will need to retrieve the connection string for your project.
This can be done by going to the **Overview** page of your project in the Azure AI Foundry portal.
### Step 2: Create Your `.env` File
To create your `.env` file run the following command in your terminal.
```bash
# zsh/bash
cp .env.example .env
```
```powershell
# PowerShell
Copy-Item .env.example .env
```
This will copy the example file and create a `.env` in your directory and where you fill in the values for the environment variables.
With your token copied, open the `.env` file in your favorite text editor and paste your token into the `PROJECT_ENDPOINT` field.
### Step 3: Sign in to Azure
As a security best practice, we'll use [keyless authentication](https://learn.microsoft.com/azure/developer/ai/keyless-connections?tabs=csharp%2Cazure-cli?WT.mc_id=academic-105485-koreyst) to authenticate to Azure OpenAI with Microsoft Entra ID.
Next, open a terminal and run `az login --use-device-code` to sign in to your Azure account.
Once you've logged in, select your subscription in the terminal.
## Additional Environment Variables - Azure Search and Azure OpenAI
For the Agentic RAG Lesson - Lesson 5 - there are samples that use Azure Search and Azure OpenAI.
If you want to run these samples, you will need to add the following environment variables to your `.env` file:
### Overview Page (Project)
- `AZURE_SUBSCRIPTION_ID` - Check **Project details** on the **Overview** page of your project.
- `AZURE_AI_PROJECT_NAME` - Look at the top of the **Overview** page for your project.
- `AZURE_OPENAI_SERVICE` - Find this in the **Included capabilities** tab for **Azure OpenAI Service** on the **Overview** page.
### Management Center
- `AZURE_OPENAI_RESOURCE_GROUP` - Go to **Project properties** on the **Overview** page of the **Management Center**.
- `GLOBAL_LLM_SERVICE` - Under **Connected resources**, find the **Azure AI Services** connection name. If not listed, check the **Azure portal** under your resource group for the AI Services resource name.
### Models + Endpoints Page
- `AZURE_OPENAI_EMBEDDING_DEPLOYMENT_NAME` - Select your embedding model (e.g., `text-embedding-ada-002`) and note the **Deployment name** from the model details.
- `AZURE_OPENAI_CHAT_DEPLOYMENT_NAME` - Select your chat model (e.g., `gpt-4o-mini`) and note the **Deployment name** from the model details.
### Azure Portal
- `AZURE_OPENAI_ENDPOINT` - Look for **Azure AI services**, click on it, then go to **Resource Management**, **Keys and Endpoint**, scroll down to the "Azure OpenAI endpoints", and copy the one that says "Language APIs".
- `AZURE_OPENAI_API_KEY` - From the same screen, copy KEY 1 or KEY 2.
- `AZURE_SEARCH_SERVICE_ENDPOINT` - Find your **Azure AI Search** resource, click it, and see **Overview**.
- `AZURE_SEARCH_API_KEY` - Then go to **Settings** and then **Keys** to copy the primary or secondary admin key.
### External Webpage
- `AZURE_OPENAI_API_VERSION` - Visit the [API version lifecycle](https://learn.microsoft.com/azure/ai-services/openai/api-version-deprecation#latest-ga-api-release) page under **Latest GA API release**.
### Setup keyless authentication
Rather than hardcode your credentials, we'll use a keyless connection with Azure OpenAI. To do so, we'll import `DefaultAzureCredential` and later call the `DefaultAzureCredential` function to get the credential.
```python
# Python
from azure.identity import DefaultAzureCredential, InteractiveBrowserCredential
```
## Stuck Somewhere?
If you have any issues running this setup, hop into our Azure AI Community Discord or create an issue.
## Next Lesson
You are now ready to run the code for this course. Happy learning more about the world of AI Agents!
[Introduction to AI Agents and Agent Use Cases](../01-intro-to-ai-agents/README.md)