# Getting Started Guide
This guide will cover the following steps to get you up and running with the Webview UI Toolkit.
1. Create a webview-based extension
2. Install and set up the toolkit
3. Set up message passing between the extension and webview
_If you get stuck at any point or if you just want a pre-configured starter extension template, install our [completed hello world sample extension](https://github.com/microsoft/vscode-webview-ui-toolkit-samples/tree/main/default/hello-world) based on this guide._
## Part 1: Create a webview-based extension
Before installing the toolkit, you need to create an extension that uses a webview. The following steps are taken directly from the Visual Studio Code [Your First Extension](https://code.visualstudio.com/api/get-started/your-first-extension) guide and [Webview API](https://code.visualstudio.com/api/extension-guides/webview) guide.
To generate a basic extension, we can use [Yeoman](https://yeoman.io/) and the [Visual Studio Code Extension Generator](https://www.npmjs.com/package/generator-code). First, though, make sure you have [Node.js](https://nodejs.org/en/) and [Git](https://git-scm.com/) installed. Then, install Yeoman and the generator using the following command:
```bash
npm install -g yo generator-code
```
Run the generator and fill out a few fields for a new TypeScript extension:
```bash
yo code
# ? What type of extension do you want to create? New Extension (TypeScript)
# ? What's the name of your extension? hello-world
# ? What's the identifier of your extension? hello-world
# ? What's the description of your extension? LEAVE BLANK
# ? Initialize a git repository? Yes
# ? Bundle the source code with webpack? No
# ? Which package manager to use? npm
# ? Do you want to open the new folder with Visual Studio Code? Open with `code`
```
### Install and configure esbuild
This extension will use [esbuild](https://esbuild.github.io/) to bundle source code. The following steps are an adapted version of those provided in the [Bundling Extensions](https://code.visualstudio.com/api/working-with-extensions/bundling-extension#using-esbuild) guide.
First install esbuild as a development dependency:
```
npm i --save-dev esbuild@0.16.17
```
_Note: Esbuild recently [released breaking changes in v0.17.0](https://github.com/evanw/esbuild/releases/tag/v0.17.0). This guide and associated sample extensions will be updated to account for this soon. But for the time being the installed version of esbuild should be pinned to the last v0.16 release._
Next, create an `esbuild.js` build script (in the root of the project) for bundling the extension code:
```js
// file: esbuild.js
const { build } = require("esbuild");
const baseConfig = {
bundle: true,
minify: process.env.NODE_ENV === "production",
sourcemap: process.env.NODE_ENV !== "production",
};
const extensionConfig = {
...baseConfig,
platform: "node",
mainFields: ["module", "main"],
format: "cjs",
entryPoints: ["./src/extension.ts"],
outfile: "./out/extension.js",
external: ["vscode"],
};
(async () => {
try {
await build(extensionConfig);
console.log("build complete");
} catch (err) {
process.stderr.write(err.stderr);
process.exit(1);
}
})();
```
This is a basic config that will build extension source code for a Node/CommonJS-based environment (required to run VS Code extensions). It accepts a `src/extension.ts` file as the input and outputs a single `out/extension.js` file. Additionally, when a "production" environment variable is set the output code will be minified and will not include sourcemaps.
To test that this works, update the `compile` and `vscode:prepublish` scripts and add a `package` script in `package.json`:
```json
// file: package.json
"scripts": {
"vscode:prepublish": "npm run package",
"compile": "node ./esbuild.js",
"package": "NODE_ENV=production node ./esbuild.js",
},
```
Now run the `package` and `compile` scripts:
```
npm run package
npm run compile
```
Running `package` should generate an `out` folder containing a minified `extension.js` file, while `compile` should generate a non-minified `extension.js` file and an `extension.js.map` sourcemap file.
**Configure source code watching**
To configure source code watching, which is required to achieve a good extension debugging experience a few more things need to be updated.
Back in `esbuild.js`, add a `watchConfig` and update the script to accept a `--watch` flag:
```js
// file: esbuild.js
// ... other configs ...
const watchConfig = {
watch: {
onRebuild(error, result) {
console.log("[watch] build started");
if (error) {
error.errors.forEach(error =>
console.error(`> ${error.location.file}:${error.location.line}:${error.location.column}: error: ${error.text}`)
);
} else {
console.log("[watch] build finished");
}
},
},
};
(async () => {
const args = process.argv.slice(2);
try {
if (args.includes("--watch")) {
// Build and watch source code
console.log("[watch] build started");
await build({
...extensionConfig,
...watchConfig,
});
console.log("[watch] build finished");
} else {
// Build source code
await build(extensionConfig);
console.log("build complete");
}
} catch (err) {
process.stderr.write(err.stderr);
process.exit(1);
}
})();
```
This watch config adheres to the conventions of the [esbuild-problem-matchers extension](https://github.com/connor4312/esbuild-problem-matchers#esbuild-via-js).
The npm `watch` script should now be updated, along with the `problemMatcher` field in `.vscode/tasks.json`.
```json
// file: package.json
"scripts": {
"watch": "node ./esbuild.js --watch",
}
```
```json
// file: .vscode/tasks.json
{
"version": "2.0.0",
"tasks": [
{
"problemMatcher": "$esbuild-watch"
// ... other configs ...
}
]
}
```
Finally, you'll likely see a warning in `tasks.json` stating "Unrecognized problem matcher. Is the extension that contributes this problem matcher installed?". To fix this [install the esbuild-problem-matchers extension](https://marketplace.visualstudio.com/items?itemName=connor4312.esbuild-problem-matchers).
### Create a webview
You now need to create a webview. The following steps are an adapted version of those provided in the [Webview API](https://code.visualstudio.com/api/extension-guides/webview) guide – for more info about webviews read the guide.
Start by navigating to the `extensions.ts` file inside the `src` directory and replacing the contents of the `activate` function with the following:
```typescript
// file: src/extension.ts
export function activate(context: vscode.ExtensionContext) {
const helloCommand = vscode.commands.registerCommand("hello-world.helloWorld", () => {
HelloWorldPanel.render();
});
context.subscriptions.push(helloCommand);
}
```
At this point, you probably have noticed that there's an error because `HelloWorldPanel` doesn't exist. Here's how to fix that.
### Create a webview panel class
Create a new directory/file at `src/panels/HelloWorldPanel.ts`.
Inside this file, create a class that manages the state and behavior of Hello World webview panels.
It'll contain all the data and methods for:
- Creating and rendering Hello World webview panels
- Properly cleaning up and disposing of webview resources when the panel is closed
- Setting the HTML content of the webview panel
- Setting message listeners so data can be passed between the webview and extension
**Constructor and properties**
Start by importing the Visual Studio Code API and creating an exported `HelloWorldPanel` class with the following properties and constructor method:
```typescript
// file: src/panels/HelloWorldPanel.ts
import * as vscode from "vscode";
export class HelloWorldPanel {
public static currentPanel: HelloWorldPanel | undefined;
private readonly _panel: vscode.WebviewPanel;
private _disposables: vscode.Disposable[] = [];
private constructor(panel: vscode.WebviewPanel) {
this._panel = panel;
}
}
```
**Render method**
Now, add the render method. This will be responsible for rendering the current webview panel – if it exists – or creating and displaying a new webview panel.
```typescript
// file: src/panels/HelloWorldPanel.ts
export class HelloWorldPanel {
// ... properties and constructor method ...
public static render() {
if (HelloWorldPanel.currentPanel) {
HelloWorldPanel.currentPanel._panel.reveal(vscode.ViewColumn.One);
} else {
const panel = vscode.window.createWebviewPanel("hello-world", "Hello World", vscode.ViewColumn.One, {
// Empty for now
});
HelloWorldPanel.currentPanel = new HelloWorldPanel(panel);
}
}
}
```
At this point, you can go back to the `src/extension.ts` file and add an import statement to resolve the earlier error.
```typescript
// file: src/extension.ts
import * as vscode from "vscode";
import { HelloWorldPanel } from "./panels/HelloWorldPanel";
// ... activate function ...
```
**Dispose method**
Back in the `HelloWorldPanel` class, you now need to define a `dispose` method so that webview resources are cleaned up when the webview panel is closed by the user or closed programmatically.
```typescript
// file: src/panels/HelloWorldPanel.ts
export class HelloWorldPanel {
// ... other properties and methods ...
public dispose() {
HelloWorldPanel.currentPanel = undefined;
this._panel.dispose();
while (this._disposables.length) {
const disposable = this._disposables.pop();
if (disposable) {
disposable.dispose();
}
}
}
}
```
With the `dispose` method defined, you also need to update the constructor method. To do this, add an `onDidDispose` event listener, so the method can be triggered when the webview panel is closed.
```typescript
// file: src/panels/HelloWorldPanel.ts
private constructor(panel: vscode.WebviewPanel) {
// ... other code ...
this._panel.onDidDispose(() => this.dispose(), null, this._disposables);
}
```
**Get webview content method**
The `_getWebviewContent` method is where the UI of the extension will be defined.
This is also where references to CSS and JavaScript files are created and inserted into the webview HTML.
```typescript
// file: src/panels/HelloWorldPanel.ts
export class HelloWorldPanel {
// ... other properties and methods ...
private _getWebviewContent() {
// Tip: Install the es6-string-html VS Code extension to enable code highlighting below
return /*html*/ `
Hello World!
Hello World!
`;
}
}
```
This is another point in which you need to update the constructor method to set the HTML content for the webview panel.
```typescript
// file: src/panels/HelloWorldPanel.ts
private constructor(panel: vscode.WebviewPanel) {
// ... other code ...
this._panel.webview.html = this._getWebviewContent();
}
```
**Set message listener method**
Message passing is handled in the third part of this guide.
### Test that everything works
Congratulations! You officially created a basic webview extension.
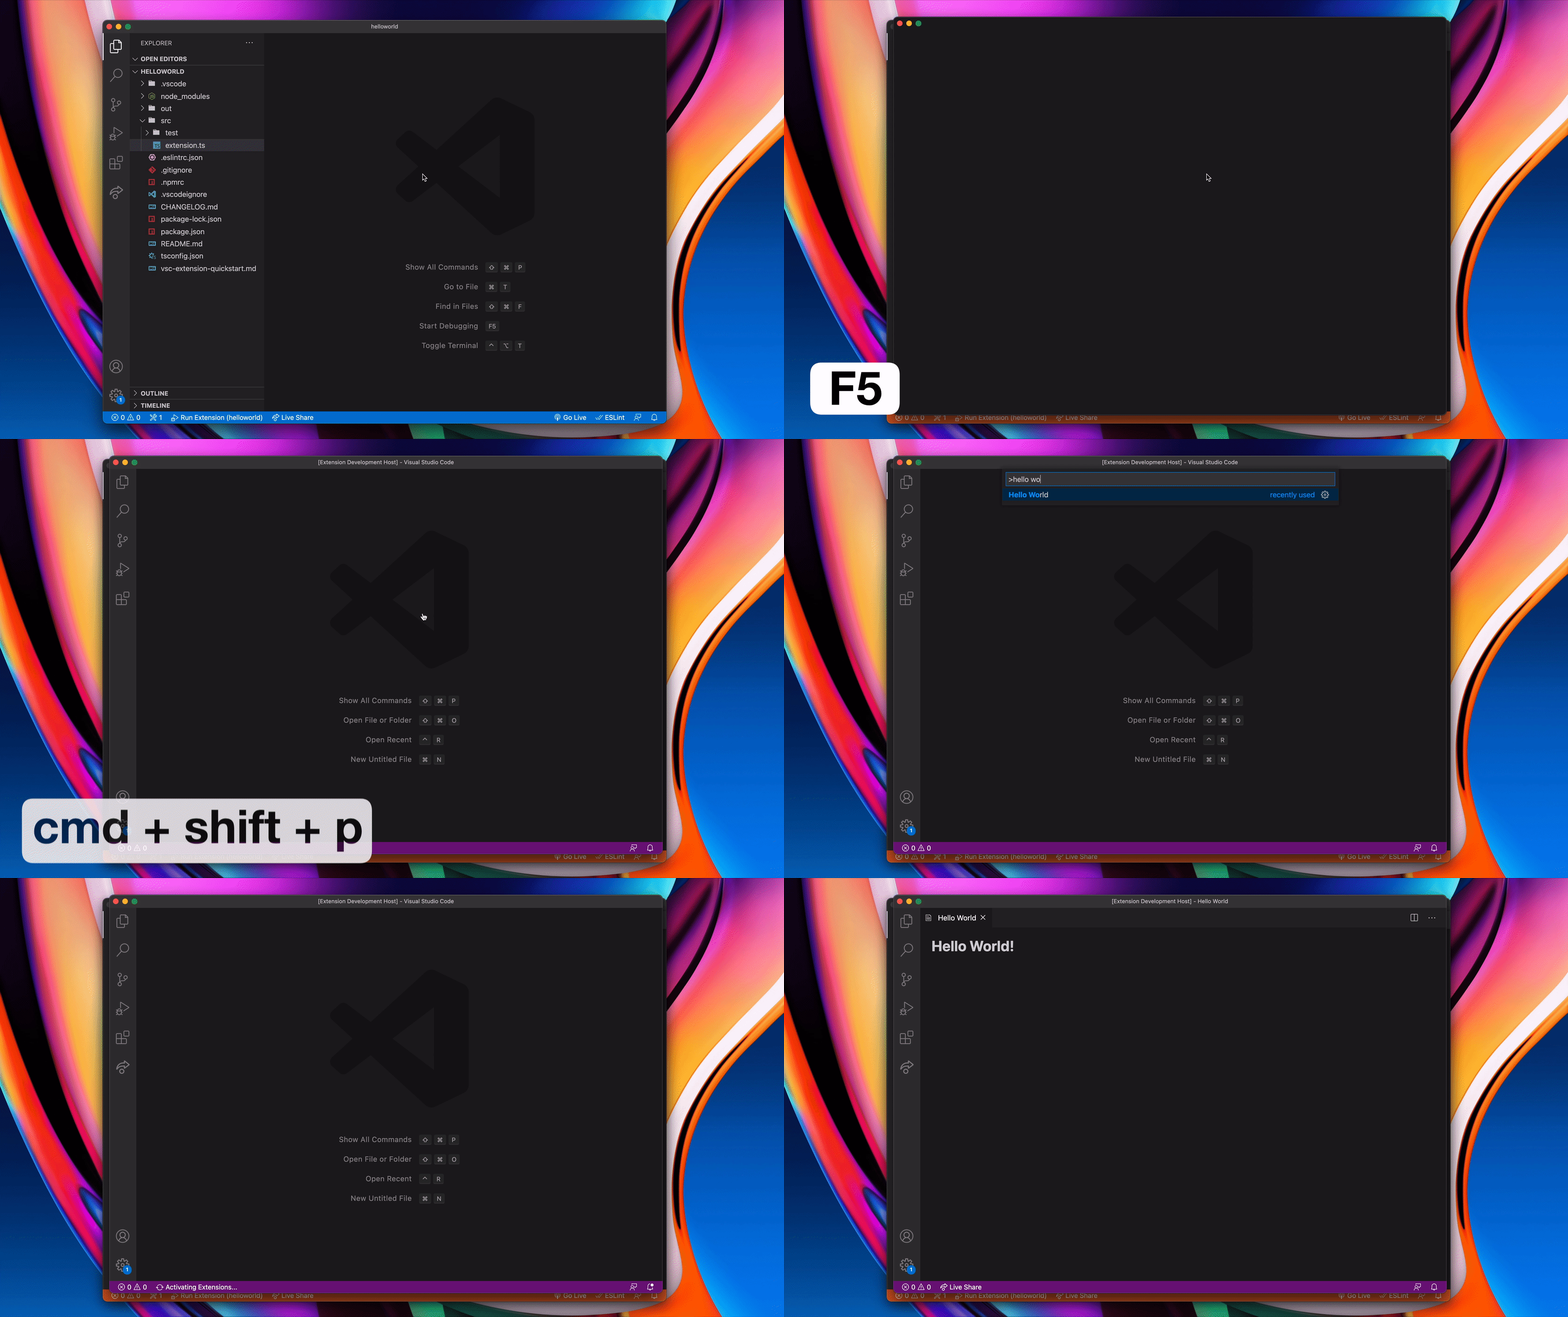
Inside the editor, press `F5` to test that everything is working. This will compile and run the extension in a new Extension Development Host window.
When the host window opens, open the Command Palette (`Crtl + Shift + P` or `Cmd + Shift + P` on Mac), type "Hello World", and click `enter` to run the command – which should display the webview panel.
## Part 2: Install and set up the toolkit
With an extension created, install the toolkit package using this command:
```
npm install --save @vscode/webview-ui-toolkit
```
### Register the toolkit components
Create a new directory/file at `src/webview/main.ts`. For now, it will contain the code that will register the toolkit web components (in this case a ``).
```js
// file: src/webview/main.ts
import { provideVSCodeDesignSystem, vsCodeButton } from "@vscode/webview-ui-toolkit";
provideVSCodeDesignSystem().register(vsCodeButton());
```
_A quick note on registering other components:_
To register more toolkit components, simply import the component
registration function and call it from within the register
method, like so:
```js
import { provideVSCodeDesignSystem, vsCodeButton, vsCodeCheckbox } from "@vscode/webview-ui-toolkit";
provideVSCodeDesignSystem().register(vsCodeButton(), vsCodeCheckbox());
```
### Add the button to the webview markup
With those changes, you can now add the `` to the webview markup like so:
```typescript
// file: src/panels/HelloWorldPanel.ts
private _getWebviewContent() {
return /*html*/ `
Hello World!
Hello World!
Howdy!
`;
}
```
### Update esbuild config
In the next step you'll add a script tag into the webview HTML that references a bundled version `src/webview/main.ts`. This means you need to update the esbuild config one final time to bundle webview code:
```js
// file: esbuild.js
// ... other configs ...
const webviewConfig = {
...baseConfig,
target: "es2020",
format: "esm",
entryPoints: ["./src/webview/main.ts"],
outfile: "./out/webview.js",
};
(async () => {
const args = process.argv.slice(2);
try {
if (args.includes("--watch")) {
// Build and watch extension and webview code
console.log("[watch] build started");
await build({
...extensionConfig,
...watchConfig,
});
await build({
...webviewConfig,
...watchConfig,
});
console.log("[watch] build finished");
} else {
// Build extension and webview code
await build(extensionConfig);
await build(webviewConfig);
console.log("build complete");
}
} catch (err) {
process.stderr.write(err.stderr);
process.exit(1);
}
})();
```
This additional config will build webview source code for an ESM-based environment (required for running code within a webview context, which you can think of as running code in a browser because webviews are just an iframe under the hood). It accepts a `src/webview/main.ts` file as the input and outputs a single `out/webview.js` file. Additionally, it inherits the `baseConfig` you added earlier, so when a "production" environment variable is set the webview code will be minified and will not include sourcemaps.
### Add a script tag to the webview markup
You can now use some Visual Studio Code APIs to create a URI pointing to the `out/webview.js` file.
These API calls can get a bit verbose, so create a small helper function to keep your code clean.
Add a new file at `src/utilities/getUri.ts` with the following:
```typescript
// file: src/utilities/getUri.ts
import { Uri, Webview } from "vscode";
export function getUri(webview: Webview, extensionUri: Uri, pathList: string[]) {
return webview.asWebviewUri(Uri.joinPath(extensionUri, ...pathList));
}
```
You can use that helper function to get a webview URI that points to the `webview.js` file and then add a script tag to the webview markup.
```typescript
// file: src/panels/HelloWorldPanel.ts
import { getUri } from "../utilities/getUri";
// ... other code ...
private _getWebviewContent() {
const webviewUri = getUri(webview, extensionUri, ["out", "webview.js"]);
return /*html*/ `
Hello World!
Hello World!
Howdy!
`;
}
```
### Add missing parameters
You might have noticed that there are some errors in the `getUri` function call. To fix this, start by updating the `_getWebviewContent` method to accept two new parameters.
```typescript
// file: src/panels/HelloWorldPanel.ts
private _getWebviewContent(webview: vscode.Webview, extensionUri: vscode.Uri) {
// ... Implementation details should be left unchanged for now ...
}
```
With this change, you also need to update the parameters of a few other methods and method calls.
Update the `constructor` method with the following:
```typescript
// file: src/panels/HelloWorldPanel.ts
private constructor(panel: vscode.WebviewPanel, extensionUri: vscode.Uri) {
// ... other code ...
this._panel.webview.html = this._getWebviewContent(this._panel.webview, extensionUri);
}
```
Update the `render` method with the following:
```typescript
// file: src/panels/HelloWorldPanel.ts
public static render(extensionUri: vscode.Uri) {
// ... other code ...
HelloWorldPanel.currentPanel = new HelloWorldPanel(panel, extensionUri);
}
```
Finally, update the call to the `render` method:
```typescript
// file: src/extension.ts
HelloWorldPanel.render(context.extensionUri);
```
### Enable webview scripts and improve security
The final set of steps you need to take are enabling and improving webview security.
Start by updating the webview panel configuration option you left empty earlier in the `render` method so that JavaScript is enabled in the webview and resource loading is restricted to the `out` directory.
```typescript
// file: src/panels/HelloWorldPanel.ts
public static render(extensionUri: vscode.Uri) {
// ... other code ...
const panel = vscode.window.createWebviewPanel("helloworld", "Hello World", vscode.ViewColumn.One, {
// Enable javascript in the webview
enableScripts: true,
// Restrict the webview to only load resources from the `out` directory
localResourceRoots: [vscode.Uri.joinPath(extensionUri, 'out')]
});
// ... other code ...
}
```
You should also update the content security policy of your webview to only allow scripts that have a specific nonce. To do this, create another utility function at `src/utilities/getNonce.ts`.
```typescript
// file: src/utilities/getNonce.ts
export function getNonce() {
let text = "";
const possible = "ABCDEFGHIJKLMNOPQRSTUVWXYZabcdefghijklmnopqrstuvwxyz0123456789";
for (let i = 0; i < 32; i++) {
text += possible.charAt(Math.floor(Math.random() * possible.length));
}
return text;
}
```
Back in `HelloWorldPanel.ts` add the nonce to the webview `script` tag and create a content security policy `meta` tag so that only loading scripts with a nonce is allowed.
```typescript
// file: src/panels/HelloWorldPanel.ts
import { getNonce } from "../utilities/getNonce";
// ... other code ...
private _getWebviewContent(webview: vscode.Webview, extensionUri: vscode.Uri) {
const webviewUri = getUri(webview, extensionUri, ["out", "webview.js"]);
const nonce = getNonce();
return /*html*/ `
Hello World!
Hello World!
Howdy!
`;
}
```
_Note: As your extension grows you will likely want to add custom styles, fonts, and/or images to your webview. If you do, you will need to update the content security policy meta tag to explicity allow for these resources. This [MDN documentation](https://developer.mozilla.org/en-US/docs/Web/HTTP/Headers/Content-Security-Policy) provides further information on the topic. Also here's a simple example of configuring these:_
```js
private _getWebviewContent(webview: vscode.Webview, extensionUri: vscode.Uri) {
return /*html*/ `
// ... other markup ...
`;
}
```
### Make sure everything works
It's time to run a test to see if everything works. Just as before, open the extension in the Extension Development Host window by pressing `F5` and then run the `Hello World` command.
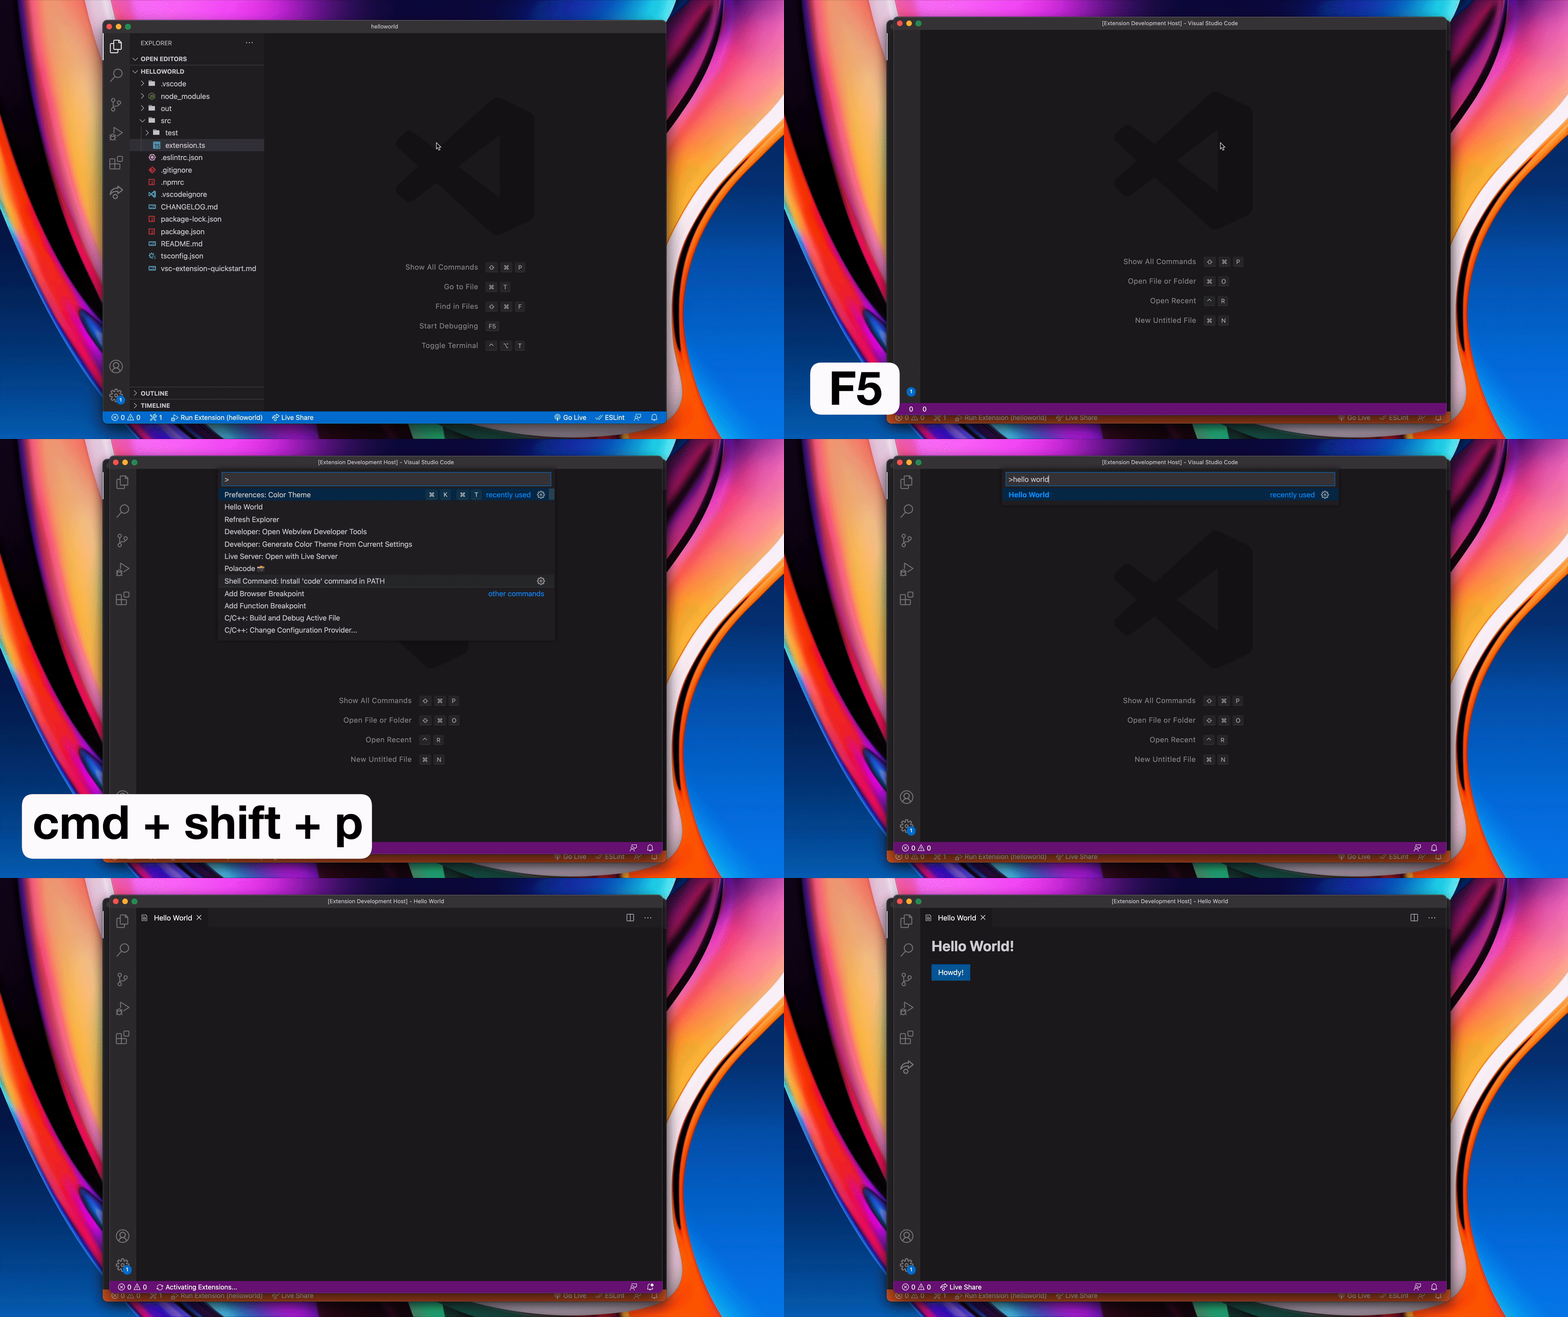
Theming is built right into the components, so you can test that out too. Open the Command Palette (`Crtl + Shift + P` or `Cmd + Shift + P` on Mac), search for "Preferences: Color Theme," and cycle through all the themes to see the button change.
## Part 3: Set up message passing
The final part of this guide will help you adjust the extension once more, so that, when the `` is clicked, a Visual Studio Code information message is displayed with some text.
### Create the message listener method
Now, you can create the `_setWebviewMessageListener` method in our `HelloWorldPanel` class. It'll be responsible for setting up an event listener that listens for messages passed from the webview context and executes code based on the received message.
```typescript
// file: src/panels/HelloWorldPanel.ts
export class HelloWorldPanel {
// ... other properties and methods ...
private _setWebviewMessageListener(webview: vscode.Webview) {
webview.onDidReceiveMessage(
(message: any) => {
const command = message.command;
const text = message.text;
switch (command) {
case "hello":
vscode.window.showInformationMessage(text);
return;
}
},
undefined,
this._disposables
);
}
}
```
You also need to call this method in your constructor.
```typescript
// file: src/panels/HelloWorldPanel.ts
private constructor(panel: vscode.WebviewPanel, extensionUri: vscode.Uri) {
// ... other code ...
this._setWebviewMessageListener(this._panel.webview);
}
```
### Create message-sending code
Now that the message listener code is created, you need message-sending code.
Back in `src/webview/main.ts` add the following code that will send a message whenever the `` is clicked.
```typescript
// file: src/webview/main.ts
import { provideVSCodeDesignSystem, vsCodeButton, Button } from "@vscode/webview-ui-toolkit";
// ... toolkit registeration code ...
const vscode = acquireVsCodeApi();
window.addEventListener("load", main);
function main() {
// To get improved type annotations/IntelliSense the associated class for
// a given toolkit component can be imported and used to type cast a reference
// to the element (i.e. the `as Button` syntax)
const howdyButton = document.getElementById("howdy") as Button;
howdyButton?.addEventListener("click", handleHowdyClick);
}
function handleHowdyClick() {
vscode.postMessage({
command: "hello",
text: "Hey there partner! 🤠",
});
}
```
You'll notice a few errors. To fix them, update the `tsconfig.json` file by changing the `lib` compiler option to include `DOM`.
```json
// file: tsconfig.json
{
"compilerOptions": {
"lib": ["ES2020", "DOM"]
// ... other options ...
}
}
```
Also, install the `@types/vscode-webview` package as a development dependency.
```
npm install --save-dev @types/vscode-webview
```
_Tip: Sometimes you need to restart the TypeScript language server for this change to be picked up. Run "TypeScript: Restart TS server" in the command palette if you're still getting type errors._
### One final test
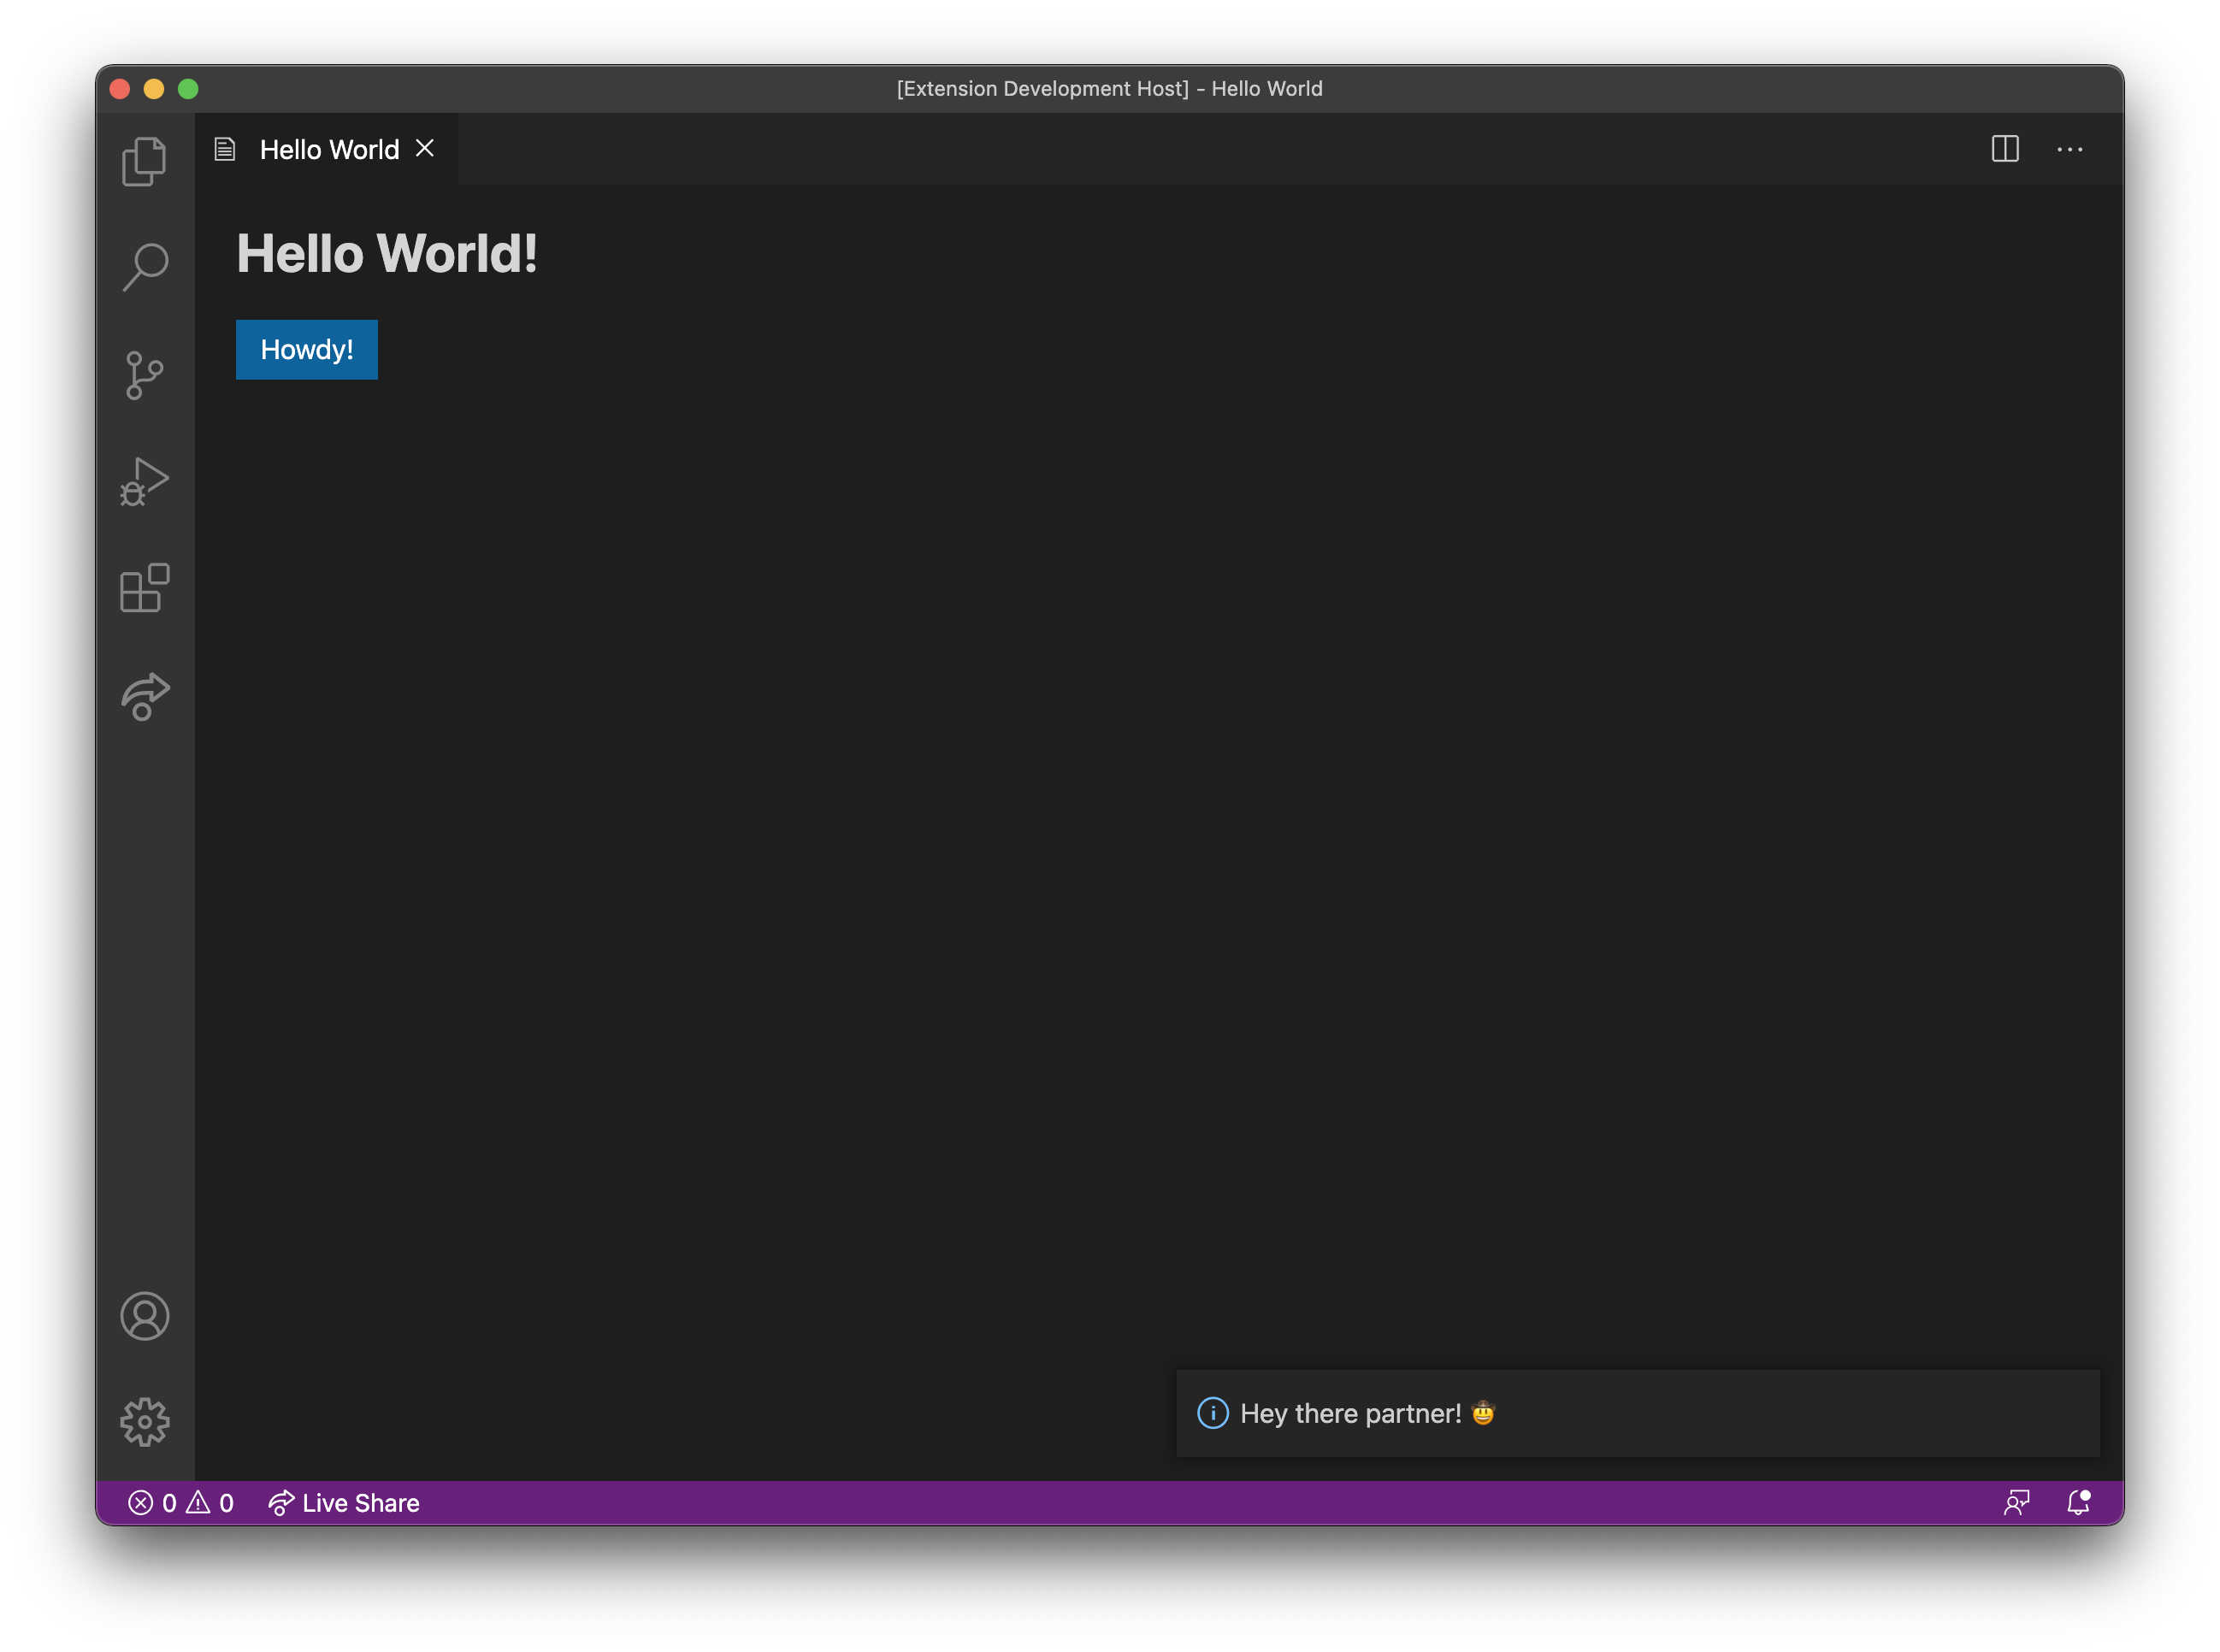
You should test that this all works. To do this, run the extension and click the "Howdy!" button.
## Next steps
Congratulations on getting started with the Webview UI Toolkit! 🎊
You can find a [completed hello world extension](https://github.com/microsoft/vscode-webview-ui-toolkit-samples/tree/main/default/hello-world) based on this guide that includes documentation comments explaining the code in even more detail. In the same repository, you can take a look at [other sample extensions/templates](https://github.com/microsoft/vscode-webview-ui-toolkit-samples) demonstrating the toolkit in more complex scenarios or with different frontend frameworks and build tools.
Also, check out our component documentation and Visual Studio Code resources on how to build extensions.
- [Component Docs](./components.md)
- [Webview API Guide](https://code.visualstudio.com/api/extension-guides/webview)
- [Webview API Guidelines](https://code.visualstudio.com/api/references/extension-guidelines#webviews)
- [Webview UX Guidelines](https://code.visualstudio.com/api/ux-guidelines/webviews)
- [Extension API Docs](https://code.visualstudio.com/api)