# DuckDB Power Query Connector by MotherDuck
This is the Power Query Custom Connector for DuckDB. Use this to connect to a DuckDB database in memory, from a local file or on MotherDuck with Power BI and Excel.
1. [Installing](#installing)
2. [How to use with Power BI](#how-to-use-with-power-bi)
3. [Turning on UTF-8 support in the Language & Region settings](#turning-on-utf-8-support-in-the-language--region-settings)
4. [[Experimental] Power BI Service](#experimental-power-bi-service)
## Installing
1. Download the latest [DuckDB ODBC driver for Windows (x86_64/AMD64)](https://github.com/duckdb/duckdb-odbc/releases/latest/download/duckdb_odbc-windows-amd64.zip).
See [the releases page](https://github.com/duckdb/duckdb-odbc/releases) for other versions and architectures.
For more information about the Windows ODBC Driver, see the [DuckDB Docs page on DuckDB ODBC API on Windows](https://duckdb.org/docs/stable/clients/odbc/windows).
2. Extract the `.zip` archive. Run `odbc_install.exe` - if Windows displays a security warning, click "More information" then "Run Anyway".
3. Optionally, verify the installation in the Registry Editor:
- Open Registry Editor by running `regedit`
- Navigate to `HKEY_LOCAL_MACHINE\SOFTWARE\ODBC\ODBCINST.INI\DuckDB`
- Confirm the Driver field shows your installed version
- If incorrect, delete the `DuckDB` registry key and reinstall
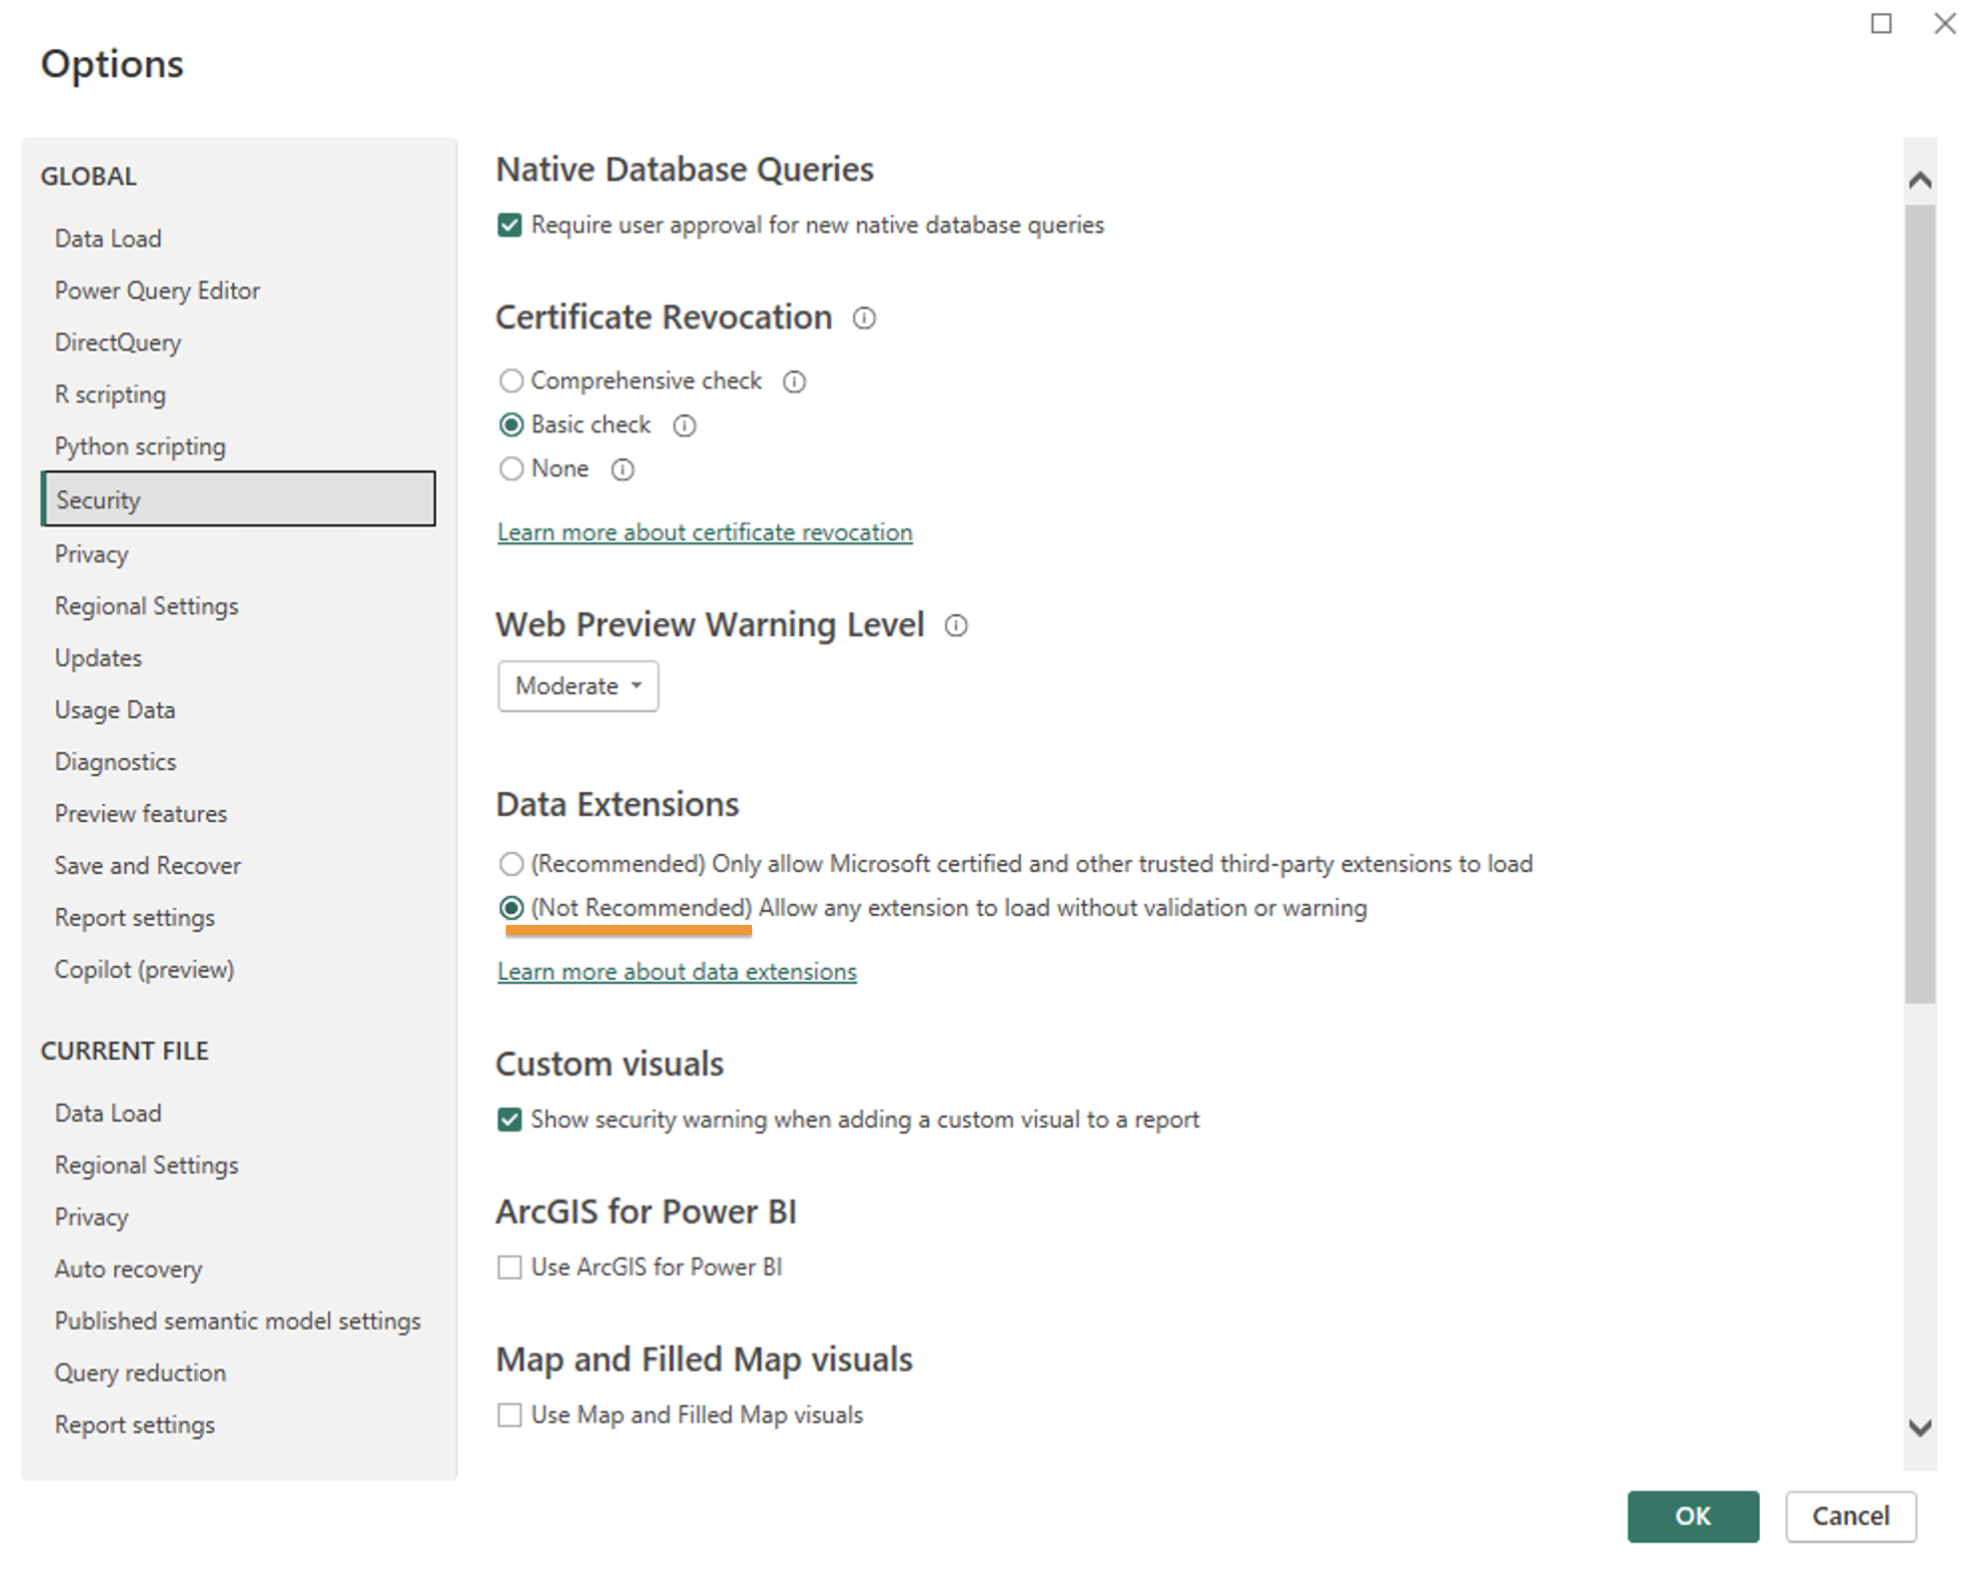
4. Configure Power BI security settings to allow loading of custom extensions:
- Go to File -> Options and settings -> Options -> Security -> Data Extensions
- Enable "Allow any extensions to load without validation or warning"
- 
5. Download the latest version of the DuckDB Power Query extension:
- [duckdb-power-query-connector.mez](https://github.com/motherduckdb/duckdb-power-query-connector/releases/latest/download/duckdb-power-query-connector.mez)
6. Create the Custom Connectors directory if it does not yet exist:
- Navigate to `[Documents]\Power BI Desktop\Custom Connectors`
- Create this folder, if it doesn't exist
- Note: If this location does not work you may need to place this in your OneDrive Documents folder instead
7. Copy the `duckdb-power-query-connector.mez` file into the Custom Connectors folder
8. Restart Power BI Desktop
## How to use with Power BI
1. In Power BI Desktop, click "Get Data" -> "More..."
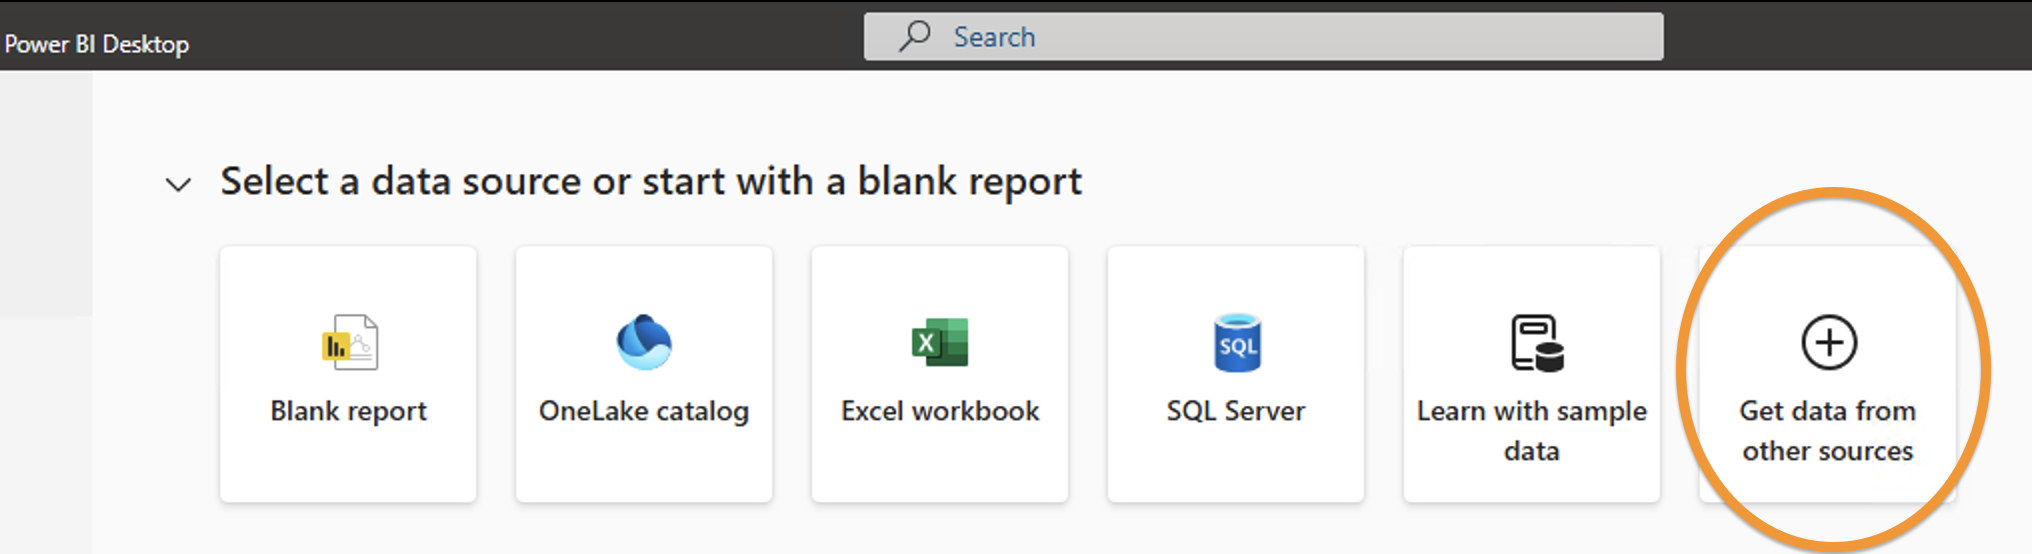
2. Search for "DuckDB" in the connector search box and select the DuckDB connector
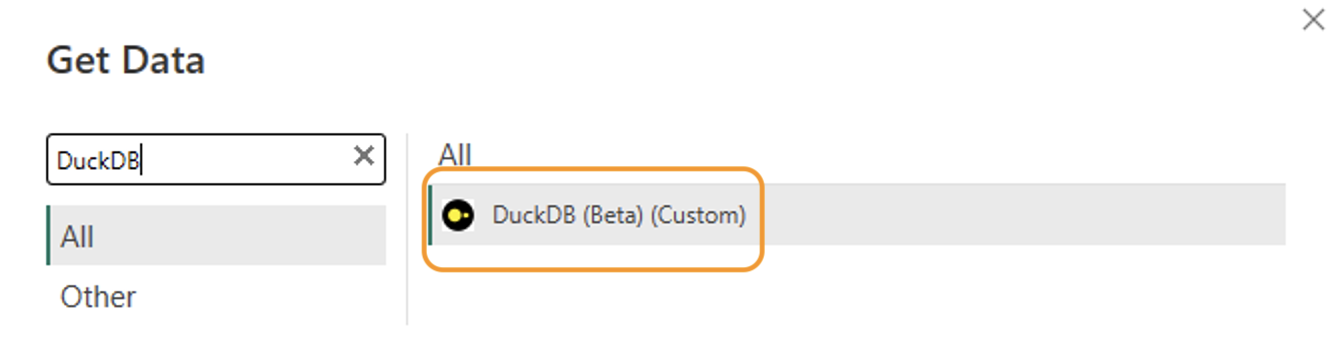
3. For MotherDuck connections, you'll need to provide:
- Database Location: Use the `md:` prefix followed by your database name (e.g., `md:my_database`). This can also be a local file path (e.g., `~\my_database.db`) or an in-memory database (`:memory:`).
- MotherDuck Token: Get your token from [MotherDuck's token page](https://motherduck.com/docs/key-tasks/authenticating-and-connecting-to-motherduck/authenticating-to-motherduck/#creating-an-access-token).
*For local DuckDB connections:* Enter "localtoken" to enable the connection.
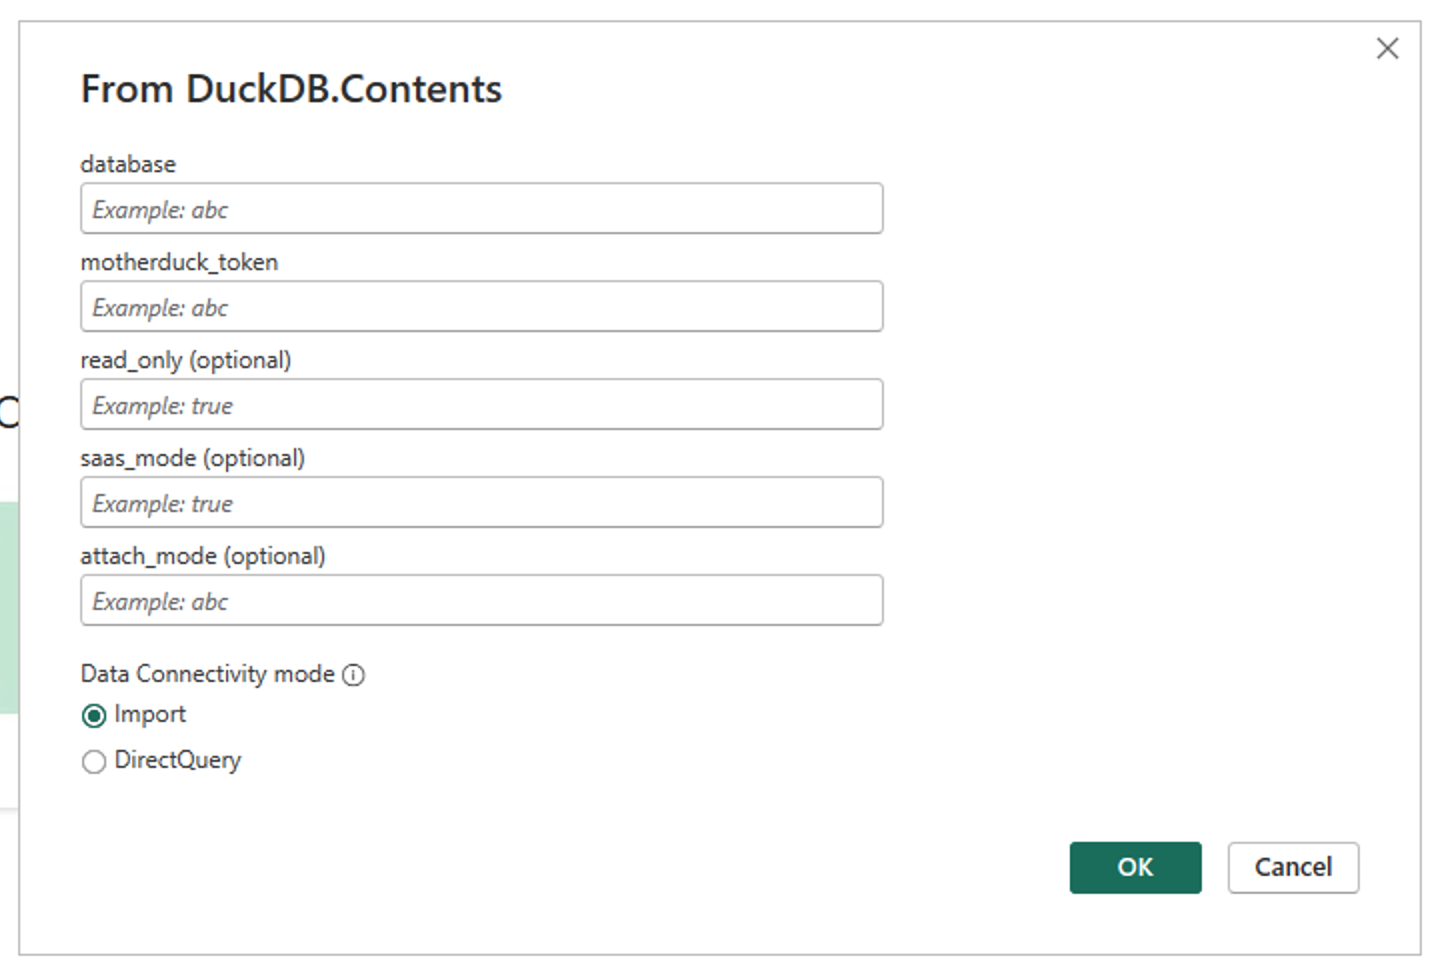
- Read Only (Optional): Set to `true` if you only need read access.
- Saas_mode (Optional): Set to `true` to disable [DuckDB extensions](https://motherduck.com/docs/concepts/duckdb-extensions).
- Attach_mode (Optional): Leave blank if you are connecting to a single database/
4. Click "OK".
5. Click "Connect".
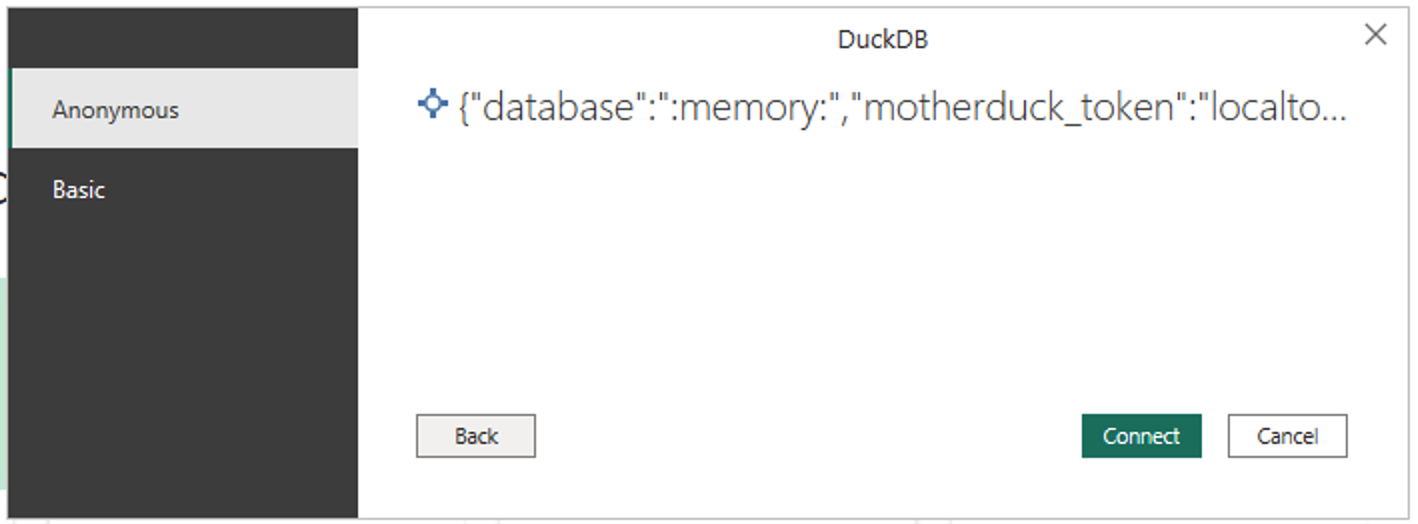
6. Select the table(s) you want to import. Click "Load".
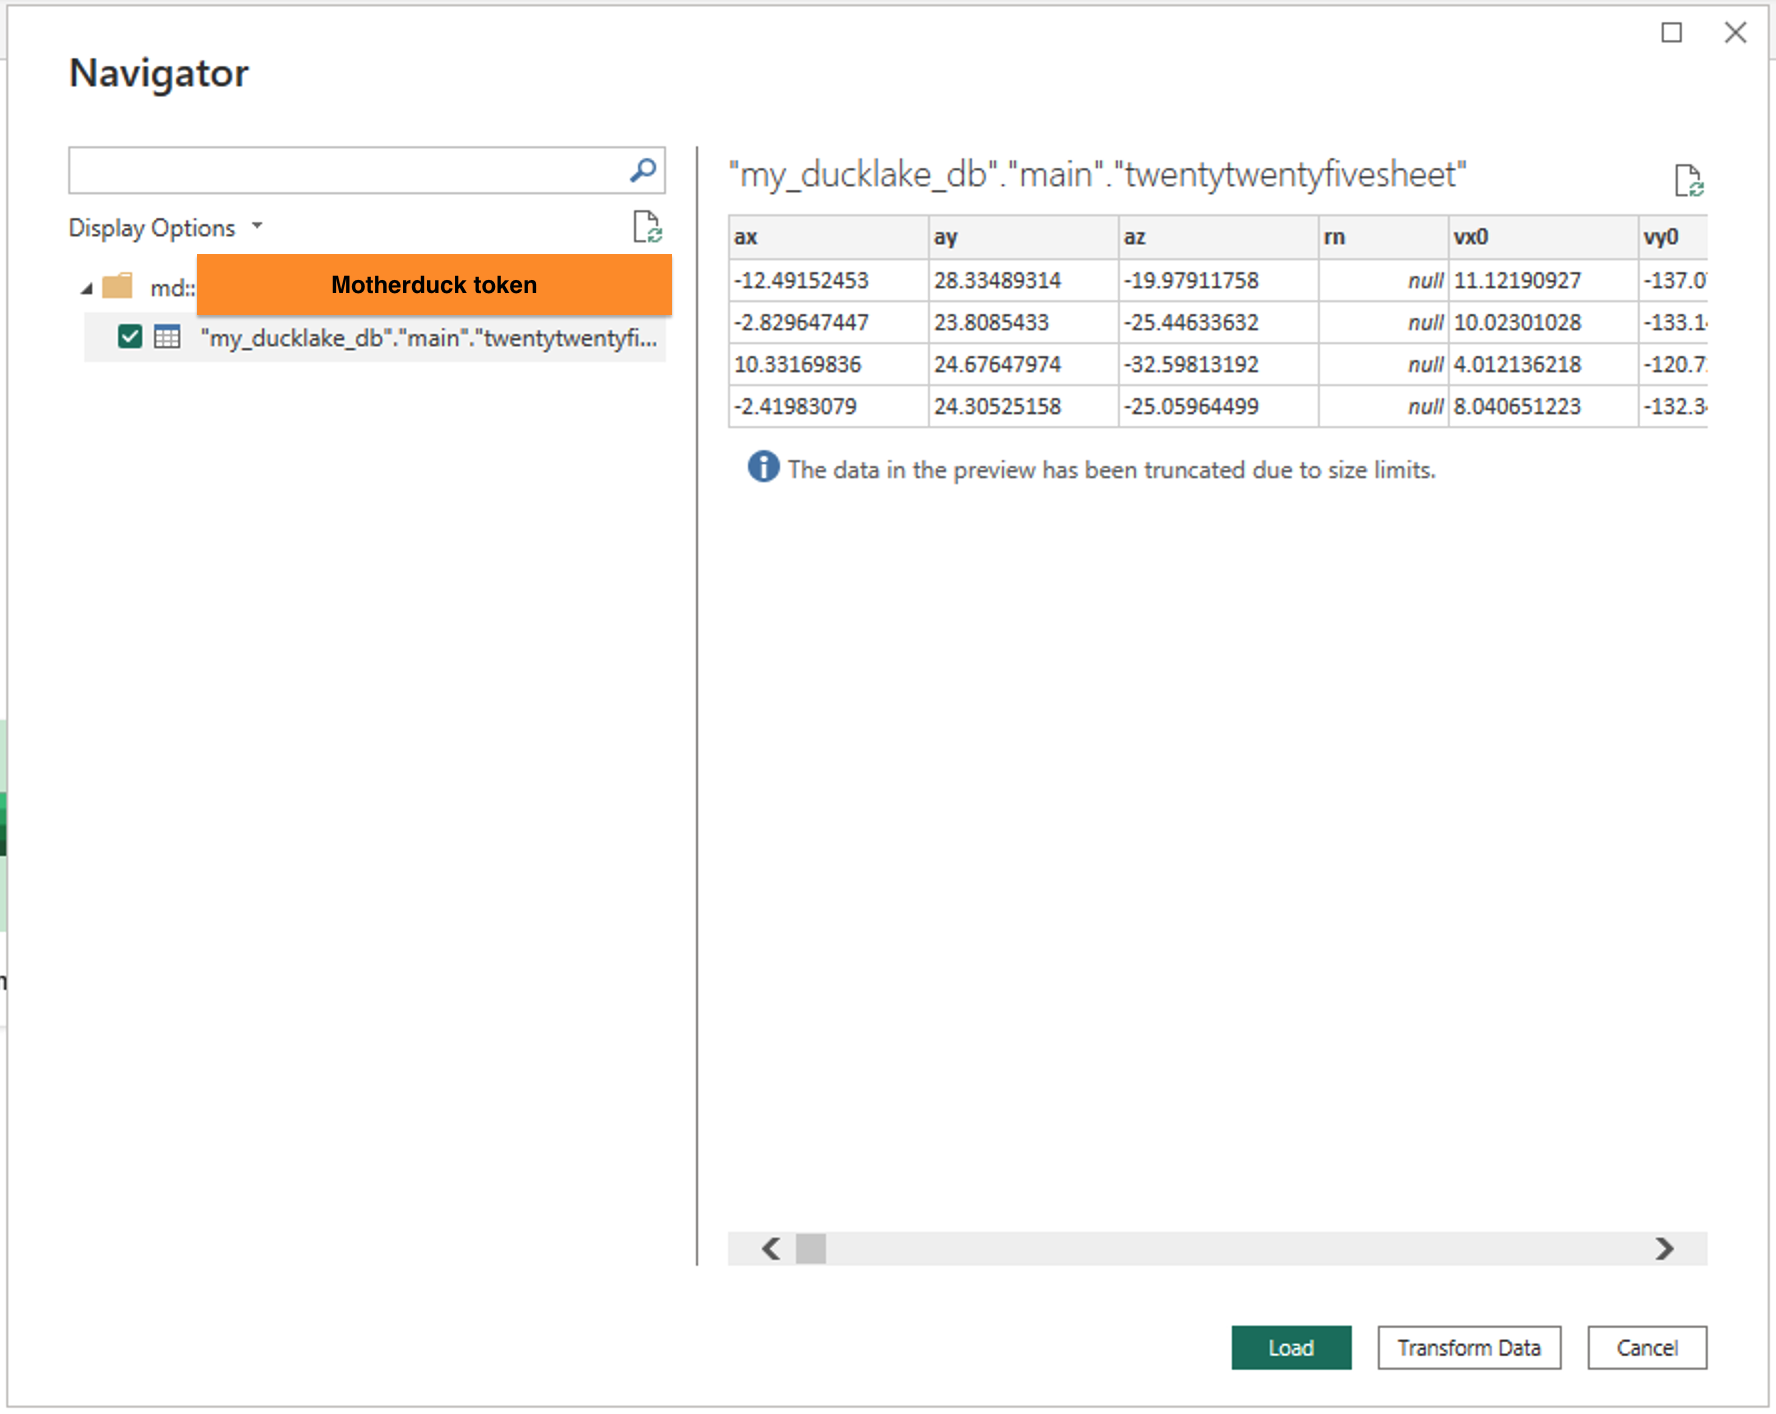
7. You can now query your data and create visualizations!
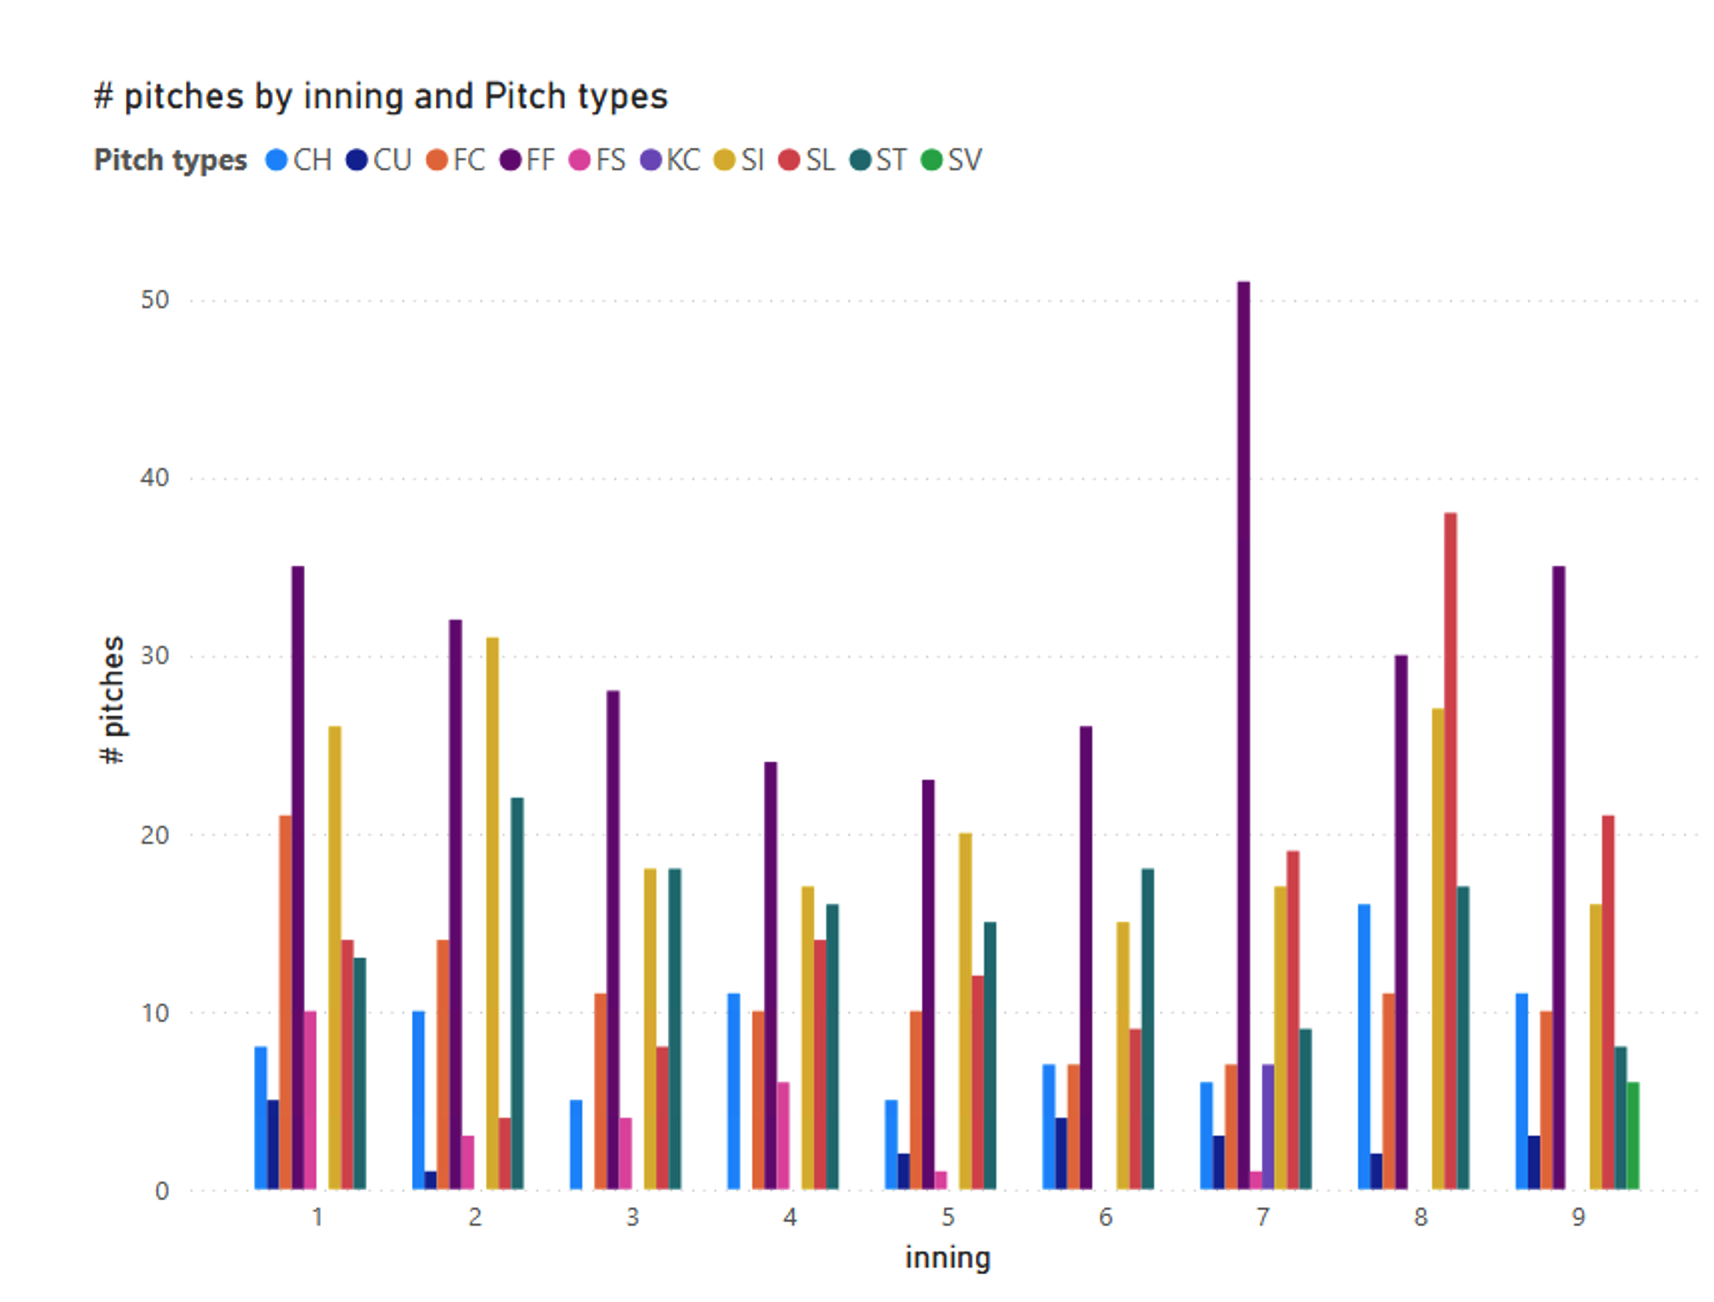
8. After connecting, you can:
- Browse and select tables from your MotherDuck or DuckDB database
- Use "Transform Data" to modify your queries before loading
- Write custom SQL queries using the "Advanced Editor"
- Import multiple tables in one go
9. Power BI will maintain the connection to your MotherDuck or DuckDB database, allowing you to:
- Refresh data automatically or on-demand
- Create relationships between tables
- Build visualizations and dashboards
- Share reports with other users (requires proper gateway setup)
## Turning on UTF-8 support in the Language & Region settings
> **Note**: With DuckDB >=1.3.2, you no longer need this workaround.
UTF-8 is currently not supported in the DuckDB ODBC driver. As a workaround, you can turn on UTF-8 decoding in Windows. Note that this may change behavior for other applications, so please use with caution.
1. Open start menu and type "Language settings". Open the "Language & region" settings
2. Click on "Administrative language settings"
3. Click on "Change system locale"
4. Check the "Beta: Use Unicode UTF-8 for worldwide language support" and click OK

5. This prompts Windows to restart.
6. Next, open Power BI, click on "Options and settings" -> "Options" -> "Data Load" and click the "Clear cache" button.
Now, you should be able to load your UTF-8 encoded database with Power BI directly:
 ## Building and releasing
CI builds the `.mez` on every PR and push to `main` (see `.github/workflows/build.yaml`).
The build just runs `msbuild DuckDB.proj` on a `windows-2025` runner — the project's
`BuildMez` target zips the connector sources into `duckdb-power-query-connector.mez`,
uploaded as the `duckdb-power-query-connector` workflow artifact. To build locally on
Windows: `msbuild DuckDB.proj` and grab `bin\AnyCPU\Debug\DuckDB.mez`.
A `smoke-test` job then installs the DuckDB ODBC driver and the Power Query SDK
`PQTest` harness on the runner and runs `test/smoke.query.pq` against the built `.mez`,
so a PR fails if the connector can't actually open a connection and run a query.
Releases are **not** cut automatically on a tag. Instead:
1. Create the release manually in GitHub (new tag on a `main` commit that has a green
build, plus your release notes) and publish it.
2. Publishing fires `.github/workflows/add_release_assets.yaml`, which downloads the
`.mez` built for that commit and attaches it to the release.
The `releases/latest/download/duckdb-power-query-connector.mez` link above always
resolves to the most recent release's attached artifact.
## [Experimental] Power BI Service
To use the [Power BI Service](https://app.powerbi.com/) with DuckDB, you can use the [On-Premises Data Gateway](https://learn.microsoft.com/en-us/power-bi/connect-data/service-gateway-onprem) application.
Note that data will only be available when the gateway is on and connected to the internet.
This will enable features like automated refresh, and let you share your PowerBI dashboards online.
1. Follow these instructions to install the on-premises data gateway: [Download and install a standard gateway](https://learn.microsoft.com/en-us/data-integration/gateway/service-gateway-install#download-and-install-a-standard-gateway).
2. Open Services, and find the On-premises data gateway service. Double click to open the Properties dialog.
## Building and releasing
CI builds the `.mez` on every PR and push to `main` (see `.github/workflows/build.yaml`).
The build just runs `msbuild DuckDB.proj` on a `windows-2025` runner — the project's
`BuildMez` target zips the connector sources into `duckdb-power-query-connector.mez`,
uploaded as the `duckdb-power-query-connector` workflow artifact. To build locally on
Windows: `msbuild DuckDB.proj` and grab `bin\AnyCPU\Debug\DuckDB.mez`.
A `smoke-test` job then installs the DuckDB ODBC driver and the Power Query SDK
`PQTest` harness on the runner and runs `test/smoke.query.pq` against the built `.mez`,
so a PR fails if the connector can't actually open a connection and run a query.
Releases are **not** cut automatically on a tag. Instead:
1. Create the release manually in GitHub (new tag on a `main` commit that has a green
build, plus your release notes) and publish it.
2. Publishing fires `.github/workflows/add_release_assets.yaml`, which downloads the
`.mez` built for that commit and attaches it to the release.
The `releases/latest/download/duckdb-power-query-connector.mez` link above always
resolves to the most recent release's attached artifact.
## [Experimental] Power BI Service
To use the [Power BI Service](https://app.powerbi.com/) with DuckDB, you can use the [On-Premises Data Gateway](https://learn.microsoft.com/en-us/power-bi/connect-data/service-gateway-onprem) application.
Note that data will only be available when the gateway is on and connected to the internet.
This will enable features like automated refresh, and let you share your PowerBI dashboards online.
1. Follow these instructions to install the on-premises data gateway: [Download and install a standard gateway](https://learn.microsoft.com/en-us/data-integration/gateway/service-gateway-install#download-and-install-a-standard-gateway).
2. Open Services, and find the On-premises data gateway service. Double click to open the Properties dialog.
 Go to the "Log On" tab and click "Local System Account" and check "Allow service to interact with Desktop".
 3. Click on "Restart" to restart the service. Open the "Connectors" tab and wait until "DuckDB" shows up in Custom Connectors. If it does not, please follow the Custom Connector installation instructions above.
 4. Go to [Power BI Service](https://app.powerbi.com/) and click on the "Settings" icon in the top right. Navigate to the "Manage connections and gateways" page.
 5. Click on the dots menu next to the gateway you configured in step 1. and click on "Settings"
 6. Click the "Allow user's cloud data sources to refresh through this gateway cluster" and "Allow user's custom data connectors to refresh through this gateway cluster."
 7. On the "Manage connections and gateways" page, click on the "Connections" tab and click "+ New"
 8. Enter your connection details. You can enter any local file name here, or use MotherDuck. If you do, make sure to enter a valid [MotherDuck token](https://app.motherduck.com/token-request?appName=powerbi).
> From version 0.1.7, the `motherduck_token` is a required parameter, in order to enable usage with Power BI Service. If you are using DuckDB, enter `localtoken` into the MotherDuck token field.
> If you are using MotherDuck, make sure that the MotherDuck extension is installed under `C:\WINDOWS\system32\config\systemprofile\.duckdb\extensions\`. To do so, you can download the [DuckDB CLI client for Windows](https://duckdb.org/install/), and run `INSTALL motherduck`. Then, you can copy over the extension files via PowerShell:
```
cp -R '~\.duckdb\extensions\v1.2.0\' "C:\WINDOWS\system32\config\systemprofile\.duckdb\extensions\"
```
> Optionally, you can override the `motherduck_token` field by setting a Username and Password using Basic Authentication. This is useful if you need to replace the token, but don't want to recreate the connection. You can set the Username to any value and the Password to the token value.
Enable the "Skip test connection" check box.
8. Enter your connection details. You can enter any local file name here, or use MotherDuck. If you do, make sure to enter a valid [MotherDuck token](https://app.motherduck.com/token-request?appName=powerbi).
> From version 0.1.7, the `motherduck_token` is a required parameter, in order to enable usage with Power BI Service. If you are using DuckDB, enter `localtoken` into the MotherDuck token field.
> If you are using MotherDuck, make sure that the MotherDuck extension is installed under `C:\WINDOWS\system32\config\systemprofile\.duckdb\extensions\`. To do so, you can download the [DuckDB CLI client for Windows](https://duckdb.org/install/), and run `INSTALL motherduck`. Then, you can copy over the extension files via PowerShell:
```
cp -R '~\.duckdb\extensions\v1.2.0\' "C:\WINDOWS\system32\config\systemprofile\.duckdb\extensions\"
```
> Optionally, you can override the `motherduck_token` field by setting a Username and Password using Basic Authentication. This is useful if you need to replace the token, but don't want to recreate the connection. You can set the Username to any value and the Password to the token value.
Enable the "Skip test connection" check box.
 Click "Create".
 9. Now you can create a Power BI report and publish it to Power BI Service.
On your report, click "Publish".
9. Now you can create a Power BI report and publish it to Power BI Service.
On your report, click "Publish".
 10. Done! Now you can click on the URL in the Publishing to Power BI dialog to access the online report.
