---
title: n8n Form Trigger node documentation
description: >-
Learn how to use the n8n Form Trigger node in n8n. Follow technical
documentation to integrate n8n Form Trigger node into your workflows.
contentType:
- integration
- reference
priority: critical
nodeTitle: n8n Form Trigger node documentation
originalFilePath: integrations/builtin/core-nodes/n8n-nodes-base.formtrigger.md
originalUrl: 'https://docs.n8n.io/integrations/builtin/core-nodes/n8n-nodes-base.formtrigger'
url: 'https://docs.n8n.io/integrations/builtin/core-nodes/n8n-nodes-base.formtrigger'
layout:
description:
visible: false
---
# n8n Form Trigger node
Use the n8n Form trigger to start a workflow when a user submits a form, taking the input data from the form. The node generates the form web page for you to use.
You can add more pages to continue the form with the [n8n Form](n8n-nodes-base.form.md) node.
## Build and test workflows
While building or testing a workflow, use the **Test URL**. Using a test URL ensures that you can view the incoming data in the editor UI, which is useful for debugging.
There are two ways to test:
- Select **Execute Step**. n8n opens the form. When you submit the form, n8n runs the node, but not the rest of the workflow.
- Select **Execute Workflow**. n8n opens the form. When you submit the form, n8n runs the workflow.
## Production workflows
When your workflow is ready, switch to using the **Production URL**. You can then publish your workflow, and n8n runs it automatically when a user submits the form.
When working with a production URL, ensure that you have saved and published the workflow. Data flowing through the Form trigger isn't visible in the editor UI with the production URL.
## Set default selections with query parameters
You can set the initial values for fields by using [query parameters](https://en.wikipedia.org/wiki/Query_string#Web_forms) with the initial URL provided by the n8n Form Trigger. Every [page in the form](n8n-nodes-base.form.md) receives the same query parameters sent to the n8n Form Trigger URL.
{% hint style="info" %}
**Only for production**
Query parameters are only available when using the form in production mode. n8n won't populate field values from query parameters in testing mode.
{% endhint %}
When using query parameters, [percent-encode](https://en.wikipedia.org/wiki/Percent-encoding) any field names or values that use special characters. This ensures n8n uses the initial values for the given fields. You can use tools like [URL Encode/Decode](https://www.url-encode-decode.com/) to format your query parameters using percent-encoding.
As an example, imagine you have a form with the following properties:
* Production URL: `https://my-account.n8n.cloud/form/my-form`
* Fields:
* `name`: `Jane Doe`
* `email`: `jane.doe@example.com`
With query parameters and percent-encoding, you could use the following URL to set initial field values to the data above:
```
https://my-account.n8n.cloud/form/my-form?email=jane.doe%40example.com&name=Jane%20Doe
```
Here, percent-encoding replaces the at-symbol (`@`) with the string `%40` and the space character (` `) with the string `%20`. This will set the initial value for these fields no matter which page of the form they appear on.
## Node parameters
These are the main node configuration fields:
### Authentication
- **Basic Auth**
- **n8n User Auth**
- **None**
#### Using basic auth
To configure this credential, you'll need:
- The **Username** you use to access the app or service your HTTP Request is targeting.
- The **Password** that goes with that username.
#### Using n8n User Auth
Only users logged in to this n8n instance can view or submit the form.
* Unauthenticated visitors loading the form are redirected to the n8n sign-in page.
* Unauthenticated form submissions receive a 401 response.
* By default, n8n adds the submitting user's ID, email, first name, and last name to the output data. Turn off **Include User in Output** in [Node options](#node-options) to exclude this.
When you select **n8n User Auth**, a **Require Workflow Execute Permission** toggle appears. Turn it on to require that the triggering user also has permission to execute the workflow in the project it belongs to. Users who are logged in but lack execute permission on the workflow can't submit the form. This is useful with [end-user credentials](https://app.gitbook.com/s/wMJrGrimpx3PxCJpUswm/manage-credentials/end-user-credentials), where each user runs the workflow with their own connected account.
### Form URLs
The Form Trigger node has two URLs: **Test URL** and **Production URL**. n8n displays the URLs at the top of the node panel. Select **Test URL** or **Production URL** to toggle which URL n8n displays.
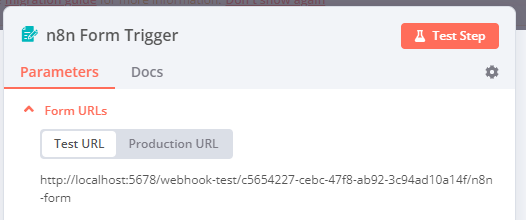
- **Test URL**: n8n registers a test webhook when you select **Execute Step** or **Execute Workflow**, if the workflow isn't active. When you call the URL, n8n displays the data in the workflow.
- **Production URL**: n8n registers a production webhook when you publish the workflow. When using the production URL, n8n doesn't display the data in the workflow. You can still view workflow data for a production execution. Select the **Executions** tab in the workflow, then select the workflow execution you want to view.
### Form Path
Set a custom slug for the form.
{% hint style="info" %}
**Feature availability**
**Form Path** is a main parameter in node version 2.1 and earlier. From node version 2.2, it's optional and you set it in [Node options](#node-options).
If you create or update the workflow using the API or by editing its JSON, set the slug in `parameters.options.path`. On node version 2.2 and later, n8n ignores a top-level `parameters.path` when it loads the workflow. The form URL then ends in the webhook ID instead.
{% endhint %}
### Form Title
Enter the title for your form. n8n displays the **Form Title** as the webpage title and main `h1` title on the form.
### Form Description
Enter the description for your form. n8n displays the **Form Description** as a subtitle below the main `h1` title on the form. Use `\n` or `
` to add a line break.
For information on allowed and restricted HTML tags, see [HTML security and allowed tags](#html-security-and-allowed-tags).
### Form Elements
Create the question fields for your form. Select **Add Form Element** to add a new field.
Every field has the following settings:
- **Field Label**: Enter the label that appears above the input field on the rendered form.
- **Field Name**: This name is used in the output of the Form Trigger node. Use it to reference a form field in downstream nodes.
- **Element Type**: Choose from **Checkboxes**, **Custom HTML**, **Date**, **Dropdown**, **Email**, **File**, **Hidden Field**, **Number**, **Password**, **Radio Buttons**, **Text**, or **Textarea**.
- Select **Checkboxes** to include checkbox elements in the form. By default, there is no limit on how many checkboxes a form user can select. You can set the limit by specifying a value for the **Limit Selection** option as **Exact Number**, **Range**, or **Unlimited**.
- Select **Custom HTML** to insert arbitrary HTML.
- You can include elements like links, images, video, and more. You can't include `