***English** | [Français](README.fr.md)*
# blink2video
**Manage your Blink cameras from a computer, and keep what they record.**
Blink is built for the phone: one clip at a time, no archive, no desktop
counterpart. Recordings live on a USB stick in a Sync Module 2 or a microSD card
in a Sync Module XR, erased as it fills up, or in the subscription cloud, which
keeps them for a few weeks.
blink2video is the missing side. A local interface to watch cameras live and arm
detection. And what the phone cannot do at all: fetch clips before rotation
erases them, burn the time into the picture,
and assemble them into one video per day, per week and per month.
Everything runs on your machine. Nothing is sent anywhere.
The web interface listens on `127.0.0.1` only: nothing else on your local
network can reach it, just this machine. It has no login of its own beyond
the Blink account session, so anyone with access to this machine can open it.
## Video walkthrough
[](https://www.youtube.com/watch?v=6rNqLI9K8Tc)
**[Watch the English walkthrough on YouTube](https://www.youtube.com/watch?v=6rNqLI9K8Tc)**:
3 min 10 s, with captions and no voice-over. See why blink2video exists,
explore live view and archives, then follow Windows installation, first launch
and the main settings.
[Version française](https://www.youtube.com/watch?v=V2E4m_SLgb4).
## Features
- Live view of any camera in the browser, arming the system or a single camera.
- Camera audio in Live View and recordings (Settings → Video), starting muted
with page-scoped listen controls.
- Live view recording on demand, one click while watching: saved to its own
archive, browsable and filterable exactly like detection clips (discard,
delete, camera and period filter).
- On-demand camera snapshot, one click from the Live tile or triggered
remotely through a webhook URL (home automation, a smart button): saved
under Pictures, browsable and deletable from the page.
- Optional outbound webhook (Settings): a plain HTTP POST with the camera
name and file path, sent once a clip or picture has actually finished
writing, for any home-automation tool that already accepts one.
- Incremental download of motion-detection clips from the module's local storage
(Sync Module 2 USB stick or Sync Module XR microSD card)
and from the subscription cloud, never fetching the same recording twice.
Download history is also kept beside `Blink_Clips`, so deleting that folder
does not download old recordings again or announce them as new.
- Camera state at a glance: battery, temperature, signal, model and firmware
for each camera.
- Date and time burned into the picture, so any player keeps it. Size,
color, background opacity and 24h or 12h (AM/PM) clock all configurable.
- One video per day, per ISO week and per month, for each camera.
- Uninteresting clips discarded in one click, moved aside rather than deleted,
and never downloaded again.
- Continuous monitoring and alerts: camera offline, low battery, detection
switched off, or nothing recorded for two days. Alerts to acknowledge,
per-camera muting.
- French and English throughout: web interface, notifications, and every
command's own console output. Detected from your browser, switchable from
the page.
- Standalone bundle for Windows, Linux and macOS, ffmpeg included.
## Screenshots
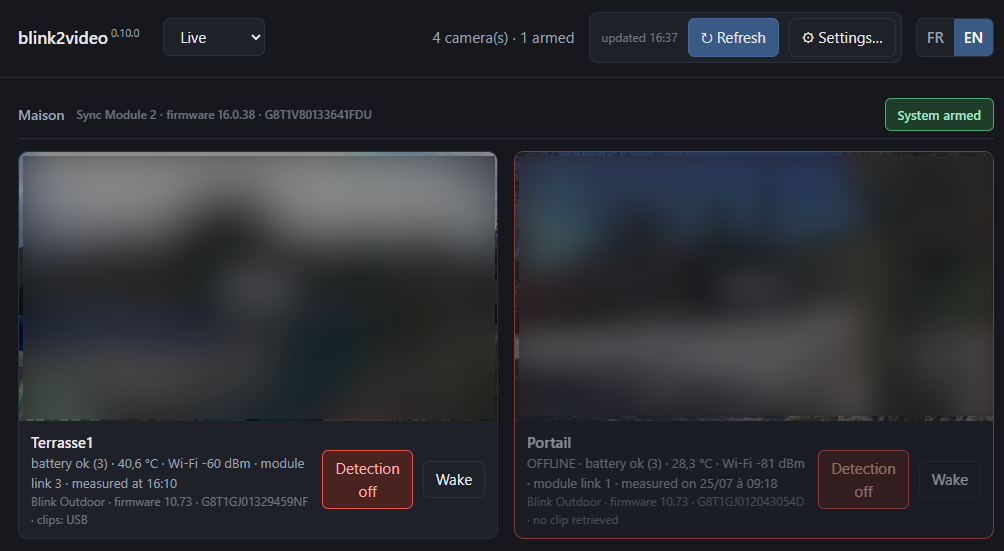
Live view: one tile per camera, its latest thumbnail, arming for the system and
for each camera, battery, temperature, signal and the time of the reading. An
offline camera keeps reporting its last known values, and the interface says how
old they are.
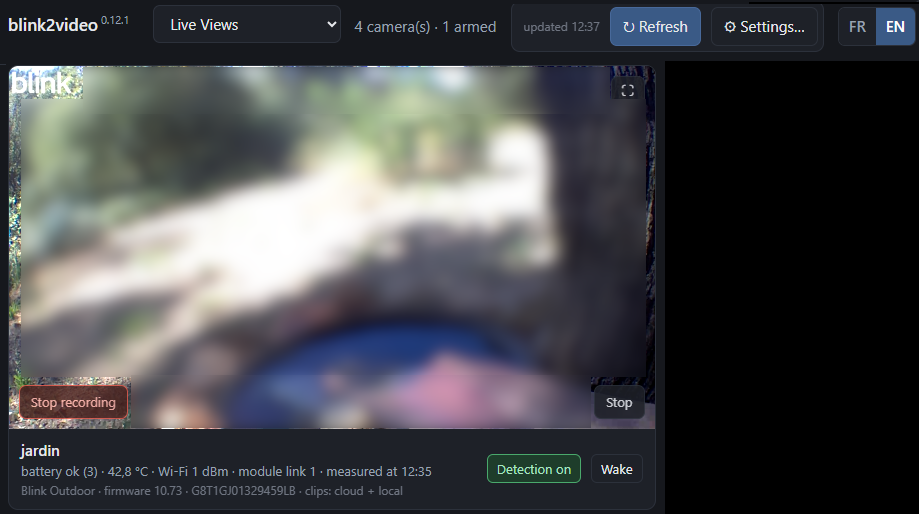
The Record button, mid-recording ("Stop recording", in red): one click to start
saving the current stream to `Blink_Direct`, one to stop. Recordings appear
under Live Recordings, browsable and filterable exactly like detection clips.
To include camera audio in live listening and recordings, enable
**Settings → Video → Include camera audio in Live View and recordings**.
This is off by default and applies to new sessions. Audio-enabled sessions
use compatible MSE mode, which can take longer to start. Use **Listen/Mute**
in Live View or the saved video's volume controls. If the primary channel
stays silent, try **Alternate** in Settings. A missing audio track still
produces playable video.
Playback starts muted. Unmuting a video shares that choice and volume with
other videos on the same page, including players recreated while scrolling.
Changing views, gallery pages or filters, or reloading the page, resets playback
to muted. Playback mute does not change the audio saved in a recording.
Previously saved silent recordings remain silent.
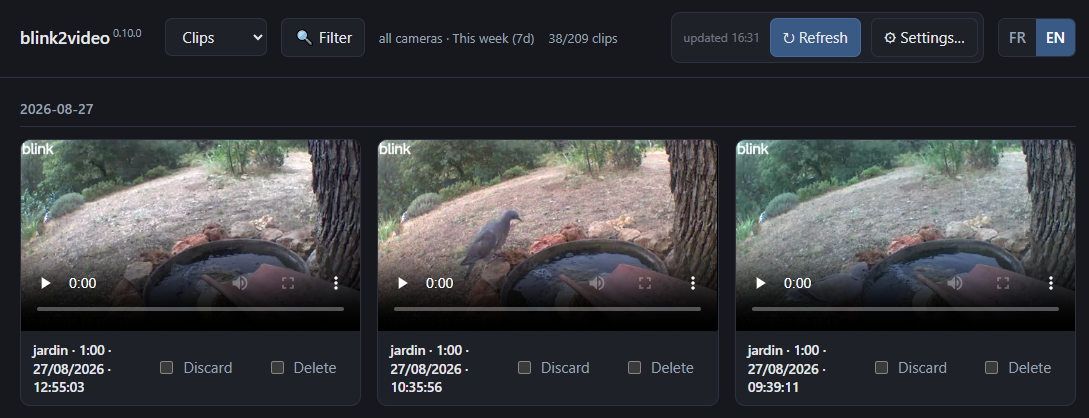
Clips newest first. Each card gives the camera, the duration, the date and
the model, and the "Écarter" button removes the clip from every assembled
video.
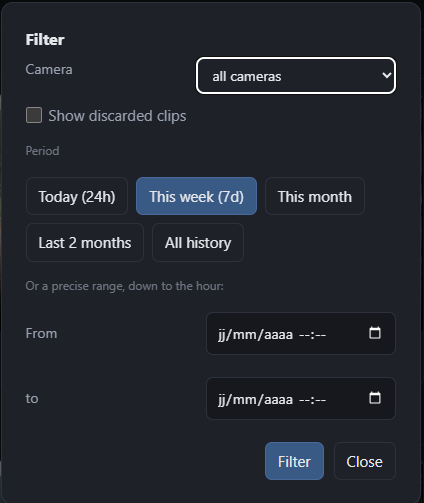
One Filter button covers camera and time period together: quick presets
(today, this week, this month, last 2 months, or full history) or a precise
custom range down to the hour, to find a specific incident without endless
scrolling through an always-armed camera's history. The active filter stays
remembered between visits.
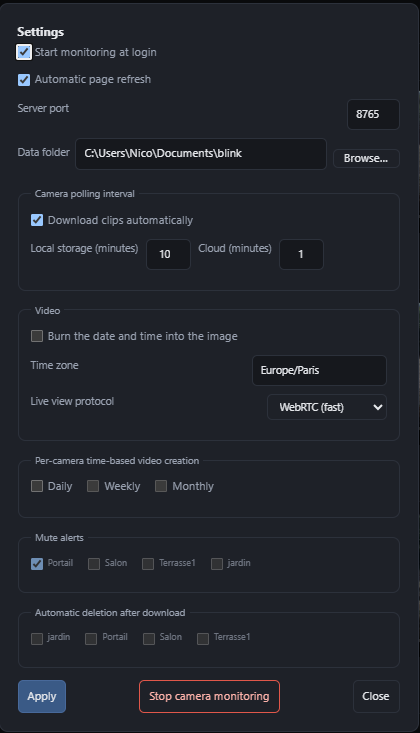
Settings, behind the gear icon: automatic startup with the session, automatic
page refresh, server port, videos folder with a native folder picker, and local
storage and cloud polling cadence. Also timestamp burned into the picture
with its size, color, background opacity and 24h/12h clock, time zone, the live view
protocol (WebRTC or MSE), daily/weekly/monthly archiving toggled
independently per period, per-camera alert muting,
automatic deletion after download per camera, and a button to stop the
whole thing without touching the command line.
## Getting started
**1. Install.** Download the archive for your system from the
[latest release](https://github.com/nico579/blink2video/releases/latest) and
unpack it. ffmpeg travels inside the bundle; nothing is installed system-wide.
| System | Archive | First run |
|---|---|---|
| Windows 10/11, x86-64 | `blink2video-windows-x86_64.zip` | `blink2video.exe` from a terminal |
| Linux x86-64, glibc 2.35+ (Ubuntu 22.04+, Debian 12+) | `blink2video-linux-x86_64.tar.gz` | `chmod +x blink2video`, then `./blink2video` |
| macOS 12+, Apple Silicon | `blink2video-macos-arm64.zip` | `xattr -dr com.apple.quarantine blink2video`, then `./blink2video` |
The archives embed WebRTC, the default live view protocol. On macOS the WebRTC
libraries need macOS 14 or later: on macOS 12 and 13 blink2video starts
normally and the live view falls back to MSE.
Windows 7 SP1 x64 has a [separate legacy build](WINDOWS7.en.md), published
alongside every [release](https://github.com/nico579/blink2video/releases/latest).
For native WebRTC, use Supermium 144 R5 or Thorium Legacy 122, both tested
on real cameras; keep MSE with Firefox ESR 115. See the
[tested browser matrix](WINDOWS7.en.md#which-browser-should-i-use-for-webrtc).
**2. Run it.** Double-click the executable (or `./blink2video` from a terminal).
No arguments needed: with no valid session yet, a browser tab opens by itself on
a sign-in page: your address, your password, then the code Blink sends. Only a
session token is kept, never the password. On the very first run, the Settings
panel then opens automatically. Check the videos folder and time zone in
particular, then click “Apply”: no clip is downloaded before that confirmation.
Monitoring, clip downloading and video assembly then start at their own pace,
and clips appear as they come in. This first-run flow is not repeated when the
videos folder is changed.
If the tab didn't open, or you closed it, `blink2video open` brings it back.
A tray icon also appears when `start` runs (Windows/macOS; Linux depends on
your desktop's tray support), with Open/Restart/Stop, no terminal needed.
**3. Settings.** The gear icon, top right, opens a panel: start automatically
when you log in, refresh the page on its own as clips arrive, how often local
storage and cloud are checked, and a button to stop everything. `blink2video autostart on`
and `blink2video stop` do the same from a terminal, if you'd rather.
From source, with Python 3.11 or newer
```bash
git clone https://github.com/nico579/blink2video
cd blink2video
python blink2video.py login
```
The first run creates an isolated environment in `~/.blink2video/venv` and
restarts there. `blink2video smoketest` then checks that everything works on your
machine.
The published binary is neither signed nor notarized: on macOS, Gatekeeper
refuses the first run of an archive downloaded through a browser, hence the
`xattr` in the table. Right-click then "Open" does the same. If you see
"Apple could not verify [...] is free of malware", that's this check, not an
actual malware detection: it just means no $99/year Apple developer account
signed the binary.
With Docker
```bash
git clone https://github.com/nico579/blink2video
cd blink2video
docker compose up -d
```
Or, without cloning, using the image published on
[Docker Hub](https://hub.docker.com/r/nico579dock/blink2video):
```bash
docker run -d --name blink2video --restart unless-stopped \
-p 127.0.0.1:8765:8765 -e BLINK_TRUSTED_LOOPBACK_PROXY=1 \
-v blink_data:/data nico579dock/blink2video
```
Open `http://127.0.0.1:8765` and sign in the same way. Settings, the session
and clips persist in a named volume (`blink_data`), separate from the image,
so rebuilding the image never loses anything.
The bundled `docker-compose.yml` publishes the port to `127.0.0.1` only,
matching the binary's own default: there is no login on the dashboard itself,
so nothing beyond this machine can reach it unless you deliberately widen the
port mapping yourself.
Reaching it remotely (reverse proxy)
Because the dashboard has no login, the server only accepts requests whose
`Host` header is `127.0.0.1`, `localhost` or `::1`, on top of requiring the
connection itself to come from this machine (a check `BLINK_TRUSTED_LOOPBACK_PROXY=1`
relaxes for the Docker bridge above, see its comment in `docker-compose.yml`).
A reverse proxy on the same machine satisfies the second part automatically,
but by default it forwards the `Host` your browser sent (its own public name
or LAN address), not `127.0.0.1`, and still gets refused with a 403 until
it's told to rewrite it. A plain TCP/L4 proxy (`socat`, a router's port
forwarding) can't do that rewriting at all, it never gets to see HTTP
headers, so it cannot reach this server no matter how it's configured; the
fix always needs an HTTP-aware reverse proxy.
The browser also sends an `Origin` header on anything beyond a plain page
load (saving a setting, stopping the monitoring, muting an alert...), and
the server checks that one too, the same way. A proxy that only rewrites
`Host` leaves `Origin` at the address the browser actually used, so the page
itself loads fine but every one of those actions still gets refused. Both
headers need rewriting.
Caddy:
```
your.domain.example {
reverse_proxy 127.0.0.1:8765 {
header_up Host 127.0.0.1
header_up -Origin
}
}
```
nginx:
```
location / {
proxy_pass http://127.0.0.1:8765;
proxy_set_header Host 127.0.0.1;
proxy_set_header Origin "";
}
```
Put your own authentication (basic auth, a client certificate, an access
list) in front of either, the proxy is what's reachable from the network,
blink2video itself still has none.
With a mesh VPN (Tailscale, WireGuard) instead of a public domain, the same
rewrite still applies, the check only ever looks at the `Host` header, never
at how the connection got there:
```
http://100.x.y.z:9765 {
reverse_proxy 127.0.0.1:8765 {
header_up Host 127.0.0.1
header_up -Origin
}
}
```
(`100.x.y.z` is this machine's Tailscale address, from `tailscale ip`; the
explicit `http://` keeps Caddy from provisioning a certificate nobody asked
for.) No separate authentication needed in this case: only your own devices
on that network can reach the address at all.
That also means the rewrite above isn't needed at all on a mesh VPN: bind
blink2video directly to the tunnel address with `BLINK_BIND`, then set that
same address as the "Trusted host" in Settings, or pass it once with
`--trusted-host 100.x.y.z` (saved from then on, like any other setting).
blink2video then accepts requests addressed to it directly, no proxy in
between. Only ever trust that one specific address, and keep `BLINK_BIND`
on it too, never `0.0.0.0`, which would accept the same `Host` from the LAN
as well and defeat the point.
Trusted host also accepts a whole subnet in CIDR notation, e.g.
`192.168.1.0/24`, for a client without a fixed address (a Windows machine on
DHCP, say) rather than one specific VPN peer. This is a different, wider
guarantee: any device already on that subnet gets the same unauthenticated
access, not just the one machine a VPN tunnel would let through. Reasonable
on a trusted home LAN, never on anything you don't fully control.
An exact trusted host (an IPv4 address or hostname, not a CIDR subnet) also
allows embedding the page in an `