English | 简体中文 | Deutsch | Français | Español | 한국어
## DISCLAIMERS 1. **Safety:** Driving policies are not perfect and may crash the robot. Always make sure you operate in a safe environment! Keep in mind, that your phone could be damaged in a collision! Make sure you always have a game controller connected and are familiar with the key mapping so you can stop the vehicle at any time. Use at your own risk! 2. **Compute hardware:** Training a driving policy requires a lot of resources and may slow down or even freeze your machine. It is recommended to use a high-end laptop or workstation with large amount of RAM and dedicated GPU, especially when training with larger batch sizes. The documentation is currently also not very detailed. Use at your own risk! 3. **Patience required:** To get a good driving policy for your custom dataset will require some patience. It is not straight-forward, involves data collection, hyperparameter tuning, etc. If you have never trained machine learning models before, it will be challenging and may even get frustrating. You first need to setup your training environment. ## Dependencies We recommend to create a conda environment for OpenBot. Instructions on installing conda can be found [here](https://docs.conda.io/projects/conda/en/latest/user-guide/install/). The easiest way to create a new environment with all dependencies is to use one of the provided environment files. On Windows, you will also need to install [Microsoft C++ Build Tools](https://visualstudio.microsoft.com/visual-cpp-build-tools/). Make sure you are in the folder `policy` within your local OpenBot repository. Based on your operating system, run the corresponding command: - **MacOS**: `conda env create -f environment_mac.yml` - **Windows**: `conda env create -f environment_win.yml` - **Linux**: `conda env create -f environment_linux.yml` For GPU support, make sure you also have the appropriate drivers installed. On Mac and Windows, everything should work out of the box. On Linux, you can install the drivers with the following command: ``` sudo apt-get install nvidia-driver-510 ``` On Linux, you will probably also need to run the following to add cuda and cudnn to your path: ``` echo 'export LD_LIBRARY_PATH=$LD_LIBRARY_PATH:$CONDA_PREFIX/lib/' >> ~/.bashrc source ~/.bashrc ``` Done! You are ready to train your own models. If this doesn't work for you, below are instructions for setting up such an environment manually. ### Manual environment setup First create a new conda environment with the following command: ```bash conda create -n openbot pip python=3.9 -y ``` Next, you need to activate your conda environment: ```bash conda activate openbot ``` If this does not work (e.g. on Windows), you may need to activate the environment with `activate openbot` instead. Once the environment is active, you need to install tensorflow. Note that training will be very slow on a laptop. So if you have access to a computer with dedicated GPU, we highly recommend to use it by installing the neccessary libraries; make sure you have recent GPU drivers installed. Below are the commands to install tensorflow for different operating systems. #### **Mac OS** ``` conda install -c apple tensorflow-deps -y pip install tensorflow-macos~=2.9.0 ``` GPU support ``` pip install tensorflow-metal~=0.5.0 ``` [Troubleshooting](https://developer.apple.com/metal/tensorflow-plugin/) #### **Linux** ``` pip install tensorflow~=2.9.0 ``` GPU support ``` sudo apt-get install nvidia-driver-510 conda install -c conda-forge cudatoolkit=11.2 cudnn=8.1 -y echo 'export LD_LIBRARY_PATH=$LD_LIBRARY_PATH:$CONDA_PREFIX/lib/' >> ~/.bashrc source ~/.bashrc ``` [Troubleshooting](https://www.tensorflow.org/install/pip#linux) #### **Windows** ``` pip install tensorflow~=2.9.0 ``` GPU support ``` conda install cudatoolkit=11.3 cudnn=8.2 -y ``` #### **Additional requirements** Make sure you are in the folder `policy` within your local OpenBot repository. Now, you can install all the remaining dependencies with the following command: ```bash pip install -r requirements.txt ``` You can also install pydot (`pip install pydot`) and graphviz ([see instructions](https://graphviz.gitlab.io/download/)) if you want to visualize the the network architecture. If you want to use the [WebApp](#web-app) for data collection and training, you need to install the following dependencies in addition. (On Mac, the `brotlipy` package is currently broken on pip, so you need to install it first using conda: `conda install brotlipy=0.7`) ```bash pip install -r requirements_web.txt ``` ### Essential packages For reference and troubleshooting, below is a list of the essential packages. Training: - [tensorflow](https://pypi.org/project/tensorflow/) - [jupyter notebook](https://pypi.org/project/notebook/) - [matplotlib](https://pypi.org/project/matplotlib/) - [numpy](https://pypi.org/project/numpy/) - [PIL](https://pypi.org/project/Pillow/) - [black[jupyter]](https://pypi.org/project/black/) Web interface: - [aiohttp](https://pypi.org/project/aiohttp/) - [aiozeroconf](https://pypi.org/project/aiozeroconf/) - [imageio](https://pypi.org/project/imageio/) ### Notes - Remember to activate the environment before running commands in the terminal: `conda activate openbot` - If your tensorflow import does not work, try installing via `pip install tensorflow --user`. (See this [issue](https://github.com/ob-f/OpenBot/issues/98).) ## Dataset ### Data Collection In order to train an autonomous driving policy, you will first need to collect a dataset. The more data you collect, the better the resulting driving policy. For the experiments in our paper, we collected about 30 minutes worth of data. Note that the network will imitate your driving behaviour. The better and more consistent you drive, the better the network will learn to drive. 1. Connect a bluetooth game controller to the phone (e.g. PS4 controller: to enter pairing mode press the PS and share buttons until the LED flashes quickly). 2. Select the `CIL-Mobile-Cmd` model in the app. 3. Now drive drive the car via a game controller and record a dataset. On the PS4 controller logging can be toggled with the **X** button. You will now find a folder called *Documents/OpenBot* in the internal storage of your smartphone. For each recording, there will be zip file. The name of the zip file will be in the format *yyyymmdd_hhmmss.zip* corresponding to the timestamp of when the recording was started. The Jupyter notebook expects a folder called `dataset` in the same folder. In this folder, there should be two subfolders, `train_data` and `test_data`. The training data is used to learn the driving policy. The test data is used to validate the learned driving policy on unseen data during the training process. This provides some indication how well this policy will work on the robot. Even though the robot may drive along the same route as seen during training, the exact images observed will be slightly different in every run. The common split is 80% training data and 20% test data. Inside the `train_data` and `test_data` folders, you need to make a folder for each recording session and give it a name such as `my_openbot_1`, `my_openbot_2`, etc. The idea here is that each recording session may have different lighting conditions, a different robot, a different route. In the Jupyter notebook, you can then train only on a subset of these datasets or on all of them. Inside each recording session folder, you drop all the recordings from that recording session. Each recording corresponds to an extracted zip file that you have transferred from the *Openbot* folder on your phone. Your dataset folder should look like this: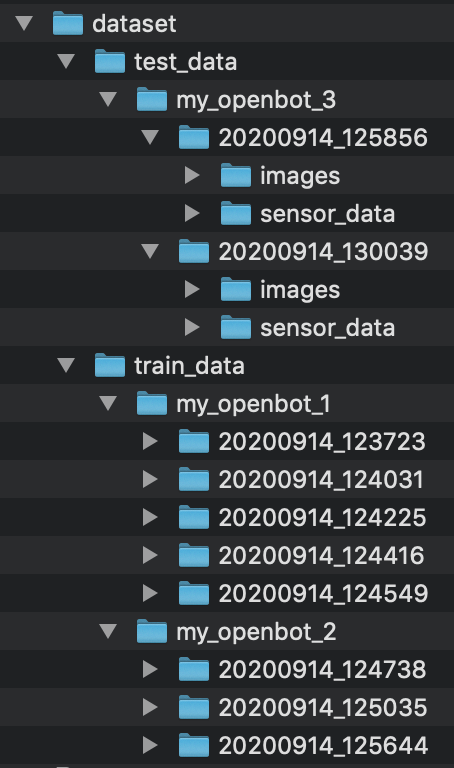 Rather than copying all files manually from the phone, you can also upload the logs automatically to a [Python server](#web-app) on your computer. In this case, the zip files will be uploaded and unpacked into the folder `dataset/uploaded`. You will still need to move them into the folder structure for training. You can simply treat the `uploaded` folder as a recording session and move it into `train_data`. The recordings will then be recognized as training data by the Jupyter notebook. If you do not already have a recording session in the `test_data` folder, you also need to move at least one recording from `train_data/uploaded` into `test_data/uploaded`.
### Data Conversion (optional)
For better training performance, you can convert the collected dataset into a specialized format. You can create a tfrecord of the train and test datasets with the following commands:
```bash
conda activate openbot
python -m openbot.tfrecord -i dataset/train_data -o dataset/tfrecords -n train.tfrec
python -m openbot.tfrecord -i dataset/test_data -o dataset/tfrecords -n test.tfrec
```
By default this conversion will be done automatically at the start of training.
## Policy Training
Make sure your conda environment for openbot is activated by executing the following command:
```bash
conda activate openbot
```
### Jupyter Notebook
We provide a [Jupyter Notebook](policy_learning.ipynb) that guides you through the steps for training an autonomous driving policy. Open the notebook with the following command.
```bash
jupyter notebook policy_learning.ipynb
```
Now a web-browser window will open automatically and load the Jupyter notebook. Follow the steps in order to train a model with your own data.
### Shell
This method assumes that the data is in the correct place. To adjust the hyperparameters you can pass the following arguments.
```bash
'--no_tf_record', action='store_true', help='do not load a tfrecord but a directory of files'
'--create_tf_record', action='store_true', help='create a new tfrecord'
'--model', type=str, default='pilot_net', choices=['cil_mobile', 'cil_mobile_fast', 'cil', 'pilot_net'], help='network architecture (default: cil_mobile)'
'--batch_size', type=int, default=16, help='number of training epochs (default: 16)'
'--learning_rate', type=float, default=0.0001, help='learning rate (default: 0.0001)'
'--num_epochs', type=int, default=10, help='number of epochs (default: 10)'
'--batch_norm', action='store_true', help='use batch norm'
'--flip_aug', action='store_true', help='randomly flip images and controls for augmentation'
'--cmd_aug', action='store_true', help='add noise to command input for augmentation'
'--resume', action='store_true', help='resume previous training'
```
If your dataset has already been converted to a tfrecord, you can train the policy from the shell with the command:
```bash
python -m openbot.train
```
If you would like to convert your dataset to a tfrecord, before training, you need to add the following flag:
```bash
python -m openbot.train --create_tf_record
```
If you do not want to convert the dataset to a tfrecord, and train using the files direclty, you need to add the following flag:
```bash
python -m openbot.train --no_tf_record
```
To train a model for final deployment, you want to use a large batch size and number of epochs. Enabling batch norm usually improves training as well. The model `pilot_net` is larger than the default `cil_mobile` but can achieve better performance on some tasks while still runnining in real time on most smartphones.
```bash
python -m openbot.train --model pilot_net --batch_size 128 --num_epochs 100 --batch_norm
```
### Deployment
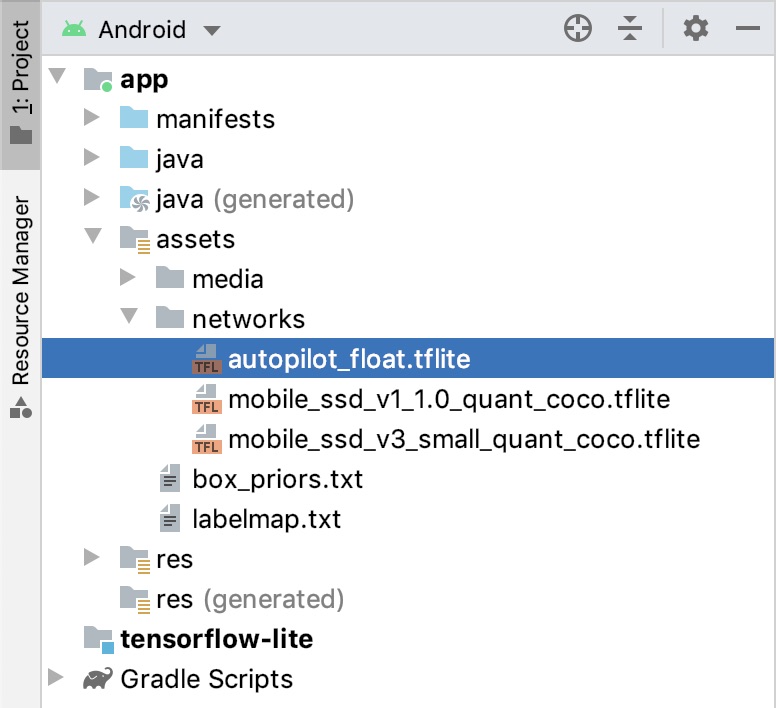
At the end of the training process, two tflite files are generated: one corresponds to the best checkpoint according to the validation metrics and the other to the last checkpoint. Pick one of them and rename it to autopilot_float.tflite. Replace the existing model in Android Studio and recompile the app.
Rather than copying all files manually from the phone, you can also upload the logs automatically to a [Python server](#web-app) on your computer. In this case, the zip files will be uploaded and unpacked into the folder `dataset/uploaded`. You will still need to move them into the folder structure for training. You can simply treat the `uploaded` folder as a recording session and move it into `train_data`. The recordings will then be recognized as training data by the Jupyter notebook. If you do not already have a recording session in the `test_data` folder, you also need to move at least one recording from `train_data/uploaded` into `test_data/uploaded`.
### Data Conversion (optional)
For better training performance, you can convert the collected dataset into a specialized format. You can create a tfrecord of the train and test datasets with the following commands:
```bash
conda activate openbot
python -m openbot.tfrecord -i dataset/train_data -o dataset/tfrecords -n train.tfrec
python -m openbot.tfrecord -i dataset/test_data -o dataset/tfrecords -n test.tfrec
```
By default this conversion will be done automatically at the start of training.
## Policy Training
Make sure your conda environment for openbot is activated by executing the following command:
```bash
conda activate openbot
```
### Jupyter Notebook
We provide a [Jupyter Notebook](policy_learning.ipynb) that guides you through the steps for training an autonomous driving policy. Open the notebook with the following command.
```bash
jupyter notebook policy_learning.ipynb
```
Now a web-browser window will open automatically and load the Jupyter notebook. Follow the steps in order to train a model with your own data.
### Shell
This method assumes that the data is in the correct place. To adjust the hyperparameters you can pass the following arguments.
```bash
'--no_tf_record', action='store_true', help='do not load a tfrecord but a directory of files'
'--create_tf_record', action='store_true', help='create a new tfrecord'
'--model', type=str, default='pilot_net', choices=['cil_mobile', 'cil_mobile_fast', 'cil', 'pilot_net'], help='network architecture (default: cil_mobile)'
'--batch_size', type=int, default=16, help='number of training epochs (default: 16)'
'--learning_rate', type=float, default=0.0001, help='learning rate (default: 0.0001)'
'--num_epochs', type=int, default=10, help='number of epochs (default: 10)'
'--batch_norm', action='store_true', help='use batch norm'
'--flip_aug', action='store_true', help='randomly flip images and controls for augmentation'
'--cmd_aug', action='store_true', help='add noise to command input for augmentation'
'--resume', action='store_true', help='resume previous training'
```
If your dataset has already been converted to a tfrecord, you can train the policy from the shell with the command:
```bash
python -m openbot.train
```
If you would like to convert your dataset to a tfrecord, before training, you need to add the following flag:
```bash
python -m openbot.train --create_tf_record
```
If you do not want to convert the dataset to a tfrecord, and train using the files direclty, you need to add the following flag:
```bash
python -m openbot.train --no_tf_record
```
To train a model for final deployment, you want to use a large batch size and number of epochs. Enabling batch norm usually improves training as well. The model `pilot_net` is larger than the default `cil_mobile` but can achieve better performance on some tasks while still runnining in real time on most smartphones.
```bash
python -m openbot.train --model pilot_net --batch_size 128 --num_epochs 100 --batch_norm
```
### Deployment
At the end of the training process, two tflite files are generated: one corresponds to the best checkpoint according to the validation metrics and the other to the last checkpoint. Pick one of them and rename it to autopilot_float.tflite. Replace the existing model in Android Studio and recompile the app.
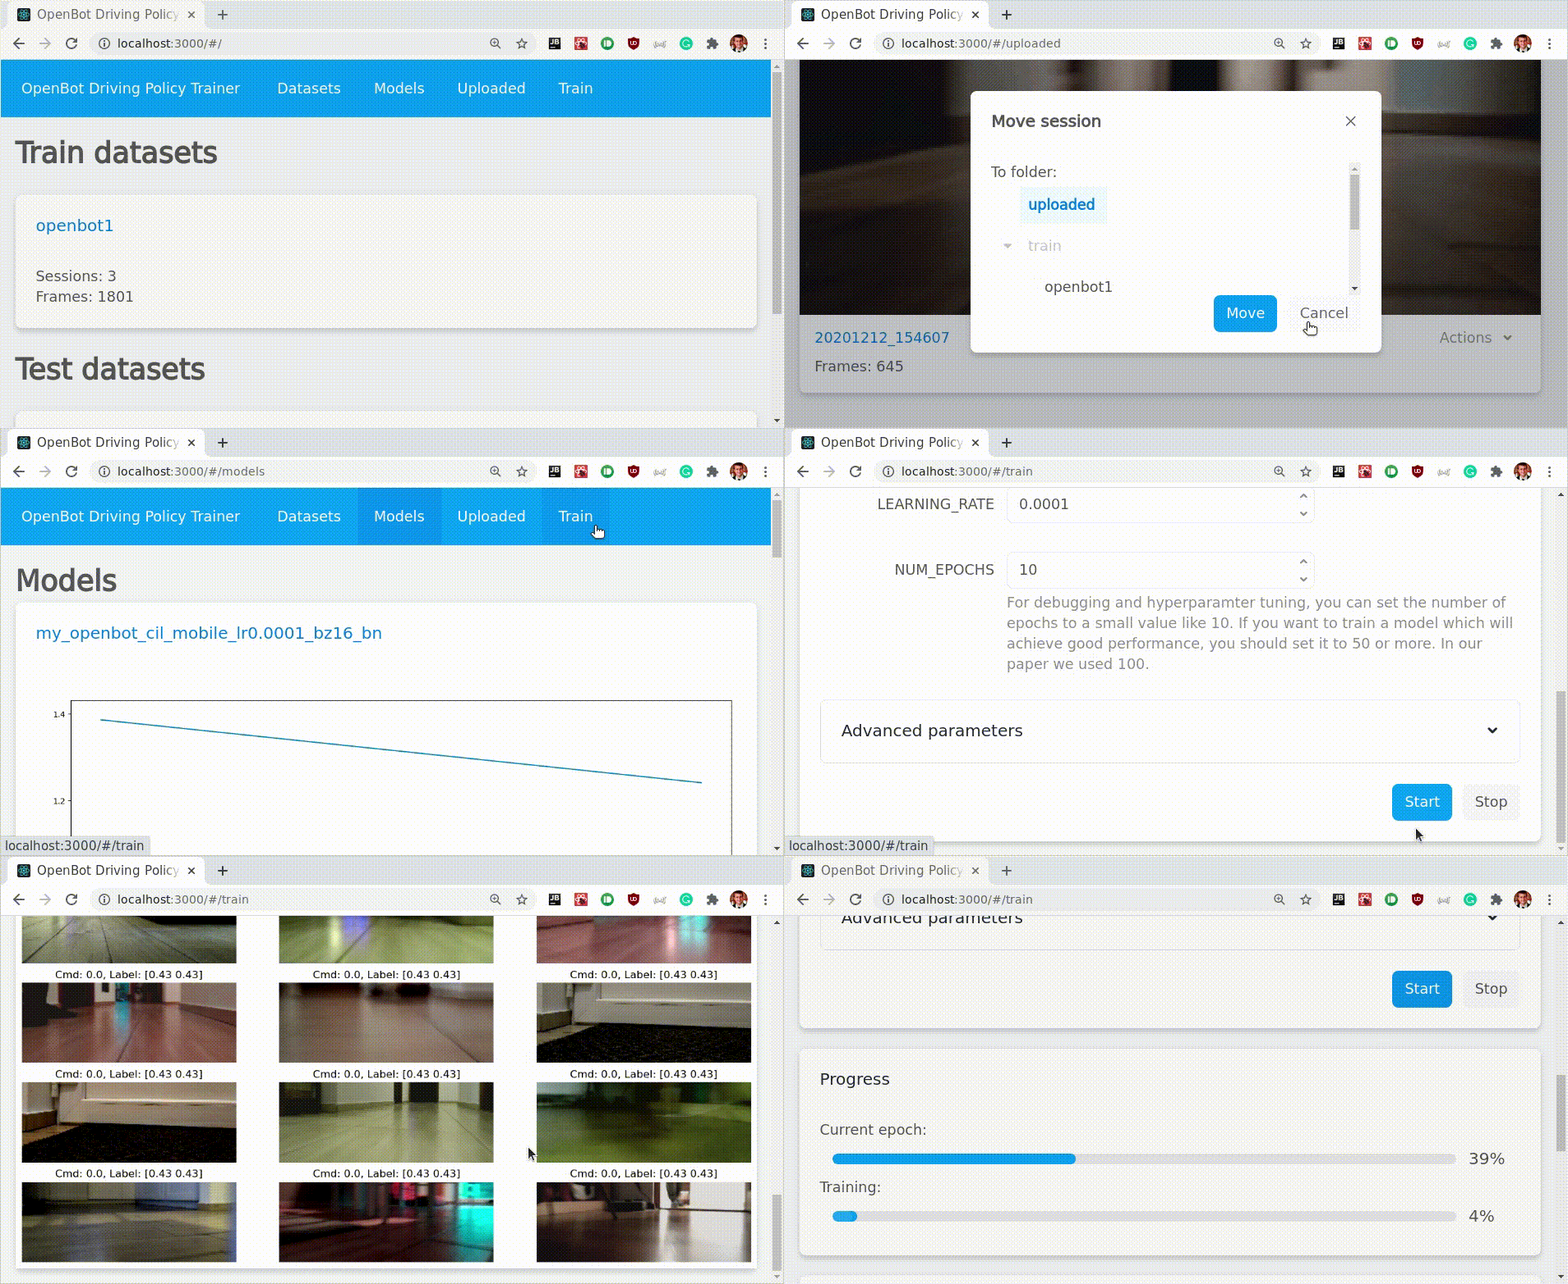 ### Quickstart
```bash
conda activate openbot
python -m openbot.server
```
You can now open your browser to visualize the dataset and see incoming uploads by going to:
[http://localhost:8000/#/uploaded](http://localhost:8000/#/uploaded)
### Running the server
You can run the python server with the command:
```bash
python -m openbot.server
```
There is also a developer mode:
```bash
adev runserver openbot/server
```
For frontend development (react app):
```
FE_DEV=1 adev runserver openbot/server
```
When you run the server you should see something like:
```
Skip address 127.0.0.1 @ interface lo
Found address 192.168.x.x @ interface wlp2s0
Registration of a service, press Ctrl-C to exit...
Running frontend: 0.7.0
Frontend path: /home/USERNAME/miniconda3/envs/openbot/lib/python3.7/site-packages/openbot_frontend
======== Running on http://0.0.0.0:8000 ========
(Press CTRL+C to quit)
```
### Troubleshooting
If the upload to the server is not working, here are some troubleshooting tips:
- Try restarting the server (computer) and the OpenBot app (smartphone)
- Make sure the smartphone and your computer are connected to the same WiFi network
- If your router has both 2.4 GHz and 5 GHz networks with the same name, disable the 5 GHz network
- Keep the phone connected to Android Studio while running the app. In the Logcat tab, select Debug from the dropdown. Type `NSD` into the filter field to see the debug messages concerning the server connection. Type `Upload` into the filter field for debug messages concerning the recording file upload.
- If a published models gets downloaded continiously, make sure the time on your phone and laptop / workstation are set correctly
### Quickstart
```bash
conda activate openbot
python -m openbot.server
```
You can now open your browser to visualize the dataset and see incoming uploads by going to:
[http://localhost:8000/#/uploaded](http://localhost:8000/#/uploaded)
### Running the server
You can run the python server with the command:
```bash
python -m openbot.server
```
There is also a developer mode:
```bash
adev runserver openbot/server
```
For frontend development (react app):
```
FE_DEV=1 adev runserver openbot/server
```
When you run the server you should see something like:
```
Skip address 127.0.0.1 @ interface lo
Found address 192.168.x.x @ interface wlp2s0
Registration of a service, press Ctrl-C to exit...
Running frontend: 0.7.0
Frontend path: /home/USERNAME/miniconda3/envs/openbot/lib/python3.7/site-packages/openbot_frontend
======== Running on http://0.0.0.0:8000 ========
(Press CTRL+C to quit)
```
### Troubleshooting
If the upload to the server is not working, here are some troubleshooting tips:
- Try restarting the server (computer) and the OpenBot app (smartphone)
- Make sure the smartphone and your computer are connected to the same WiFi network
- If your router has both 2.4 GHz and 5 GHz networks with the same name, disable the 5 GHz network
- Keep the phone connected to Android Studio while running the app. In the Logcat tab, select Debug from the dropdown. Type `NSD` into the filter field to see the debug messages concerning the server connection. Type `Upload` into the filter field for debug messages concerning the recording file upload.
- If a published models gets downloaded continiously, make sure the time on your phone and laptop / workstation are set correctly