SVG Evolution 3: Applying Polish
Article update, 16th June 2010: Browser support notes at the end of the article updated.
In Case You Are Just Tuning In
This is the third entry in a series of articles in which we explore how to integrate SVG into DHTML web applications. In our first article, we gave an introduction to SVG language and some of its basic capabilities, including integration with the DOM, demonstrating how to bring SVG to a simple photo gallery. In the second article, we started to illustrate some of the immediate benefits of SVG, demonstrated declarative animation in order to spice up the user interface, and then provided some useful functionality to our gallery by creating a styled SVG toolbar with some script for flipping the image horizontally/vertically. Here is the SVG photo gallery that we ended up with at the end of the second article.
We are going to take a similar approach with this article, by first demonstrating another major feature of SVG to provide some eye candy and then moving on to enhance the photo gallery's functionality using that feature.
SVG Filters: Not Just Eye Candy
One of the more sophisticated features of Scalable Vector Graphics is SVG Filters. Put simply, a SVG filter modifies the visual appearance of any SVG element before it is rendered to the output device. Filters are made up of filter primitives. Each filter primitive provides a mechanism to produce some RGBA pixels in a single specific way, usually based on some input graphic. For instance, there are filter primitives that apply a gaussian blur to an input image, to provide lighting or to generate noise. Filter primitives can provide a variety of 'knobs' that control its behavior in the form of XML attributes. Of course filter primitives can be combined in interesting ways to achieve impressive visual effects.
Figure 1 - Filter Primitive Concept
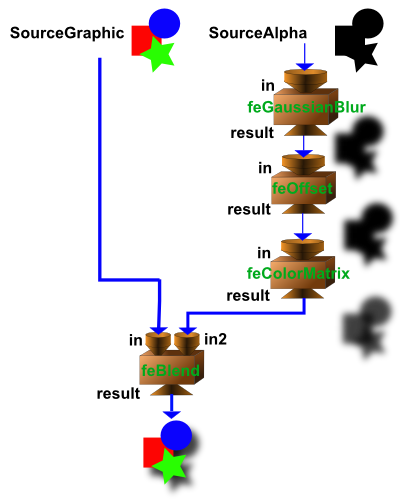
I like to think of filter primitives as pluggable components. Each filter primitive has zero or more inputs and one output, that can be hooked up (or "chained") to other primitives. See Figure 1. The behavior of each filter primitive is controlled by attributes as described in the SVG specification.
A filter can consist of only one simple primitive (like a feGaussianBlur), or it can consist of several primitives chained together, with outputs of one stage serving as inputs to the next stage in the filter. Some primitives allow multiple inputs (like the feBlend primitive, which blends two images together) and some have no inputs (like the feTurbulence primitive, which produces noise).
The input to each filter primitive or stage is specified by the in attribute and the output from each filter primitive is named in the result attribute (which can be used by later filter primitives). We will illustrate this concept by building a filter. For our first experiment, we're going to use a filter to demonstrate some eye candy in the form of drop shadows underneath our thumbnail images.
Drop Shadows
We first need to define what we mean by "drop shadow": We would like a fuzzy, darkened region that appears under the thumbnail image in the same rough shape and size of the thumbnail image rectangle, but offset by 5-10 pixels to the right and down.
feGaussianBlur, defs, SourceAlpha
The first thing we will try is to use the feGaussianBlur filter primitive to generate the "fuzzy region":
    <svg viewBox="0 0 100 100">
      <defs>
        <filter id="drop-shadow">
          <feGaussianBlur in="SourceGraphic" stdDeviation="4" />
        </filter>
      </defs>

      <circle fill="blue" cx="50" cy="50" r="40" filter="url(#drop-shadow)" />
    </svg>
We have named the filter "drop-shadow" here and placed it in the defs section of the SVG document. The defs element is used for creating definitions of elements that will be referenced later in the document. The "drop-shadow" filter has one element, a feGaussianblur filter primitive element. The blue circle specifies to the renderer that it should apply the "drop-shadow" filter before sending the circle's visual output to the screen. We do this by specifying the filter attribute: filter="url(#drop-shadow)".
Figure 2 - Gaussian Blur Filter Primitive

The feGaussianBlur filter primitive has a couple important settings that we must pay attention to. The in attribute has been set to the special value SourceGraphic. This tells the renderer that the blur filter primitive uses the source image (in this case, the blue circle) as its input. The attribute stdDeviation describes how blurry the output should be. The results of this filter as shown in Figure 2.
The blurry circle looks a little bit like a shadow now, except for the fact that it's the wrong colour. We want our shadow to be black. The easiest way to change this is instead of using SourceGraphic as the input to the feGaussianBlur primitive, we use SourceAlpha (i.e. only the alpha channel of the blue circle) as input to the filter. To do this, we set the in attribute of the feGaussianBlur filter primitive to be SourceAlpha (that is in="SourceAlpha"). The results are shown below:
Figure 3 - Gaussian Blur with Source Alpha as Input

feBlend, feOffset
There, now that looks like a shadow of a circle! But we have a problem - we're missing the original blue circle now. Thankfully, we can use the feGaussianBlurfeBlend filter primitive to tell the renderer that it should combine/blend the original source image with the output of the feGaussianBlur primitive. That is layer the two on top:
    <svg viewBox="0 0 100 100">
      <defs>
        <filter id="drop-shadow">
          <feGaussianBlur in="SourceAlpha" result="blur-out" stdDeviation="4" />
          <feBlend in="SourceGraphic" in2="blur-out" mode="normal"/>
        </filter>
      </defs>

      <circle fill="blue" cx="50" cy="50" r="40" filter="url(#drop-shadow)" />
    </svg>
Here, we've added a new filter primitive to our "drop-shadow" filter. The feBlend primitive combines the original source image with the output of the feGaussianBlur stage. However, there is a problem with this approach: the shadow is in the same location as the blue circle, so it will get almost completely covered by the blue circle that is rendered on top by the feBlend element. We need to add one more filter primitive to our chain, the feOffset filter primitive.
The feOffset filter primitive shifts the image in the x and/or y direction by a given amount. It is useful for specific scenarios like drop shadows. The final filter code looks like:
    <svg viewBox="0 0 120 120">
      <defs>
        <filter id="drop-shadow" filterUnits="userSpaceOnUse" width="120" height="120">
          <feGaussianBlur in="SourceAlpha" result="blur-out" stdDeviation="4" />
          <feOffset in="blur-out" result="the-shadow" dx="8" dy="8"/>
          <feBlend in="SourceGraphic" in2="the-shadow" mode="normal"/>
        </filter>
      </defs>

      <circle fill="blue" cx="50" cy="50" r="40" filter="url(#drop-shadow)" />
    </svg>
Note that the output of the feGaussianBlur now gets sent to the feOffset primitive, where it is shifted over by 8 pixels in the x and y directions. Then, the output of the feOffset primitive is blended with the original graphic by sending both as inputs to the feBlend filter primitive to achieve the final result. The attributes which were added to the filter element were necessary to tell the rendered that the user coordinates should be used and to specify the filter output region. The results of this filter are:
Figure 4 - Drop Shadow Using SVG Filters

The beauty of this is that any SVG element can use this "drop-shadow" filter element to acquire a drop-shadow just by adding filter="url(#drop-shadow)" as an attribute of that element.
Updating the SVG Image Gallery
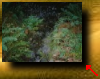
You can see the SVG Image Gallery updated with drop shadows on the thumbnail images at the top. Note that I had to slightly shrink the thumbnails further such that the drop shadows and images all fit within the original region of space defined by the object element.
Figure 5 - Drop Shadow On Image Thumbnails
Now let's move on to provide some useful functionality using SVG Filters.
Grey Scale
For our next trick, we'll see how we can use an SVG filter to turn any colour image into a greyscale one. This is something that is not possible in SVG without using filters. First, let's define the theory of what we want to do:
Theory
Without getting too far into colour theory, digital representation and mathematics, very briefly - each pixel in an image has a Red, Green, and Blue "channel", which is a fancy name for value. We often see the abbreviation RGB to describe this. The reason RGB terminology is used is because each actual physical pixel on the screen is made up of 3 different phosphors that emit red, green and blue light in various combinations to create all the colours you can possibly see. For instance, a pure red pixel would have a value of zero for Green (G=0) and Blue (B=0) channels and a non-zero value in Red (the brighter the red, the higher the value of the R component).
We also speak of an Alpha channel per pixel that defines that pixel's transparency, so a completely opaque pixel has the highest Alpha value of 1.0 (meaning this element completely obscures elements "behind" it at that pixel), while a completely transparent pixel has an A value of 0 (meaning other entities can be seen "behind" that pixel).
If each RGBA channel can vary between 0.0 and 1.0, one way to convert a coloured pixel into a grey pixel is to first determine how "bright" (or luminous) the pixel is by doing the following:
Brightness = (Red Value + Green Value + Blue Value) / 3.0
           = (0.3333*R + 0.3333*G + 0.3333*B)
Thus, a completely black pixel (RGB=0,0,0) would result in a "Brightness" of 0 and a completely white pixel (RGB=1,1,1) would result in a "Brightness" of (1+1+1)/3 = 1.0. A completely blue pixel (RGB=0,0,1) would result in a "Brightness" of 0.3333, while a completely yellow pixel (RGB=1,1,0) would result in a "Brightness" of 0.6666.
Now that we know how bright each pixel is, we can simply set each of the Red, Green, and Blue channels to this value. When you set a pixel's RGB values to the same value, you are forcing it to be a grey pixel (that varies from pure black to pure white in proportion to the "Brightness" value).
This is what we want to do. Essentially, we can write 4 equations for the new R'G'B'A' values (grey-scale) based on the old RGBA values (colour):
R' = 0.3333*R + 0.3333*G + 0.3333*B + 0.0*A
G' = 0.3333*R + 0.3333*G + 0.3333*B + 0.0*A
B' = 0.3333*R + 0.3333*G + 0.3333*B + 0.0*A
A' =    0.0*R      0.0*G +    0.0*B + 1.0*A (always use the same alpha)
The Color Matrix
Mathematicians like to use short-cuts in writing equations like those above. Basically if we take all the numbers in the above equations (in bold), they can be grouped into a rectangle of 16 numbers that we call a matrix:
| 0.3333 0.3333 0.3333 0.0 |
| 0.3333 0.3333 0.3333 0.0 |
| 0.3333 0.3333 0.3333 0.0 |
| 0.0    0.0    0.0    1.0 |
SVG provides the feColorMatrix filter primitive. This primitive allows you to specify the exact color matrix that should be applied to the input image. The filter primitive will output the resultant RGBA pixels after multiplying them by the specified color matrix.
The feColorMatrix primitive actually adds a column to the color matrix to allow for offsets to be added to the RGBA values, but for our purposes that column can stay all zeros. Below shows the updated color matrix with the extra column added:
| 0.3333 0.3333 0.3333 0.0  0.0 |
| 0.3333 0.3333 0.3333 0.0  0.0 |
| 0.3333 0.3333 0.3333 0.0  0.0 |
| 0.0    0.0    0.0    1.0  0.0 |
So Where's The Code?
We're finally at a point where we can apply all this theory to some SVG and see what's what. We're going to construct a filter consisting of a feColorMatrix primitive with the above matrix and apply it to an image:
    <svg viewBox="0 0 512 192">
      <defs>
       <filter id="grey-filter" filterUnits="userSpaceOnUse" x="0" y="0" width="512" height="192">
          <feColorMatrix in="SourceGraphic" type="matrix"
              values="0.3333 0.3333 0.3333 0 0
                      0.3333 0.3333 0.3333 0 0
                      0.3333 0.3333 0.3333 0 0
                      0      0      0      1 0"/>
       </filter>
      </defs>

      <image xlink:href="calif2.jpg" x="0" y="0" width="256" height="192" />
      <image xlink:href="calif2.png" x="256" y="0" width="256" height="192"
             filter="url(#grey-filter)" />
    </svg>
The result is shown below. It is clear that our filter does what we wanted - turns any colour image into a greyscale one.
Figure 6 - Demonstrating a Greyscale Filter

So now back to our SVG Image Gallery web application. First, we'll put in the "grey-filter" filter element into our defs section. Then, we'll create a new button in our toolbar (see last article). In this instance, I want the button to indicate "Switch to Greyscale", and when clicked, it will incidate "Switch to Color". We do this by adding two buttons to the toolbar in the same location and making one of these buttons initially not visible:
        <g id="options_panel" display="none" transform="translate(50,5)">
            ...
            <!-- Flip Horizontal button -->
            ...
            <!-- Flip Vertical button -->
            ...
            <!-- Greyscale button -->
            <g id="grey_button" transform="translate(62.5,2.5)" cursor="pointer"
                pointer-events="all">
                <title>Switch To Greyscale</title>
                <polyline class="topleftborder" points="0,25 0,0 25,0"/>
                <polyline class="botrightborder" points="25,0 25,25 0,25"/>
                <rect x="1" y="2" width="4" height="20" fill="#222" stroke="none"/>
                <rect x="4" y="2" width="4" height="20" fill="#444" stroke="none"/>
                <rect x="7" y="2" width="4" height="20" fill="#666" stroke="none"/>
                <rect x="10" y="2" width="4" height="20" fill="#888" stroke="none"/>
                <rect x="13" y="2" width="4" height="20" fill="#aaa" stroke="none"/>
                <rect x="16" y="2" width="4" height="20" fill="#ccc" stroke="none"/>
                <rect x="19" y="2" width="4" height="20" fill="#eee" stroke="none"/>
            </g>
            <!-- Color button, initially not displayed -->
            <g id="color_button" transform="translate(62.5,2.5)" cursor="pointer"
                pointer-events="all" style="display:none" >
                <title>Switch To Color</title>
                <rect x="1" y="2" width="5" height="20" fill="red" stroke="none"/>
                <rect x="6" y="2" width="5" height="20" fill="blue" stroke="none"/>
                <rect x="11" y="2" width="5" height="20" fill="yellow" stroke="none"/>
                <rect x="16" y="2" width="5" height="20" fill="purple" stroke="none"/>
                <rect x="21" y="2" width="5" height="20" fill="green" stroke="none"/>
                <polyline class="topleftborder" points="0,25 0,0 25,0"/>
                <polyline class="botrightborder" points="25,0 25,25 0,25"/>
            </g>
This gives us a new button on our toolbar: 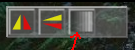
Now we need to hook up some functionality to it. We create a global variable, gnGreyMode, that defines our greyscale mode (initially set to 0). Then we create a simply JavaScript function that will set or unset the filter attribute on the image:
        <script>
            function setGrey() {
                var sGreyButtStyle = (gnGreyMode ? "display:none" : "display:default");
                var sColorButtStyle = (gnGreyMode ? "display:default" : "display:none");
                var sImageFilter = (gnGreyMode ? "url(#grey-filter)" : "");
                document.getElementById("grey_button").setAttributeNS(null, "style", sGreyButtStyle);
                document.getElementById("color_button").setAttributeNS(null, "style", sColorButtStyle);
                document.getElementById("thePreviewImage").setAttributeNS(null, "filter", sImageFilter);
            }
            ...
        </script>
Then, we hook up a mouse-click handler to each of the buttons like so:
        <g id="grey_button" onclick="gnGreyMode=true; setGrey()" ...</g>
        <g id="color_button" onclick="gnGreyMode=false; setGrey()" ...</g>
And now we're done — see the updated SVG Image Gallery application with greyscale capabilities.
Side Note: Revisiting the Drop Shadow
Now that we've learned a bit about color theory, I took the opportunity to add a feColorMatrix element into our drop shadow filter. This primitive simply takes the black shadow and outputs a slightly transparent shadow (not fully black) which is then merged to achieve the final result. We do this by applying the following color matrix:
| 1 0 0 0   0 |
| 0 1 0 0   0 |
| 0 0 1 0   0 |
| 0 0 0 0.8 0 |
which translates to the following filter equations:
R' = 1*R
G' = 1*G
B' = 1*B
A' = 0.8*A
In other words, our drop shadow is no longer completely opaque (few shadows are) but slightly transparent, which provides a more realistic effect. This picture shows how we have assembled the Drop Shadow filter.
Conclusion
Our SVG Image Gallery web application has grown in little jets and spurts as we've added various drops of eye candy and functionality to it. Viewing this application in Opera or other advanced renderers of SVG, the app starts to feel very, um, "Flash"-like, especially when you consider where we started. But the application still has lots of room to grow. Off the top of my head, some useful features that could still be added:
- A Rotate tool
- A Crop tool
- A "brightness" slider that adjusts the lightness/darkness of the whole image
- Red, Green, Blue sliders that affect colour properties of the image
- A "burn" tool (creates small, mostly transparent circles filled with a radial gradient that can darken specific areas of the image)
- Ability to save the modified SVG DOM to client's disk as an SVG image
- Ability to save the modifications to the server side
Implementation notes
As of 2010, Opera is still the only browser that supports the greyscale filter and the blur drop shadow effect. This is a shame, as three years have passed since the article was first written. Good news may well be on the horizon though. Firefox 3.7 alpha runs the drop-shadow effect properly and it recognises the greyscale filter, although it doesn't seem to interpret it properly and you end up with a completely grey image. But at least this is showing some progress. And who knows what IE9 will bring?
Jeff Schiller

Jeff Schiller is a software developer and freelance writer interested in web and game development living in the Chicago area. He maintains a blog at http://blog.codedread.com/
This article is licensed under a Creative Commons Attribution, Non Commercial - No Derivs 2.5 license.
Comments
The forum archive of this article is still available on My Opera.
No new comments accepted.