# Deploying Pega Platform on an AKS cluster
Deploy Pega Platform™ on an Azure Kubernetes Service (AKS) cluster set up in your Microsoft Azure account. The following procedures are written for any level of user, from a system administrator to a development engineer who is interested in learning how to install and deploy Pega Platform onto an AKS cluster.
Pega helps enterprises and agencies quickly build business apps that deliver the outcomes and end-to-end customer experiences that you need. Use the procedures in this guide, to install and deploy Pega software onto an AKS cluster without much experience in either AKS configurations or Pega Platform deployments.
Create a deployment of Pega Platform on which you can implement a scalable Pega application in an AKS cluster. You can use this deployment for a Pega Platform development environment. By completing these procedures, you deploy Pega Platform on an AKS cluster with an SQL database instance and two clustered virtual machines (VMs).
## Deployment process overview
Use Kubernetes tools and the customized orchestration tools and Docker images to orchestrate a deployment in a AKS cluster that you create for the deployment:
1. Prepare your local system:
- To prepare a local Linux system, install required applications and configuration files - [Preparing your local Linux system – 45 minutes](prepping-local-system-runbook-linux.md).
- To prepare a local Windows system, install required applications and configuration files -
[Preparing your local Windows 10 system – 45 minutes](prepping-local-system-runbook-windows.md).
2. Create an AKS cluster and an SQL database resource in your Azure account - [Prepare your AKS resources – 60 minutes](#prepare-your-aks-resources--60-minutes).
3. Customize a configuration file with your AKS details and use the command-line tools, kubectl and Helm, to install and then deploy Pega Platform onto your AKS cluster - [Deploying Pega Platform using Helm charts – 90 minutes](#installing-and-deploying-pega-platform-using-helm-charts--90-minutes).
4. Configure your network connections in the DNS management zone of your choice so you can log in to Pega Platform - [Logging in to Pega Platform – 10 minutes](#logging-in-to-pega-platform--10-minutes).
To understand how Pega maps Kubernetes objects with Pega applications and services, see [Understanding the Pega deployment architecture](https://docs.pega.com/bundle/platform/page/platform/deployment/client-managed-cloud/pega-kubernetes-architecture.html).
## Assumptions and prerequisites
This guide assumes:
- You have a basic familiarity with running commands from a Windows 10 PowerShell with Administrator privileges or a Linux command prompt with root privileges.
- You use open source packaging tools on Windows or Linux to install applications onto your local system.
The following account, resources, and application versions are required for use in this document:
- A Microsoft Azure account with a payment method set up to pay for the Azure resources that you create and appropriate Microsoft Azure account permissions and knowledge to:
- Create an AKS service, an SQL Database, and a storage resource.
- Select an appropriate location in which to deploy Microsoft Azure resources;
the document assumes your location is US East.
- You are responsible for any financial costs incurred for your AKS resources.
- Pega Platform 8.3.1 or later.
- Pega Docker images – your deployment requires the use of several Docker images that you download and make available in a private Docker registry. For step-by-step details, see [Downloading and managing Pega Platform docker images (linux)](prepping-local-system-runbook-linux.md#downloading-and-managing-pega-platform-docker-images) or [Downloading and managing Pega Platform docker images (windows)](prepping-local-system-runbook-windows.md#downloading-and-managing-pega-platform-docker-images).
- Helm 3.0 or later. Helm is only required to use the Helm charts and not to use the Kubernetes YAML examples directly. For more information, see the [Helm documentation portal](https://helm.sh/docs/).
- kubectl – the Kubernetes command-line tool that you use to connect to and manage your Kubernetes resources.
## Prepare your AKS resources – 60 minutes
In order to deploy Pega Platform to an AKS environment, you must create the AKS resources that the deployment will use in your Azure account. This section covers the details necessary to create an AKS cluster and an SQL database resource.
### Creating an AKS cluster
To deploy Pega using an AKS cluster, create the cluster in an existing project in your Microsoft Azure account. During deployment the required Kubernetes configuration file is copied into the cluster. Create a cluster with two VMs that have sufficient memory and CPU resources to support a deployment of Pega Platform that can perform under high workloads.
1. In a web browser, login to Microsoft Azure Portal ()
with your credentials.
2. Search for **Kubernetes services** and then select it in the dropdown list.
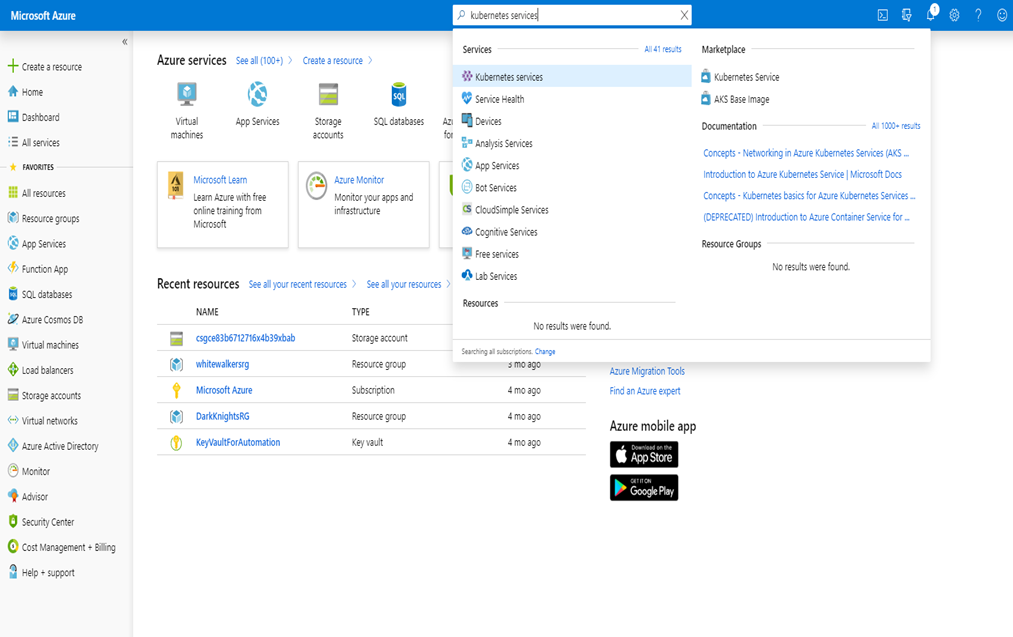
3. Click **+Add**.
4. On the **Create an AKS Kubernetes service page**, on the **Basics** tab
page, add details to the following required fields for this Kubernetes
service:
a. In **Project Details**, select your Azure **Subscription** (the default is
**Microsoft Azure**).
b. In **Resource Group** area, select the appropriate group or click **Create new** and provide a name.
c. In **Cluster details**, enter a **Kubernetes cluster name**.
d. Select a **Region** that is appropriate for your deployment.
e. Select the default **Kubernetes version** that is version 1.13.10 or later.
f. For **DNS name prefix**, enter a prefix that your organization requires or use the default prefix. Azure creates the prefix based on the **Kubernetes cluster name** that you provided.
g. In Primary node pool specify the size of your VMs for this service.
Select VMs of type **D8Sv3** (8 vcpus, 32 GiB memory). Change the filters if you cannot find this type using the search function.
h. Specify a **Node count**. Note that the cost varies with different VM
configurations.
Pega recommends standard deployments use at least two nodes.
5. Click **Next: Scale**.
6. In the **Scale** tab page, use the default settings: **Virtual nodes** and **VM Scale sets** both set to **Disabled**.
7. Click **Next: Authentication**.
8. In the **Authentication** tab page, add details to the following required
fields for this Kubernetes service:
a. In **Cluster Infrastructure** area/**Service principal**, select a service principal:
- If you do not have an existing service principal leave the field at the default to create a new service principal.
- If you have an existing service principal, click **Configure service principal**, and then,in the **Configure service principal** window, select **Use existing** and enter the **Service principal client ID** and **client secret**.
b. In **Kubernetes authentication and authorization**, leave Enable RBAC
toggled to **Yes**.
9. Click **Next: Networking**.
10. In the **Networking** tab page, add details to the following required fields
for this Kubernetes service:
a. Ensure that **HTTP application routing** is **Disabled**.
b. Ensure that **Networking configuration** is set to **Advanced**.
c. In **Configure virtual networks**, leave the default network and address settings unless you have specific, advanced networking requirements.
11. Click **Next: Monitoring**.
12. In the **Monitoring** tab page, in **Azure Monitor**, accept the defaults to
**Enable container monitoring** to use the default analytics workspace
to store monitoring data.
13. Click **Next: Tags**.
14. In the **Tags** tab page, add any tags with which you want to identify resources such as owner, user, and organization name by using the **Name** and **Value** tags.
Tags can help clarify billing details for your AKS resources.
15. Click **Next: Review + create**.
Azure runs a validation and when validated, your service is ready to be created.
16. Check your configurations on the **Create and Review** tab.
Azure validates your configuration.
17. Click **Create**.
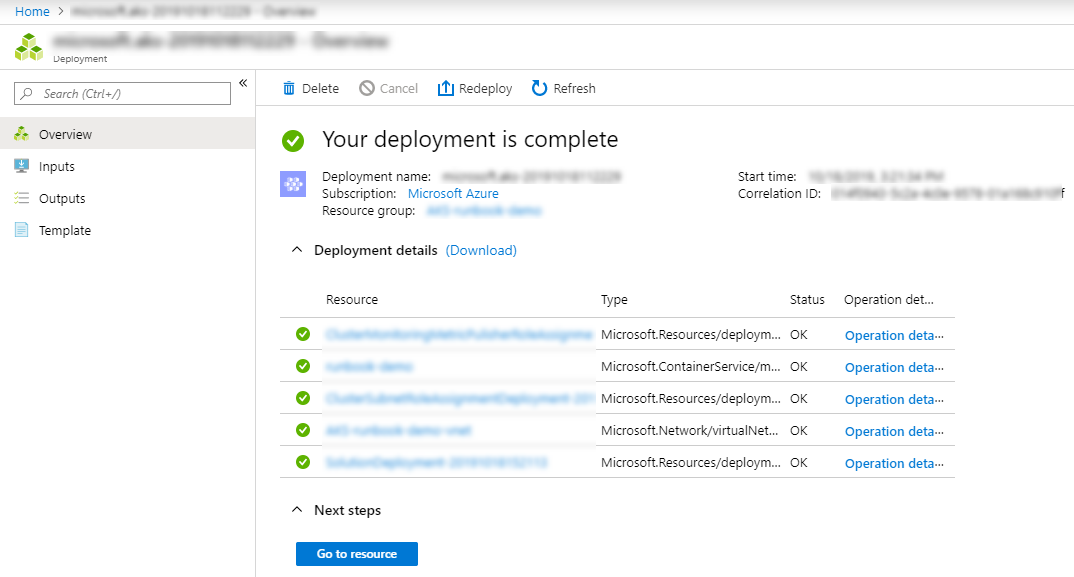
A deployment progress page displays the status of your deployment until it is complete, which takes about 15 minutes. When complete, the Azure UI displays all of the resources created for your AKS cluster in **Deployment details**:
### Creating an SQL database resource
AKS deployments require you to install Pega Platform software in an SQL database. After creating an SQL database, obtain the database and server name to customize your pega.yaml Helm chart with this information.
1. In a web browser, login to Microsoft Azure Portal (https://portal.azure.com/)
with your credentials.
2. Search for **SQL Databases** and select it in the dropdown list.
3. Click **+Add**.
4. On the **Create SQL Database** page, in the **Basics** tab page, add details
to the following required fields for this database server:
5. In **Project details**, select your Azure Subscription.
6. In **Resource Group**, select the same group you specified or created for
your AKS cluster.
7. In **Database details**, enter a database server name.
8. In **Server**, click **Create new**.
9. In the **New server** window, enter a name, security details, select the
same **Region** as in your AKS cluster, and then click **OK**.
10. Set **Want to use SQL elastic pool?** with the default: **No**.
11. In **Compute + storage server**, click configure database and then
select Gen5 compute hardware and a minimum of **4** vCores and **32 GB**
storage.
12. Click **Next: Networking**.
13. On the **Networking** tab page, add details to the following required fields
for this database server:
a. In the **Network connectivity** area, for a **Connectivity method**, select
**Public endpoint**.
b. In the **Firewall rules** area, for **Allow Azure services and resources to
access this server**, select **Yes**.
c. In the **Firewall rules** area, for **Add current client IP address**,
select **Yes**.
14. Click **Next: Additional settings**.
15. On the **Additional settings** tab page, use the following settings for this
database server:
- **Data source**: **None**
- **Database collation**: use the default
- **Enable Advanced data security**: Not now
16. Click **Next: Tags**.
17. On the **Tags** tab page, add any tags with which you want to identify resources such as owner, user, and organization name by using the **Name** and **Value** tags.
Tags can help clarify billing details for your AKS resources.
21. Click **Next: Review + create**.
22. On the **Create and Review** tab.
Azure validates your configuration for your parameters.
23. Click **Create**.
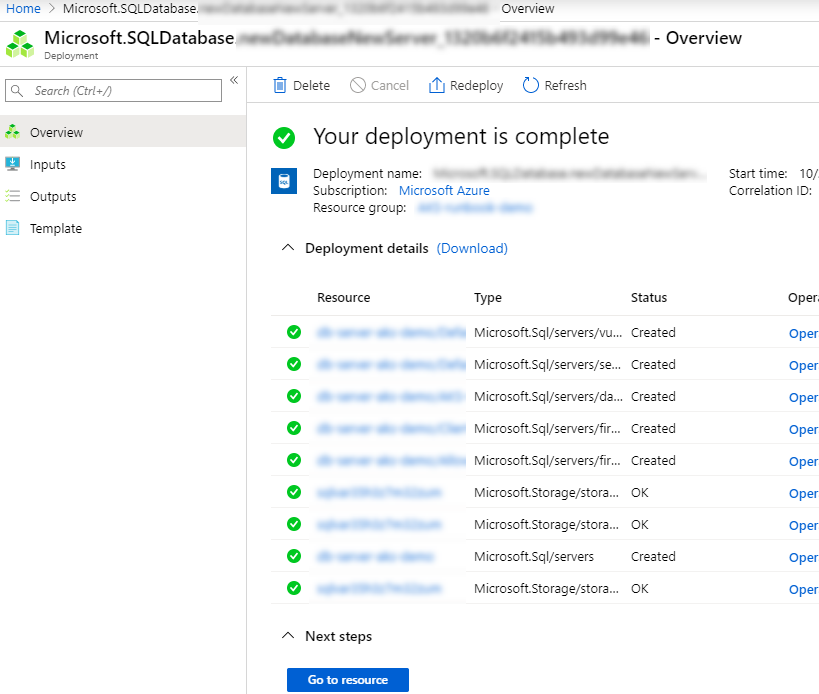
A deployment progress page displays the status of your server creation until it is complete, which takes about 5 minutes. When complete, the Azure UI displays all of the resources created for your SQL database deployment details:
### Creating an Application Gateway Resource
Create an Application Gateway for the deployment load balancer. After creating the Application Gateway, note the name and resource group in which you created the Application Gateway. You must add these details to the Addons helm chart you configured in [your local Linux system](prepping-local-system-runbook-linux.md) or [your local Windows 10 system](prepping-local-system-runbook-windows.md).
1. In a web browser, log in to Microsoft Azure Portal (https://portal.azure.com/)
with your credentials.
2. Search for **Application Gateway** and select it in the dropdown list.
3. Click **+Add**.
4. On the **Create an Application Gateway** page, on the **Basics** tab page, add details to the following required fields:
a. Select the **Resource Group** in which you created your cluster.
b. In **Instance Details**, enter an unique name and choose an appropriate region.
c. In **Configure virtual network**, select the Virtual Network in which you created your cluster, then select a different subnet from the one you selected for cluster.
`Note: Selecting the same subnet in this field is not supported and results in an error.`
d. Click **Next: Frontends.**
5. In **Frontends** tab page, add details:
a. For **Frontend IP address type**, select **Public**.
b. In **Public IP address**, click on **Create new**:
The **Add a public IP address** option opens.
c. Select an unique name and click **Ok**.
d. Click **Next : Backends**.
6. In **Backends** tab page, add details:
a. Click **Add a backend pool** and do the following:
- In the **Add a backend pool** dialogue box, enter a unique \<*backend pool name*\>.
- In **Add backend pool without targets** select **Yes**.
b. Click **Next : Configuration**.
With the Frontends and Backends configurations complete, create Routing rules that include - Listener, Backend targets, and an HTTP setting.
7. Click on **Add a rule**.
a. In **Add a routing rule** dialog, enter a unique **Rule name**.
b. Configure **Listener** settings.
- Enter a unique **Listener Name**.
- For **Frontend IP**, select **Public**.
- For **Protocol**, select **HTTP**.
- For as **Port**, enter **80**.
- Leave the remaining settings at the default value.
- Click the **Backend targets** tab.
c. Configure **Backend targets** settings.
- For **Backend Pool**, select **Target type**.
- For **Backend Target**, select the backend pool that you created in Step 6.
- For **HTTP Setting**, click **Create new**.
d. Configure **Add an HTTP Setting**.
- Enter an unique **HTTP Setting Name**.
- For **Backend Protocol**, select **HTTP**.
- For **Backend port**, enter Give **80**.
- Leave the remaining settings at the default value.
8. Click **Next : Tags**.
9. Add any necessary, required tags.
10. Click **Next : Review + Create**.
11. Click **Create**.
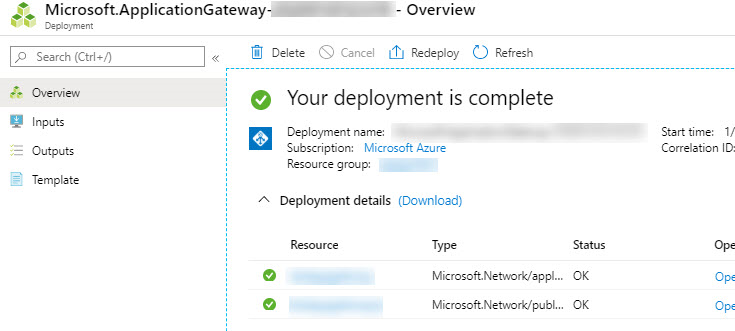
A deployment progress page displays the status of your server creation until it is complete, which takes about 5 minutes. When complete, the Azure UI displays all of the resources created for your Application Gateway details:
### Locating your SQL database details
After you finalize your SQL database configuration and you are ready to deploy, locate the the SQL Server name for
**YOUR_DB_HOST** and the SQL database name for **YOUR_DB_NAME** for this database URL string in the “pega” Helm chart:
`jdbc:sqlserver://**YOUR_DB_HOST**:1433;databaseName=**YOUR_DB_NAME**;selectMethod=cursor;sendStringParametersAsUnicode=false:`
1. In the upper left corner of your Azure portal, click the **Portal** menu.
2. In the **Favorites** section, select **SQL databases**.
3. In the **Name** column, select the database name that you just created to display
it details.
4. Locate **YOUR_DB_NAME** and **YOUR_DB_HOST**.
You need these names to update your pega.yaml Helm chart.

## Installing and deploying Pega Platform using Helm charts – 90 minutes
To deploy Pega Platform by using Helm, customize the default Helm charts that holds the specific settings for your deployment needs and then run a series of Helm commands to complete the deployment.
An installation with deployment will take about 90 minutes total, because a Pega Platform installation in your PostgreSQL database takes up to an hour.
### Adding the Pega configuration files to your Helm installation on your local system
Pega maintains a repository of Helm charts that are required to deploy Pega Platform using Helm, including a generic version of the following charts. After you add the repository to your local system, you can customize these Pega configuration files for your Pega Platform deployment:
- pega/addons – Use this chart to install any supporting services and tools which your Kubernetes environment will require to support a Pega deployment: the required services, such as a load balancer or metrics server, that your deployment requires depend on your cloud environment. For instance you can specify whether you want to use a generic load-balancer or use one that is offered in your Kubernetes environment. With the instructions in this runbook, you deploy these supporting services once per Kubernetes environment when you install the addons chart, regardless of how many Pega Infinity instances are deployed.
- pega/pega - Use this chart to set customization parameters for your deployment. You will modify this chart later in the deployment tasks.
- pega/backingservices - Use this chart to set customization parameters for the Pega-provided Search and Reporting Service (SRS) your deployment. You will modify this chart later in the deployment tasks.
To customize these files, you must download them from the source github repository to your local system, edit them with a text editor, and then save them to your local system using the same filename.
1. To add the Pega repository to your Helm installation, enter:
`$ helm repo add pega https://pegasystems.github.io/pega-helm-charts`
2. To verify the new repository, you can search it by entering:
```
$ helm search repo pega
NAME CHART VERSION APP VERSION DESCRIPTION
pega/pega 2.2.0 Helm chart to configure required installation and deployment configuration settings in your environment for your deployment.
pega/addons 2.2.0 1.0 Helm chart to configure supporting services and tools in your environment for your deployment.
pega/backingservices 2.2.0 Helm Chart to provision the latest Search and Reporting Service (SRS) for your Pega Infinity deployment.
```
The pega and addons charts require customization for your organization's AKS deployment of Pega Platform. Use of the backingservices chart is optional, but recommended for Pega Infinity 8.6 and later.
#### Updating the addons.yaml Helm chart values
To configure the use of an Application Gateway Ingress Controller (AGIC) in the addons.yaml file, download the file in the charts/addons folder, edit it with a text editor, and then save it to your local system using the same filename.
1. Download the example pega/addons [addons.yaml](./resources/addons-aks.yaml) to the \/aks-demo.
This example addons file specifies the use of an AGIC and contains several parameters that will specify details from your AKS environment that are required to deploy Pega Platform into your environment.
2. Use a text editor to open the addons-aks.yaml file and update the following parameters in the chart based on your AKS requirements:
- Specify your Azure subscription ID in the `appgw.subscriptionId: ` parameter.
- Specify the Azure resource group in which you created the Application Gateway in the `appgw.resourceGroup: ` parameter.
- Specify the name of the Application Gateway in the `appgw.name: ` parameter.
- To expose the AGIK loadbalancer ingress to a public IP, leave the parameter setting to `usePrivateIP: false`; for cases where you need to restrict the ingress to only use a private IP address, enable the setting with the parameter value `usePrivateIP: true`.
- To configure authentication with the AGIC in your AKS cluster, generate a kubernetes secret from an Active Directory Service Principal that is based on your AKS subscription ID. You must encode the Service Principal with base64 and add the result to the `armAuth.secretJSON` field. For details, see [Using a Service Principal](https://docs.microsoft.com/en-us/azure/application-gateway/ingress-controller-install-existing#using-a-service-principal).
In Linux, use the command:
`$ az ad sp create-for-rbac --subscription --sdk-auth true | base64 -w0`
Copy the output and paste it in `armAuth.secretJSON: `
In a Windows system, use a gitbash shell or equivalent command line to encode the command output with the following sequence of commands:
`$ az ad sp create-for-rbac --sdk-auth | base64 -w0`
Pega recommends using gitbash because Powershell commands for the encryption do not support this command.
Copy the output and paste it in `armAuth.secretJSON: `
When you deploy, the actual JSON values that were encoded in the previous step is copied into the "config" file in the C:\Users\XXXXX\.kube folder.
As an authentication alternative, you can configure an AAD Pod Identity to manage authentication access with the AGIC in your cluster via the Azure Resource Manager. For details, see [set-up-aad-pod-identity](https://docs.microsoft.com/en-us/azure/application-gateway/ingress-controller-install-existing#set-up-aad-pod-identity) using the AAD-Pod-Identity [GitHub project](https://github.com/Azure/aad-pod-identity).
- To enable Role-Based Access Control (RBAC) in your deployment, which you must also enable in your Azure AKS environment, set the `rbac.enabled: true` parameter.
3. Save the file.
#### Updating the backingservices.yaml Helm chart values for the SRS (Supported when installing or upgrading to Pega Infinity 8.6 and later)
To configure the parameters in the backingservices.yaml file, download the file in the charts/backingservices folder, edit it with a text editor, and then save it to your local system using the same filename.
1. To download the backingservices.yaml Helm chart to the \\aks-demo, enter:
`$ helm inspect values pega/backingservices > /aks-demo/backingservices.yaml`
2. Use a text editor to open the backingservices.yaml file and update the following parameters in the chart based on your AKS requirements:
| Chart parameter name | Purpose | Your setting |
|:---------------------------------|:-------------------------------------------|:--------------|
| global.imageCredentials.registry: username: password: | Include the URL of your Docker registry along with the registry “username” and “password” credentials. |
url: “\”
username: "\"
password: "\"
|
| global.k8sProvider: | Specify the value of your Kubernetes provider. | k8sProvider: "aks" |
| srs.deploymentName: | Specify unique name for the deployment based on org app and/or srs applicable environment name. | deploymentName: "acme-demo-dev-srs" |
| srs.srsRuntime.srsImage: | Specify the Pega-provided srs-service image, services/search-n-reporting-service:dockerTag that you downloaded and pushed to your Docker registry. | srs.srsRuntime.srsImage: "platform-services/search-n-reporting-service:". For `` tag (refer [compatibility matrix](../charts/backingservices/charts/srs/README.md#srs-version-compatibility-matrix)) |
| srs.srsRuntime.imagePullSecretNames: | Specify any pre-existing image pull secrets required to pull images from your organization's registry. (Optional) | imagePullSecretNames: [secret1, secret2] |
| srs.srsStorage.provisionInternalESCluster: | Enabled by default to provision an Elasticsearch cluster. |
Set srs.srsStorage.provisionInternalESCluster:`true` and run `$ make es-prerequisite NAMESPACE=`
Set srs.srsStorage.provisionInternalESCluster:`false` if you want to use an existing, externally provisioned ElasticSearch cluster.
|
| srs.srsStorage.domain: port: protocol: basicAuthentication: awsIAM: requireInternetAccess: | Disabled by default. Enable only when srs.srsStorage.provisionInternalESCluster is false and you want to configure SRS to use an existing, externally provisioned Elasticsearch cluster. For an Elasticsearch cluster secured with Basic Authentication, use `srs.srsStorage.basicAuthentication` section to provide access credentials. For an AWS Elasticsearch cluster secured with IAM role based authentication, use `srs.srsStorage.awsIAM` section to set the aws region where AWS Elasticsearch cluster is hosted. For unsecured managed ElasticSearch cluster do not configure these options. |
srs.srsStorage.domain: "\"
srs.srsStorage.port: "\"
srs.srsStorage.protocol: "\"
srs.srsStorage.basicAuthentication.username: "\"
srs.srsStorage.basicAuthentication.password: "\"
srs.srsStorage.awsIAM.region: "\"
srs.srsStorage.requireInternetAccess: "\"
|
| elasticsearch: volumeClaimTemplate: resources: requests: storage: | Specify the Elasticsearch cluster disk volume size. Default is 30Gi, set this value to at least three times the size of your estimated search data size |
|
3. Save the file.
4. To use an internal Elasticsearch cluster (srs.srsStorage.provisionInternalESCluster:true) for your deployment, you must run `$ make es-prerequisite NAMESPACE=`.
#### Add supported custom settings for Pega to your deployment
The Pega deployment model supports advanced configurations to fit most existing
clients' needs. If you are a Pega client and have known, required customizations
for your deployment and you already use the following files to add your known
customizations, you can copy those configurations into the configuration files
Pega added for this purpose in the [pega-helm-charts](https://github.com/pegasystems/pega-helm-charts) repository folder, pega-helm-charts/charts/pega/config/deploy:
- context.xml: add additional required data sources
- prlog4j2.xml.tmpl: modify your logging configuration, if required
- prconfig.xml: adjust the standard Pega Platform configuration with known,
required settings
Make these changes before you begin deploying Pega Platform using Helm charts.
#### (Optional) Add Support for providing DB credentials using External Secrets Operator
Create two files following the Kubernetes documentation for External Secrets Operator [External Secrets Operator](https://external-secrets.io/v0.5.3/) :
• An external secret file that specifies what information in your secret to fetch.
• A secret store to define access how to access the external and placing the required files in your Helm directory.
- Copy both files into the pega-helm-charts/charts/pega/templates directory of your Helm
- Update repo to the latest-> helm repo update pega https://pegasystems.github.io/pega-helm-charts
- Update Pega.yaml file to refer to the external secret manager for DB password.
#### Updating the pega.yaml Helm chart values
To configure the parameters in the pega.yaml Helm, download the file in the charts/pega folder, edit it with a text editor, and then save it to your local system using the same filename.
Configure the following parameters so the pega.yaml Helm chart matches your deployment resources in these areas:
- Specify that this is an AKS deployment.
- Credentials for your DockerHub account in order to access the required Docker images.
- Access your Azure SQL database.
- Access your ElasticSearch service (For 8.6 and later, Pega recommends deploying your service using an SRS cluster).
- Install the version of Pega Platform that you built into your Docker installation image.
- Specify host names for your web and stream tiers and import and use any required SSL certificates for your web tiers.
- Enable encryption of traffic between the ingress/load balancer and the pods by specifying SSL certificates for your web tiers.
- Enable Hazelcast client-server model for Pega Platform 8.6 and later.
- For new deployments, Pega recommends deploying Pega Platform using an externalized Kafka configuration as a stream service provider to use your own managed Kafka infrastructure. Deployment of stream with externalized Kafka configuration requires Pega Infinity 8.4 or later.
1. To download the pega.yaml Helm chart to the \\aks-demo, enter:
```bash
helm inspect values pega/pega > /aks-demo/pega.yaml
```
2. Use a text editor to open the pega.yaml file and update the following parameters in the chart based on your AKS requirements:
| Chart parameter name | Purpose | Your setting |
|-------------------------|-------------------------------------------|--------------|
| provider: | Specify an AKS deployment. | provider:"aks"|
| actions.execute: | Specify a “deploy” deployment type. | execute: "deploy" |
| Jdbc.url: | Specify the server and database name for your Pega Platform installation. |
To locate **YOUR_DB_HOST_NAME** and **YOUR_DB_NAME** of your Azure SQL database, see [Locating your SQL database details](#locating-your-sql-database-details).
|
| Jdbc.driverClass: | Specify the driver class for this type of database. | driverClass: "com.microsoft.sqlserver.jdbc.SQLServerDriver" |
| Jdbc.dbType: | Specify the database type. | dbType: "mssql” |
| Jdbc.driverUri: | Specify the database driver Pega Platform uses during the deployment. For AKS, reference the URL of the required 8.2.0. driver file that is publicly available in the referenced Maven repository. | driverUri: "https://repo1.maven.org/maven2/com/microsoft/sqlserver/mssql-jdbc/8.2.0.jre11/mssql-jdbc-8.2.0.jre11.jar" |
| Jdbc: username: password: | Set the security credentials for your database server to allow installation of Pega Platform into your database. |
username: "\"
password: "\"
|
| jdbc.rulesSchema: jdbc.dataSchema: | Set the names of both your rules and the data schema to the values that Pega Platform uses for these two schemas. | rulesSchema: "rules" dataSchema: "data" |
| customArtifactory.authentication: basic.username: basic.password: apiKey.headerName: apiKey.value: | To download a JDBC driver from your custom artifactory which is secured with Basic or APIKey Authentication. Use `customArtifactory.authentication.basic` section to provide access credentials or use `customArtifactory.authentication.apiKey` section to provide APIKey value and dedicated APIKey header details. |
basic.username: "\"
basic.password: "\"
apiKey.headerName: "\"
apiKey.value: "\"
|
| customArtifactory.certificate: | Custom artifactory SSL certificate verification is enabled by default. If your custom artifactory domain has a self-signed SSL certificate, provide the certificate. You can disable SSL certificate verification by setting `customArtifactory.enableSSLVerification` to `false`;however, this setting establishes an insecure connection. |
certificate: "\"
|
| docker.registry.url: username: password: | Include the URL of your Docker registry along with the registry “username” and “password” credentials. |
url: “\”
username: "\"
password: "\"
|
| docker.imagePullSecretNames | Specify the Docker registry secrets to pull an image from a private Docker repository. Refer to [Kubernetes Secrets](https://kubernetes.io/docs/tasks/configure-pod-container/pull-image-private-registry/) to create Docker registry secrets. | imagePullSecretNames: ["secret1", "secret2"] |
| docker.pega.image: | Specify the Pega-provided `Pega` image you downloaded and pushed to your Docker registry. | Image: "\/my-pega:\" |
| tier.name: ”web” tier.ingress.domain:| Set a host name for the pega-web service of the DNS zone. |
domain: "\"
tier.ingress.tls: set to `true` to support HTTPS in the ingress and pass the SSL certificate in the cluster using a secret. For details, see step 12 in the section, **Deploying Pega Platform using the command line**.
|
| tier.name: ”web” tier.service.tls:| Set this parameter as `true` to encrypt the traffic between the load balancer/ingress and pods. Beginning with Helm version `2.2.0` Pega provides a default self-signed certificate; Pega also supports specifying your own CA certificate. |
tier.service.tls.enabled: set to `true` to enable the traffic encryption
tier.service.tls.port: 443
tier.service.tls.targetPort: 8443
tier.service.tls.keystore: The base64 encoded content of the keystore file. Leave this value empty to use the default, Pega-provided self-signed certificate. The CN(Common Name) of the certificate should match that of the domain specified in `tiers.web.ingress.domain`, see [End-to-end TLS with the v2 SKU](https://docs.microsoft.com/en-us/azure/application-gateway/ssl-overview#end-to-end-tls-with-the-v2-sku).
tier.service.tls.keystorepassword: the password of the keystore file
tier.service.tls.cacertificate: the base64 encrypted content of the root CA certificate. Leave this value empty for AKS deployments.
tier.service.traefik.enabled: set to `false` as this option is for `k8s` provider not for `AKS`
|
| tier.name: ”stream” (Deprecated) tier.ingress.domain: | The "Stream tier" is deprecated, please enable externalized Kafka service configuration under External Services.Set the host name for the pega-stream service of the DNS zone. |
domain: "\"
Your stream tier host name should comply with your networking standards.
tier.ingress.tls: set to `true` to support HTTPS in the ingress and pass the SSL certificate in the cluster using a secret. For details, see step 12 in the section, **Deploying Pega Platform using the command line**.
To remove the exposure of a stream from external network traffic, delete the `service` and `ingress` blocks in the tier.
|
| pegasearch: | For Pega Platform 8.6 and later, Pega recommends using the chart 'backingservices' to enable Pega SRS. To deploy this service, you must configure your SRS cluster using the backingservices Helm charts and provide the SRS URL for your Pega Infinity deployment. |
externalSearchService: true
externalURL: pegasearch.externalURL For example, http://srs-service.mypega-pks-demo.svc.cluster.local
|
| installer.image: | Specify the Pega-provided Docker `installer` image that you downloaded and pushed to your Docker registry. | Image: "\/my-pega-installer:\" |
| installer. adminPassword: | Specify an initial administrator@pega.com password for your installation. This will need to be changed at first login. The adminPassword value cannot start with "@". | adminPassword: "\" |
| hazelcast: | For Pega Platform 8.6 and later, Pega recommends using Hazelcast in client-server model. Embedded deployment would not be supported in future platform releases.| |
| hazelcast.image: hazelcast.clusteringServiceImage: | Specify the Pega-provided clustering-service Docker image that you downloaded and pushed to your Docker registry. | Image: "/my-pega-installer:" |
| hazelcast.enabled: hazelcast.clusteringServiceEnabled: hazelcast.replicas: hazelcast.username: hazelcast.password: | Enable the use of Hazelcast in client-server model for the version of Pega Platform, configure the number of replicas and set a username and password for authentication. |
enabled: true/false Setting above to true will deploy Pega Platform using a client-server Hazelcast model for version 8.6 through 8.7.x. Note: Make sure to set this value as "false" if your Pega Platform version is earlier than "8.6"; if not set, the installation will fail.
clusteringServiceEnabled: true/false Setting above to true will deploy Pega Platform using a client-server Hazelcast model for version 8.8 and later.
replicas:
username: ""
password: ""
|
| stream.enabled: stream.bootstrapServer: stream.securityProtocol: stream.trustStore: stream.trustStorePassword: stream.keyStore: stream.keyStorePassword: stream.saslMechanism: stream.jaasConfig: stream.streamNamePattern: stream.replicationFactor: stream.external_secret_name:| Enable an externalized kafka configuration to connect to your existing stream service, by configuring these required settings |
enabled: true/false Set to true if you want to deploy Pega Platform to use an externalized Kafka configuration, otherwise leave set to false. Note: Pega recommends enabling an externalized Kafka configuration and has deprecated using a stream tier configuration starting at version 8.7.
bootstrapServer: Provide your existing Kafka broker URLs separated by commas.
securityProtocol: Provide the required security protocol that your deployment will use to communicate with your existing brokers. Valid values are: PLAINTEXT, SSL, SASL_PLAINTEXT, SASL_SSL.
trustStore: When using a trustStore certificate, you must also include a Kubernetes secret name, that contains the trustStore certificate, in the global.certificatesSecrets parameter. Pega deployments only support trustStores using the Java Key Store (.jks) format.
trustStorePassword: If required, provide keyStore value in plain text.
keyStore: When using a keyStore certificate, you must also include a Kubernetes secret name, that contains the keyStore certificate, in the global.certificatesSecrets parameter. Pega deployments only support keyStores using the Java Key Store (.jks) format.
keyStorePassword: If required, provide keyStore value in plain text.
jaasConfig: If required, provide jaasConfig value in plain text.
saslMechanism: If required, provide SASL Mechanism. Supported values are: PLAIN, SCRAM-SHA-256, SCRAM-SHA-512.
streamNamePattern: By default, topics originating from Pega Platform have the "pega-" prefix, so that it is easy to distinguish them from topics created by other applications. Pega supports customizing the name pattern for your Externalized Kafka configuration for each deployment.
replicationFactor: Your replicationFactor value cannot be more than the number of Kafka brokers and 3.
external_secret_name: To avoid exposing trustStorePassword, keyStorePassword, and jaasConfig parameters, leave the values empty and configure them using an External Secrets Manager, making sure that you configure the keys in the secret in the order:STREAM_TRUSTSTORE_PASSWORD, STREAM_KEYSTORE_PASSWORD and STREAM_JAAS_CONFIG. Enter the external secret name.
|
4. Save the file.
> Note: To connect AKS with an Azure SQL database using managed Identity, you must include the `Authentication` type as well as `msiClientId` if using user assigned managed identity under `jdbc.connectionProperties`.
example:
`connectionProperties: "selectMethod=cursor;Authentication=ActiveDirectoryMSI;msiClientId=;"`
> As an authentication alternative, you can configure an AAD Pod Identity to manage authentication access for VMSS of your cluster to Azure SQL database. Use the `tier[*].podLabels` parameter to pass a `aadpodidbinding` label to your Pega pod to enable it to discover your AAD Pod Identity. For Installer pod use `"installer".podLabels`
example:
tier:
- name: "web"
nodeType: "Stream,BackgroundProcessing,WebUser,Search"
podLabels:
aadpodidbinding: