# 
*Upgit* 可以快捷地将文件上传到 Github 仓库并得到其直链。简洁跨平台,不常驻内存。
可作为 [Typora](https://support.typora.io/Upload-Image/#image-uploaders) 的自定义上传器使用。
**太长不看**:本程序用于快速上传。配合 AHK 可以帮助你一键完成截图、上传、复制链接的操作。
## 特点
+ 支持多平台,包括 Linux、Windows 和 macOS
+ 支持**多种上传器**,目前包括 Github 和 SMMS
+ 不限制文件类型
+ 支持从**剪贴板上传**
+ 自定义**自动重命名**规则(包括路径)
+ 可通过替换规则实现**CDN**加速
+ 可通过**环境变量**配置
+ 将 URL 输出到标准输出/**剪贴板**,支持 Markdown 格式
### 上传扩展
+ Github
+ Gitee
+ 腾讯云 COS
+ 七牛云 Kodo
+ 又拍云
+ Hello
+ Niupic
+ SM.MS
+ Imgur
+ ImgUrl.org
+ CatBox
+ LSkyPro
+ Chevereto
+ ImgBB
+ Cloudinary
+ EasyImage
+ DALEXNI
查看更多: `./upgit ext ls`
## 开始使用
### 下载
从[Release](https://github.com/pluveto/upgit/releases) 下载.
>如果不知道下载哪一个:
>
> + 对于大多数 Windows用户,请选择 `upgit_win_amd64.exe`
> + 对于大多数 macOS用户,请选择 `upgit_macOS_arm64`
下载后将其重命名为`upgit`(对于Windows用户,`upgit.exe`),保存到某处。若要从任何地方访问它,请将其目录添加到 `PATH` 环境变量中。
**提醒:** 此程序不会自动检查更新。如果你关心本程序的新功能,可以点右上角的 ⭐star 收藏。
### 配置
在程序的同一目录创建 `config.toml` 文件,内容按照[此示例配置文件](https://github.com/pluveto/upgit/blob/main/config.sample.zh-CN.toml) 填写即可.
### 使用
比如上传 `logo.png` 并自动使用重命名规则,执行:
```shell
./upgit logo.png
# for windows: .\upgit.exe logo.png
```
然后会看到一个指向 `logo.png` 的直链。
比如上传 `logo.png` 到远程文件夹 `/my_images/demo`,执行:
```shell
./upgit logo.png -t /my_images/demo
# 对于 Windows: .\upgit.exe logo.png -t /my_images/demo
```
有关更多帮助,请键入“-h”参数
```shell
Upload anything to github repo or other remote storages and then get its link.
For more information: https://github.com/pluveto/upgit
Usage: upgit [--target-dir TARGET-DIR] [--verbose] [--size-limit SIZE-LIMIT] [--wait] [--config-file CONFIG-FILE] [--clean] [--raw] [--no-log] [--uploader UPLOADER] [--output-type OUTPUT-TYPE] [--output-format OUTPUT-FORMAT] [--application-path APPLICATION-PATH] FILE [FILE ...]
Positional arguments:
FILE local file path to upload. :clipboard for uploading clipboard image
Options:
--target-dir TARGET-DIR, -t TARGET-DIR
upload file with original name to given directory. if not set, will use renaming rules
--verbose, -V when set, output more details to help developers
--size-limit SIZE-LIMIT, -s SIZE-LIMIT
in bytes. overwrite default size limit (5MiB). 0 means no limit
--wait, -w when set, not exit after upload, util user press any key
--config-file CONFIG-FILE, -c CONFIG-FILE
when set, will use specific config file
--clean, -C when set, remove local file after upload
--raw, -r when set, output non-replaced raw url
--no-log, -n when set, disable logging
--uploader UPLOADER, -u UPLOADER
uploader to use. if not set, will follow config
--output-type OUTPUT-TYPE, -o OUTPUT-TYPE
output type, supports stdout, clipboard [default: stdout]
--output-format OUTPUT-FORMAT, -f OUTPUT-FORMAT
output format, supports url, markdown and your customs [default: url]
--application-path APPLICATION-PATH
custom application path, which determines config file path and extensions dir path. current binary dir by default
--help, -h display this help and exit
Manage extensions:
upgit ext ACTION
Actions:
ls list all downloadable extensions
my list all local extensions
add smms.jsonc install SMMS uploader
remove smms.jsonc remove SMMS uploader
```
### 配合 Typora 使用
> 假设 *upgit* 程序保存在`“C:\repo\upgit\upgit.exe`。
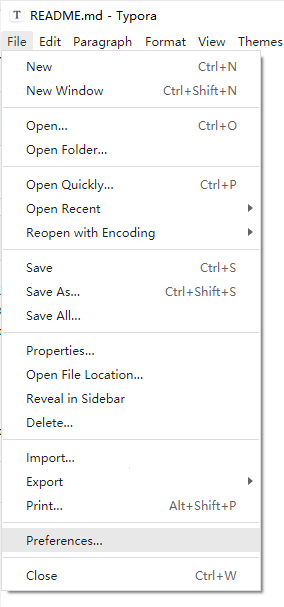
选择 *文件 > 首选项*
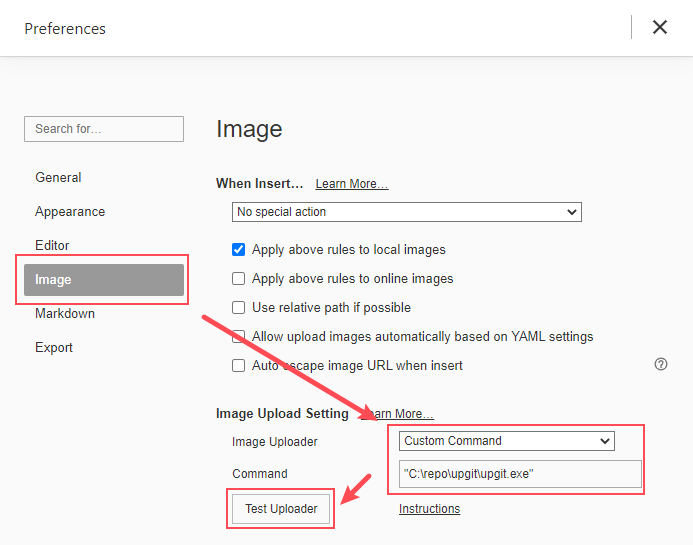
转到 *Image*。选择*自定义命令*作为*图像上传器*。
在*命令*文本框中输入*upgit* 程序位置。
> 你可以点击*测试上传*按钮来确保它工作正常。
然后就可以使用了。
### 上传剪贴板图像
使用 `:clipboard` 占位符放置剪贴板图像。(仅支持**png**格式)
```shell
./upgit :clipboard
```
截图快捷键:
+ 在 macOS 上,使用 `Ctrl+Shift+Cmd+4`
+ 在 Linux/Ubuntu 上,使用 `Ctrl+Shift+PrintScreen`
+ 在 Windows 上,使用 `Shift+Win+s`
### 上传剪贴板文件
**注意:**此功能仅在 Windows 上支持。
使用 `:clipboard-files` 或 `:clipboard-file` 的位置标识来表示剪贴板文件。两者都将上传剪贴板中的所有文件。
```shell
./upgit :clipboard-files
```
因为 golang 不支持直接获取剪贴板文件列表,所以 *upgit* 将使用 [APIProxy-Win32](https://github.com/pluveto/APIProxy-Win32) 来获取剪贴板文件列表。当你第一次使用这个功能时,它将自动下载。
### 将 URL 保存到剪贴板
使用参数 `--output-type clipboard`:
```shell
./upgit logo.png --output-type clipboard
# or .\upgit.exe :clipboard -o clipboard
```
#### 复制为 Markdown 格式
增加参数 `--output-format markdown`:
```shell
./upgit logo.png --output-type clipboard --output-format markdown
# or .\upgit.exe :clipboard -o clipboard -f markdown
```
然后会在剪贴板上得到一个 Markdown 图片链接,比如:
```md

```
### AHK 的最佳实践
对于 Windows 用户:
1. 安装AHK
2. 创建这个脚本 `upload_clipboard.ahk` 并运行:
```ahk
; Press Ctrl + F9 to upload clipboard image
^F9::
RunWait, "upgit.exe" :clipboard --output-type clipboard --output-format markdown
return
```
3. 然后按 WinShiftS 截图,按 CtrlF9上传并将其链接复制到剪贴板
## 配置文件说明
| 键 | 说明 |
| --------------------- | ------------------------------------------------------------ |
| username | 您的 Github 用户名,例如 `pluveto` |
| repo | 您的 Github 存储库名称,例如 `upgit` |
| branch | 保存文件的分支,例如 `master` 或 `main` |
| pat | 个人访问令牌。 访问 [GitHub 文档](https://docs.github.com/en/authentication/keeping-your-account-and-data-secure/creating-a-personal-access-token) 了解更多信息 |
| rename | 重命名规则。不存在的路径目录将被创建。 支持下列占位符: |
| -- `{year}` | -- 年份,如 `2006` |
| -- `{month}` | -- 月,如 `01` |
| -- `{day}` | -- 日,如 `02` |
| -- `{hour}` | -- 时 |
| -- `{minute}` | -- 分 |
| -- `{second}` | -- 秒 |
| -- `{unix_ts}` | -- 以秒计的 Unix 时间戳,如 `1643373370`. |
| -- `{unix_tsms}` | -- 以毫秒计的 Unix 时间戳,如 `1644212979622`. |
| --- `{ext}` | -- 扩展名,如 `.png`,若文件无扩展名,则为空串 |
| -- `{fname}` | -- 原始文件名,如 `logo` (不含扩展名) |
| -- `{fname_hash}` | -- `{fname}`的 MD5 散列值 |
| -- `{fname_hash_4}` | -- `{fname}`的 MD5 散列值,取前 4 位 |
| -- `{fname_hash_8}` | -- `{fname}`的 MD5 散列值,取前 8 位 |
这是一个简单的示例配置文件:
```toml
rename = "{year}/{month}/upgit_{year}{month}{day}_{unix_ts}{ext}"
[uploaders.github]
pat = "ghp_XXXXXXXXXXXXXXXXXXXXXXXXXXXXXXXXXXXX"
repo = "repo-name"
username = "username"
```
### 自定义输出格式
可以通过如下方式自定义输出格式:
```toml
[output_formats]
"bbcode" = "[img]{url}[/img]"
"html" = ' '
"markdown-simple" = ""
```
使用方法示例:
```
upgit :clipboard -o clipboard -f bbcode
```
'
"markdown-simple" = ""
```
使用方法示例:
```
upgit :clipboard -o clipboard -f bbcode
```