---
title: "Master Tutorial: Use R for Cancer Genomics Cloud"
date: "`r Sys.Date()`"
output:
rmarkdown::html_document:
toc: true
toc_float: true
toc_depth: 4
number_sections: true
theme: "flatly"
highlight: "textmate"
css: "sevenbridges.css"
vignette: >
%\VignetteEngine{knitr::rmarkdown}
%\VignetteIndexEntry{Master Tutorial: Use R for Cancer Genomics Cloud}
---
```{r include=FALSE}
knitr::opts_chunk$set(eval = FALSE)
library("sevenbridges")
```
# Introduction
This tutorials originates from 2016 Cancer Genomics Cloud Hackathon R workshop I prepared, and it's recommended for beginner to read and run through all examples here yourself in your R IDE like Rstudio. Then try to make your own app.
In this tutorial, you will learn:
1. API client in R with __sevenbridges__ R package to fully automate analysis
2. Describe command line interface with R package __docopt__
3. Make your own Docker app
4. Describe a standard RNA-seq Bioconductor workflow in CWL with pre-defined report template
5. Execute it in the cloud
6. Reporting tool to generate as many R markdown report or Shiny apps report as you want
7. Deploy directly on shiny server like shinyapps.io from a "report" tool
# Prerequisites
This tutorial doesn't require you to be an advanced R user, everything you need
is R or even better, a cool IDE like Rstudio (or Emacs+ESS), then just open
this R Markdown document in Rstudio. It's easy to learn!
Suggest learning for all users: Docker.
Now we are ready to go!
## Installation
First download the [R Markdown source](https://raw.githubusercontent.com/sbg/sevenbridges-r/master/vignettes/bioc-workflow.Rmd) of this page, so you can load it to your RStudio or your favorite IDE to run through all examples and tweak setup.
This package `sevenbridges` is available on Bioconductor ([release branch](https://bioconductor.org/packages/release/bioc/html/sevenbridges.html), [development branch](https://bioconductor.org/packages/devel/bioc/html/sevenbridges.html)). The latest development version is on [GitHub](https://github.com/sbg/sevenbridges-r).
To install the latest development version from GitHub, run the following commands in R:
```{r}
if (!require("devtools", quietly = TRUE)) install.packages("devtools")
install.packages("BiocManager")
devtools::install_github(
"sbg/sevenbridges-r",
repos = BiocManager::repositories(),
build_vignettes = TRUE, dependencies = TRUE
)
```
After the installation you can always browse the vignettes
```{r}
browseVignettes(package = "sevenbridges")
```
## Register on Cancer Genomics Cloud
 You can find login/registration on the Cancer Genomics Cloud homepage [https://www.cancergenomicscloud.org](https://www.cancergenomicscloud.org).
Follow the [signup tutorial](http://docs.cancergenomicscloud.org/docs/sign-up-for-the-cgc)
if you need to access TCGA Controlled Data on the CGC via NIH eRA Commons.
## Authentication
After logged in, you can get your authentication token under your account setting and the "Developer" tab ([tutorial](http://docs.cancergenomicscloud.org/docs/get-your-authentication-token)).
## Register on shinyapps.io (Optional)
In this tutorial, if you want to try to deploy the Shiny web application automatically on a remote server like shinyapps.io, please visit [https://www.shinyapps.io/](https://www.shinyapps.io/) to register and login.
Get you token and secret ready to deploy:
You can find login/registration on the Cancer Genomics Cloud homepage [https://www.cancergenomicscloud.org](https://www.cancergenomicscloud.org).
Follow the [signup tutorial](http://docs.cancergenomicscloud.org/docs/sign-up-for-the-cgc)
if you need to access TCGA Controlled Data on the CGC via NIH eRA Commons.
## Authentication
After logged in, you can get your authentication token under your account setting and the "Developer" tab ([tutorial](http://docs.cancergenomicscloud.org/docs/get-your-authentication-token)).
## Register on shinyapps.io (Optional)
In this tutorial, if you want to try to deploy the Shiny web application automatically on a remote server like shinyapps.io, please visit [https://www.shinyapps.io/](https://www.shinyapps.io/) to register and login.
Get you token and secret ready to deploy:
 ## Report issues
This package is under active development, will bring many new features as well,
at any moment, if you have questions or problem about this R package,
please file issues on [GitHub](https://github.com/sbg/sevenbridges-r/issues).
If you have question regarding the Cancer Genomics Cloud or other Seven Bridges
platforms, we have a different channel for each platform, for example,
Cancer Genomics Cloud have lots [documentation](http://docs.cancergenomicscloud.org/docs)
and a [forum](http://docs.cancergenomicscloud.org/discuss).
Please, feedback is always welcomed!
# Quickstart
The final goal is make a workflow that
1. Input gene feature, design matrix, bam files, and generate differential
expression report and output full report, a picture and a count table as example.
2. Add report tool with two Shiny app template and two R Markdown template
to collect files from previous flow and generate new report, even deploy on
shinyapps.io automatically after a task is finished.
The final workflow looks like this, it's composed of two tools:
RNA-seq analysis tool and reporting tool.
## Report issues
This package is under active development, will bring many new features as well,
at any moment, if you have questions or problem about this R package,
please file issues on [GitHub](https://github.com/sbg/sevenbridges-r/issues).
If you have question regarding the Cancer Genomics Cloud or other Seven Bridges
platforms, we have a different channel for each platform, for example,
Cancer Genomics Cloud have lots [documentation](http://docs.cancergenomicscloud.org/docs)
and a [forum](http://docs.cancergenomicscloud.org/discuss).
Please, feedback is always welcomed!
# Quickstart
The final goal is make a workflow that
1. Input gene feature, design matrix, bam files, and generate differential
expression report and output full report, a picture and a count table as example.
2. Add report tool with two Shiny app template and two R Markdown template
to collect files from previous flow and generate new report, even deploy on
shinyapps.io automatically after a task is finished.
The final workflow looks like this, it's composed of two tools:
RNA-seq analysis tool and reporting tool.
 The Shiny app report with ggvis module on the shinyapps.io server looks like [this](https://tengfei.shinyapps.io/scatter_plot/)
A ggvis interactive scatter plot
The Shiny app report with ggvis module on the shinyapps.io server looks like [this](https://tengfei.shinyapps.io/scatter_plot/)
A ggvis interactive scatter plot
 A differential expression table
 A full HTML report included, it's also the output from the first tool, in this
way, you can orchestrate many tools output into single report for your task.
A full HTML report included, it's also the output from the first tool, in this
way, you can orchestrate many tools output into single report for your task.

 Now let's start building tools.
## Create a project under your account via API R client
I know, we can always do it via graphic user interface, but let's have fun with the `sevenbridges` packages you just installed.
For complete API tutorial and reference manual, please read another tutorial.
```{}
vignette("api", package = "sevenbridges")
```
Now let's do some simple steps, first thing to do is to create an _Auth_ object,
almost everything started from this object. Our API client follow a style like
this `Auth$properties$action`. On the platform, `Auth` is your account,
and it contains projects, billing groups, users, project contains tasks,
apps, files etc, so it's easy to imagine your API call.
To create an `Auth` object, simply pass the token and platform name (or
alternatively, API base URL) to the `Auth` function.
The default platform is set to CGC. Good news you can use the `sevenbridges`
package to access any Seven Bridges platform with API (v2).
This is the main way to create an Auth object, just replace `your_token`
with your own authentication token from the CGC:
```{r}
a <- Auth(token = "your_token", platform = "cgc")
```
Alternatively, you can save your authentication cross different platforms
in a user configuration file named `credentials` under the directory
`$HOME/.sevenbridges/`. This allows you to manage multiple user profiles
registered on multiple Seven Bridges environments. An example user
configuration file looks like this:
```
[aws-us-tengfei]
api_endpoint = https://api.sbgenomics.com/v2
auth_token = token_for_this_user
# This is a comment:
# another user on platform aws-us
[aws-us-yintengfei]
api_endpoint = https://api.sbgenomics.com/v2
auth_token = token_for_this_user
[cgc]
api_endpoint = https://cgc-api.sbgenomics.com/v2
auth_token = token_for_this_user
[gcp]
api_endpoint = https://gcp-api.sbgenomics.com/v2
auth_token = token_for_this_user
```
When you have this user configuration file ready at this default location,
all you need to do is setting `from = "file"` and choose the `profile_name`
to use. For example:
```{r}
a <- Auth(from = "file", profile_name = "cgc")
# # remove old project
# a$project(id = "tengfei/hackathon")$delete()
```
The third way to save authentication information is by setting system
environment variables. To set the two environment variables
(`SB_API_ENDPOINT` and `SB_AUTH_TOKEN`) in your system, you could
use the function `sbg_set_env()`. For example:
```{r}
sbg_set_env("https://cgc-api.sbgenomics.com/v2", "your_token")
```
To create an `Auth` object using credentials in the environment variables:
```{r}
a <- Auth(from = "env")
```
To create a new project, you need to know your billing group id, cost related
to this project will be charged from this billing group, now play with your
free credit.
```{r}
(b <- a$billing())
# a single billing group is showing
```
Now let's create a new project called "hackathon", save it to an object named
`p` for convenient usage for any call related to this project.
```{r}
(p <- a$project_new("hackathon",
billing_group_id = b$id,
description = "This project is for CGC hackathon"
))
```
Now check it on CGC, you will see a fresh new project is created.
Now let's start building tools.
## Create a project under your account via API R client
I know, we can always do it via graphic user interface, but let's have fun with the `sevenbridges` packages you just installed.
For complete API tutorial and reference manual, please read another tutorial.
```{}
vignette("api", package = "sevenbridges")
```
Now let's do some simple steps, first thing to do is to create an _Auth_ object,
almost everything started from this object. Our API client follow a style like
this `Auth$properties$action`. On the platform, `Auth` is your account,
and it contains projects, billing groups, users, project contains tasks,
apps, files etc, so it's easy to imagine your API call.
To create an `Auth` object, simply pass the token and platform name (or
alternatively, API base URL) to the `Auth` function.
The default platform is set to CGC. Good news you can use the `sevenbridges`
package to access any Seven Bridges platform with API (v2).
This is the main way to create an Auth object, just replace `your_token`
with your own authentication token from the CGC:
```{r}
a <- Auth(token = "your_token", platform = "cgc")
```
Alternatively, you can save your authentication cross different platforms
in a user configuration file named `credentials` under the directory
`$HOME/.sevenbridges/`. This allows you to manage multiple user profiles
registered on multiple Seven Bridges environments. An example user
configuration file looks like this:
```
[aws-us-tengfei]
api_endpoint = https://api.sbgenomics.com/v2
auth_token = token_for_this_user
# This is a comment:
# another user on platform aws-us
[aws-us-yintengfei]
api_endpoint = https://api.sbgenomics.com/v2
auth_token = token_for_this_user
[cgc]
api_endpoint = https://cgc-api.sbgenomics.com/v2
auth_token = token_for_this_user
[gcp]
api_endpoint = https://gcp-api.sbgenomics.com/v2
auth_token = token_for_this_user
```
When you have this user configuration file ready at this default location,
all you need to do is setting `from = "file"` and choose the `profile_name`
to use. For example:
```{r}
a <- Auth(from = "file", profile_name = "cgc")
# # remove old project
# a$project(id = "tengfei/hackathon")$delete()
```
The third way to save authentication information is by setting system
environment variables. To set the two environment variables
(`SB_API_ENDPOINT` and `SB_AUTH_TOKEN`) in your system, you could
use the function `sbg_set_env()`. For example:
```{r}
sbg_set_env("https://cgc-api.sbgenomics.com/v2", "your_token")
```
To create an `Auth` object using credentials in the environment variables:
```{r}
a <- Auth(from = "env")
```
To create a new project, you need to know your billing group id, cost related
to this project will be charged from this billing group, now play with your
free credit.
```{r}
(b <- a$billing())
# a single billing group is showing
```
Now let's create a new project called "hackathon", save it to an object named
`p` for convenient usage for any call related to this project.
```{r}
(p <- a$project_new("hackathon",
billing_group_id = b$id,
description = "This project is for CGC hackathon"
))
```
Now check it on CGC, you will see a fresh new project is created.
 To delete it, just call, but I will suggest you keep it for following tutorial : )
```{r}
# p$delete()
```
## Build a RNA-Seq tool: from bam to report
### Step 1: Have a plan
To demonstrate I will use a RNA-seq
[workflow](https://www.bioconductor.org/help/workflows/rnaseqGene/)
from Bioconductor, when you open this link, you will notice a full example
written in Markdown I want to make it into an app and allow you to input
new files and generate new report base on this template.
Before you build any tool, you have to have a plan in mind
1. What Input, Output and Parameter you want to define for the tool
2. Is there a Docker container already available for your tool?
Do you want to build one with command line interface?
First thing first, let's define our tool first, here is a diagram
generated with Seven Bridges' graphical user interface.
To delete it, just call, but I will suggest you keep it for following tutorial : )
```{r}
# p$delete()
```
## Build a RNA-Seq tool: from bam to report
### Step 1: Have a plan
To demonstrate I will use a RNA-seq
[workflow](https://www.bioconductor.org/help/workflows/rnaseqGene/)
from Bioconductor, when you open this link, you will notice a full example
written in Markdown I want to make it into an app and allow you to input
new files and generate new report base on this template.
Before you build any tool, you have to have a plan in mind
1. What Input, Output and Parameter you want to define for the tool
2. Is there a Docker container already available for your tool?
Do you want to build one with command line interface?
First thing first, let's define our tool first, here is a diagram
generated with Seven Bridges' graphical user interface.
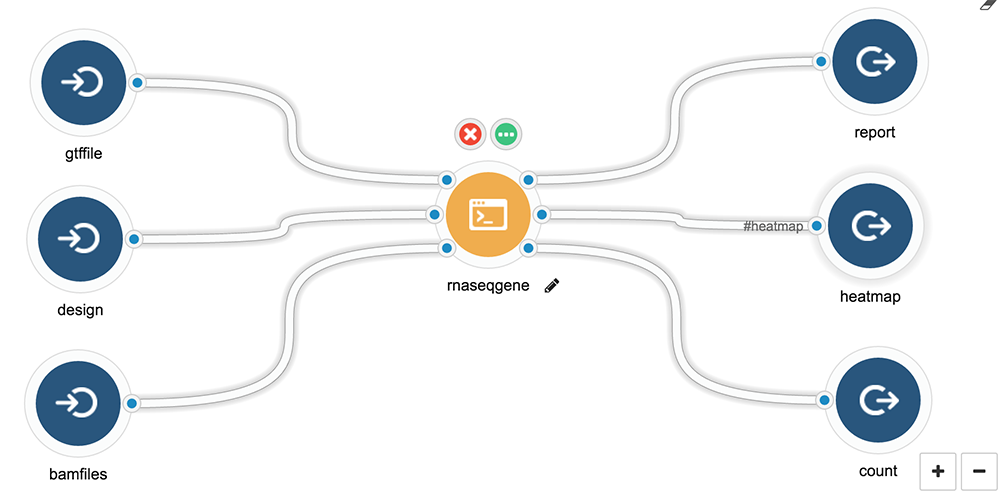 - Input
- Gene feature file
- A list of bamfiles
- Design matrix
- Output
- Report in PDF, using the R Markdown associated with this workflow and example
- Graphics
- Differential expression table
### Step 2: Create Docker container for your tool
Building a development environment is essential for developing your
command line interface and your app. There are some principles:
1. First you need to check is there any existing container you can directly
use, so you don't have to make a new one. If you don't know what to use,
I will suggest you start with `rocker/hadleyverse`, it has lots of stuff like
Markdown, knitr need and other Hadley's popular packages.
Official R Docker images is called "Rocker" project and is on
[GitHub](https://github.com/rocker-org/rocker), please visit the page
to find more details and Dockerfile.
| Image | Description |
| -------------------- |:----------------------------------:|
| `rocker/r-base` | base package to build from |
| `rocker/r-devel` | base + R-devel from SVN |
| `rocker/rstudio` | base + RStudio Server |
| `rocker/hadleyverse` | rstudio + Hadley's packages, LaTeX |
| `rocker/ropensci` | hadleyverse + rOpenSci packages |
| `rocker/r-devel-san` | base, SVN's R-devel and SAN |
Bioconductor have a nice [page](https://bioconductor.org/help/docker/) about the official Docker images, please read for more details.
| Image (release branch) | Image (development branch) |
| ----------------------------------- | ----------------------------------- |
| `bioconductor/release_base` | `bioconductor/devel_base` |
| `bioconductor/release_core` | `bioconductor/devel_core` |
| `bioconductor/release_flow` | `bioconductor/devel_flow` |
| `bioconductor/release_microarray` | `bioconductor/devel_microarray` |
| `bioconductor/release_proteomics` | `bioconductor/devel_proteomics` |
| `bioconductor/release_sequencing` | `bioconductor/devel_sequencing` |
| `bioconductor/release_metabolomics` | `bioconductor/devel_metabolomics` |
For example, you know there is an `runif` function in the `rocker/r-base`
container, you can just do something like this. Please read another
tutorial called "Describe and Execute CWL Tools/Workflows in R",
it introduced a simpler example with random number generator.
```{r, comment = "", eval = TRUE}
rbx <- Tool(
id = "runif",
label = "runif",
hints = requirements(docker(pull = "rocker/r-base"), cpu(1), mem(2000)),
baseCommand = "Rscript -e 'runif(100)'",
stdout = "output.txt",
outputs = output(id = "random", glob = "*.txt")
)
rbx$toJSON(pretty = TRUE)
```
You can directly follow this
[tutorial](http://docs.cancergenomicscloud.org/docs/the-tool-editor),
paste your JSON into your tool editor by click "import".
Then "save" and "run", you will be able to run your first application
on CGC with no parameters and input files.
2. If you don't want to make a new container with command line interface
and you can simply insert script temporarily for existing container.
You can do things as quick as this, by provide a script in the
'content' of 'fileDef'.
```{r, eval = TRUE}
# provide scripts
# make a new script file
fd <- fileDef(
name = "runif.R",
content = "set.seed(1); runif(100)"
)
rbx <- Tool(
id = "runif",
label = "runif",
hints = requirements(docker(pull = "rocker/r-base"), cpu(1), mem(2000)),
requirements = requirements(fd),
baseCommand = "Rscript runif.R", # run script you created.
stdout = "output.txt",
outputs = output(id = "random", glob = "*.txt")
)
```
__Note__: in the above example, I made a mistake on purpose,
so try to debug on the platform if the task fails : )
I will introduce "Tool" function, in the later section, don't worry.
3. For advanced developer/users: if you think a cool command line interface
is worth doing, and convenient in any case, then go ahead and make one and
create our own container will always be a better idea. this allow you to
provide much formal interface at both command line level or container level.
Here is Dockerfile I used to generate the workflow I need
```{r, eval = TRUE}
fl <- system.file("docker/rnaseqGene", "Dockerfile",
package = "sevenbridges"
)
```
Here is the current content of the `Dockerfile`:
```{r comment='', eval = TRUE}
cat(readLines(fl), sep = "\n")
```
It does a couple of things:
1. Install workflow I need and all dependencies
2. Insert command line interface I created, make it executable and in `PATH`
3. Insert full report template I am using
In the next section, I will show you how to create command line interface.
### Step 3: Create your command line interface
In this step, I am going to:
1. Use R package `docopt` to make R command line interface
2. Insert my script into the container I made
3. Test function inside container
Here is the command line I am using it's called "performDE.R"
```{r, eval = TRUE}
fl <- system.file("docker/rnaseqGene/src", "performDE.R",
package = "sevenbridges"
)
```
Here is the current content of the `Dockerfile`:
```{r comment='', eval = TRUE}
cat(readLines(fl), sep = "\n")
```
I am using `docopt` package instead of `commandArgs` because it allows you
to create a formal interface. For example, you have `'--help'` from command
line for free. Feel free to use other methods like `commandArgs()` in R.
```
$./performDE.R --help
Loading required package: methods
usage: performDE.R [options]
options:
--bamfiles= bamfiles
--design= design data frame
--gtffile= gene feature file
--format= pdf or html. [default: html]
```
Sometime you want to produce a report, so in the end you will notice how
I pass parameters from command line to a report.
### Step 4: Add default report template to your app
As a developer, if you always have a fixed report template provided for you tool,
you can hard-code your template into your Docker container, like you noticed in
the Dockerfile I created, I insert a report R Markdown template. And in the
command line interface, in the end, I pass it to `rmarkdown::render` function
as parameters 'param'. In this way, you define your input in the header of R Markdown.
Examples like this, this template I used here, is exactly the same report on
Bioconductor's RNA-Seq workflow [website](https://www.bioconductor.org/help/workflows/rnaseqGene/).
```{r, eval = TRUE}
fl <- system.file("docker/rnaseqGene/report", "rnaseqGene.Rmd",
package = "sevenbridges"
)
```
Here is the current content (first 50 lines of the whole report) of the template:
```{r comment = "", eval = TRUE}
cat(readLines(fl, n = 50), sep = "\n")
```
See the header, you will see 'params' which is passed from `rmarkdown::render`,
so you can use it directly in the report like `params$bamfiles`.
Now you have
- `Dockerfile`
- Command line interface with report template
You are ready to build Docker container and push it to the registry.
You can choose to use registry like dockerhub or use CGC's own Docker registry
(`cgc-images.sbgenomics.com`). To learn how to use CGC Image registry,
please read out [tutorial](http://docs.cancergenomicscloud.org/docs/the-cgc-image-registry).
### Step 5: Describe your tool in R into CWL
Finally it's time to describe your tool in R (CWL format)!
Well, you are always encouraged to use graphical user interface, but it is
at the same time fun to learn how to do it in R, so you could script how
you build it together, like what I did here, for every single tool JSON, I have
an R script called `generator.R` in the same folder, so I can always trace back.
For example, you can see the same in the `sbg/sevenbridges-r` GitHub repo, under
[inst/docker](https://github.com/sbg/sevenbridges-r/tree/master/inst/docker),
you will see three examples, 1. package Docker 2. RNA-Seq tool 3. report tool,
under each folder, you will see 1. one `Dockerfile`, 2. `src/` for command line
3. `report/` for report template and 4. rabix a generator file and a JSON.
- Input
- Gene feature file
- A list of bamfiles
- Design matrix
- Output
- Report in PDF, using the R Markdown associated with this workflow and example
- Graphics
- Differential expression table
### Step 2: Create Docker container for your tool
Building a development environment is essential for developing your
command line interface and your app. There are some principles:
1. First you need to check is there any existing container you can directly
use, so you don't have to make a new one. If you don't know what to use,
I will suggest you start with `rocker/hadleyverse`, it has lots of stuff like
Markdown, knitr need and other Hadley's popular packages.
Official R Docker images is called "Rocker" project and is on
[GitHub](https://github.com/rocker-org/rocker), please visit the page
to find more details and Dockerfile.
| Image | Description |
| -------------------- |:----------------------------------:|
| `rocker/r-base` | base package to build from |
| `rocker/r-devel` | base + R-devel from SVN |
| `rocker/rstudio` | base + RStudio Server |
| `rocker/hadleyverse` | rstudio + Hadley's packages, LaTeX |
| `rocker/ropensci` | hadleyverse + rOpenSci packages |
| `rocker/r-devel-san` | base, SVN's R-devel and SAN |
Bioconductor have a nice [page](https://bioconductor.org/help/docker/) about the official Docker images, please read for more details.
| Image (release branch) | Image (development branch) |
| ----------------------------------- | ----------------------------------- |
| `bioconductor/release_base` | `bioconductor/devel_base` |
| `bioconductor/release_core` | `bioconductor/devel_core` |
| `bioconductor/release_flow` | `bioconductor/devel_flow` |
| `bioconductor/release_microarray` | `bioconductor/devel_microarray` |
| `bioconductor/release_proteomics` | `bioconductor/devel_proteomics` |
| `bioconductor/release_sequencing` | `bioconductor/devel_sequencing` |
| `bioconductor/release_metabolomics` | `bioconductor/devel_metabolomics` |
For example, you know there is an `runif` function in the `rocker/r-base`
container, you can just do something like this. Please read another
tutorial called "Describe and Execute CWL Tools/Workflows in R",
it introduced a simpler example with random number generator.
```{r, comment = "", eval = TRUE}
rbx <- Tool(
id = "runif",
label = "runif",
hints = requirements(docker(pull = "rocker/r-base"), cpu(1), mem(2000)),
baseCommand = "Rscript -e 'runif(100)'",
stdout = "output.txt",
outputs = output(id = "random", glob = "*.txt")
)
rbx$toJSON(pretty = TRUE)
```
You can directly follow this
[tutorial](http://docs.cancergenomicscloud.org/docs/the-tool-editor),
paste your JSON into your tool editor by click "import".
Then "save" and "run", you will be able to run your first application
on CGC with no parameters and input files.
2. If you don't want to make a new container with command line interface
and you can simply insert script temporarily for existing container.
You can do things as quick as this, by provide a script in the
'content' of 'fileDef'.
```{r, eval = TRUE}
# provide scripts
# make a new script file
fd <- fileDef(
name = "runif.R",
content = "set.seed(1); runif(100)"
)
rbx <- Tool(
id = "runif",
label = "runif",
hints = requirements(docker(pull = "rocker/r-base"), cpu(1), mem(2000)),
requirements = requirements(fd),
baseCommand = "Rscript runif.R", # run script you created.
stdout = "output.txt",
outputs = output(id = "random", glob = "*.txt")
)
```
__Note__: in the above example, I made a mistake on purpose,
so try to debug on the platform if the task fails : )
I will introduce "Tool" function, in the later section, don't worry.
3. For advanced developer/users: if you think a cool command line interface
is worth doing, and convenient in any case, then go ahead and make one and
create our own container will always be a better idea. this allow you to
provide much formal interface at both command line level or container level.
Here is Dockerfile I used to generate the workflow I need
```{r, eval = TRUE}
fl <- system.file("docker/rnaseqGene", "Dockerfile",
package = "sevenbridges"
)
```
Here is the current content of the `Dockerfile`:
```{r comment='', eval = TRUE}
cat(readLines(fl), sep = "\n")
```
It does a couple of things:
1. Install workflow I need and all dependencies
2. Insert command line interface I created, make it executable and in `PATH`
3. Insert full report template I am using
In the next section, I will show you how to create command line interface.
### Step 3: Create your command line interface
In this step, I am going to:
1. Use R package `docopt` to make R command line interface
2. Insert my script into the container I made
3. Test function inside container
Here is the command line I am using it's called "performDE.R"
```{r, eval = TRUE}
fl <- system.file("docker/rnaseqGene/src", "performDE.R",
package = "sevenbridges"
)
```
Here is the current content of the `Dockerfile`:
```{r comment='', eval = TRUE}
cat(readLines(fl), sep = "\n")
```
I am using `docopt` package instead of `commandArgs` because it allows you
to create a formal interface. For example, you have `'--help'` from command
line for free. Feel free to use other methods like `commandArgs()` in R.
```
$./performDE.R --help
Loading required package: methods
usage: performDE.R [options]
options:
--bamfiles= bamfiles
--design= design data frame
--gtffile= gene feature file
--format= pdf or html. [default: html]
```
Sometime you want to produce a report, so in the end you will notice how
I pass parameters from command line to a report.
### Step 4: Add default report template to your app
As a developer, if you always have a fixed report template provided for you tool,
you can hard-code your template into your Docker container, like you noticed in
the Dockerfile I created, I insert a report R Markdown template. And in the
command line interface, in the end, I pass it to `rmarkdown::render` function
as parameters 'param'. In this way, you define your input in the header of R Markdown.
Examples like this, this template I used here, is exactly the same report on
Bioconductor's RNA-Seq workflow [website](https://www.bioconductor.org/help/workflows/rnaseqGene/).
```{r, eval = TRUE}
fl <- system.file("docker/rnaseqGene/report", "rnaseqGene.Rmd",
package = "sevenbridges"
)
```
Here is the current content (first 50 lines of the whole report) of the template:
```{r comment = "", eval = TRUE}
cat(readLines(fl, n = 50), sep = "\n")
```
See the header, you will see 'params' which is passed from `rmarkdown::render`,
so you can use it directly in the report like `params$bamfiles`.
Now you have
- `Dockerfile`
- Command line interface with report template
You are ready to build Docker container and push it to the registry.
You can choose to use registry like dockerhub or use CGC's own Docker registry
(`cgc-images.sbgenomics.com`). To learn how to use CGC Image registry,
please read out [tutorial](http://docs.cancergenomicscloud.org/docs/the-cgc-image-registry).
### Step 5: Describe your tool in R into CWL
Finally it's time to describe your tool in R (CWL format)!
Well, you are always encouraged to use graphical user interface, but it is
at the same time fun to learn how to do it in R, so you could script how
you build it together, like what I did here, for every single tool JSON, I have
an R script called `generator.R` in the same folder, so I can always trace back.
For example, you can see the same in the `sbg/sevenbridges-r` GitHub repo, under
[inst/docker](https://github.com/sbg/sevenbridges-r/tree/master/inst/docker),
you will see three examples, 1. package Docker 2. RNA-Seq tool 3. report tool,
under each folder, you will see 1. one `Dockerfile`, 2. `src/` for command line
3. `report/` for report template and 4. rabix a generator file and a JSON.

 Tool is the simple basic unit of a workflow, you can put the whole flow in one
container and one tool, it of course works, just make it hard to factorize
components. This is the exact example, I can make one tool for `DESeq2` and one
tool for `Rsamtools`, I can also put everything I need in one tool and provide
single functionality.
Note: you can use single Docker image, but describe as many tools as you want
if it contains what you need such as different command.
Follow the example to create Tool with `Tool` function. It's straightforward.
Especially if you are familiar with Seven Bridges Tool editor already.
Hints: please pay attention to how I create
- File list: via ItemArray("File") or "File..." this allow you to input
multiple files form the task page.
- Single File: just "File", only single file allowed.
- Expression to specify the javascript expression (note:it's convenient to do it
with graphic user interface, because you can directly see the result of
the expression)
- Enum: call 'enum'.
```{r, eval = TRUE}
rbx <- Tool(
id = "rnaseqGene",
label = "rnaseqgene",
description = "A RNA-seq Differiencial Expression Flow and Report",
hints = requirements(docker(pull = "tengfei/rnaseqgene"), cpu(1), mem(2000)),
baseCommand = "performDE.R",
inputs = list(
input(
id = "bamfiles", label = "bam files",
description = "a list of bam files",
type = "File...", ## or type = ItemArray("File")
prefix = "--bamfiles",
itemSeparator = ","
),
input(
id = "design", label = "design matrix",
type = "File",
prefix = "--design"
),
input(
id = "gtffile", label = "gene feature files",
type = "File",
prefix = "--gtffile"
),
input(
id = "format", label = "report foramt html or pdf",
type = enum("format", c("pdf", "html")),
prefix = "--format"
)
),
outputs = list(
output(
id = "report", label = "report",
description = "A reproducible report created by Rmarkdown",
glob = Expression(
engine = "#cwl-js-engine",
script = "x = $job[['inputs']][['format']]; if(x == 'undefined' || x == null){x = 'html';};'rnaseqGene.' + x"
)
),
output(
id = "heatmap", label = "heatmap",
description = "A heatmap plot to show the Euclidean distance between samples",
glob = "heatmap.pdf"
),
output(
id = "count", label = "count",
description = "Reads counts matrix",
glob = "count.csv"
),
output(
id = "de", label = "Differential expression table",
description = "Differential expression table",
glob = "de.csv"
)
)
)
```
By default it output YAML, but you can print it into JSON as well.
```{r comment = "", eval = TRUE}
rbx
rbx$toJSON(pretty = TRUE)
rbx$toJSON()
# # or write to an external file
# fl <- "~/Downloads/rnaseqGene.json"
# write(rbx$toJSON(pretty = TRUE), fl)
```
Now you want to add app to your project `p`, by calling `app_add` method,
the first argument is name, the second is either a CWL JSON file,
`Tool` object, or `Workflow` object.
```{r}
# add App you just created
(rna.app <- p$app_add("rnaseqgene", rbx))
```
Please go check your app in your project, check input output and how it maps to the UI.
### Step 6: Execute your tool with a new task via R API
Now let's create a task and execute it with example files. You need to pass unique
file id as input, so the first thing is to get file id you need for that project.
Now let's import some files to your project for this tutorial, you can also do it
via our API client by call `upload` function on project object. It supports
- Single file, multiple file, and folder (recursively all files) as first arugment
- `name`: a new name (with single file upload)
- `overwrite = TRUE` to overwrite existing file
- `metadata`: a list of meta otherwise search for the same file name ended with ".meta"
For example:
```{r}
fl <- system.file("extdata", "sample1.fastq", package = "sevenbridges")
(p <- a$project(id = "tengfei/quickstart"))
# by default load .meta for the file
p$upload(fl, overwrite = TRUE)
# pass metadata
p$upload(fl, overwrite = TRUE, metadata = list(library_id = "testid2", platform = "Illumina x11"))
# rename
p$upload(fl,
overwrite = TRUE, name = "sample_new_name.fastq",
metadata = list(library_id = "new_id")
)
# upload folder
dir.ext <- system.file("extdata", package = "sevenbridges")
p$upload(dir.ext, overwrite = TRUE)
# upload file list
fls <- list.files(dir.ext, recursive = TRUE, full.names = TRUE)
p$upload(fls, overwrite = TRUE)
```
For now try using our graphic user interface to import all files listed here:
```{r, comment = "", eval = TRUE}
download.fl <- system.file("extdata/download.txt", package = "sevenbridges")
cat(readLines(download.fl), sep = "\n")
```
To use the API to uplaod, let's download it to a folder and upload via API.
```{r}
td <- tempfile()
dir.create(td)
for (f in readLines(download.fl)) {
download.file(f, file.path(td, basename(f)))
}
# double check
list.files(td)
# upload to the project you created
p$upload(td)
```
Copy this list, and then in your project, click "add files", and choose
"import from ftp" ([tutorial](http://docs.cancergenomicscloud.org/docs/copy-files-to-a-project)).
When it's finished, refresh your file page, you will be able to see all of them.
The cool thing is that you can search file by 'name' not by id, it support fuzzy
pattern match.
```{r}
# get file id you need as inout
(bamfiles.in <- p$file(".bam"))
(design.in <- p$file("sample_table.csv"))
(gtf.in <- p$file("Homo_sapiens.GRCh37.75_subset.gtf"))
```
Note: you can also passed a list of files like this, to give exact file names
```{r}
bam1 <- p$file("SRR1039516_subset.bam")
bam2 <- p$file("SRR1039512_subset.bam")
bamfiles.in2 <- list(bam1, bam2)
```
Now create a new draft task in your project, don't forget to pass input.
```{r}
# add a new Task
(tsk <- p$task_add(
name = "RNA DE report new",
description = "RNA DE analysis report",
app = rna.app$id,
inputs = list(
bamfiles = bamfiles.in,
design = design.in,
gtffile = gtf.in
)
))
# don't forget to run a draft task
tsk$run()
```
To monitor the task, run following command, it will tell you when it's finished,
but this is not running in the background now.
```{r}
# # monitor the task
# tsk$monitor()
```
A better way is to use the Task hook function, it's flexible, you can hook any
function to a task status. For example, when it's complete download the files.
Now try to send your self a text message : )
```{r}
setTaskHook("completed", function() {
tsk$download("~/Downloads")
})
tsk$monitor()
```
To download all files from a completed tasks
```{r}
tsk$download("~/Downloads")
```
To run task in batch mode, check `?batch` for more details.
Here is an mock running:
```{r}
# batch by items
(tsk <- p$task_add(
name = "RNA DE report new batch 2",
description = "RNA DE analysis report",
app = rna.app$id,
batch = batch(input = "bamfiles"),
inputs = list(
bamfiles = bamfiles.in,
design = design.in,
gtffile = gtf.in
)
))
# batch by metadata, input files has to have metadata fields specified
(tsk <- p$task_add(
name = "RNA DE report new batch 3",
description = "RNA DE analysis report",
app = rna.app$id,
batch = batch(
input = "fastq",
c("metadata.sample_id", "metadata.library_id")
),
inputs = list(
bamfiles = bamfiles.in,
design = design.in,
gtffile = gtf.in
)
))
```
For more details, check R API tutorial.
## Build a reporting Tool
### What is report tool?
In our last section, we demonstrate how to hardcode a R report template
into your Docker container and your command line will output a new report
with new input files.
But how about this, instead of coding template into Docker, I want to
- Provide multiple R markdown template as input
- Provide multiple shiny template as input
- Provide multiple liftr template as input
- Collect files from a flow used for my report
- Collect report from different tools of a single workflow and compile a summary report
Here I am developing a report tool to support all these in a single tool and it
uses two different engines to provide isolated environment to generate report,
because each report has different dependencies.
- `packrat` engine: isolated libraries
- liftr engine (in progress): Docker in Docker
Tool is the simple basic unit of a workflow, you can put the whole flow in one
container and one tool, it of course works, just make it hard to factorize
components. This is the exact example, I can make one tool for `DESeq2` and one
tool for `Rsamtools`, I can also put everything I need in one tool and provide
single functionality.
Note: you can use single Docker image, but describe as many tools as you want
if it contains what you need such as different command.
Follow the example to create Tool with `Tool` function. It's straightforward.
Especially if you are familiar with Seven Bridges Tool editor already.
Hints: please pay attention to how I create
- File list: via ItemArray("File") or "File..." this allow you to input
multiple files form the task page.
- Single File: just "File", only single file allowed.
- Expression to specify the javascript expression (note:it's convenient to do it
with graphic user interface, because you can directly see the result of
the expression)
- Enum: call 'enum'.
```{r, eval = TRUE}
rbx <- Tool(
id = "rnaseqGene",
label = "rnaseqgene",
description = "A RNA-seq Differiencial Expression Flow and Report",
hints = requirements(docker(pull = "tengfei/rnaseqgene"), cpu(1), mem(2000)),
baseCommand = "performDE.R",
inputs = list(
input(
id = "bamfiles", label = "bam files",
description = "a list of bam files",
type = "File...", ## or type = ItemArray("File")
prefix = "--bamfiles",
itemSeparator = ","
),
input(
id = "design", label = "design matrix",
type = "File",
prefix = "--design"
),
input(
id = "gtffile", label = "gene feature files",
type = "File",
prefix = "--gtffile"
),
input(
id = "format", label = "report foramt html or pdf",
type = enum("format", c("pdf", "html")),
prefix = "--format"
)
),
outputs = list(
output(
id = "report", label = "report",
description = "A reproducible report created by Rmarkdown",
glob = Expression(
engine = "#cwl-js-engine",
script = "x = $job[['inputs']][['format']]; if(x == 'undefined' || x == null){x = 'html';};'rnaseqGene.' + x"
)
),
output(
id = "heatmap", label = "heatmap",
description = "A heatmap plot to show the Euclidean distance between samples",
glob = "heatmap.pdf"
),
output(
id = "count", label = "count",
description = "Reads counts matrix",
glob = "count.csv"
),
output(
id = "de", label = "Differential expression table",
description = "Differential expression table",
glob = "de.csv"
)
)
)
```
By default it output YAML, but you can print it into JSON as well.
```{r comment = "", eval = TRUE}
rbx
rbx$toJSON(pretty = TRUE)
rbx$toJSON()
# # or write to an external file
# fl <- "~/Downloads/rnaseqGene.json"
# write(rbx$toJSON(pretty = TRUE), fl)
```
Now you want to add app to your project `p`, by calling `app_add` method,
the first argument is name, the second is either a CWL JSON file,
`Tool` object, or `Workflow` object.
```{r}
# add App you just created
(rna.app <- p$app_add("rnaseqgene", rbx))
```
Please go check your app in your project, check input output and how it maps to the UI.
### Step 6: Execute your tool with a new task via R API
Now let's create a task and execute it with example files. You need to pass unique
file id as input, so the first thing is to get file id you need for that project.
Now let's import some files to your project for this tutorial, you can also do it
via our API client by call `upload` function on project object. It supports
- Single file, multiple file, and folder (recursively all files) as first arugment
- `name`: a new name (with single file upload)
- `overwrite = TRUE` to overwrite existing file
- `metadata`: a list of meta otherwise search for the same file name ended with ".meta"
For example:
```{r}
fl <- system.file("extdata", "sample1.fastq", package = "sevenbridges")
(p <- a$project(id = "tengfei/quickstart"))
# by default load .meta for the file
p$upload(fl, overwrite = TRUE)
# pass metadata
p$upload(fl, overwrite = TRUE, metadata = list(library_id = "testid2", platform = "Illumina x11"))
# rename
p$upload(fl,
overwrite = TRUE, name = "sample_new_name.fastq",
metadata = list(library_id = "new_id")
)
# upload folder
dir.ext <- system.file("extdata", package = "sevenbridges")
p$upload(dir.ext, overwrite = TRUE)
# upload file list
fls <- list.files(dir.ext, recursive = TRUE, full.names = TRUE)
p$upload(fls, overwrite = TRUE)
```
For now try using our graphic user interface to import all files listed here:
```{r, comment = "", eval = TRUE}
download.fl <- system.file("extdata/download.txt", package = "sevenbridges")
cat(readLines(download.fl), sep = "\n")
```
To use the API to uplaod, let's download it to a folder and upload via API.
```{r}
td <- tempfile()
dir.create(td)
for (f in readLines(download.fl)) {
download.file(f, file.path(td, basename(f)))
}
# double check
list.files(td)
# upload to the project you created
p$upload(td)
```
Copy this list, and then in your project, click "add files", and choose
"import from ftp" ([tutorial](http://docs.cancergenomicscloud.org/docs/copy-files-to-a-project)).
When it's finished, refresh your file page, you will be able to see all of them.
The cool thing is that you can search file by 'name' not by id, it support fuzzy
pattern match.
```{r}
# get file id you need as inout
(bamfiles.in <- p$file(".bam"))
(design.in <- p$file("sample_table.csv"))
(gtf.in <- p$file("Homo_sapiens.GRCh37.75_subset.gtf"))
```
Note: you can also passed a list of files like this, to give exact file names
```{r}
bam1 <- p$file("SRR1039516_subset.bam")
bam2 <- p$file("SRR1039512_subset.bam")
bamfiles.in2 <- list(bam1, bam2)
```
Now create a new draft task in your project, don't forget to pass input.
```{r}
# add a new Task
(tsk <- p$task_add(
name = "RNA DE report new",
description = "RNA DE analysis report",
app = rna.app$id,
inputs = list(
bamfiles = bamfiles.in,
design = design.in,
gtffile = gtf.in
)
))
# don't forget to run a draft task
tsk$run()
```
To monitor the task, run following command, it will tell you when it's finished,
but this is not running in the background now.
```{r}
# # monitor the task
# tsk$monitor()
```
A better way is to use the Task hook function, it's flexible, you can hook any
function to a task status. For example, when it's complete download the files.
Now try to send your self a text message : )
```{r}
setTaskHook("completed", function() {
tsk$download("~/Downloads")
})
tsk$monitor()
```
To download all files from a completed tasks
```{r}
tsk$download("~/Downloads")
```
To run task in batch mode, check `?batch` for more details.
Here is an mock running:
```{r}
# batch by items
(tsk <- p$task_add(
name = "RNA DE report new batch 2",
description = "RNA DE analysis report",
app = rna.app$id,
batch = batch(input = "bamfiles"),
inputs = list(
bamfiles = bamfiles.in,
design = design.in,
gtffile = gtf.in
)
))
# batch by metadata, input files has to have metadata fields specified
(tsk <- p$task_add(
name = "RNA DE report new batch 3",
description = "RNA DE analysis report",
app = rna.app$id,
batch = batch(
input = "fastq",
c("metadata.sample_id", "metadata.library_id")
),
inputs = list(
bamfiles = bamfiles.in,
design = design.in,
gtffile = gtf.in
)
))
```
For more details, check R API tutorial.
## Build a reporting Tool
### What is report tool?
In our last section, we demonstrate how to hardcode a R report template
into your Docker container and your command line will output a new report
with new input files.
But how about this, instead of coding template into Docker, I want to
- Provide multiple R markdown template as input
- Provide multiple shiny template as input
- Provide multiple liftr template as input
- Collect files from a flow used for my report
- Collect report from different tools of a single workflow and compile a summary report
Here I am developing a report tool to support all these in a single tool and it
uses two different engines to provide isolated environment to generate report,
because each report has different dependencies.
- `packrat` engine: isolated libraries
- liftr engine (in progress): Docker in Docker
 __Requirement for your report template__
This is how it works
1. An app folder is created for each template
2. In this root folder, you have `data`, `src`, `www` folders,
on the interface, you can connect output into those folders, so data flows into it.
3. First copy what's in your template, then copy those task output into those folders.
4. Now create isolated environment by `packrat` or `liftr`.
5. Compile your template into report or new Shiny app
6. If you pass shinyapp.io token, name, secret, will deploy shiny app for you!
7. So in your template, you have to know file name and location relative to
your app root, this is the most important requirement now.
If you are interested, you can still read my `Dockerfile`, command line,
tool generator and JSON.
_I will suggest you directly copy the json into your project._
Just to try add an app in a different way.
```{r comment = "", eval = TRUE}
fl <- system.file("docker/reporttool/rabix/reporttool.json",
package = "sevenbridges"
)
cat(readLines(fl), sep = "\n")
```
Or just use API to add the raw JSON file
```{r}
# directly add json file
p <- a$project(id = "tengfei/hackathon")
(report.app <- p$app_add("report-tool", fl))
```
Checkout the Dockerfile
```{r comment = "", eval = TRUE}
fl <- system.file("docker/reporttool/Dockerfile",
package = "sevenbridges"
)
cat(readLines(fl), sep = "\n")
```
Checkout the command line
```{r comment = "", eval = FALSE}
fl <- system.file("docker/reporttool/src/report.R",
package = "sevenbriges"
)
cat(readLines(fl), sep = "\n")
```
Checkout the tool generator
```{r comment = "", eval = FALSE}
fl <- system.file("docker/reporttool/rabix/generator.R",
package = "sevenbriges"
)
cat(readLines(fl), sep = "\n")
```
## Compose a full workflow
Even though in R with `sevenbridges` package you can use `%>>%` to connect
two Tool object, but this only works for linear simple flow. For a complicated
flow, we recommend you to use graphic user interface, it's a lot of fun.
Now connect your RNA-seq tool with the report tool you just add it to your
project, follow the tutorial [here](http://docs.cancergenomicscloud.org/docs/the-pipeline-editor),
then make a workflow like this:
__Requirement for your report template__
This is how it works
1. An app folder is created for each template
2. In this root folder, you have `data`, `src`, `www` folders,
on the interface, you can connect output into those folders, so data flows into it.
3. First copy what's in your template, then copy those task output into those folders.
4. Now create isolated environment by `packrat` or `liftr`.
5. Compile your template into report or new Shiny app
6. If you pass shinyapp.io token, name, secret, will deploy shiny app for you!
7. So in your template, you have to know file name and location relative to
your app root, this is the most important requirement now.
If you are interested, you can still read my `Dockerfile`, command line,
tool generator and JSON.
_I will suggest you directly copy the json into your project._
Just to try add an app in a different way.
```{r comment = "", eval = TRUE}
fl <- system.file("docker/reporttool/rabix/reporttool.json",
package = "sevenbridges"
)
cat(readLines(fl), sep = "\n")
```
Or just use API to add the raw JSON file
```{r}
# directly add json file
p <- a$project(id = "tengfei/hackathon")
(report.app <- p$app_add("report-tool", fl))
```
Checkout the Dockerfile
```{r comment = "", eval = TRUE}
fl <- system.file("docker/reporttool/Dockerfile",
package = "sevenbridges"
)
cat(readLines(fl), sep = "\n")
```
Checkout the command line
```{r comment = "", eval = FALSE}
fl <- system.file("docker/reporttool/src/report.R",
package = "sevenbriges"
)
cat(readLines(fl), sep = "\n")
```
Checkout the tool generator
```{r comment = "", eval = FALSE}
fl <- system.file("docker/reporttool/rabix/generator.R",
package = "sevenbriges"
)
cat(readLines(fl), sep = "\n")
```
## Compose a full workflow
Even though in R with `sevenbridges` package you can use `%>>%` to connect
two Tool object, but this only works for linear simple flow. For a complicated
flow, we recommend you to use graphic user interface, it's a lot of fun.
Now connect your RNA-seq tool with the report tool you just add it to your
project, follow the tutorial [here](http://docs.cancergenomicscloud.org/docs/the-pipeline-editor),
then make a workflow like this:
 And next run a task on the platform via UI like this:
 # Exercise: bring your own tool
Now use either graphic user interface or R to describe your tool, your workflow,
write report template for your tool (hard coded) and then share your flow with
your friends.
# More tutorials
After you installed the package
```{r}
browseVignettes("sevenbridges")
```
or on the [vignettes page](https://sbg.github.io/sevenbridges-r/articles/).
# Exercise: bring your own tool
Now use either graphic user interface or R to describe your tool, your workflow,
write report template for your tool (hard coded) and then share your flow with
your friends.
# More tutorials
After you installed the package
```{r}
browseVignettes("sevenbridges")
```
or on the [vignettes page](https://sbg.github.io/sevenbridges-r/articles/).