 📑 Presenter 🎞️
SeleniumBase Presenter (slide-maker) lets you use Python to generate HTML presentations.
Here's a sample presentation:
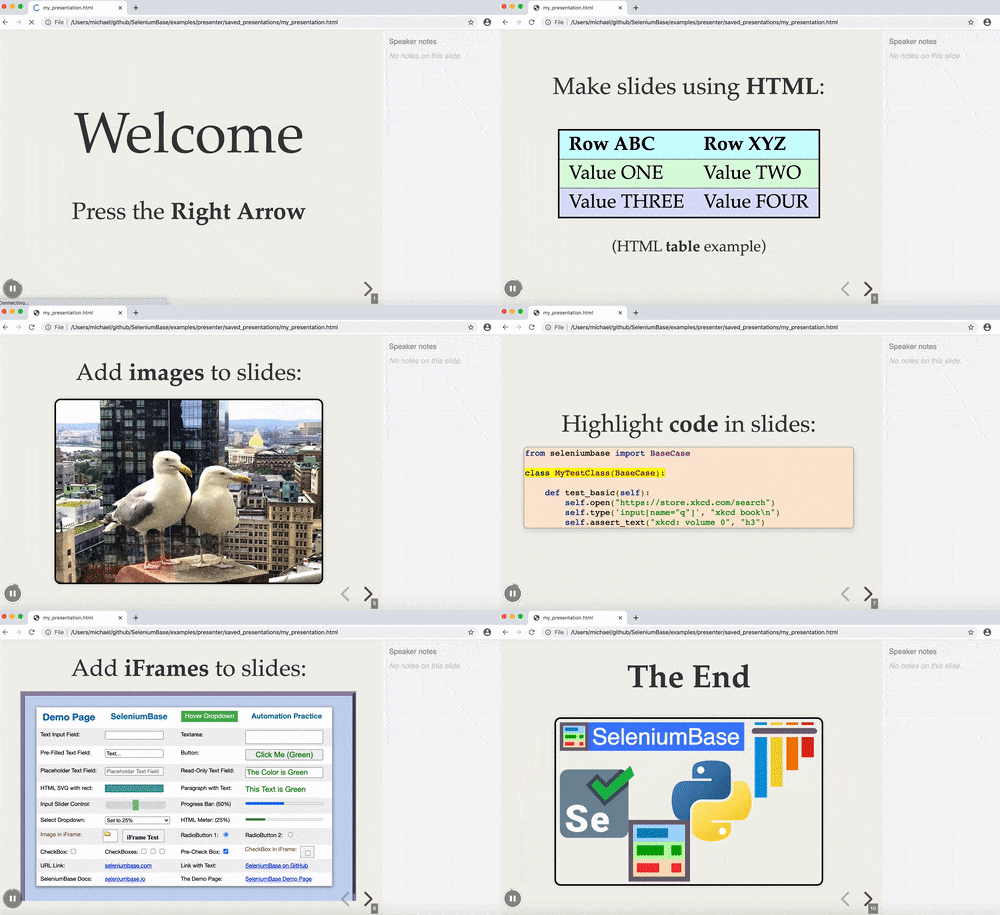
([Click on the image/GIF for the actual presentation](https://seleniumbase.io/other/presenter.html))
([Here's the code for that presentation](https://github.com/seleniumbase/SeleniumBase/blob/master/examples/presenter/my_presentation.py))
Slides can include HTML, code, images, and iframes.
Here's how to run the example presentation:
```zsh
cd examples/presenter
pytest my_presentation.py
```
Here's a presentation with a chart:
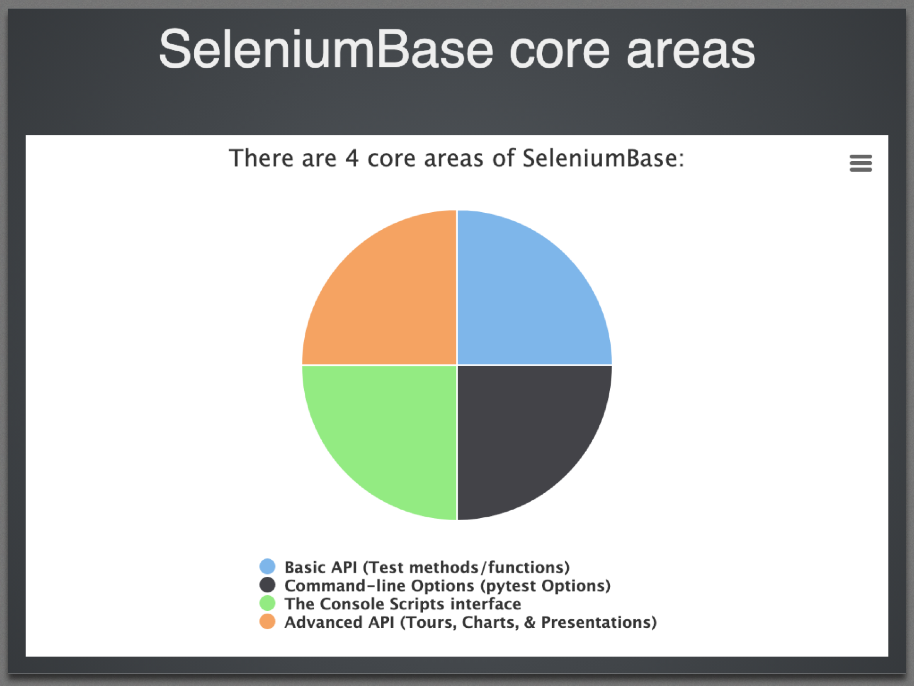
([Click on the image/GIF for the actual presentation](https://seleniumbase.io/other/core_presentation.html))
([Here's the code for that presentation](https://github.com/seleniumbase/SeleniumBase/blob/master/examples/presenter/core_presentation.py))
Here's how to run that example:
```zsh
cd examples/presenter
pytest core_presentation.py
```
Creating a new presentation:
```python
self.create_presentation(name=None, theme="serif", transition="default")
""" Creates a Reveal-JS presentation that you can add slides to.
@Params
name - If creating multiple presentations at the same time,
use this to specify the name of the current presentation.
theme - Set a theme with a unique style for the presentation.
Valid themes: "serif" (default), "sky", "white", "black",
"simple", "league", "moon", "night",
"beige", "blood", and "solarized".
transition - Set a transition between slides.
Valid transitions: "none" (default), "slide", "fade",
"zoom", "convex", and "concave".
"""
```
If creating multiple presentations at the same time, you can pass the ``name`` parameter to distinguish between different presentations.
Notes are disabled by default. You can enable notes by specifying:
``show_notes=True``
Adding a slide to a presentation:
```python
self.add_slide(content=None, image=None, code=None, iframe=None,
content2=None, notes=None, transition=None, name=None)
""" Allows the user to add slides to a presentation.
@Params
content - The HTML content to display on the presentation slide.
image - Attach an image (from a URL link) to the slide.
code - Attach code of any programming language to the slide.
Language-detection will be used to add syntax formatting.
iframe - Attach an iFrame (from a URL link) to the slide.
content2 - HTML content to display after adding an image or code.
notes - Additional notes to include with the slide.
ONLY SEEN if show_notes is set for the presentation.
transition - Set a transition between slides. (overrides previous)
Valid transitions: "none" (default), "slide", "fade",
"zoom", "convex", and "concave".
name - If creating multiple presentations at the same time,
use this to select the presentation to add slides to.
"""
```
Running a presentation:
```python
self.begin_presentation(
filename="my_presentation.html", show_notes=False, interval=0)
""" Begin a Reveal-JS Presentation in the web browser.
@Params
name - If creating multiple presentations at the same time,
use this to select the one you wish to add slides to.
filename - The name of the HTML file that you wish to
save the presentation to. (filename must end in ".html")
show_notes - When set to True, the Notes feature becomes enabled,
which allows presenters to see notes next to slides.
interval - The delay time between autoplaying slides. (in seconds)
If set to 0 (default), autoplay is disabled.
"""
```
Before the presentation is run, the full HTML is saved to the ``saved_presentations/`` folder.
All methods have the optional ``name`` argument, which is only needed if you're creating multiple presentations at once.
Here's an example of using SeleniumBase Presenter:
```python
from seleniumbase import BaseCase
BaseCase.main(__name__, __file__)
class MyPresenterClass(BaseCase):
def test_presenter(self):
self.create_presentation(theme="serif")
self.add_slide(
'Welcome
\n'
'Press the Right Arrow
')
self.add_slide(
'SeleniumBase Presenter
\n'
' '
''
'
'
''
' '
'
'
'
\nCreate presentations with Python
')
self.add_slide(
'Make slides using HTML:
\n'
''
'\n\n'
'| Row ABC | Row XYZ |
\n'
''
'| Value ONE | Value TWO |
\n'
'\n'
'| Value THREE | Value FOUR |
\n'
'
\n(HTML table example)
')
self.add_slide(
'Keyboard Shortcuts:
\n'
'\n'
'| Key | Action |
|---|
\n'
'| => | Next Slide (N also works) |
\n'
'| <= | Previous Slide (P also works) |
'
'\n| F | Full Screen Mode |
\n'
'| O | Overview Mode Toggle |
\n'
'| esc | Exit Full Screen / Overview Mode |
\n'
'| . | Pause/Resume Toggle |
\n'
'| space | Next Slide (alternative) |
')
self.add_slide(
'Add images to slides:
',
image="https://seleniumbase.github.io/other/seagulls.jpg")
self.add_slide(
'Add code to slides:
',
code=(
'from seleniumbase import BaseCase\n\n'
'class MyTestClass(BaseCase):\n\n'
' def test_basics(self):\n'
' self.goto("https://store.xkcd.com/search")\n'
' self.type(\'input[name="q"]\', "xkcd book\\n")\n'
' self.assert_text("xkcd: volume 0", "h3")\n'
' self.goto("https://xkcd.com/353/")\n'
' self.assert_title("xkcd: Python")\n'
' self.assert_element(\'img[alt="Python"]\')\n'
' self.click(\'a[rel="license"]\')\n'
' self.assert_text("free to copy and reuse")\n'
' self.go_back()\n'
' self.click_link("About")\n'
' self.assert_exact_text("xkcd.com", "h2")'))
self.add_slide(
"Highlight code in slides:
",
code=(
'from seleniumbase import BaseCase\n\n'
'class MyTestClass(BaseCase):\n\n'
' def test_basics(self):\n'
' self.goto("https://store.xkcd.com/search")\n'
' self.type(\'input[name="q"]\', "xkcd book\\n")\n'
' self.assert_text("xkcd: volume 0", "h3")'))
self.add_slide(
'Add iFrames to slides:
',
iframe="https://seleniumbase.io/demo_page")
self.add_slide(
'Getting started is easy:
',
code=(
'from seleniumbase import BaseCase\n\n'
'class MyPresenterClass(BaseCase):\n\n'
' def test_presenter(self):\n'
' self.create_presentation(theme="serif")\n'
' self.add_slide("Welcome to Presenter!")\n'
' self.add_slide(\n'
' "Add code to slides:",\n'
' code=(\n'
' "from seleniumbase import BaseCase\\n\\n"\n'
' "class MyPresenterClass(BaseCase):\\n\\n"\n'
' " def test_presenter(self):\\n"\n'
' " self.create_presentation()\\n"))\n'
' self.begin_presentation(\n'
' filename="demo.html", show_notes=True)'))
self.add_slide(
'Include notes with slides:
',
code=('self.add_slide("[Your HTML goes here]",\n'
' code="[Your software code goes here]",\n'
' content2="[Additional HTML goes here]",\n'
' notes="[Attached speaker notes go here]"\n'
' "[Note A! -- Note B! -- Note C! ]")'),
notes='- Note A!
- Note B!
- Note C!
- Note D!
',
content2="(Notes can include HTML tags)
")
self.add_slide(
'Multiple themes available:
',
code=(
'self.create_presentation(theme="serif")\n\n'
'self.create_presentation(theme="sky")\n\n'
'self.create_presentation(theme="simple")\n\n'
'self.create_presentation(theme="white")\n\n'
'self.create_presentation(theme="moon")\n\n'
'self.create_presentation(theme="black")\n\n'
'self.create_presentation(theme="night")\n\n'
'self.create_presentation(theme="beige")\n\n'
'self.create_presentation(theme="league")'))
self.add_slide(
'The End
',
image="https://seleniumbase.github.io/img/sb_logo_10.png")
self.begin_presentation(
filename="presenter.html", show_notes=True, interval=0)
```
That example is from [my_presentation.py](https://github.com/seleniumbase/SeleniumBase/blob/master/examples/presenter/my_presentation.py), which you can run from the ``examples/presenter`` folder with the following command:
```zsh
pytest my_presentation.py
```
Saving a presentation:
If you want to save the presentation you created as an HTML file, use:
```python
self.save_presentation(filename="my_presentation.html", show_notes=True)
```
Presentations automatically get saved when calling:
```python
self.begin_presentation(show_notes=True)
```
Special abilities:
If you want to highlight multiple lines at different times in the same slide with the `` / `` tags, you can use the new ``-``, ``-`` tags, which will generate multiple HTML slides from one Python slide.
Example:
```python
self.add_slide(
code=(
Highlight this on the 1st generated slide
Highlight this on the 2nd generated slide
Highlight this on the 3rd generated slide
Highlight this on the 4th generated slide
)
)
```
Those should automatically get converted to `` ... `` on their turn:
Eg. First generated slide:
```html
Highlight this on the first generated slide
Highlight this on the second generated slide
Highlight this on the third generated slide
Highlight this on the fourth generated slide>
```
Eg. Second generated slide:
```html
Highlight this on the first generated slide
Highlight this on the second generated slide
Highlight this on the third generated slide
Highlight this on the fourth generated slide>
```
Etc...
--------
