# Getting Started with AMYboard
Welcome to **AMYboard** -- a powerful music synthesizer on a small modular-compatible board, for $29. AMYboard is built on the [AMY synthesizer](https://github.com/shorepine/amy) and runs [MicroPython](https://micropython.org) on an ESP32-S3.
**[See our AMYboard FAQ!](faq.md)**
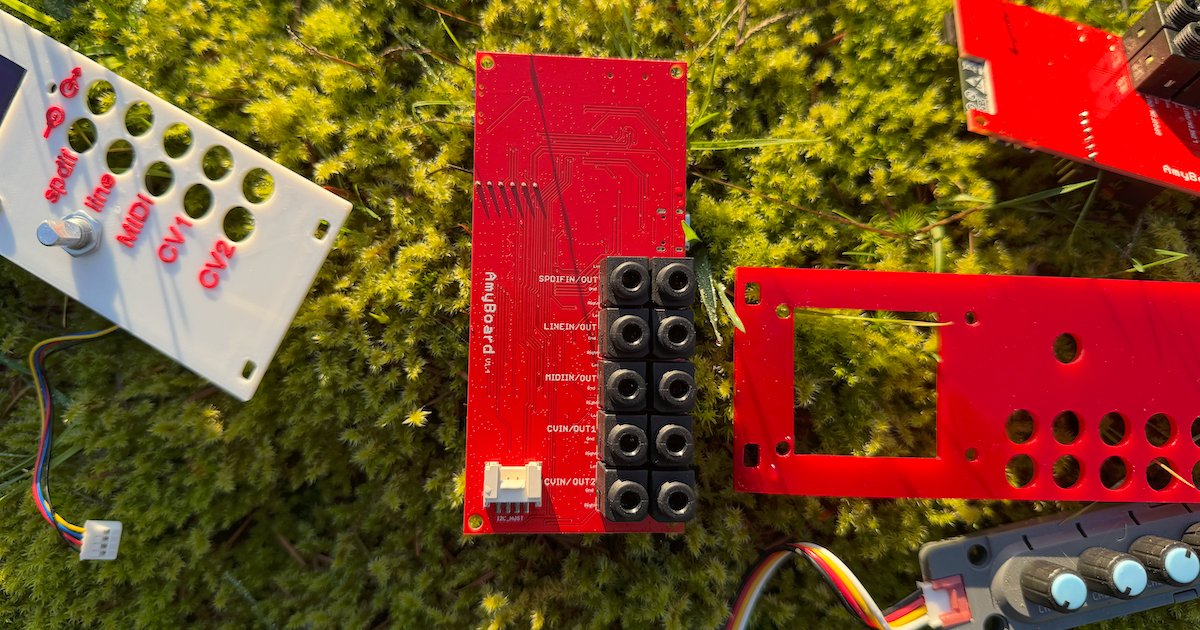 AMYboard gives you:
- **128 Juno-6 analog patches** and **128 DX7 FM patches**, plus piano, drums, and custom synthesis
- **MIDI in and out** (USB gadget and TRS)
- **CV in and out** for modular synth integration (-10V to +10V)
- **S/PDIF in and out** for digital audio
- **SD card** for extra storage and samples
- **I2C port** for [accessories](accessories.md) -- encoders, displays, and more
- **Python programmability** -- write code to control every parameter of the synth
- **Web editor** at [amyboard.com](https://amyboard.com/editor) for patch design and sketch management
If you have problems with AMYboard, check out the [troubleshooting page](troubleshooting.md) or find us on [Discord](https://discord.gg/TzBFkUb8pG).
-- DAn and Brian
## What's in the box
AMYboard ships from [Makerfabs](https://amyboard.com/#get). In the box you'll get the board itself with a plexiglass/acrylic unlabeled front panel, the connectors already on, and screw nuts for attaching the connectors to the panel. The panel is 10HP eurorack width. See [Modular Synth Setup](modular.md) for details on the front panel and Eurorack mounting.
## How AMYboard works - knobs and sketches
By default, our firmware boots your AMYboard up with what we call a sketch. This is code that can do anything you want on your AMYboard - make sequenced music, set up synthesizers, and much more. The sketch also contains the state of your "knobs" - each parameter of the default synth, like filters, frequencies, ADSRs, LFOs and effects.
You use [AMYboard online](online.md) to change the patches, load new presets, find fun sketches from others on our file sharing network AMYboard World, or write your own code to run on your AMYboard.
When AMYboard starts up, it sets up whatever patches are set to each channel and then runs the code that the user set up, if any. The code lets you build great interactive environments: you can load default patches and then have code modify them or change how inputs from CV or MIDI affect the patches, for example.
You can browse AMYboard World to find other sketches to get inspiration! Download them and change them to fit your needs.
You can also remove our custom firmware (it's easy to put back!) and run AMYboard under [Arduino](arduino.md) where you'll have full control over everything on AMYboard.
## Board overview
AMYboard gives you:
- **128 Juno-6 analog patches** and **128 DX7 FM patches**, plus piano, drums, and custom synthesis
- **MIDI in and out** (USB gadget and TRS)
- **CV in and out** for modular synth integration (-10V to +10V)
- **S/PDIF in and out** for digital audio
- **SD card** for extra storage and samples
- **I2C port** for [accessories](accessories.md) -- encoders, displays, and more
- **Python programmability** -- write code to control every parameter of the synth
- **Web editor** at [amyboard.com](https://amyboard.com/editor) for patch design and sketch management
If you have problems with AMYboard, check out the [troubleshooting page](troubleshooting.md) or find us on [Discord](https://discord.gg/TzBFkUb8pG).
-- DAn and Brian
## What's in the box
AMYboard ships from [Makerfabs](https://amyboard.com/#get). In the box you'll get the board itself with a plexiglass/acrylic unlabeled front panel, the connectors already on, and screw nuts for attaching the connectors to the panel. The panel is 10HP eurorack width. See [Modular Synth Setup](modular.md) for details on the front panel and Eurorack mounting.
## How AMYboard works - knobs and sketches
By default, our firmware boots your AMYboard up with what we call a sketch. This is code that can do anything you want on your AMYboard - make sequenced music, set up synthesizers, and much more. The sketch also contains the state of your "knobs" - each parameter of the default synth, like filters, frequencies, ADSRs, LFOs and effects.
You use [AMYboard online](online.md) to change the patches, load new presets, find fun sketches from others on our file sharing network AMYboard World, or write your own code to run on your AMYboard.
When AMYboard starts up, it sets up whatever patches are set to each channel and then runs the code that the user set up, if any. The code lets you build great interactive environments: you can load default patches and then have code modify them or change how inputs from CV or MIDI affect the patches, for example.
You can browse AMYboard World to find other sketches to get inspiration! Download them and change them to fit your needs.
You can also remove our custom firmware (it's easy to put back!) and run AMYboard under [Arduino](arduino.md) where you'll have full control over everything on AMYboard.
## Board overview
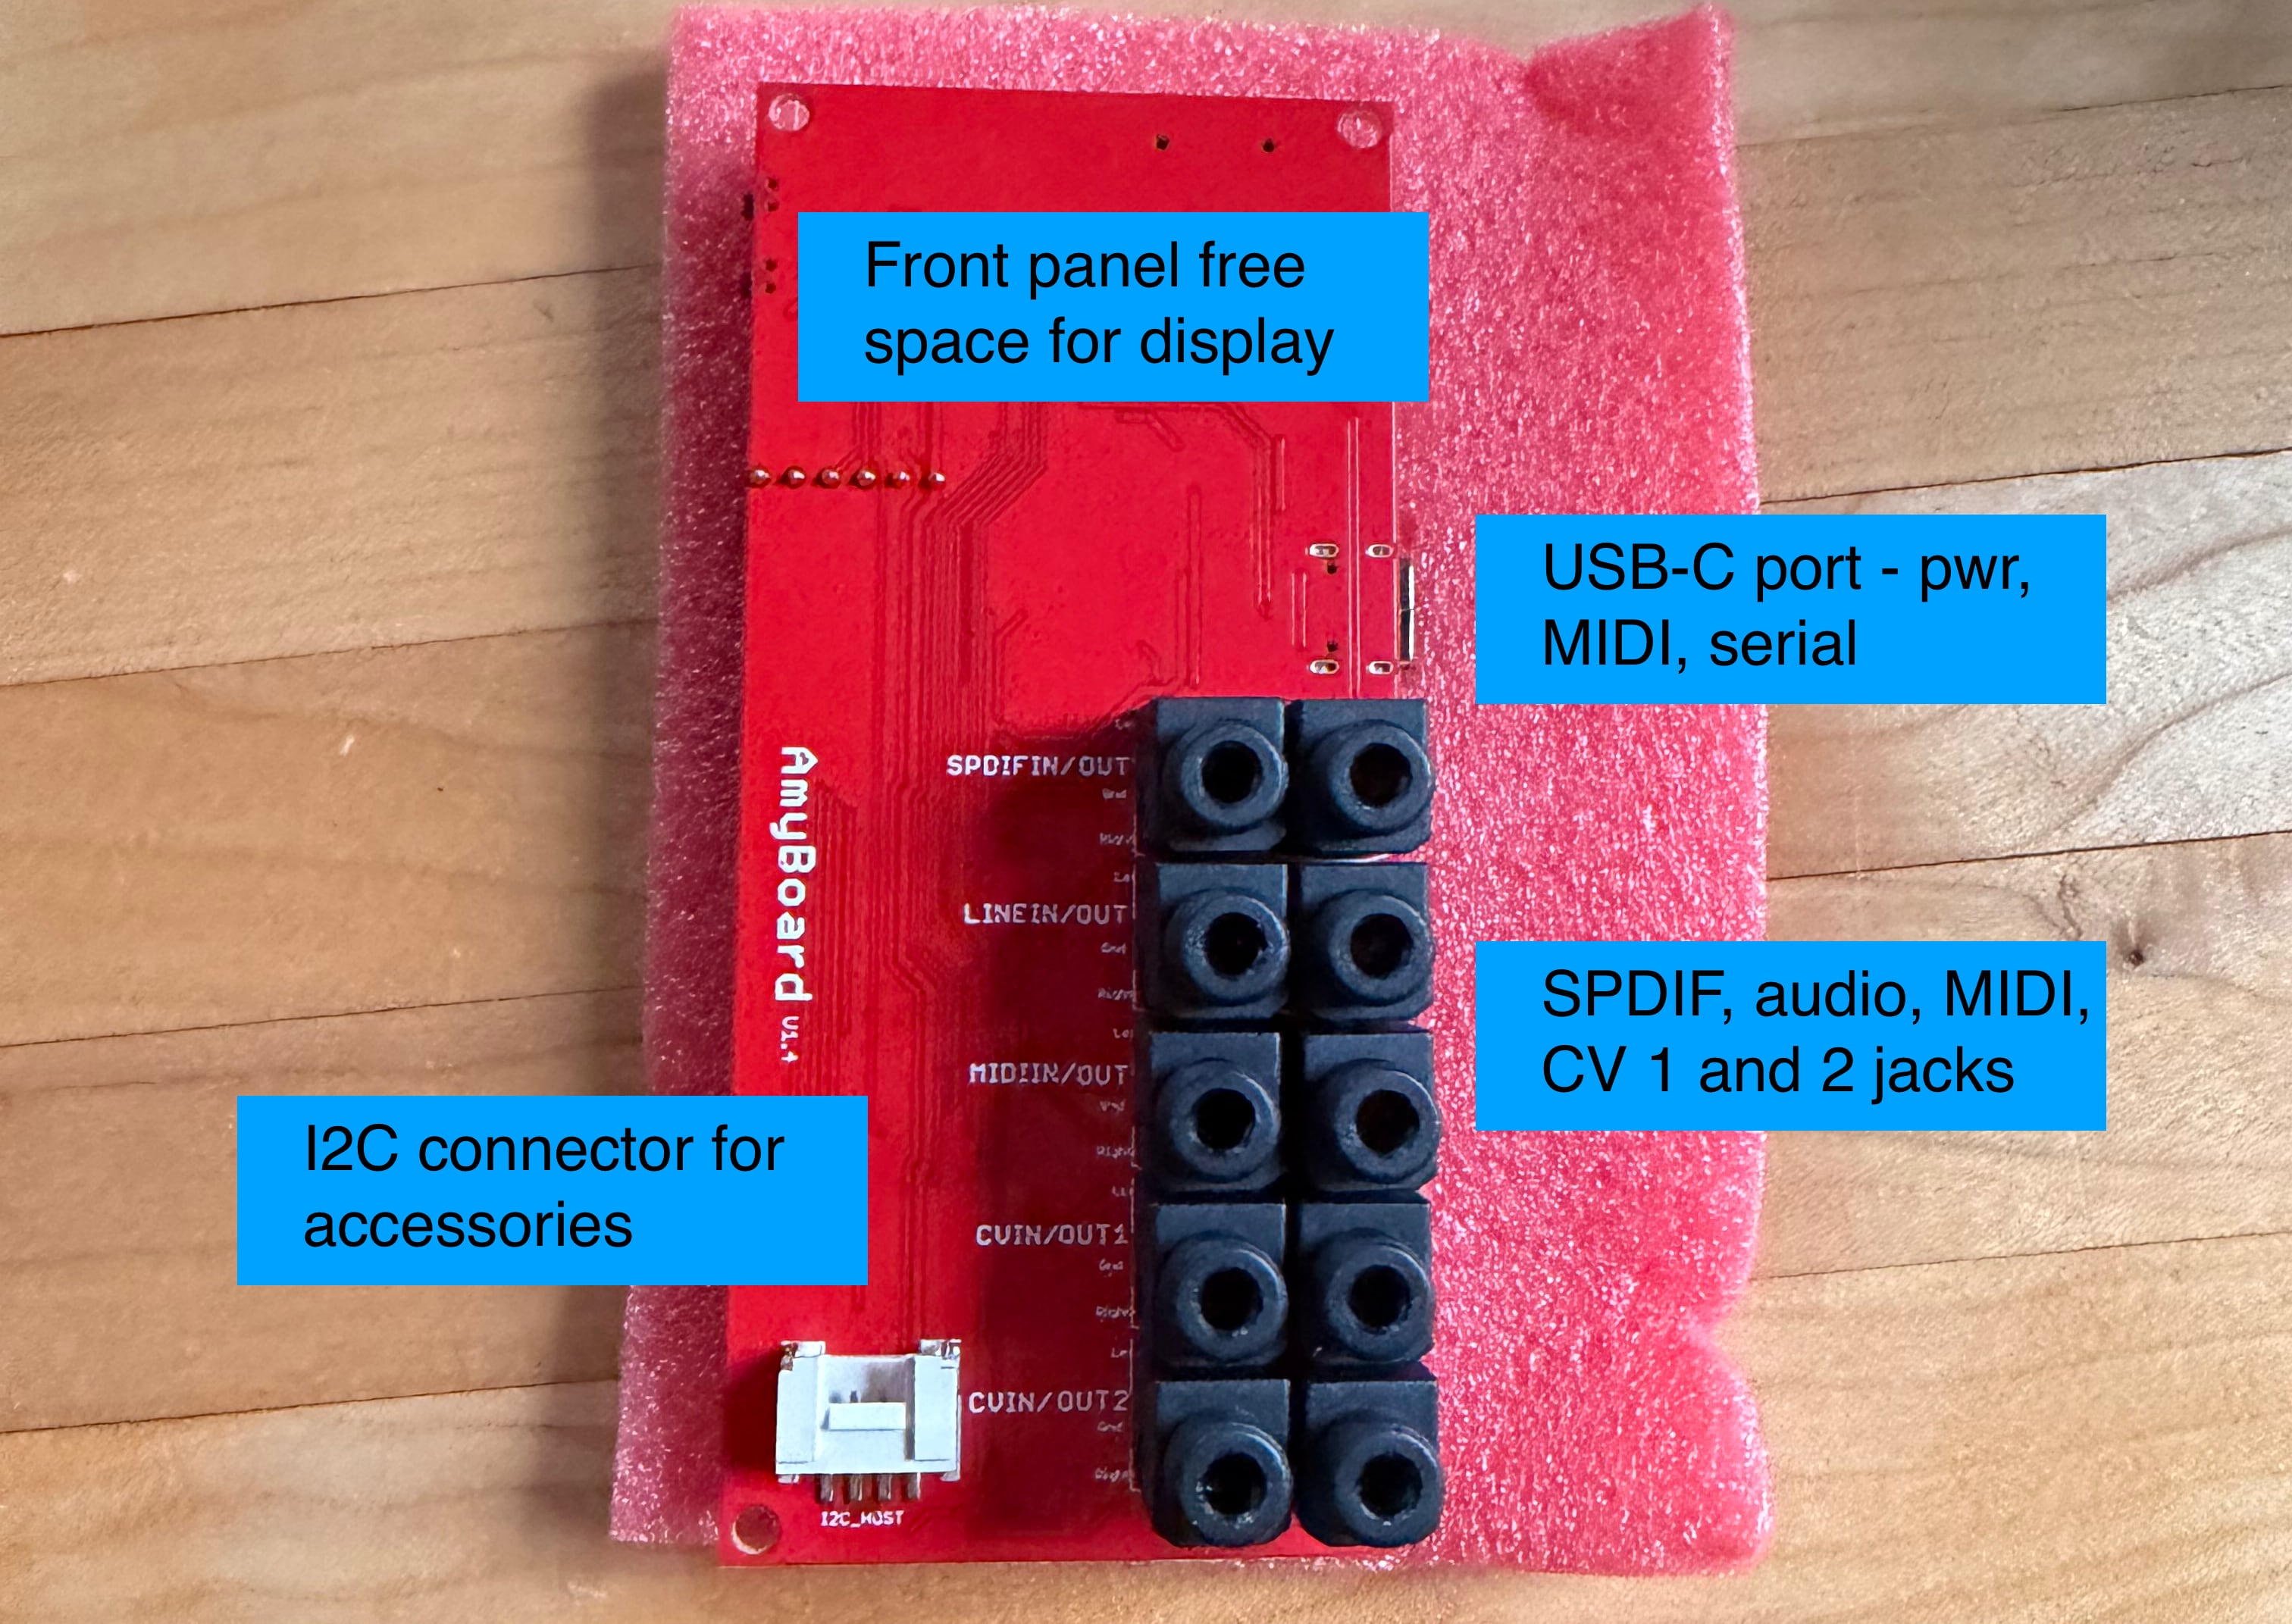 **Front panel connectors** (top to bottom, 10 jacks):
| Connector | Description |
|-----------|-------------|
| **S/PDIF in** | 3.5mm digital audio input |
| **S/PDIF out** | 3.5mm digital audio output |
| **Line in** | 3.5mm stereo analog audio input - can be 10vpp via DIP switch |
| **Line out** | 3.5mm stereo analog audio output - can be 10vpp via DIP switch |
| **MIDI in** | 3.5mm TRS MIDI Type-A or B input |
| **MIDI out** | 3.5mm TRS Type-A or B MIDI output (software switchable) |
| **CV1 in** | 3.5mm analog input, -10V to +10V (ADS1015 ADC) |
| **CV1 out** | 3.5mm analog output, -10V to +10V (GP8413 DAC) |
| **CV2 in** | 3.5mm analog input, -10V to +10V (ADS1015 ADC) |
| **CV2 out** | 3.5mm analog output, -10V to +10V (GP8413 DAC) |
**Front panel connectors** (top to bottom, 10 jacks):
| Connector | Description |
|-----------|-------------|
| **S/PDIF in** | 3.5mm digital audio input |
| **S/PDIF out** | 3.5mm digital audio output |
| **Line in** | 3.5mm stereo analog audio input - can be 10vpp via DIP switch |
| **Line out** | 3.5mm stereo analog audio output - can be 10vpp via DIP switch |
| **MIDI in** | 3.5mm TRS MIDI Type-A or B input |
| **MIDI out** | 3.5mm TRS Type-A or B MIDI output (software switchable) |
| **CV1 in** | 3.5mm analog input, -10V to +10V (ADS1015 ADC) |
| **CV1 out** | 3.5mm analog output, -10V to +10V (GP8413 DAC) |
| **CV2 in** | 3.5mm analog input, -10V to +10V (ADS1015 ADC) |
| **CV2 out** | 3.5mm analog output, -10V to +10V (GP8413 DAC) |
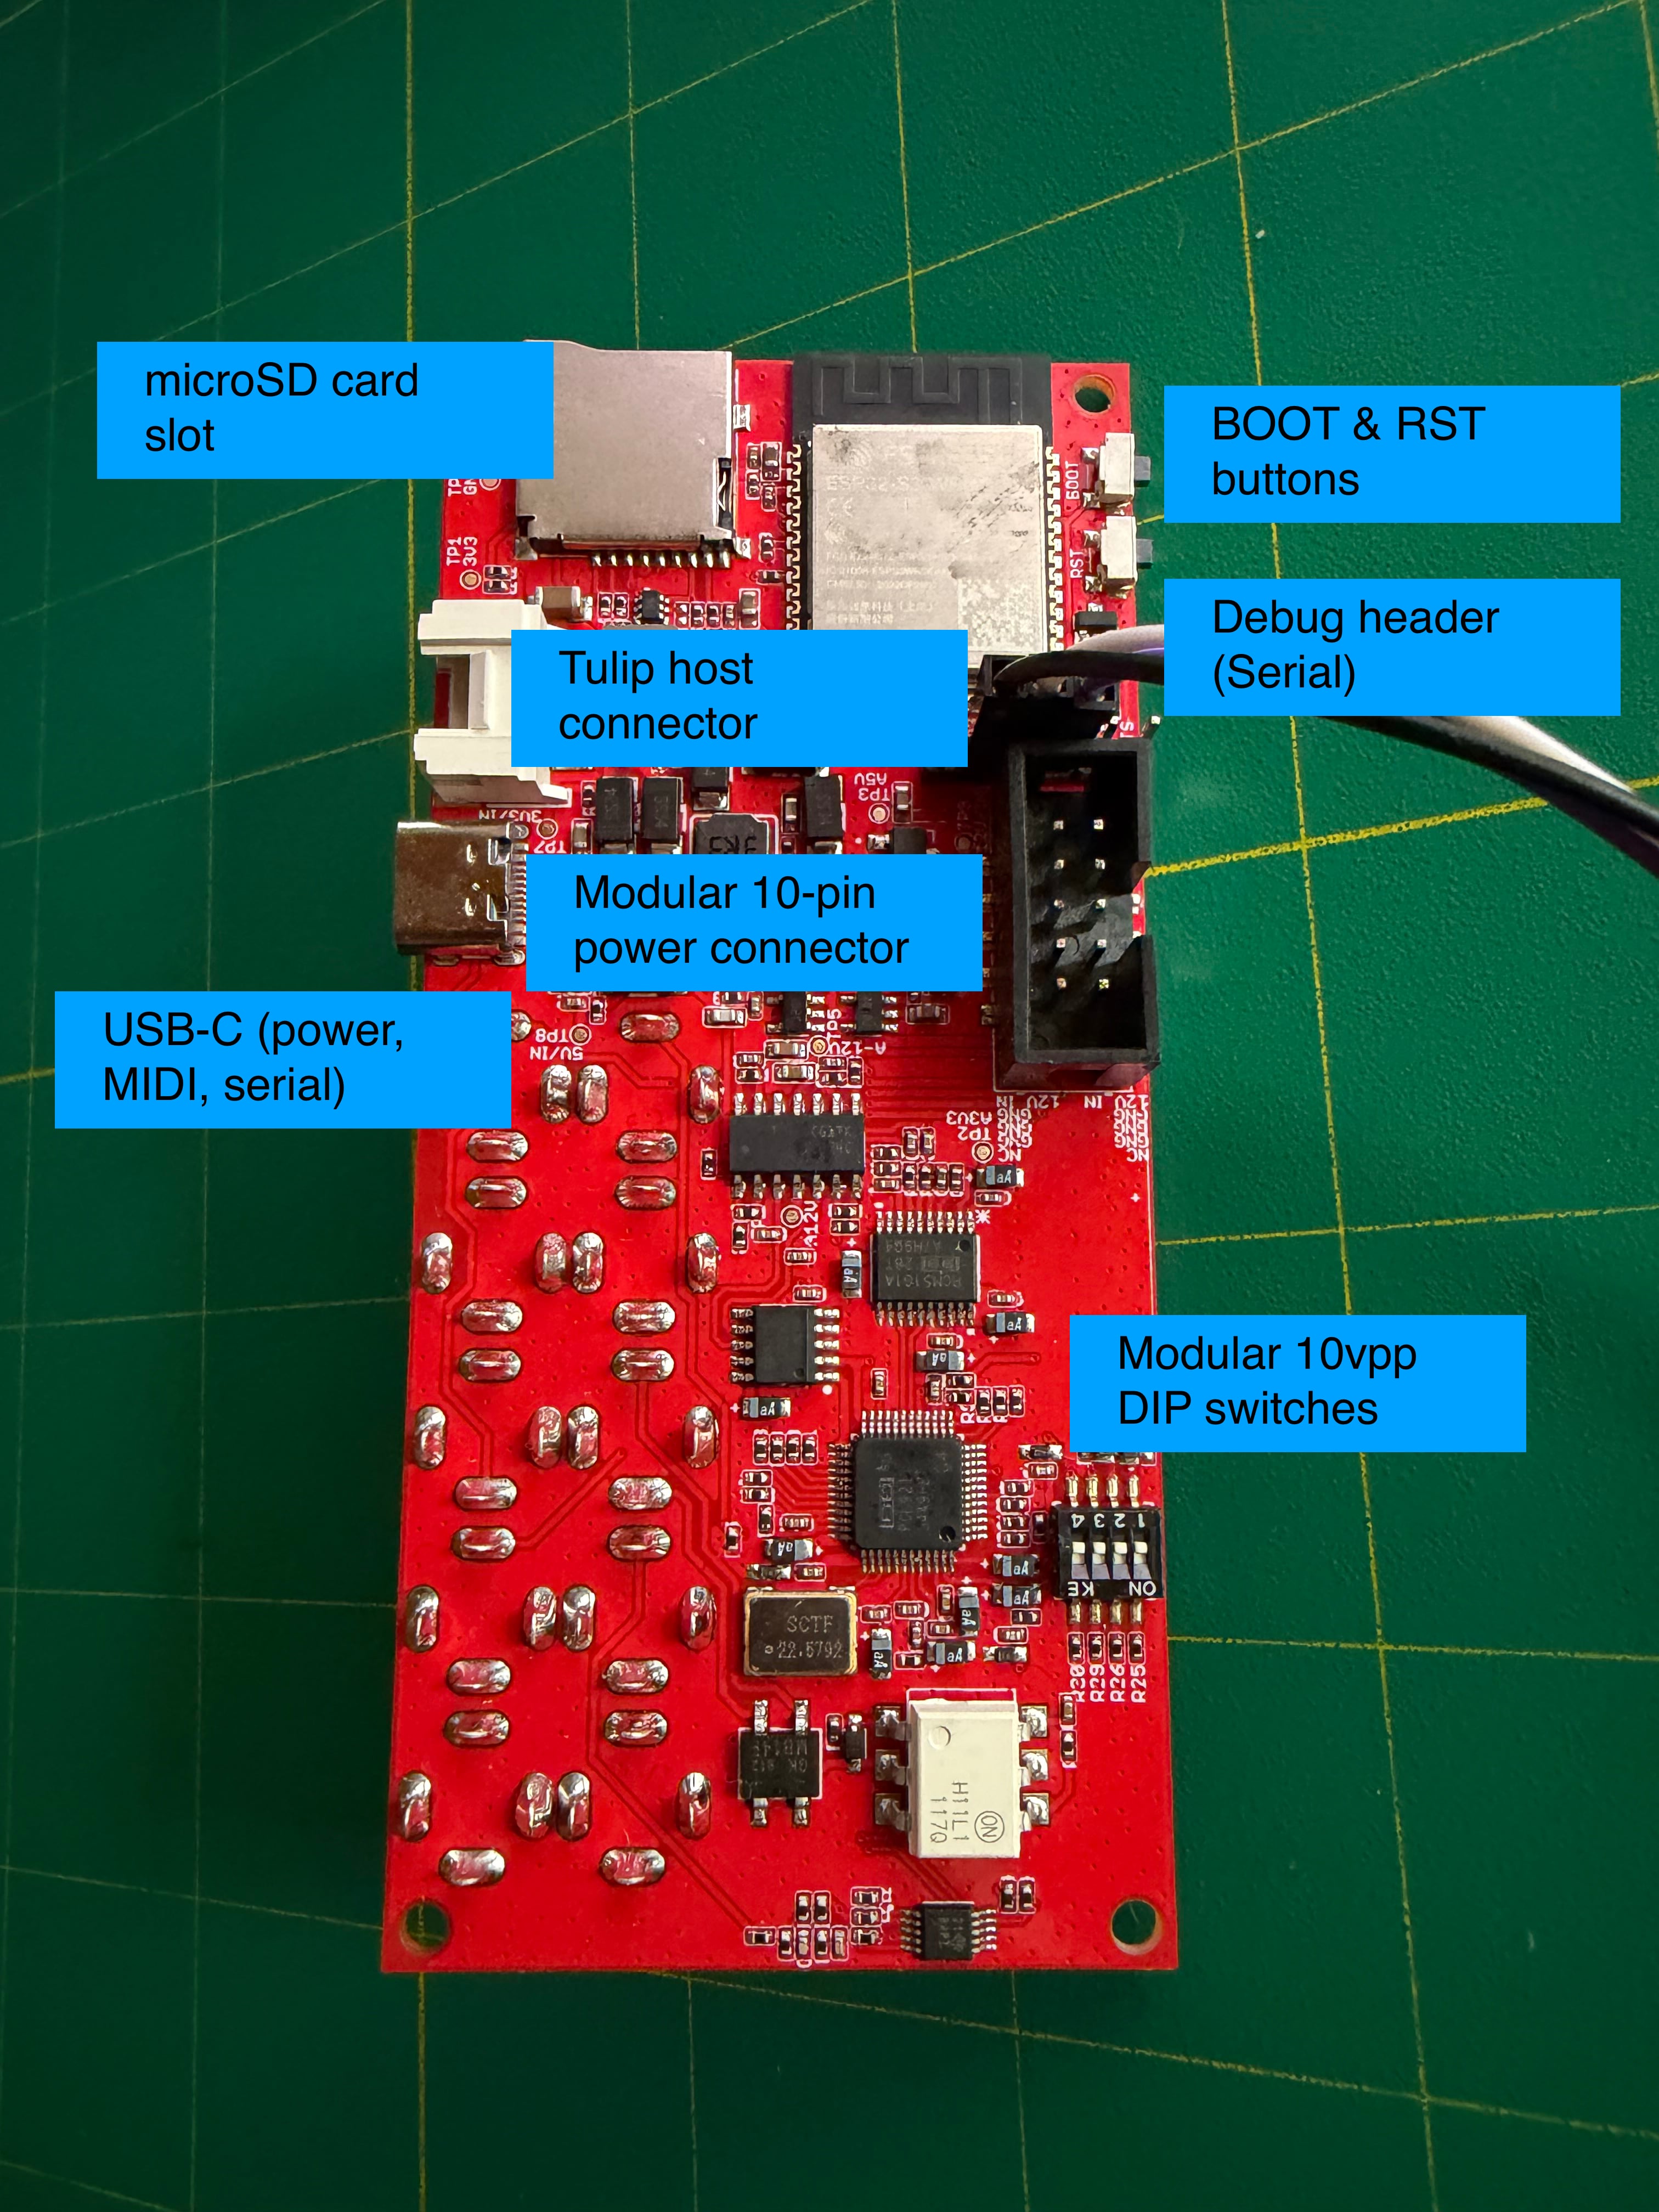 **Other connectors:**
| Connector | Location | Description |
|-----------|----------|-------------|
| **USB-C** | Side | Power, serial REPL, USB MIDI (gadget mode, NOT HOST), firmware updates |
| **I2C front panel** | Front | I2C Grove port for [accessories](accessories.md) (encoders, displays) |
| **I2C host** | Back | For connecting to a [Tulip Creative Computer](https://github.com/shorepine/tulipcc) |
| **MicroSD card** | Side | Extra storage for samples and patches |
| **Modular power** | Back | 10-pin Eurorack power supply connector |
| **Debug header** | Back | For firmware development |
## Power Supplies
AMYboard can be powered 3 ways:
* USB-C connector: standard 5V input via USB
* Modular 10-pin connector: a standard Eurorack connector can power AMYboard via the +12V connector
* I2C host: a Tulip Creative Computer or other 3.3V i2c connection via the Grove connector
If multiple power supplies are connected AMYboard will use the highest available voltage.
When powered only over the I2C host / Grove port (for example, from a Tulip), AMYboard draws about **350 mA** from that 3.3V line. Make sure whatever supplies the port can spare it. If your Tulip reboots in a loop after you connect an AMYboard, see [Quick start - Tulip](#quick-start---tulip) below.
## DIP switches
There are 4 DIP switches on the back of the AMYboard that set the audio input and output levels. All 4 switches should be set the same way, depending on how you're using AMYboard:
- **Line level equipment** (headphones, speakers, audio interface, mixer): set all 4 DIP switches to **OFF** -- each switch pushed toward the **top** of the back of the board, toward the 10-pin power jack.
- **Modular synth** (10Vpp Eurorack signals): set all 4 DIP switches to **ON** -- each switch pushed toward the **bottom** of the board, toward the white opto-isolator chip.
See the [Modular Synth Setup](modular.md) page for more details on 10Vpp operation.
## Upgrading firmware
Before you do anything else, upgrade your firmware! The easiest way is online via your browser. See our [firmware upgrading page](firmware.md) for more info on how to upgrade.
## Quick start - Standalone
1. **Plug in USB-C** from your computer to AMYboard. It powers the board and gives you a serial and MIDI connection.
2. **Plug in headphones or speakers** to the audio out jack.
3. **Connect a MIDI controller** (To your DAW using USB MIDI or TRS MIDI) and play! AMYboard boots with Juno-6 patch #0 on MIDI channel 1 by default.
4. **Try out AMYboard online**. Use [AMYboard online](online.md) in **Control mode** to change synth patches, try out code environments and see other people's patches and code on AMYboard World. You can send code and patches right to your AMYboard over a MIDI connection (TRS MIDI or USB).
## Quick start - Modular Synth
1. **Flip the DIP switches for modular 10vpp output**. See our [Modular page](modular.md) for more info.
2. **Connect 10-pin modular power.** Make sure to use a cable that has a "key" for the correct orientation.
3. **Connect your CV and audio and MIDI cables**. By default AMYboard plays a synth patch on MIDI channel 1. But it can do SO MUCH MORE.
4. Since the USB connection on your AMYboard will be hidden during a Eurorack install, use TRS MIDI to transfer sketches between [AMYboard online](online.md) and your AMYboard in a case.
## Quick start - Tulip
If you have a [Tulip Creative Computer](https://tulip.computer), you can directly connect your AMYboard to it via the GROVE port and the back I2C HOST connector. Tulip will power and communicate with the AMYboard!
> **⚠️ Power note:** when the AMYboard is powered this way it pulls about **350 mA** off the Tulip's 3.3V rail, on top of the Tulip's own ~575 mA. A weak USB charger, a charge-only or thin USB-C cable, an unpowered hub, or a low battery may then sag the Tulip's supply enough to brown out the ESP32-S3 -- which shows up as the Tulip **rebooting in a loop**. If that happens, power the Tulip from a solid **1–2 A** 5V supply with a good data USB-C cable (no hub), or **power the AMYboard from its own USB-C** -- it uses the highest voltage present, so it'll run off its own 5V instead of drawing from the Tulip.
In Tulip, just
```python
from machine import I2C
i2c = I2C(0, freq=400000)
amy.override_send = lambda x: i2c.writeto(0x3f, x)
```
And all sound will come from the AMYboard.
## Guides
- **[Using AMYboard Online](online.md)** -- The web editor at amyboard.com for patch design and management
- **[Arduino Setup](arduino.md)** -- Using the AMY synth engine in Arduino projects
- **[Modular Synth Setup](modular.md)** -- CV, gate, and MIDI integration with your modular rig
- **[Using Python](python.md)** -- Programming AMYboard with MicroPython
- **[Control API (MIDI SysEx)](control_api.md)** -- Drive AMYboard from your own scripts: transfer files both ways, dump synth state, run Python, reboot, read errors
- **[Accessories](accessories.md)** -- Compatible displays, encoders, and other I2C accessories
- **[Troubleshooting](troubleshooting.md)** -- Common issues and how to fix them
- **[FAQ](faq.md)** -- Frequently asked questions from the AMYboard community
## Learn more about AMY
AMYboard is powered by [AMY](https://github.com/shorepine/amy), an open-source synthesizer engine. To learn more about synthesis, patches, and the wire protocol:
- [AMY synth documentation](https://github.com/shorepine/amy/blob/main/docs/synth.md)
- [AMY API reference](https://github.com/shorepine/amy/blob/main/docs/api.md)
- [AMY MIDI documentation](https://github.com/shorepine/amy/blob/main/docs/midi.md)
## Community
[ **Chat about AMYboard on our Discord!**](https://discord.gg/TzBFkUb8pG)
**Other connectors:**
| Connector | Location | Description |
|-----------|----------|-------------|
| **USB-C** | Side | Power, serial REPL, USB MIDI (gadget mode, NOT HOST), firmware updates |
| **I2C front panel** | Front | I2C Grove port for [accessories](accessories.md) (encoders, displays) |
| **I2C host** | Back | For connecting to a [Tulip Creative Computer](https://github.com/shorepine/tulipcc) |
| **MicroSD card** | Side | Extra storage for samples and patches |
| **Modular power** | Back | 10-pin Eurorack power supply connector |
| **Debug header** | Back | For firmware development |
## Power Supplies
AMYboard can be powered 3 ways:
* USB-C connector: standard 5V input via USB
* Modular 10-pin connector: a standard Eurorack connector can power AMYboard via the +12V connector
* I2C host: a Tulip Creative Computer or other 3.3V i2c connection via the Grove connector
If multiple power supplies are connected AMYboard will use the highest available voltage.
When powered only over the I2C host / Grove port (for example, from a Tulip), AMYboard draws about **350 mA** from that 3.3V line. Make sure whatever supplies the port can spare it. If your Tulip reboots in a loop after you connect an AMYboard, see [Quick start - Tulip](#quick-start---tulip) below.
## DIP switches
There are 4 DIP switches on the back of the AMYboard that set the audio input and output levels. All 4 switches should be set the same way, depending on how you're using AMYboard:
- **Line level equipment** (headphones, speakers, audio interface, mixer): set all 4 DIP switches to **OFF** -- each switch pushed toward the **top** of the back of the board, toward the 10-pin power jack.
- **Modular synth** (10Vpp Eurorack signals): set all 4 DIP switches to **ON** -- each switch pushed toward the **bottom** of the board, toward the white opto-isolator chip.
See the [Modular Synth Setup](modular.md) page for more details on 10Vpp operation.
## Upgrading firmware
Before you do anything else, upgrade your firmware! The easiest way is online via your browser. See our [firmware upgrading page](firmware.md) for more info on how to upgrade.
## Quick start - Standalone
1. **Plug in USB-C** from your computer to AMYboard. It powers the board and gives you a serial and MIDI connection.
2. **Plug in headphones or speakers** to the audio out jack.
3. **Connect a MIDI controller** (To your DAW using USB MIDI or TRS MIDI) and play! AMYboard boots with Juno-6 patch #0 on MIDI channel 1 by default.
4. **Try out AMYboard online**. Use [AMYboard online](online.md) in **Control mode** to change synth patches, try out code environments and see other people's patches and code on AMYboard World. You can send code and patches right to your AMYboard over a MIDI connection (TRS MIDI or USB).
## Quick start - Modular Synth
1. **Flip the DIP switches for modular 10vpp output**. See our [Modular page](modular.md) for more info.
2. **Connect 10-pin modular power.** Make sure to use a cable that has a "key" for the correct orientation.
3. **Connect your CV and audio and MIDI cables**. By default AMYboard plays a synth patch on MIDI channel 1. But it can do SO MUCH MORE.
4. Since the USB connection on your AMYboard will be hidden during a Eurorack install, use TRS MIDI to transfer sketches between [AMYboard online](online.md) and your AMYboard in a case.
## Quick start - Tulip
If you have a [Tulip Creative Computer](https://tulip.computer), you can directly connect your AMYboard to it via the GROVE port and the back I2C HOST connector. Tulip will power and communicate with the AMYboard!
> **⚠️ Power note:** when the AMYboard is powered this way it pulls about **350 mA** off the Tulip's 3.3V rail, on top of the Tulip's own ~575 mA. A weak USB charger, a charge-only or thin USB-C cable, an unpowered hub, or a low battery may then sag the Tulip's supply enough to brown out the ESP32-S3 -- which shows up as the Tulip **rebooting in a loop**. If that happens, power the Tulip from a solid **1–2 A** 5V supply with a good data USB-C cable (no hub), or **power the AMYboard from its own USB-C** -- it uses the highest voltage present, so it'll run off its own 5V instead of drawing from the Tulip.
In Tulip, just
```python
from machine import I2C
i2c = I2C(0, freq=400000)
amy.override_send = lambda x: i2c.writeto(0x3f, x)
```
And all sound will come from the AMYboard.
## Guides
- **[Using AMYboard Online](online.md)** -- The web editor at amyboard.com for patch design and management
- **[Arduino Setup](arduino.md)** -- Using the AMY synth engine in Arduino projects
- **[Modular Synth Setup](modular.md)** -- CV, gate, and MIDI integration with your modular rig
- **[Using Python](python.md)** -- Programming AMYboard with MicroPython
- **[Control API (MIDI SysEx)](control_api.md)** -- Drive AMYboard from your own scripts: transfer files both ways, dump synth state, run Python, reboot, read errors
- **[Accessories](accessories.md)** -- Compatible displays, encoders, and other I2C accessories
- **[Troubleshooting](troubleshooting.md)** -- Common issues and how to fix them
- **[FAQ](faq.md)** -- Frequently asked questions from the AMYboard community
## Learn more about AMY
AMYboard is powered by [AMY](https://github.com/shorepine/amy), an open-source synthesizer engine. To learn more about synthesis, patches, and the wire protocol:
- [AMY synth documentation](https://github.com/shorepine/amy/blob/main/docs/synth.md)
- [AMY API reference](https://github.com/shorepine/amy/blob/main/docs/api.md)
- [AMY MIDI documentation](https://github.com/shorepine/amy/blob/main/docs/midi.md)
## Community
[ **Chat about AMYboard on our Discord!**](https://discord.gg/TzBFkUb8pG)