# Using Tulip to make music tutorial
Welcome to Tulip!
This tutorial shows you all the ways to make music and make code to make music on Tulip. We'll update it as more examples, techniques and demos appear.
First, make sure you've gone through the initial [getting started tutorial](getting_started.md). Especially, please make sure you've run `tulip.upgrade()`.
## What Tulip is
Tulip is a **music computer** where everything about the underlying synthesis and sequencer engine can be programmed, live, on the Tulip itself. We provide a code editor and you can run programs right on Tulip, including multi-tasking apps that work together. We provide a few programs -- a patch editor, a place to assign voices, a drum machine -- but the real value of Tulip is the power to make whatever you imagine, or the programs contributed by others.
## What Tulip can do with music
- Play very accurate Juno-6 patches and similar analog synths, up to 6 note polyphony / multimbrality. You have full control over all the parameters.
- Play very accurate DX7 patches, and allow you to create your own FM synthesis setup -- in code!
- Play built in 808-style drum patches, with pitch control
- Play a very good piano synthesis without samples
- Load in your own .WAV samples to use in a sampler
- Control CV outputs for modular synths and analog synths, with built in waveforms and sample & hold
- Sample CV inputs from an ADC to control other events on Tulip
- Send MIDI in and out, from code. You can write code to respond to MIDI messages to do whatever you want
- Use USB MIDI devices like keyboards or synthesizers or adapters connected to Tulip's USB-KB port (with a hub to still support typing keyboards)
- Share a common sequencer clock across multiple apps, for example, a drum machine and an arpeggiator
- Add global EQ, chorus, echo or reverb to the audio output
- A scale and chord library to define musical notes in code, e.g. `music.Chord("F:min")`
- Have total low level control of all oscillators, specifying their filters, waveform, modulation sources, ADSRs
- Write your own audio effects and oscillators **in C**, compiled and hot-swapped at runtime from Python -- see [Writing audio effects and oscillators in C](user_c_dsp.md)
## A small note about Tulip Desktop and Tulip Web
If you're using [Tulip Desktop](tulip_desktop.md) or [Tulip Web](https://tulip.computer/run) instead of a real Tulip, things will mostly be the same. CV sending does not work on Tulip Desktop. And anytime you see `/sys/` (for example, to open an example), replace it with `../sys/`.
## The built-in Tulip synthesizer
When you start up your Tulip, it is configured to receive MIDI messages from the MIDI in port (or the USB MIDI port if connected.) You can plug in any MIDI device that sends MIDI out, like a MIDI keyboard or your computer running a sequencer.
Try to just play notes once you've turned on Tulip, By default, MIDI channel 1 plays a Juno-6 patch. Notes on channel 10 will play PCM patches, roughly aligned with General MIDI drums. (Channel 10 is set up for you as the GM drum kit, AMY `patch=384` — the TR-808 kit — so note 36 is the kick, 38 the snare, 42 the closed hat, and so on. Six more kits live at patches 385-390: TR-909, Linn 9000, Univox MR-12, Tokyo Synthetics, 80s Power Kit and Percussion. Switch kits with `amy.send(synth=10, patch=38x)` or over MIDI with bank select MSB 3 (CC0=3) plus a program change 0-6 on channel 10. If you configure a drum synth by hand, load a kit patch — `amy.send(synth=10, patch=384)` — rather than a bare `wave=amy.PCM` osc. Drum kits are single-voice: the one voice holds a dedicated osc per drum sound, so `num_voices` should be left to its default of 1.)
You can adjust patch assignments per channel, or change patches, using our built in `voices` app. You can type `run('voices')` or tap the bottom right launcher menu and tap `Voices`.
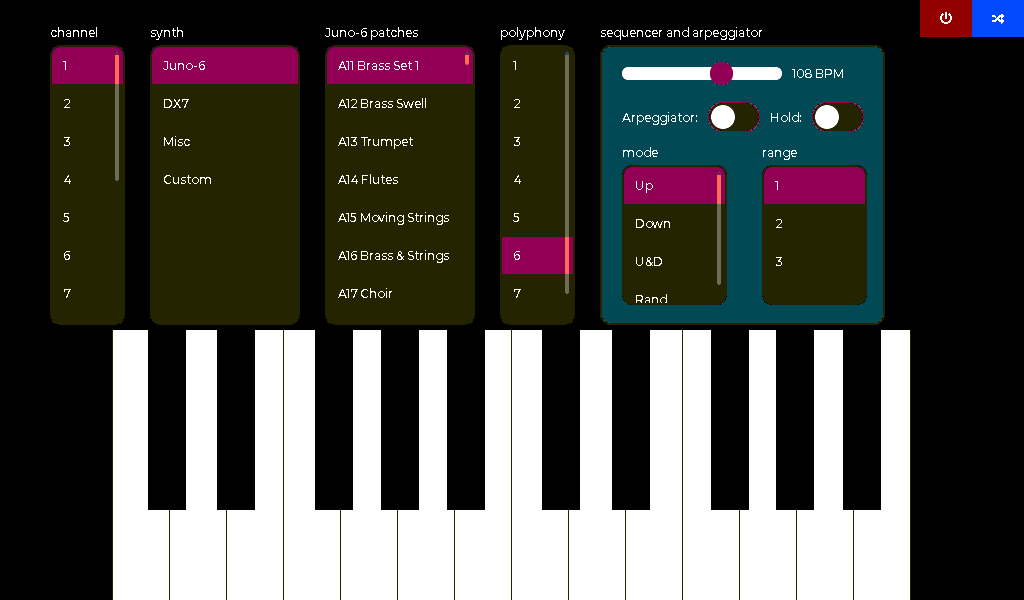 The red button on the top right will quit the app, and the blue button will switch to other apps, including the REPL (where you can type commands.)
Try changing the channel 1 patch to a different Juno-6 patch, or a DX-7 patch. Also make sure to try our [new piano patch](https://shorepine.github.io/amy/piano.html), by selecting "Misc" and choosing "dpwe Piano".
You can also tap the keyboard on screen, even with multiple fingers. Try also playing with the arpeggiator.
## The built-in Juno-6 patch editor
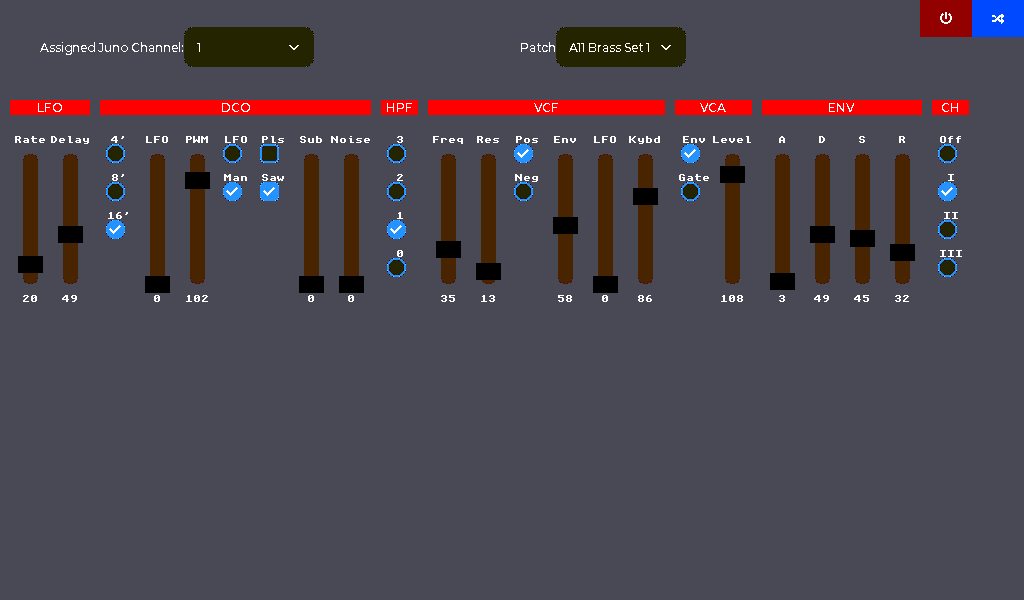
If you want to modify parameters of the Juno-6 synthesizer you can open `juno6`, either from the REPL or the launcher menu. While you have a Juno-6 patch assigned to a MIDI channel, you can modify any parameters of it, just like a real Juno-6. You can also assign MIDI control change values to a parameter, so that your MIDI keyboards sliders/knobs can control parameters.
The red button on the top right will quit the app, and the blue button will switch to other apps, including the REPL (where you can type commands.)
Try changing the channel 1 patch to a different Juno-6 patch, or a DX-7 patch. Also make sure to try our [new piano patch](https://shorepine.github.io/amy/piano.html), by selecting "Misc" and choosing "dpwe Piano".
You can also tap the keyboard on screen, even with multiple fingers. Try also playing with the arpeggiator.
## The built-in Juno-6 patch editor
If you want to modify parameters of the Juno-6 synthesizer you can open `juno6`, either from the REPL or the launcher menu. While you have a Juno-6 patch assigned to a MIDI channel, you can modify any parameters of it, just like a real Juno-6. You can also assign MIDI control change values to a parameter, so that your MIDI keyboards sliders/knobs can control parameters.
 ## The Tulip sequencer and built-in drum machine
There's an 808-style drum machine that comes with Tulip, accessed via `run('drums')`. You can play back any PCM sample that ships on Tulip, or even load your own (see below.) The Tulip drum machine shares a common clock alongside any other Tulip program that uses a sequencer. This means that, for example, the arpeggiator in the `voices` app will stay in time with the drum machine. We'll show you how to control and use the sequencer in your own programs below.
## The Tulip sequencer and built-in drum machine
There's an 808-style drum machine that comes with Tulip, accessed via `run('drums')`. You can play back any PCM sample that ships on Tulip, or even load your own (see below.) The Tulip drum machine shares a common clock alongside any other Tulip program that uses a sequencer. This means that, for example, the arpeggiator in the `voices` app will stay in time with the drum machine. We'll show you how to control and use the sequencer in your own programs below.
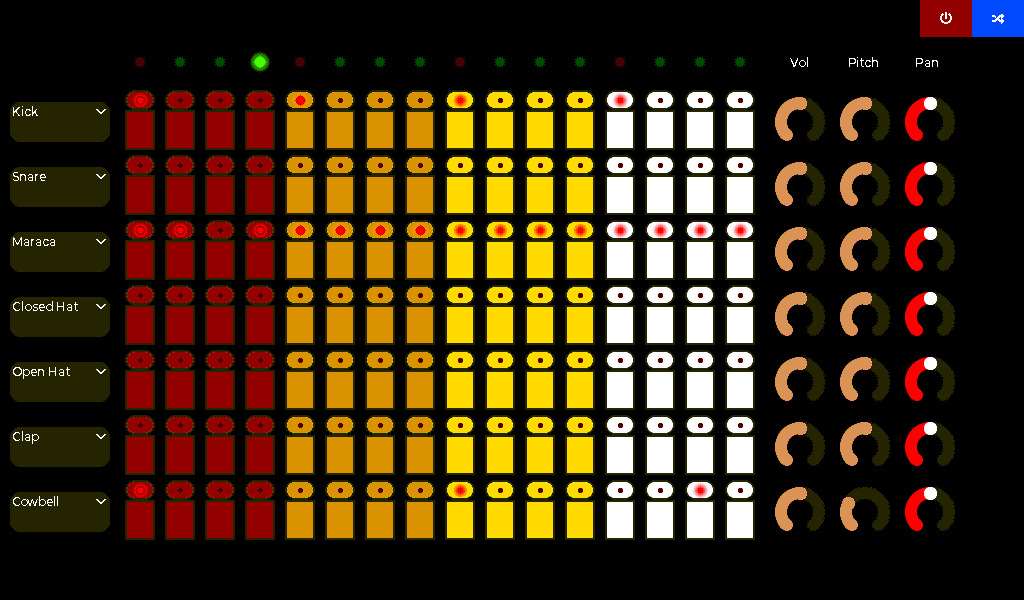 Set up a nice drum sequence for a bit. Play with the pitch parameter and pan. Now, go back to the REPL with the "switch" icon, or by using `control-Tab`. The drum machine should still be playing!
Let's make some of our own Tulip code to play along! You can make programs with our editor or just write small functions in the REPL itself. Let's start there. What we want to do is play the notes of a chord randomly, but in time with the drum machine already playing.
First, let's make the synth we'll be playing. We'll boot a 4-note polyphonic Juno-6 synth playing patch 0, the same patch that boots on MIDI channel 1. While we're here, we'll also choose the chord we want to play. So just type
```python
import music, random
chord = music.Chord("F:min7").midinotes()
syn = synth.PatchSynth(num_voices=4, patch=0)
```
The first `import music, random` tells Tulip that we'll be using those libraries. Some (like `tulip, amy, midi, synth, sequencer`) are already included on bootup, but it's a good habit to get into when writing programs.
If you just type `chord` and enter, you'll see the contents - just a list of MIDI notes corresponding to F minor 7. And `syn` is an object you can send messages to do make tones. Try `syn.note_on(50, 0.5)` -- will play a MIDI note 50 at half volume.
To set this up to play with the sequencer, we will add a **sequence**. A sequence has a set length per note (like quarter note, 1/32nd note, etc) and total length of the pattern. Let's make a 8 quarter note long sequence filled with random notes in the F:min7 chord we got earlier.
For now, let's make a `Sequence` of 8 quarter notes -- the `4` defines the `1/4` note and the `8` is the length.
(When finishing typing this, hit enter a few times at the end until you see a `>>>` prompt again (not a `...`.) )
```python
seq = sequencer.AMYSequence(8, 4)
for i in range(8):
seq.add(i, syn.note_on, [random.choice(chord), 0.6])
```
To unpack this a litte, we're creating a 8 1/4 note long pattern `(8,4)` and then adding 8 random notes of the F:min7 chord we created earlier to it. The `seq.add` first takes a parameter of which element to schedule (here, just 0, 1, 2, 3.... 7) and then the function to call (`syn.note_on`), then the arguments for that function (`random.choice(chord)` chooses a random midi note, and 0.6 is the velocity.)
You should now be hearing a synth pattern play every quarter note in time with the drums. It will keep going! The second parameter of `sequencer.AMYSequence` is the `divider`. This tells Tulip how long each step of the sequence is. A `4` means `1/4`, a quarter note. If you made it `8`, each step would be an eighth note.
```python
seq.clear() # the sequence should stop
seq = sequencer.AMYSequence(8, 8)
for i in range(8):
seq.add(i, syn.note_on, [random.choice(chord), 0.6])
```
This should be twice as fast!
(If you want to do more complex things that aren't in even time, you can set your divider up to `192` and it will be called every single tick (with roughly 10ms between ticks) and you can decide when to emit notes. You can also run multiple `AMYSequence`s at once for polyrhythms.
You can also schedule any python function with a sequencer, not just a music note. You can do this with `TulipSequence` instead of `AMYSequence`. This will be useful to do things like update the screen, or send something to an external device, or anything you can imagine. The two sequencers stay in sync. Instead of `syn.note_on` as the function, just make your own function!
```python
def p(x):
print("hey!")
print_seq = sequencer.TulipSequence(2, p)
```
To stop this printing every half note, type `print_seq.clear()`. Your programs should end in a `seq.clear()` so that you can clean up after yourself!
While you're playing with this, you can change the patch your synth is playing without stopping the sequence:
```python
syn.program_change(143) # change to patch #143 (dx-7 patch BASS 2)
```
Juno patches use patch number 0-127, DX7 are 128-255, the piano is at 256, the General MIDI drum kits are 384-390, and patches you store yourself (see below) start at 1024.
You can also easily change the BPM of the sequencer -- this will impact everything using it, like the drum machine as well:
```python
sequencer.tempo(120)
```
[(Make sure to read more about the sequencer API in the API docs!)](tulip_api.md)
## Making new synths
Each `synth.PatchSynth` you create gets its own voices, so it won't conflict with the synths Tulip boots with for MIDI (or anything else running on Tulip.) You can make as many as you like:
```python
syn = synth.PatchSynth(num_voices=2, patch=143) # two note polyphony, patch 143 is DX7 BASS 2
```
And if you want to play multimbral tones, like a Juno-6 bass alongside a DX7 pad:
```python
synth1 = synth.PatchSynth(num_voices=1, patch=0) # Juno
synth2 = synth.PatchSynth(num_voices=1, patch=128) # DX7
synth1.note_on(50, 1)
synth2.note_on(50, 0.5)
```
You can also "schedule" notes. This is useful for sequencing fast parameter changes. `synth`s accept a `time` parameter, and it's in milliseconds. For example, type this into the REPL.
```python
# play a chord all at once
import music, midi, tulip
synth4 = synth.PatchSynth(num_voices=4, patch=1)
chord = music.Chord("F:min7").midinotes()
for i,note in enumerate(chord):
synth4.note_on(note, 0.5, time=tulip.amy_ticks_ms() + (i * 1000)) # time is i seconds from now
# each note on will play precisely one second after the last
```
You can send `all_notes_off()` to your synth to stop playing notes:
```python
synth4.all_notes_off()
```
If you are booting a new synth in your program, remember to `release` your synths when you're done with them
```python
synth1.release() # Does all note-off and then clears the voice alloc
synth2.release()
synth4.release()
```
As you learn more about AMY (the underlying synth engine) you may be interested in making your own `synth`s in Python. See `synth.py`'s `OscSynth` for an example.
## Modifying the default synth or other MIDI channel assignments in code
You may want to programatically change the MIDI to synth mapping. One example would be to lower the polyphony of the booted by default 6-note synth on channel 1, so that notes coming in through MIDI don't impact the performance or polyphony of your app. Or if you want to set up your music app to receive different patches on different MIDI channels.
You can change the parameters of channel synths like this:
```python
midi.config.add_synth(channel=c, synth=synth.PatchSynth(patch=p, num_voices=n))
```
Note that `add_synth` will stop any running synth on that channel and boot a new one in its place.
## The editor
You can get a lot done in the Tulip REPL just playing around. But you'll eventually want to save your creations and run them alongside other things. Let's start up the Tulip Editor and save your first program. You can go ahead and quit the drum machine if you want, and remember to run
```
seq.clear() # the synth should stop
```
to stop your REPL sequencer callback.
Set up a nice drum sequence for a bit. Play with the pitch parameter and pan. Now, go back to the REPL with the "switch" icon, or by using `control-Tab`. The drum machine should still be playing!
Let's make some of our own Tulip code to play along! You can make programs with our editor or just write small functions in the REPL itself. Let's start there. What we want to do is play the notes of a chord randomly, but in time with the drum machine already playing.
First, let's make the synth we'll be playing. We'll boot a 4-note polyphonic Juno-6 synth playing patch 0, the same patch that boots on MIDI channel 1. While we're here, we'll also choose the chord we want to play. So just type
```python
import music, random
chord = music.Chord("F:min7").midinotes()
syn = synth.PatchSynth(num_voices=4, patch=0)
```
The first `import music, random` tells Tulip that we'll be using those libraries. Some (like `tulip, amy, midi, synth, sequencer`) are already included on bootup, but it's a good habit to get into when writing programs.
If you just type `chord` and enter, you'll see the contents - just a list of MIDI notes corresponding to F minor 7. And `syn` is an object you can send messages to do make tones. Try `syn.note_on(50, 0.5)` -- will play a MIDI note 50 at half volume.
To set this up to play with the sequencer, we will add a **sequence**. A sequence has a set length per note (like quarter note, 1/32nd note, etc) and total length of the pattern. Let's make a 8 quarter note long sequence filled with random notes in the F:min7 chord we got earlier.
For now, let's make a `Sequence` of 8 quarter notes -- the `4` defines the `1/4` note and the `8` is the length.
(When finishing typing this, hit enter a few times at the end until you see a `>>>` prompt again (not a `...`.) )
```python
seq = sequencer.AMYSequence(8, 4)
for i in range(8):
seq.add(i, syn.note_on, [random.choice(chord), 0.6])
```
To unpack this a litte, we're creating a 8 1/4 note long pattern `(8,4)` and then adding 8 random notes of the F:min7 chord we created earlier to it. The `seq.add` first takes a parameter of which element to schedule (here, just 0, 1, 2, 3.... 7) and then the function to call (`syn.note_on`), then the arguments for that function (`random.choice(chord)` chooses a random midi note, and 0.6 is the velocity.)
You should now be hearing a synth pattern play every quarter note in time with the drums. It will keep going! The second parameter of `sequencer.AMYSequence` is the `divider`. This tells Tulip how long each step of the sequence is. A `4` means `1/4`, a quarter note. If you made it `8`, each step would be an eighth note.
```python
seq.clear() # the sequence should stop
seq = sequencer.AMYSequence(8, 8)
for i in range(8):
seq.add(i, syn.note_on, [random.choice(chord), 0.6])
```
This should be twice as fast!
(If you want to do more complex things that aren't in even time, you can set your divider up to `192` and it will be called every single tick (with roughly 10ms between ticks) and you can decide when to emit notes. You can also run multiple `AMYSequence`s at once for polyrhythms.
You can also schedule any python function with a sequencer, not just a music note. You can do this with `TulipSequence` instead of `AMYSequence`. This will be useful to do things like update the screen, or send something to an external device, or anything you can imagine. The two sequencers stay in sync. Instead of `syn.note_on` as the function, just make your own function!
```python
def p(x):
print("hey!")
print_seq = sequencer.TulipSequence(2, p)
```
To stop this printing every half note, type `print_seq.clear()`. Your programs should end in a `seq.clear()` so that you can clean up after yourself!
While you're playing with this, you can change the patch your synth is playing without stopping the sequence:
```python
syn.program_change(143) # change to patch #143 (dx-7 patch BASS 2)
```
Juno patches use patch number 0-127, DX7 are 128-255, the piano is at 256, the General MIDI drum kits are 384-390, and patches you store yourself (see below) start at 1024.
You can also easily change the BPM of the sequencer -- this will impact everything using it, like the drum machine as well:
```python
sequencer.tempo(120)
```
[(Make sure to read more about the sequencer API in the API docs!)](tulip_api.md)
## Making new synths
Each `synth.PatchSynth` you create gets its own voices, so it won't conflict with the synths Tulip boots with for MIDI (or anything else running on Tulip.) You can make as many as you like:
```python
syn = synth.PatchSynth(num_voices=2, patch=143) # two note polyphony, patch 143 is DX7 BASS 2
```
And if you want to play multimbral tones, like a Juno-6 bass alongside a DX7 pad:
```python
synth1 = synth.PatchSynth(num_voices=1, patch=0) # Juno
synth2 = synth.PatchSynth(num_voices=1, patch=128) # DX7
synth1.note_on(50, 1)
synth2.note_on(50, 0.5)
```
You can also "schedule" notes. This is useful for sequencing fast parameter changes. `synth`s accept a `time` parameter, and it's in milliseconds. For example, type this into the REPL.
```python
# play a chord all at once
import music, midi, tulip
synth4 = synth.PatchSynth(num_voices=4, patch=1)
chord = music.Chord("F:min7").midinotes()
for i,note in enumerate(chord):
synth4.note_on(note, 0.5, time=tulip.amy_ticks_ms() + (i * 1000)) # time is i seconds from now
# each note on will play precisely one second after the last
```
You can send `all_notes_off()` to your synth to stop playing notes:
```python
synth4.all_notes_off()
```
If you are booting a new synth in your program, remember to `release` your synths when you're done with them
```python
synth1.release() # Does all note-off and then clears the voice alloc
synth2.release()
synth4.release()
```
As you learn more about AMY (the underlying synth engine) you may be interested in making your own `synth`s in Python. See `synth.py`'s `OscSynth` for an example.
## Modifying the default synth or other MIDI channel assignments in code
You may want to programatically change the MIDI to synth mapping. One example would be to lower the polyphony of the booted by default 6-note synth on channel 1, so that notes coming in through MIDI don't impact the performance or polyphony of your app. Or if you want to set up your music app to receive different patches on different MIDI channels.
You can change the parameters of channel synths like this:
```python
midi.config.add_synth(channel=c, synth=synth.PatchSynth(patch=p, num_voices=n))
```
Note that `add_synth` will stop any running synth on that channel and boot a new one in its place.
## The editor
You can get a lot done in the Tulip REPL just playing around. But you'll eventually want to save your creations and run them alongside other things. Let's start up the Tulip Editor and save your first program. You can go ahead and quit the drum machine if you want, and remember to run
```
seq.clear() # the synth should stop
```
to stop your REPL sequencer callback.
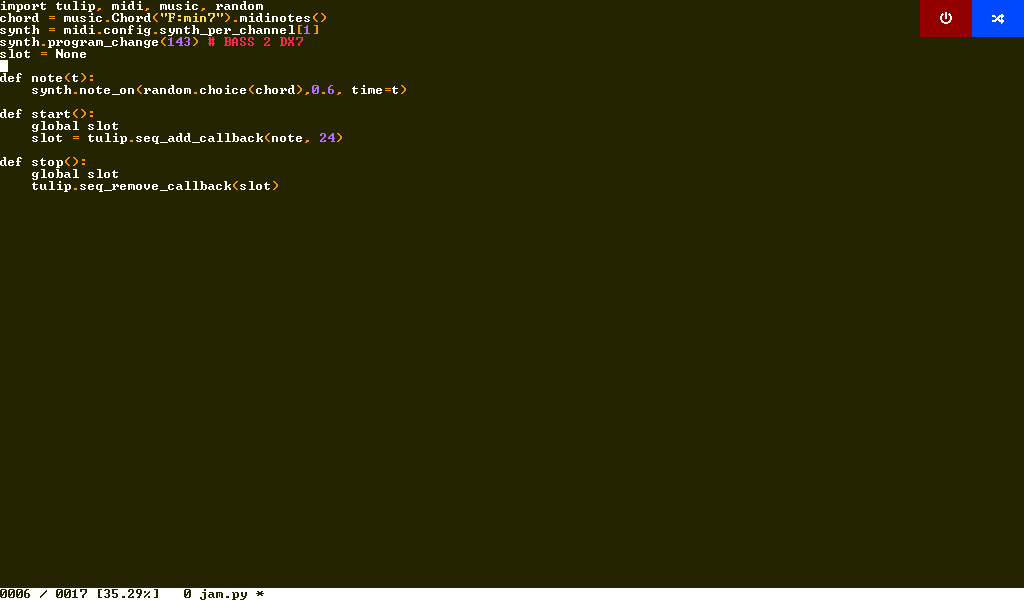 Type `edit('jam.py')` (or whatever you want to call it.) You'll see a black screen open. This is the editor! You can use it like a computer's editor to save code. Just start typing, let's put our program in posterity:
```python
import tulip, midi, music, random, sequencer, synth
chord = music.Chord("F:min7").midinotes()
syn = synth.PatchSynth(num_voices=1, patch=143) # DX7 BASS 2
seq = None
def note(t):
syn.note_on(random.choice(chord), 0.6, time=t)
def start():
global seq
seq = sequencer.TulipSequence(8, note)
def stop():
global seq
seq.clear()
syn.release()
```
Hit `control-X` to save this (you'll see a little asterisk `*` go away in the status bar) and then either `control-Q` to quit the editor or `control-Tab` to switch back to the REPL. Now, just:
```
import jam
jam.start() # should start playing
jam.stop() # will stop playing
```
This will be easier for you to edit your creations and try things out. Try different chords, patches, different sequences, etc. If you stopped the drum machine, you can restart it anytime and it will stay in time with your `jam`.
The drum machine itself is actually a simple Tulip program, written in Python. Check out [the drum machine code](https://github.com/shorepine/tulipcc/blob/main/tulip/shared/py/drums.py) -- most of it is UI setup, and then you can see it setting up a sequencer callback and sending off the drum messages every beat. If you want to make your own version, copy it onto your Tulip under a new name (like `my_drums.py`), edit it, and `run('my_drums')`.
## UIScreens
You may have noticed that the editor, the `voices` and `drums` app all have those buttons on the top right and their own screen, while your `jam.py` just runs in the REPL. That works for a lot of things, but maybe you want to build a UI or show status of your app on its own screen. To do that, we can easily adapt our simple program to be a Tulip `UIScreen` app like its big siblings. Let's make a `jam2.py` into a UIScreen with a slider for tempo. Open `edit('jam2.py')` (quit the editor and restart it if you're editing something else) and make it
```python
import tulip, midi, music, random, sequencer, synth
def note(t):
global app
app.syn.note_on(random.choice(app.chord), 0.6, time=t)
def start(app):
app.seq = sequencer.TulipSequence(8, note)
def stop(app):
app.seq.clear()
app.syn.release()
def run(screen):
global app
app = screen
app.seq = None
app.chord = music.Chord("F:min7").midinotes()
app.syn = synth.PatchSynth(num_voices=1, patch=143) # DX7 BASS 2
app.present()
app.quit_callback = stop
start(app)
```
Save this and then just `run('jam2')` from the REPL (you can omit the `.py` if you want.) You'll see a blank screen with the top right buttons and you should be hearing your sequence, started when the app starts. If you hit "switch" or `control-Tab` it will still be going. If you quit or `control-Q` the app, it will stop. That's the `quit_callback` being setup there.
Let's add a UI component. Add a few lines to `run` so it looks like:
```python
def run(screen):
global app
app = screen
app.seq = None
app.chord = music.Chord("F:min7").midinotes()
app.syn = synth.PatchSynth(num_voices=1, patch=143) # DX7 BASS 2
bpm_slider = tulip.UISlider(sequencer.tempo()/2.4, w=300, h=25,
callback=bpm_change, bar_color=123, handle_color=23)
app.add(bpm_slider, x=300,y=200)
app.present()
app.quit_callback = stop
start(app)
```
And also add a new function, above the `run(screen)`. This is the callback from when someone changes the bpm slider. In this function, we want to change the system BPM:
```python
def bpm_change(event):
sequencer.tempo(event.get_target_obj().get_value()*2.4)
```
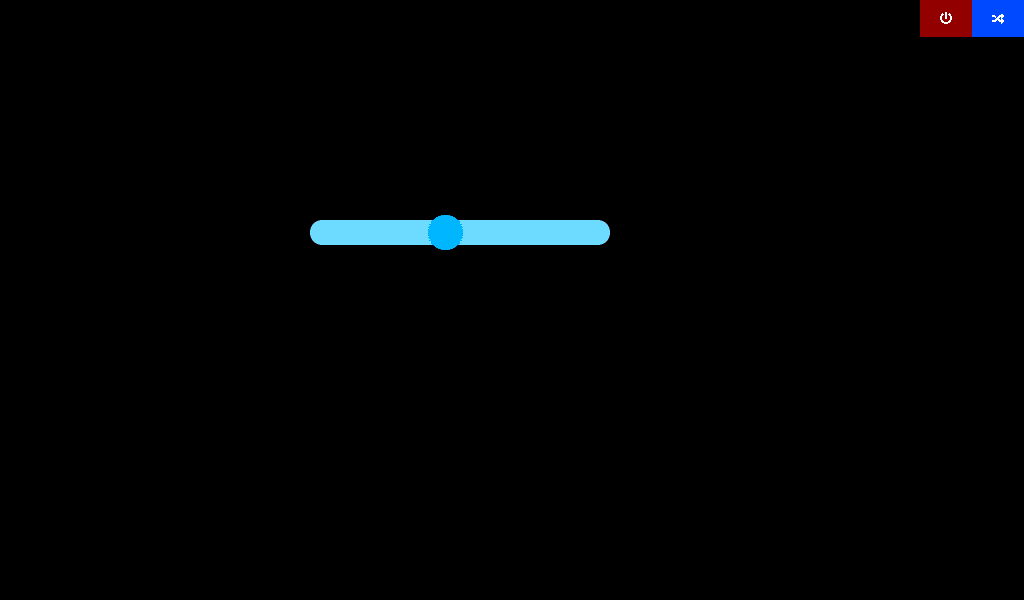
Now quit the `jam2` app if it was already running and re-`run` it. You should see a slider, and when you move it, the system BPM changes. The `2.4` you see in the code is because sliders return values between 0-100, and we convert that into BPMs of 0-240. You can add all sorts of UI elements. We provide a few classic ones like `UICheckbox` and `UIButton`. You should look at the source of `drums` and `voices` to see how they're built and [our API documentation for the full details.](tulip_api.md) How about a `UIText` entry box for people to type in the chord they want to play?
Type `edit('jam.py')` (or whatever you want to call it.) You'll see a black screen open. This is the editor! You can use it like a computer's editor to save code. Just start typing, let's put our program in posterity:
```python
import tulip, midi, music, random, sequencer, synth
chord = music.Chord("F:min7").midinotes()
syn = synth.PatchSynth(num_voices=1, patch=143) # DX7 BASS 2
seq = None
def note(t):
syn.note_on(random.choice(chord), 0.6, time=t)
def start():
global seq
seq = sequencer.TulipSequence(8, note)
def stop():
global seq
seq.clear()
syn.release()
```
Hit `control-X` to save this (you'll see a little asterisk `*` go away in the status bar) and then either `control-Q` to quit the editor or `control-Tab` to switch back to the REPL. Now, just:
```
import jam
jam.start() # should start playing
jam.stop() # will stop playing
```
This will be easier for you to edit your creations and try things out. Try different chords, patches, different sequences, etc. If you stopped the drum machine, you can restart it anytime and it will stay in time with your `jam`.
The drum machine itself is actually a simple Tulip program, written in Python. Check out [the drum machine code](https://github.com/shorepine/tulipcc/blob/main/tulip/shared/py/drums.py) -- most of it is UI setup, and then you can see it setting up a sequencer callback and sending off the drum messages every beat. If you want to make your own version, copy it onto your Tulip under a new name (like `my_drums.py`), edit it, and `run('my_drums')`.
## UIScreens
You may have noticed that the editor, the `voices` and `drums` app all have those buttons on the top right and their own screen, while your `jam.py` just runs in the REPL. That works for a lot of things, but maybe you want to build a UI or show status of your app on its own screen. To do that, we can easily adapt our simple program to be a Tulip `UIScreen` app like its big siblings. Let's make a `jam2.py` into a UIScreen with a slider for tempo. Open `edit('jam2.py')` (quit the editor and restart it if you're editing something else) and make it
```python
import tulip, midi, music, random, sequencer, synth
def note(t):
global app
app.syn.note_on(random.choice(app.chord), 0.6, time=t)
def start(app):
app.seq = sequencer.TulipSequence(8, note)
def stop(app):
app.seq.clear()
app.syn.release()
def run(screen):
global app
app = screen
app.seq = None
app.chord = music.Chord("F:min7").midinotes()
app.syn = synth.PatchSynth(num_voices=1, patch=143) # DX7 BASS 2
app.present()
app.quit_callback = stop
start(app)
```
Save this and then just `run('jam2')` from the REPL (you can omit the `.py` if you want.) You'll see a blank screen with the top right buttons and you should be hearing your sequence, started when the app starts. If you hit "switch" or `control-Tab` it will still be going. If you quit or `control-Q` the app, it will stop. That's the `quit_callback` being setup there.
Let's add a UI component. Add a few lines to `run` so it looks like:
```python
def run(screen):
global app
app = screen
app.seq = None
app.chord = music.Chord("F:min7").midinotes()
app.syn = synth.PatchSynth(num_voices=1, patch=143) # DX7 BASS 2
bpm_slider = tulip.UISlider(sequencer.tempo()/2.4, w=300, h=25,
callback=bpm_change, bar_color=123, handle_color=23)
app.add(bpm_slider, x=300,y=200)
app.present()
app.quit_callback = stop
start(app)
```
And also add a new function, above the `run(screen)`. This is the callback from when someone changes the bpm slider. In this function, we want to change the system BPM:
```python
def bpm_change(event):
sequencer.tempo(event.get_target_obj().get_value()*2.4)
```
Now quit the `jam2` app if it was already running and re-`run` it. You should see a slider, and when you move it, the system BPM changes. The `2.4` you see in the code is because sliders return values between 0-100, and we convert that into BPMs of 0-240. You can add all sorts of UI elements. We provide a few classic ones like `UICheckbox` and `UIButton`. You should look at the source of `drums` and `voices` to see how they're built and [our API documentation for the full details.](tulip_api.md) How about a `UIText` entry box for people to type in the chord they want to play?
 ## Sampler, OscSynth
Tulip defines a few different `synth` classes, including `OscSynth` which directly uses one oscillator per voice of polyphony, as in this simple sine wave synth:
```python
s = synth.OscSynth(wave=amy.SINE)
s.note_on(60,1)
s.note_off(60)
```
Let's try it as a sampler. Tulip bakes in the full TR-808 drum sample bank as PCM `preset`s 0-18, and 136 more drum and percussion samples (TR-909, Linn 9000, Univox MR-12, Tokyo Synthetics, 80s Power Kit and Percussion) live at presets 256-391. The sampler can adjust the pitch and pan of each one. You can try it out with:
```python
# You can pass any AMY arguments to the setup of OscSynth
s = synth.OscSynth(wave=amy.PCM, preset=8) # PCM wave type, preset=8 (808 Cowbell)
s.note_on(50, 1.0)
s.note_on(40, 1.0) # different pitch
s.update_oscs(pan=0) # different pan
s.note_on(40, 1.0)
s.update_oscs(preset=18) # preset 18 is the 808 Cymbal
s.note_on(40, 1.0)
```
You can load your own samples into Tulip. Take any .wav file and [load it onto Tulip.](getting_started.md#transfer-files-between-tulip-and-your-computer) Now, load it in as a PCM preset:
```python
amy.load_sample('sample.wav', preset=50)
s = synth.OscSynth(wave=amy.PCM, preset=50)
s.note_on(60, 1.0)
```
You can also load PCM presets with looped segments if you have their loopstart and loopend parameters (these are often stored in the WAVE metadata. If the .wav file has this metadata, we'll parse it. The example file `/sys/ex/vlng3.wav` has it. You can also provide the metadata directly.) To indicate looping, use `mode=amy.PCM_LOOP` (or `PCM_LOOP_FOREVER` to keep the loop going while the ADSR fades it out).
```python
amy.load_sample("/sys/ex/vlng3.wav", preset=50) # loads wave looping metadata
s = synth.OscSynth(wave=amy.PCM, preset=50, mode=amy.PCM_LOOP, num_voices=1)
s.note_on(60, 1.0) # loops
s.note_on(55, 1.0) # loops
s.note_off(55) # stops
```
You can unload samples from RAM with `amy.unload_sample(preset_number)`.
## Modify Juno-6 patches programatically
We showed above how to `run('juno6')` to see a Juno-6 editor. But if you want your code to change the patches, you can do it yourself with:
```python
run("juno6")
# Go back to REPL
juno6.vcf_res.set(64) # 0-127
```
If you switch back to the Juno-6 editor, you'll see the slider for resonance physically moved as well.
You can type `juno6.` and then hit the `TAB` key to see functions you can call.
## AMY low-level control in Tulip
Tulip's synth is powered by [AMY](https://github.com/shorepine/amy), a very full featured multi-oscillator additive and subtractive style synth. It's got tons of features. Our examples so far have all been in the "higher-level" Tulip python mode, but you can send direct AMY commands by simply calling `amy.send()`:
```python
import amy
amy.send(osc=30, wave=amy.SINE, freq=440, vel=1) # 440Hz sine wave
amy.send(osc=30, vel = 0) # note off
amy.reverb(1) # turn on global reverb
amy.echo(level=1, delay_ms=400, feedback=0.8) # global echo
amy.reset() # reset every AMY oscillator
```
Here's how to make an 808-style bass drum tone in pure AMY oscillators:
```python
amy.send(osc=31, wave=amy.SINE, amp=0.5, freq=0.25, phase=0.5)
amy.send(osc=32, wave=amy.SINE, bp0="0,1,500,0,0,0", freq="150,1,0,0,0,1", mod_source=31, vel=1)
```
If you're interested in going deeper on all that AMY can do, [check out AMY's README](https://github.com/shorepine/amy/blob/main/README.md).
## Sending and receiving MIDI in code
You can write functions that respond to MIDI inputs easily on Tulip. Let's say you wanted to make a very simple sine wave oscillator that responded to MIDI messages on channel 1. All you need to do is write a MIDI callback function, like the sequencer one you did earlier.
```python
import midi, amy
def sine(m):
if m[0] == 144: # MIDI message channel 1 byte 0 note on
# send a sine wave to osc 30, with midi note and velocity
amy.send(osc=30, wave=amy.SINE, note=m[1], vel=m[2] / 127.0)
# turn off Tulip's native handling of MIDI so we can hear our synth
midi.config.reset()
# Add our callback
midi.add_callback(sine)
# Now play a MIDI note into Tulip. If you don't have a KB attached, use midi_local to send the message:
tulip.midi_local((144, 60, 100))
# You should hear a sine wave
# Turn off the midi callback
midi.remove_callback(sine)
# reset back to the default synths
midi.add_default_synths()
```
To send MIDI out, just use `tulip.midi_out(message)`, e.g. `tulip.midi_out([0x90, 0x40, 0x7F])` to send a note-on at velocity 127 and note 64 to the first MIDI channel. You can, for example, use this to send a MIDI message out every sequencer tick on Tulip.
## Outputting CV signals to modular and analog synths
Tulip can output CV signals instead of audio signals out a compatible DAC chip that you attach on the side "i2c" port. [You can get a DAC](https://github.com/shorepine/tulipcc/blob/main/docs/getting_started.md#dacs-or-adcs-for-modular-synths) and send any waveform out its port, even synced to a tempo or using sample & hold. I'd first recommend trying out the user-contributed `waves.py` app, which brings all this together using a GUI:
To get the `waves.py` app, you'll first need to join Wi-Fi and get it from Tulip World. See the [getting started](getting_started.md) tutorial for more info, but just do:
```python
tulip.wifi(ssid, password)
world.download('waves.py')
run('waves')
```
And you should see:
## Sampler, OscSynth
Tulip defines a few different `synth` classes, including `OscSynth` which directly uses one oscillator per voice of polyphony, as in this simple sine wave synth:
```python
s = synth.OscSynth(wave=amy.SINE)
s.note_on(60,1)
s.note_off(60)
```
Let's try it as a sampler. Tulip bakes in the full TR-808 drum sample bank as PCM `preset`s 0-18, and 136 more drum and percussion samples (TR-909, Linn 9000, Univox MR-12, Tokyo Synthetics, 80s Power Kit and Percussion) live at presets 256-391. The sampler can adjust the pitch and pan of each one. You can try it out with:
```python
# You can pass any AMY arguments to the setup of OscSynth
s = synth.OscSynth(wave=amy.PCM, preset=8) # PCM wave type, preset=8 (808 Cowbell)
s.note_on(50, 1.0)
s.note_on(40, 1.0) # different pitch
s.update_oscs(pan=0) # different pan
s.note_on(40, 1.0)
s.update_oscs(preset=18) # preset 18 is the 808 Cymbal
s.note_on(40, 1.0)
```
You can load your own samples into Tulip. Take any .wav file and [load it onto Tulip.](getting_started.md#transfer-files-between-tulip-and-your-computer) Now, load it in as a PCM preset:
```python
amy.load_sample('sample.wav', preset=50)
s = synth.OscSynth(wave=amy.PCM, preset=50)
s.note_on(60, 1.0)
```
You can also load PCM presets with looped segments if you have their loopstart and loopend parameters (these are often stored in the WAVE metadata. If the .wav file has this metadata, we'll parse it. The example file `/sys/ex/vlng3.wav` has it. You can also provide the metadata directly.) To indicate looping, use `mode=amy.PCM_LOOP` (or `PCM_LOOP_FOREVER` to keep the loop going while the ADSR fades it out).
```python
amy.load_sample("/sys/ex/vlng3.wav", preset=50) # loads wave looping metadata
s = synth.OscSynth(wave=amy.PCM, preset=50, mode=amy.PCM_LOOP, num_voices=1)
s.note_on(60, 1.0) # loops
s.note_on(55, 1.0) # loops
s.note_off(55) # stops
```
You can unload samples from RAM with `amy.unload_sample(preset_number)`.
## Modify Juno-6 patches programatically
We showed above how to `run('juno6')` to see a Juno-6 editor. But if you want your code to change the patches, you can do it yourself with:
```python
run("juno6")
# Go back to REPL
juno6.vcf_res.set(64) # 0-127
```
If you switch back to the Juno-6 editor, you'll see the slider for resonance physically moved as well.
You can type `juno6.` and then hit the `TAB` key to see functions you can call.
## AMY low-level control in Tulip
Tulip's synth is powered by [AMY](https://github.com/shorepine/amy), a very full featured multi-oscillator additive and subtractive style synth. It's got tons of features. Our examples so far have all been in the "higher-level" Tulip python mode, but you can send direct AMY commands by simply calling `amy.send()`:
```python
import amy
amy.send(osc=30, wave=amy.SINE, freq=440, vel=1) # 440Hz sine wave
amy.send(osc=30, vel = 0) # note off
amy.reverb(1) # turn on global reverb
amy.echo(level=1, delay_ms=400, feedback=0.8) # global echo
amy.reset() # reset every AMY oscillator
```
Here's how to make an 808-style bass drum tone in pure AMY oscillators:
```python
amy.send(osc=31, wave=amy.SINE, amp=0.5, freq=0.25, phase=0.5)
amy.send(osc=32, wave=amy.SINE, bp0="0,1,500,0,0,0", freq="150,1,0,0,0,1", mod_source=31, vel=1)
```
If you're interested in going deeper on all that AMY can do, [check out AMY's README](https://github.com/shorepine/amy/blob/main/README.md).
## Sending and receiving MIDI in code
You can write functions that respond to MIDI inputs easily on Tulip. Let's say you wanted to make a very simple sine wave oscillator that responded to MIDI messages on channel 1. All you need to do is write a MIDI callback function, like the sequencer one you did earlier.
```python
import midi, amy
def sine(m):
if m[0] == 144: # MIDI message channel 1 byte 0 note on
# send a sine wave to osc 30, with midi note and velocity
amy.send(osc=30, wave=amy.SINE, note=m[1], vel=m[2] / 127.0)
# turn off Tulip's native handling of MIDI so we can hear our synth
midi.config.reset()
# Add our callback
midi.add_callback(sine)
# Now play a MIDI note into Tulip. If you don't have a KB attached, use midi_local to send the message:
tulip.midi_local((144, 60, 100))
# You should hear a sine wave
# Turn off the midi callback
midi.remove_callback(sine)
# reset back to the default synths
midi.add_default_synths()
```
To send MIDI out, just use `tulip.midi_out(message)`, e.g. `tulip.midi_out([0x90, 0x40, 0x7F])` to send a note-on at velocity 127 and note 64 to the first MIDI channel. You can, for example, use this to send a MIDI message out every sequencer tick on Tulip.
## Outputting CV signals to modular and analog synths
Tulip can output CV signals instead of audio signals out a compatible DAC chip that you attach on the side "i2c" port. [You can get a DAC](https://github.com/shorepine/tulipcc/blob/main/docs/getting_started.md#dacs-or-adcs-for-modular-synths) and send any waveform out its port, even synced to a tempo or using sample & hold. I'd first recommend trying out the user-contributed `waves.py` app, which brings all this together using a GUI:
To get the `waves.py` app, you'll first need to join Wi-Fi and get it from Tulip World. See the [getting started](getting_started.md) tutorial for more info, but just do:
```python
tulip.wifi(ssid, password)
world.download('waves.py')
run('waves')
```
And you should see:
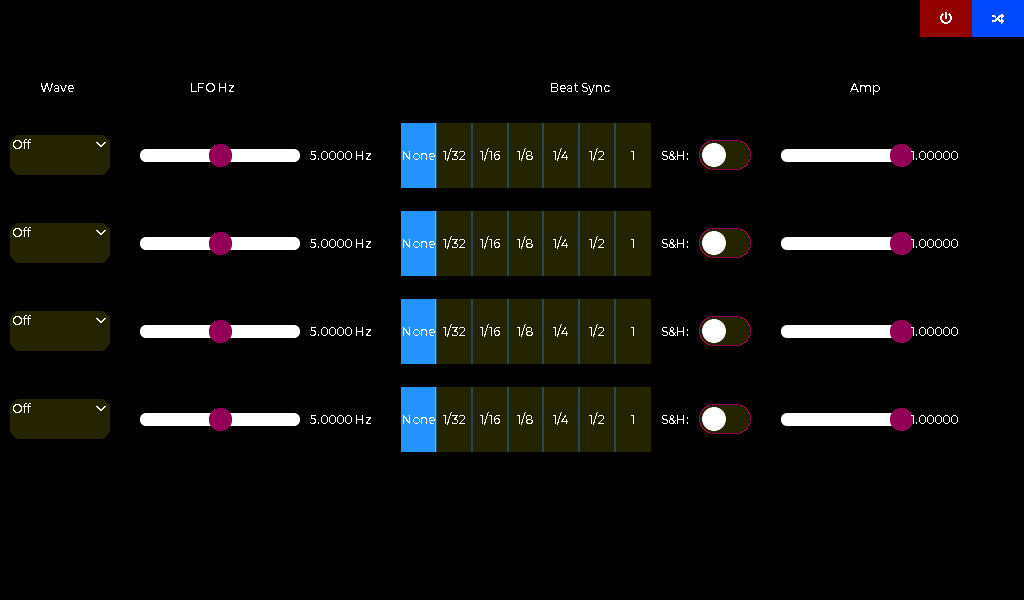 If you look at the source of `waves.py` in the editor, you can see it's pretty simple after the UI setup.
```python
amy.send(osc=30, external_channel=1, wave=amy.SAW_DOWN, vel=1, freq=0.5, amp=1)
```
This sends a saw wave out the first channel of DACs at 0.5Hz with amplitude of 1, so will be 0-5V peak to peak.
Send
```python
amy.send(osc=30, amp=0)
```
to stop it. You can also send individual voltages with
```python
import mabeedac
mabeedac.set(2.5, channel=0) # sends 2.5V to the first CV channel.
```
## Custom FM tones and AMY patches (WOOD PIANO)
Let's see how to make your own FM synthesis in AMY commands. The 4-operator "WOOD PIANO" FM tone is a classic. It's pretty simple, too.
Let's make a custom patch, which is a set of AMY commands you can assign to a patch number (from 1024 to 1055.)
To do so, ask AMY to "remember" what we're doing, but not send it to the internal synthesizer. This is done by
```python
amy.start_store_patch()
```
Anything you send AMY from now will be logged to a custom patch and not to the internal synth.
Now, send the AMY setup commands for your patch. Make sure your patch is consecutive oscillators, starting at oscillator 0 for the "root oscillator."
The WOOD PIANO patch is four operators, each with an envelope and different modulation amplitude.
```python
amy.send(osc=1, bp0="0,1,5300,0,0,0", phase=0.25, ratio=1, amp="0.3,0,0,1,0,0")
amy.send(osc=2, bp0="0,1,3400,0,0,0", phase=0.25, ratio=0.5, amp="1.68,0,0,1,0,0")
amy.send(osc=3, bp0="0,1,6700,0,0,0", phase=0.25, ratio=1, amp="0.23,0,0,1,0,0")
amy.send(osc=4, bp0="0,1,3400,0,0,0", phase=0.25, ratio=0.5, amp="1.68,0,0,1,0,0")
```
Then, send the "root" oscillator instructions. This is the one you'd send note-ons to. The root oscillator gets an "algorithm", which indicates how to modulate the operators. See the [AMY documentation](https://github.com/shorepine/amy) for more detail. It also gets its own amplitude and pitch envelopes (`bp0` and `bp1`).
```python
amy.send(osc=0, wave=amy.ALGO, algorithm=5, algo_source="1,2,3,4", bp0="0,1,147,0", bp1="0,1,179,1", freq="0,1,0,0,1,1")
```
Now, tell AMY to stop logging the patch and store it to a custom patch number.
```python
amy.stop_store_patch(1024)
```
Now, you're free to use this patch number like all the Juno and DX7 ones. For a polyphonic wood piano, do:
```python
s = synth.PatchSynth(num_voices=5, patch=1024)
s.note_on(50, 1)
s.note_on(50, 1)
s.note_on(55, 1)
```
Try saving these setup commands (including the `store_patch`, which gets cleared on power / boot) to a python file, like `woodpiano.py`, and `execfile("woodpiano.py")` on reboot to set it up for you!
If you look at the source of `waves.py` in the editor, you can see it's pretty simple after the UI setup.
```python
amy.send(osc=30, external_channel=1, wave=amy.SAW_DOWN, vel=1, freq=0.5, amp=1)
```
This sends a saw wave out the first channel of DACs at 0.5Hz with amplitude of 1, so will be 0-5V peak to peak.
Send
```python
amy.send(osc=30, amp=0)
```
to stop it. You can also send individual voltages with
```python
import mabeedac
mabeedac.set(2.5, channel=0) # sends 2.5V to the first CV channel.
```
## Custom FM tones and AMY patches (WOOD PIANO)
Let's see how to make your own FM synthesis in AMY commands. The 4-operator "WOOD PIANO" FM tone is a classic. It's pretty simple, too.
Let's make a custom patch, which is a set of AMY commands you can assign to a patch number (from 1024 to 1055.)
To do so, ask AMY to "remember" what we're doing, but not send it to the internal synthesizer. This is done by
```python
amy.start_store_patch()
```
Anything you send AMY from now will be logged to a custom patch and not to the internal synth.
Now, send the AMY setup commands for your patch. Make sure your patch is consecutive oscillators, starting at oscillator 0 for the "root oscillator."
The WOOD PIANO patch is four operators, each with an envelope and different modulation amplitude.
```python
amy.send(osc=1, bp0="0,1,5300,0,0,0", phase=0.25, ratio=1, amp="0.3,0,0,1,0,0")
amy.send(osc=2, bp0="0,1,3400,0,0,0", phase=0.25, ratio=0.5, amp="1.68,0,0,1,0,0")
amy.send(osc=3, bp0="0,1,6700,0,0,0", phase=0.25, ratio=1, amp="0.23,0,0,1,0,0")
amy.send(osc=4, bp0="0,1,3400,0,0,0", phase=0.25, ratio=0.5, amp="1.68,0,0,1,0,0")
```
Then, send the "root" oscillator instructions. This is the one you'd send note-ons to. The root oscillator gets an "algorithm", which indicates how to modulate the operators. See the [AMY documentation](https://github.com/shorepine/amy) for more detail. It also gets its own amplitude and pitch envelopes (`bp0` and `bp1`).
```python
amy.send(osc=0, wave=amy.ALGO, algorithm=5, algo_source="1,2,3,4", bp0="0,1,147,0", bp1="0,1,179,1", freq="0,1,0,0,1,1")
```
Now, tell AMY to stop logging the patch and store it to a custom patch number.
```python
amy.stop_store_patch(1024)
```
Now, you're free to use this patch number like all the Juno and DX7 ones. For a polyphonic wood piano, do:
```python
s = synth.PatchSynth(num_voices=5, patch=1024)
s.note_on(50, 1)
s.note_on(50, 1)
s.note_on(55, 1)
```
Try saving these setup commands (including the `store_patch`, which gets cleared on power / boot) to a python file, like `woodpiano.py`, and `execfile("woodpiano.py")` on reboot to set it up for you!