# Start Linger on macOS
We are applying for an Apple-recognized signing certificate. **Signed macOS
builds are coming soon.** The steps and screenshots below are a temporary
workaround for the current unsigned package.
You need an Apple silicon Mac running macOS 14.0 or later. There is no package
for Intel Macs; use [Docker Compose](self-hosting.md) there.
## Allow the first launch
[Download the DMG below](#download), open it and drag Linger to Applications.
The package is not yet signed with a certificate Apple recognizes, so macOS
blocks the first launch.
**Run this in Terminal, then open Linger:**
```bash
xattr -dr com.apple.quarantine /Applications/Linger.app
```
**If Terminal prints `Operation not permitted`**, macOS is stopping Terminal
from changing apps, and `sudo` does not help. Open **System Settings › Privacy &
Security › App Management**, turn on **Terminal**, quit and reopen Terminal, and
run the command again.
### Without Terminal
Allow the launch once in System Settings instead:
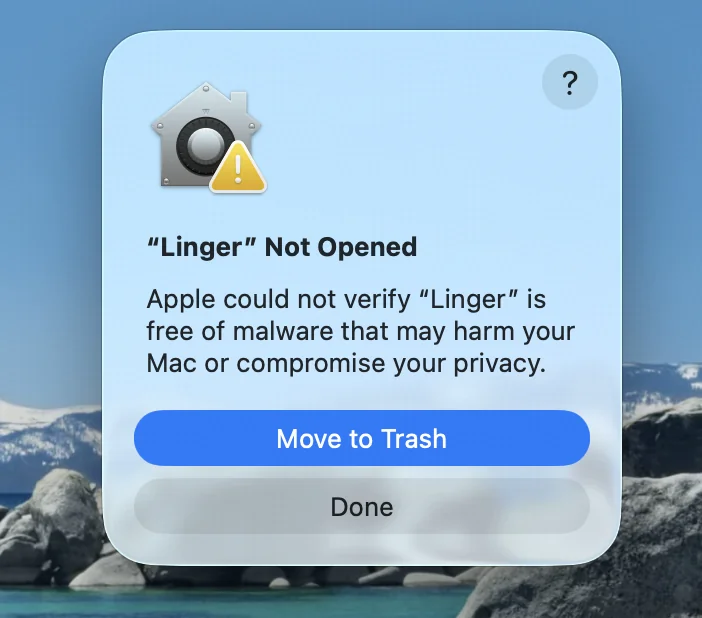
1. Open Linger from Applications. In the **“Linger” Not Opened** dialog, click
**Done**. Do not click **Move to Trash**, the highlighted button.
 2. Open **System Settings › Privacy & Security** and scroll to **Security**.
Next to **“Linger” was blocked to protect your Mac**, click **Open Anyway**.
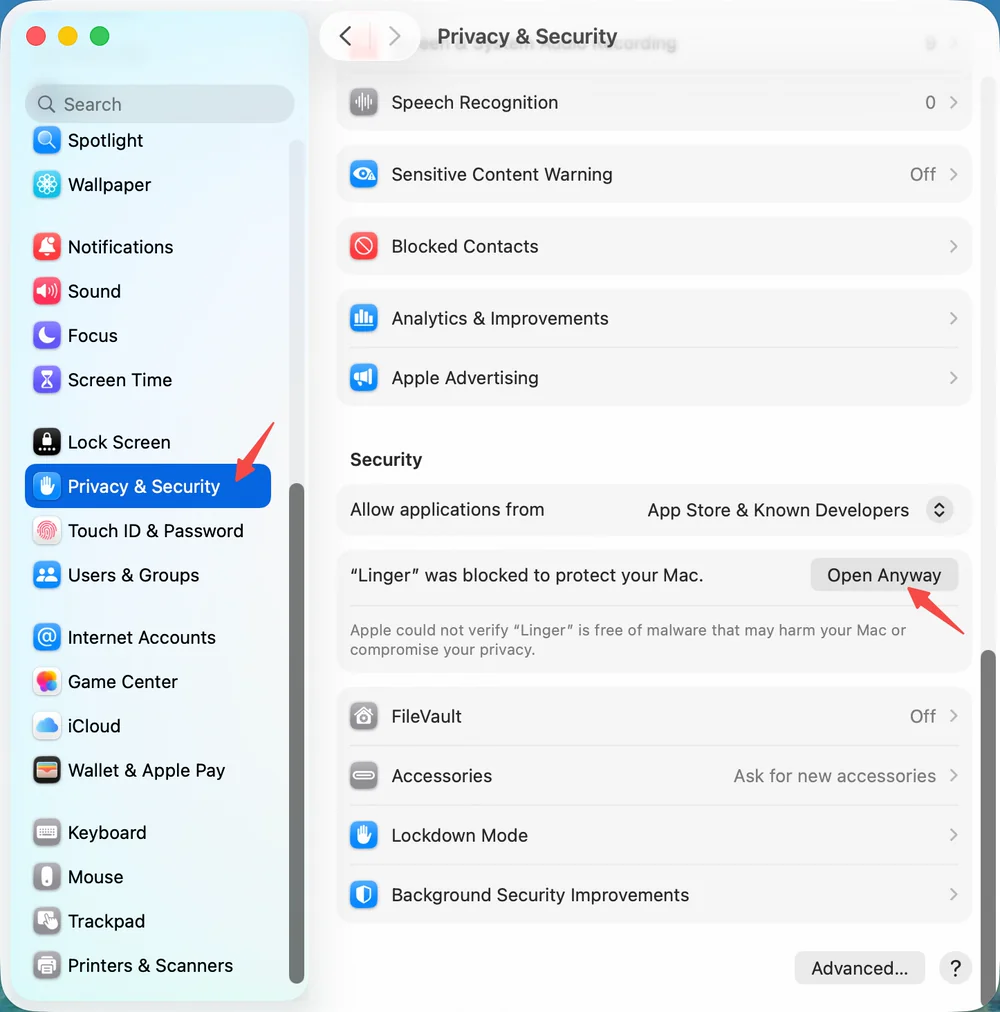 3. Click **Open Anyway** again and enter your password or use Touch ID.
If macOS says Linger "is damaged and can't be opened", or **Open Anyway** does
not appear, use the Terminal command above.
## Download
**[Download the latest macOS release](https://github.com/simplexai-labs/linger/releases/latest)**
Under **Assets**, choose `Linger--macos-arm64.dmg` for Apple silicon.
Check the download against `SHA256SUMS.txt` from the same release.
See [Install the desktop app](https://docs.heylinger.com/install/desktop-app)
for help when setup fails.
## Keep Computer permissions after an update
Computer use involves two apps with their own grants: **CuaDriver**, which
captures the screen and sends input, and **Linger**, which starts it. The
permission card's **Computer use (CuaDriver)** rows read what CuaDriver reports
about itself; macOS may also evaluate Linger, the app that starts CuaDriver, for
the same capture. Each grant is recorded against one app's identity, and an
update can leave a recorded entry no longer satisfying the check even though
**System Settings › Privacy & Security** still shows the switch on. CuaDriver
also caches its Screen Recording reading for the life of its process, so only a
restart sees a grant made since.
Symptoms: a Room's permission card reports **Computer use (CuaDriver) · Screen
Recording — Not allowed** while System Settings shows the switches on, computer
actions fail, and a message can later fail with `The Runtime process could not
be confirmed stopped`.
Record the grants again:
1. In **System Settings › Privacy & Security › Screen Recording**, switch the
**CuaDriver** row off and back on. If the row is missing, add it with **+**:
`Linger.app/Contents/Resources/cli/computer-tools/cua/CuaDriver.app`. Do the
same for **Linger**.
2. Repeat both rows under **Accessibility**.
3. Quit Linger and open it again, so CuaDriver starts with the new records.
From a terminal, clear both identities instead and grant again afterwards:
```bash
tccutil reset ScreenCapture com.trycua.driver
tccutil reset Accessibility com.trycua.driver
tccutil reset ScreenCapture com.simplexai.linger.desktop.preview
tccutil reset Accessibility com.simplexai.linger.desktop.preview
```
Signed desktop builds will carry the grants across updates; until then, repeat
these steps after an update while the card reports **Not allowed**.