https://smp46.me smp46 2026-04-22T19:19:54.679Z Next.js using Feed for Node.js smp46 me@smp46.me https://smp46.me/whoami Projects, attempts and other things https://raw.githubusercontent.com/smp46/smp46.github.io/nextjs/public/favicon.ico All rights reserved 2026, smp46 <![CDATA[CyberBattles]]> https://smp46.me/blog/CyberBattles 2025-12-04T00:00:00.000Z Title

CyberBattles: An Award Winning Educational Attack and Defence CTF Platform

What is a Cyber? What are Battles? Well in short, it's hundreds of hours worth of work that resulted in something that I don't think otherwise exists (commercially).

CyberBattles is the project that 5 classmates and myself have spent the last ~4 months banging our heads against. Completed as part of our capstone class for Computer Science, DECO3801, at the University of Queensland; DECO3801 or uninspiringly named "Design Computing Studio 3 - Build". The idea of the class, as much as many fellow students hate it, is to throw us in the deep-end and give us a taste of collaborative (i.e. real world) software engineering.

34 Boring Briefs and Something Interesting

At the beginning of the Semester we were given a list of 35 project briefs to choose from. Most (read: almost all) were incredibly boring, fun examples include "Geodatabase Tools for Load Modelling" and "Leveraging Digital Technologies to Influence Tourist Dispersal Behaviour", while these might be interesting to some strange people, they did not tickle my fancy. However, I was in luck as there was a category for "Cyber Security" and as an aspiring software-engineering-cyber-security-something this piqued my interest. The most interesting being "Red vs Blue Team Cybersecurity Simulation", or a boring description of what would become CyberBattles.

The brief was:

... design and develop a two-team “Capture the Flag” cybersecurity game platform as a learning tool ... implement an interactive system where two opposing teams, the Red Team (attackers) and Blue Team (defenders), compete in a scenario-based simulation to compromise or protect digital assets.

And it contained four success criteria: Team-Based Asymmetric Gameplay, Challenge-Based Capture the Flag Structure, Instructor Visibility and Game Balance, Post-Game Review and Learning Support.

This really piqued my interest, as an active member (and ex-executive) of UQ Cyber Squad I had a decent amount of exposure, if not experience, in capture the flag (CTF) challenges. And I kept hearing endlessly about Attack Defence competitions, which I am far from skilled enough to participate in. So, I got a group of friends together and we put in our bid for the project.

Explaining Words

If the words "Cybersecurity Simulation","Capture the Flag" or "Attack Defence" don't mean anything to you:

Cyber Security Simulation

This is a fancy way of saying gamified hacking competitions. The idea is that anyone with an interest in Cybersecurity can practice real world skills in a competitive, game-like, environment. While the skills learned in these types of simulations aren't always directly transferable to real-world use cases, they are an exercise in practising problem-solving and learning about the ever changing world of Cybersecurity.

Capture the Flag (CTF)

This is the most common form of "Cyber Security Simulation". The idea is a player is given a challenge, whether it be an image file, a website, or a program that contains a "flag" which normally resembles a string like this using leetspeak: cybrbtls{g00djobFORf1nd1ngm3}. The player then has to extract this flag through whatever means they can, usually via a form of "hacking".

Attack Defence (AD)

This is a type of "Cyber Security Simulation" normally of a CTF, where instead of the challenge being against a static or non-player controlled entity like a pre-made website or program. Players are given a matching environment with multiple vulnerable entities (programs, websites, etc.) to exploit. The challenge then becomes not only to try to capture the flags of other teams but also to defend against attacks against their own version of the programs. The way in which a team chooses to defend is entirely up to them, often the entity is accompanied by the code used to make it so players can read, rewrite, and patch it on-the-fly. An important and necessary caveat of this type of CTF challenge is that the service needs to be preserved so that a regular (usually automated) user can still use it for its intended purpose. This prevents a team trying to be smart and just shutting down their services to prevent being hacked.

Why the Brief was Interesting

As I've established above, CTFs, and AD CTFs specifically, have already been done; they aren't new. However, what didn't already exist was an easy to use, publicly accessible platform that did the hard parts of running an AD competition for you.

The Hard Parts

An AD competition is inherently not simple, it requires at the very least:

  • Pre-made scenarios which well thought out and rewarding challenges
  • An environment that replicates these services for every team in the competition
  • A relatively anonymous bot that can mimic a real world user for every service
  • A way to score the competition
  • A secure way to interact with and access each environment

These might sound a little like the aforementioned success criteria given to us as part of the project brief, which they are indeed. At the end of the project, I can now appreciate that who (or what) ever wrote the brief had a good grasp on AD essentials.

A Storied Development

A Team Effort

For most of the team this was our first real team project and our first taste of dipping our toes in the deep-end of real world collaborative software engineering. Enthusiastically we said we'd do everything just like real developers. We set up a Github organisation, a nice looking repo (and domain), a Discord server with a bot that notifies us of each other's progress and most importantly (until we couldn't be bothered): Jira for story boarding. And importantly a timeline for when milestones should be done by.

What is story boarding? Great question, it seems to involve the words "epics" and "stories" quite often. But in short, it's just an extravagant way of breaking down a project into achievable sub-sections, but with a lot of "Silicon Valley"-esque lingo to make it seem cool and innovative. While initially it seemed like a great idea, we found that when nobody was enforcing the use of this story boarding it quickly fell apart. As it became just more work on top of the already large task we had ahead of us.

Divvying Up the Work

As a group of six, we sought to evenly distribute the work amongst ourselves, giving people tasks suited to their existing skill sets. We assigned three people to website/frontend development, as this would be the main way users interact with our project so it should look good. Then my friend Howie, someone with some real experience in playing and winning CTFs, was assigned to challenge development and to provide a template for the scenario networking. And unfortunately, another friend, Lachlan was given the job of code review and repo management. That left me to do the fun (hard) part, making the server that would orchestrate the whole shebang.

The Reality of Group Work

While we set out strong, as group projects are wont to do, the timeline quickly became a time-suggestion which ended up as a time-wish by the end of the semester. As my workload was relatively light for the semester, I had a majority of my side of the project done within a month. And unfortunately as the most experienced in web development on the team, much of my semester ended up being spent on that side of the project.

My Half of the Whole Shebang

So I had the dead simple job of:

  • Design the architecture and designate capabilities of the platform
  • Create data types that would encapsulate all the information needed to run and manage the sessions
  • Make it scalable for multiple teams
  • Make it secure

It was not in fact simple nor straightforward. I started by finding out what kind of software solutions exist to connect all these things together. For the virtualising/encapsulation of the environment I picked Docker, as it is lightweight and I was already fairly experienced in using it. Fortunately, I found a very helpful Node.js module called Dockerode, which provides an easy to work with, programmatic interface for working with the Docker virtual environment. My plan of attack was to plan out each function I would need for the server to operate and work through them step-by-step until I reached a minimum viable product.

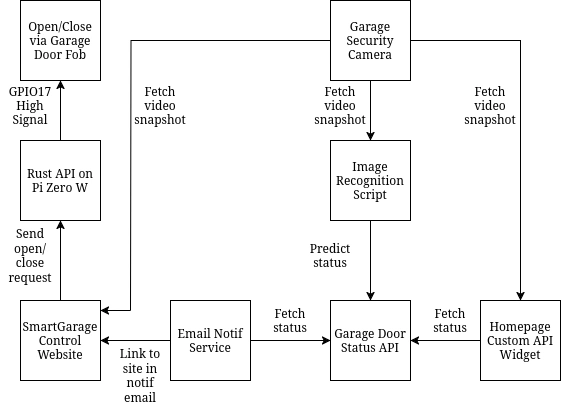
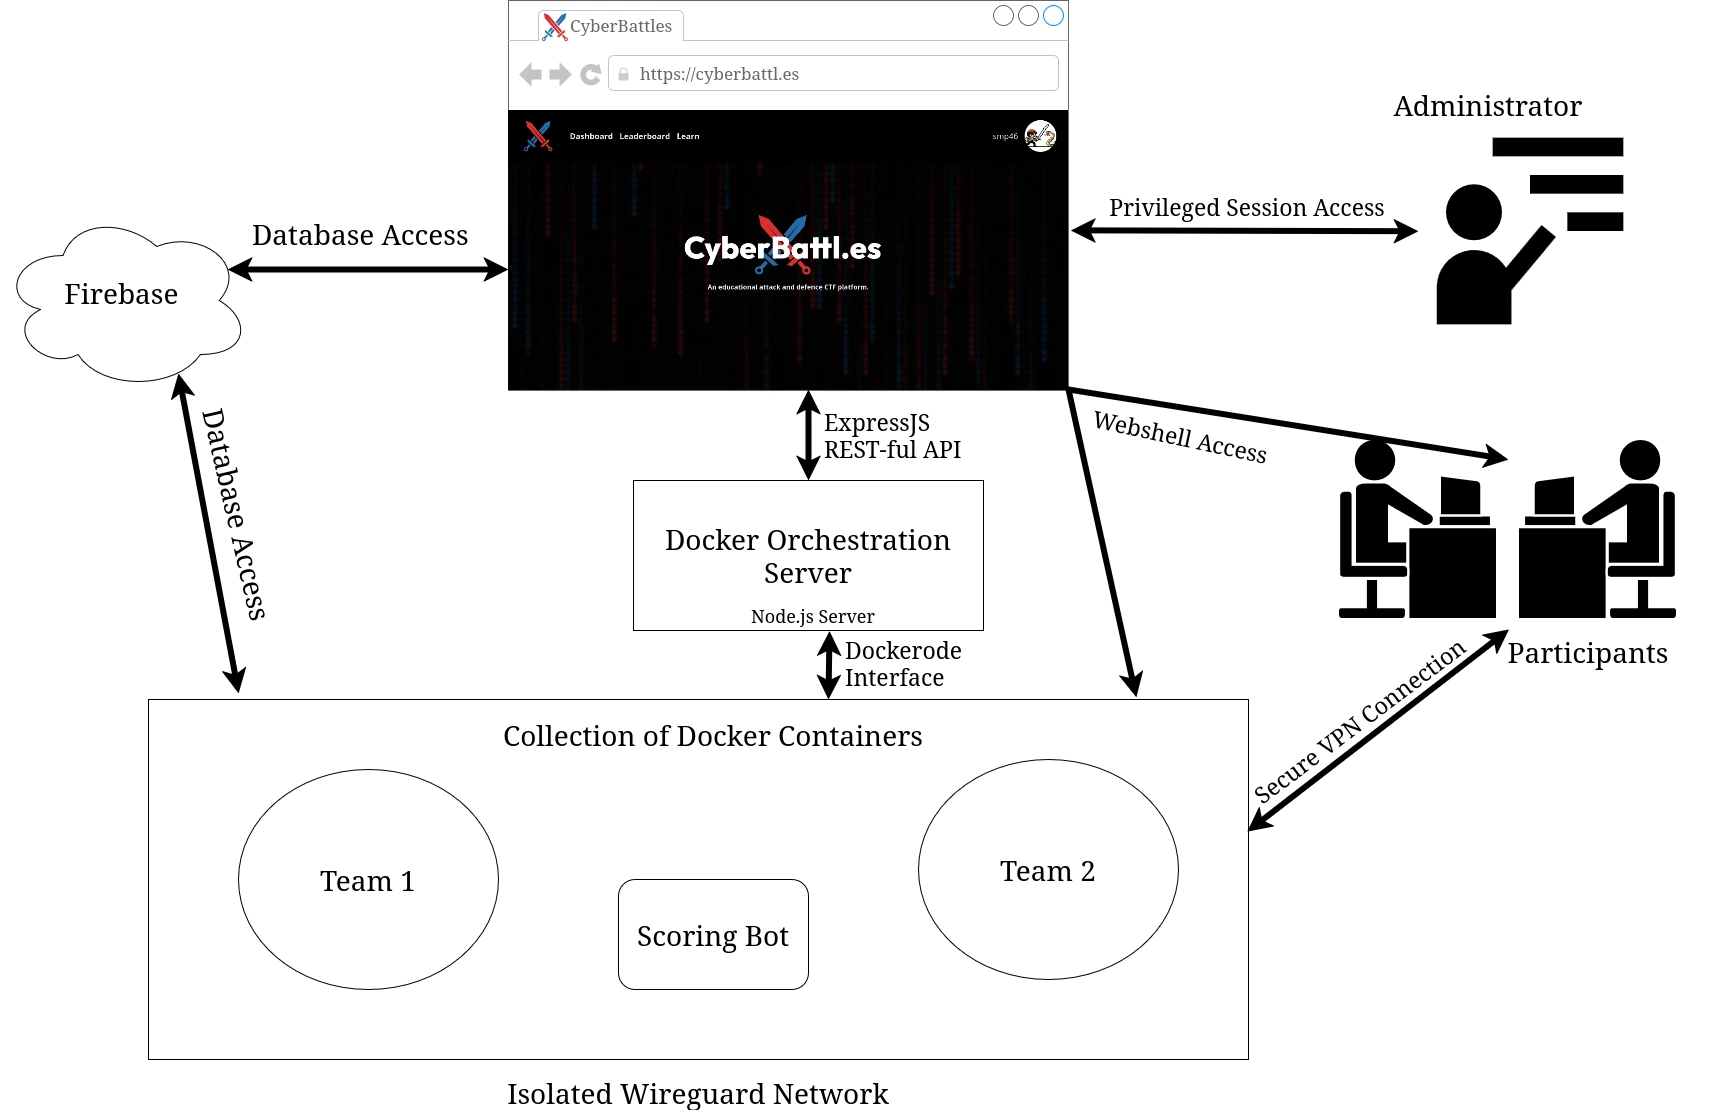
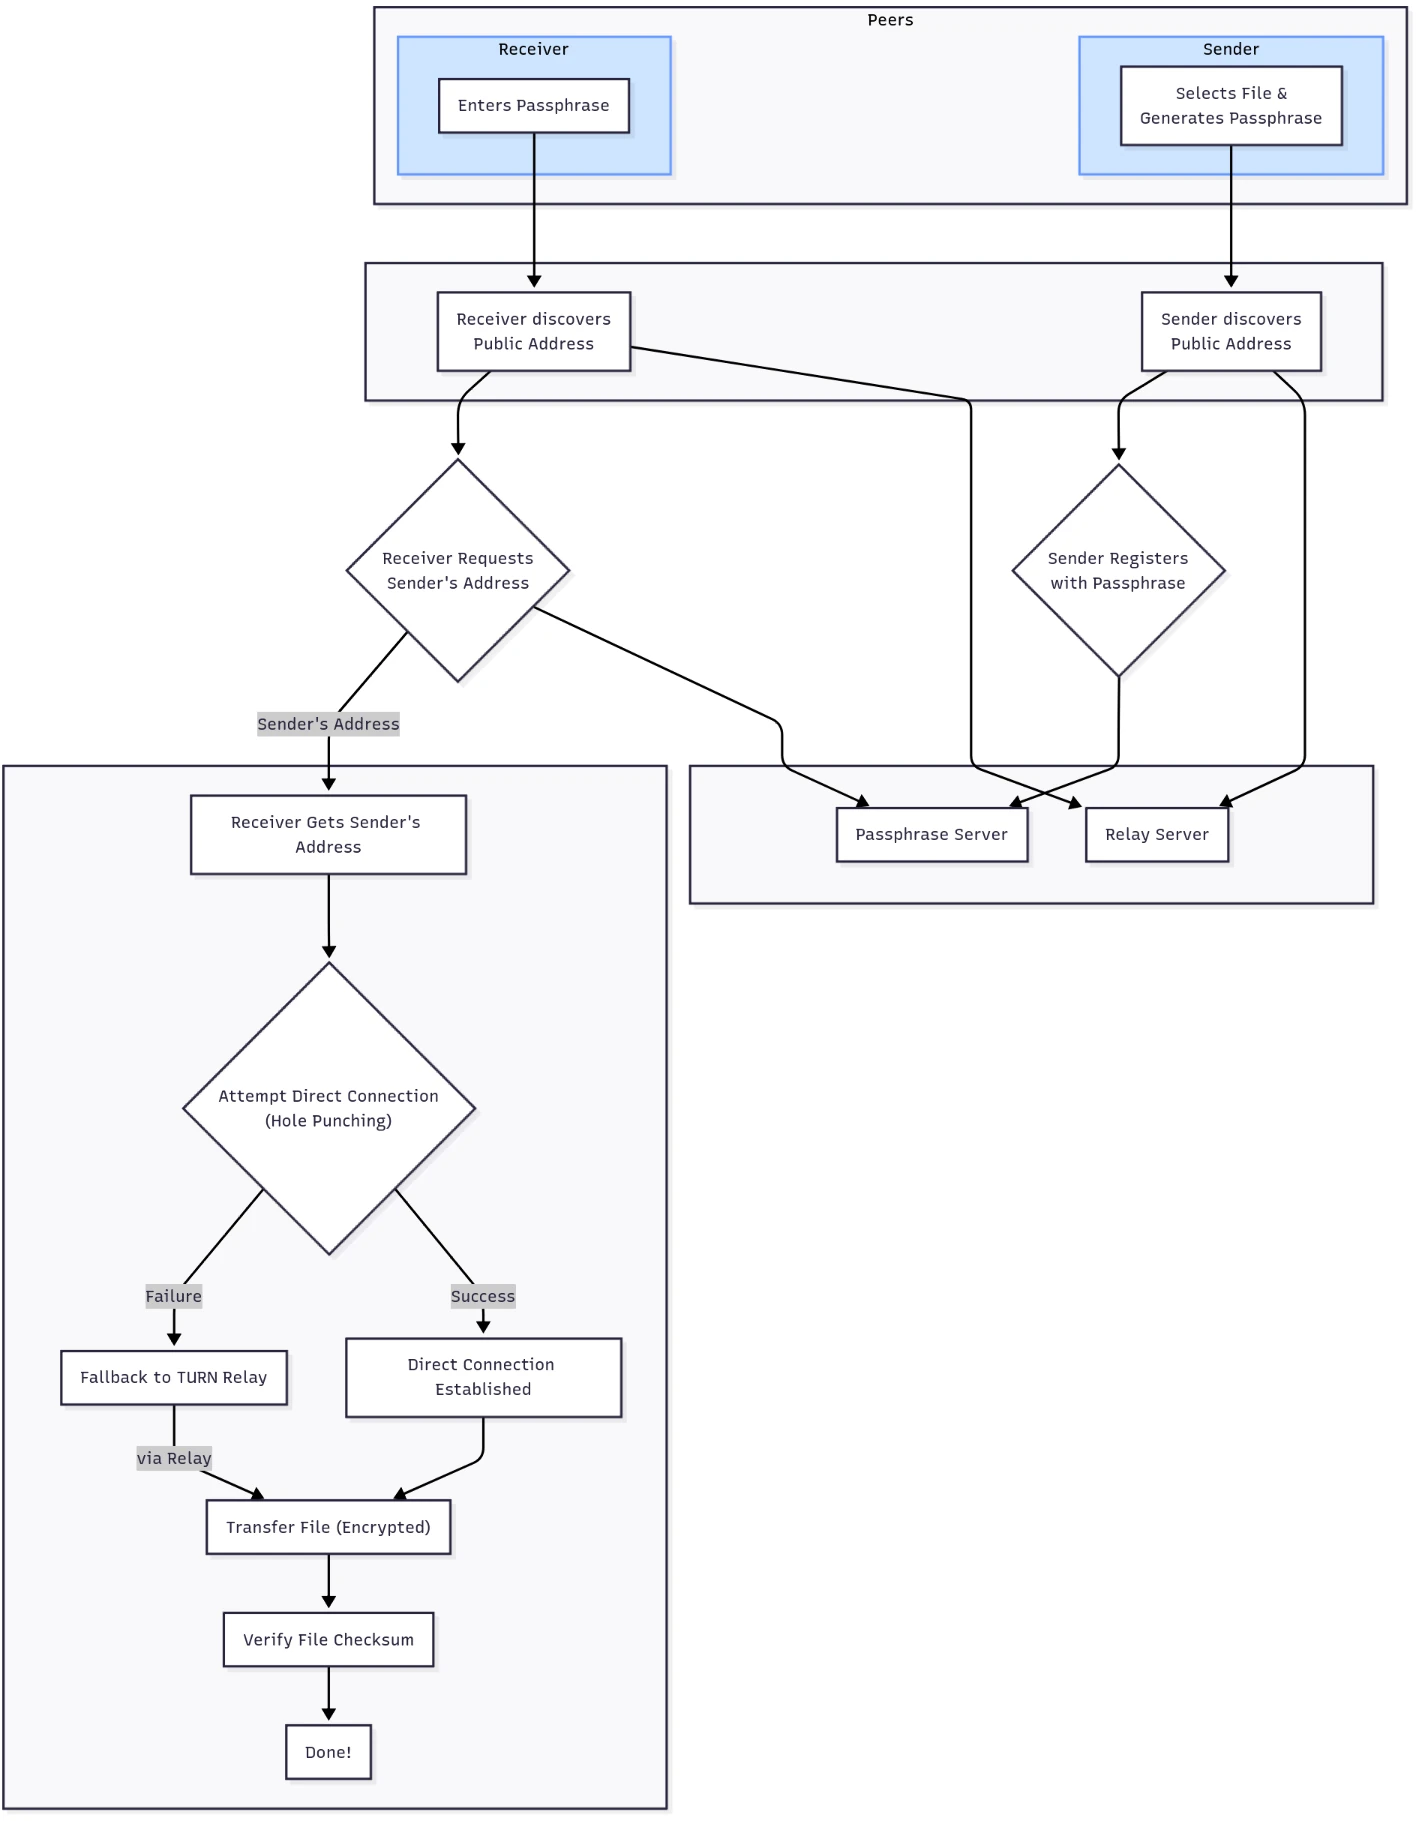
The flow of the Orchestration server looks roughly like this:

  1. On the website, a user creates a new session, selecting the number of teams, maximum members per team and one of the pre-made scenarios. This is then sent to the API listening on the server.
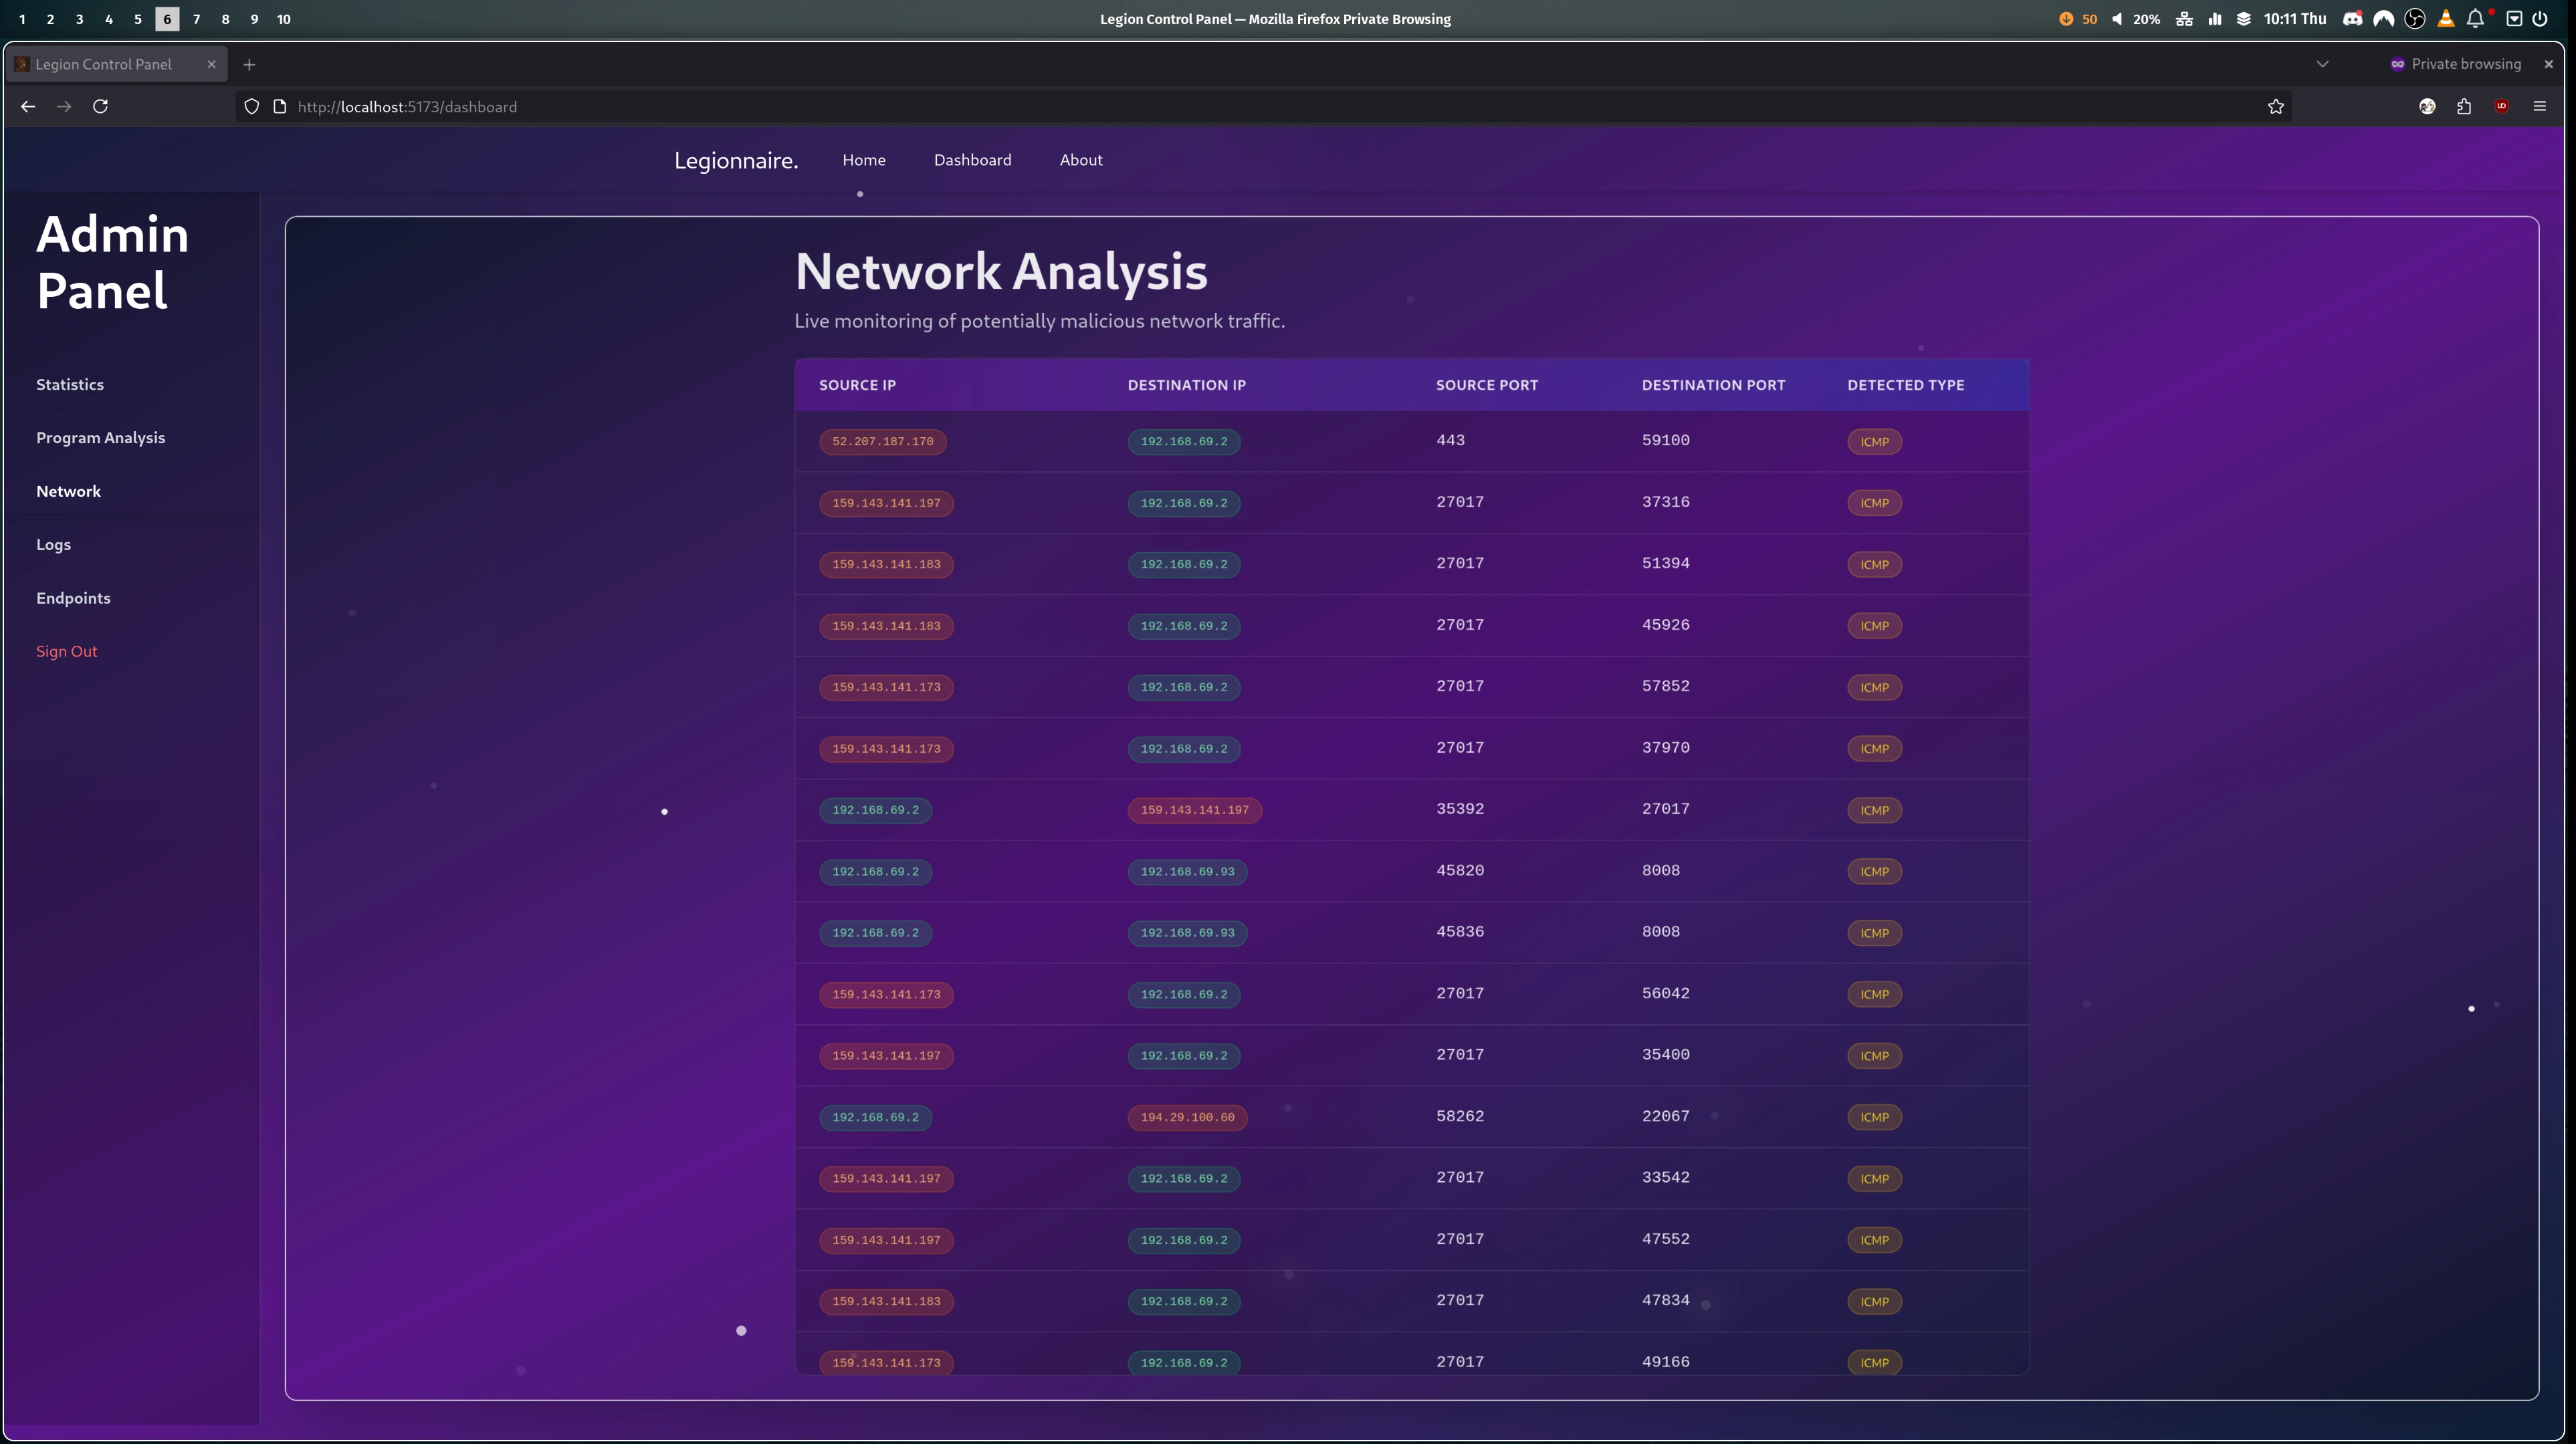
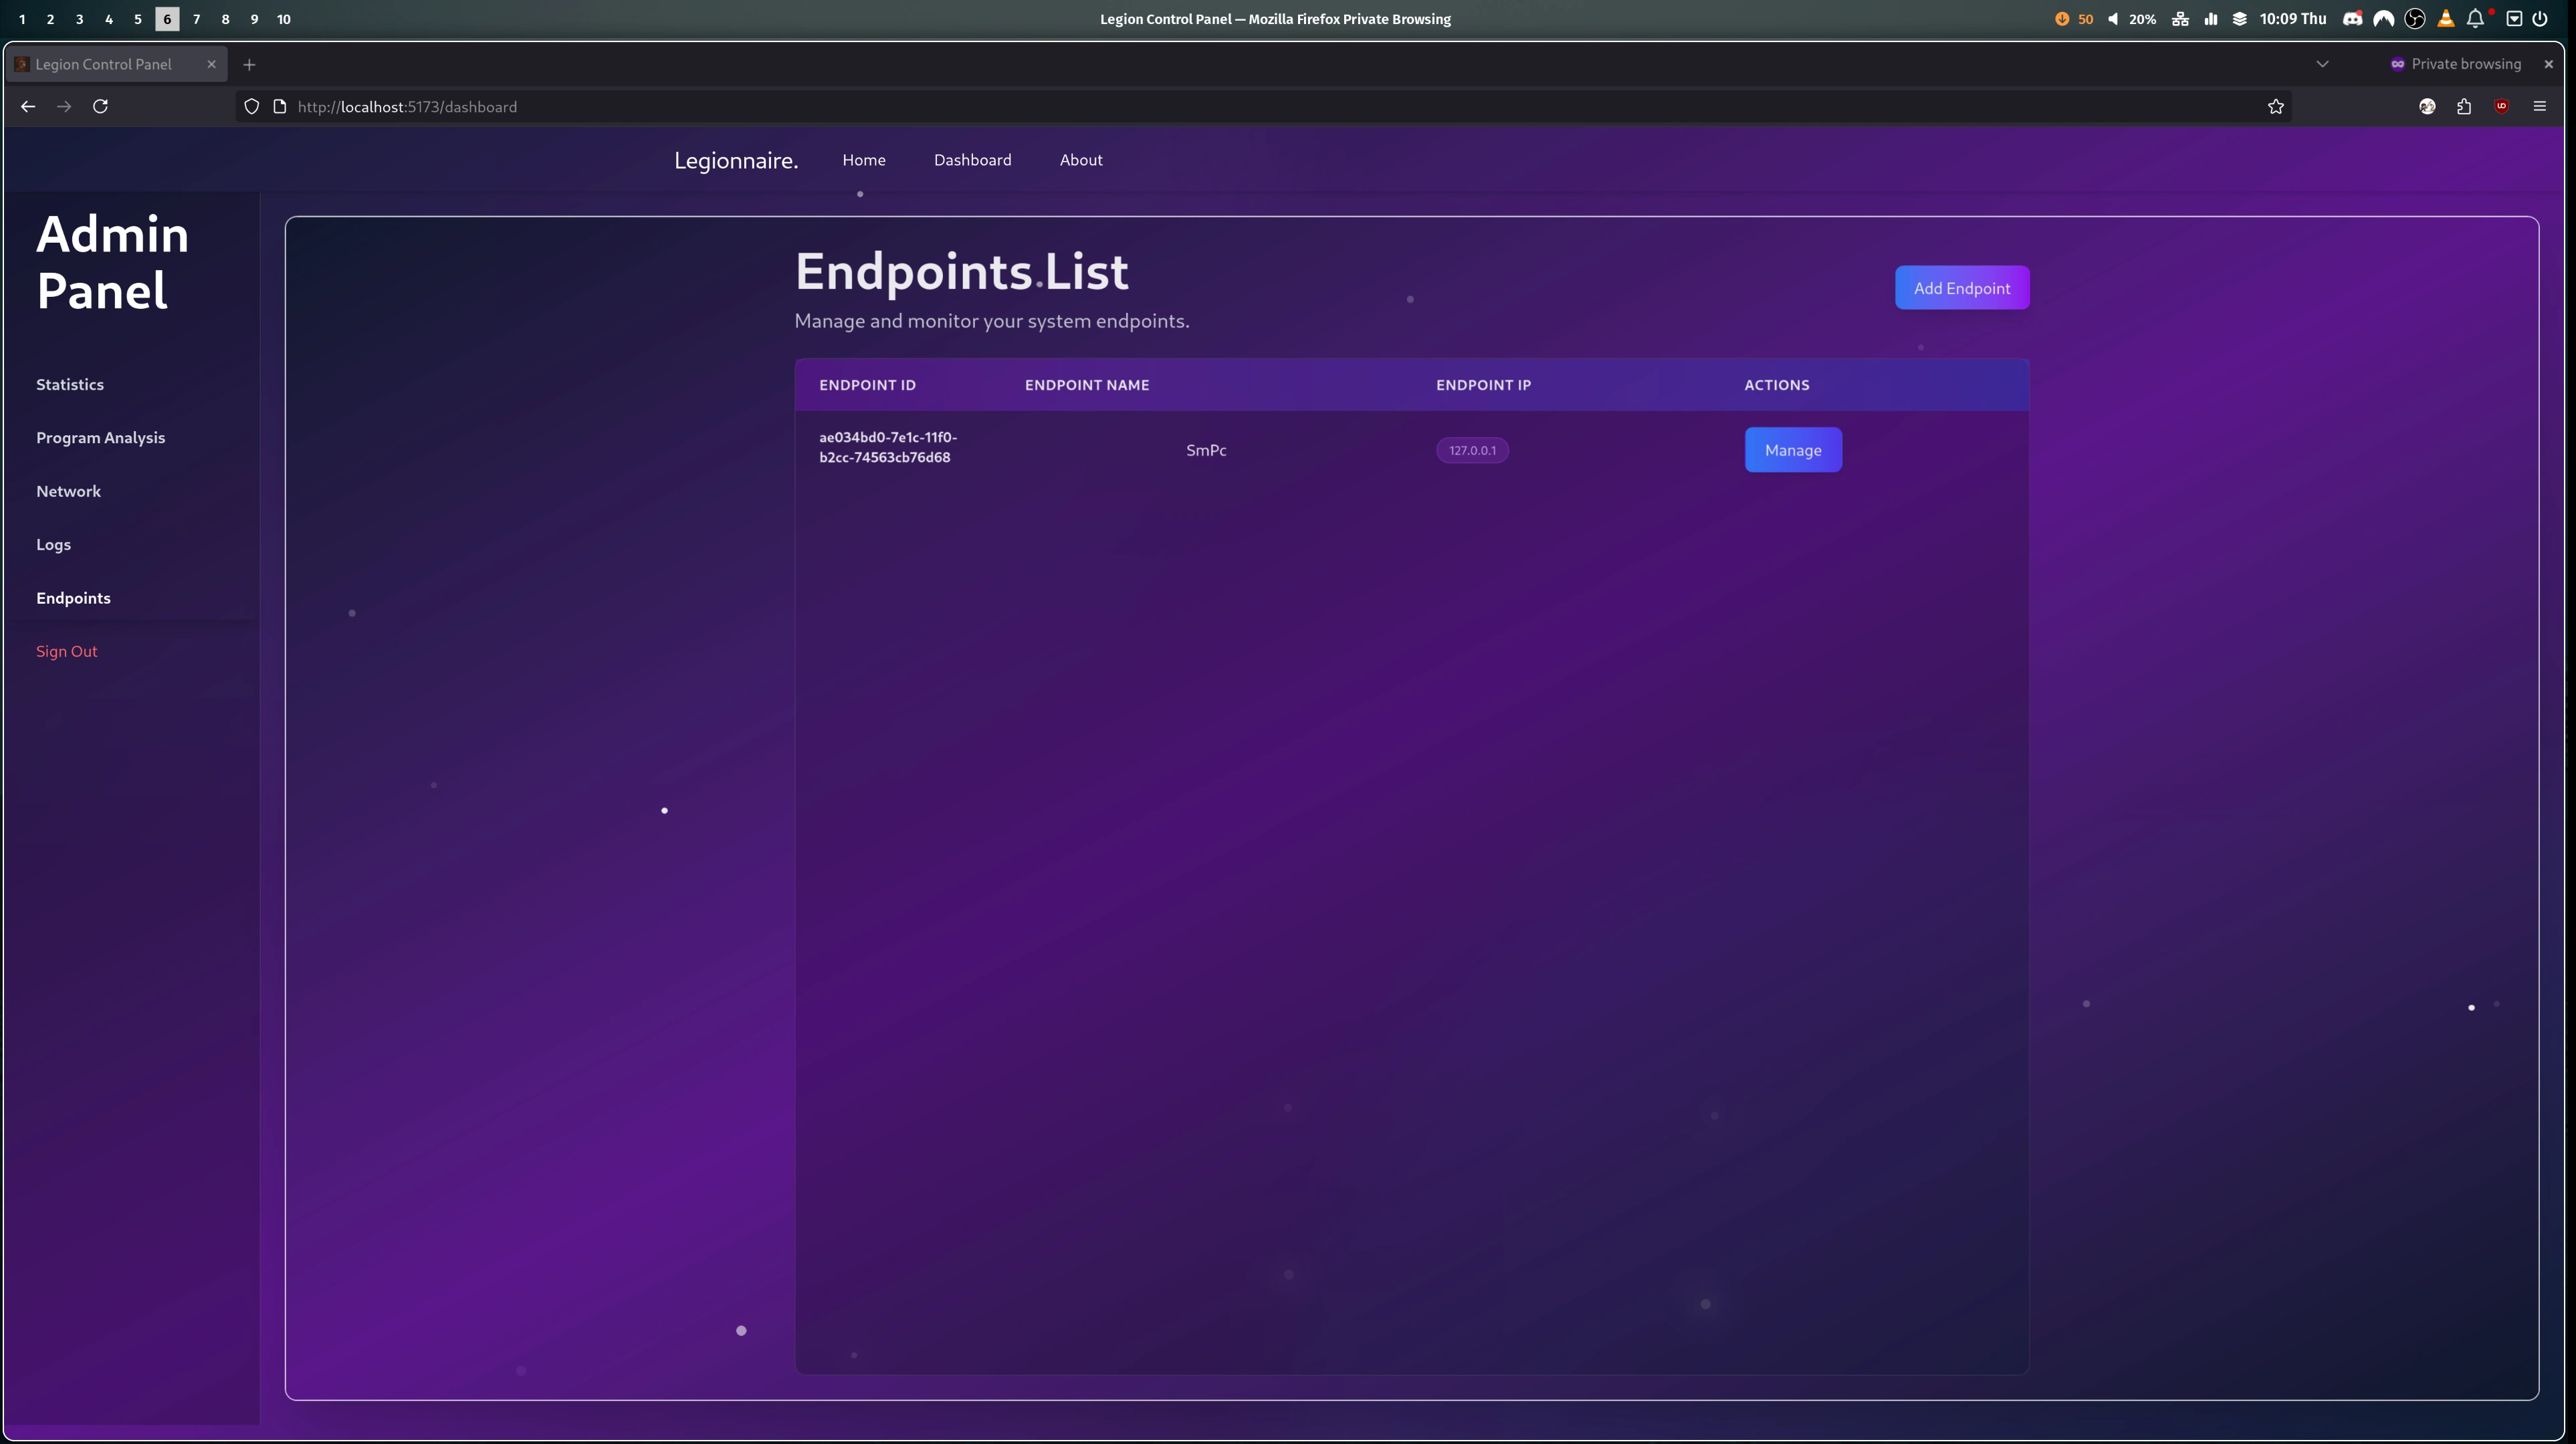
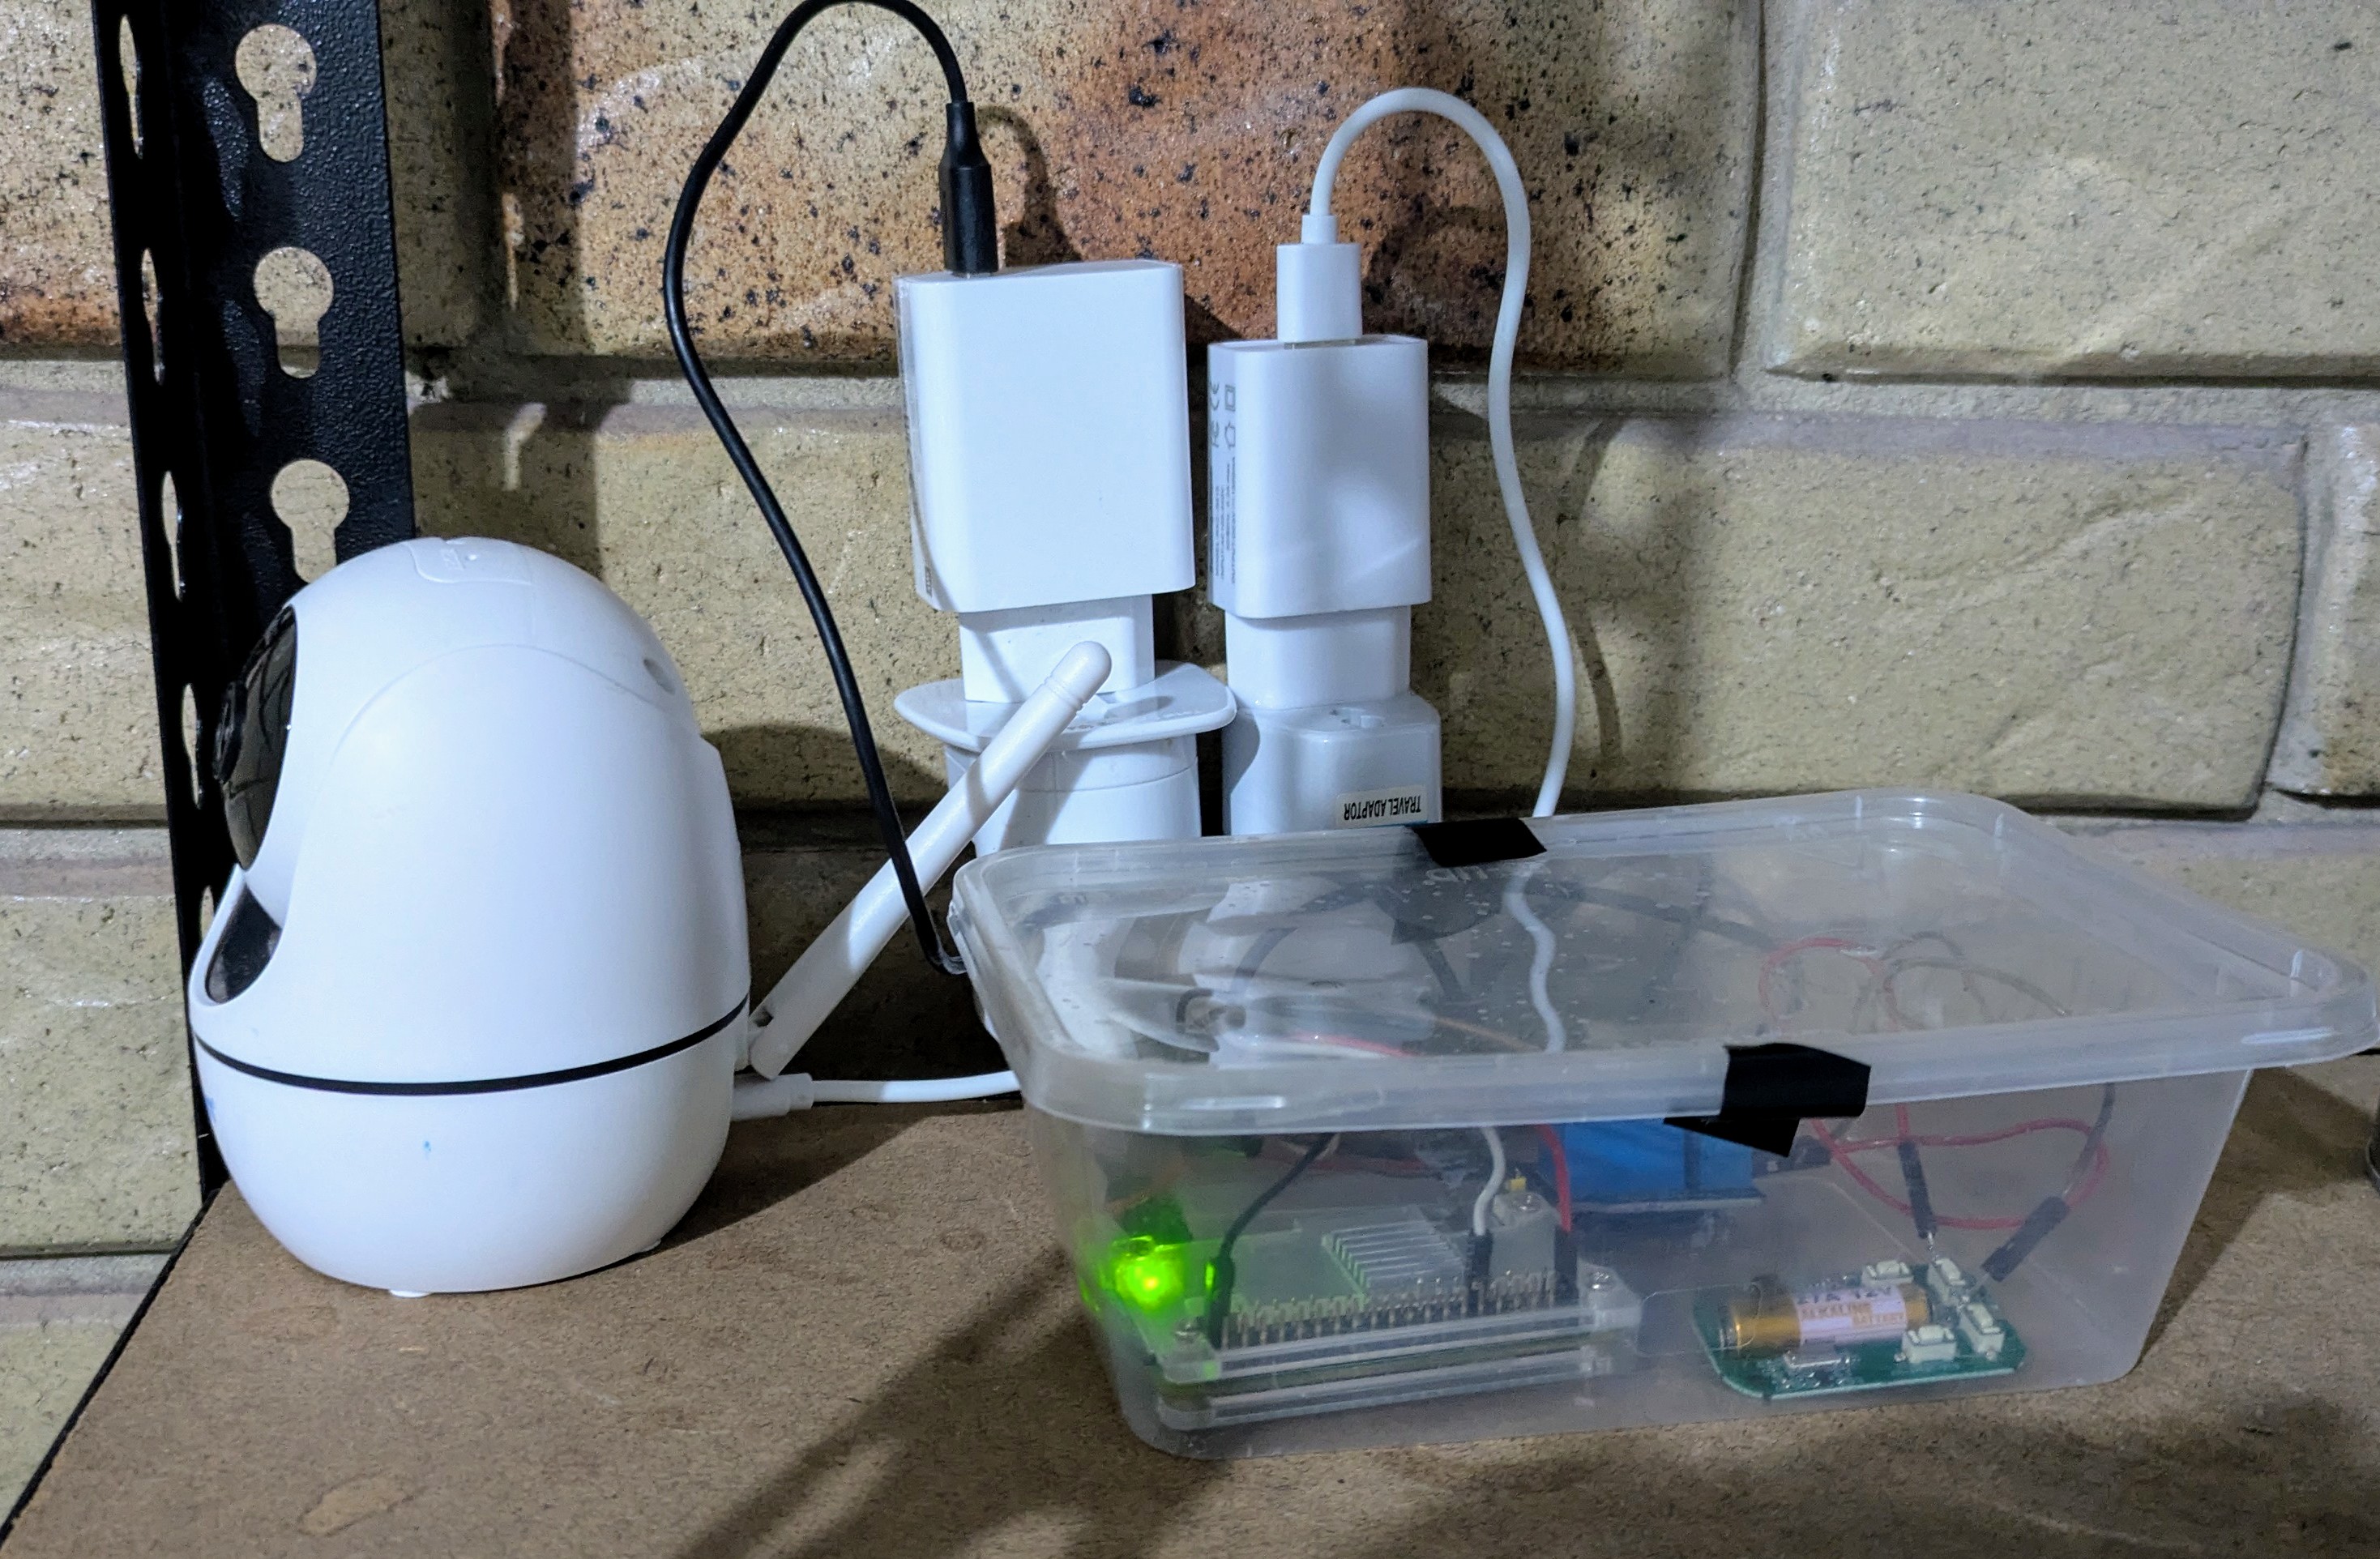
  2. The server creates a WireGuard VPN container which will act as the router. WireGuard then generates VPN configs: one for every team, one for every player, and one additional per team for the admin to use. Then one container is spun up for each team, using the Docker Image designated for the scenario. And finally the last container is added, this acts as the "Scoring Bot", pretending to be a real user to check the services work as expected and insert the flags the participants need to steal.
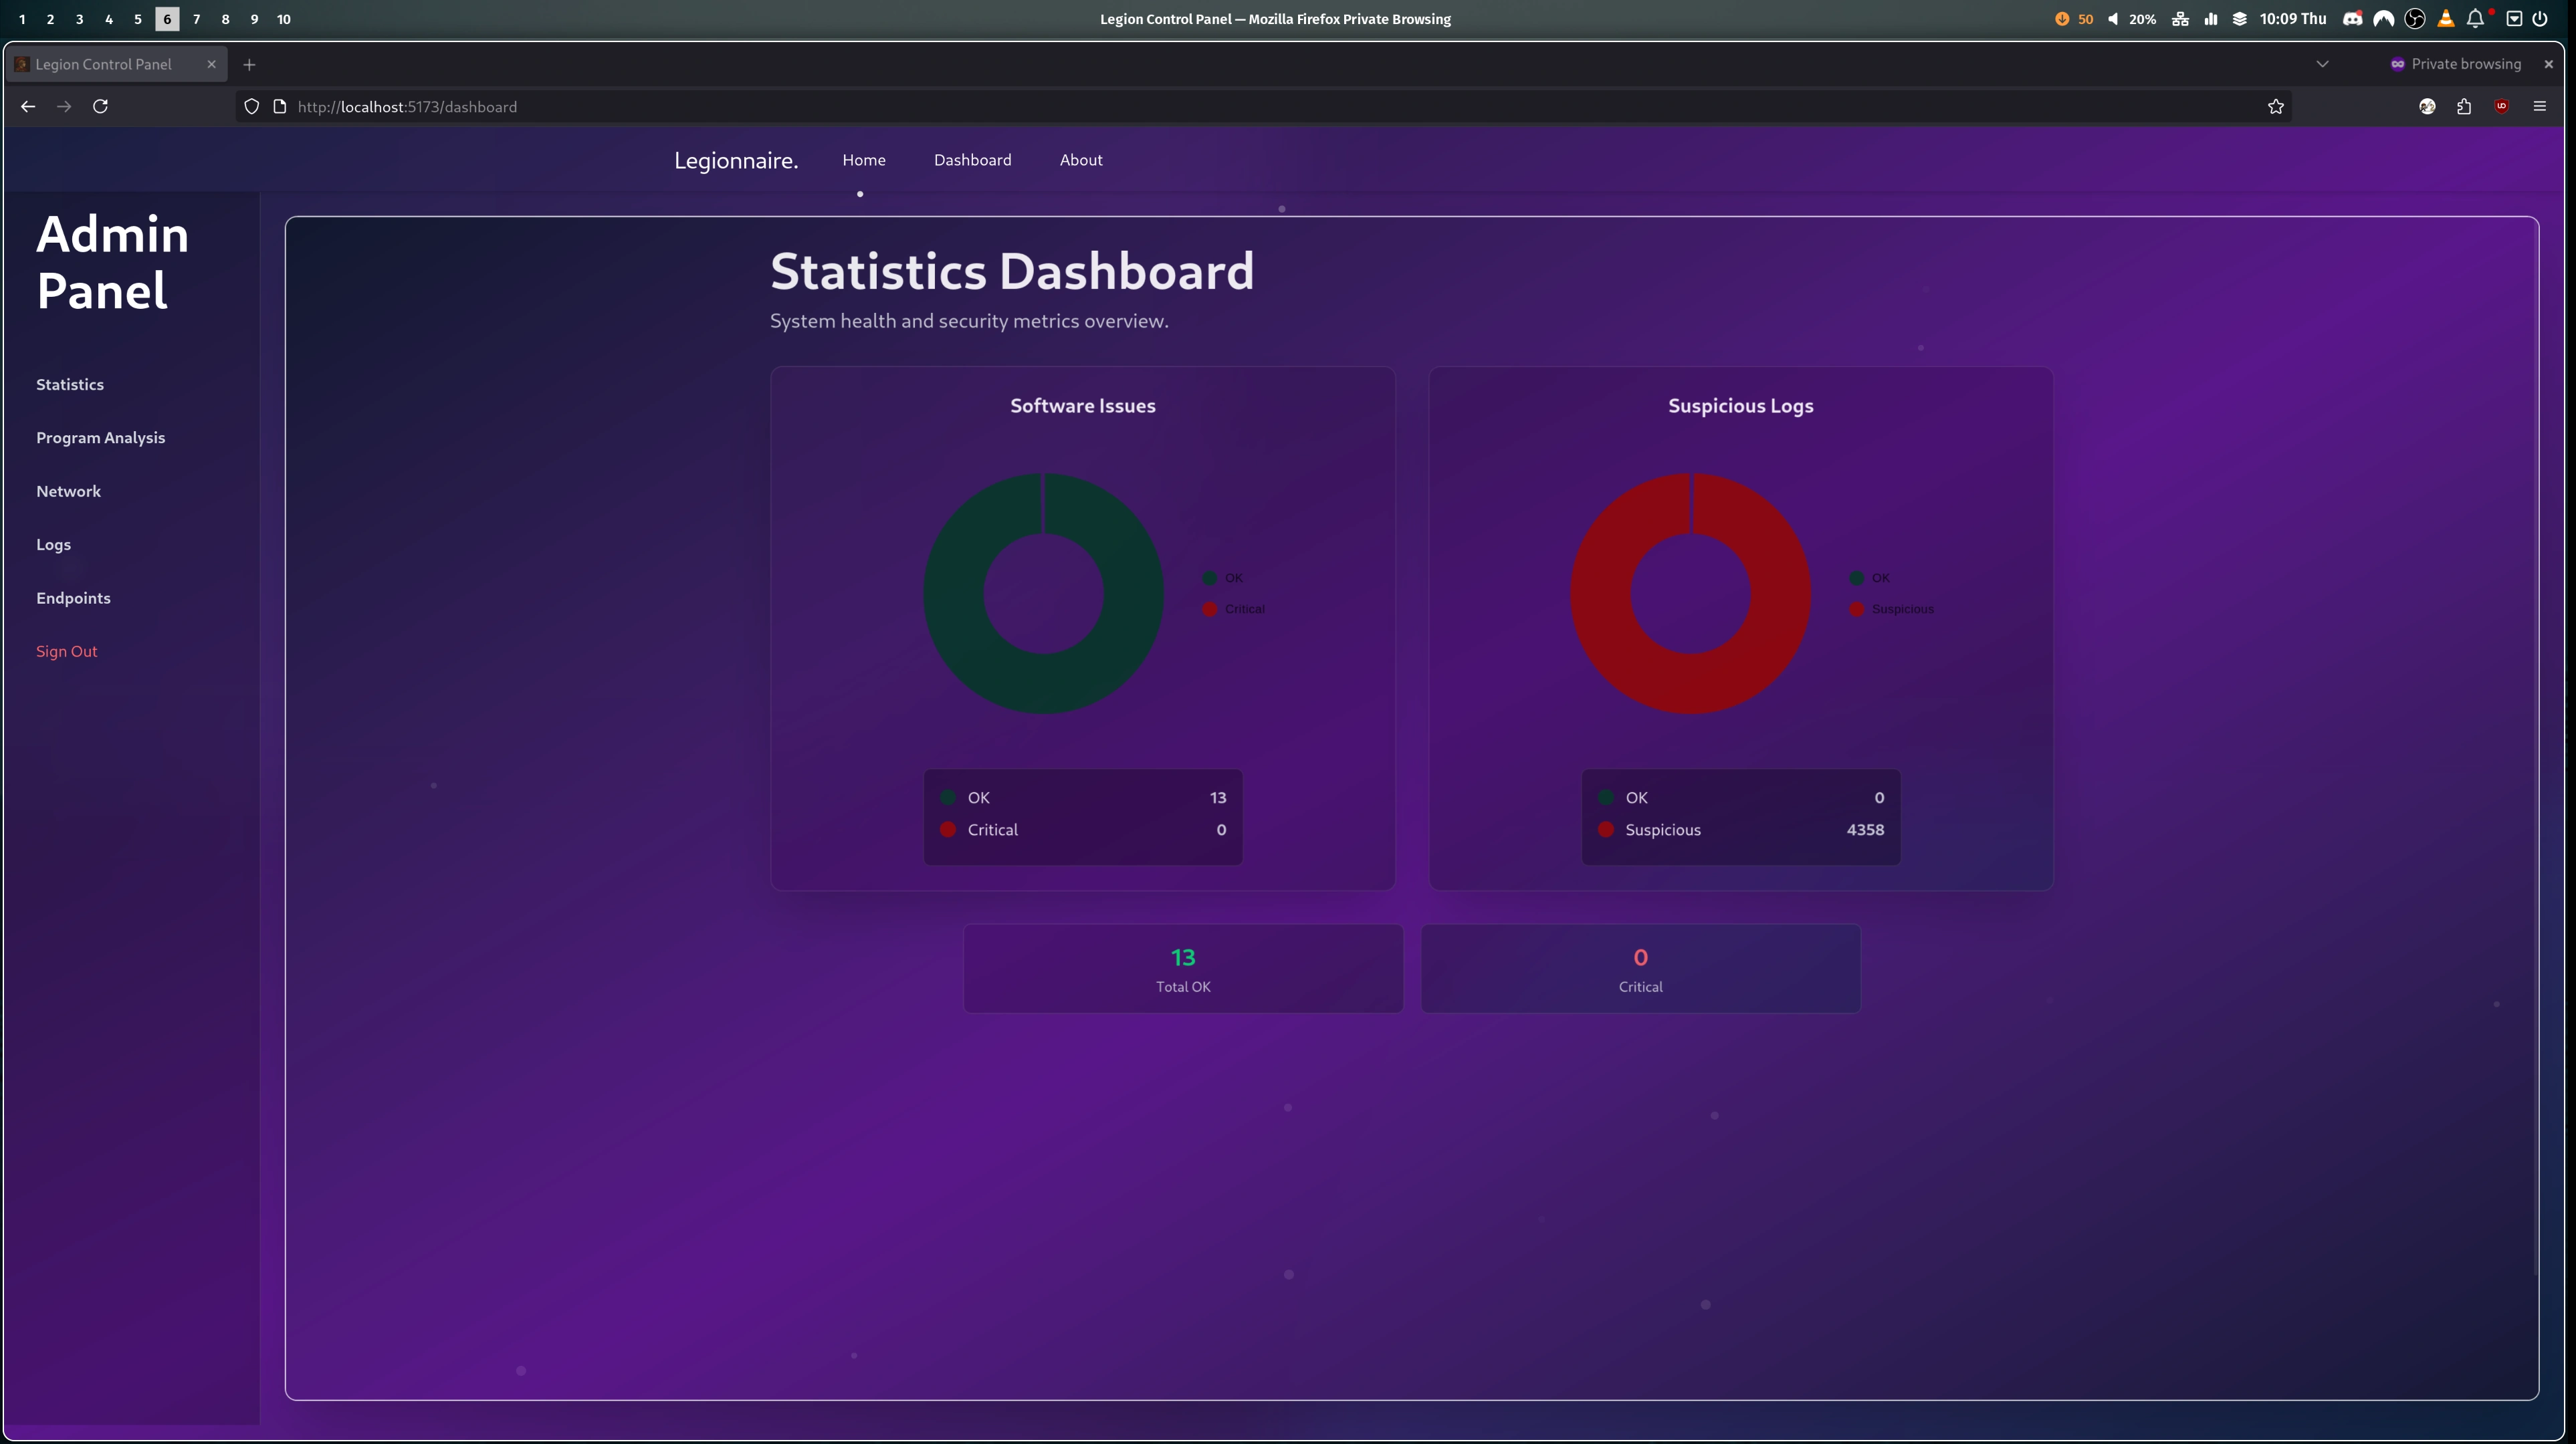
  3. The session is now in the "lobby" phase, the admin is presented with their dashboard on the website and they can invite users to join the teams.
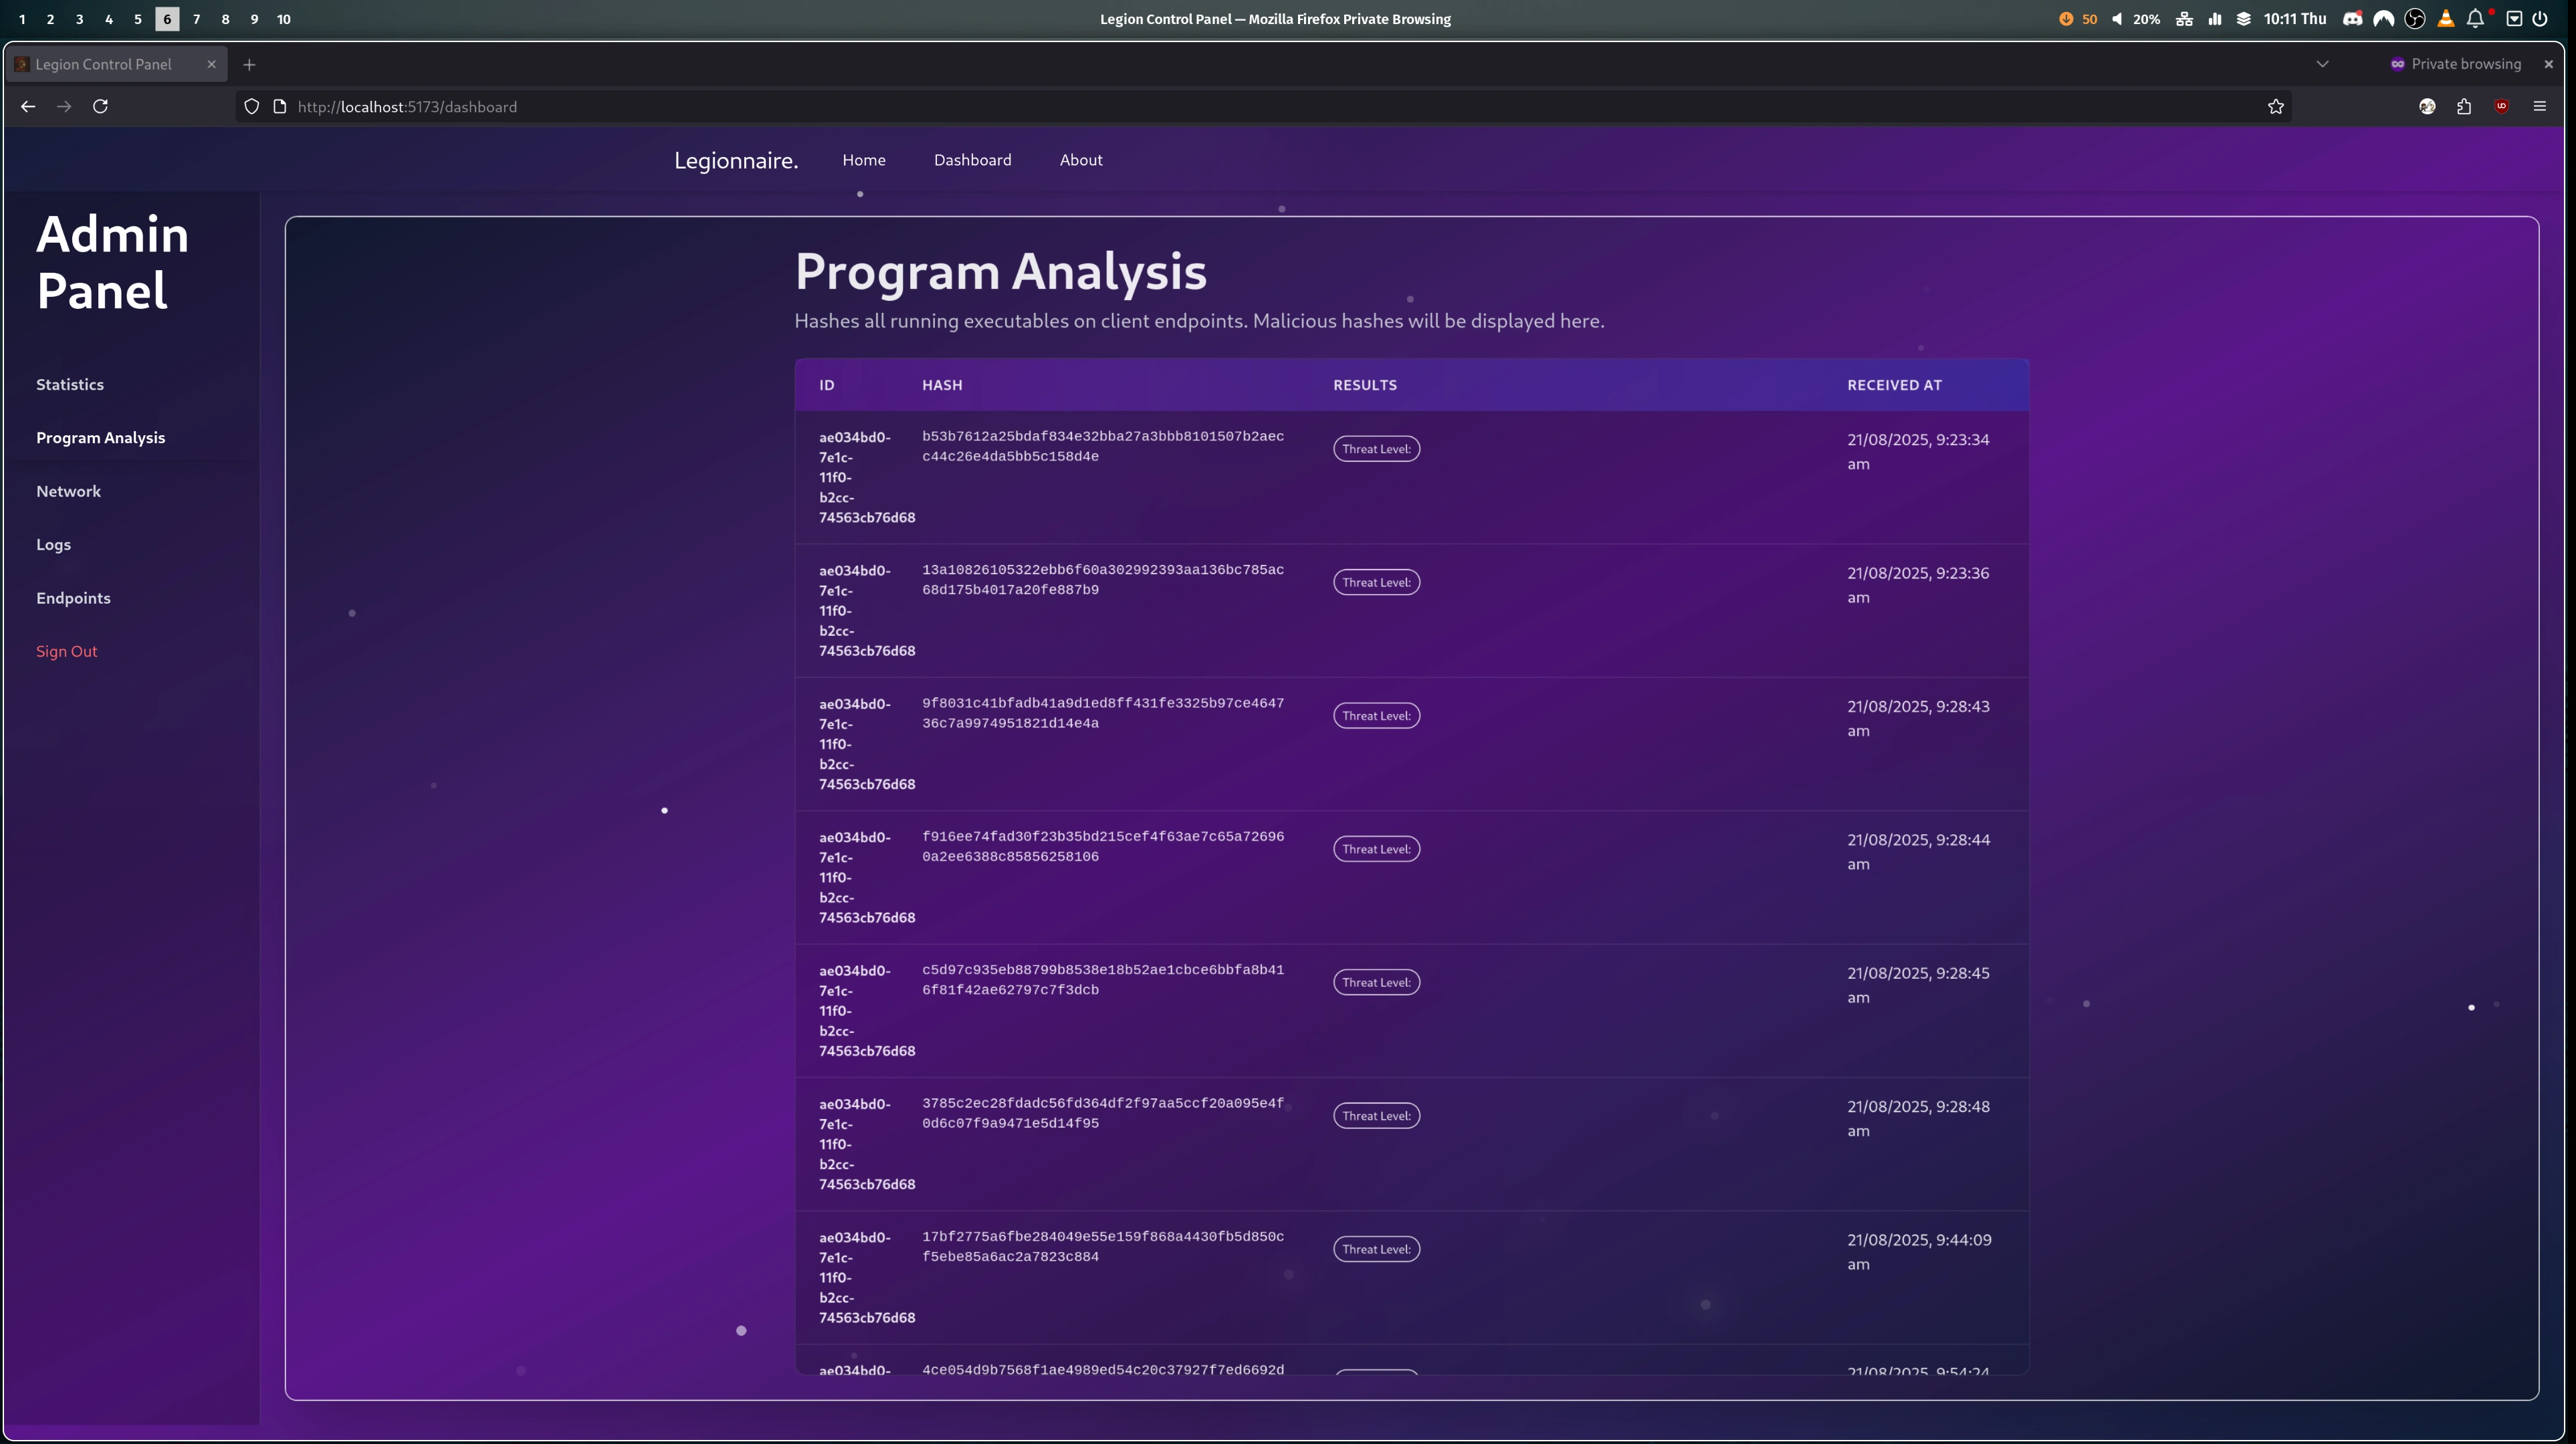
  4. Once the admin starts the game on the website. The server gets to work and creates a user account on every team container, for each member of the team, as well as an additional account in every team for the admin. Then the "Scoring Bot" is instructed to start its scoring. The bot attempts to use the services as expected (e.g. inserts a flag into a notes app) and if it succeeds the flag is stored in Firebase. If it fails the attempt then a counter is increased and that team's score is affected.
  5. Now the participants and the administrator can access their container via a web shell or via the VPN config provided to them. The web shell uses WebSockets to access a secure bash session directly on their team's container. Whereas the VPN gives the participant direct access to the isolated network, so they can SSH into their team container using their own preferred terminal.
  6. Once the game is finished the relevant session info is saved on the frontend and the Orchestration server goes through and removes every container, deleting all generated configs and finishing back on a clean slate.

The Architecture

Here is a rough diagram of how the whole platform comes together:

Plan

Challenges and Difficulties

Not Enough Hours in a Day nor Days in a Week

I would argue the hardest part of the project was the workload, as this was a group project it was a considerable task we were given. While the finished platform always felt achievable, it was hidden behind a mountain load of work, which wasn't always shared evenly, but c'est la vie.

Vibing Web Dev

Due to time constraints and lack-of-experience the frontend had a lot of vibe coding put into it. To each their own, sometimes it would be amusing to see PRs full of lengthy code comments, emojis and or my least favourite the AI glowing gradients on everything. But unfortunately, the end result is while the website is complete, the code quality is sub par and impossible to maintain. Especially with the Firebase integration, the website slurps up the user's resources even when it is just idle.

An Award Winning Result

While we can all complain endlessly about what should have been done differently. We did manage to produce a platform that meets, and arguably exceeds, the goals given to us. CyberBattles is now an easy to use and accessible Attack Defence platform. I think this is super important for lowering the bar to entry for this style of competition. Providing a gamified and educational way to learn essential skills in an ever growing industry.

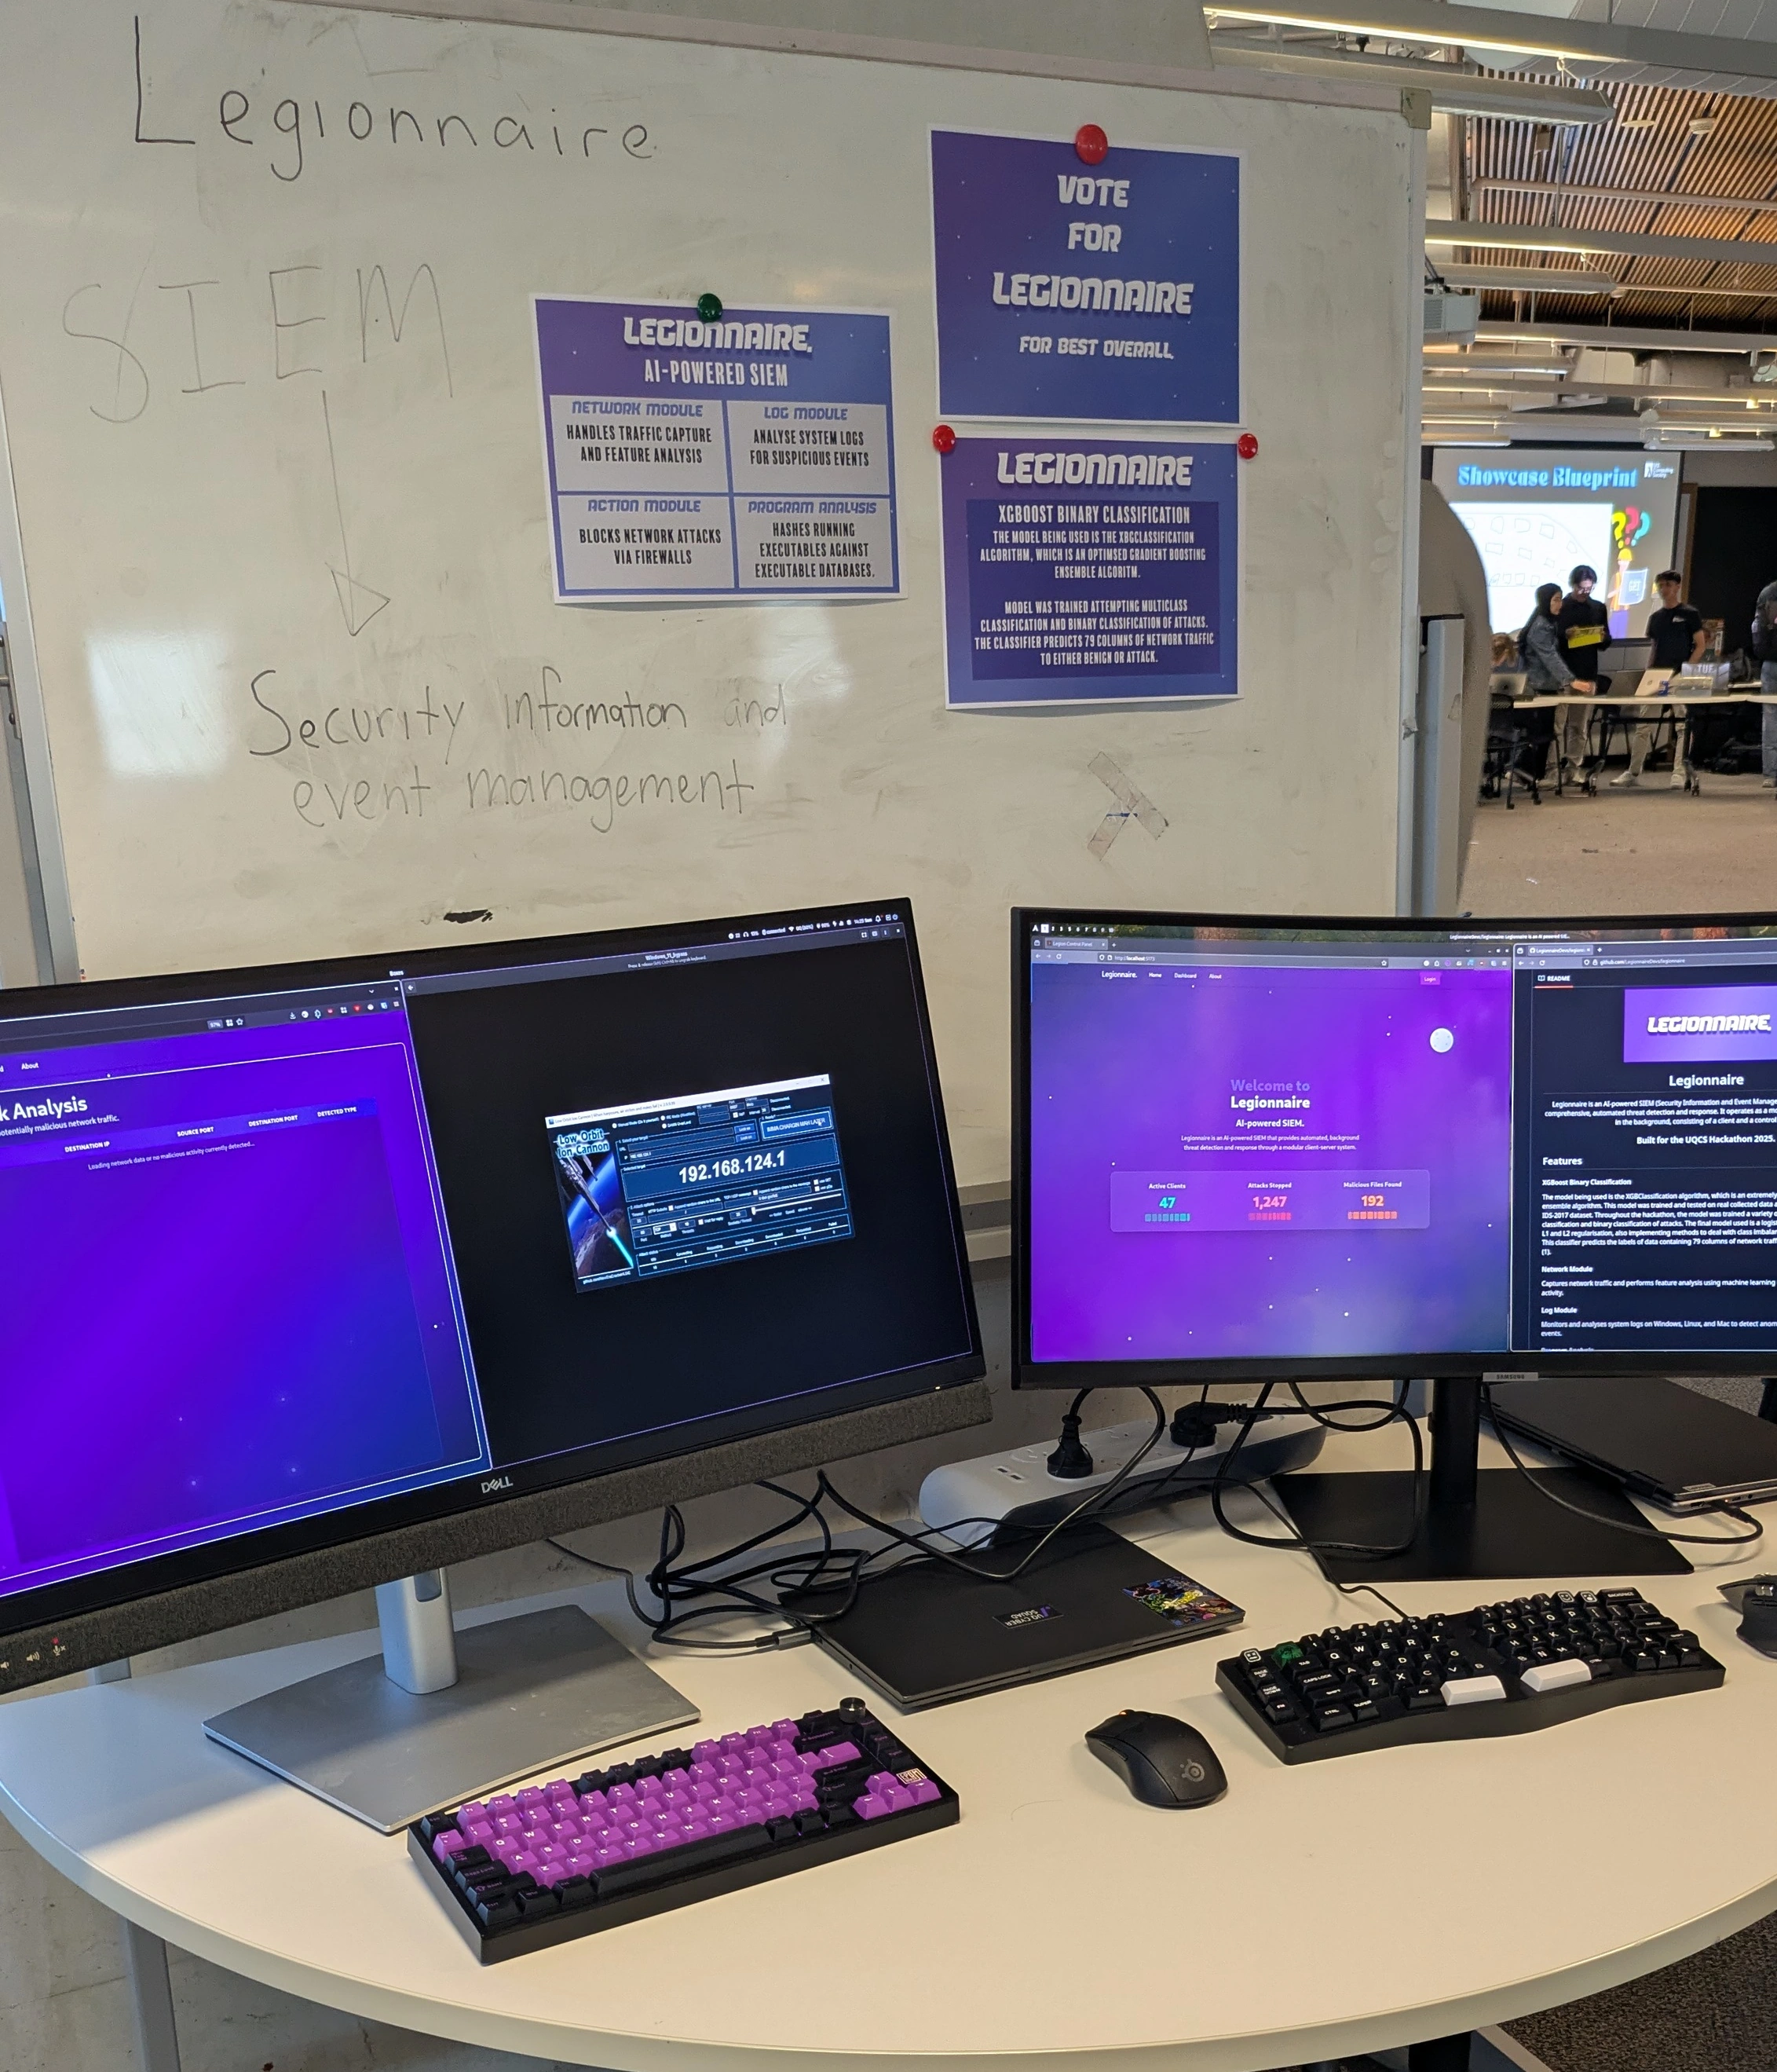
An unexpected result was that the project was nominated by the course coordinator for UQ Illuminate, a showcase of the best projects produced by graduates (both under and post grads) in 2025. Specifically we were nominated for the category of "Best Cyber Security and Data Privacy Project". The event was a good chance for Lachlan and myself to show off what the team had put so much work into.

Here's a look at our booth for the night:

Showcase

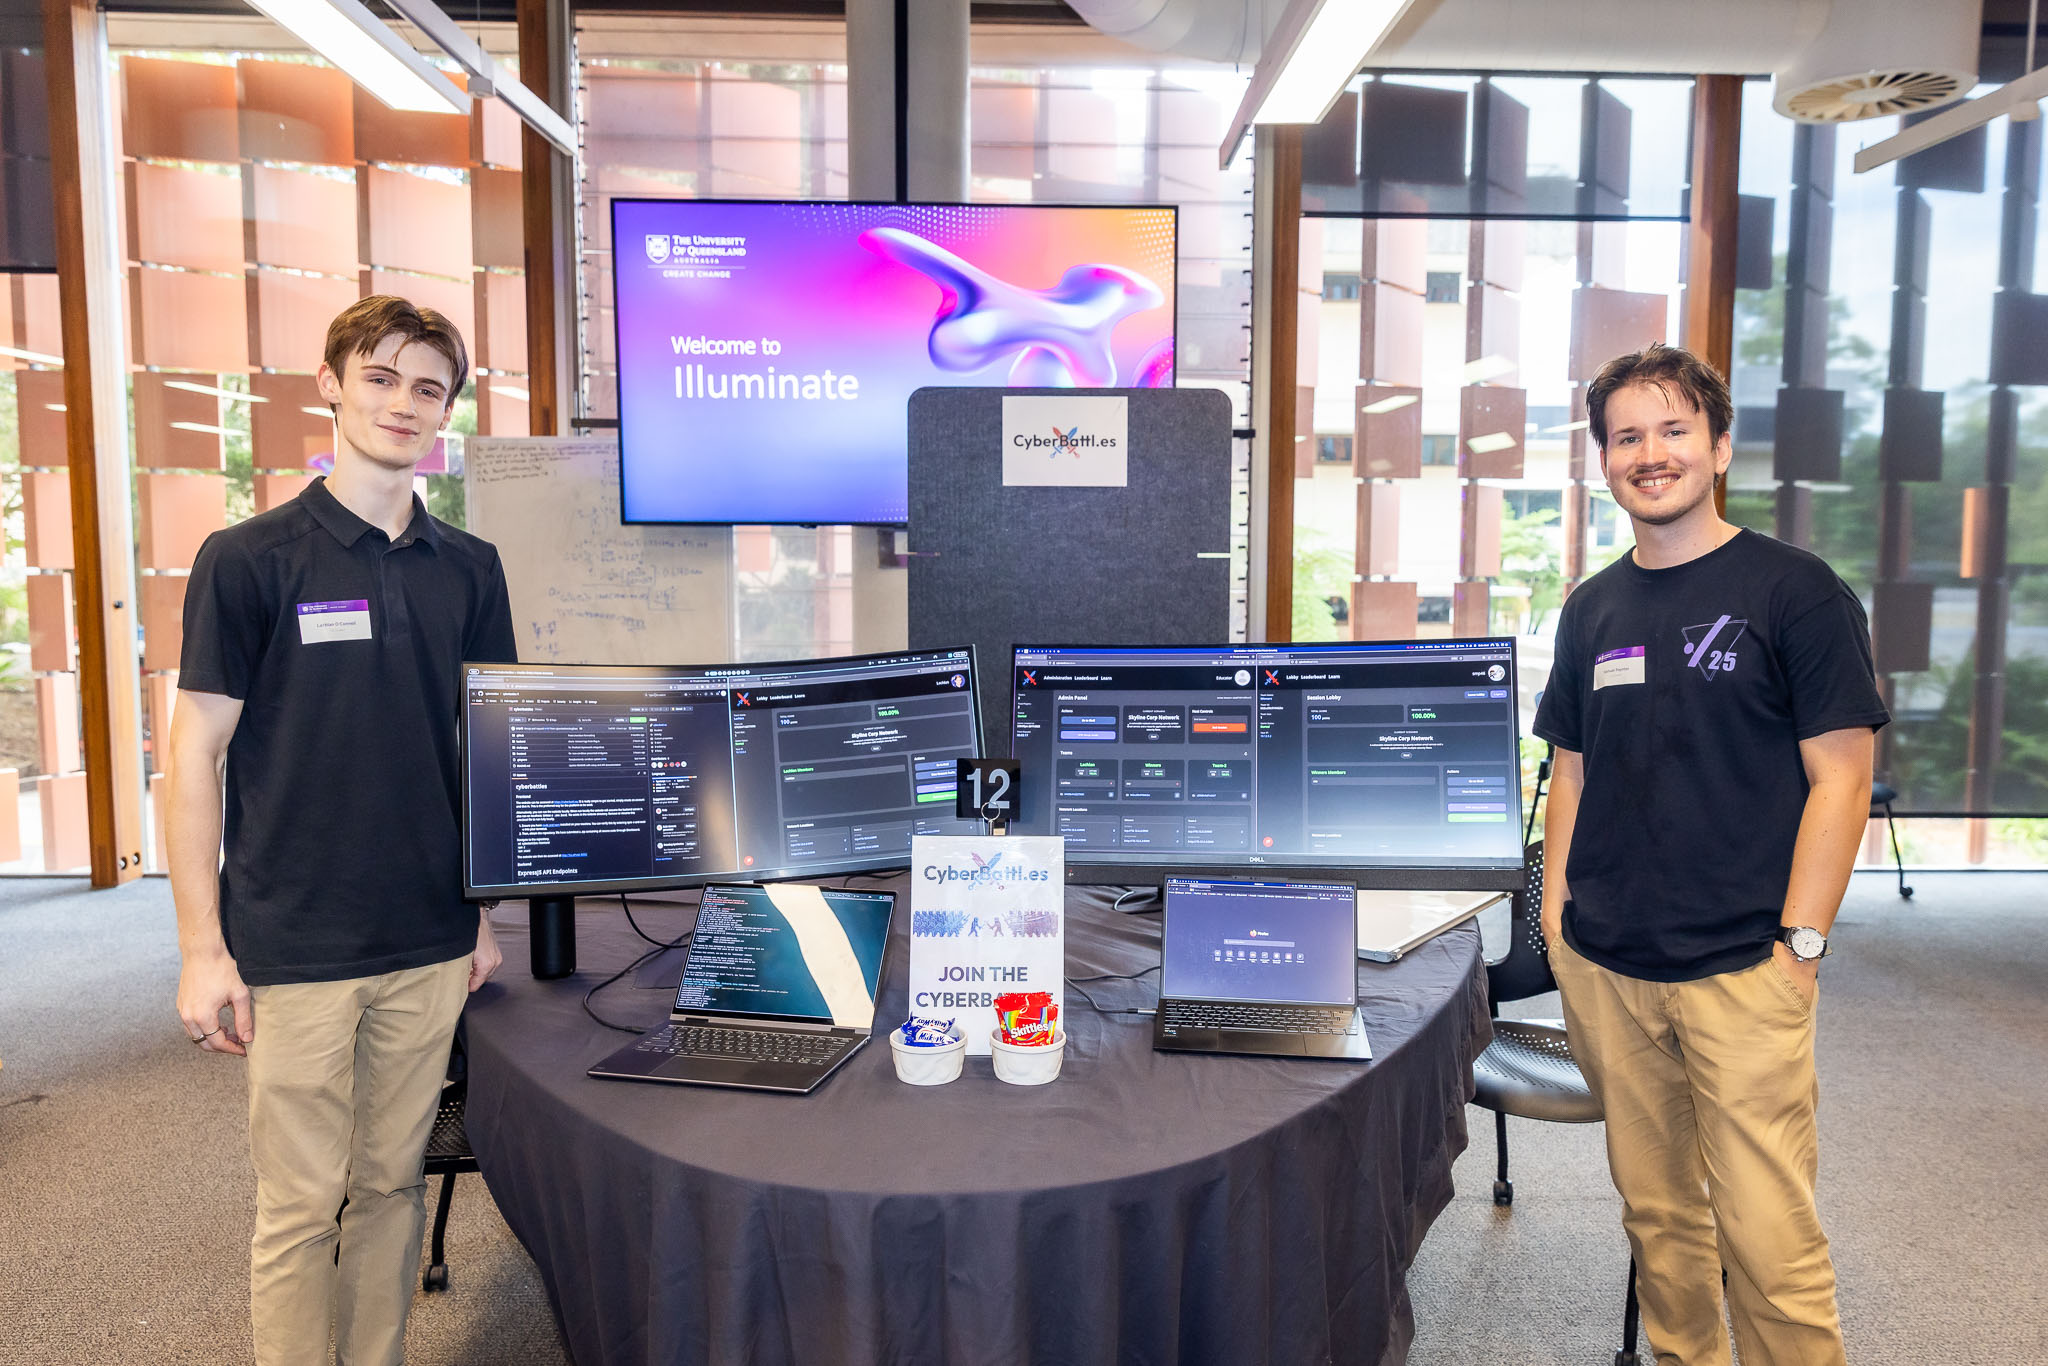
To our surprise, the judges picked CyberBattles as the best project for our category. This has been hugely encouraging and a really rewarding experience. Lachlan and I plan on continuing development of the platform and getting it into the hands of educators.

The Future of CyberBattles

We are excited and still surprised at what we managed to produce, but it's not done yet. There is a bit of a plan to carry out before we're ready to hand out the platform, however source code is now available on our repo (click the GitHub icon on this page). The main issue we want to address is that as an open-source platform, depending on Firebase as our database provider is limiting. Due to the nature of the platform, both in the hosting expense and the liability of providing relatively anonymous internet-connected virtual environments, due to that CyberBattles will be transitioned to a database solution that can be hosted alongside the rest of the platform (locally). I will also be personally taking this opportunity to rewrite the website to fit the new database solution, whatever we choose, and add a little more polish.

]]>
2025-12-04T00:00:00.000Z
<![CDATA[Legionnaire]]> https://smp46.me/blog/Legionnaire 2025-08-21T00:00:00.000Z Title

Legionnaire: Caffeine, Code, and Cyber Security, a 48 Hour AI-Powered SIEM Hackathon Project

Acryonyms, Acronyms, Acryonyms

A few months ago I found myself sitting at a talk at CrikeyConX in the Brisbane Convention Centre. The talk was titled "SIEM-less security; Panacea or placebo", and it took approximately 10 minutes before my friend Lachlan and I turned to each other and admitted we had no idea what a SIEM or an EDR is. After a quick search, we were suddenly (acronym) experts and the talk began to make a little more sense.

Therefore in case you don't know:

  • SIEM (Security Information and Event Management)
  • EDR (Endpoint Detection and Response)

Crikeycon

The key takeaways from the talk were:
a) SIEMs are expensive (i.e. they're worth a lot of money)
b) SIEMs and EDRs are tools to be used by experienced Security Professionals, not one-shot solutions that you can throw money at to solve cyber security.
c) Modularity is important in these kinds of products.

That got our cogs turning. Then the UQ Computing Society's yearly weekend Hackathon comes around and we have an idea, why not build our own SIEM in less than 48 hours. Last year we made a poorly written idle game in Rust, so something a little more serious sounded appropriate. We also learnt, based on last year's winners, that some kind of AI tech (or at least Machine Learning) was a requirement to get any of the judges to even consider our project. So we have two requirements for our project, some kind of SIEM/EDR product and it has to utilise AI. Easy right?

The Architecture Plan

As this was the second time our team had participated in the UQCS Hackathon, we knew the biggest hurdle was ensuring everyone had work to do. We had to prevent (as much as possible) devs waiting on other devs to get work done. As a result, a modular approach was decided upon.

Given the goal is to make an enterprise-level product, the Client has to be a background-only service that provides zero feedback or notifications to the user. It is comprised of four modules:

  • Network Module, for monitoring and collecting network flow features to be sent to the control-server for analysis.
  • System Log Analysis Module, for monitoring key system logs and flagging any suspicious or otherwise unwanted entries.
  • Program Analysis Module, for hashing all running programs and checking if any match known malware (via the MalwareBazaar API).
  • Action Module, so once a Security Specialist has read logs they can act against any potential threats. Actions include: Adding and removing firewall rules, killing processes and removing files.

The Control Server is then responsible for:

  • Running the Network Flow analysis algorithm and flagging any suspicious activity.
  • Collating logs and storing the client identifiers for every entry.
  • Proxy-ing any actions from the Web Dashboard to the appropriate Client's Action Module.

The Web Dashboard connects to the Control Server via a REST-ful API to:

  • Provide a per module logs overview
  • Provide statistics and graphing
  • Allow viewing logs associated with each Client
  • Take context specific actions for each Client (e.g. blocking traffic, killing and deleting programs)

Plan

The Tech Stack

Last Hackathon my team made the mistake of trying to both learn and write in a language we had not used before. While we had hoped to use Golang for this project's backend, for speed and reliability, only a couple of members had experience writing it. So, Python was selected as the language of choice.

The most important of the libraries we used are:

  • cicflowmeter, which allowed live monitoring and extraction of over 79 network flow features.
  • xgboost, for training and running the binary classification model that allowed us to accurately analyse and flag traffic.
  • flask, the gold-standard for implementing web applications in Python. In our case it was used for REST-ful API communications between Client, Control Server and Web Dashboard.

The Web Dashboard was written using React + Vite + TailwindCSS, to provide an easy to develop and run front-end for the users. Firebase is used for login authentication and was intended to be used for backing up logs, however that has not yet been implemented.

Turning Nice Ideas into Code

What Went Well

Honestly, there were no major hurdles or roadblocks this time around. Development went relatively smoothly and we managed to produce an end-product that fit almost exactly the scope that we set out to do. The modular approach was a great idea, it allowed each developer to work relatively independently up until it came time to combine and connect the modules.

Issues

The only major issue encountered was that we hoped to use an existing Dataset for the AI Analysis: CIC-IDS2017. The dataset provides over 70gb of data over a week of data collection, with data labelled as benign or categorised as a specific type of attack. While a model was trained on this data, we found it very ineffective for the actual data we were producing. i.e. for whatever reason the testing we did produced very different features and thus inaccurate results for the model.

As a result we had to do our own data collection. I personally collected the data using the same cicflowmeter python module, a Kali Linux Virtual Machine and various attack tools.

What About AI?

Don't say it too loudly, our Machine Learning dev is not a fan of using buzzwords to describe what 5 years ago would just be called an Algorithm. But the year is 2025 and we wanted to tick that box. If you do want to understand a little more about how the classification model works, I will quote our ML Dev here:

The model being used is the XGBClassification algorithm, which is an extremely optimised gradient boosting ensemble algorithm. This model was trained and tested on real collected data and verified using the CIC-IDS-2017 dataset. Throughout the hackathon, the model was trained a variety of times, attempting multiclass classification and binary classification of attacks. The final model used is a logistic binary classifier trained with L1 and L2 regularisation, also implementing methods to deal with class imbalances such as weight scaling. This classifier predicts the labels of data containing 79 columns of network traffic to either Benign (0) or Attack (1).

What can I reveal? It's that it actually worked surprisingly well. Resource usage on the Control Server was negligent, and that's even when the model is running nearly constantly analysing multiple clients network flows. The main reasons I found the model impressive is the ability to identify malicious activities of network connections, without interception, packet inspection or decryption. Monitoring is completely passive and transparent, yet still effective.

The Result: Visuals

Here's a short demo of the Web-Dashboard in action:

Per Page Module Overview

Graphing and General Statistics: Dashboard Stats

Program Analysis Logs: Program Analysis

Network Analysis Logs: Network Analysis

System Logs Analysis Logs: System Logs

Endpoint (Client) Management: Endpoint Management

Client Specific Logs and Actions:

Client Logs

What I Learned

The most important thing I learned is that 5-6 hours of sleep and a lot of caffeine, is pretty much the equivalent of a full-nights sleep (not true).

What I did learn is that as easy as it is to hate on Python, it is remarkably flexible, very easy to work with and the module support is incredible. So who knows, maybe my new profile picture will be me working with a Python instead of fighting one.

Additionally, some valuable teamwork skills were picked up. This year was a much more productive and effective use of our time. It turns out task management is super important when trying to work with multiple developers, especially when parallelisation of work is a must.

A Future Startup?

Haha no.

In reality this is very much still a hackathon-level project in terms of polish and code quality. I intend to work with the team and fix some of the minor issues and act on some feedback we achieved. But most importantly regardless of the future, I am proud of the team and myself and think this marks a great final project for our UQCS Hackathon Career before we all graduate.

A little look at our showcase at the UQCS Hackathon 2025: Showcase

]]>
2025-08-21T00:00:00.000Z
<![CDATA[Pandora's Box]]> https://smp46.me/blog/PandorasBox 2025-07-15T00:00:00.000Z Title

Pandora's Box: Developing an LLM-Powered Web Honeypot in 96 Hours

The Problem

The idea of a Honeypot is to detect and collect information on attackers by pretending to be an open server. The downside is that Honeypots normally return a static, generic or no response, which can tip off attackers and prevent defenders from gaining valuable insights.

The Solution

In the age of large language models, why settle for a basic response? Given that a web request is all readable text, it is relatively simple to feed it to and get a response from a Large Language Model. So that is what my team and I, the aptly named Honeypotters, set out to do.

Does it Already Exist?

Yes, in a way. Through my research I found an existing solution called Galah. It largely achieves what we aimed for: using an LLM to produce realistic, relevant responses to web requests. However, Galah has a drawback. It depends on external LLMs via online APIs, which simplifies things but introduces a significant issue: latency. Most web servers should respond in under 100 milliseconds, depending on your network connection. Online LLMs like ChatGPT and Gemini are large, and their response times can be slow, particularly when using inexpensive or free APIs. More importantly, these times can vary significantly. Neither of these factors is ideal when trying to imitate a real web server.

What Makes Pandora's Box Different

My team thought, given how good modern LLM tech is and how fast computers are, why not create a specialised purpose-built one? Which is exactly what we (by which I mean Brandon, our machine learning major) did. As a base model, we chose a distilled low-parameter version of GPT2, distilbert/distilgpt2, mostly because it is relatively fast to train, and very fast to run (with GPU acceleration).

One of the largest challenges of training a model is finding relevant existing data and collecting our own. Ideally, you want a large amount of data to train with; however, given our time frame, we could not collect and prepare enough data to be useful. Instead, a large amount of the data was synthesised; this approach gave us lots of data in the exact format needed for training.

The final model we used can be found on Huggingface. It was trained in about 15 minutes using 20,000 examples and can produce a result in under a second with an RTX 5070 Ti.

Putting it Together

While the LLM was the honeypot's primary component, we still needed software for the honeypotting operations. We chose Golang for its speed, excellent built-in HTTP server support, and straightforward multithreading. Lachlan and I developed this component. It consists of an HTTP server that listens for requests, sends them to the LLM running behind a Python Flask API, receives the response, and converts and sends it back to the client. We also included extensive statistics collection to provide a good user interface.

My biggest contribution was the dashboard and statistics collection. This is a minimal Next.js website that displays the request count, uptime, average response time, an overview of the 10 most requested items and their responses, and charts categorising each request. For categorisation, I used Gemini Flash 2 because it's free and the task doesn't demand rapid responses.

dashboard_1 dashboard_2

The Result

What Could Be Better

Our model's biggest limitation was the synthesised data. Ideally, we would have preferred to use much more real and unique data. This would have led to a far more varied and creative model. Handling HTTPS would have also been beneficial, though I'm still unsure how to manage certificates for that.

Something Functional

To our surprise, we successfully built what we set out to achieve: a working AI-powered honeypot. Sending a request to the server yields a unique response each time, as intended. For example, if you visit the server IP in a browser, you'll see one of several variations of different webpages. None of these pages are actually stored on the honeypot; they are all generated on the fly by our model.

If you're interested in giving Pandora's Box a try, you can view the GitHub through the link on this page. There you will also find our DevPost submission story and video.

]]>
2025-07-15T00:00:00.000Z
<![CDATA[FileFerry]]> https://smp46.me/blog/FileFerry 2025-06-23T00:00:00.000Z Flow Chart

FileFerry: Building a Secure, Peer-to-Peer File Sharing App from Scratch

Motivation

I'm a big fan and user of the file-sharing utility magic-wormhole. An easy-to-use utility that allows you to transfer a folder or file between any two devices running a magic-wormhole client, using a phrase to connect. However, the client is, in my opinion, the limiting factor. It is usually a command-line utility, requiring both a command line and a computer to run it on. Although it can be run through Termux on Android, that's not quite the user experience I'm after. So what if I could bring magic-wormhole to the browser?

Initial Idea: Literally Bring Magic-Wormhole to the Browser

Being the genius I am (sarcasm) I thought I could literally just bring the wormhole-client to the browser. My preferred client is wormhole-william, an implementation of magic-wormhole written in Golang. A cool feature of Golang is that anything can be compiled to WASM, WebAssembly. So I thought I could just make a web interface for wormhole-william, compile it to WASM and boom, browser-based file sharing!

No, that's not how it works :(

Peer-to-Peer in the Browser and its Limitations

While WASM is super cool tech, a browser is still a browser. And that means limitations. For today, the important limitation is "You cannot access the network in an unpermissioned way." This means the traditional and established method of TCP hole-punching to establish direct network connections between two otherwise unconnected peers doesn't work. I guess this is understandable, but it did throw a spanner in the works. Magic-wormhole works exclusively via TCP hole-punching, a fact I discovered only after building a basic prototype in the browser.

So what can you do in the browser?

WebSockets and WebRTC are what you can do in the browser. WebSockets are our equivalent of a basic TCP stream in the browser. The WebSockets API "makes it possible to open a two-way interactive communication session between the user's browser and a server." Which sounds pretty neat, I'm going to need to make some connections beyond HTTP requests. And WebRTC "enables Web applications and sites to ... exchange arbitrary data between browsers without requiring an intermediary." Sounds like exactly what I would need for a browser-based file sharing application, how easy. With WebSockets for creating streams and WebRTC as our transfer protocol, all it needs is some magic to get the direct connection.

The (Imperfect) Magic: libp2p

libp2p is an open source networking library used by the world's most important distributed systems such as Ethereum, IPFS, Filecoin, Optimism and countless others. There are native implementations in Go, Rust, Javascript, C++, Nim, Java/Kotlin, Python, .Net, Swift and Zig. It is the simplest solution for global scale peer-to-peer networking and includes support for pub-sub message passing, distributed hash tables, NAT hole punching and browser-to-browser direct communication.

Libp2p is what I used to build FileFerry, and it is awesome. As a whole, libp2p is a specification for bringing together a lot of cool networking technologies into a single framework. And look right there in the blurb it says it supports Javascript, hole punching and direct browser-to-browser communication.

Okay, so the scope of the project has increased a little... but it seems I have the tools to make my browser-based alternative to magic-wormhole.

Building FileFerry with js-libp2p

This has been a long journey, and let's just say I'm glad Neovim doesn't keep track of usage by number of hours.

Wrangling js-libp2p

While js-libp2p does handle the magic, it isn't exactly simple nor straightforward. I started with this webrtc browser-to-browser example and went from there. Unfortunately, while libp2p has some cool built-in protocols like gossip-sub for chat apps. It doesn't offer a file transfer protocol, so that was my job to implement. But in theory if I can get a stream, I should be able to just push some data through it, save it on the other end and boom, file-sharing done. Well, in a perfect world maybe, but I found WebSockets and WebRTC isn't exactly tailored to shoving large amounts of data through a stream as fast as possible. Connection stability was a gigantic headache, connections will drop and handling that is a pain.

Complete Transfers over Incomplete Connections

The general idea seemed easy, if I just track at an application level how far through a file transfer the app is then if a connection drops, it can reconnect and keep on going. And that's how I started. But there are issues:

  • How do we know when to reconnect?
  • How do we know that the data arrived all in one piece?
  • What if the Sender gets ahead of the Receiver?

To address the first issue, I implemented a Connection Management class that keeps track of, handles and directs connections. I also made it the Sender's job to reconnect upon connection loss. It sounds simple now, but working out how the specific implementation required a lot of reading of the libp2p spec, reading the source code and trial and error.

The second issue was much easier, and dare I say fun. Hashing to produce a checksum. Now most hashing I can think of works by taking a complete file and processing it all at once. But only the Sender has a complete file, at least until the transfer is done. Instead of having the Receiver process the whole file again and hash it after receiving, I decided I could do it during the transfer. I could do it during the transfer, this way it would be less of an issue if the connection dropped as well. So I picked an algorithm I had actually used in the Algorithms and Datastructures class I took at uni, FNV1a because it is very fast and relatively secure. Okay so now the Sender makes the initial checksum part of the file header and the Receiver can compare its final result against it. Another issue down.

The final issue, I also solved thanks to some networking basics I was taught at uni. The stream behaves like a UDP connection, you can write and read data to it but who is to say whether that data did or didn't arrive. So I thought what if I took a page from TCP and implemented an ACKnowledgement system. Basically, every 200 chunks the Sender will stop sending and wait for the Receiver to send an acknowledgement that it has received the last batch. This helped especially when connection drop-outs occurred, often the sender would reconnect and keep blasting data while the receiver is still trying to catch up.

A (Poorly Made) Overview

Flow Chart

The UI

The nautical theme was picked mostly because I was looking for something interesting. As I'm not a UI designer, it felt easier to make something a little different. The site uses purely HTML/Typescript/TailwindCSS. And I'm not ashamed to admit Claude Opus was definitely the lead CSS designer, I thought it was pretty incredible the stuff it can come up with purely in CSS. Zero pre-rendered assets (images) are used, it's all CSS, SVGs and text.

The Backend

To bring it all together, I self-host two of the three required back-end servers:

  • The Passphrase Server: A simple API that provides access to a database. A sender can make a POST request with a key value pair of their passphrase (the key) and their public peer address (the value). A receiver, with a shared passphrase, can then make a GET request (with the passphrase) and receive the Sender's peer address. The database entry is then immediately deleted.
  • WebRTC Necessities: For a more detailed explanation of exactly how these two servers come into play I suggest this article. But simply put:
    • The CoTURN Server: The fallback relay that is used if a direct connection can't be made between two clients. Coturn is just an open source implementation that I utilised for this project.
    • The STUN Servers: These are public external services that help with client discoverability and establishing direct connections with WebRTC. As these use very little bandwith, there are many publicly available. I used this list and my own fork of a GeoIP API to retrieve the three geographically closest STUN servers to the client.

The Result: A Demo

Demo

Visit fileferry.xyz to try it yourself!

To Conclude

This turned into a really fun and challenging project, and has definitely inspired me to work further with the libp2p framework in the future. Due to the complexity of the project I spent a long time getting into the weeds, reading and trying to understand the source code of js-libp2p. I ran into many problems that neither Google nor ChatGPT could help me with, which made it a very rewarding project to complete.

But for now, I am finished with FileFerry and will enjoy my new easy way to share files in the browser.

]]>
2025-06-23T00:00:00.000Z
<![CDATA[SmartGarage]]> https://smp46.me/blog/SmartGarage 2025-05-14T00:00:00.000Z SmartGarage: A DIY Wireless Garage Door Control System with a Side of Machine Learning

Introduction

One day my friend Howie was over and he saw me open my garage door. Naturally he got out the Flipper Zero he always carries in his bag and asks I use my garage door fob again, he captures and resends it easily. I thought that was odd, shouldn't there be, I don't know, maybe at least rolling codes on any modern garage door opener. But I was inspired and thought if it's that easy surely I could automate that with some lower cost hardware.

So I get thinking and I come up with the project you're reading right now. To create a system to remotely open and close my garage door without physically modifying the opener itself (I live in a rental so unfortunately this was a requirement). But hey that doesn't sound very ambitious and the year is 2024, so I have to to add aRtIFicIAlL inTELiGeNce in here somewhere. In all seriousness, often I leave the house and five minutes later start wondering if I did close my garage door. So what if instead of wondering I could just check my homepage dashboard, or even get an email notification if the garage door has been open too long. And how can I check if the door is open or not without wiring anything in, easy, I'll just train an image recognition model that can tell me just that.

This project ended up combining hardware hacking, machine learning, and a web interface to create a practical solution using nothing but off the shelf (or the internet) parts and a bit of coding elbow grease.

Final Result

It's hard to show a teaser of the final result because it has so many parts, but here is what was the hardest part of the solution (I swear it's not a bomb).

Initial Attempts and Challenges

I started with the hard part, how do I clone the garage door fob signal and resend it on command. The fob uses the 433MHz band for transmission. I happened to have a Raspberry Pi Zero W sitting in my drawer, so I go online and find the Texas Instruments CC1101 Sub-GHz transceiver (the same chip that is used by the Flipper Zero). This should let me capture the signal and sent it right on back. More searching and I see there's plenty of drivers and other projects for this transceiver so it can't be that hard to use right. I order one, a breadboard and a wiring kit to put it together.

As soon as I got it, I started trying to cobble something together, I try a CC1101 driver library, I find a python interface for it even. But I don't have much luck.

I get to the stage where I can receive some kind of signal, however to be honest I know nothing about radio and I'm only a CompSci student not an electrical engineer. Even though it is the same chip used by the Flipper Zero, there seems to be fair bit of special sauce that goes into being able to pull a signal out of the air cleanly, then resend it. Documentation for the drivers didn't make much sense to me, if there was any at all. So after weeks of trying I decide to pivot to another approach (definitely not a skill issue... okay maybe a little).

So I have a crack at the other side of the project, training an image recognition model to tell me if the door is open or not. I start with getting the cheapest wireless security camera I can find off of chinese marketplace number 508 (banggood.com), configuring my firewall to never let it phone home (block all its internet access) and begin collecting data.

To do this I write a Bash script for fetching security camera snapshots, and make it into a systemd service on my Debian home server. A few weeks later and I have hundreds of thousands of photos that can be categorised as open or closed.

I spent a while then doing some research on how exactly this whole machine learning stuff works. I decided on making something with PyTorch. A little later and some long discussions with Professor GPT I have two python scripts. The first lets me add my own training data onto the MobileNetV2 model (a lightweight neural network designed for mobile devices) and configure it to provide a binary output, the second loads my custom model, takes the input of a picture and outputs: "Opened or Closed". Neat! However, knowing my garage door was actually left open doesn't really help me if I can't remotely close it.

A little over a year goes by, life goes on, and my garage remains dumb :(

However, recently while procrastinating some other programming assignments I remembered this project. And I thought, if a fob can open and close the door, maybe I can just automate pressing the button on the fob. Sometimes the simplest solutions are the ones staring you right in the face all along...

The Hardware Hack

So I ordered a couple of generic garage door fobs off eBay that were compatible with my opener. After adding them to the garage door (following the actual process in the manual), I started thinking about how I could simulate a button press with my Raspberry Pi Zero W.

Now, I'm not an electrical engineer by any stretch, but I figured how complicated could a fob be. I carefully cracked open one of the generic fobs and examined the PCB. After some poking around with a multimeter, I discovered the button on the fob just bridges two contacts on the PCB. If I could find a way to bridge those contacts on command from the Pi, I'd be cooking.

fob_contacts

Here is the naked fob and the contacts I needed to bridge.

After some research, I figured out I needed:

  • Arduino Compatible 5V Relay
    • This allows me to use the GPIO on the Pi to send a high signal, which can then bridge the circuit. As the Pi can't "bridge" but it can send high low signals.
  • 220 Ohm 0.5 Watt Resistor
    • This prevents the unlikely chance of the Relay drawing too much current and cooking my Pi (in the bad way).
  • Some wires to connect everything together (I used the ones that came with my breadboard kit)
  • A bit of soldering skill (which I do not have)

Here's the circuit I ended up with: circuit_diagram

I soldered two thin wires to the contact points either side of the fob's button, ran them to the relay, and connected everything according to the diagram above. The idea is simple: when GPIO pin 17 goes high, it activates the relay, which bridges the contacts on the fob, which sends the signal to open/close the garage door.

To test, I put together a basic python script that makes GPIO17 high for half a second. And shockingly, the door opens. Yippee!

You might be wondering what sleek professional way I put this all together: final_circuit 
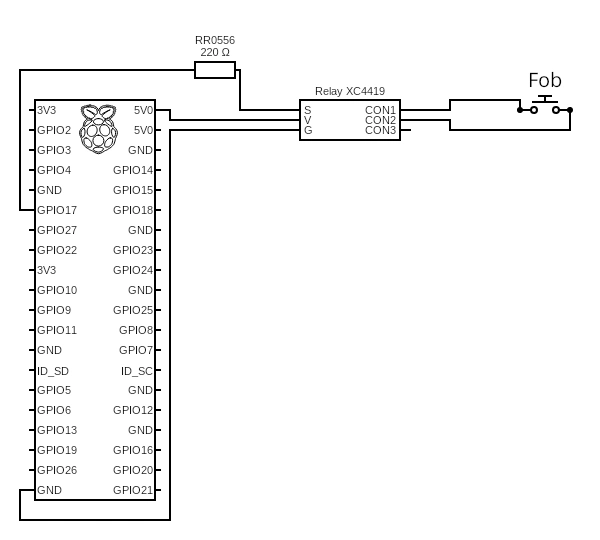
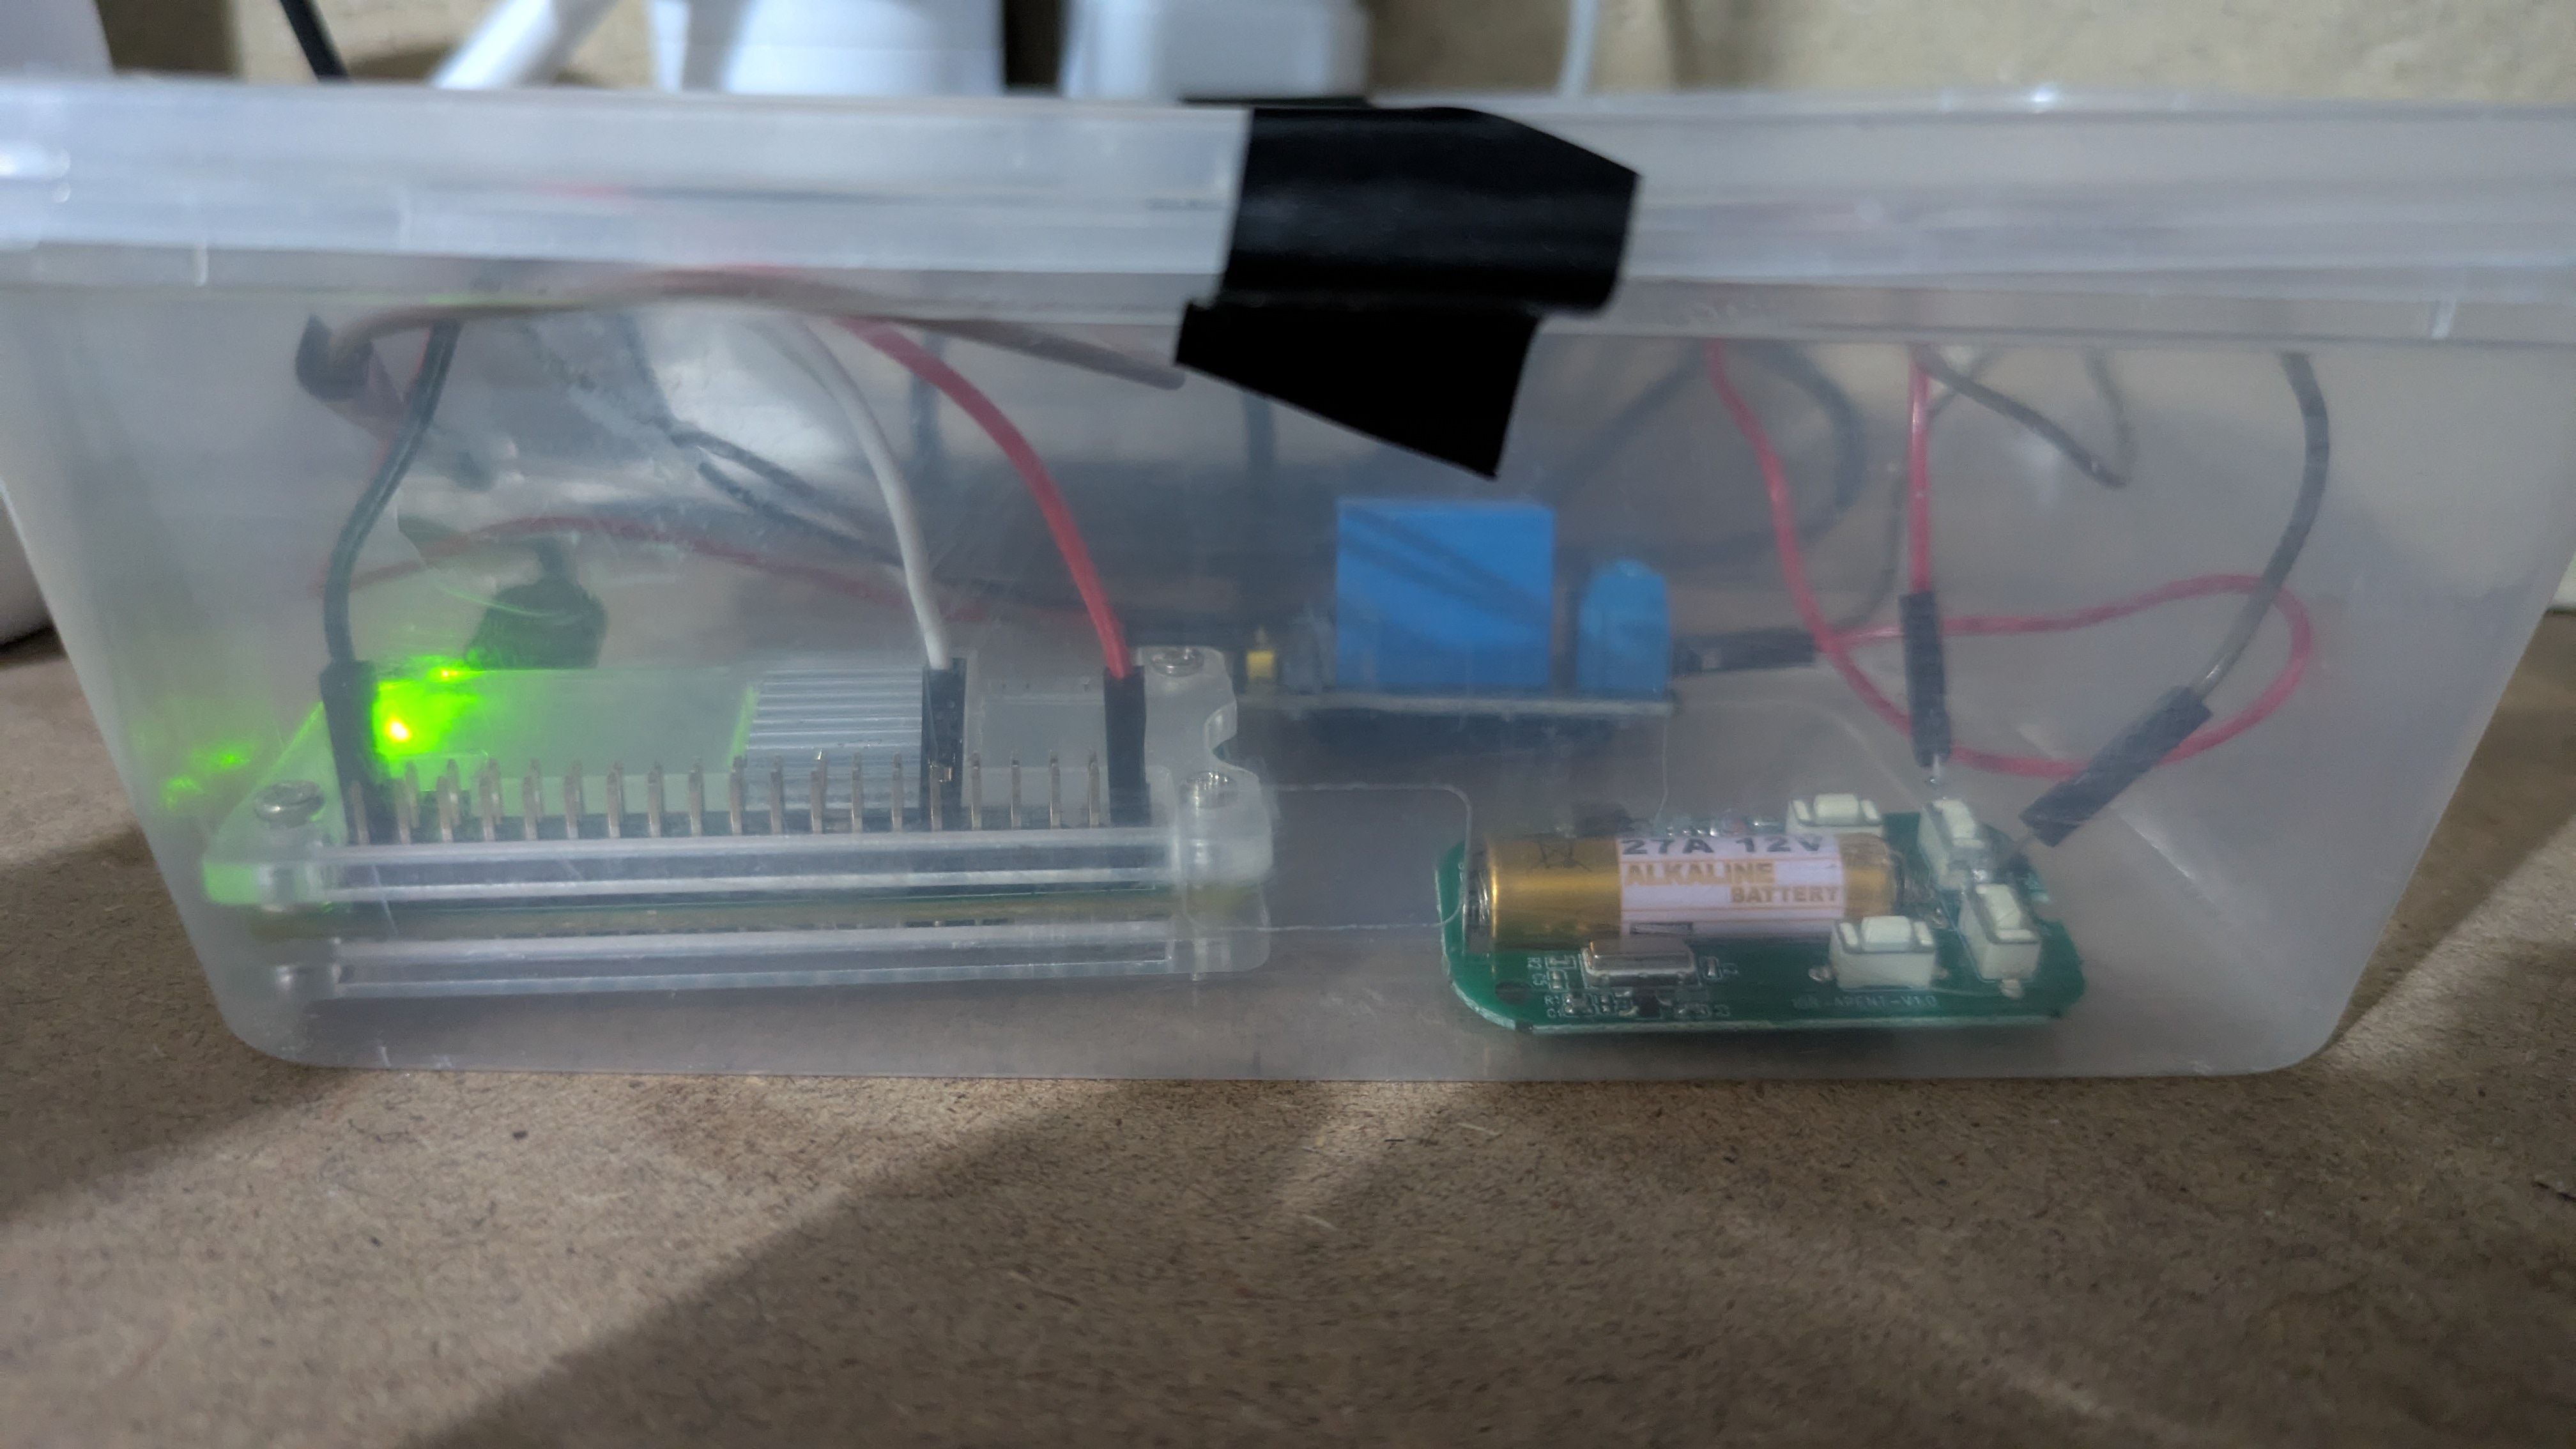
I'm honestly not sure what the correct way to package something like this is, am definitely open to feedback if anyone has any better ideas.

Teaching My Computer to See

After getting the hardware working, I needed to tackle the "smart" part of my SmartGarage: teaching a computer to recognize whether my garage door was open or closed from camera images. This meant dabbling in machine learning—specifically, computer vision.

Data Collection: The Boring Bit

Honestly, this was the hardest and most tedious part of making the image recognition model. In order to train an accurate model, I needed a lot of data and I needed it categorised.

So I used that bash script that saves a picture every minute, or every second during "peak times" i.e. times when the door is mostly likely to be open, to collect a lot of data.

The result:

$ ls ~/garage/training_imgs | wc -l
158332

Now that might look nice - more data is more better right? Not quite. When training a model I discovered a good dataset is a balanced dataset. And balance is difficult when most of the time the garage door is not open. To remedy this I made that bash script collect more often when the door might be open and used a python script that creates a lot of permutations of the same pictures.

But how do you categorise all those pictures? Slowly and manually...

The specific software I use is XnView MP which is just a more effecient image library manager with support for batch renaming. That and moving the data set to a RAMdisk while I'm working with it helped speed things up. As turns out handling over 150 thouseand ~20Kb files isn't super easy. Here's a snapshot of the exciting action:

sorting_gif

The Training Process

During my first attempt at this project, I put together a set of Python scripts using the MobileNetV2 model with PyTorch. For this revival, I upgraded to MobileNetV3, which is meant to be better overall without needing additional compute, and made some adjustments to optimize the images for training.

Why the MobileNet Model?

I picked MobileNet predominantly because it's designed for mobile devices—meaning it's not very computationally expensive. This is important as the model needs to run against an image every 10 seconds, 24/7.

Also, I only have access to my Radeon 6950XT for training, which is a nice gaming GPU but in the world of AI, it's not particularly powerful. I tried training with the ConvNeXtV2 model (a much newer and heavier model), and the training was estimated to take 125 hours to complete. MobileNetV3, by comparison, takes less than 45 minutes even with ~140,000 images in the dataset.

How do Those Scripts Work?

Click the Githhub icon on this page to view the project itself and all the code.

But the workflow looks a little like this, I clone the repo, mount it alongside the training images in the PyTorch docker container and do something like this:

root@docker:/train# python3 binaryTrainer.py train
Enter the path to the training images: /train/training_imgs_sorted/
What is the object you are trying to classify? Garage Door
Enter the classification names separated by a comma: open,closed
Enter the model name to save as: may10_bigdata_10_epochs
Enter the number of epochs: 10

The output of that model will be a file called may10_bigdata_10_epochs.pth and a config.ini, this contains the additional training data needed for predictions and the configuration for the other script justPredict.py. That second script allows me to just pass it a file:

root@docker:/train# python3 justPredict.py testing_imgs/garage5.jpg
open
Can I Give it a Go?

Please! I tried making the script fairly user-friendly, mostly so I don't have to remember the intricacies when I want to update / train a new model. Currently, it is limited to a binary output i.e. a True or False classification. But it does have some nice features like a progress bar and stopping training when it detects accuracy loss.

Was all this ML stuff necessary? Probably not. Was there a simpler way to achieve this? Absolutely. But where's the fun in that? Plus, I learned a fair bit about machine learning in the process, which was kind of the point.

Putting It All Together

With the hardware and machine learning components working, I needed a way to tie everything together into a cohesive system. Let me illustrate the architecture and then I can explain why this is a perfectly sane project (and not at all an overcomplicated solution to a problem that probably has a $20 commercial alternative):

Architecture

The system follows a microservices approach, with each component handling a specific responsibility and communicating via HTTP APIs. The Rust HTTP server runs on the Pi Zero W, the rest is running on my homeserver both in and out of Docker containers.

software_architecture

The Components
Rust HTTP API Server

Initially this was just another Python FastAPI, but I switched to Rust, using Axum Server, because it needs to be running 24/7 and I don't want my poor little Pi Zero W running too hard. The server listens on port 3000 for a POST request to the /toggle endpoint with the correct authorisation token, when received it triggers the button on the fob and the door opens or closes.

Fetch Video Snapshot Bash Script

Every second a script retrieves a snapshot of the garage security camera feed and saves this to a RAM-disk. A RAM-disk is used to prevent excessive wear and tear from constant writes to the system drive. A custom systemd service is used to trigger this every second, as crontab is limited to once per minute.

Image Recognition Script

This is a variant of justPredict.py script mentioned before, except it reads a file from a specified path and sends its results to the Garage Door Status API. Again, I use a custom systemd service to keep this script running and restart it on boot.

Garage Door Status API

Super simple Python HTTP API server, using FastAPI, that receives and stores the garage door status from the Image Recognition Script and updates its internal last_opened state if the status changes from closed to open. And then responds with this data in a JSON response when a POST request is sent to http://garage-api:5000/status.

Homepage Custom API Widget

This widget lives on my homepage and provides the snapshot from the camera, the status of the door as reported by the Garage Door Status API and the time it was last opened. The preview is using an iframe that just displays the snapshot image, where the iframe html is mounted to the homepage docker container.

widget_preview

Email Notification Service

This is a bash script that is run every minute with crontab. It checks the Status API for the current status and the last opened status, if it is currently open and the last opened was more than 10 minutes ago it sends a friendly email with a link to the website to close it.

SmartGarage Control Website

This website provides the snapshot of the security camera and has a button that sends a POST request through an nginx proxy to the Rust HTTP API Server on the Pi. The website is hosted via nginx through a Cloudflare Tunnel, using Google SSO it is protected against unwanted visitors.

website

The Result

But at What Cost?

Not too much actually, if we ignore how many hours I put into this, and there's a few things leftover / will be used when I do something similar again.

Component Cost (AUD)
Raspberry Pi Zero W $25.00
Pi GPIO Pins and Case $8.00
Generic Garage Door Fob $8.00
5V Relay $8.00
220 Ohm 0.5 Watt Resistors $0.85
Soldering Iron kit $45.00
Total $94.85
To Conclude

After several months of development, testing, and refinement, I'm happy to report that my SmartGarage system has been running reliably for over a month now. The system successfully:

  • Allows me to remotely open and close my garage door from anywhere with internet access
  • Detects the door's open/closed state with reasonable accuracy
  • Sends me notifications if I've left the door open for more than 10 minutes
  • Provides a remotely accessible, nearly real-time view of my garage through via the camera

Here's a demo of it in action: demo

]]>
2025-05-11T00:00:00.000Z