# Installation and first steps
[Documentation](README.md) / Getting started
## Download
Get the latest build from the
[Releases page](https://github.com/snooky234/scribedog/releases/latest).
### Windows
| File | What it is |
|---|---|
| `ScribeDog_x.y.z_x64-setup.exe` | NSIS installer, the recommended one. Can add an "Open with ScribeDog" entry to the Explorer folder context menu. |
| `ScribeDog_x.y.z_x64_en-US.msi` | MSI package. |
| `ScribeDog_x.y.z_portable.zip` | Portable build, nothing is installed. |
### Linux
| File | What it is |
|---|---|
| `ScribeDog_x.y.z_amd64.AppImage` | No installation needed. Mark it executable and run it. This is the portable option on Linux. |
| `ScribeDog_x.y.z_amd64.deb` | For Debian and Ubuntu based distributions. |
## The portable build (Windows)
Unpack the zip into a folder you own, such as Documents, Downloads or a USB
stick, and run `ScribeDog.exe`.
- Settings live in the `.scribedog` folder next to the executable, so the
whole folder travels with you.
- It adds no Explorer context menu entry and does not update itself.
- API keys still go to the Windows Credential Manager. They stay on the
machine where you typed them. That is deliberate: a plain text key on a
stick you might lose would be worse.
> **Tip:** Avoid system locations such as `C:\Program Files` or
> `C:\ProgramData`. They are often not writable, and antivirus software is
> quicker to scan or flag a program that sits there without an installer.
If the folder cannot be written to, ScribeDog falls back to the normal
system locations and tells you so in the settings.
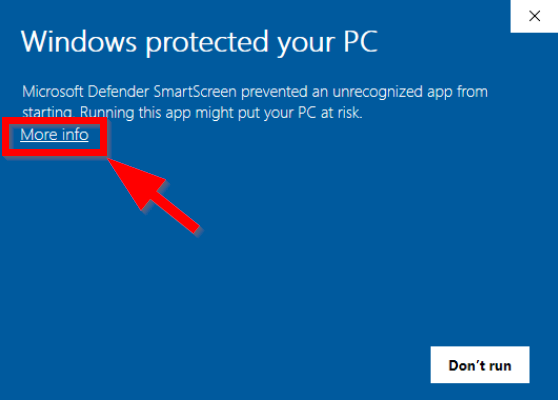
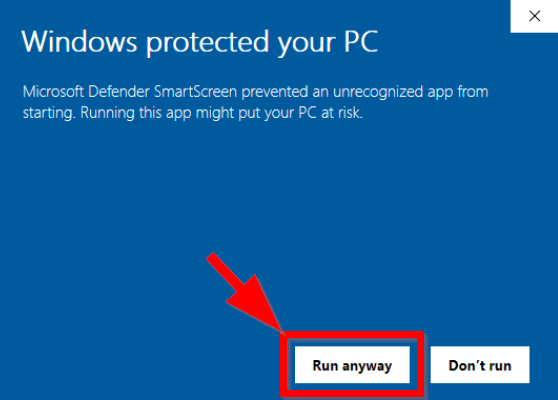
## The "Windows protected your PC" warning
The installers are not signed with a paid code-signing certificate yet.
Because of that, Windows SmartScreen shows a warning the first time you run a
freshly downloaded installer.
This is expected. It means the file has not built up enough reputation with
Microsoft yet. It does not mean the file was flagged as malicious. Every
release is built from this repository's source by GitHub Actions, so you can
check what went into it.
To continue:
1. Click **More info**.
 2. Click **Run anyway**.
 Some antivirus suites run their own scan during setup as well. That is normal
for unsigned, less widely distributed apps. Let the scan finish. If you want
to double-check a release, compare it with the matching
[GitHub Actions build](https://github.com/snooky234/scribedog/actions).
## Your first ten minutes
1. **Open a folder.** Use the folder button in the sidebar. ScribeDog shows
every `.md` file inside it as a tree. Any folder works, including one full
of existing Markdown notes. This folder is your *vault*.
2. **Write.** Create a note with the plus button and start typing. Headings,
lists and tables appear as formatted text, not as Markdown syntax.
3. **Save.** Press `Ctrl+S`, or switch on auto-save in the toolbar options.
4. **Try the shortcuts.** `Ctrl+#` opens the cheat sheet with every shortcut.
5. **Add AI if you want it.** It is optional and off until you set it up. See
[Setting up AI](ai-setup.md).
## Open a folder from outside the app
- **Windows:** the installer can add "Open with ScribeDog" to the Explorer
context menu of a folder.
- **Command line:** pass the folder as an argument to start ScribeDog on it.
## Updates
On Windows, ScribeDog checks GitHub for a new release when it starts. It only
compares version numbers and sends no usage data. You can switch it off in the
settings. The portable build does not install updates itself and points you to
the release page instead.
[Back to the documentation index](README.md)