Products 
To open this page, go to Products -> Products.
This page is where you can create and manage products and their characteristics throughout your online shop.
Specifically, from this page you can:
- Add an abstract product
- Create a concrete product (variant)
- Create a bundle product
- Add or remove attributes of an abstract product
- Manage abstract and concrete (variants) products
- Manage attributes for variants
Graphic User Interface
To access the Product page, from the Administration Interface's main menu (on the left), click Products and then Products.

Hover your mouse over the numbers to view their description.
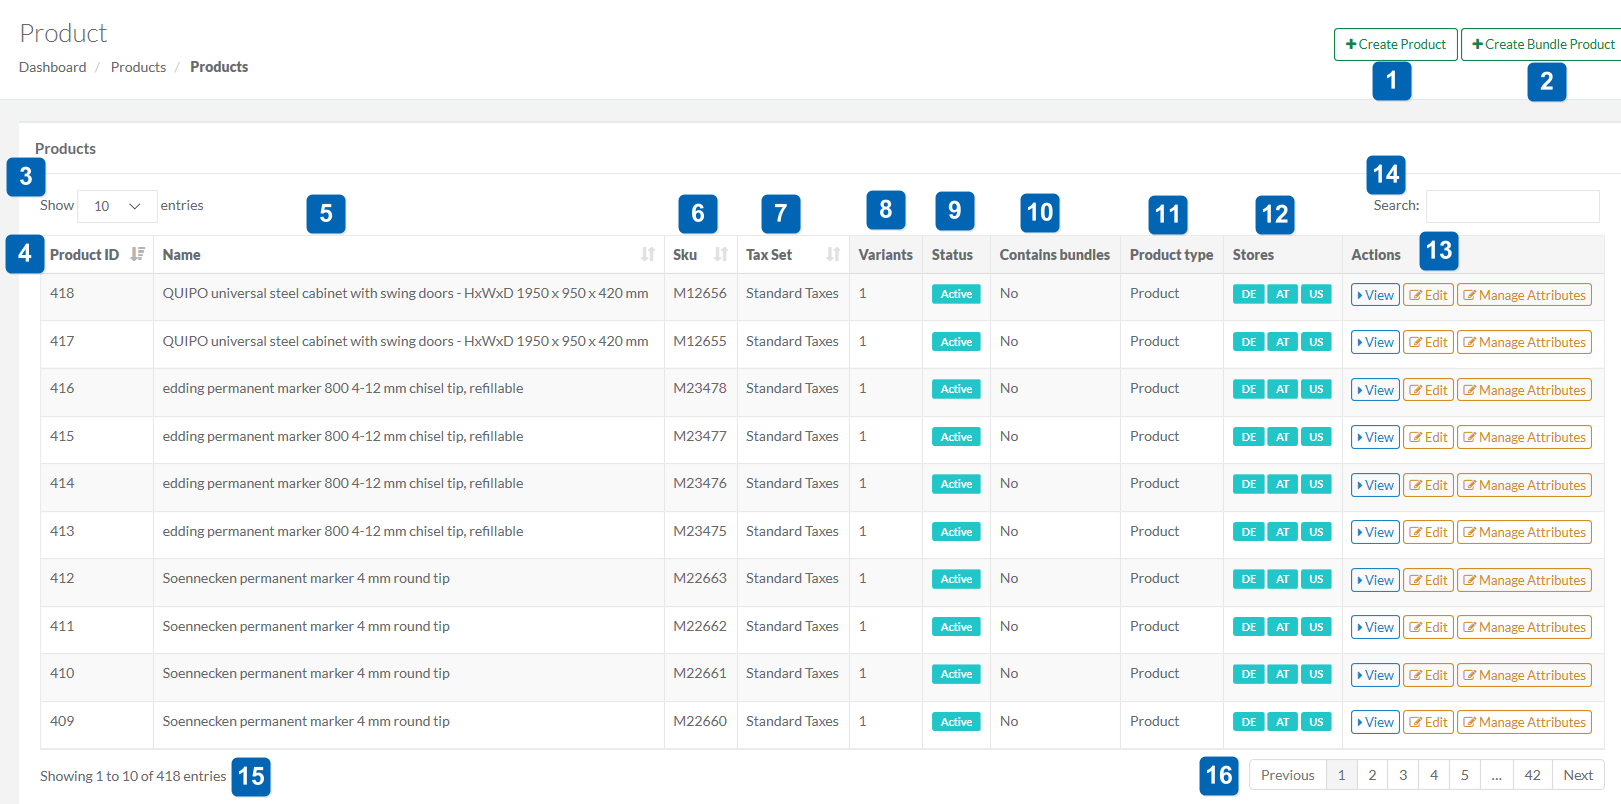
You can create an abstract and bundle product directly from the Products page.
To create an abstract product:
- Click +Create Product in the upper right corner.
To create a bundle product, click +Create Bundle Product and follow the steps described below.
This will take you to the Create a Product page.
- In the General tab:
- In the Store relation section, select the store(s) your product should be available for.
- Enter a SKU prefix.
- Type the name(s) for your product.
- Enter New from and New to dates if you want to specify when the product should go online in the web-shop. This step is optional.
- Click Save.
- Click Next to go to the next tab (Price & Tax) or select a necessary tab.
-
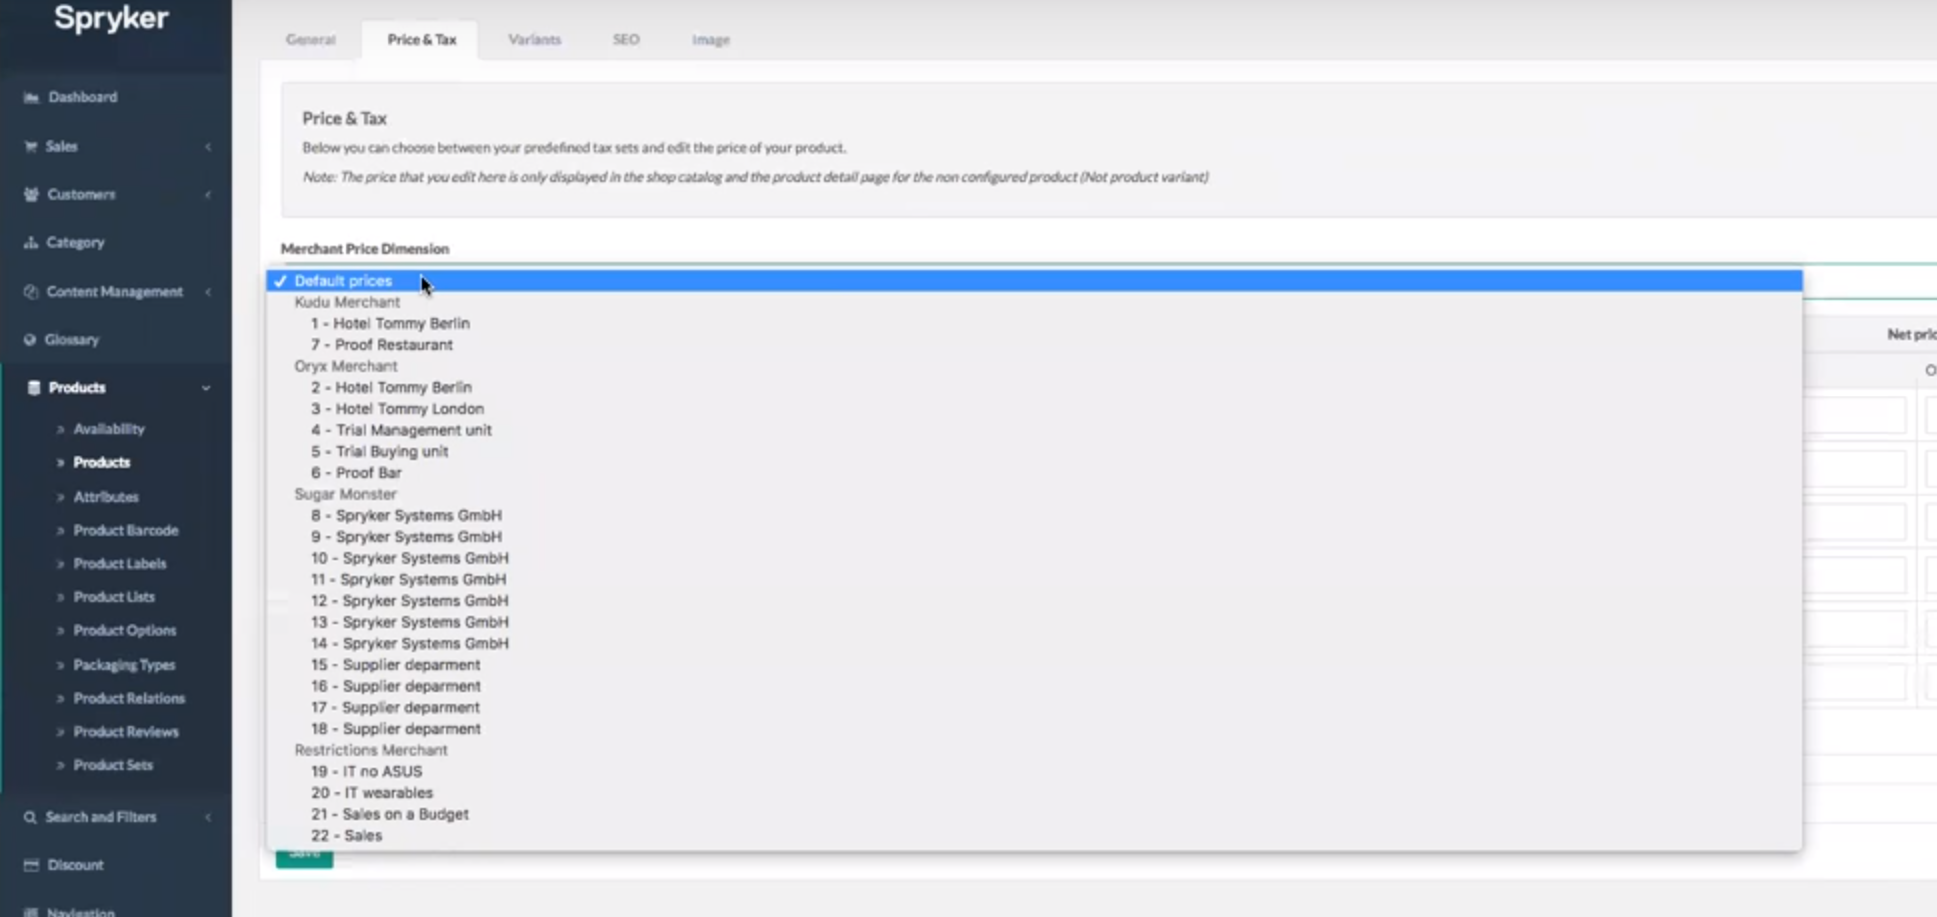
In the Price & Tax tab, you can set prices and taxes for products.
- You can define prices that will apply to all users, as well as set specific prices for individual merchant relations. See Merchant Relations to learn how to create a merchant relation, which can subsequently be assigned specific product prices.
To set default prices for all users, select Default prices in the Merchant Price Dimension dropdown.

To define specific prices for an individual merchant relation, select the merchant relation in the Merchant Price Dimension dropdown.
- Enter Original and eventually Default prices for the product for Gross and Net price modes.
Defaultprices are prices your customers will pay, whereas original prices are the "previous price" is case you want to display promotions. If you specify only a default price, it will be displayed just like a normal product price. However if both prices are specified, the original one will appear crossed out in the shop.
- Select a Tax Set from the drop-down menu.
- Click Next to go to the Variants tab or select a necessary tab.
The merchant relation prices are inherited by Product Variants as well.
To check this, go to the Variants tab of the Edit Product page and click Edit in Actions column of the Product variants table. On the Price & Stock tab, select the merchant relation in the Merchant Price Dimension dropdown. The merchant relation prices of the concrete product will be the same as those of its abstract product. - You can define prices that will apply to all users, as well as set specific prices for individual merchant relations. See Merchant Relations to learn how to create a merchant relation, which can subsequently be assigned specific product prices.
- In the Variants tab, select attributes and values that define the difference between your product variants.
It is required to create at least one product variant while creating a product to have a possibility to activate this product, or to add more product variants.
- In the SEO tab, enter meta information to describe page's content. This meta information appears only in the page’s code, not in its content. This step is optional.
- In the Image tab, add images for the product. This step is optional.
5. In the Image tab, click Add image set. Enter an image set name into the Image Set Name field and set URLs for small and large versions.
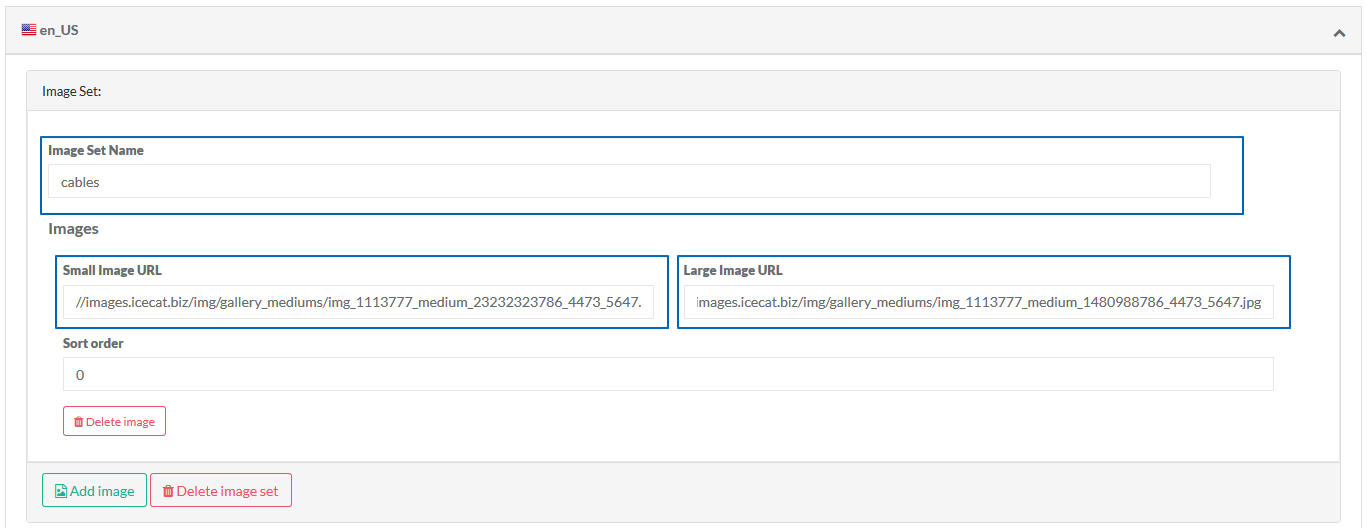
Even though you can add several image sets, out of the box, there is no place in the back end and front end where several image sets can be displayed for a product. However, if you still do that, the image set going first or having the name 'default' will be applied to the product.
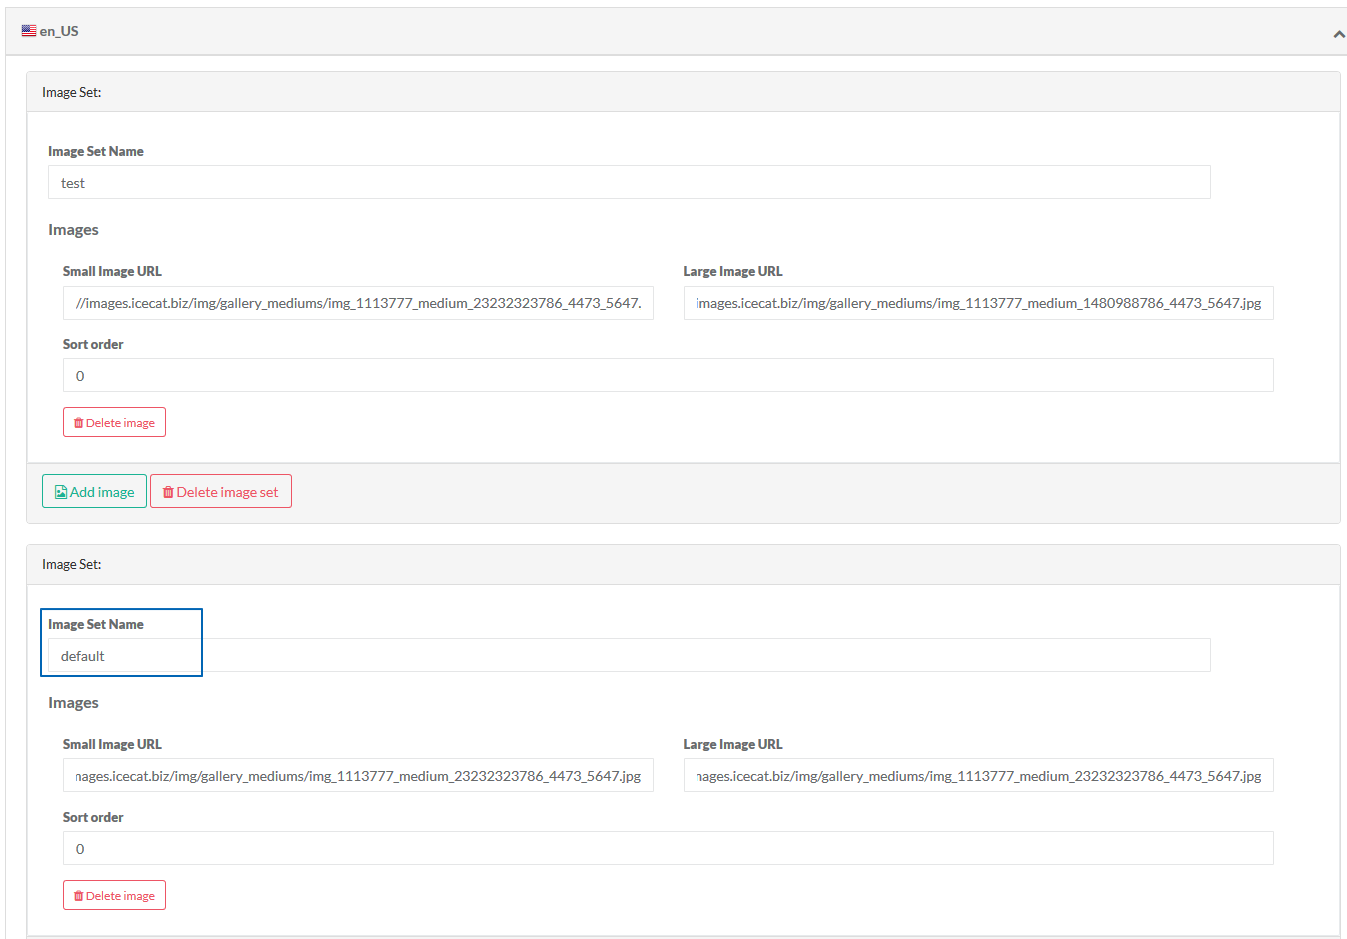
If you add several images to an active image set, specify the order in which they are to be shown in the front end and back end using Sort Order fields. The order of images is defined by the order of entered numbers where the image set with sort order "0" is the first to be shown.

If there are several image sets with the same Sort Order field value, the order in which they have been added defines the order in which they are to be shown.
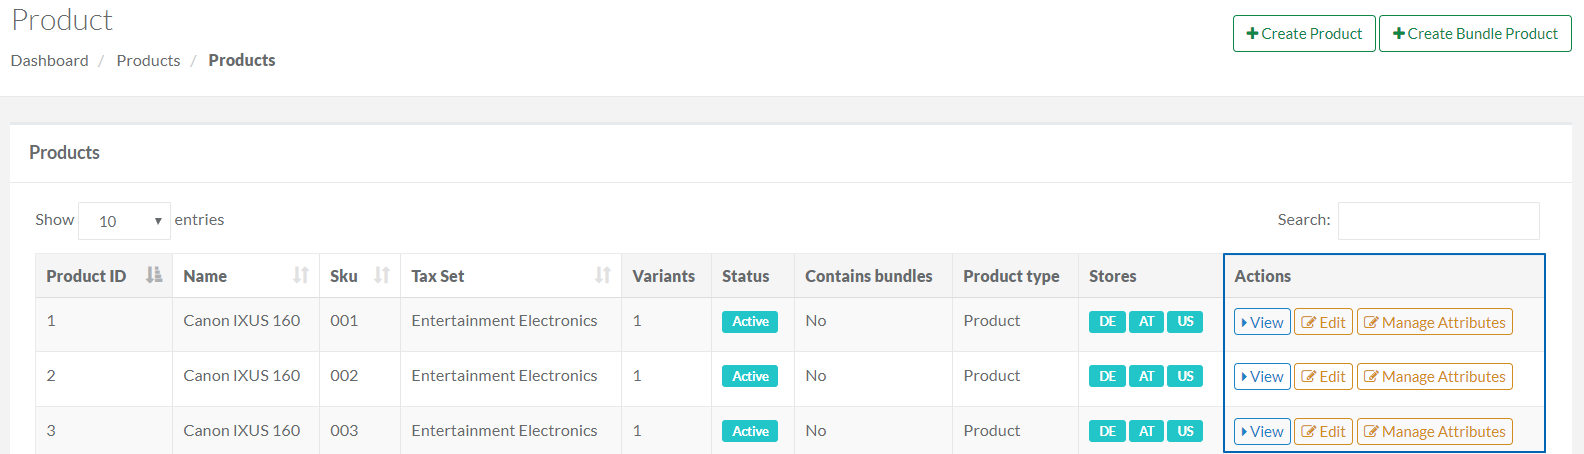
The products can be managed by triggering certain actions in the Actions column in the Products table on the Product page. Specifically, you can View, Edit and Manage product attributes here.
Viewing Products
Clicking View in the Actions column will take you to the View Product Abstract page where you can see all product-related information:
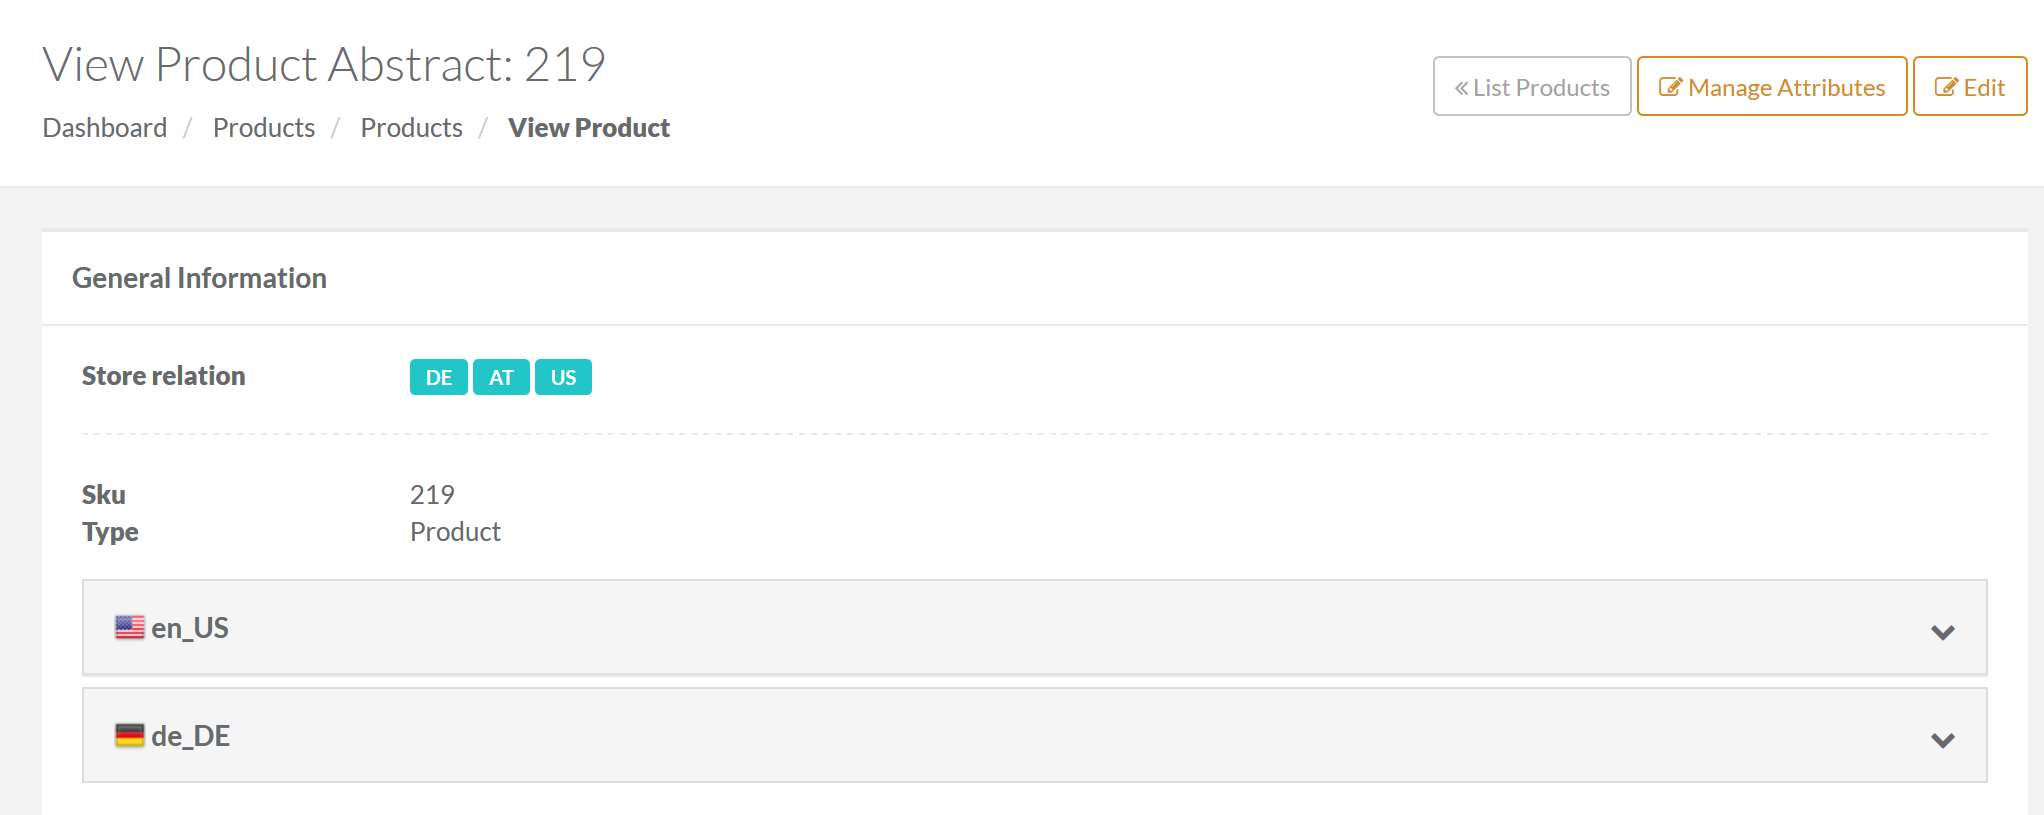
- General information: Displays the locales for which the product is available, its SKU and type, as well as shows a product description.
- Price&Taxes: Contains prices and tax sets applied to a product.
- Attributes: Provides all the details about the product properties.
- SEO: Shows meta information.
- Images Sets: Displays an image and a name of the sets.
- Variants: Allows you to view, edit, and manage product variants.

- Product groups: Allows you to view what products belong to the group.
- Categories: Displays the category the product is assigned, as well as allows you to manage categories. Clicking on the category will redirect you to the page where you can select products to be assigned.

Editing Products
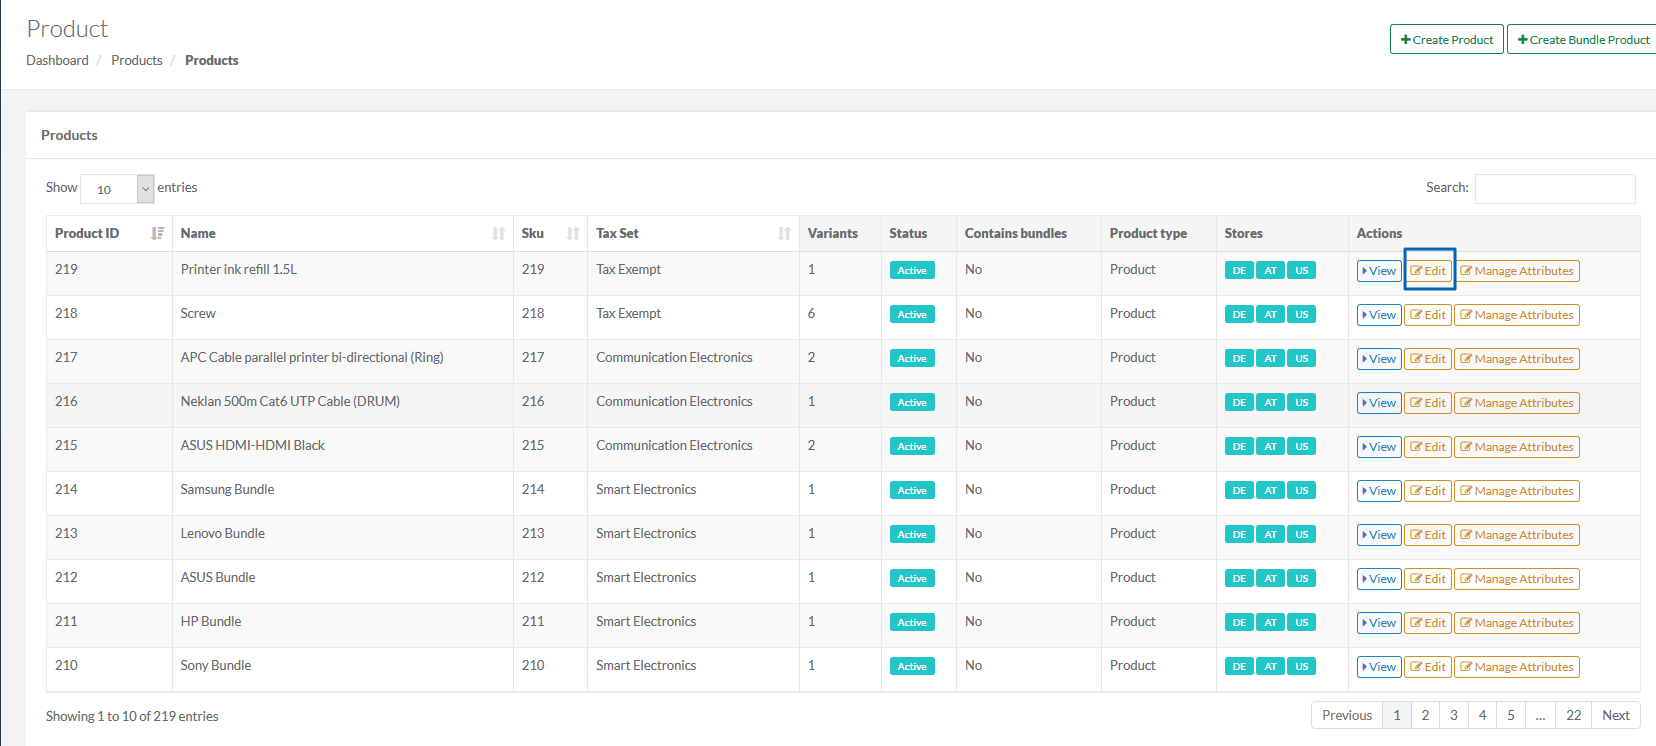
To edit products, go to Content Management → Products and click Edit for the product you want to edit in the Actions column of the table. The Edit Product Abstract page will open.
This allows you to perform the following actions with the product (abstract):
- Specify a store for which the product will be available.
- Define the validity range for the product to be visible on the store website.
- Set default and original prices for the product.
- Specify merchant relations.
- Manage product variants.
- Edit meta details per a locale.
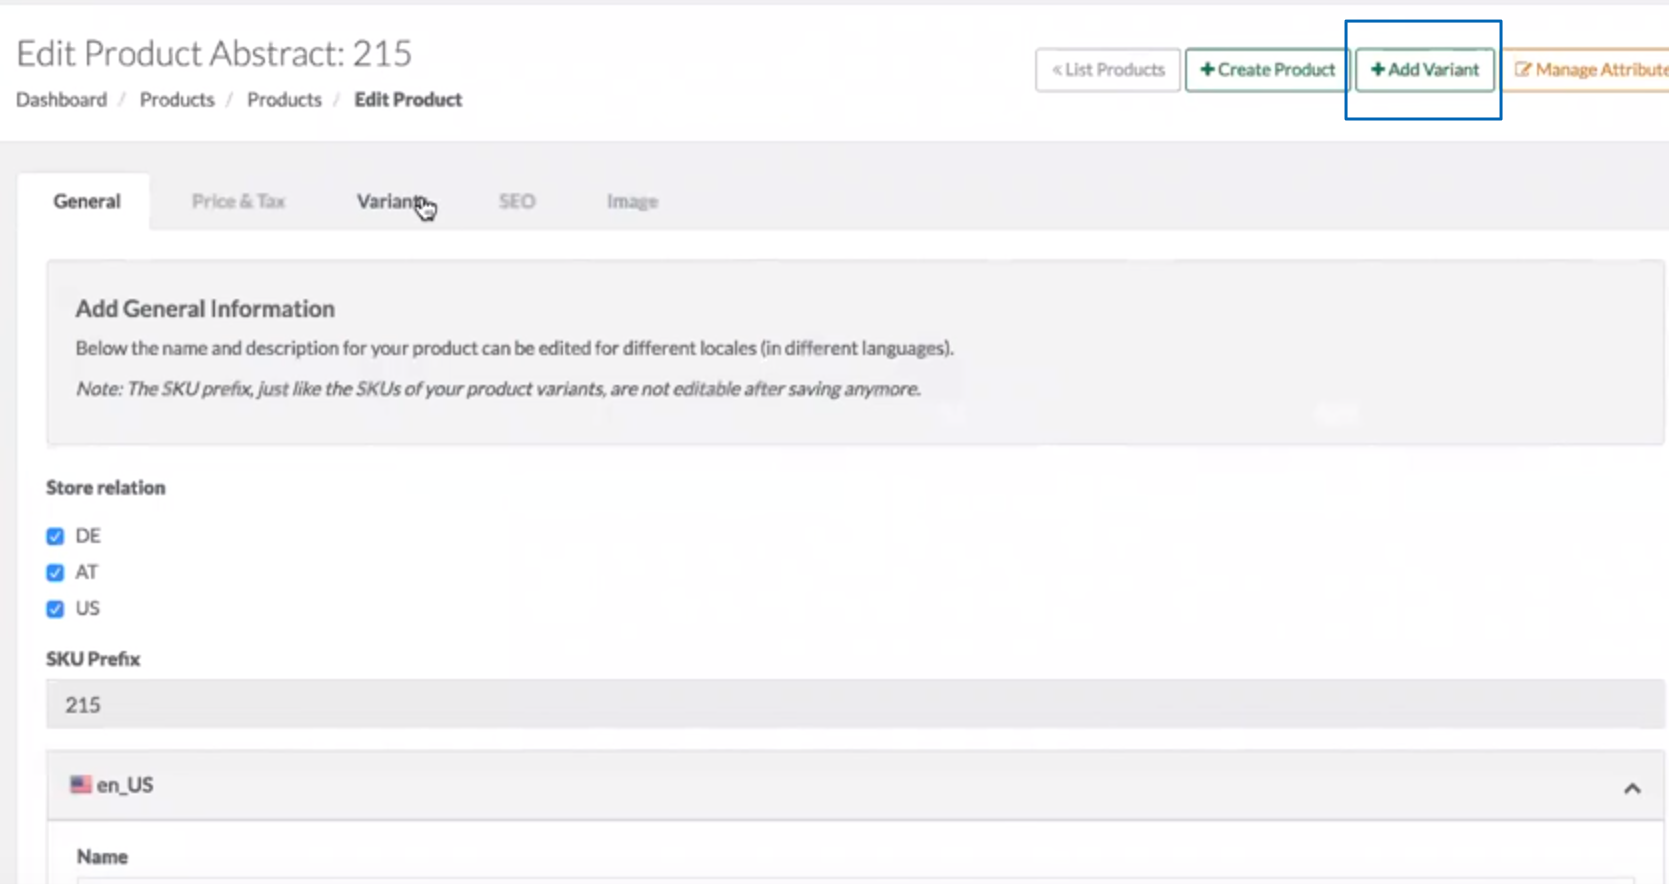
Below you will find descriptions of the buttons displayed at the top of the Edit Product page:
| # | Button | Description |
|---|---|---|
| 1 | List Products | Returns to the Product list page. |
| 2 | +Create Product | Opens the page where you can create a new abstract product. See Create a new Abstract Product for more details. |
| 3 | +Add Variant | Opens the page where you can add a concrete product (variant) to an abstract product. See Create New Product Variants for Abstract Products to learn how to do this. |
| 4 | Manage Attributes | Opens the page where you can add or remove product attributes. See Managing Attributes for an Abstract Product for more details. |
Managing Attributes for an Abstract Product
You can add or remove attributes of an abstract product.
To manage attributes, select Productsunder Products and click Manage Attributes for the product you want to edit in the Actions column of the table.

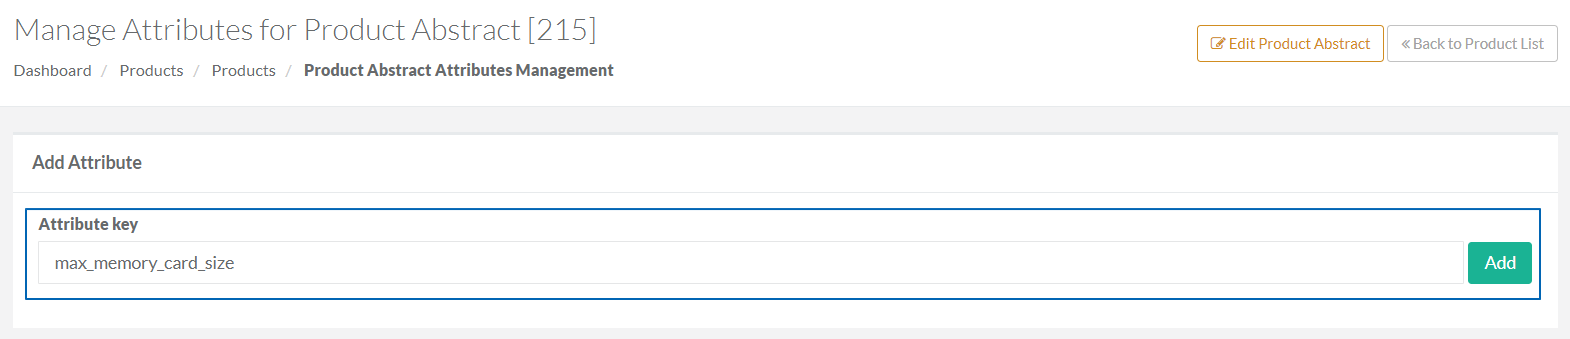
The Manage Attributes for Product Abstract [Product ID] page will open.
To add an existing attribute to the product:
- In the Attribute key field, start typing the key.
- Select the one matching your requirements from the suggestion list.
- Click Add. This will add an attribute key.
- Set a pointer on the field and select the value from the drop-down.
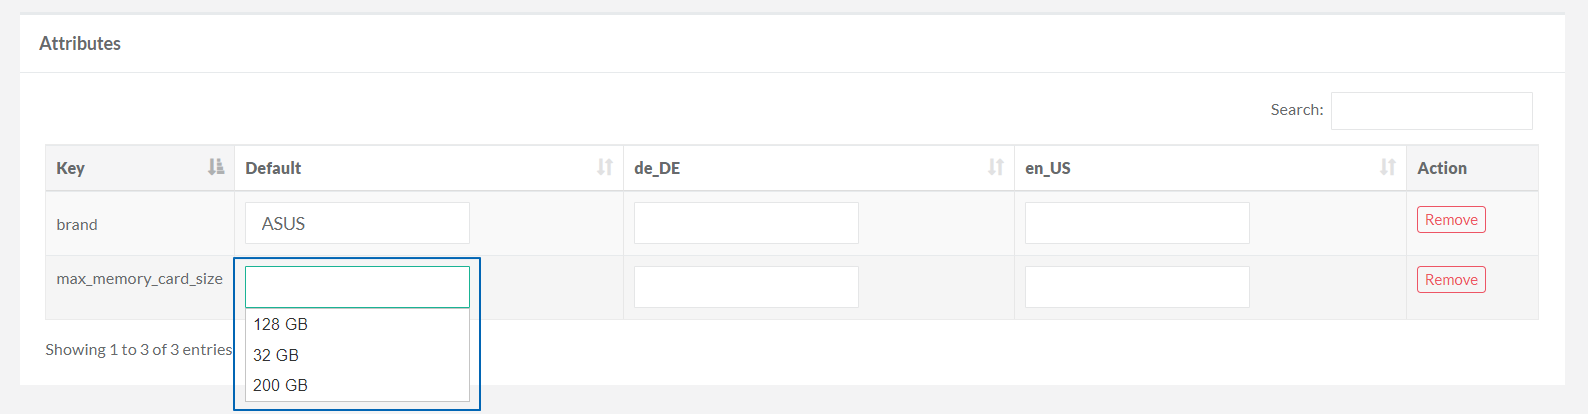
If you want to remove the existing attribute key of the abstract product, click Remove.
- Click Save.
From this page, you can:
- Return to the page where you can edit general information on the product (abstract), change its price and image. For this, click Edit Product Abstract.
- Return to a list of products. To do this, click Back to Product List.
Keep in mind that to create a new product variant, the abstract product should have a super attribute.
- On the left-side navigation bar, select Products under Products.
- Click Edit next to the product for which you want to create a new variant. This will take you to the Edit Product Abstract page.
- Click +Add Variant in the upper right corner. The concrete product (variant) editor will open.
- In the General tab:
- Add SKU or select Autogenerate SKU.
- Select a super attribute.
- Add product name and description and select Searchable if you want your product to be searchable by its name in the shop application.
- Enter Valid From and Valid To dates to specify when the product should go online in the web-shop. This step is optional.
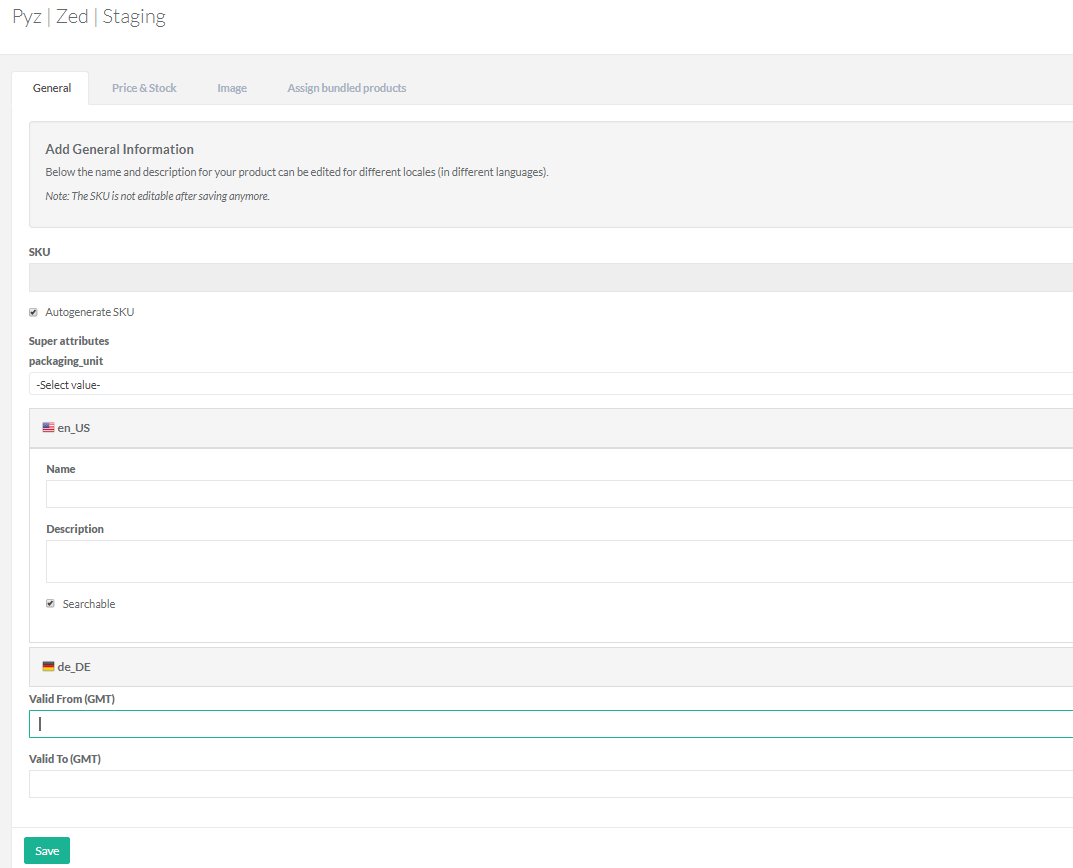
- Go to the Price & Stock tab.
-
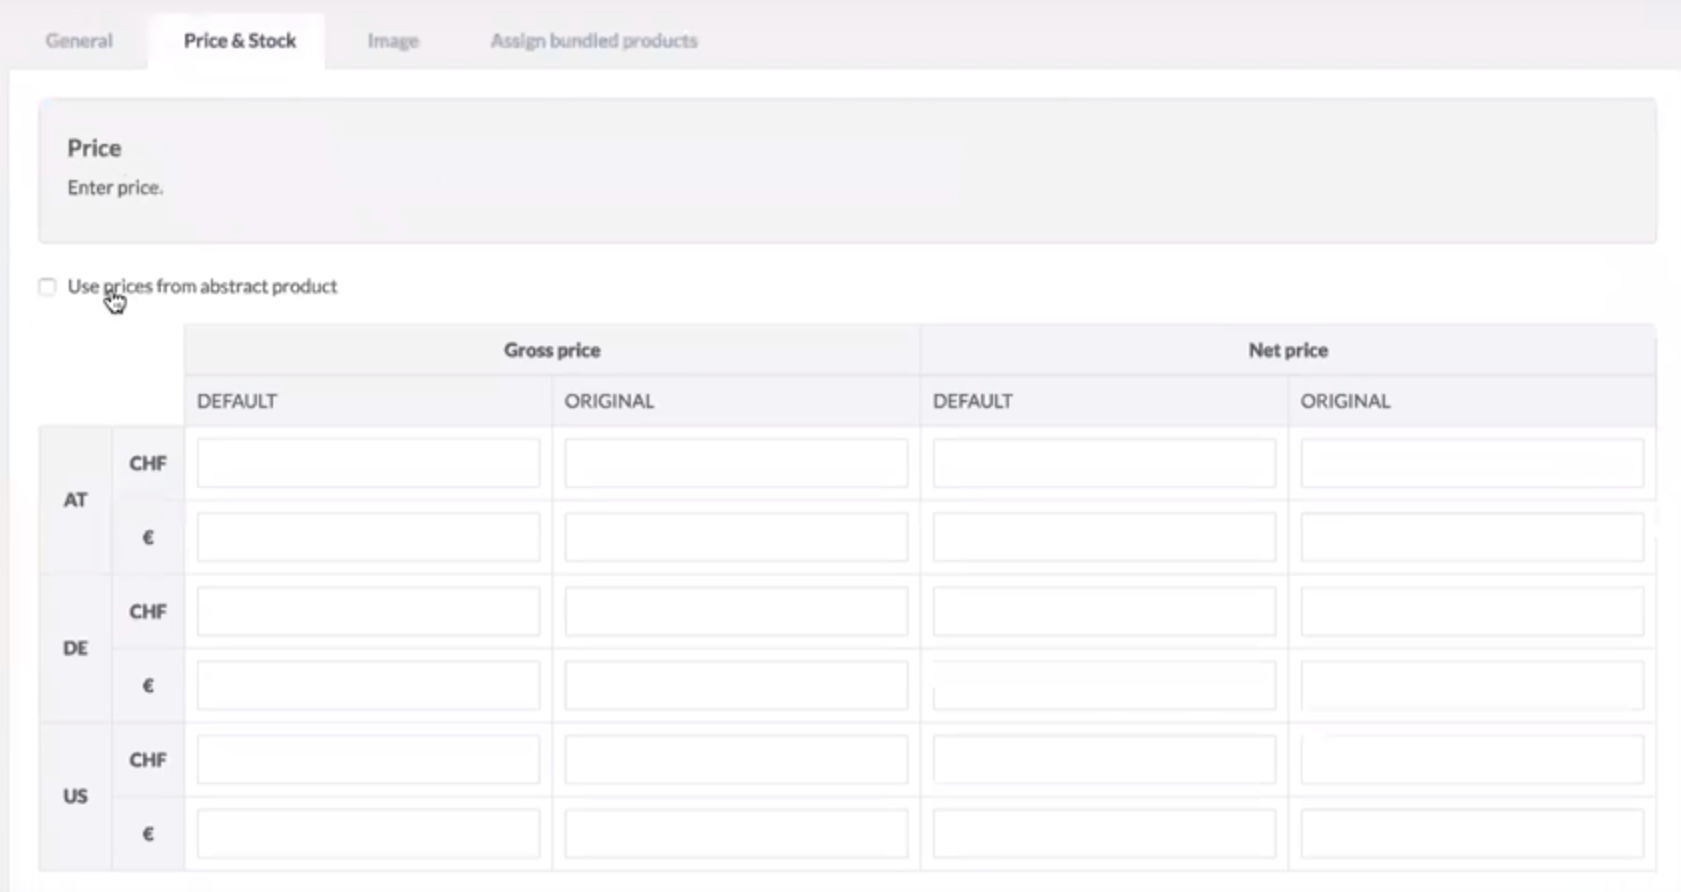
In the Price & Tax tab, set prices and taxes for products:
- To take the prices over from the abstract product, select Use prices from abstract product.
 Otherwise, enter Original and eventually Default prices for the product for Gross and Net price modes.
Default prices are prices your customers will pay, whereas original prices are the "previous price" is case you want to display promotions. If you specify only a default price, it will be displayed just like a normal product price. However if both prices are specified, the original one will appear crossed out in the shop.
- You can define prices that will apply to all users, as well as set specific prices for individual merchant relations. See Merchant Relations to learn how to create a merchant relation, which can subsequently be assigned specific product prices.
To set default prices for all users, select Default prices in the Merchant Price Dimension dropdown.
To define specific prices for an individual merchant relation, select the merchant relation in the Merchant Price Dimension dropdown.
The merchant relation prices are inherited by Product Variants as well. You can check this by going to the Variants tab of the Edit Product page and clicking Edit in the Actions column of the Product variants table. In the Price & Stock tab, select the merchant relation in the Merchant Price Dimension dropdown. The merchant relation prices of the concrete product will be the same as those of its abstract product.
- Select Quantity for the product and then select Never out of stock if you want the product to never go out of stock.
- Click Save.
- Click Next to go to the next tab (Image) or select a necessary tab.
- To take the prices over from the abstract product, select Use prices from abstract product.
- In the Image tab, add images for the product and click Save. This step is optional.
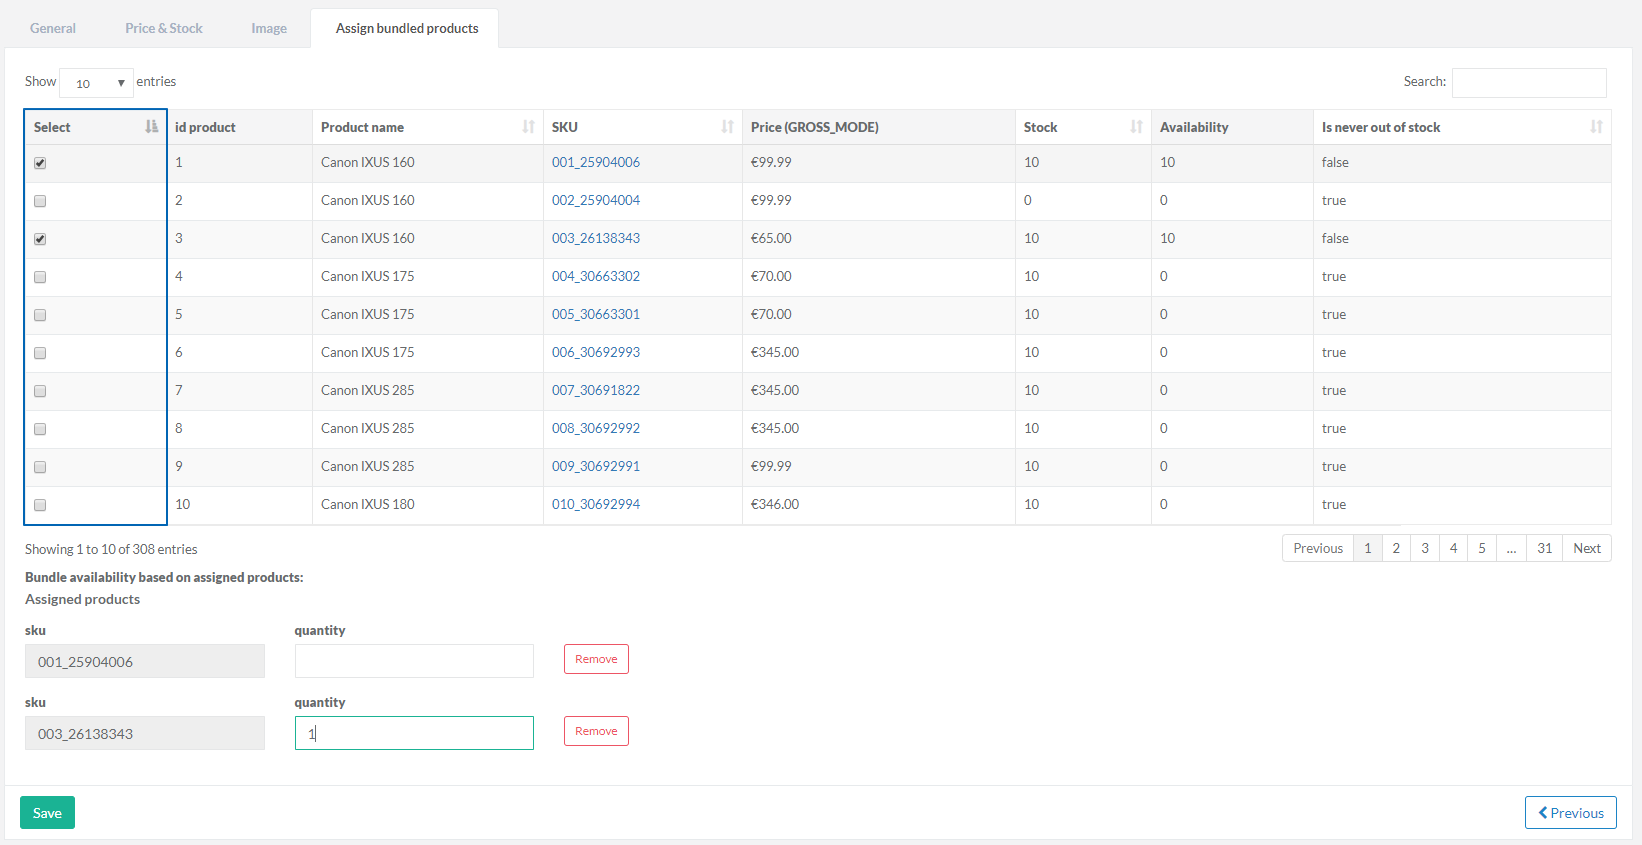
- In the Assign bundled product, select the bundled products to be sold together with the new product and click Save. This step is optional.
You can manage concrete product details by clicking respective buttons in the Actions column of the Variants section from the Product menu.
To access the Variants section, click View or Edit in the Actions column next to the product abstract for which would like to manage product concrete.
If you click View, scroll down to the Variants section.
When you click Edit, go to the Variants tab.

Viewing a Concrete Product
Clicking View will take you to the View Product Concrete menu.
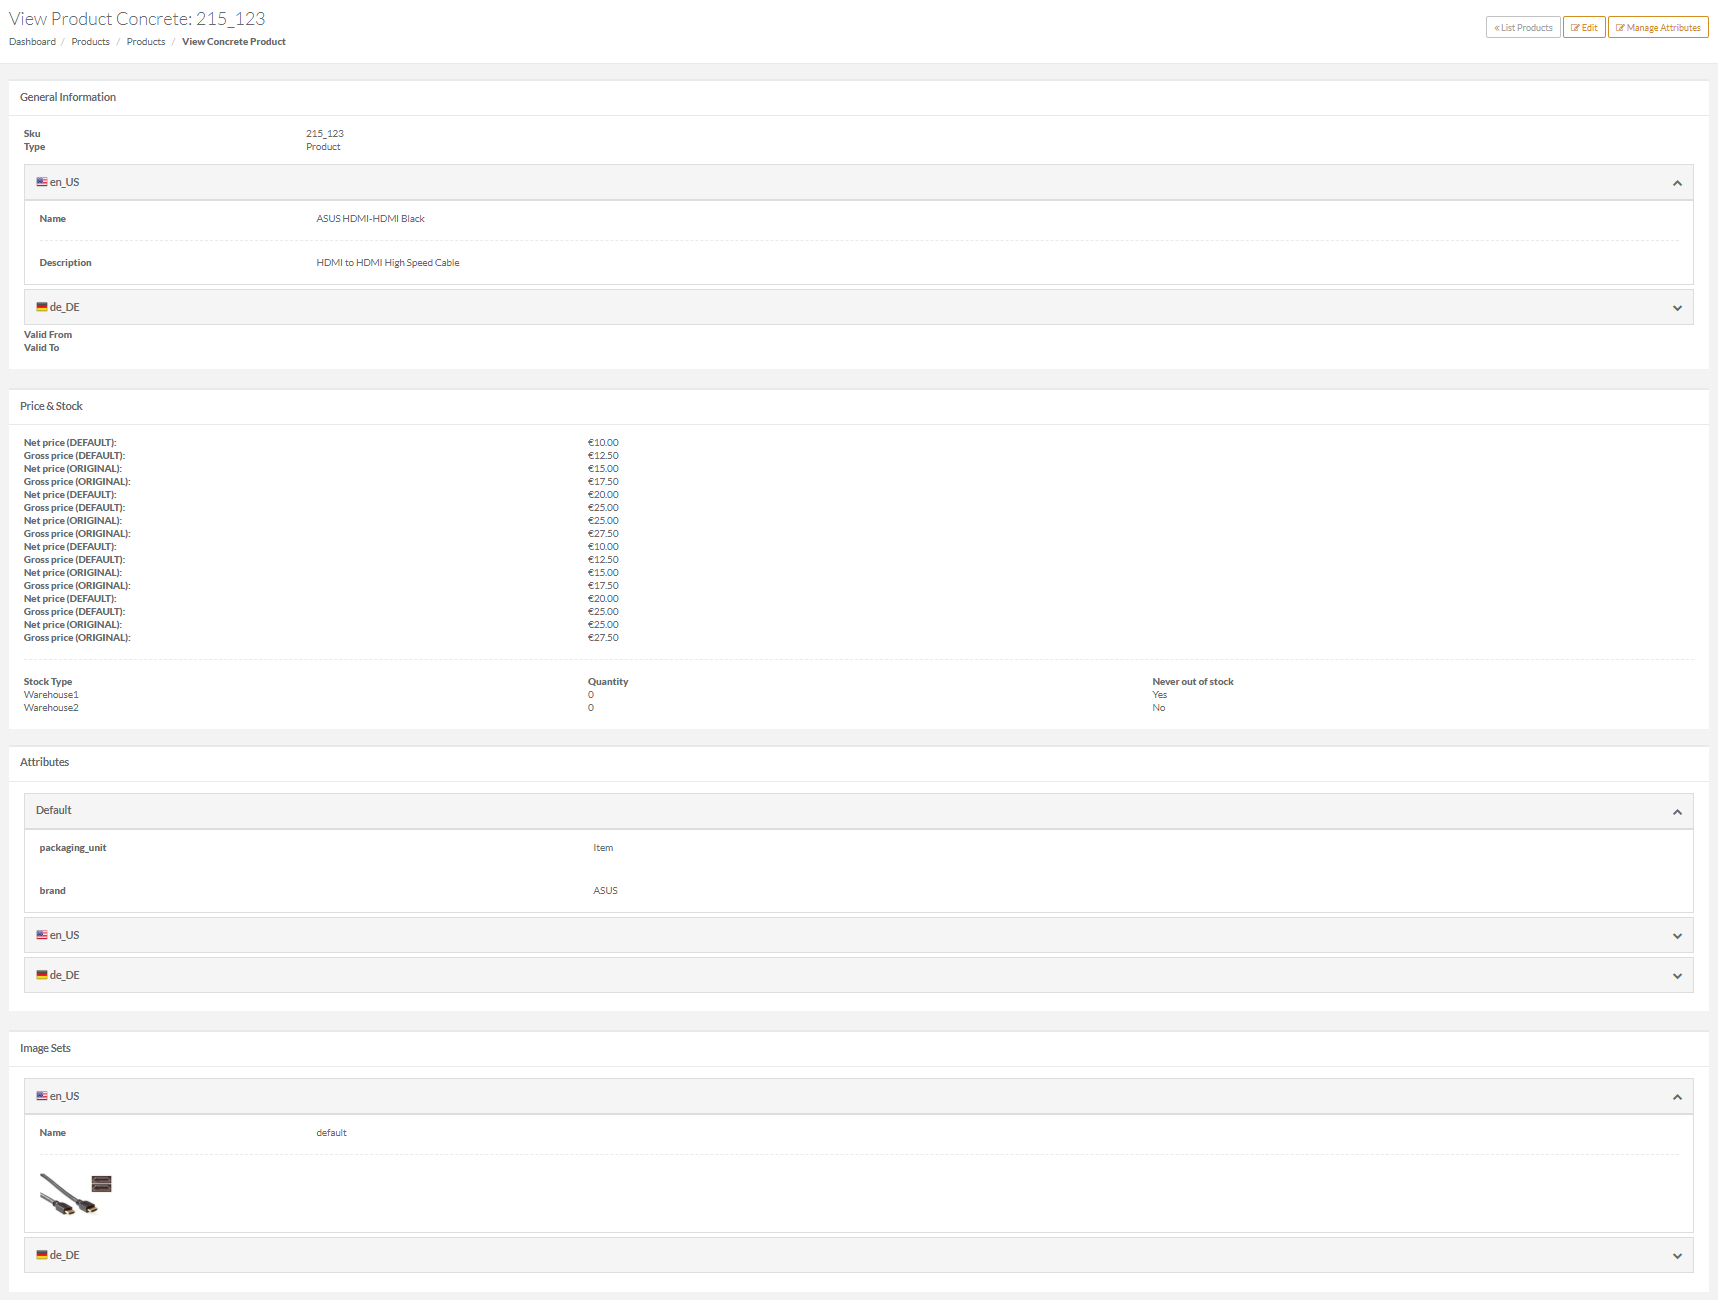
The General information section displays the following information on the product: its SKU, product type, name, description, and validity period during which the product is available.
The Price&Stock section provides details on prices and taxes for products, as well as displays information on quantity and stock availability.
The Attributes and Image set sections displays information on product attributes and images assigned to products.
By clicking a respective button on the top menu, you can:

| # | Button | Description |
|---|---|---|
| 1 | List Products | Return to the Product list page. |
| 2 | Edit | Open the page where you can edit concrete product. See Create a new Concrete Product for more details. |
| 3 | Manage Attributes | Open the page where you can add or remove product attributes for a concrete products. See Managing Attributes for a Concrete Product for more details. |
Editing Concrete Products
Clicking Edit will take you to the Edit Concrete Product page.
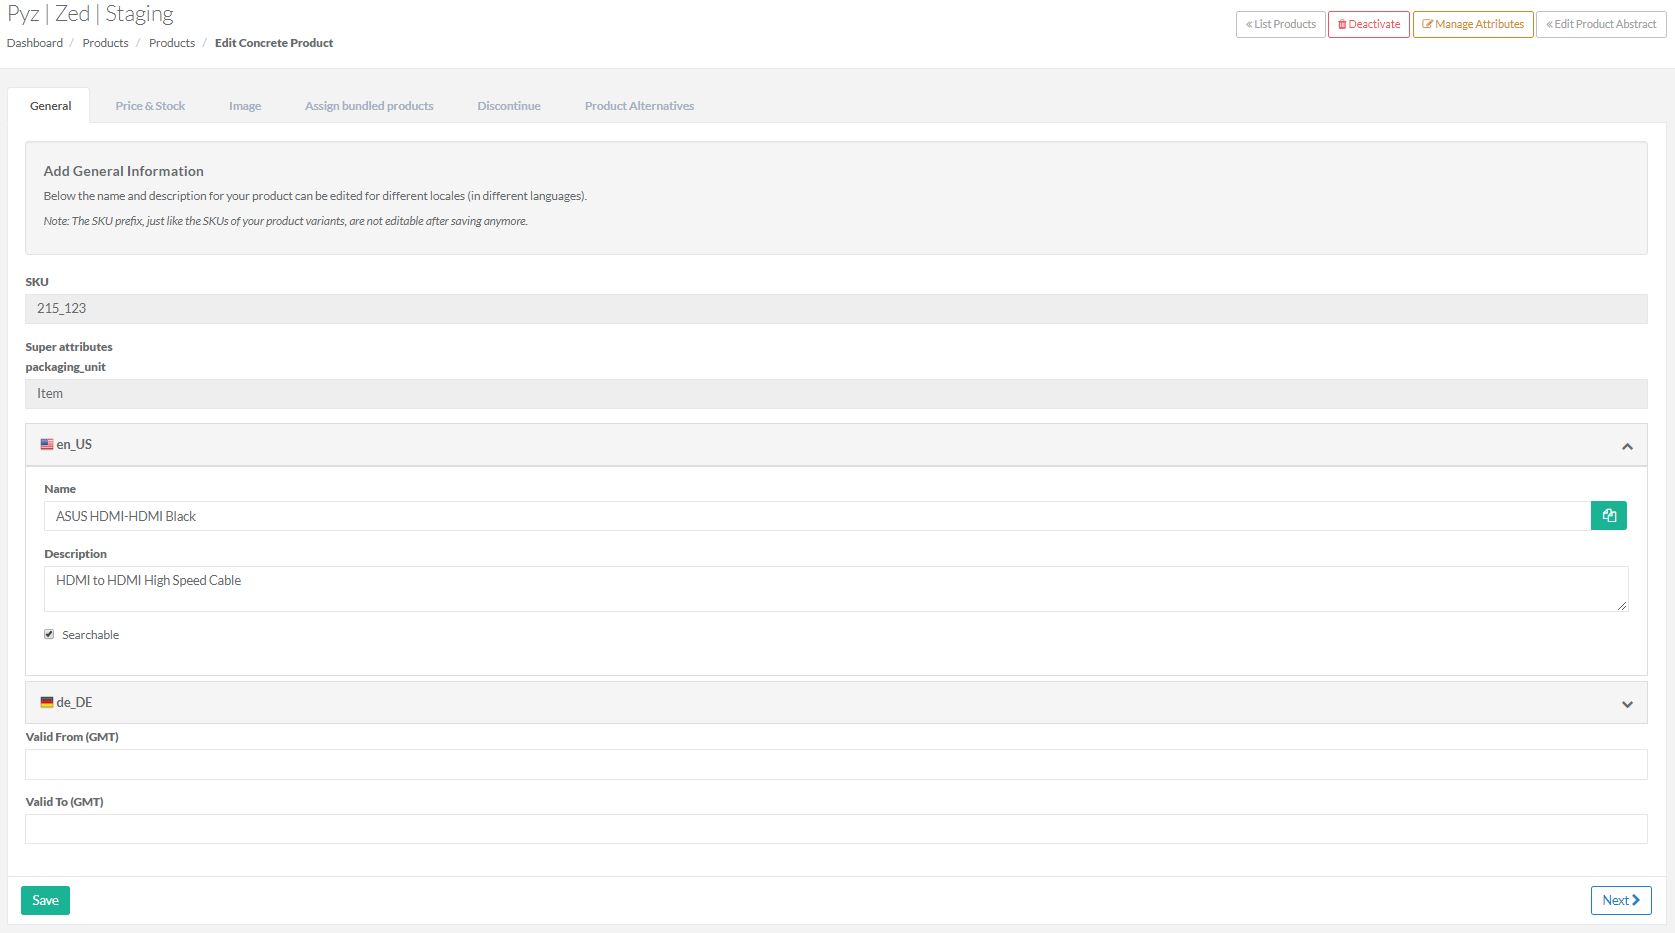
This page allows you to perform the following actions:
- Change product name and description.
- Set if the product will be searchable by its name in the shop application.
- Specify the validity period during which the product will be visible on the shop website.
- Define a price and availability in stores.
- Add an image.
- Assign products to bundles to be sold together.
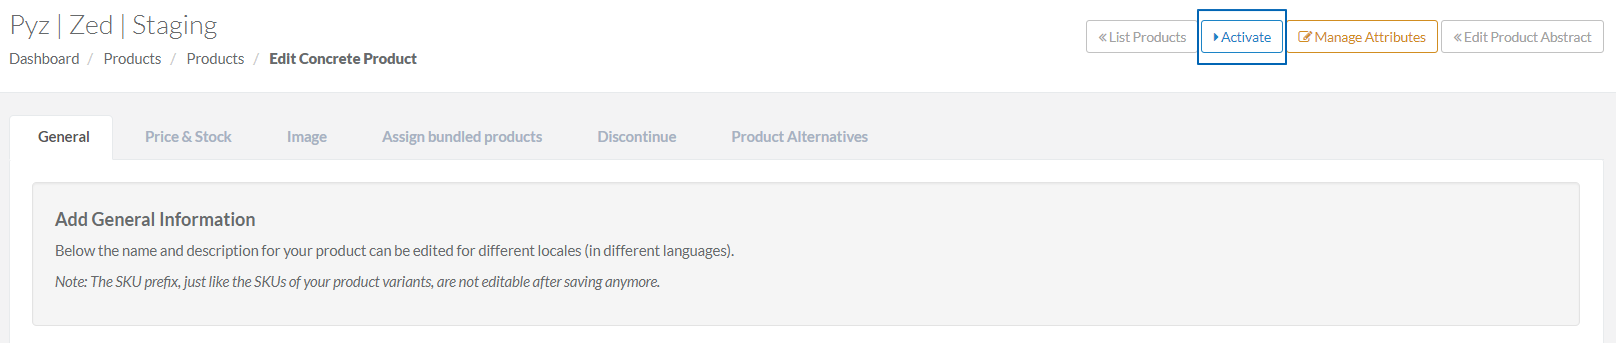
From this page, you can:
- Return to a list of products. For this, click List Products in the upper right corner of the page.
- Deactivate or activate the product by clicking Deactivate or Activate.
- Return to the page where you can manage attributes for a concrete product. To do this, click Manage Attributes.
- Go to the Edit Product Abstract page by clicking Edit Product Abstract.
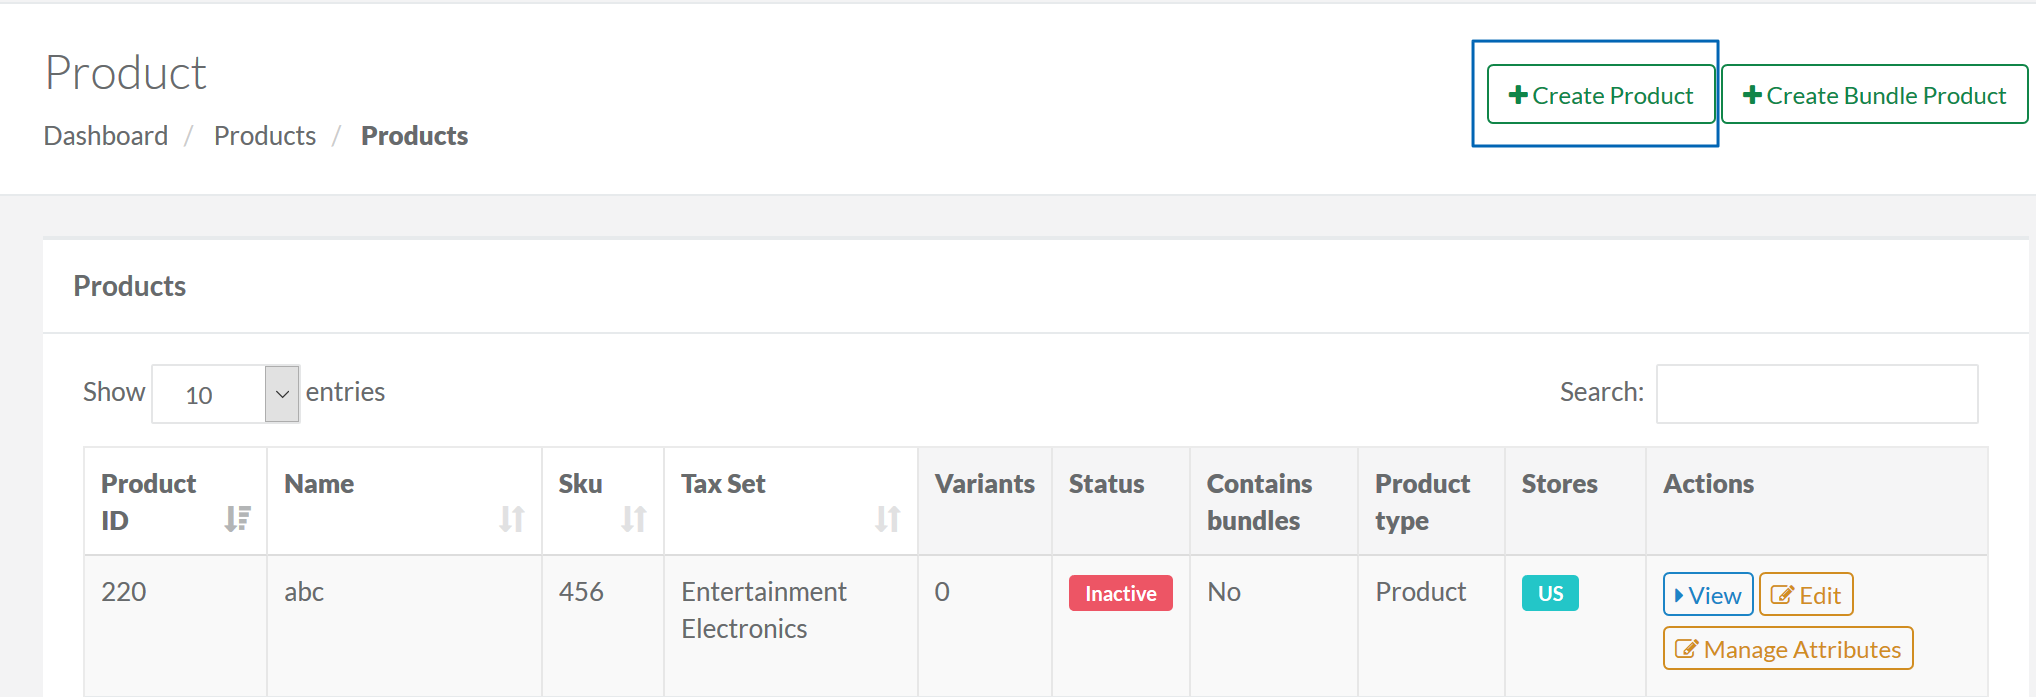
Marking Product as "Discontinued"
To mark the product as discontinued, do the following:
- On the Edit Concrete Product page, switch to the Discontinue tab. By clicking on this tab, you can discontinue the concrete product.
When the product is discontinued, Discontinued is colored in red.
- Once Discontinue is selected, you need to add a note describing the reason why the product was discontinued.
The date of the deactivation is also available for you on the Discontinue tab.
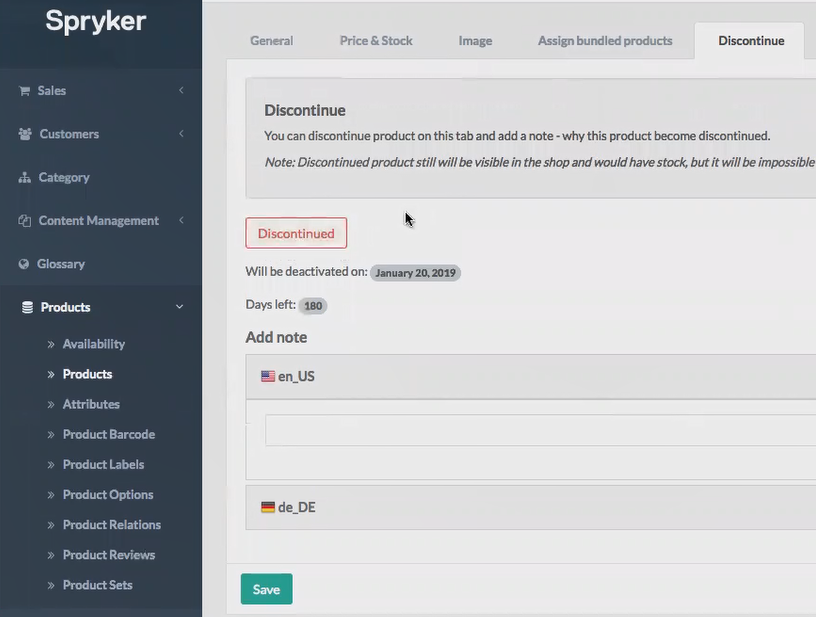
Days left (active_until) value is set to 180 days by default. You can change it on project level.
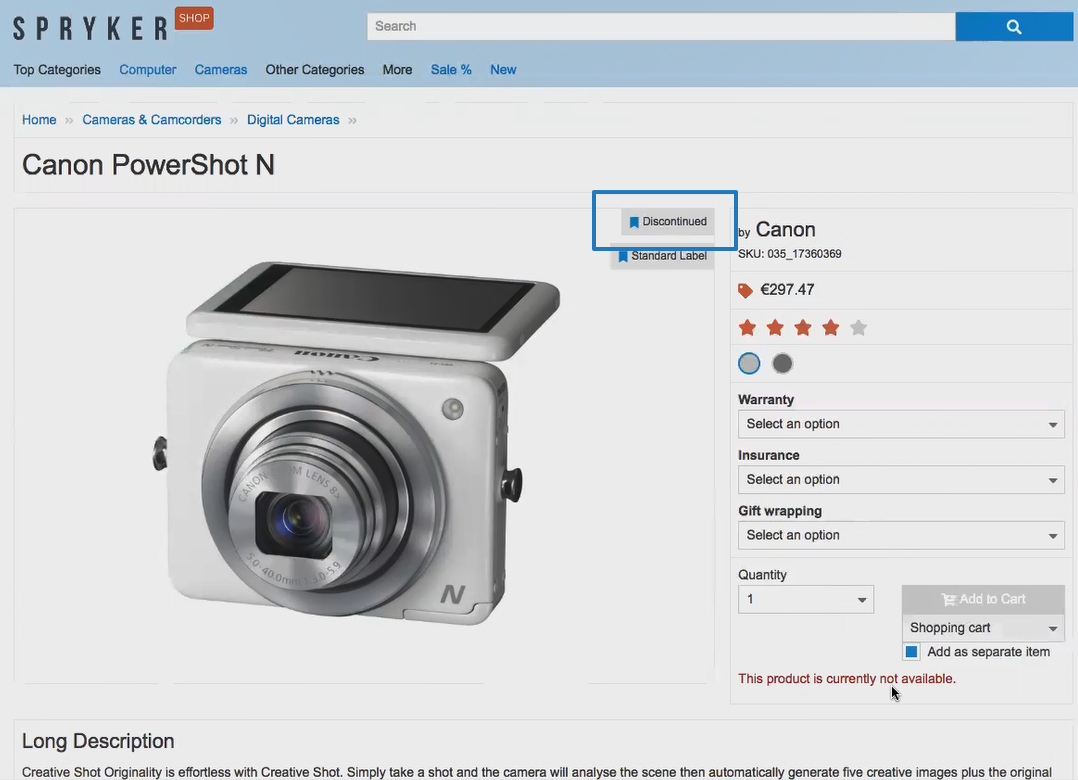
After the product is marked as discontinued, a corresponding label appears on the product detail page and search results in the shop application.
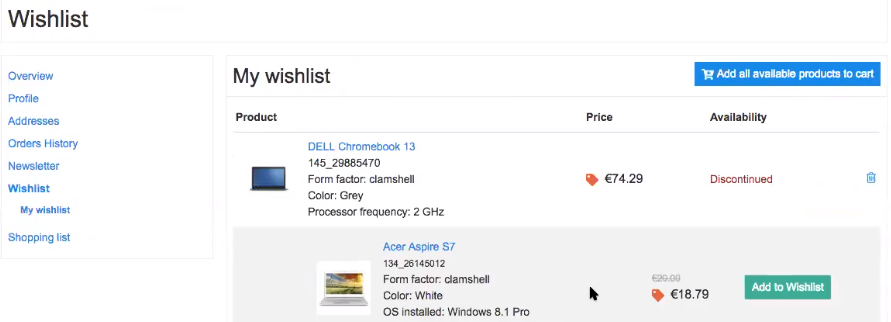
If the product added to the shopping list or wishlist is marked as discontinued, the Discontinued status will appear in the list and the shopper will not be able to proceed to the checkout:
Setting Product Alternatives for a Concrete Product
To set product alternatives for a product, do the following:
- On the Edit Concrete Product page, switch to the Product Alternatives tab:
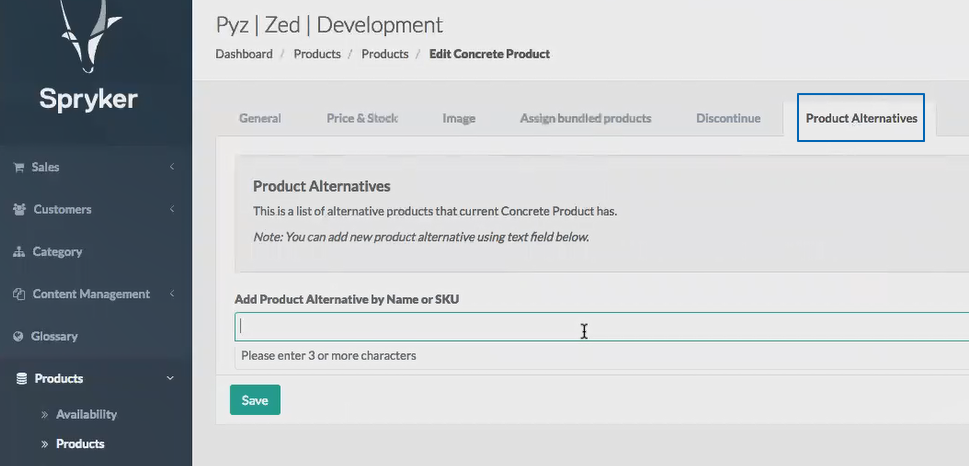
- To add product alternatives, enter Product Name or its SKU in the Add Product Alternative by Name or SKU field:
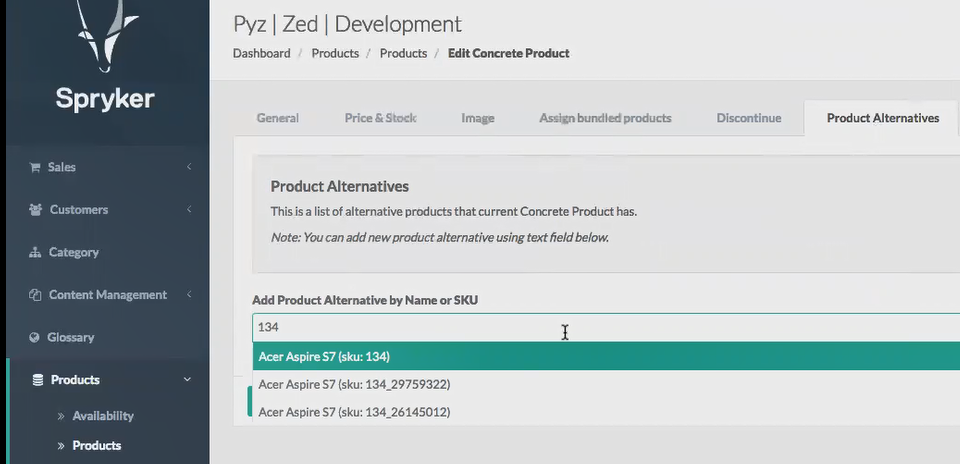
- Click Save.
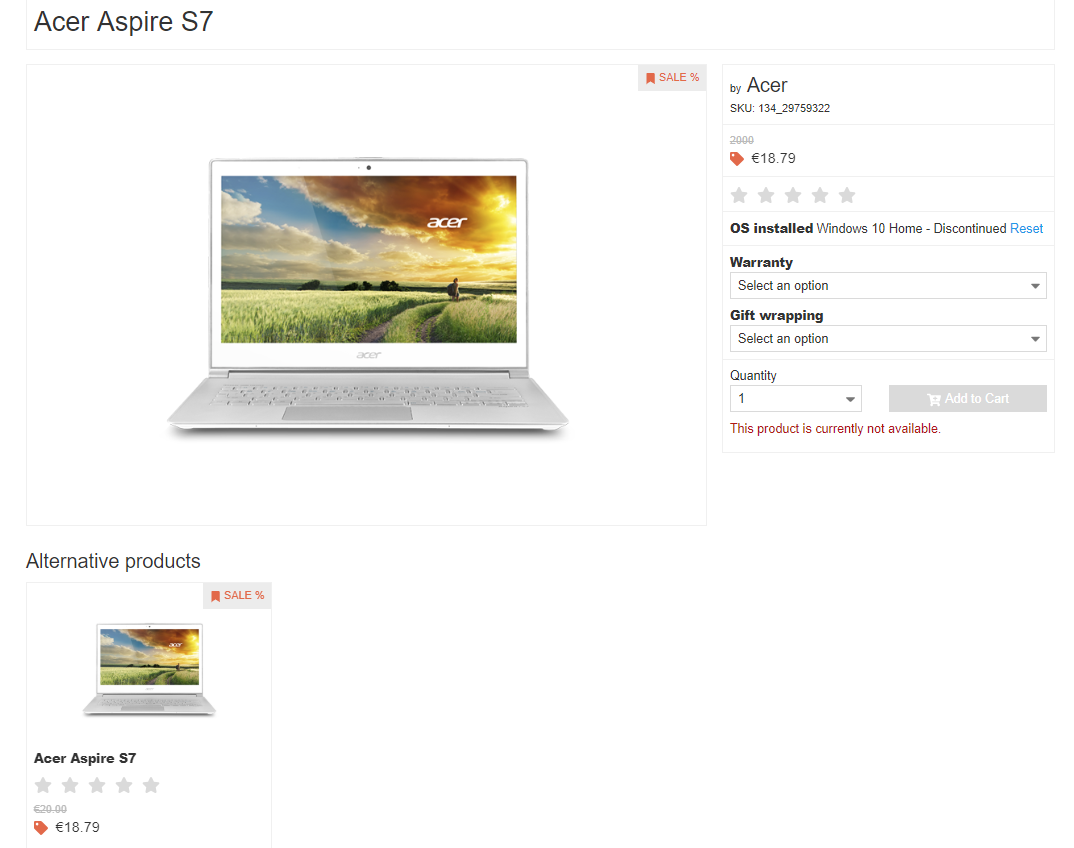
Below you can see how the shop visitors can view product alternatives on the product detail page:
Clicking Manage Attributes will take you to the Manage Attributes for Product [Product ID] page.
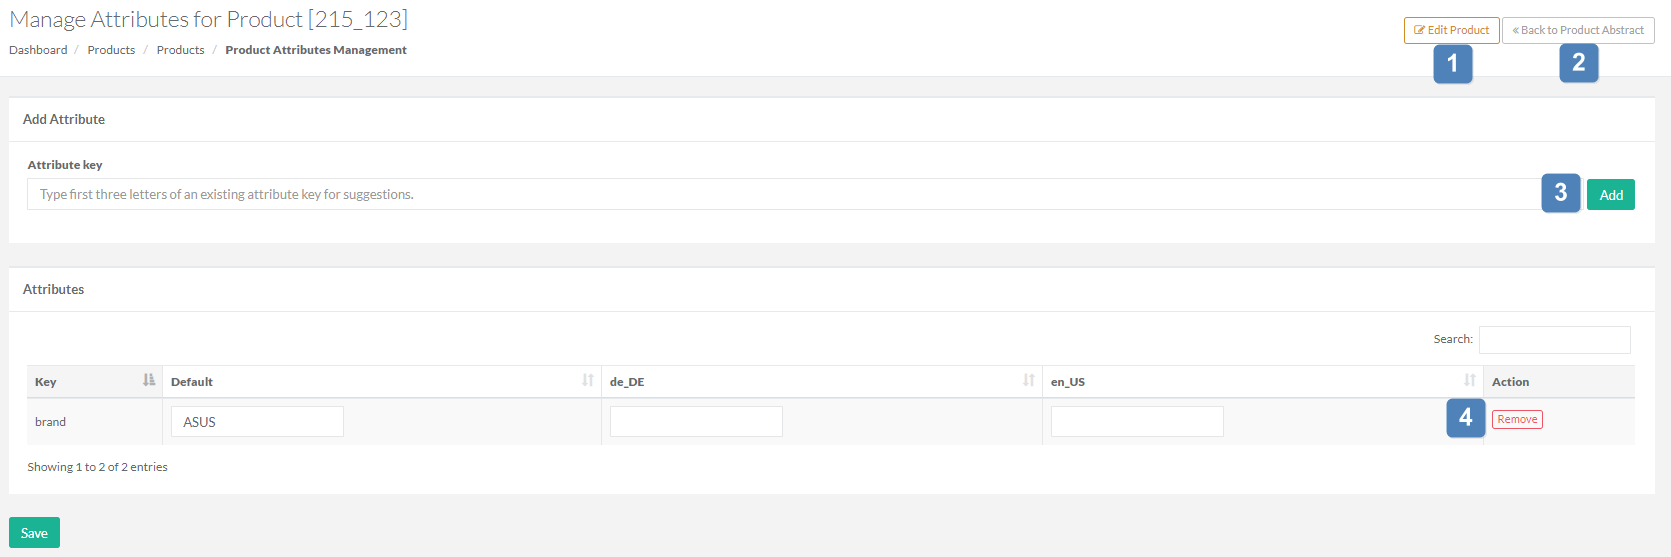
On this page, you can perform the following actions:
| # | Button | Description |
|---|---|---|
| 1 | Edit Product | Go to the page where you can edit this concrete product. |
| 2 | Back to Product Abstract | Go to the page where you can edit the abstract product to which this concrete product belong. |
| 3 | Add | Add a new attribute to the product. |
|
4 |
Remove |
Remove an existing attribute. |
Last review date: Feb 19, 2019