### devlopr-jekyll - A Beautiful Jekyll Theme Built for Developers
[](#contributors-)
[](https://badge.fury.io/rb/devlopr)

[](https://app.netlify.com/sites/devlopr/deploys)

[](https://lbesson.mit-license.org/)
[](https://opencollective.com/devlopr-jekyll/)
You can use Devlopr as a starter for building your own Site. we purposely keep the styling minimal and bare to make it easier to add your own flare and markup. (Under Active Development) !
Highly Customizable and No Hosting or Maintainence Cost is required !
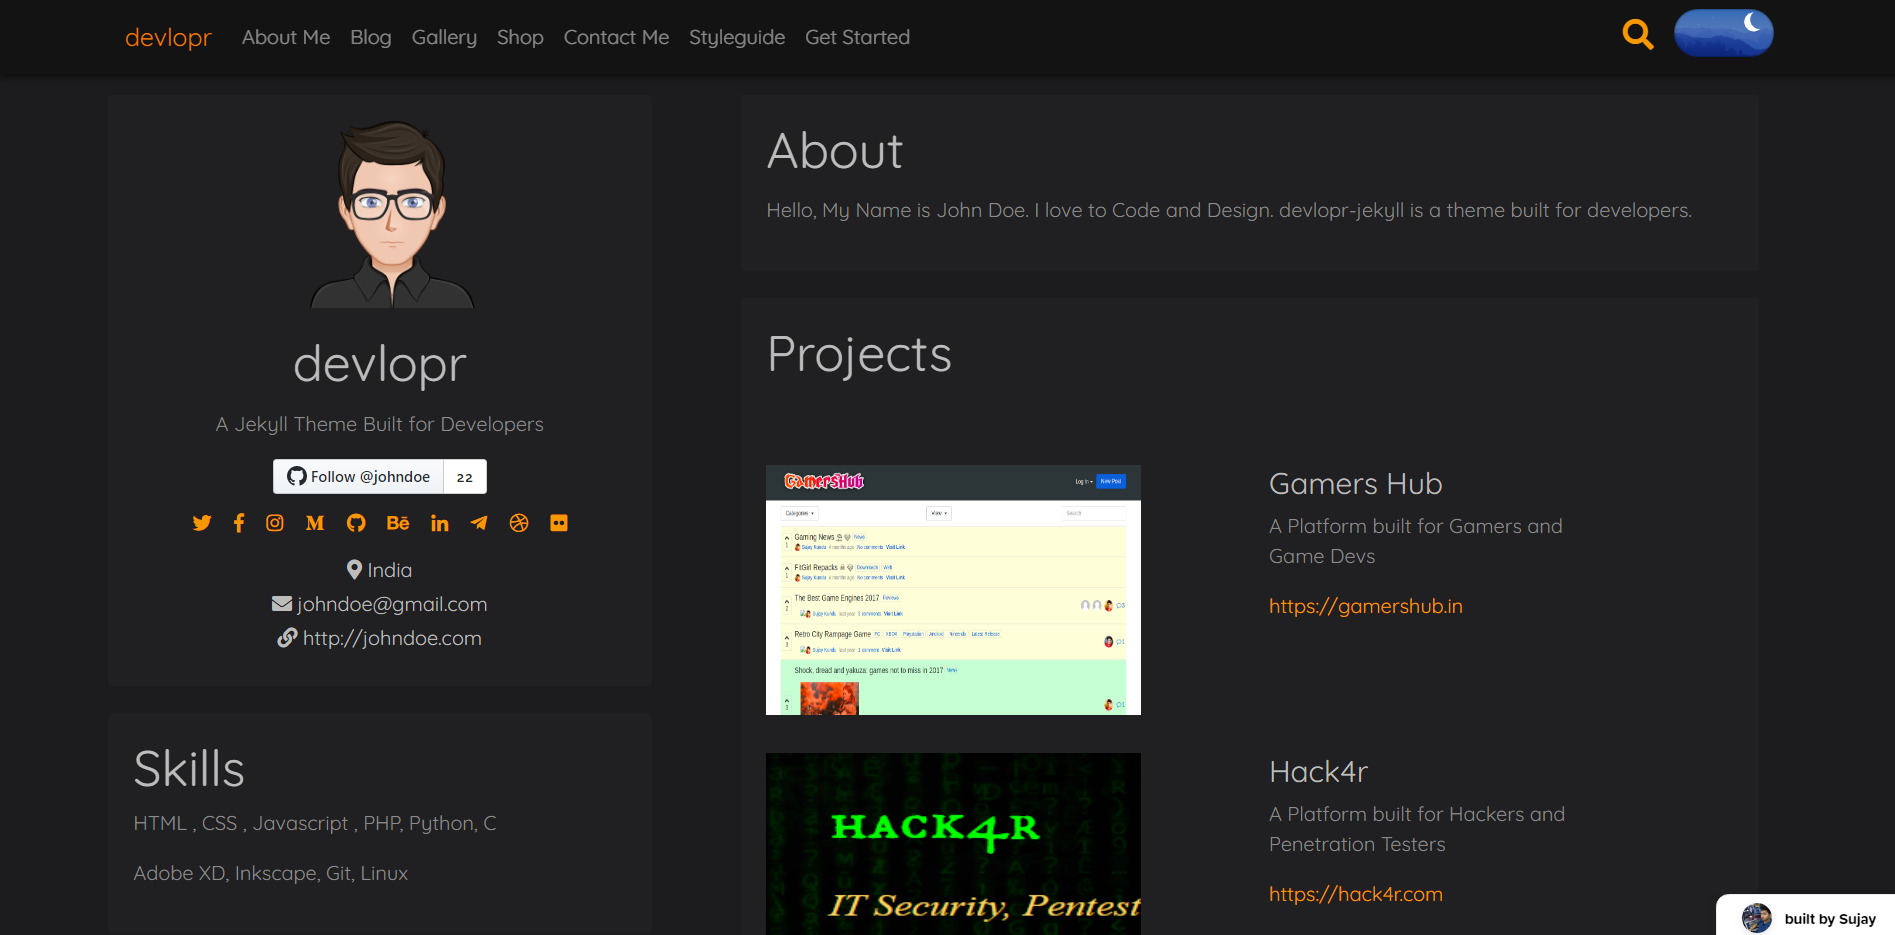
devlopr uses Markdown Files to generate data like Blog Posts, Gallery, Shop Products etc. No external database is required.
### Launch your Static Site using Devlopr in minutes :rocket:
To get started follow this [Tutorial](https://devlopr.netlify.app/get-started)
or if you want to try fast :
### Follow this steps in browser (takes 5-10 mins):
1. Fork this Repo with your name as your_username.github.io
2. Visit your Fork repo at https://github.com/your_username/your_username.github.io
3. Press "." in keyboard (this will open up vs-code editor in browser) of the repo.
4. Customize config.yml file according to your needs (eg. change your Name, Email... etc.)
5. Commit your changes, and push
6. Wait for CI/CD to build your website. Visit Github Actions to see the build process.
7. Once Ready, Your website will be ready at https://your_username.github.io :sparkles:
8. Happy Hacking your new site ! For Local changes you can clone locally.
## Local Development Steps :
Step 1: Fork this repo with your github username.
Step 2: Clone Locally
```s
$ git clone https://github.com/your_github_username/your_github_username.github.io.git
$ cd your_github_username
```
Step 3: Now follow the below guides based on your OS.
### For Linux : (Ubuntu 20.04)
To work locally with ubuntu, follow this commands.
Install Ruby :
```s
$ sudo apt install ruby-full
$ ruby --version
ruby 2.7.0p0 (2019-12-25 revision 647ee6f091) [x86_64-linux-gnu]
$ gem install jekyll bundler
$ bundle update
$ bundle install
$ bundle exec jekyll -v
jekyll 4.2.2
$ bundle exec jekyll serve --livereload
```
### For Windows :
To work locally with windows machine, follow this commands. You might need to download and install [ruby (with devkit)](https://www.ruby-lang.org/en/downloads/) and [git](https://git-scm.com/downloads).
```s
$ ruby -v
(ruby 3.1.2p20 (2022-04-12 revision 4491bb740a) [universal.x86_64-darwin21])
$ gem install jekyll bundler
$ bundler -v
Bundler version 2.3.23
$ bundle update
$ bundle install
$ bundle exec jekyll -v
jekyll 4.2.2
$ bundle exec jekyll serve --livereload
```
If you are running into permission issues running bundler, try the following:
```s
$ sudo rm -rf _site
$ bundle update
$ bundle install
$ bundle exec jekyll serve
```
Start the server locally at http://127.0.0.1:4000/ or http://localhost:4000/
### For MacOS :
Run the following in your terminal :
#### Option 1. Install ruby using Homebrew
`/bin/bash -c "$(curl -fsSL https://raw.githubusercontent.com/Homebrew/install/HEAD/install.sh)"`
`brew install ruby`
Add the below in ~/.zshrc file:
Edit either the ~/.zshrc and ~/.zprofile files:
`$ open -e ~/.zshrc`
### For Mac M1, M2, M3
```sh
# override system ruby with homebrew-installed ruby
if [ -d "/opt/homebrew/opt/ruby/bin" ]; then
export PATH=/opt/homebrew/opt/ruby/bin:$PATH
export PATH=`gem environment gemdir`/bin:$PATH
```
### For Mac Intel
On Mac Intel, add this at the end of your ~/.zshrc or ~/.zprofile file.
```sh
if [ -d "/usr/local/opt/ruby/bin" ]; then
export PATH=/usr/local/opt/ruby/bin:$PATH
export PATH=`gem environment gemdir`/bin:$PATH
fi
```
Save the file. This sets the Homebrew-installed Ruby to a higher priority than the system Ruby and adds the directory used for Ruby gems.
### Reset the shell session
Close and reopen the Terminal window to pick up the changes to the configuration file. Or enter source ~/.zshrc or source ~/.zprofile to reset the shell environment without closing the Terminal window.
```sh
$ source ~/.zprofile
$ source ~/.zshrc
```
The source command reads and executes a shell script file, resetting the shell environment.
You should be able to see this :
```sh
$ ruby -v
ruby 3.3.4 (2024-07-09 revision be1089c8ec) [arm64-darwin23]
```
2. Install churby and ruby-install with Homebrew
We will be using [ruby-install](https://github.com/postmodern/ruby-install) to install ruby and [chruby](https://github.com/postmodern/chruby) to change the current ruby version.
`brew install chruby ruby-install`
Install latest ruby version
`ruby-install ruby`
This will take a few minutes, and once it’s done, configure your shell to automatically use chruby:
```sh
echo "source $(brew --prefix)/opt/chruby/share/chruby/chruby.sh" >> ~/.zshrc
echo "source $(brew --prefix)/opt/chruby/share/chruby/auto.sh" >> ~/.zshrc
echo "chruby ruby-3.3.4" >> ~/.zshrc
```
If you are facing any problems not getting the version that you just now installed, here is a amazing guide :
[how to uninstall ruby on mac](https://mac.install.guide/ruby/9)
If you’re using Bash, replace *.zshrc* with *.bash_profile*.
Quit and relaunch Terminal, then check that everything is working:
`$ ruby -v`
ruby 3.3.4 (2024-07-09 revision be1089c8ec) [arm64-darwin23]
5. Install latest gems
```sh
$ gem install jekyll bundler
$ gem update --system 3.5.15
$ bundler -v
Bundler version 2.5.15
$ bundle update
$ bundle exec jekyll -v
jekyll 4.3.3
$ bundle exec jekyll serve --livereload
```
### Security
We use codeQL and dependabot alerts for vulnerabality analysis & fixes.
```s
$ bundle audit
```
### Deploy your devlopr-jekyll blog - One Click Deploy
[](https://zeit.co/new/project?template=https://github.com/sujaykundu777/devlopr-jekyll)
[](https://app.netlify.com/start/deploy?repository=https://github.com/sujaykundu777/devlopr-jekyll)
[](https://heroku.com/deploy?template=https://github.com/sujaykundu777/devlopr-jekyll)
### Github Actions
This Project has actions to auto deploy jekyll to github pages and firebase. The deployment target can be set by editing the `DEPLOY_STRATEGY` file. Valid values are:
- `none`: default value. use this if you don't want to deploy the site.
- `gh-pages`: deploys to github pages. This uses a custom action available in the Marketplace - [Jekyll Deploy Action](https://github.com/marketplace/actions/deploy-jekyll-site)
- `firebase`: deploys to firebase. Before you can use this you need to first create a firebase project [here](https://console.firebase.google.com/). You can signup for a Free Spark Plan. Then, in your github repo's settings, go to the secrets section and add the following:
* `FIREBASE_TOKEN`: your firebase token. you can get this by running `firebase login:ci` with the firebase cli.
* `FIREBASE_PROJECT_ID`: the project id of the project you just created
### Demo (Hosted Apps)
- Github Pages Demo - [here](https://sanketkundu.github.io/)
- Firebase Demo - [here](https://devlopr.web.app)
- Netlify Demo - [here](https://devlopr.netlify.com)
- Vercel Demo - [here](https://devlopr-jekyll.vercel.app/#/)
- Heroku Demo - [here](https://devlopr-jekyll.herokuapp.com)
- AWS Amplify Demo - [here](https://master.d3t30wwddt6jju.amplifyapp.com/)
#### Features :
- Local CMS Admin Support using [Jekyll Admin](https://jekyll.github.io/jekyll-admin/)
- Headless CMS Admin Support using [Netlify CMS](https://sujaykundu.com/blog/how-to-setup-netlify-cms-with-github-pages-hosted-jekyll-blog/)
- Supports Latest [Jekyll 4.x](https://jekyllrb.com) and [Bundler](https://bundler.io)
- Stylesheet built using Sass
- Comments using [Hyvor](https://talk.hyvor.com/) and [Disqus](https://disqus.com/)
- SEO-optimized
- Real Time Search - [Algolia](https://sujaykundu.com/blog/adding-real-time-search-to-jekyll-site-using-algolia/)
- Sell Stuff (Ecommerce) in your Blog using [Snipcart](https://snipcart.com/)
- Send Newsletters using [Mailchimp](https://mailchimp.com/)
- Contact Forms Support for [Getform](https://getform.io), [Formspree](https://formspree.io/)
- Coding Activity using [Wakatime](https://wakatime.com/)
- Hosting Support for [Github Pages](https://pages.github.com), [Netlify](https://netlify.com), [Vercel](https://vercel.com), [Heroku](https://heroku.com), [AWS Amplify](aws.amplify.com), [Firebase](https://firebase.com)
- CI/CD Support using [Travis CI](https://sujaykundu.com/blog/deploy-jekyll-blog-using-github-pages-and-travis-ci/)
#### Jekyll Admin
You can easily manage the site locally using the Jekyll admin : [http://localhost:4000/admin](http://localhost:4000/admin)
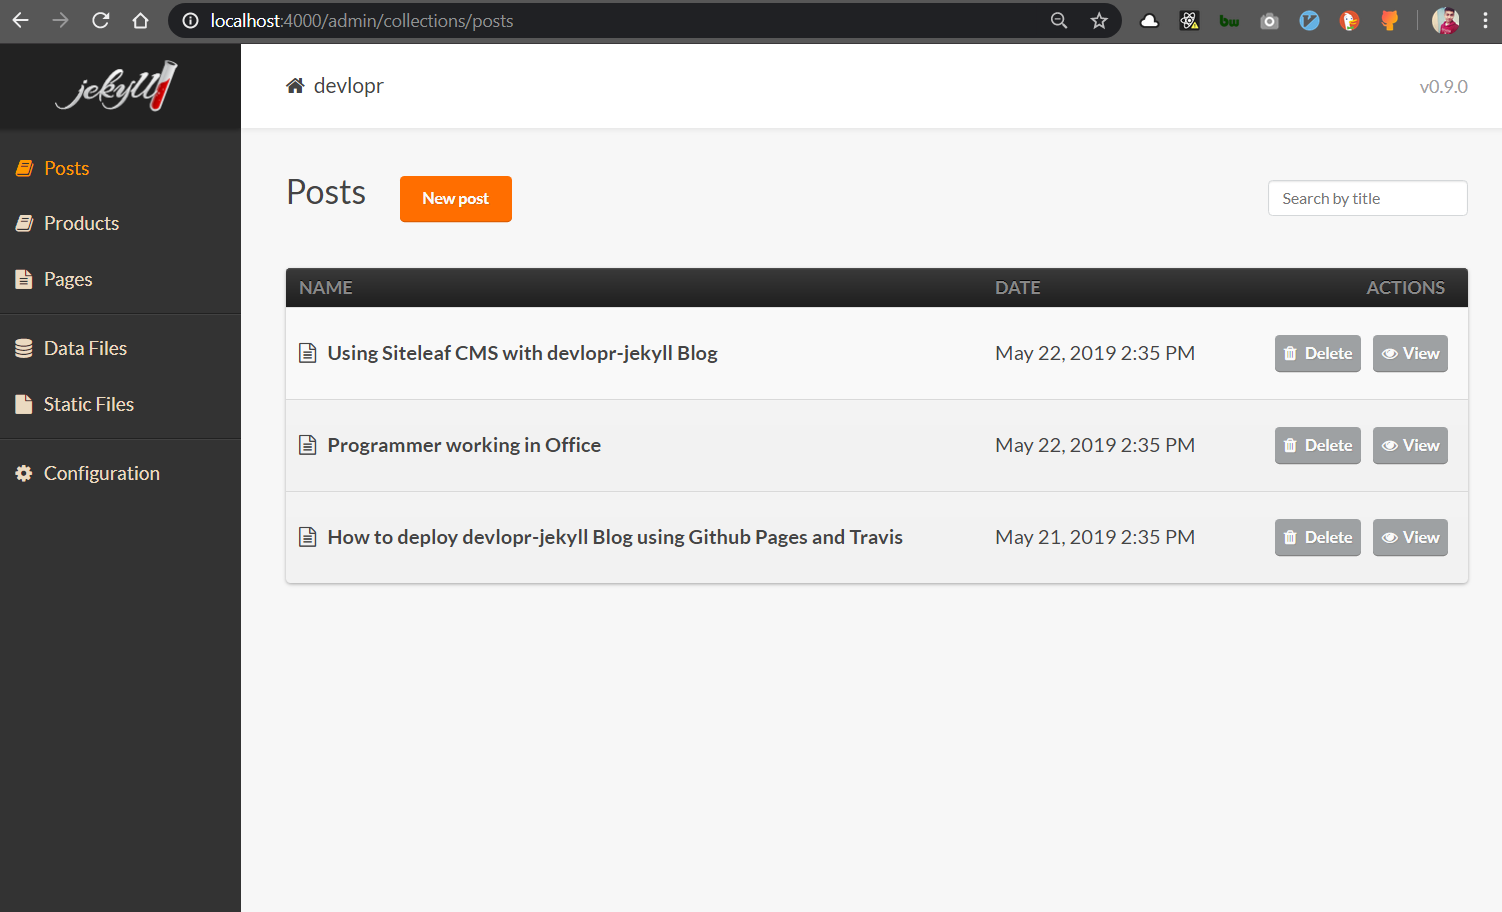
You can check out for all changelogs [here](https://devlopr.olvy.co/)
## Pull the latest changes
```s
git remote -v
git remote add upstream https://github.com/sujaykundu777/devlopr-jekyll.git
git fetch upstream
git checkout master
git merge upstream/master
git push
```
## Using Docker :
Building the Image :
`docker build -t my-devlopr-jekyll-blog .`
Running the container :
`docker run -d -p 4000:4000 -it --volume="$PWD:/srv/jekyll" --name "my_blog" my-devlopr-jekyll-blog:latest jekyll serve --watch`
## Using Docker Compose :
### Development :
You can run the app in development mode : (your changes will be reflected --watch moded)
Serve the site at http://localhost:4000 :
`docker-compose -f docker-compose-dev.yml up --build --remove-orphans`
### Production :
You can run the app in production mode : (your changes will be reflected --watch moded)
Serve the site at http://localhost:4000 :
`docker-compose -f docker-compose-prod.yml up --build --remove-orphans`
Stop the app :
`docker-compose -f docker-compose-prod.yml down`
Once everything is good and ready to go live -
`docker-compose -f docker-compose-prod.yml up --build --detach`
## Contributors:
This project exists thanks to all the people who contribute.
Contributions are more than just welcome. Fork this repo and create a new branch, then submit a pull request
- 1.Fork it [http://github.com/sujaykundu777/devlopr-jekyll/fork](http://github.com/sujaykundu777/devlopr-jekyll/fork )
- 2.Create your feature branch
`git checkout -b my-new-feature`
- 3.Commit your changes
`git commit -am 'Add some feature'`
- 4.Push to the branch
`git push origin my-new-feature`
- 5.Create new Pull Request
## Support this Project:
Back this project by Donating to our [Open Collective](https://opencollective.com/devlopr-jekyll/donate) or if you like my work [Buymeacoffee](https://buymeacoffee.com/sujaykundu).
Thanks to all our Backers ! [Become a Backer](https://opencollective.com/devlopr-jekyll/donate)

 ### For Help :
You can contact me, if you need any help via [Email](mailto:sujaykundu777@gmail.com). If you like the project. Don't forget to :star: !
## Licence
The theme is available as open source under the terms of the [MIT License](https://opensource.org/licenses/MIT). You can do anything you want, including projects for your clients, as long as you mention an attribution back (credit links in footer). See the [Licence](https://github.com/sujaykundu777/devlopr-jekyll/blob/master/LICENSE) file
### For Help :
You can contact me, if you need any help via [Email](mailto:sujaykundu777@gmail.com). If you like the project. Don't forget to :star: !
## Licence
The theme is available as open source under the terms of the [MIT License](https://opensource.org/licenses/MIT). You can do anything you want, including projects for your clients, as long as you mention an attribution back (credit links in footer). See the [Licence](https://github.com/sujaykundu777/devlopr-jekyll/blob/master/LICENSE) file


