# Central Server & Team Collaboration
Running TalkOps on your own laptop is great when you are working solo. Wait until an incident hits at 2 AM, though, and working on separate laptops quickly gets messy: one person has the right cloud permissions, another person is looking at the wrong logs, and nobody can see what the last person already tried.
**`talkops serve` turns TalkOps into a shared server for your team.** Instead of everyone configuring AI keys, cloud credentials, and tools on their own machine, you set them up once on a central server. Your teammates—and your automated CI/CD jobs or monitoring alerts—can then connect to that server from anywhere, share the same workspace, and pick up investigations right where someone else left off.
One Shared Setup
Configure your AI models, cloud access (AWS, GCP, Azure, Kubernetes), and tools in one place instead of on every laptop.
|
Shared Incident History
Save all conversations and findings in PostgreSQL (for teams) or SQLite (for a single machine) so nothing is lost when someone closes their terminal.
|
Private Work + Shared Alerts
Each team member's day-to-day chats stay private to them, while automated alert investigations (from PagerDuty, Datadog, or GitHub) are visible to the whole on-call team.
|
Simple, Secure Sign-In
Team members sign in once with talkops auth login. TalkOps handles session tokens and renewals automatically in the background.
|
---
## How It Works
When you run `talkops serve`, the server handles four jobs behind the scenes so your terminal stays fast and lightweight:
```mermaid
flowchart LR
subgraph Clients["Your Team & Tools"]
C1["Engineer A (Terminal UI)
talkops --server-url ..."]
C2["Engineer B (Terminal UI)
talkops --server-url ..."]
C3["CI/CD Pipeline
talkops -p ... --server-url ..."]
WH["Monitoring & Alerts
PagerDuty · Alertmanager · Datadog · GitHub · AWS"]
end
subgraph Server["TalkOps Central Server (Port 2024)"]
Auth["Sign-In & Access
Verifies team members"]
Gateway["Session Manager
Lists, resumes & branches chats"]
Webhooks["Webhook Receiver
Turns incoming alerts into investigations"]
Agent["TalkOps AI Engine
Runs cloud & DevOps tools safely"]
end
subgraph Storage["Database"]
DB[("PostgreSQL or SQLite
Saved Chats & Team Memory")]
end
C1 & C2 & C3 --> Auth
Auth --> Gateway & Agent
WH --> Webhooks
Webhooks --> Agent
Gateway & Agent <--> DB
```
1. **Runs the AI & Cloud Tools**: Executes cloud checks, Kubernetes commands, and infrastructure tasks on the server using the server's configured permissions.
2. **Manages Conversations**: Lets you list past sessions, resume an investigation (`-r`), or branch a teammate's session (`/fork`) to try a different idea safely.
3. **Handles Team Sign-In**: Verifies who is connecting and keeps each person's personal threads separate.
4. **Listens for Live Alerts (Webhooks)**: Receives alerts from PagerDuty, Alertmanager, Datadog, GitHub, Jenkins, ServiceNow, and AWS SNS, and automatically starts an investigation before an engineer even opens their laptop.
---
## Step 1: Start the Central Server
You can run `talkops serve` on any virtual machine, Docker container, or Kubernetes cluster—or right on your own machine to try it out.
### Quick start (single machine, no database setup needed)
If you just want to test the server or run it on a single host, TalkOps automatically saves everything in a local SQLite file (`~/.talkops/sessions.db`):
```bash
talkops serve --host 0.0.0.0 --port 2024
```
### Production setup (with PostgreSQL for teams)
For a shared team server, pass `--postgres-uri` so conversations and long-term memory are stored in PostgreSQL:
```bash
talkops serve \
--host 0.0.0.0 \
--port 2024 \
--postgres-uri "postgresql://talkops:password@postgres.internal:5432/talkops" \
--approval-mode smart
```
> [!TIP]
> **Want to keep your team port private while receiving public alerts?**
> Pass `--port 2024 --webhook-port 8080`. This lets you open port `8080` to receive webhooks from PagerDuty or GitHub, while keeping port `2024` locked down to your company VPN for engineer connections.
### Checking active features and webhook URLs
Before or after starting the server, you can check which server features (called **addons**) and webhook URLs are enabled:
```bash
# See which server addons are enabled
talkops serve addons
# See all built-in webhook URLs for PagerDuty, Datadog, GitHub, etc.
talkops serve list
```
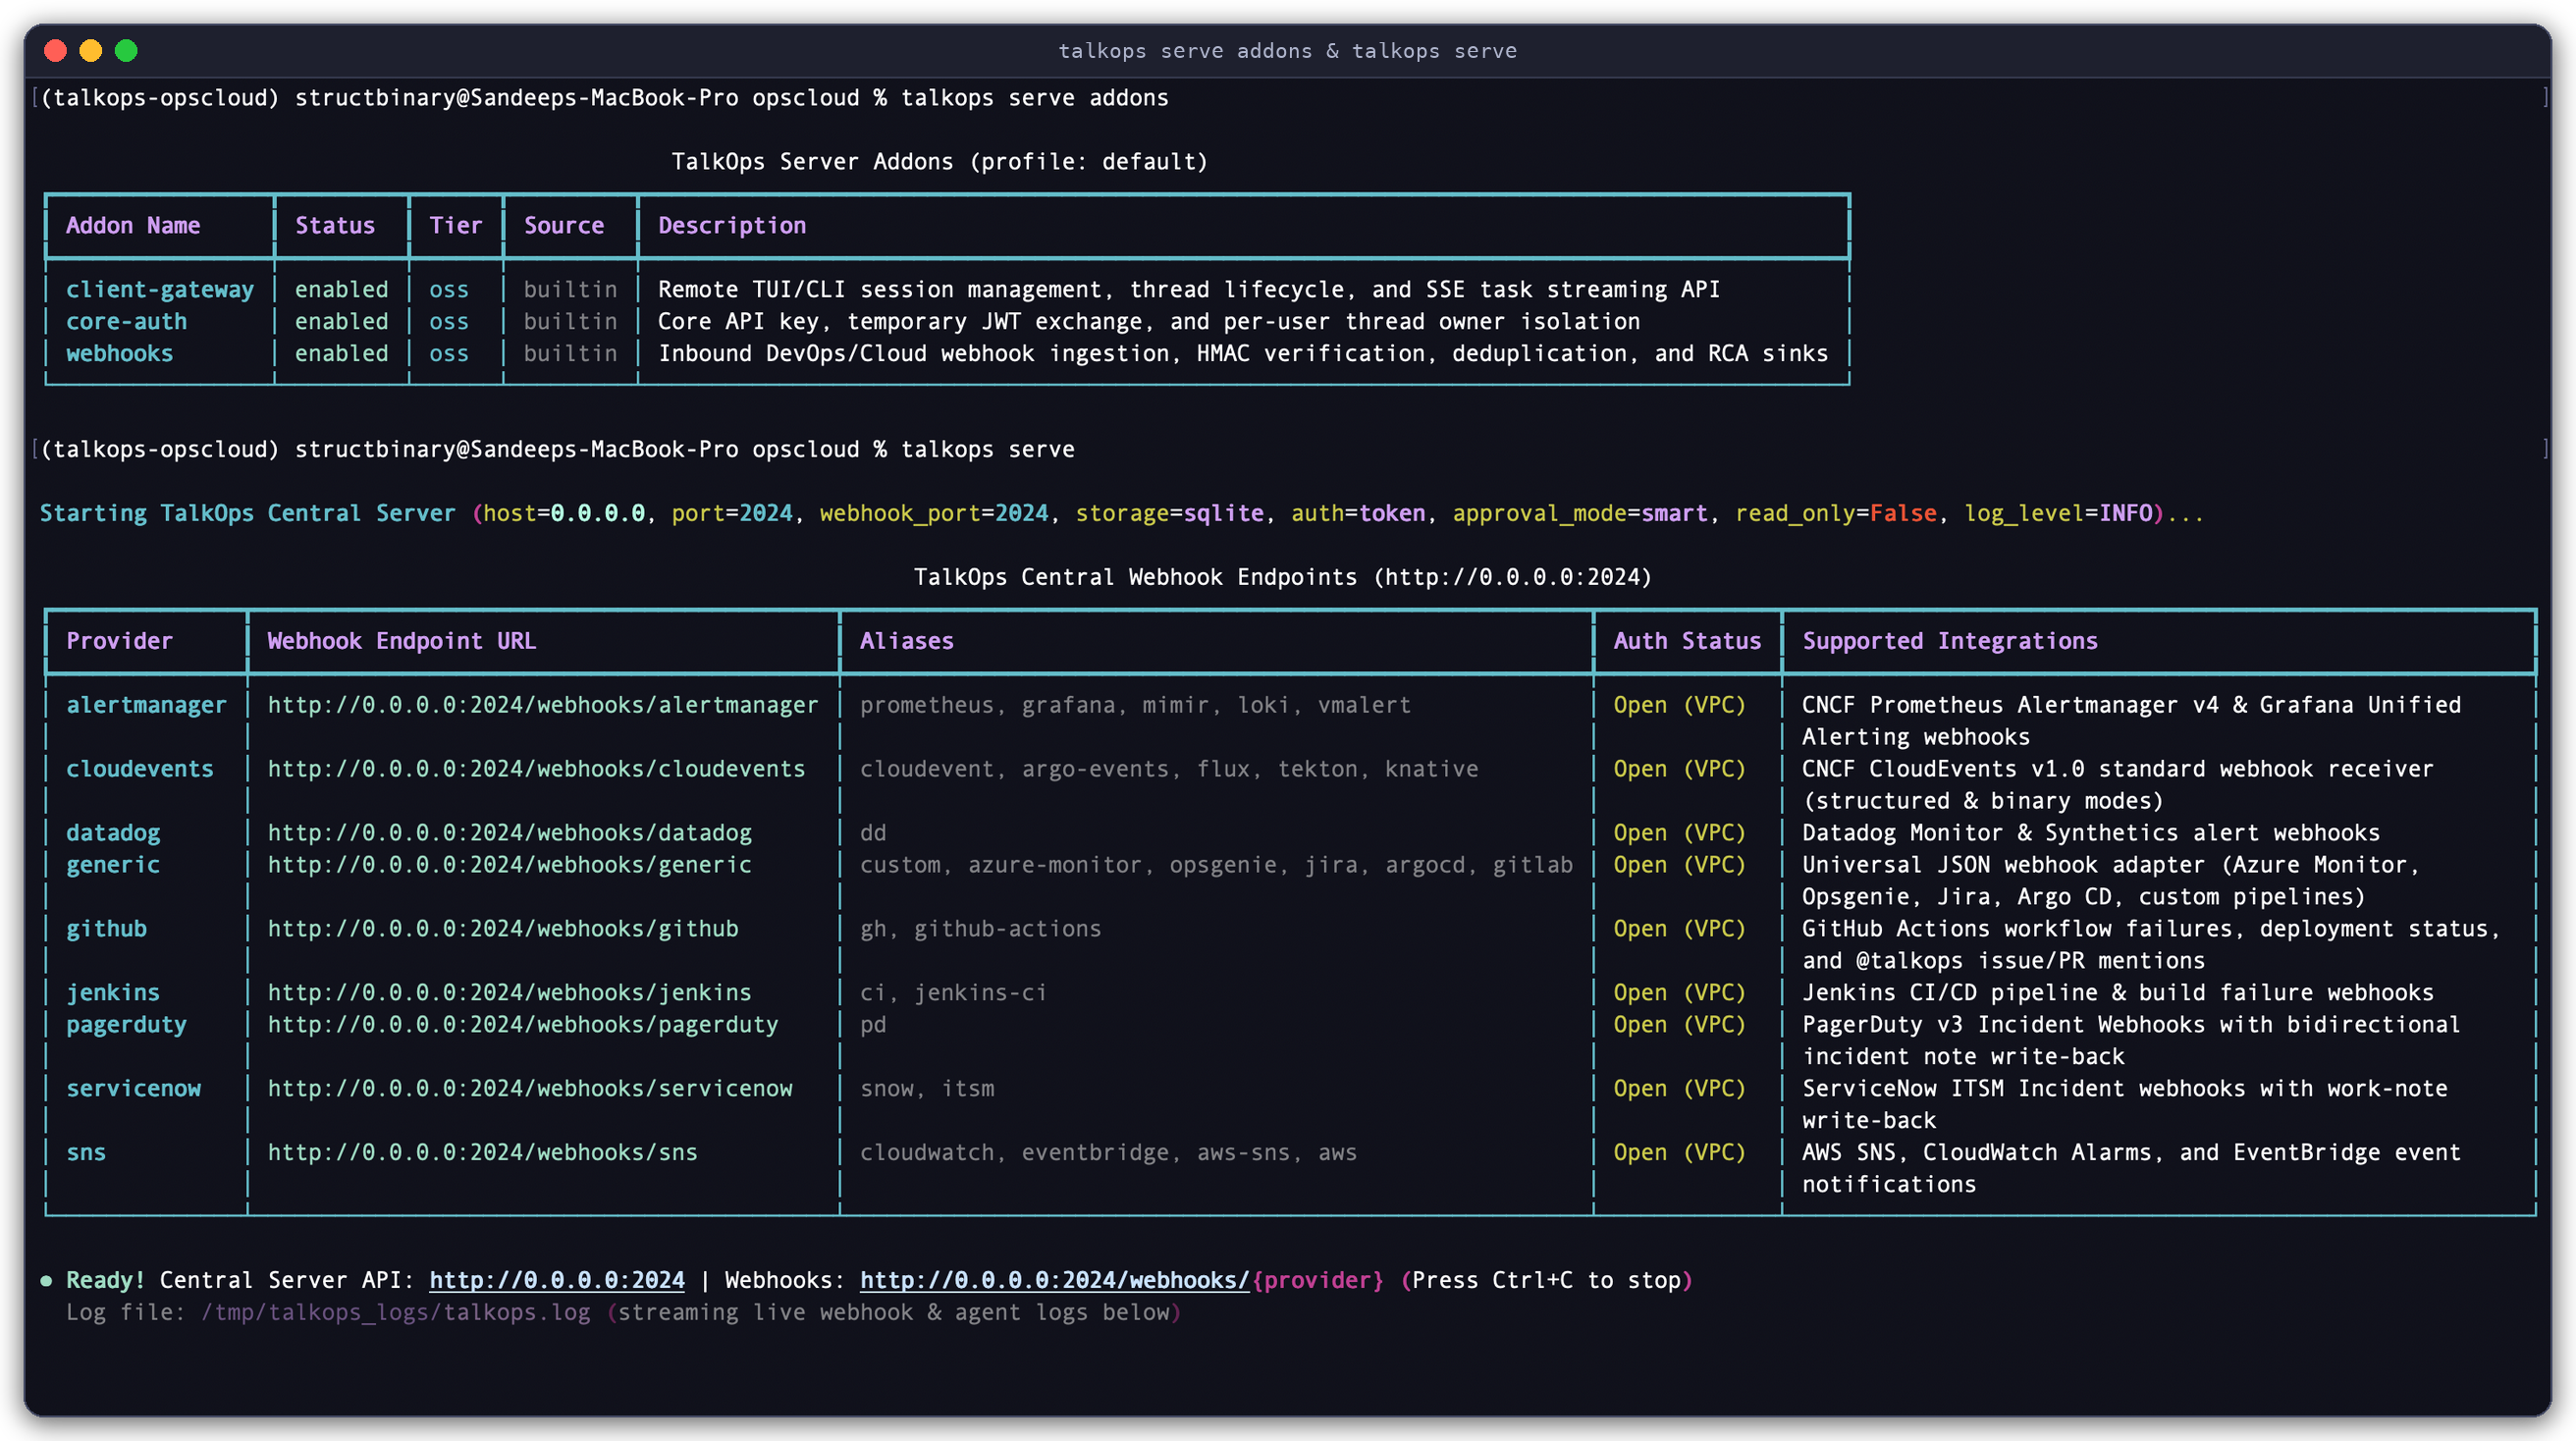
Starting the Central Server (talkops serve addons & talkops serve): Checking the enabled server features (client-gateway, core-auth, webhooks) and launching the Central Server on port 2024.
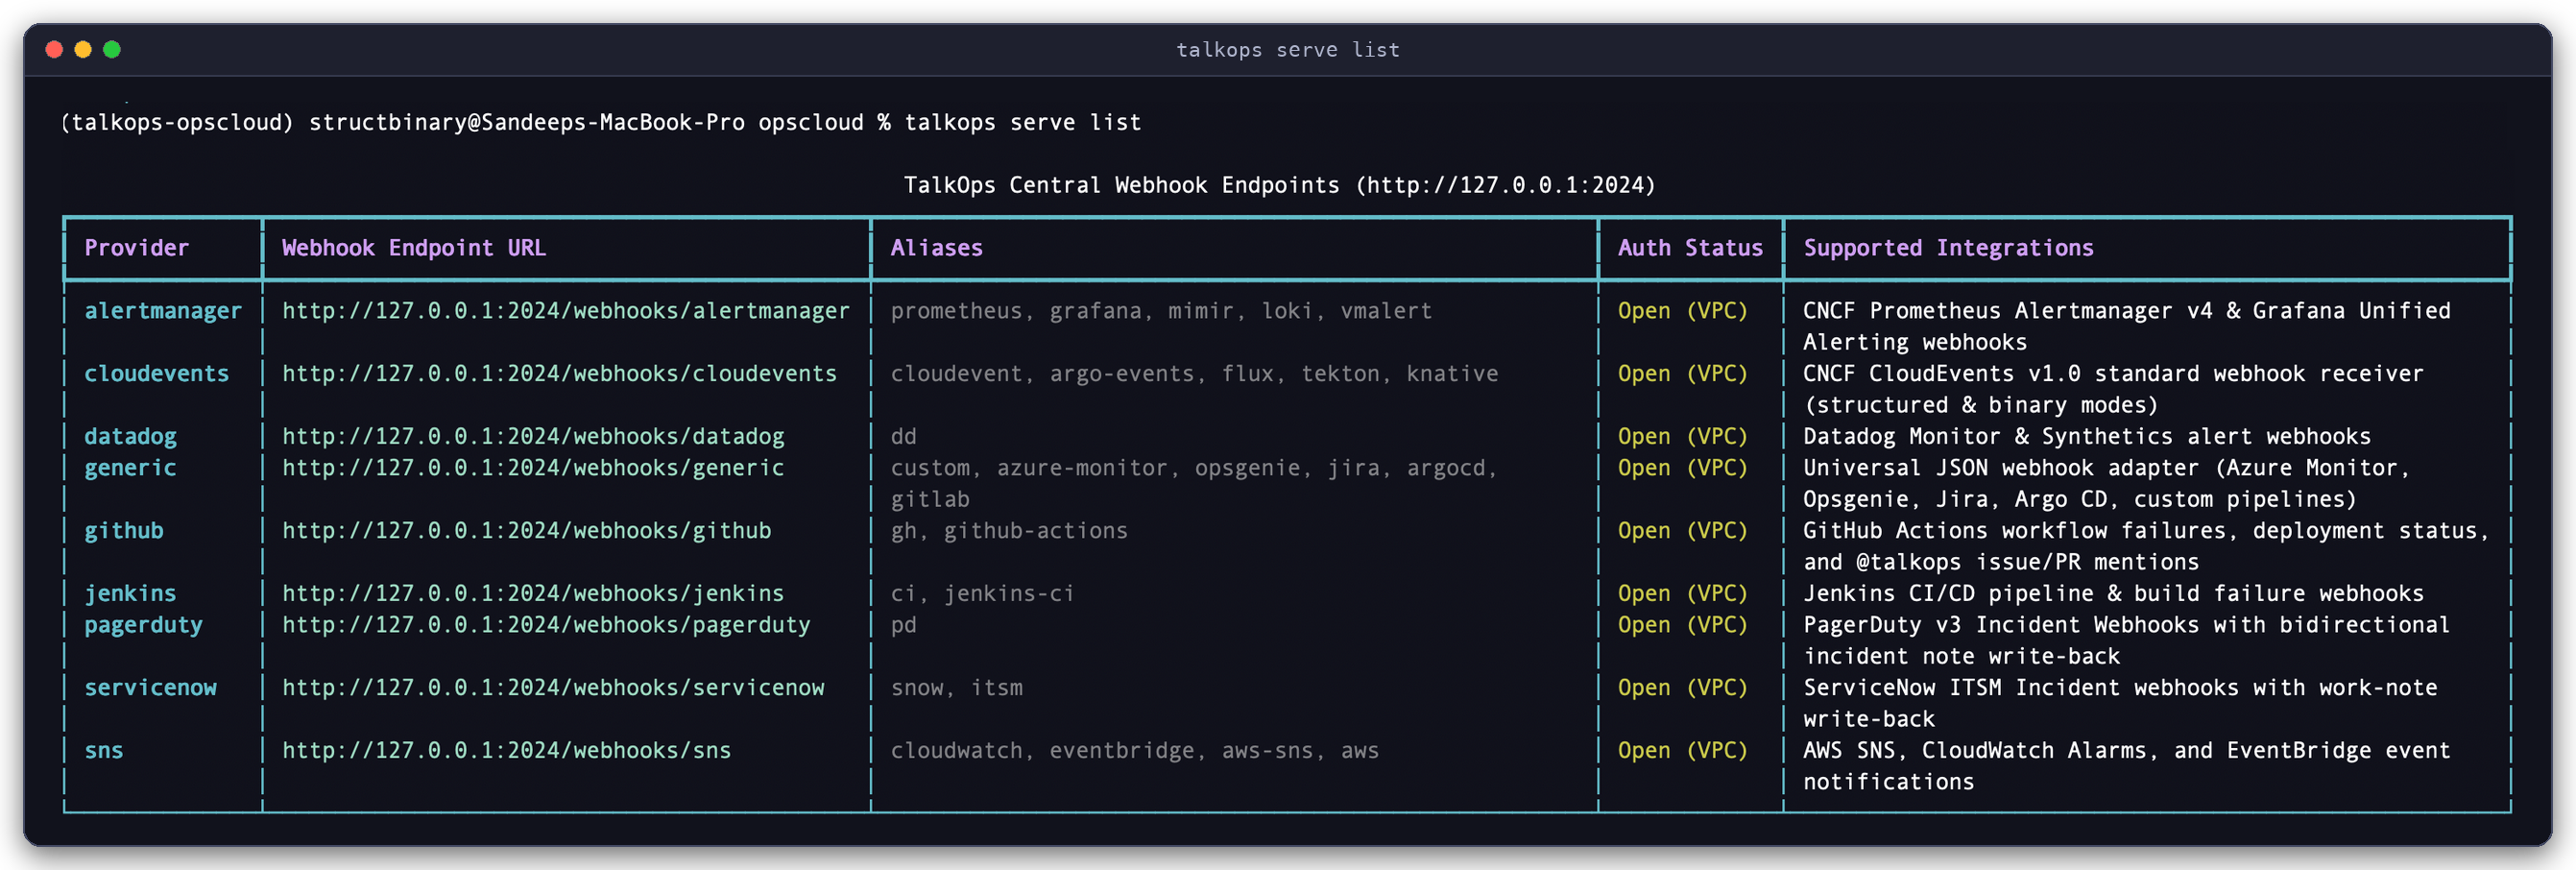
Viewing Webhook URLs (talkops serve list): Listing all 9 built-in alert and CI/CD integrations ready to receive events on port 2024.
---
## Step 2: Connect from Your Terminal
Once the server is running, anyone on your team can connect their local `talkops` CLI to it. You get the exact same interactive terminal experience as running locally, except all the heavy lifting happens on the central server.
### Connect directly
Pass `--server-url` when starting `talkops`:
```bash
talkops --server-url http://localhost:2024
```
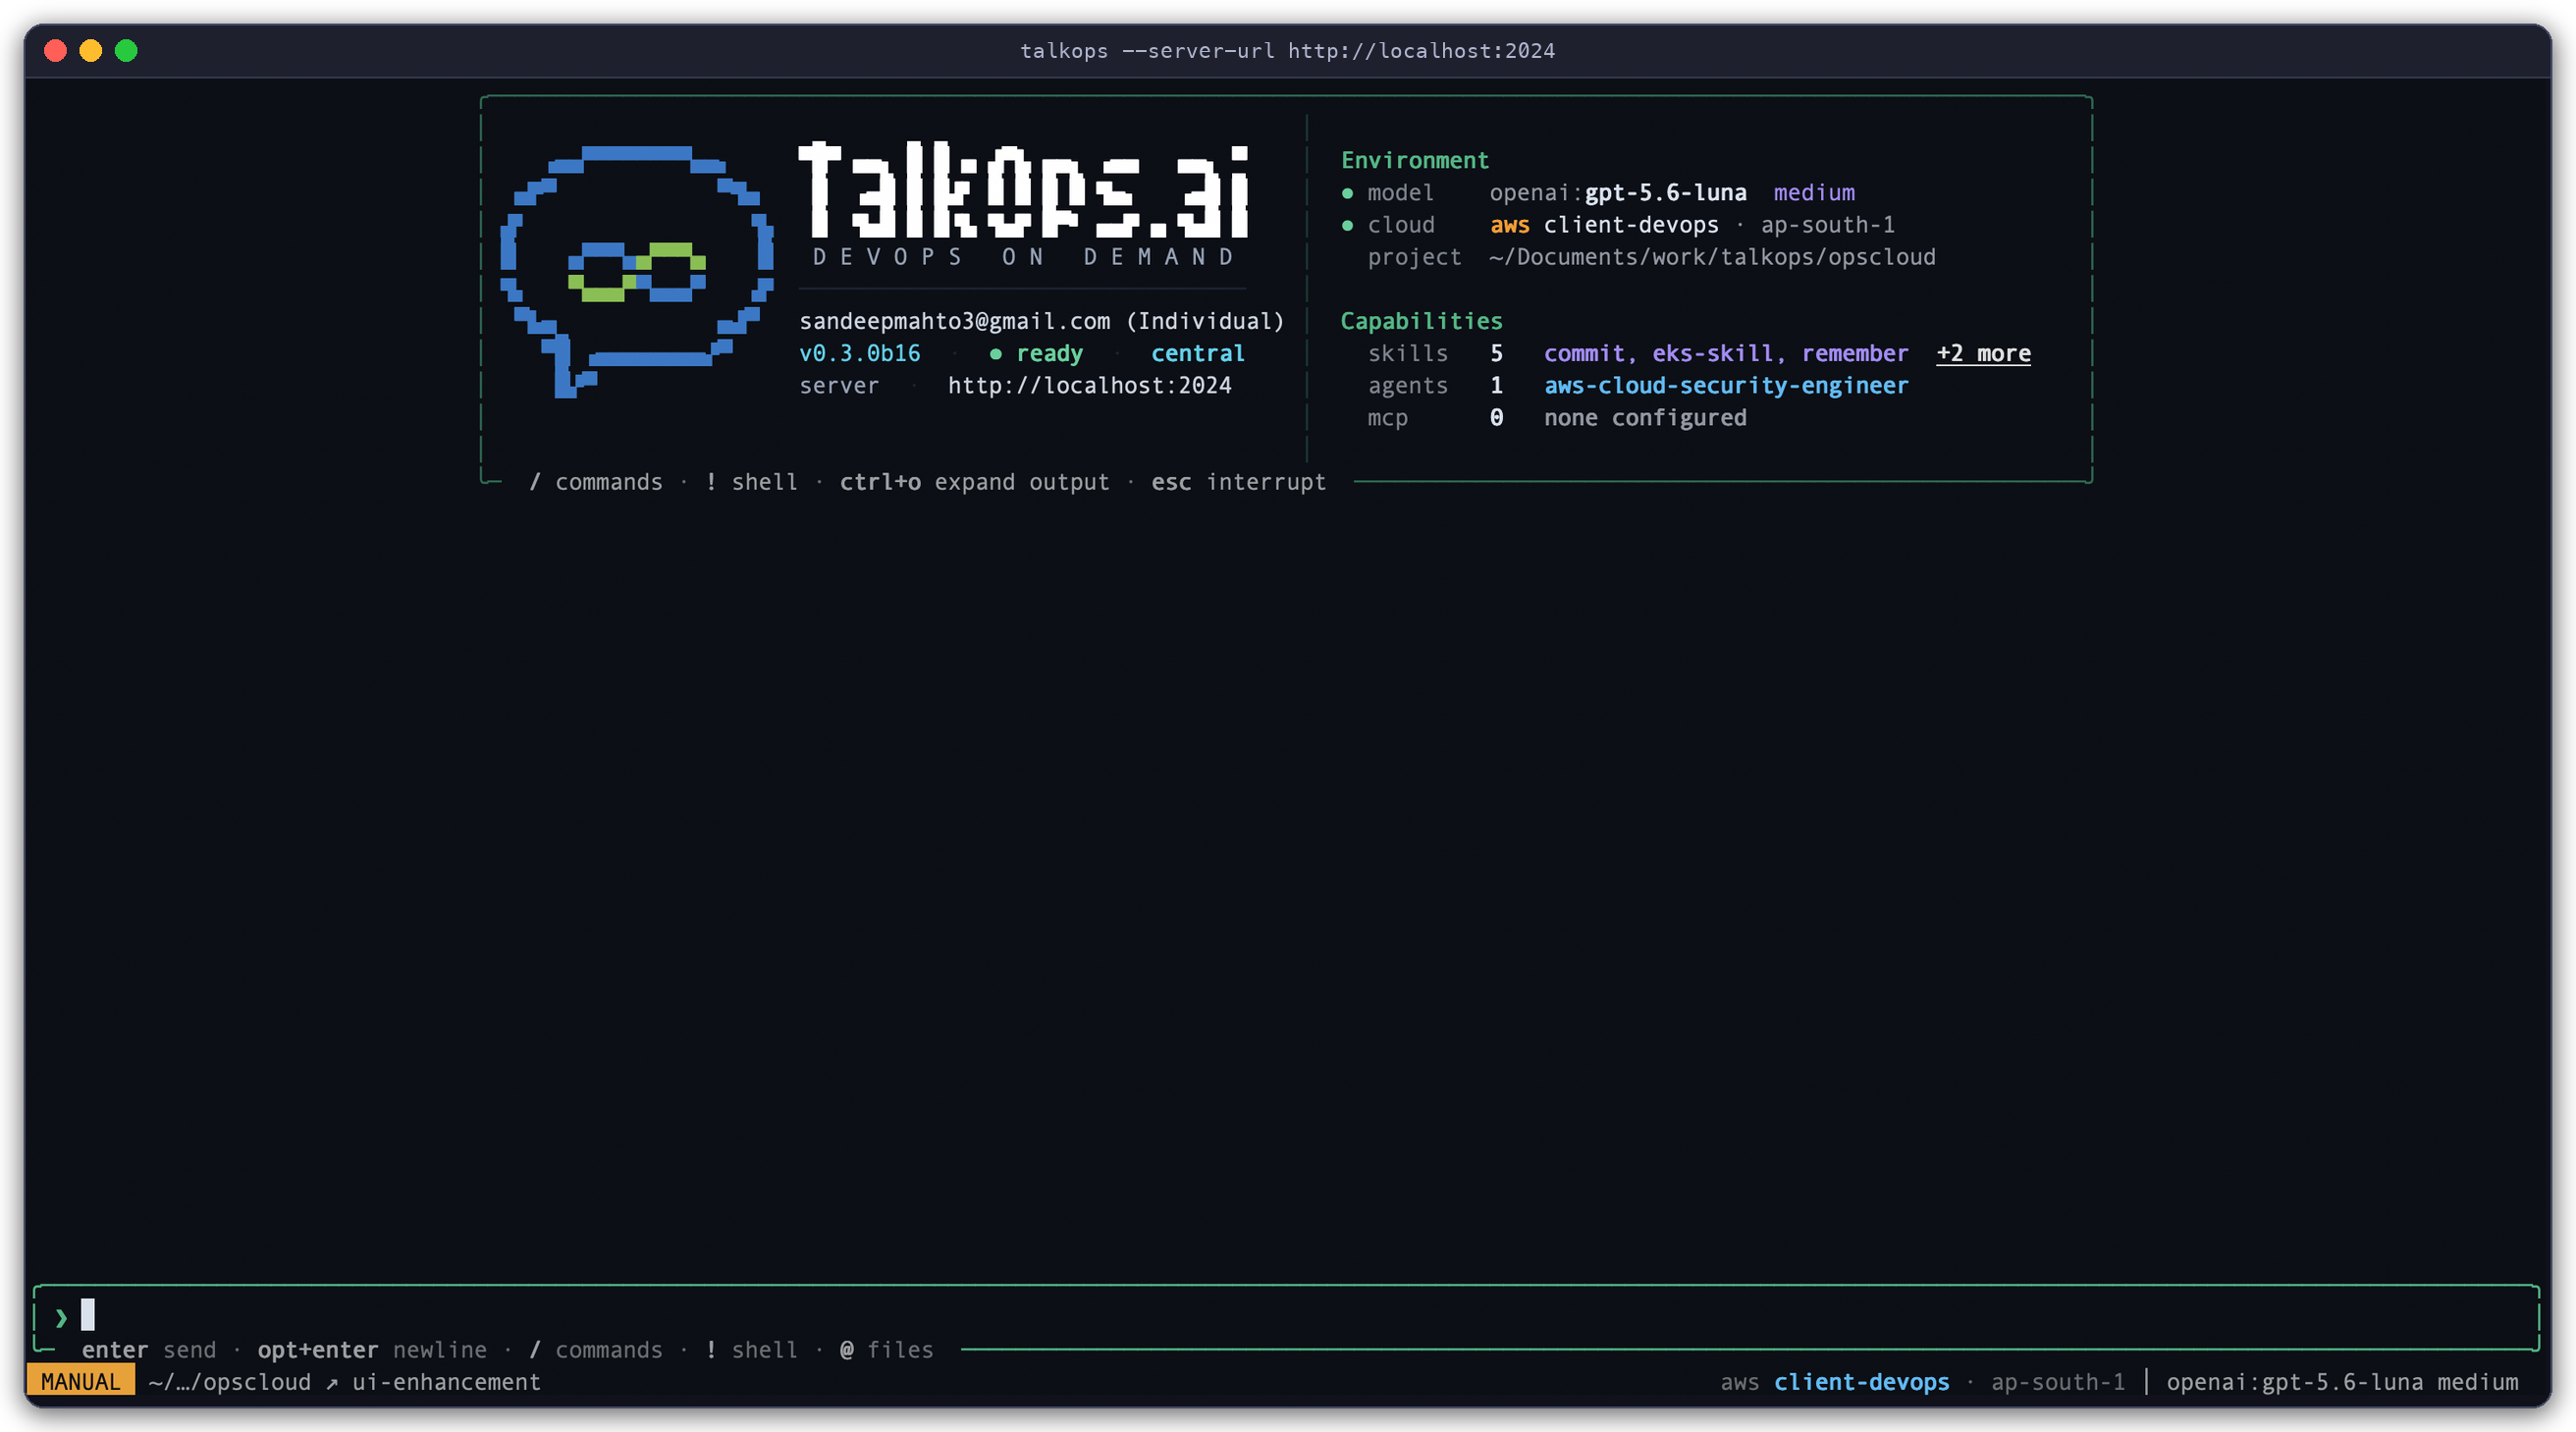
Connected to the Central Server (talkops --server-url http://localhost:2024): Notice the left side of the welcome banner—it shows v0.3.0b16 · ● ready · central and server · http://localhost:2024 so you always know you are connected to a central server rather than running locally (which shows local).
### Save your server login (so you don't have to type flags every time)
Instead of passing `--server-url` and `--api-key` on every command, sign in once:
```bash
talkops auth login \
--server-url http://talkops.internal:2024 \
--api-key oc_live_9f8e7d6c5b4a... \
--user-id alice
```
You can verify your saved connection at any time with:
```bash
talkops auth status
```
---
## Step 3: Work Together on Investigations
Connecting to a central server makes it easy to hand off work between teammates or inspect automated runs:
```bash
# 1. Open an interactive session as yourself
talkops --server-url http://talkops.internal:2024 --user-id alice
# 2. Jump straight into an existing conversation (or an automated alert investigation) by its ID
talkops --server-url http://talkops.internal:2024 -r 4e8b12a0
# 3. Run a one-off check from a CI/CD pipeline using the central server
talkops -p "Check if all pods in production are healthy after deployment" \
--server-url http://talkops.internal:2024
```
### Helpful commands inside the Terminal UI
While connected to the central server, you can use these slash commands in the chat box:
- **`/threads`** *(or `/resume`)* — Browse and switch between your past conversations and shared alert investigations.
- **`/fork`** — Make a copy of the current conversation so you can test a fix or explore a theory without interrupting a teammate who is looking at the same thread.
- **`/compact`** — Summarize a long conversation to free up context space.
- **`/tasks`** — Watch or stop long-running background commands running on the server.
---
## Choosing a Server Mode (`--profile`)
By default, `talkops serve` turns on everything you need: team sign-in, interactive terminal connections, and incoming webhooks. If you run a larger environment and want to split those jobs across different servers, you can pick a profile with `--profile`:
| Profile | What It Runs | When to Use It |
| :--- | :--- | :--- |
| **`default`** | Team connections + Webhooks | Best for most teams. One server handles both engineer terminals and incoming alerts. |
| **`api-only`** | Team connections only | Use when you want a dedicated server just for engineers and CI pipelines (no webhooks). |
| **`webhook-worker`** | Webhooks only | Use when you want dedicated background servers that only process incoming alerts. |
| **`enterprise-full`** | Everything + Enterprise Addons | Enables all built-in features plus any extra enterprise or custom addons you have installed. |
```bash
# Example: Run a server dedicated only to engineer terminal sessions
talkops serve --profile api-only --port 2024 --postgres-uri "$TALKOPS_POSTGRES_URI"
```
Installing or creating custom server addons (Optional)
If your team wants to add custom features to the server—such as a custom Slack bot or an internal audit logger—you can manage server addons with `talkops addon`:
```bash
# List available addons
talkops addon list
# Start the server with a custom Python addon or an addons.json config file
talkops serve --custom-addon ./addons/audit_sink.py:AuditSinkAddon
talkops serve --addons-config ./.talkops/addons.json
```
---
## Common `talkops serve` Options
| Option | Environment Variable | Default | What It Does |
| :--- | :--- | :--- | :--- |
| `start` / `list` / `addons` | — | `start` | `start` launches the server; `list` shows webhook URLs; `addons` shows enabled server features. |
| `--host ` | `TALKOPS_WEBHOOK_HOST` | `0.0.0.0` | Network address the server listens on. |
| `--port ` | `TALKOPS_WEBHOOK_PORT` | `2024` | Main port for client connections and webhooks. |
| `--webhook-port ` | — | Same as `--port` | Optional separate port just for incoming webhooks. |
| `--postgres-uri ` | `TALKOPS_POSTGRES_URI` | SQLite | PostgreSQL database URL for saving team conversations and memory. |
| `--approval-mode ` | `TALKOPS_APPROVAL_MODE` | `smart` | Controls how commands are approved (`smart`, `auto`, or `manual`). |
| `--read-only` / `--dry-run` | `TALKOPS_READ_ONLY` | `False` | Safe mode—allows the AI to inspect resources but blocks any changes or deletions. |
| `-M`, `--model ` | `TALKOPS_MODEL` | Configured default | Sets the default AI model used by the server (for example, `anthropic:claude-sonnet-4-5`). |
| `--aws-profile` / `--aws-region` | `AWS_PROFILE` / `AWS_REGION` | Configured default | Sets the default AWS profile and region for server runs. |
| `--profile ` | — | `default` | Chooses which server features to run (`default`, `api-only`, `webhook-worker`, `enterprise-full`). |
| `-V` / `-q` | `TALKOPS_LOG_LEVEL` | `INFO` | `-V` shows detailed debug logs; `-q` hides live log output in the terminal. |
Advanced: How Server Authentication & HTTP Endpoints Work
### How authentication works under the hood
When you connect with an API key (`talkops auth login` or `--api-key`), TalkOps automatically exchanges your long-lived API key at `POST /api/v1/auth/token` for a short-lived session token (15-minute JWT) and renews it in the background.
For self-hosted teams without an external auth service, you can configure per-user API keys directly on the server using `TALKOPS_SERVER_API_KEYS`:
```bash
export TALKOPS_SERVER_API_KEYS="alice:oc_live_key_for_alice,bob:oc_live_key_for_bob"
talkops serve --port 2024
```
### Built-in HTTP Endpoints
If you are integrating external tools or load balancer health checks with `talkops serve`, these are the main HTTP endpoints exposed by the server:
| Endpoint | Purpose |
| :--- | :--- |
| `GET /api/v1/server/info` | Returns server status, storage type (`postgres` or `sqlite`), and active addons. |
| `GET /api/v1/addons` | Returns health status for all enabled server addons. |
| `POST /api/v1/auth/token` | Exchanges an API key for a short-lived session token. |
| `GET /api/v1/threads` | Lists saved conversations for the signed-in user (plus shared webhook threads). |
| `POST /api/v1/threads/{id}/fork` | Creates a copy of a conversation so another engineer can branch off safely. |
| `GET /webhooks/health` | Health check endpoint (`{"status": "ok"}`) for load balancers and Kubernetes probes. |
| `POST /webhooks/{provider}` | Receives incoming alerts from `pagerduty`, `alertmanager`, `datadog`, `github`, `jenkins`, `servicenow`, `sns`, `cloudevents`, or `generic`. |
---
## Next Steps
- **[Webhooks & Event-Driven Automation](webhooks.md)** — Connect PagerDuty, Alertmanager, Datadog, AWS SNS, ServiceNow, Jenkins, and GitHub to your server
- **[Approval Modes & Jev Smart Mode](approval-mode.md)** — Learn how Smart Mode keeps automated runs safe while lowering AI model costs
- **[CLI & Slash Command Reference](cli-reference.md)** — Everyday command guide for the terminal and chat box
- **[Credentials & Authentication](credentials.md)** — Set up AI provider keys, team login, and cloud access