Instituto Superior Técnico, Universidade de Lisboa
**Network and Computer Security**
# Lab guide: Implementation and Analysis of a Virtual Computer Network
This guide covers the implementation and analysis of virtual computer networks.
It focuses on setting up networks using VirtualBox or VMWare, understanding TCP/IP packet flow, and network address translation (NAT).
## Goals
- Implement and test a virtual computer network;
- Perform a simple TCP/IP packet analysis.
## 1. Virtualization tool
The setup of the machines and networks for this lab has is different depending on the usage of VirtualBox or VMWare on your machine.
Both have similar options but there are differences.
When these differences are relevant, we will have separate subsections with letter A and B, respectively.
Please follow the instructions according to your environment.
If you are unable to use VirtualBox or VMware Fusion, then you still have the option of using an earlier version of the VM, at an RNL lab located in the Alameda campus.
If you require this option, please contact faculty for additional `rnl-virt` specific materials.
## 2. Setup machines and networks
To set up the lab environment, you need to have three instances of your VMs, as represented in Figure 1.
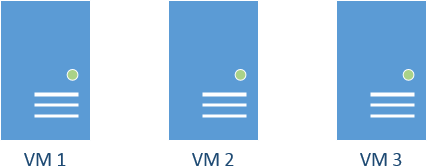
*Figure 1. In this lab, you must make three virtual machines to study how they communicate in virtual networks and to check how they send data packets.*
We will clone (copy) the existing machine `VM1`.
Alternatively, you can [install two new machines from scratch](https://github.com/tecnico-sec/Setup/), but this will take longer and is not recommended.
## 2.1. Clone virtual machines
### 2.1.A VirtualBox
If you decide to clone the existing machine you should:
- Click `Clone`
- Select the name you want to give to the new machine
- MAC Adress Policy: Generate new MAC addresses for all network adapters
- Select `Linked Clone`
Repeat this process twice and call the machines `VM2` and `VM3`.
### 2.1.B VMWare Fusion
If you decide to clone the existing machine you should:
- Shutdown the virtual machine you want to clone (shutdown, not suspend).
- Open VMWare Fusion and right click on the machine you want to clone.
- Select create linked clone (uses less space)
- Store it at `//Virtual Machines` (default).
## 2.2. Set up the networks
The intended topology of our network is shown in Figure 2, with VM2 also connected to the Internet (with an IP address obtained via DHCP).
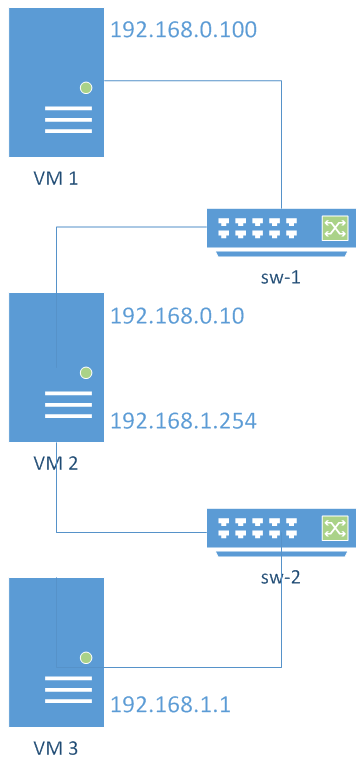
*Figure 2. Intended network layout. VM1 and VM2 are connected in a virtual network via switch `sw-1`. VM2 and VM3 are connected in another virtual network via switch `sw-2`. VM2 will operate as a gateway between the two subnets, and as a gateway to the Internet.*
DHCP (Dynamic Host Configuration Protocol) is a network management protocol used to automatically assign IP addresses and other network configuration details to devices on a network.
It allows devices to join a network seamlessly without manual configuration.
### 2.2.A VirtualBox
To connect VM1 and VM2 in the same network is to do the following in the VirtualBox interface with the VM turned off:
- Select the VM Settings/Network/Adapter1
- Attach to `Internal Network`. Call it "sw-1"
- Promiscuous Mode: Allow VMs
Note that if you are using VirtualBox version >= 7.1.0, make sure you select the `Expert` column in the VM settings to view all network adapters.
Repeat for VM2 and VM3 but this time creating a second Network adapter in VM2 and calling the `Internal Network` "sw-2".
Finally, create a third network adapter in VM2 that is `nat`-ed with your physical address.
This interface will be used to access the Internet.
### 2.2.B VMWare Fusion
For VMWare Fusion, you need to create two private networks manually before attaching the adapters to your newly-created VMs.
- Close VMWare Fusion (the easiest way is to click on a VMWare Fusion window and hit ⌘+Q);
- Edit the following file:
```sh
sudo nano /Library/Preferences/VMware\ Fusion/networking
```
- Add the following lines to the file:
```plaintext
answer VNET_2_HOSTONLY_NETMASK 255.255.255.0
answer VNET_2_HOSTONLY_SUBNET 192.168.0.0
answer VNET_3_HOSTONLY_NETMASK 255.255.255.0
answer VNET_3_HOSTONLY_SUBNET 192.168.1.0
```
- You can add them right after the last `answer VNET_1...` line.
- Very important: do NOT edit anything else on this file. VMWare reserves `vmnet1` and `vmnet8` for its own use, and you should not change those.
- In this topology, `vmnet2` represents `sw-1`, the network between VM1 and VM2, and `vmnet3` represents `sw-2`, the network between VM2 and VM3.
- Save and exit;
- Re-open VMWare Fusion and head to the Virtual Machine Library (⌘+⇧+L);
- Right-click VM1 and select `Settings`:
- Click `Add Device` and select `Network Adapter`;
- Select `vmvnet2`;
- Click `Advanced Options` and hit `Generate` to generate a new MAC address for VM1;
- Right-click VM2 and select `Settings`:
- Click `Add Device` and select `Network Adapter`;
- Select `vmvnet2`;
- Select `Show All` and select `Network Adapter` once again and add a second adapter, this time selecting `vmvnet3`;
- Once again, click `Show All`, `Network Adapter`, and add a third adapter, this time selecting `Share with my Mac`, which is a NAT adapter, allowing VM2 to communicate with the Internet;
- Click `Advanced Options` and hit `Generate` to generate a new MAC address for VM2;
- Right-click VM3 and select `Settings`:
- Click `Add Device` and select `Network Adapter`;
- Select `vmvnet3`;
- Click `Advanced Options` and hit `Generate` to generate a new MAC address for VM3.
If you want to know more about this process or troubleshoot, please refer to [this guide](https://spin.atomicobject.com/2017/04/03/vmware-fusion-custom-virtual-networks/).
## 2.3. Configure the machines to use the virtual networks
We will now configure the machines to the virtual network that connects VM1 to VM2 and the one that connects VM2 and VM3.
### 2.3.1. Configure the virtual network for VM1 and VM2
We will now configure the IP network (supported by virtual switch `sw-1`) with static IP addresses.
VM1 and VM2 will talk using a subnet.
We will use the private IP addresses `192.168.0.0/24` (meaning that the subnet mask is `255.255.255.0` – we can have 254 addresses to use, from `192.168.0.1` to `192.168.0.254`).
Note that `192.168.0.255` is reserved for broadcast.
Figure 3 presents an overview of the desired configuration.
The IP address of `VM1` will be `192.168.0.100` and `VM2` will be `192.168.0.10`.
The values ending with `100` and `10` are arbitrary, they could be any (different) value between `1` and `254`.
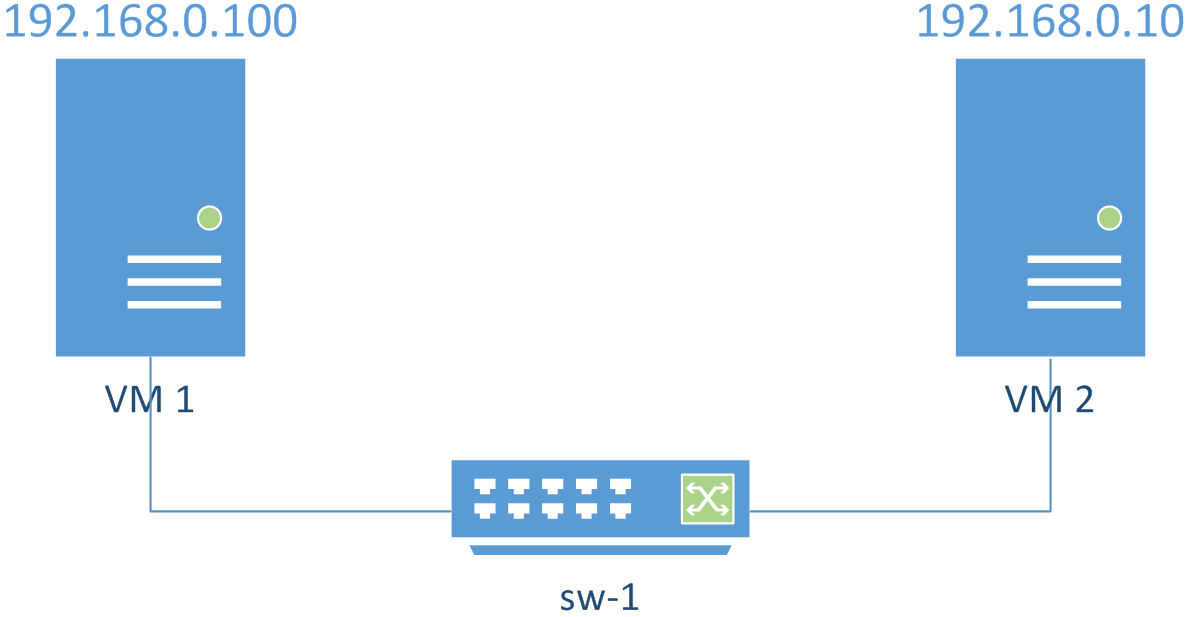
*Figure 3 Expected layout of the subnet in which VM1 and VM2 will communicate using `sw-1`.*
Follow the configuration procedure below for both VM1 and VM2.
We are assuming that VM1 has an interface `eth0` (connected to `sw-1`) and VM2 has interfaces `eth0` (connected to `sw-1`), `eth1` (connected to `sw-2`), and `eth2` (connected to the internet).
These `eth...` values are the network interface names and are automatically assigned by the operating system, so they may be different in your case.
Given this, it is a good idea to take note and map each interface to each switch as you complete the guide.
- For VM1, the mapping is simple:
- `eth0` is connected to `sw-1`
- For VM3, it is the same case:
- `eth0` is connected to `sw-2`
- For VM2, the mapping is a bit more elaborate:
- `eth0` should be connected to `sw-1`;
- `eth1` should be connected to `sw-2`;
- `eth2` should be connected to the Internet;
- But this may not always be the case, so try to switch these around until you suceed.
In VirtualBox, you can look at MAC addresses to know which interface is connected to `sw-1` and which one is connected to `sw-2`.
Running `ip a` shows the MAC address of each interface and you can compare with those of VirtualBox.
First, assign an IP address to VM1 on interface `eth0`.
```sh
$ sudo ifconfig eth0 192.168.0.100/24 up
```
And do the same for VM2 (again, note that the interface name may be different)
```sh
$ sudo ifconfig eth0 192.168.0.10/24 up
```
Now running `ifconfig` on the VMs should show the respective assigned IP addresses on interface `eth0`.
If not, try to reload the network interfaces of both VM1 and VM2:
```sh
$ sudo systemctl restart NetworkManager
$ sudo systemctl enable NetworkManager
$ sudo systemctl start NetworkManager
```
To check that the configuration is correct:
```sh
$ ifconfig
$ route
```
VM2 should now be able to ping VM1:
```sh
$ ping 192.168.0.100
```
And VM1 should be able to ping VM2:
```sh
$ ping 192.168.0.10
```
### 2.3.2. Configure the virtual network for VM2 and VM3
We will now configure the IP network (supported by virtual switch `sw-2`) with static IP addresses.
VM2 and VM3 will talk using another subnet.
We will use the private IP addresses `192.168.1.0/24`.
Figure 4 presents the intended configuration.
The IP address of VM2 will be `192.168.1.254` and the address of VM3 will be `192.168.1.1`.
Again, `254` and `1` are arbitrary values between `1` and `254`.
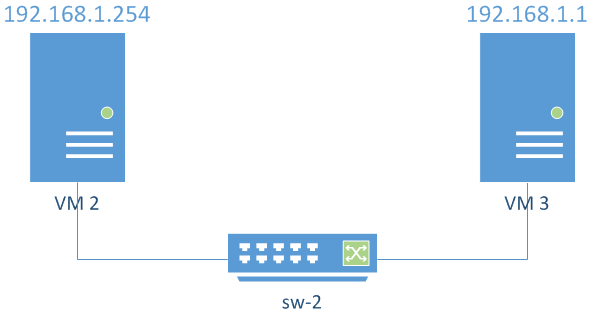
*Figure 4 Expected layout of the subnet in which VM2 and VM3 will communicate using `sw-2`.*
In VM3, assign the IP address `192.168.1.1` to interface `eth0`.
In VM2 assign the IP address `192.168.1.254` to interface `eth1` (recall that interface `eth0` of VM2 should be connected to `sw-1` and interface `eth1` of VM2 should be connected to `sw-2`).
The command `ifconfig` should define default routes for those networks.
You can check it with command `route`.
To finish creating this network, reload the network interfaces of both VM2 and VM3:
```sh
$ sudo systemctl restart NetworkManager
$ sudo systemctl enable NetworkManager
$ sudo systemctl start NetworkManager
```
To check that the configuration is correct:
```sh
$ ifconfig
$ route
```
VM2 should now be able to ping VM3:
```sh
$ ping 192.168.1.1
```
VM3 should now be able to ping VM2:
```sh
$ ping 192.168.1.254
```
Try to ping VM3 from VM1:
```sh
$ ping 192.168.1.1
```
It should return *Network is unreachable* because VM1 does not know where to send the packets addressed at network `192.168.1.X`.
## 2.4. Configure VM2 as gateway
Defining a *default gateway* means that whenever a machine does not have a specific route for a given network, those packets are sent to its default gateway.
Since VM2 will be the default gateway for VM1, IP forwarding must be enabled in VM2.
This will allow VM1 to communicate with machines outside its subnet `192.168.0.X`.
Activate IP forwarding with:
```sh
$ sudo sysctl net.ipv4.ip_forward=1 # on VM2
```
Confirm that the flag value was updated to `1`:
```sh
$ sysctl net.ipv4.conf.all.forwarding
```
Also, setup forwarding rules in VM2:
```sh
$ sudo iptables -P FORWARD ACCEPT # Defines default policy for FORWARD
$ sudo iptables -F FORWARD # Flushes all the rules from chain FORWARD
```
Now set VM2 as the default gateway for VM1 by doing this:
```sh
$ sudo ip route add default via 192.168.0.10 # on VM1
```
Try again to ping VM3 from VM1.
```sh
$ ping 192.168.1.1 # on VM1
```
Does it work? Can you identify where the problem is?
Run the commands below and see if you can understand what is happening.
```sh
$ sudo tcpdump -i eth0 # on VM1
$ sudo tcpdump -i eth0 # on VM2
$ sudo tcpdump -i eth1 # on VM2
$ sudo tcpdump -i eth0 # on VM3
```
What happens now when you ping VM1 from VM3?
Why is the answer different?
Now set VM2 also as the default gateway for VM3.
This will allow VM3 to talk to machines outside its subnet `192.168.1.X`.
```sh
$ sudo ip route add default via 192.168.1.254 # on VM3
```
Can you now ping VM3 from VM1?
Why?
And can you ping VM1 from VM3?
Why?
## 2.5. Configure NAT (Network Address Translation)
Try to ping `google.com` from the three machines?
Why can you not do it from VM1 nor VM3?
The issue is that VM2 is acting as the gateway to the Internet for both VM1 and VM3 but is not NATing the packets.
If you run:
```sh
$ ping 8.8.8.8 # on VM1
$ sudo tcpdump -i eth2 -p icmp # on VM2 (interface to the Internet)
```
You can observe that the packets go out to `google.com` but do not come back.
Why?
Because `google.com` does not know where `192.168.0.100` is and so cannot send the packets back.
To correct this behavior, we will need NAT.
Network Address Translation (NAT) is a method used in networking to modify network address information in packet headers while in transit.
This allows multiple devices on a private network to share a single public IP address.
NAT allows private network users to access the Internet and can also enhance security by hiding internal IP addresses.
You can use the `iptables` command to set up, maintain, and inspect IP packet filter rules in the Linux kernel (see `man iptables` for more information).
Run the following commands in VM2 to have NAT do the source and destination mapping:
```sh
$ sudo iptables -t nat -F # Flushes all the rules from table NAT
$ sudo iptables -t nat -A POSTROUTING -o eth2 -j MASQUERADE # Creates a source NAT on interface eth2
```
Test again:
```sh
$ ping 8.8.8.8 # on VM1
$ sudo tcpdump -i eth2 -p icmp # on VM2 (interface to the Internet)
```
What do you observe?
Why does it work now?
What is the source address of the packet now?
Compare this source address to the previous case.
Can you retry pinging `google.com` from VM1 and VM3? Why can you still not do it, even though pinging 8.8.8.8 works?
What is happening is the domain name `google.com` is not being resolved to an IP address.
To correct this behavior, we will need to add a DNS server to the configuration of VM1 and VM3.
Edit the file `/etc/resolv.conf` and add the following line (replace any other `nameserver` line that may exist):
```plaintext
nameserver 8.8.8.8
```
Let us now go back to the scenario where VM2 is the default gateway for VM1 but where **VM3 has no default gateway**.
To remove the default gateway run in VM3:
```sh
$ sudo route del default # on VM3
```
As seen before you cannot ping VM3 from VM1.
Could you solve this issue with a NAT (in interface `eth1` of VM2) instead of adding VM2 as the default gateway for VM3?
Why?
And can you ping VM1 from VM3?
Why?
## 3. Monitor network traffic
To monitor the network traffic, we may use VM2 (or another machine, e.g. a VM4, also connected to the network) to run `tcpdump` and capture all network traffic.
Make sure you can detect ICMP packets originating at VM3 and with destination VM1 (using the `ping` command).
Use `tcpdump` with options `-X` and `-XX` and identify the IP addresses, MAC addresses and protocol in a given packet.
While still running `tcpdump`, open a `telnet` connection between VM1 and VM3 using user `kali` and password `kali` (adjust if different).
Verify that you can capture both the username and password with `tcpdump`.
Note: If you have trouble using `telnet`, visit the [troubleshooting section](#6.-Troubleshooting).
**You have successfully eavesdropped communications... but what is the difference between executing telnet from VM1 to VM3 with and without NAT (in interface `eth1` of VM2)? Use `tcpdump` to analyse the output and compare the differences.**
You might want to run:
```sh
$ sudo tcpdump -i eth0 # on VM1
$ sudo tcpdump -i eth0 # on VM2
$ sudo tcpdump -i eth1 # on VM2
$ sudo tcpdump -i eth0 # on VM3
```
## 4. Make changes permanent
The changes you made before will be lost once you perform a reboot of your machine.
In order to make them permanent you have to edit the corresponding `/etc/network/interfaces` file.
On VM1:
```plaintext
source /etc/network/interfaces.d/*
# The loopback network interface and sw-1 interface
auto lo eth0
iface lo inet loopback
# sw-1 interface
iface eth0 inet static
address 192.168.0.100
netmask 255.255.255.0
gateway 192.168.0.10
```
On VM2:
```plaintext
source /etc/network/interfaces.d/*
# The loopback network interface, sw-1 interface and sw-2 interface
auto lo eth0 eth1
iface lo inet loopback
# sw-1 interface
iface eth0 inet static
address 192.168.0.10
netmask 255.255.255.0
# sw-2 interface
iface eth1 inet static
address 192.168.1.254
netmask 255.255.255.0
```
On VM3:
```plaintext
source /etc/network/interfaces.d/*
# The loopback network interface and sw-2 interface
auto lo eth0
iface lo inet loopback
# sw-2 interface
iface eth0 inet static
address 192.168.1.1
netmask 255.255.255.0
gateway 192.168.1.254
```
You should also enable IP forwarding permanently on VM2.
For that you need to edit `/etc/sysctl.conf` and uncomment or add the following line:
```plaintext
net.ipv4.ip_forward=1
```
Apply this change to any other files in `/etc/sysctl.d/` that may be imported in the previous `/etc/sysctl.conf` file.
To make the `iptables` rules persistent, in VM2 install `iptables-persistent` (select "yes" to save current rules):
```sh
$ sudo apt update
$ sudo apt install iptables-persistent
```
To save the current `iptables` rules, do:
```sh
# FOR IPv4
$ sudo sh -c 'iptables-save > /etc/iptables/rules.v4'
# FOR IPv6
$ sudo sh -c 'ip6tables-save > /etc/iptables/rules.v6'
```
To automatically apply the saved `iptables` rules on boot, you need to enable the `netfilter-persistent.service`. Run the following command:
```sh
$ sudo systemctl enable netfilter-persistent.service
```
## 5. Conclusion
This lab guide focused on the setup and analysis of virtual computer networks using VirtualBox or VMWare.
It started by cloning virtual machines.
Then, it moved to setting up network connections between two groups of machines: machine 1 with machine 2, and machine 2 with machine 3.
Next, machine 2 was configured as a gateway for network communication and Internet access using IP forwarding and NAT (Network Address Translation).
The guide also included monitoring network traffic.
In the end, it showed how to save these network settings permanently.
## 6. Troubleshooting
### 6.1. Enable Telnet
In the Kali Linux image, it may be necessary to enable the `telnet` service. This will allow a machine to act as a `telnet` server. To do this, you can run the following instructions:
First, install the required services:
```sh
sudo apt update
sudo apt install xinetd telnetd telnet -y
```
Then, edit the `/etc/xinetd.d/telnet` file with your favorite text editor with superuser privileges (e.g. `sudo nano /etc/xinetd.d/telnet`), and add the following configuration:
```plaintext
service telnet
{
disable = no
flags = REUSE
socket_type = stream
wait = no
user = root
server = /usr/sbin/telnetd
log_on_failure += USERID
}
```
Finally, restart the `xinetd` service:
```sh
sudo /etc/init.d/xinetd restart
```
If you want to enable `xinetd` to start automatically on boot along with `telnet`, run the following command:
```sh
sudo systemctl enable xinetd
```
You should now be able to use the machine as a `telnet` server. Test it with the following command, which should open a local `telnet`:
```sh
telnet localhost
```
### 6.2. Enable SSH
To access a machine via SSH, the SSH service must be enabled. To do this, you can run the following instructions:
First, start the SSH service:
```sh
sudo systemctl start ssh
```
Then, if you want to enable the SSH service to start automatically on boot, run the following command:
```sh
sudo systemctl enable ssh
```
Test it with the following command, which should open a local SSH session:
```sh
ssh localhost
```
----
[SIRS Faculty](mailto:meic-sirs@disciplinas.tecnico.ulisboa.pt)