# PyEvoc Documentation
PyEvoc is a Python package for corpus-based representational analysis grounded in the EVOC (Étude des VOCabulaire) framework. It processes social-media or text corpora through a modular pipeline that ends in visual outputs showing how words and emojis are distributed across conceptual zones.
---
## Table of Contents
1. [Installation](#installation)
2. [Pipeline Overview](#pipeline-overview)
3. [Step-by-Step Guide](#step-by-step-guide)
- [Step 1 – Import PyEvoc](#step-1--import-pyevoc)
- [Step 2 – Load and standardise the dataset](#step-2--load-and-standardise-the-dataset)
- [Step 3 – Language filtering](#step-3--language-filtering)
- [Step 4 – Thematic filtering](#step-4--thematic-filtering)
- [Step 5 – Corpus statistics](#step-5--corpus-statistics)
- [Step 6 – Text cleaning](#step-6--text-cleaning)
- [Step 7 – Linguistic annotation](#step-7--linguistic-annotation)
- [Step 8 – Emoji assignment](#step-8--emoji-assignment)
- [Step 9 – Structural foregrounding and positional salience](#step-9--structural-foregrounding-and-positional-salience)
- [Step 10 – Unigram selection](#step-10--unigram-selection)
- [Step 11 – Compute AFE/AOE indices](#step-11--compute-afeaoe-indices)
- [Step 12 – Concreteness labelling](#step-12--concreteness-labelling)
- [Step 13 – Emoji labelling](#step-13--emoji-labelling)
- [Step 14 – EVOC quadrants](#step-14--evoc-quadrants)
- [Step 15 – Collocations and Named Entities](#step-15--collocations-and-named-entities)
- [Step 16 – Temporal stability](#step-16--temporal-stability)
- [Step 17 – Visualisations](#step-17--visualisations)
4. [Output Reference](#output-reference)
---
## Installation
**From source (recommended for development):**
```bash
git clone https://github.com/text-lab/pyevoc.git
cd pyevoc
pip install -e .
```
The `-e` flag installs in editable mode so any local changes are immediately available.
**Directly from GitHub:**
```bash
pip install git+https://github.com/text-lab/pyevoc.git
```
**Optional dependencies:**
```bash
pip install lingua-language-detector # for secondary language validation
```
Stanza language models (required for annotation):
```python
import stanza
stanza.download("en")
```
---
## Pipeline Overview
The pipeline follows this module structure:
```
pyevoc.data → load and standardise the corpus
pyevoc.preprocessing → language filtering, thematic filtering,
cleaning, annotation
pyevoc.features → salience, term indices, emoji & concreteness labels
pyevoc.analysis → EVOC quadrants, collocations, temporal stability
pyevoc.visualisation → maps, trees, Sankey diagrams
```
Each step produces an output dataframe that is passed to the next step. Intermediate results can be saved and reloaded, which is useful for long annotation runs.
---
## Step-by-Step Guide
### Step 1 – Import PyEvoc
Verify the package is importable and confirm which installation is being used:
```python
import os
import pandas as pd
import pyevoc
print("PyEvoc imported from:")
print(pyevoc.__file__)
```
> **Tip:** Keep your dataset file, your anchor list, and your notebook in the same folder to simplify path management.
---
### Step 2 – Load and standardise the dataset
PyEvoc expects four columns with specific names:
| Standard name | Description |
|---|---|
| `user_id` | Author or account identifier |
| `doc_id` | Document or post identifier |
| `time` | Publication timestamp |
| `text` | Raw text content |
Map your own column names to these standards via `DatasetConfig`. Any extra columns in your source file are preserved.
**Example – mapping from a Twitter dataset:**
```python
from pyevoc.data.dataset import DatasetConfig, load_dataset
INPUT_FILE = "AGI.xlsx" # .csv, .tsv, .xlsx, .parquet, or .json
config = DatasetConfig(
column_map={
"account_ID": "user_id",
"tweet_ID": "doc_id",
"tweet_pub_time": "time",
"tweet_text": "text",
},
start_date="2022-10-01",
end_date="2025-05-01",
timezone="UTC",
drop_missing_text=True,
)
corpus = load_dataset(INPUT_FILE, config=config)
print(corpus.shape)
```
---
### Step 3 – Language filtering
PyEvoc uses a two-stage language identification workflow. The primary detector is **fastText** (`lid.176.bin`); an optional secondary validator uses **Lingua** for uncertain cases.
Supported languages: English, Italian, French, German, Spanish, Portuguese.
**Download the fastText model (first time only):**
```python
from pyevoc.preprocessing.language_filtering import download_fasttext_lid_model
model_path = download_fasttext_lid_model(compact=False)
```
**Apply filtering:**
```python
from pyevoc.preprocessing.language_filtering import (
LanguageFilterConfig,
filter_by_language,
)
lang_config = LanguageFilterConfig(
text_col="text",
target_language="en",
min_probability=0.90, # fastText confidence threshold
ambiguous_min_probability=0.50, # lower bound for Lingua fallback
ambiguous_max_probability=0.90, # upper bound for Lingua fallback
use_lingua_fallback=True,
lingua_min_confidence=0.80,
keep_probability=True,
keep_diagnostics=False,
verbose=False,
)
subcorpus_lin = filter_by_language(corpus, config=lang_config, model_path=model_path)
print(subcorpus_lin.shape)
```
> **Note:** Large corpora can take several minutes. Enable `verbose=True` to see progress.
---
### Step 4 – Thematic filtering
This step extracts a domain-specific subcorpus using an anchor term list. The anchor file is a plain `.txt` file with one term or phrase per line.
```python
from pyevoc.preprocessing.thematic_filtering import (
ThematicFilterConfig,
build_thematic_subset,
)
ANCHOR_FILE = "anchor.txt"
theme_config = ThematicFilterConfig(
text_col="text",
min_anchor_hits=1,
similarity_threshold=0.10,
min_expansion_hits=2,
max_features=50000,
lowercase=True,
ngram_range=(1, 2),
)
subcorpus_the, theme_metadata = build_thematic_subset(
subcorpus_lin,
anchor_file=ANCHOR_FILE,
config=theme_config,
)
print(subcorpus_the.shape)
```
> **Tip:** This step is optional. If your entire corpus is already domain-specific, you can skip it and pass `subcorpus_lin` directly to the next step.
---
### Step 5 – Corpus statistics
Get a descriptive summary of the filtered corpus before proceeding:
```python
from pyevoc.preprocessing.corpus_statistics import corpus_statistics
stats = corpus_statistics(
subcorpus_lin, # or subcorpus_the if thematic filtering was applied
text_col="text",
)
stats
```
---
### Step 6 – Text cleaning
Cleaning produces a new column `clean_text` in the dataframe:
```python
from pyevoc.preprocessing.cleaning import CleaningConfig, clean_corpus
clean_config = CleaningConfig(
lowercase=True,
remove_urls=True,
url_placeholder="URL",
expand_contractions=True,
space_emojis=True,
reduce_elongated_vowels=True,
space_punctuation=True,
show_progress=True,
)
corpus_clean = clean_corpus(
subcorpus_lin, # or subcorpus_the
text_col="text",
output_col="clean_text",
config=clean_config,
)
```
---
### Step 7 – Linguistic annotation
Annotation uses **Stanza** to produce a token-level dataframe with columns for token, lemma, UPOS tag, dependency relations, and positional metadata.
> **Prerequisite:** Download the Stanza English model once: `stanza.download("en")`
```python
from pyevoc.preprocessing import (
AnnotationConfig,
annotate_with_stanza,
)
ann_config = AnnotationConfig(
text_col="clean_text",
doc_id_col="doc_id",
user_col="user_id",
time_col="time",
language="en",
processors="tokenize,pos,lemma,depparse",
use_gpu=True,
batch_size=128,
save_parquet=True,
output_dir="annotated_outputs",
output_name="corpus_stanza_anno",
)
tokens_raw = annotate_with_stanza(corpus_clean, config=ann_config)
```
**Recovering from a saved annotation** (avoids re-running annotation):
```python
import pandas as pd, os
tokens_raw = pd.read_parquet(
os.path.join("annotated_outputs", "corpus_stanza_anno.parquet")
)
```
---
### Step 8 – Emoji assignment
Emoji tokens are identified and reassigned to the `EMOJI` UPOS category so they can be treated as a distinct lexical class in subsequent steps:
```python
from pyevoc.features.emoji_assignment import assign_emoji_upos
tokens, emoji_diag, emoji_top = assign_emoji_upos(
tokens_raw,
token_col="token",
upos_col="upos",
lemma_col="lemma",
return_diagnostics=True,
)
```
---
### Step 9 – Structural foregrounding and positional salience
This step computes the indicators that reconstruct the AOE-like salience component: opening-sentence position, emphasis, list/quote context, and intensification. Weights must sum to 1.0.
```python
from pyevoc.features.foregrounding import (
ForegroundingConfig,
ForegroundingWeights,
add_salience_indicators,
foregrounding_diagnostics,
metadata_coverage,
)
metadata_coverage(tokens)
fg_config = ForegroundingConfig(
doc_col="doc_id",
user_col="user_id",
time_col="time",
token_col="token",
sentence_col="sentence_id",
position_col="position",
weights=ForegroundingWeights(
opening_sentence=0.35,
emphasis=0.25,
list_or_quote=0.20,
intensification=0.20,
),
)
tokens = add_salience_indicators(tokens, config=fg_config)
foregrounding_diagnostics(tokens)
```
---
### Step 10 – Unigram selection
This step filters the token table down to the lexical units used for representational analysis. The minimum document and user thresholds control how rare a term must be to be excluded.
```python
from pyevoc.features.unigram_selection import select_unigrams
tokens_selected, unigram_diag, unigram_params = select_unigrams(
tokens,
keep_upos={"NOUN", "ADJ", "EMOJI"},
token_col="token",
lemma_col="lemma",
upos_col="upos",
doc_col="doc_id",
user_col="user_id",
min_docs_per_term=3,
min_users_per_term=3,
return_diagnostics=True,
)
unigram_diag
```
---
### Step 11 – Compute AFE/AOE indices
This step produces the core quantitative indices: diffusion (AFE), rank-weighted salience (AOE), and positional salience. A quadrant summary is returned alongside the per-term table.
```python
from pyevoc.features.term_indices import SalienceConfig, compute_term_statistics
term_stats, pos_thresholds, quadrant_summary = compute_term_statistics(
tokens_selected,
term_col="term",
upos_col="upos",
user_col="user_id",
doc_col="doc_id",
time_col="time",
r_pos_col="r_pos",
r_str_col="r_str",
config=SalienceConfig(
alpha=0.50,
max_rank_value=5.0,
use_users_for_frequency=True,
focal_upos={"NOUN", "ADJ", "EMOJI"},
),
)
pos_thresholds
```
---
### Step 12 – Concreteness labelling
When a concreteness lexicon is available, this step adds concreteness labels to `term_stats`:
```python
from pyevoc.features.concreteness import load_concreteness_lexicon, add_concreteness_labels
lexicon = load_concreteness_lexicon()
term_stats, concreteness_coverage = add_concreteness_labels(
term_stats,
lexicon=lexicon,
)
concreteness_coverage
```
---
### Step 13 – Emoji labelling
Adds human-readable descriptions to emoji terms. When a dedicated lookup entry is unavailable, the function falls back to standard Unicode names:
```python
from pyevoc.features.emoji_labelling import load_emoji_lookup, add_emoji_descriptions
emoji_lookup = load_emoji_lookup()
term_stats, emoji_coverage, emoji_methods, missing_emoji = add_emoji_descriptions(
term_stats,
lookup=emoji_lookup,
min_similarity=0.80,
)
emoji_coverage
```
---
### Step 14 – EVOC quadrants
Thresholds are computed **per POS category**. Terms are assigned to one of four quadrants based on their AOE rank and relative diffusion. An HTML report is generated automatically.
```python
from pyevoc.analysis.quadrants import assign_evoc_quadrants
evoc_quadrants, quadrant_counts, pos_thresholds_round = assign_evoc_quadrants(
term_stats,
generate_html=True,
html_output_dir="evoc_outputs",
html_top_n=5,
)
evoc_quadrants.attrs["html_outputs"]
```
The four EVOC zones and what they mean:
| Zone | AOE rank | Relative diffusion | Interpretation |
|---|---|---|---|
| **Central nucleus** | Low (high salience) | High | Highly shared, strongly foregrounded – the core of the representation |
| **First periphery** | Low (high salience) | High | Shared and accessible, but less central |
| **Contrast zone** | High (low salience) | High | Diffuse but not prototypical – contested or transitional elements |
| **Peripheral system** | High (low salience) | Low | Individual or emerging elements at the margins |
---
### Step 15 – Collocations and Named Entities
Extracts statistically significant bigram collocations and, optionally, named entities from the annotated token table:
```python
from pyevoc.analysis.collocations_entities import extract_collocations_and_entities
colloc_results = extract_collocations_and_entities(
tokens_df=tokens_raw,
include_collocations=True,
include_entities=False, # set True to include NER
min_freq=2,
min_docs=2,
min_users=2,
write_html=True,
)
collocations_df = colloc_results["collocations_df"]
print(collocations_df.shape)
```
To include named entities and resolve overlaps with collocations:
```python
results = extract_collocations_and_entities(
tokens_df=tokens,
include_collocations=True,
include_entities=True,
entity_n=2,
resolve_overlap=True,
prefer_overlap="evidence",
write_html=True,
)
collocations_df = results["collocations_df"]
entities_df = results["entities_df"]
overlap_log_df = results["overlap_log_df"]
```
---
### Step 16 – Temporal stability
Temporal stability analysis re-runs the EVOC framework within each time period so you can track how terms migrate between zones over time.
**Equal-interval partitioning:**
```python
from pyevoc.analysis.temporal_stability import run_temporal_stability_analysis
temporal_results = run_temporal_stability_analysis(
df=tokens_selected,
evoc_quadrants_df=evoc_quadrants,
pos_thresholds_round_df=pos_thresholds_round,
n_periods=4,
time_period_mode="equal_days",
show_tables=False,
)
```
**Custom time boundaries:**
```python
temporal_results = run_temporal_stability_analysis(
df=tokens_selected,
evoc_quadrants_df=evoc_quadrants,
pos_thresholds_round_df=pos_thresholds_round,
time_period_mode="custom",
custom_time_cuts=["2022-01-01", "2024-01-01"],
period_labels=["2018-2021", "2022-2023", "2024-2026"],
show_tables=False,
)
```
---
### Step 17 – Visualisations
PyEvoc provides four main plot types. Set a shared output directory and call them in sequence:
```python
from pyevoc.visualisation import (
build_evoc_target_plot,
build_evoc_collocation_tree_for_upos,
build_emoji_evoc_plot,
build_temporal_sankey_ordered,
)
OUTPUT_DIR = "evoc_outputs"
```
#### EVOC target maps
Scatter-like plots that position each term according to its AOE rank (x-axis) and relative diffusion (y-axis), with coloured quadrant regions.
```python
plot_nouns = build_evoc_target_plot(
evoc_quadrants, "NOUN", pos_thresholds_round,
output_dir=OUTPUT_DIR, node_size_mode="fixed",
)
plot_adjectives = build_evoc_target_plot(
evoc_quadrants, "ADJ", pos_thresholds_round,
output_dir=OUTPUT_DIR, node_size_mode="fixed",
)
```
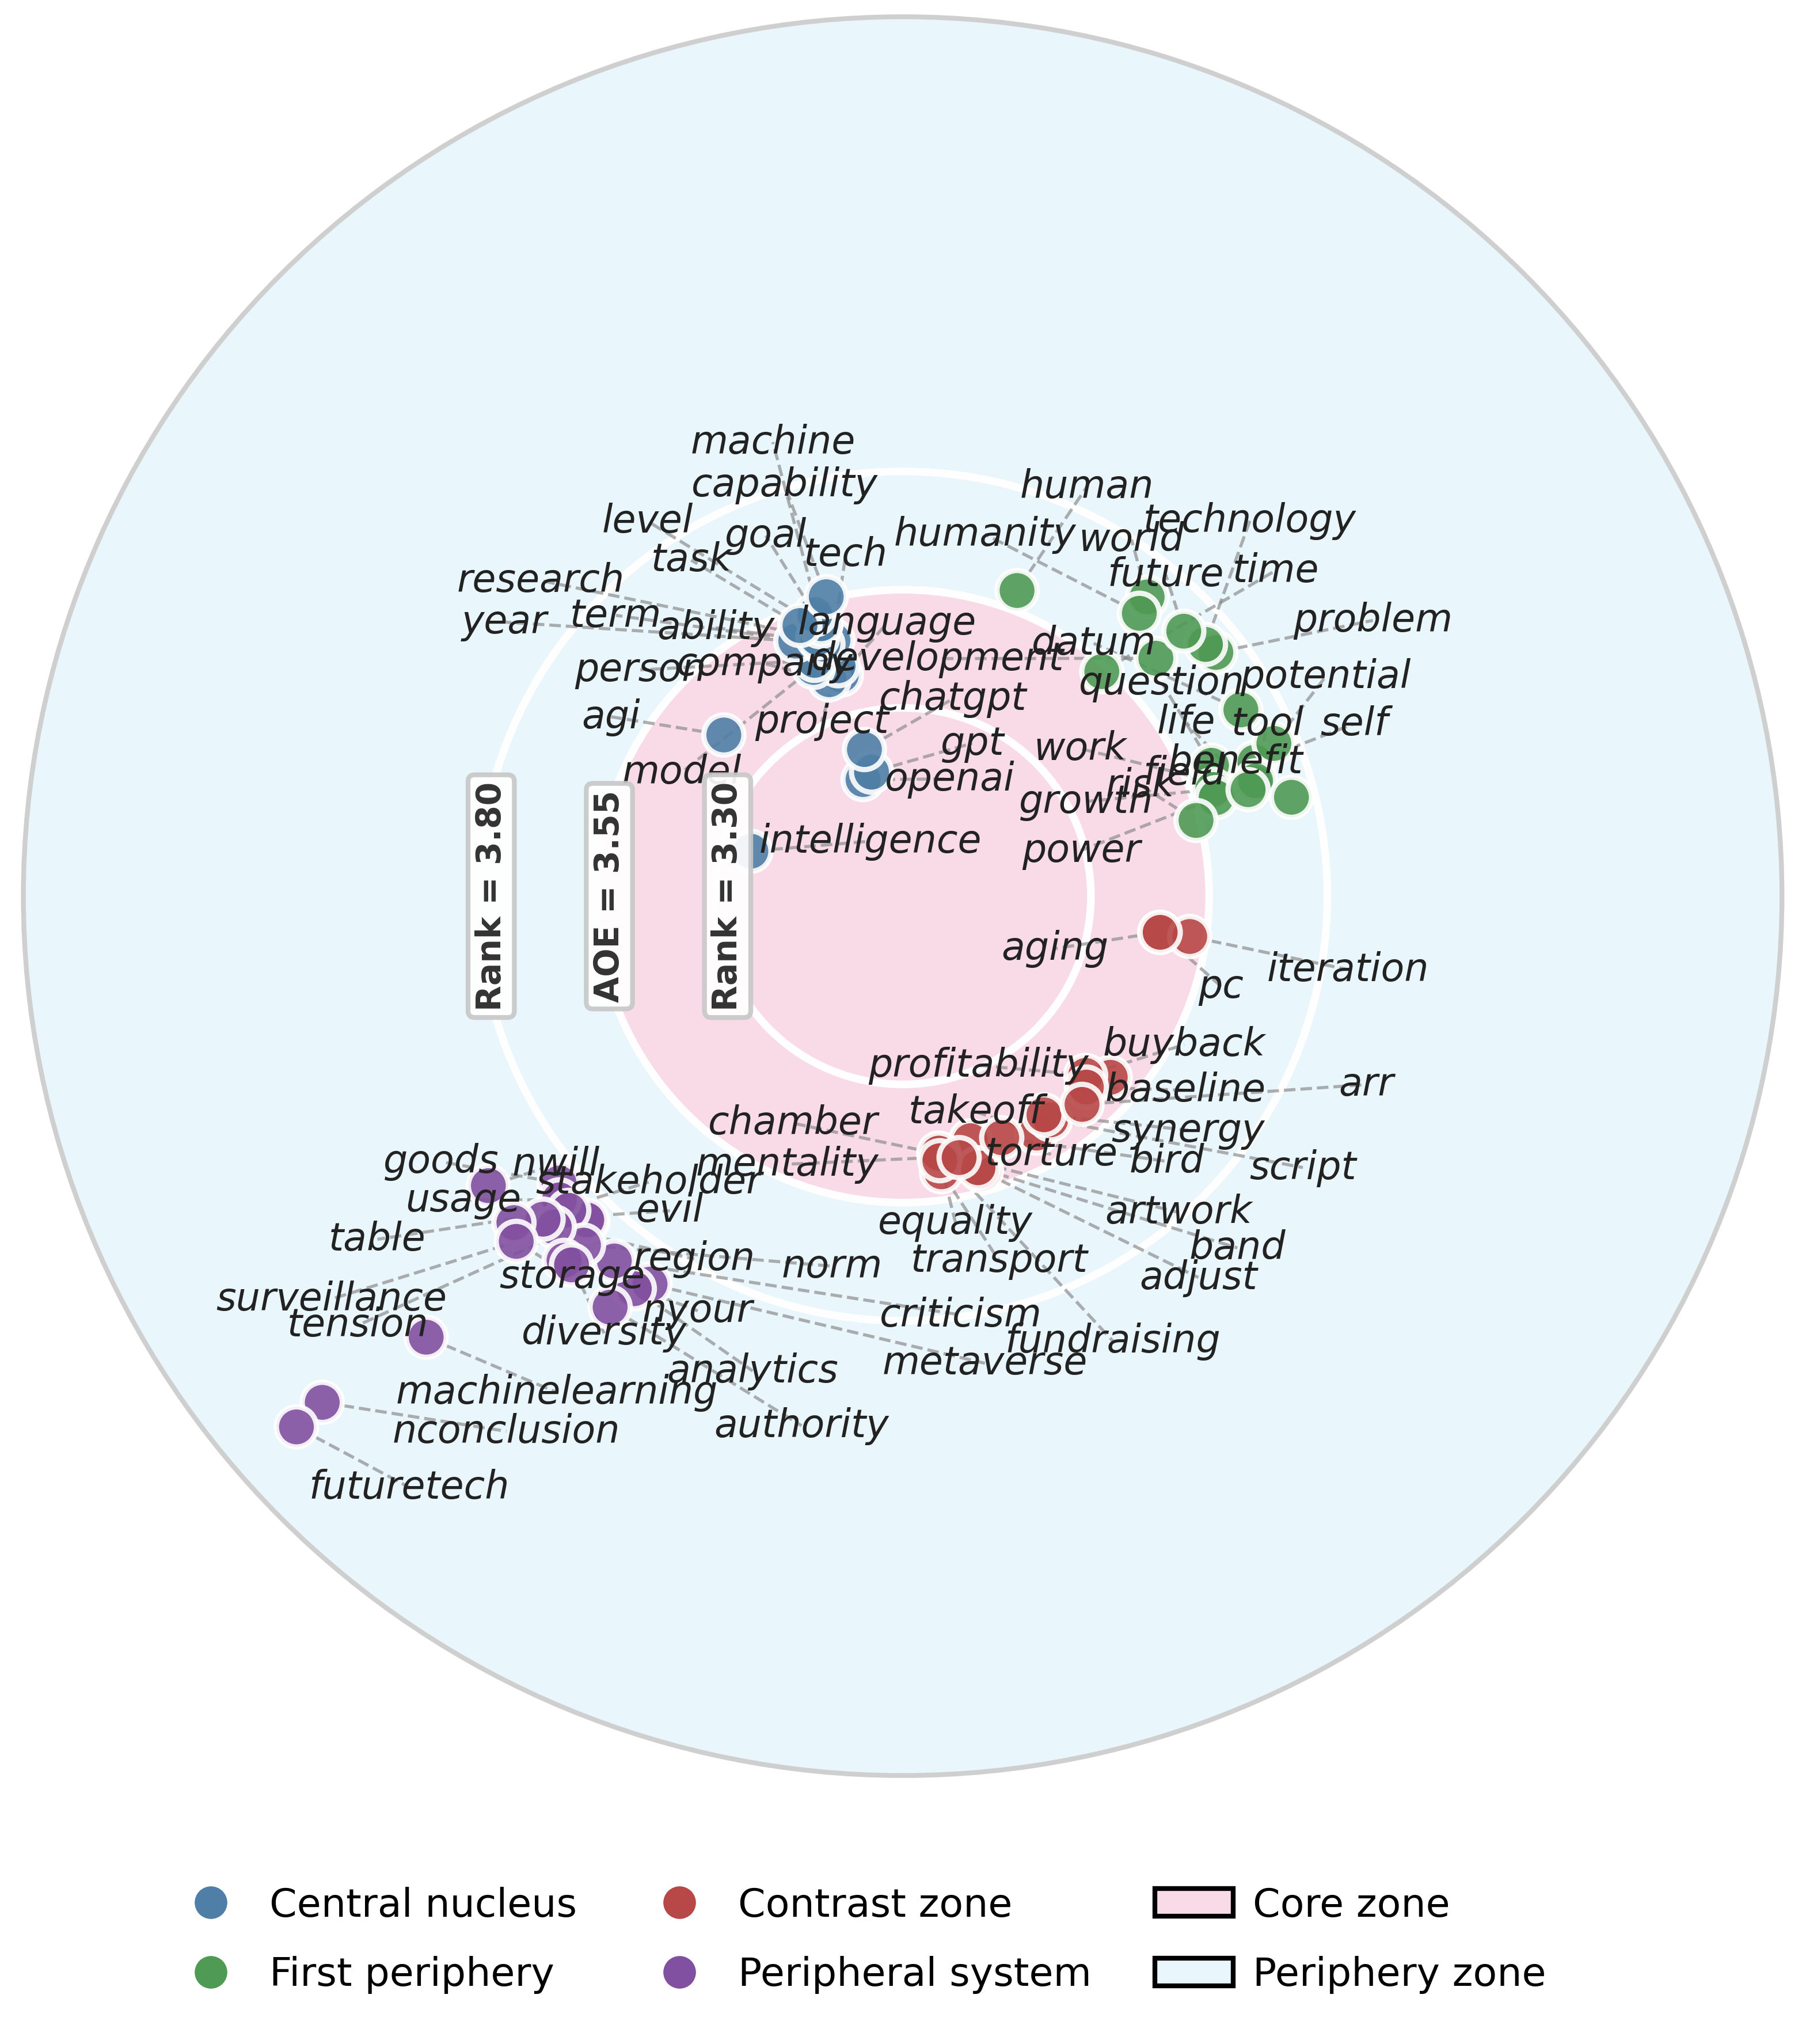
*Example: EVOC target map for nouns. Each term is placed by its AOE rank (x-axis) and relative diffusion (y-axis). Dashed lines mark the quadrant thresholds.*
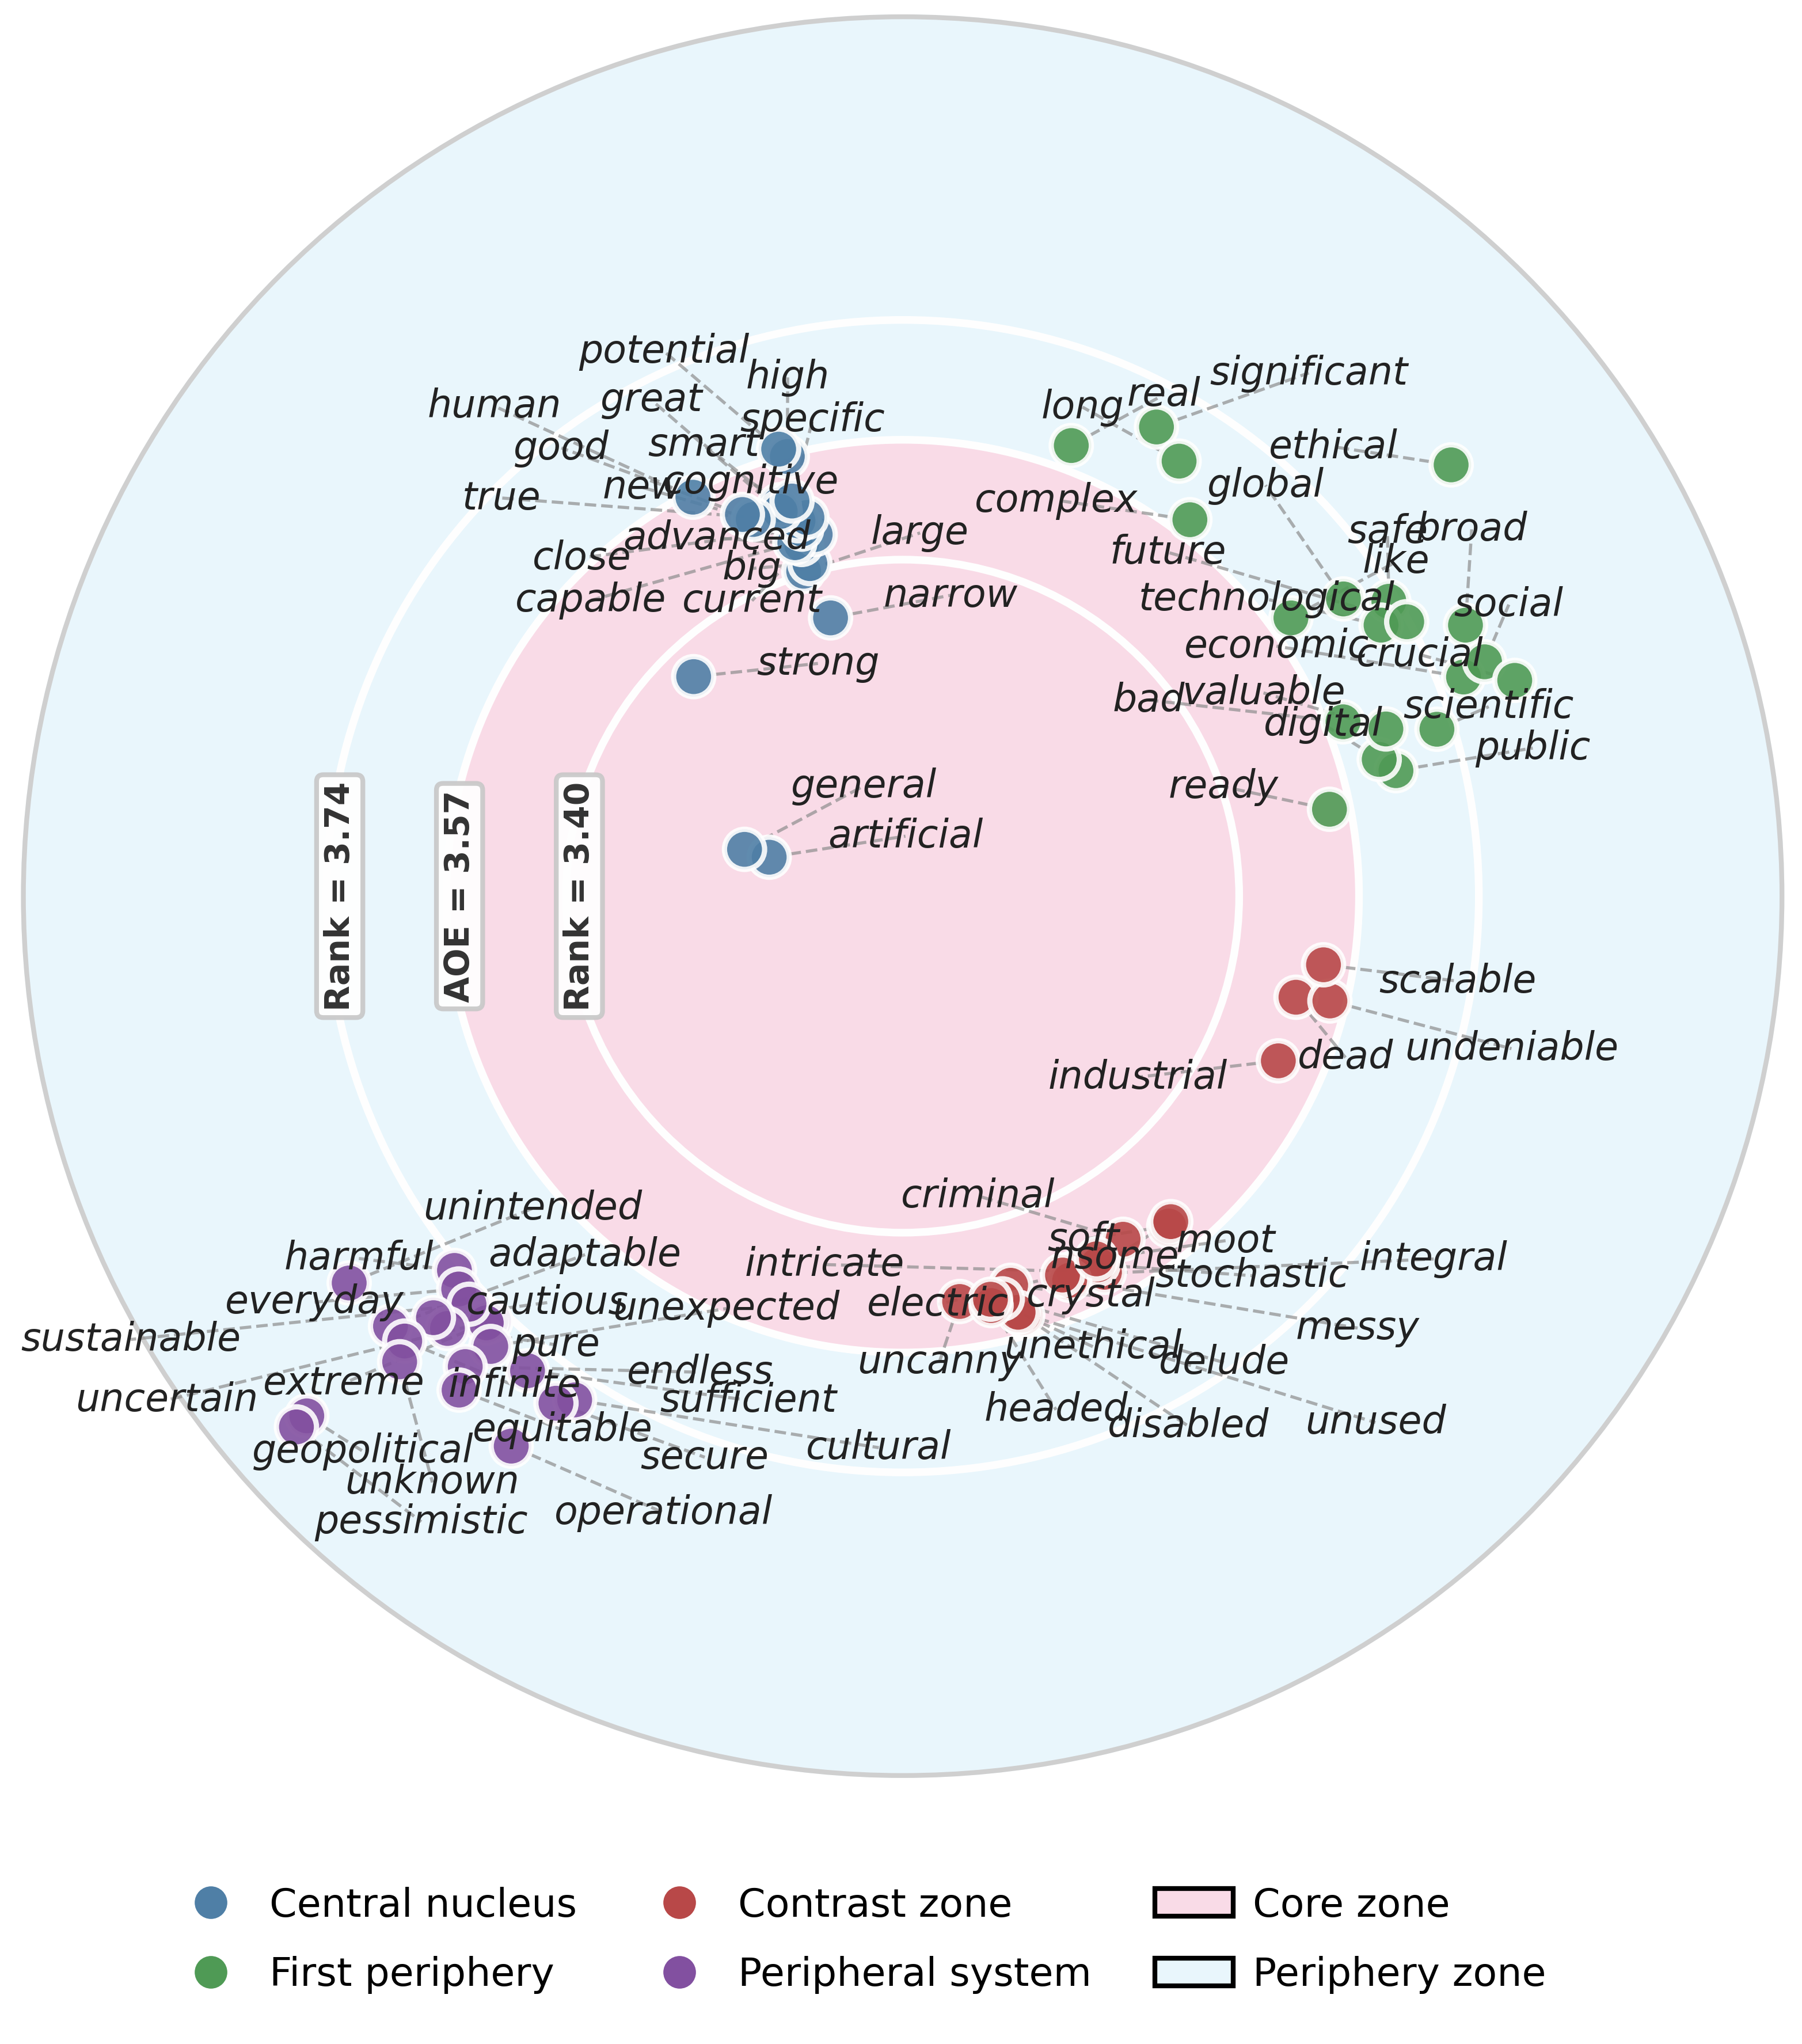
*Example: EVOC target map for adjectives.*
#### EVOC semantic trees
Arc diagrams showing each term's top bigram collocates, grouped by quadrant:
```python
tree_nouns = build_evoc_collocation_tree_for_upos(
evoc_quadrants_df=evoc_quadrants,
collocations_df=collocations_df,
tokens_df=tokens_raw,
upos="NOUN",
output_dir=OUTPUT_DIR,
top_roots_per_quadrant=5,
max_leaves_per_root=3,
min_leaf_freq=5,
)
tree_adjectives = build_evoc_collocation_tree_for_upos(
evoc_quadrants_df=evoc_quadrants,
collocations_df=collocations_df,
tokens_df=tokens_raw,
upos="ADJ",
output_dir=OUTPUT_DIR,
top_roots_per_quadrant=5,
max_leaves_per_root=3,
min_leaf_freq=5,
)
```
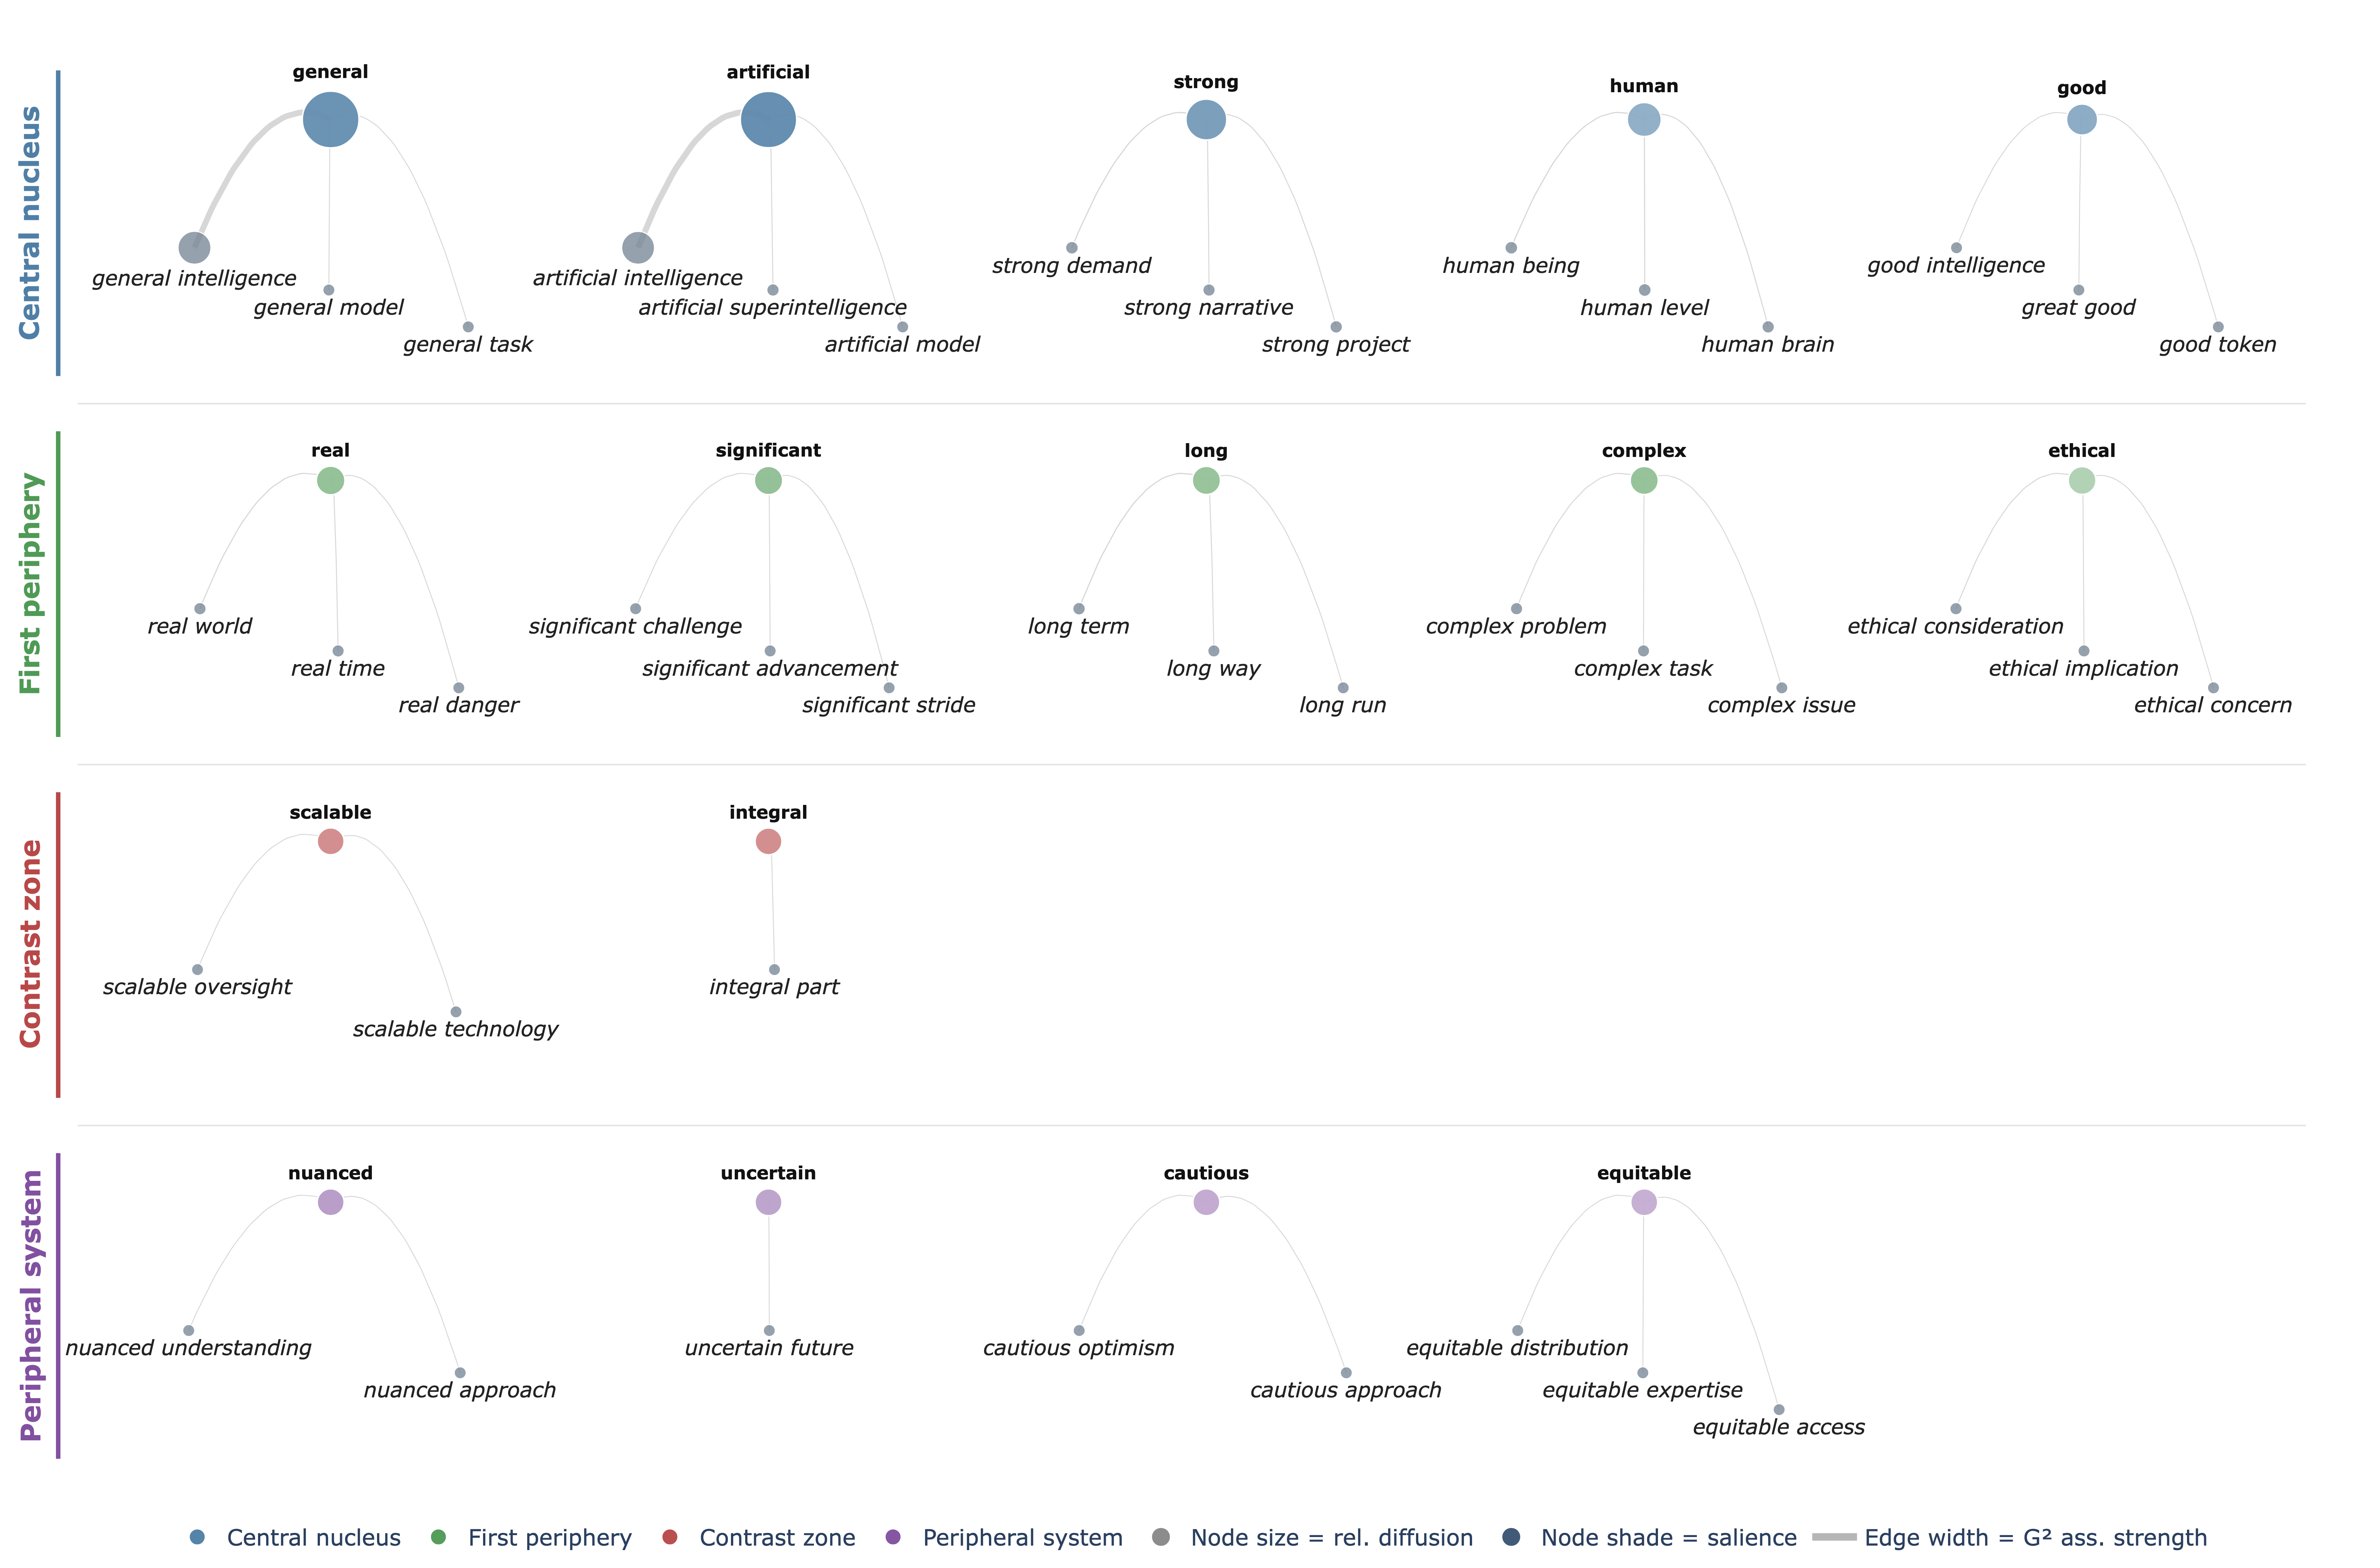
*Collocation tree for adjectives. Node size encodes relative diffusion; node shade encodes salience; edge width encodes G² association strength.*
#### EVOC emoji map
Plots emoji terms on the same AOE × diffusion space as the target maps:
```python
fig_emoji, emoji_evoc_df, emoji_evoc_html = build_emoji_evoc_plot(
html_file=f"{OUTPUT_DIR}/evoc_quadrants_emoji_compact.html",
output_dir=OUTPUT_DIR,
output_png=None,
)
```
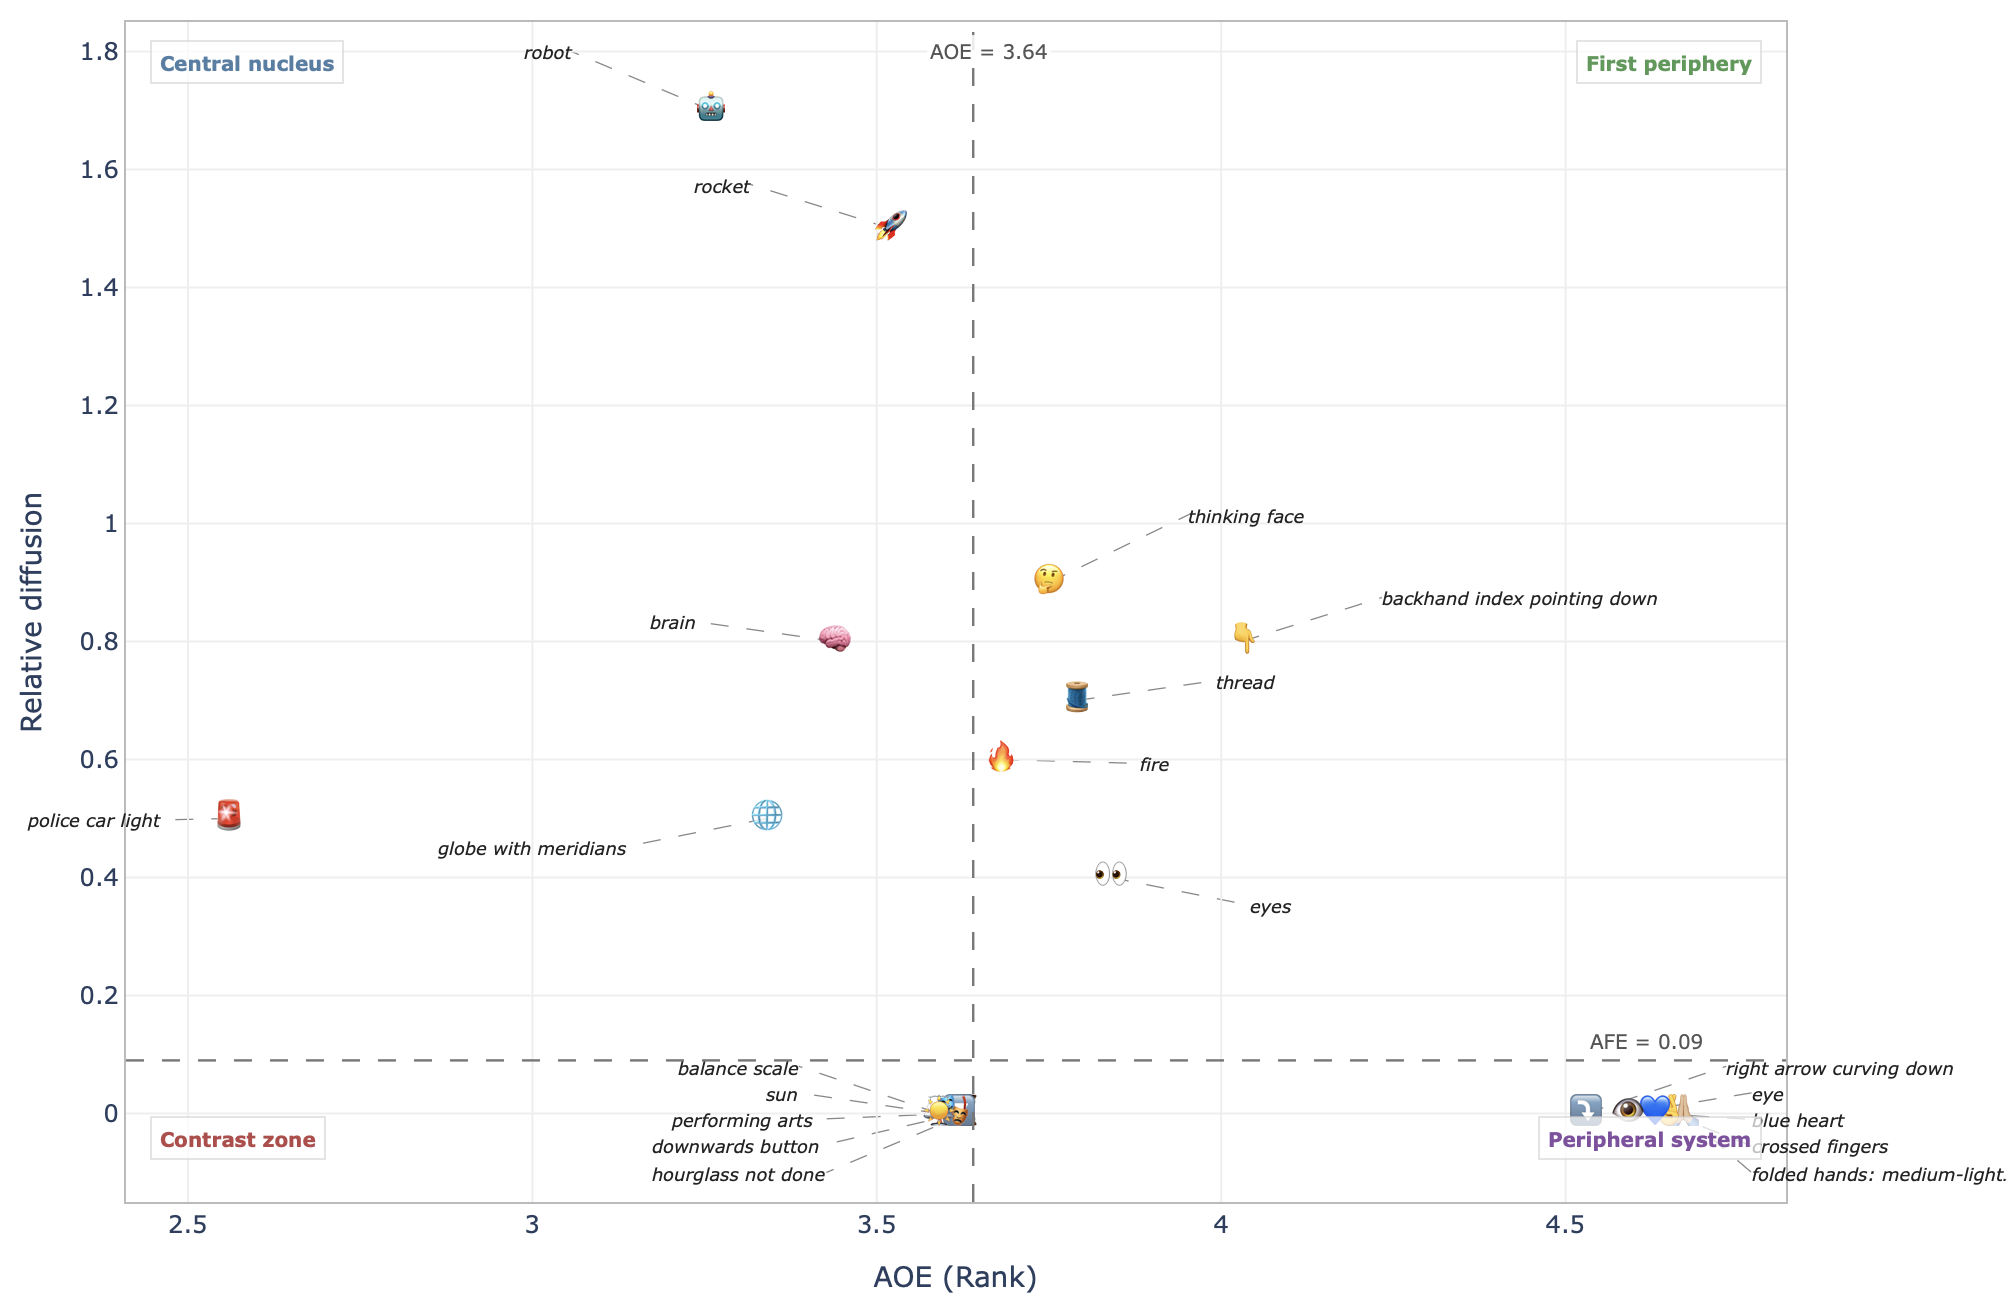
*Example: EVOC emoji map. Emoji labels are placed by their AOE rank and diffusion score.*
#### EVOC temporal Sankey
Flow diagram that traces how terms move between quadrants across time periods:
```python
sankey_results = build_temporal_sankey_ordered(
period_quadrants=temporal_results["period_quadrants"],
output_dir=OUTPUT_DIR,
output_html="evoc_temporal_sankey.html",
output_png=None,
arrangement="snap",
show_zero_nodes=False,
width=1000,
height=500,
)
```
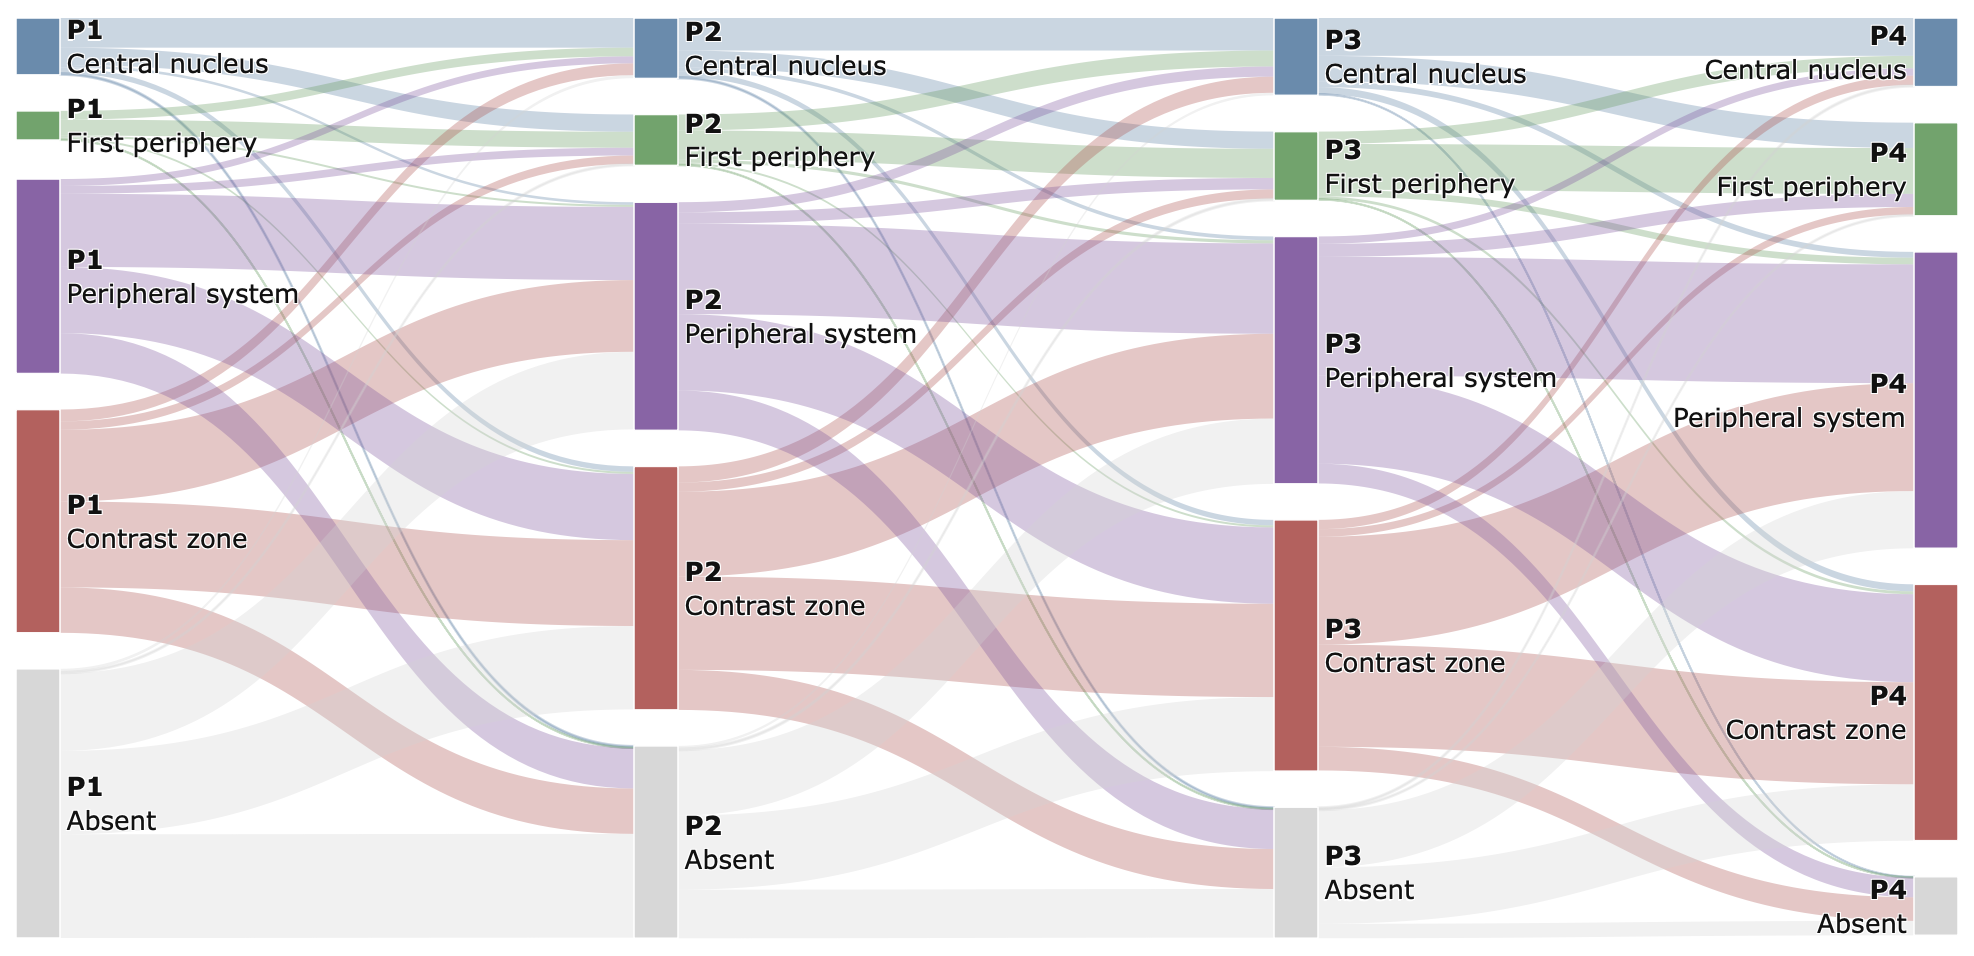
*Example: Sankey diagram across four time periods (P1–P4). Each ribbon traces terms as they remain stable or migrate between zones.*
---
## Output Reference
After completing the full pipeline you will have produced:
| Output | Description |
|---|---|
| `corpus` | Standardised corpus dataframe |
| `subcorpus_lin` | Language-filtered corpus |
| `subcorpus_the` | Thematically filtered subcorpus (if applied) |
| `corpus_clean` | Cleaned corpus with `clean_text` column |
| `tokens_raw` / `tokens_selected` | Token-level annotated dataframes |
| `term_stats` | Per-term AFE/AOE indices with concreteness and emoji labels |
| `evoc_quadrants` | EVOC zone assignments per term |
| `collocations_df` | Bigram collocations with association statistics |
| `temporal_results` | Per-period quadrant assignments and transitions |
| `evoc_outputs/` | HTML reports and static PNG visualisations |
For theoretical background on the EVOC framework and the AFE/AOE indices, see `docs/methodology.md`.