---
title: "Docker"
subtitle: Biostat 203B
author: "Dr. Hua Zhou @ UCLA"
date: today
format:
html:
theme: cosmo
embed-resources: true
number-sections: true
toc: true
toc-depth: 4
toc-location: left
code-fold: false
knitr:
opts_chunk:
fig.align: 'center'
---
## What is Docker
- It took us considerable efforts to set up our own laptop, or a cloud compute instance, or Hoffman2, or Windows WSL with a full stack of tools we need: Ubuntu, Linux libraries, R, R Studio, tidyverse, Shiny server, ...
- We can save the configuration as an image (or snapshot) so we don't have to re-configure each time using a new computer, cloud service, or cluster.
- In a more complex research or business environment, different apps may have different or conflicting dependencies, making configuration and deployment an excessive overhead.
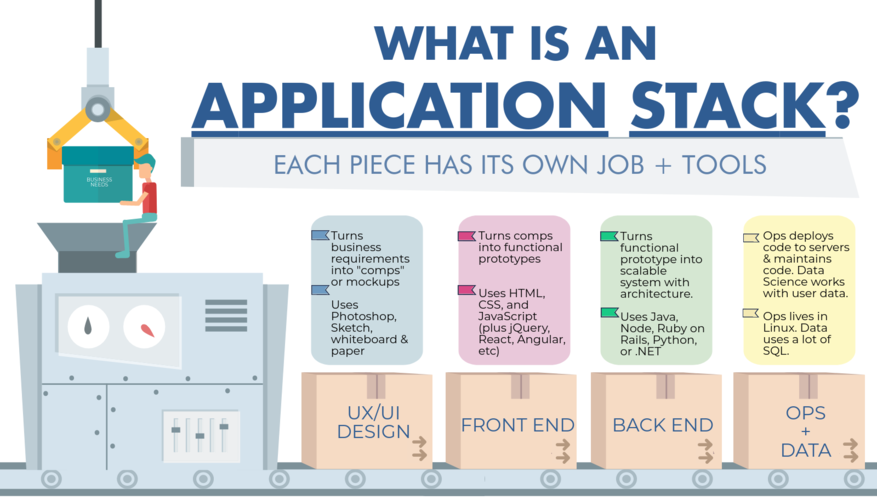{width=400px}
- Alternative approach: each app, together with its computing environment and database, can be **containerized**.
- **Paradigm**: develop apps locally (with potentially different toolchains), deploy (at scale) anywhere.
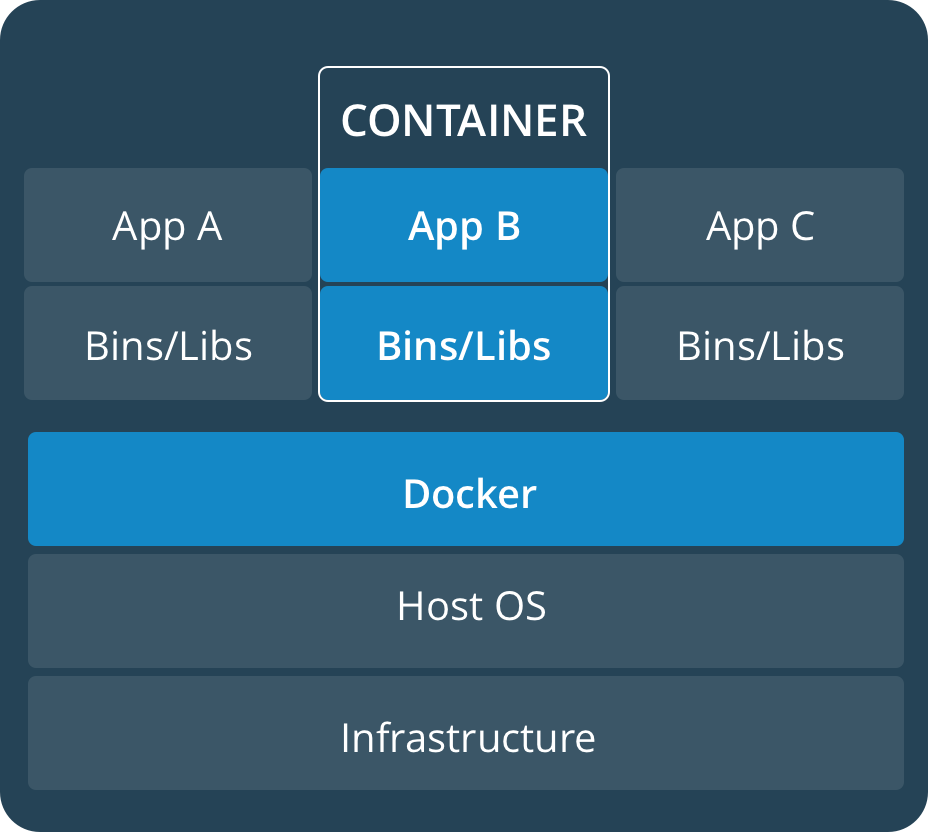{width=300px}
## Why do _we_ (students, researchers) care?
Scenario 1: You have a Windows machine, but want to learn the open source toolchains on Linux.
Scenario 2: Your paper gets rejected, because the reviewer wants comparison with an existing method. But software for existing method only runs on Linux.
Scenario 3: You made a fancy Shiny app. You want to deploy in AWS or GCP and scale that up to potentially many users.
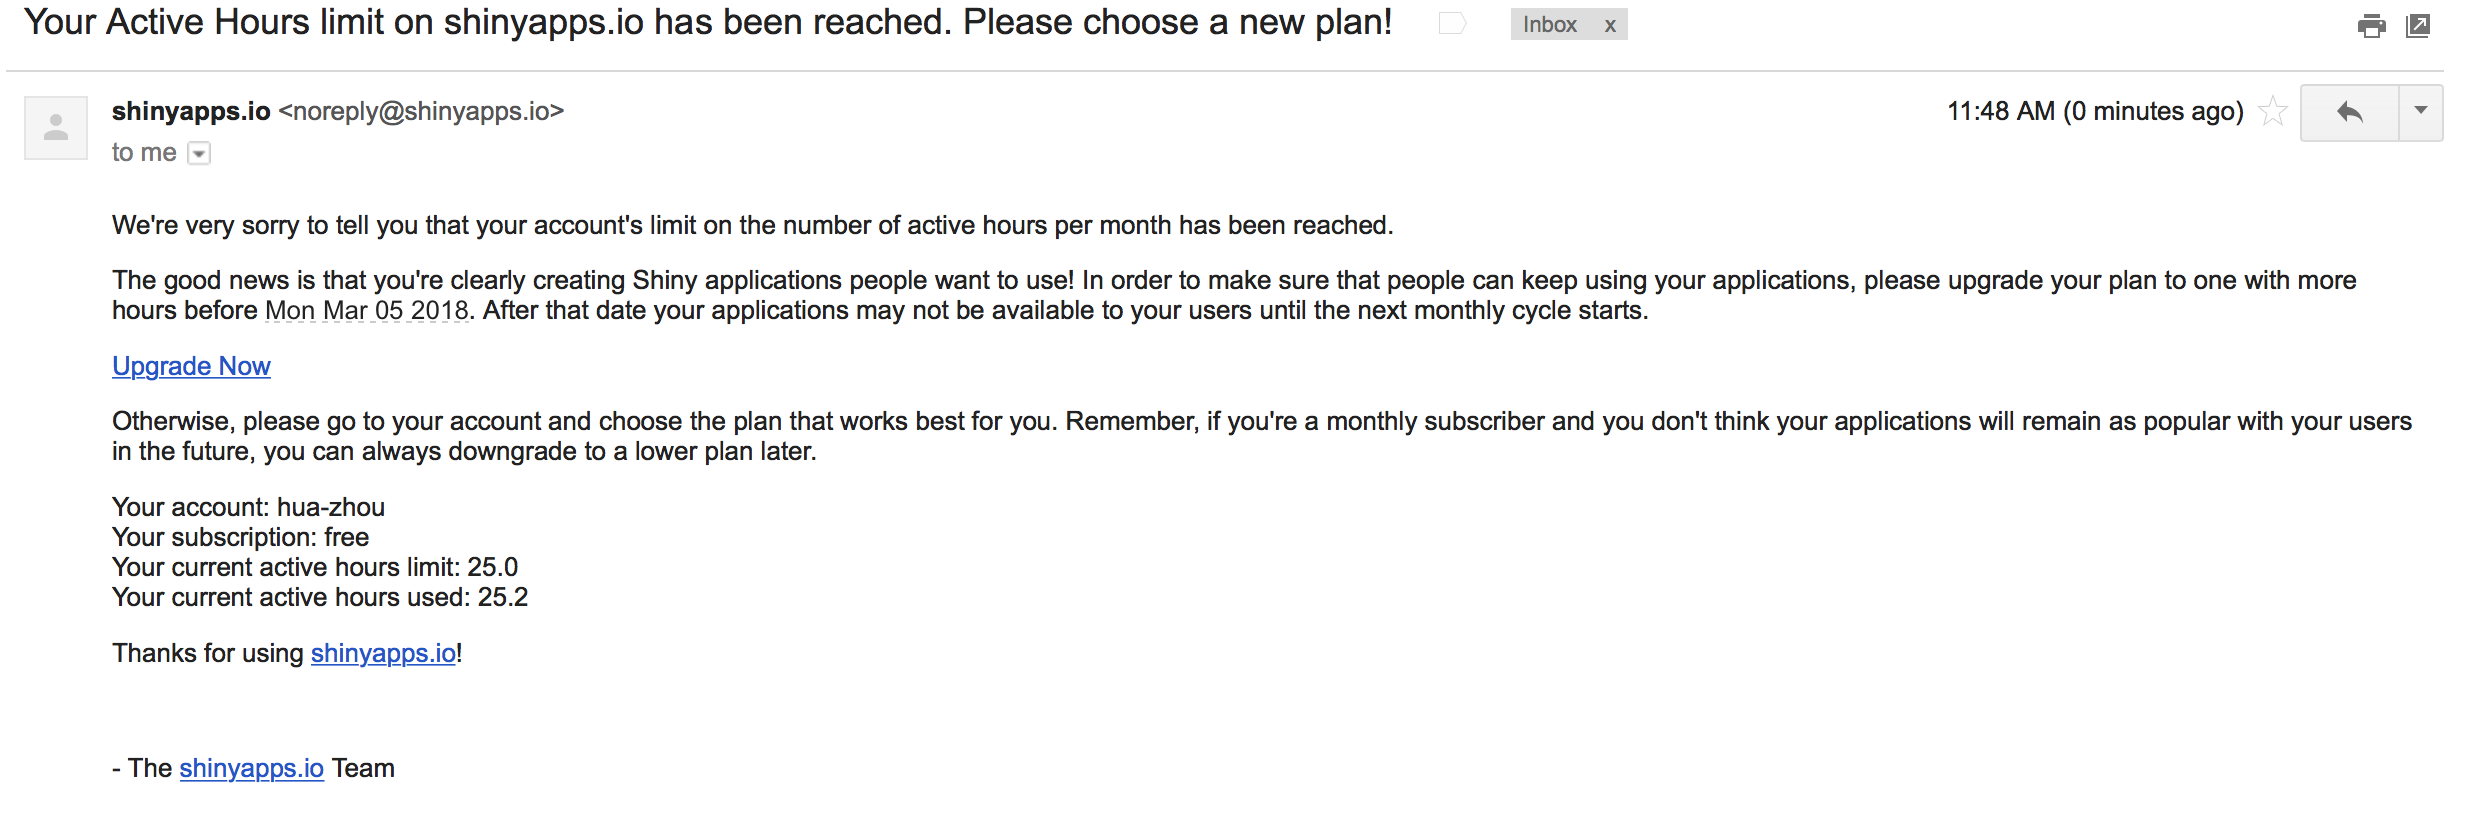{width=700px}
Scenario 4: You develop a software package and want to debug/test on different versions of R, on different OS (MacOS, Linux, Windows).
Scenario 5: You develop a software package, which unfortunately only works on Linux. You want Mac and Windows users to be able to use your package as well.
Scenario 6: Reproducible research. Hardware and software evolve fast. Simulation results in research papers are often hard to reproduce due to the changing computing environment. We can use Docker to containerize a simulation experiment (specific versions of OS and software), which can reproduce same results in any future moment.
## Learning objectives
- Be conversant with the container technology.
- Understand the role containers play in the development and deployment process.
- Master basic Docker usage.
## Tutorial
We will follow the tutorial [Get started with Docker](https://docs.docker.com/get-started/) to:
- **containerize** a Python web app.
- run the **container**.
- run the container as a **service**.
- run interrelated services as a **stack**.
- deploy a stack to cloud.
```{bash}
#| eval: false
# remove: all stopped containers, all networks not used by at least one container, all images without at least one container associated to them, all build cache
docker system prune -a -f
# kill all containers and then remove them
docker container kill $(docker container ls -a -q)
docker container rm $(docker container ls -a -q)
# remoeve all Docker iamges
docker image rm $(docker image ls -a -q)
```
### Installation
[Download](https://www.docker.com/products/docker-desktop) and install the Docker Desktop on your computer.
### Docker survival commands
Part 1:
```{bash}
#| eval: false
## List Docker CLI commands
docker
docker container --help
## Display Docker version and info
docker --version
docker version
docker info
## Excecute Docker image
docker run hello-world
## List Docker images
docker image ls
## List Docker containers (running, all, all in quiet mode)
docker container ls
docker container ls --all
docker container ls -a -q
```
Part 2:
```{bash}
#| eval: false
docker build -t friendlyhello . # Create image using this directory's Dockerfile
docker run -p 4000:80 friendlyhello # Run "friendlyname" mapping port 4000 to 80
docker run -d -p 4000:80 friendlyhello # Same thing, but in detached mode
docker container ls # List all running containers
docker container ls -a # List all containers, even those not running
docker container stop # Gracefully stop the specified container
docker container kill # Force shutdown of the specified container
docker container rm # Remove specified container from this machine
docker container rm $(docker container ls -a -q) # Remove all containers
docker image ls -a # List all images on this machine
docker image rm # Remove specified image from this machine
docker image rm $(docker image ls -a -q) # Remove all images from this machine
docker login # Log in this CLI session using your Docker credentials
docker tag username/repository:tag # Tag for upload to registry
docker push username/repository:tag # Upload tagged image to registry
docker run username/repository:tag # Run image from a registry
```
Part 3:
```{bash}
#| eval: false
docker stack ls # List stacks or apps
docker stack deploy -c # Run the specified Compose file
docker service ls # List running services associated with an app
docker service ps # List tasks associated with an app
docker inspect # Inspect task or container
docker container ls -q # List container IDs
docker stack rm # Tear down an application
docker swarm leave --force # Take down a single node swarm from the manager
```
### Containerize a web app
We use Docker to develop an app that serves a webpage on the teaching server, which is a GCP instance.
#### Essential components
- [`requirements.txt`](https://raw.githubusercontent.com/Hua-Zhou/Hua-Zhou.github.io/master/teaching/biostatm280-2019winter/slides/14-docker/requirements.txt) lists the Python dependencies:
```{bash, eval=TRUE}
cat requirements.txt
```
Flask is Python tool for web development. Redis is a in-memory database system.
- [`app.py`](https://raw.githubusercontent.com/Hua-Zhou/Hua-Zhou.github.io/master/teaching/biostatm280-2019winter/slides/14-docker/app.py) is the Python code for serving a webpage.
```{bash}
#| eval: false
cat app.py
```
- [`Dockerfile`](https://raw.githubusercontent.com/Hua-Zhou/Hua-Zhou.github.io/master/teaching/biostatm280-2019winter/slides/14-docker/Dockerfile) instructs Docker how to put things together in a container:
```{bash}
#| eval: false
cat Dockerfile
```
See [python on Docker Hub](https://hub.docker.com/_/python/) for details on the `python:2.7-slim` image.
See [Dockerfile reference](https://docs.docker.com/engine/reference/builder/) for commands in Dockerfile.
#### Build the app
Build the image:
```{bash}
#| eval: false
docker build -t friendlyhello .
```
Display the image:
```{bash}
#| eval: false
docker image ls
```
#### Run the app
Run the app by
```{bash}
#| eval: false
docker run -p 4000:80 friendlyhello
```
or in detached mode
```{bash}
#| eval: false
docker run -d -p 4000:80 friendlyhello
```
`-p 4000:80` maps port 80 of the container to port 4000 of host.
Display the container:
```{bash}
#| eval: false
docker container ls
```
We now should be able to check the webpage by pointing browser to `localhost:4000`.
To stop the container, issue:
```{bash}
#| eval: false
docker container stop
```
To kill all containers
```{bash}
#| eval: false
docker container kill $(docker container ls -a -q)
```
then remove them
```{bash}
#| eval: false
docker container rm $(docker container ls -a -q)
```
#### Share the image
Tag the `friendlyhello` image:
```{bash}
#| eval: false
docker tag friendlyhello huazhou/get-started:part2
```
Upload the tagged image to registry:
```{bash}
#| eval: false
docker push huazhou/get-started:part2
```
Now the image is up on [Docker Hub registry](https://hub.docker.com/r/huazhou/get-started/). We can run image (on any machine with Docker installed) from the registry:
```{bash}
#| eval: false
docker run -d -p 4000:80 huazhou/get-started:part2
```
### Run replicates of a container as service
**Services** are really just "containers in production." A service only runs one image, but it codifies the way that image runs—what ports it should use, how many replicas of the container should run so the service has the capacity it needs, and so on.
Following [`docker-compose.yml`](https://raw.githubusercontent.com/Hua-Zhou/Hua-Zhou.github.io/master/teaching/biostatm280-2019winter/slides/14-docker/docker-compose.yml) specifies:
- Pull the image `huazhou/get-started:part2`.
- Run 5 instances of that image as a service called `web`, limiting each one to use, at most, 10% of the CPU (across all cores), and 50MB of RAM.
- Immediately restart containers if one fails.
- Map port 80 on the host to `web`’s port 80.
- Instruct `web`’s containers to share port 80 via a load-balanced network called webnet. (Internally, the containers themselves publish to `web`’s port 80 at an ephemeral port.)
- Define the `webnet` network with the default settings (which is a load-balanced overlay network).
```{bash}
#| eval: false
cat docker-compose.yml
```
See [Docker Compose reference](https://docs.docker.com/compose/compose-file/) for commands in Docker Compose.
Run a new load-balanced app:
```{bash}
#| eval: false
docker swarm init
docker stack deploy -c docker-compose.yml getstartedlab
```
List the service:
```{bash}
#| eval: false
docker service ls
```
List the tasks for your service:
```{bash}
#| eval: false
docker service ps getstartedlab_web
```
To take down the service and swarm:
```{bash}
#| eval: false
docker stack rm getstartedlab
docker swarm leave --force
```
### Run interrelated services as a stack
A **stack** is a group of interrelated services that share dependencies, and can be orchestrated and scaled together. A single stack is capable of defining and coordinating the functionality of an entire application.
Here we want to add two more services: a `visualizer` for visualizing services and a `redis` database for counting webpage visits.
The only thing we need to do is to update the `docker-composer.yml` file. Let's name the new file [`docker-compose-stack.yml`](https://raw.githubusercontent.com/Hua-Zhou/Hua-Zhou.github.io/master/teaching/biostatm280-2019winter/slides/14-docker/docker-compose-stack.yml) to avoid confusion:
```{bash}
#| eval: false
cat docker-compose-stack.yml
```
Then deploy
```{bash}
#| eval: false
docker swarm init
docker stack deploy -c docker-compose-stack.yml getstartedlab
```
List the service:
```{bash}
#| eval: false
docker service ls
```
List the tasks for your service:
```{bash}
#| eval: false
docker service ps getstartedlab_web
```
Now we can check the new webpage at `localhost:80` and the visualizer at `localhost:8080` in browser.
To take down the service and swarm:
```{bash}
#| eval: false
docker stack rm getstartedlab
docker swarm leave --force
```
### Deploy a stack to GCP
Option 1: Create a container-optimized instance in GCP Compute Engine.
Option 2: On any GCP instance, install Docker and run a container.
- On CentOS, [install Docker CE](https://docs.docker.com/install/linux/docker-ce/centos/) by:
```{bash}
#| eval: false
# install yum-config-manager
sudo yum install -y yum-utils
sudo yum install -y yum-config-manager device-mapper-persistent-data lvm2
# add Docker CE repo for CentOS
sudo yum-config-manager --add-repo https://download.docker.com/linux/centos/docker-ce.repo
## install Docker CE
sudo yum install docker-ce
```
- Run container:
```{bash}
#| eval: false
sudo docker run -d -p 80:80 huazhou/get-started:part2
```
- To run the web service, copy `docker-compose.yml` to the server and run
```{bash}
#| eval: false
sudo docker swarm init
sudo docker stack deploy -c docker-compose.yml getstartedlab
```
- To run the stack with web+visualizer+redis, copy `docker-compose-stack.yml` to the server and run
```{bash}
#| eval: false
sudo docker swarm init
sudo docker stack deploy -c docker-compose-stack.yml getstartedlab
```
- To take down the service and swarm:
```{bash}
#| eval: false
sudo docker stack rm getstartedlab
sudo docker swarm leave --force
```
### Multi-container, multi-machine applications
See [part 4](https://docs.docker.com/get-started/part4/) of the tutorial.
### Stack: heterogenous containers, multi-machine applications
See [part 5](https://docs.docker.com/get-started/part5/) of the tutorial.
### Deploy stack to AWS/Azure
See [part 6](https://docs.docker.com/get-started/part6/) of the tutorial.
## Scenario: Run a Linux container interactively
Run [CentOS](https://hub.docker.com/_/centos/) interactively (as `root`):
```{bash}
#| eval: false
docker run -ti --rm centos:latest
```
`-i` means interactive. `-t` allocates a pseudo-tty. `--rm` removes the container when it exits.
Run [Ubuntu](https://hub.docker.com/_/ubuntu/) interactively (as `root`):
```{bash}
#| eval: false
docker run -ti --rm ubuntu:latest
```
## Scenario: Run Linux+R on your MacOS/Windows laptop
- Launch R interactively:
```{bash}
#| eval: false
docker run -ti --rm -v ~/Desktop:/Desktop r-base
```
It downloads, builds, and runs a Docker image called [`r-base`](https://hub.docker.com/r/_/r-base/) (Debian + R). `-v` maps a folder on host to a folder in the container.
- Run a bash session on the container:
```{bash}
#| eval: false
docker run -ti --rm r-base /usr/bin/bash
```
- Run R in batch mode. Suppose current folder contains an R script `autoSim.R`, which we want to run:
```{bash}
#| eval: false
docker run -ti --rm -v "$PWD":/home/docker -w /home/docker -u docker r-base Rscript autoSim.R
```
`-w` specifies the working directory. `-u` specifies the user.
## Scenario: Deploy a Shiny app to cloud
Suppose we have a Shiny app `census-app` with contents: `app.R`, `data/counties.rds`, and `helpers.R`. It has dependencies `maps` and `mapproj` R packages. We want to deploy the Shiny app to a GCP instance. We can use following Dockerfile to compile an image
```{bash}
#| eval: false
cat ../19-shiny/census-app/Dockerfile
```
and then deploy to cloud.
## Scenario: Ubuntu + R + RStudio Server + tidyverse toolchain
To build an image with Ubuntu + R + RStudio Server + tidyverse toolchain, we can use a Dockerfile.