---
title: "Linux Basics"
author: "Dr. Hua Zhou @ UCLA"
date: "Jan 7, 2020"
subtitle: Biostat 203B
output:
# ioslides_presentation: default
html_document:
toc: true
toc_depth: 4
bibliography: ../bib-HZ.bib
---
```{r setup, include=FALSE}
knitr::opts_chunk$set(echo = TRUE, comment = '')
```
## Why Linux
Linux is _the_ most common platform for scientific computing and deployment of data science tools.
- Open source and community support.
- Things break; when they break using Linux, it's easy to fix.
- Scalability: portable devices (Android, iOS), laptops, servers, clusters, and super computers.
- E.g. UCLA Hoffmann2 cluster runs on Linux; most machines in cloud (AWS, Azure, GCP) run on Linux.
- Cost: it's free!
## [Distributions of Linux](http://upload.wikimedia.org/wikipedia/commons/1/1b/Linux_Distribution_Timeline.svg)
- Debian/Ubuntu is a popular choice for personal computers.
- RHEL/CentOS is popular on servers.
- The teaching server for this class runs CentOS 7.
- MacOS was originally derived from Unix/Linux (Darwin kernel). It is POSIX compliant. Most shell commands we review here apply to MacOS terminal as well. Windows/DOS, unfortunately, is a totally different breed.
- Show distribution/version on Linux:
```{bash}
cat /etc/*-release
```
----
- Show distribution/version on MacOS:
```{bash, eval=FALSE}
sw_vers -productVersion
```
or
```{bash, eval=FALSE}
system_profiler SPSoftwareDataType
```
# Linux shells
## Shells
- A shell translates commands to OS instructions.
- Most commonly used shells include `bash`, `csh`, `tcsh`, `zsh`, etc.
- The default shell in MacOS changed from `bash` to `zsh` since MacOS v10.15.
- Sometimes a command and a script does not run simply because it's written for another shell.
- We mostly use `bash` shell commands in this class.
- Determine the current shell:
```{bash}
echo $SHELL
```
- List available shells:
```{bash}
cat /etc/shells
```
- Change to another shell:
```{bash, eval=FALSE}
exec bash -l
```
The `-l` option indicates it should be a login shell.
- Change your login shell permanently:
```{bash, eval=FALSE}
chsh -s /bin/bash userid
```
Then log out and log in.
## Command history and bash completion
We can navigate to previous/next commands by the upper and lower keys, or maintain a command history stack using `pushd` and `popd` commands.
Bash provides the following standard completion for the Linux users by default. Much less typing errors and time!
- Pathname completion.
- Filename completion.
- Variablename completion: `echo $[TAB][TAB]`.
- Username completion: `cd ~[TAB][TAB]`.
- Hostname completion `ssh hwachou@[TAB][TAB]`.
- It can also be customized to auto-complete other stuff such as options and command's arguments. Google `bash completion` for more information.
## `man` is man's best friend
Online help for shell commands: `man commandname`.
```{bash}
# display documentation for the ls command
man ls
```
# Navigate file system
## Linux directory structure
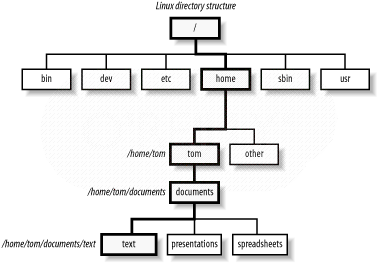
- Upon log in, user is at his/her home directory.
- `tree` command (if installed) displays directory structure.
`tree -L levels` display levels directories deep.
```{bash}
# display only directories in levels 1, 2 from root directory
tree -d -L 2 /
```
## Move around the file system
- `pwd` prints absolute path to the current working directory:
```{bash}
pwd
```
- `ls` lists contents of a directory:
```{bash}
ls
```
- `ls -l` lists detailed contents of a directory:
```{bash}
ls -l
```
- `ls -al` lists all contents of a directory, including those start with `.` (hidden folders):
```{bash, small=TRUE}
ls -al
```
- `..` denotes the parent of current working directory.
- `.` denotes the current working directory.
- `~` denotes user's home directory.
- `/` denotes the root directory.
- `cd ..` changes to parent directory.
- `cd` or `cd ~` changes to home directory.
- `cd /` changes to root directory.
## File permissions
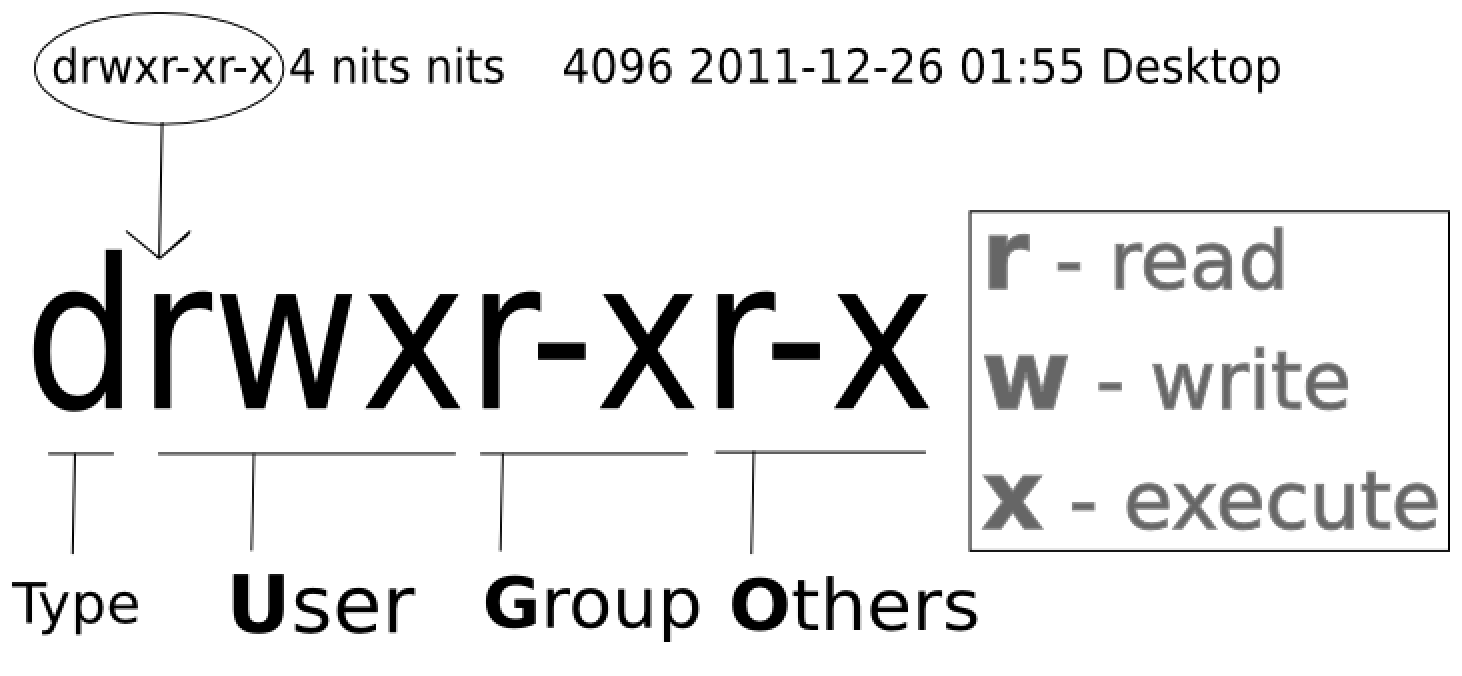
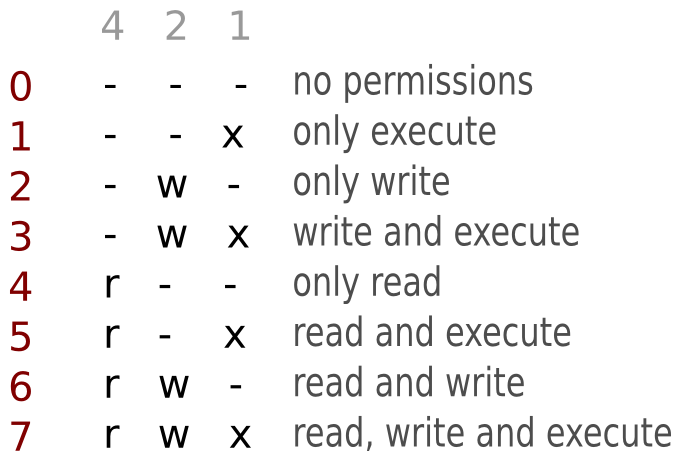
----
- `chmod g+x file` makes a file executable to group members.
- `chmod 751 file` sets permission `rwxr-x--x` to a file.
- `groups userid` shows which group(s) a user belongs to:
```{bash}
groups huazhou
```
## Manipulate files and directories
- `cp` copies file to a new location.
- `mv` moves file to a new location.
- `touch` creates a text file; if file already exists, it's left unchanged.
- `rm` deletes a file.
- `mkdir` creates a new directory.
- `rmdir` deletes an _empty_ directory.
- `rm -rf` deletes a directory and all contents in that directory (be cautious using the `-f` option ...).
## Find files
- `locate` locates a file by name (need `mlocate` program installed):
```{bash}
locate linux.Rmd
```
- `find` is similar to `locate` but has more functionalities, e.g., select files by age, size, permissions, .... , and is ubiquitous.
```{bash}
find linux.Rmd
```
```{bash}
find /home/huazhou -name linux.Rmd
```
- `which` locates a program (executable file):
```{bash}
which R
```
## Wildcard characters
| Wildcard | Matches |
|------------|-------------------------------------|
| `?` | any single character |
| `*` | any character 0 or more times |
| `+` | one or more preceding pattern |
| `^` | beginning of the line |
| `$` | end of the line |
| `[set]` | any character in set |
| `[!set]` | any character not in set |
| `[a-z]` | any lowercase letter |
| `[0-9]` | any number (same as `[0123456789]`) |
-
```{bash}
# all png files in current folder
ls -l *.png
```
## Regular expression
- Wildcards are examples of _regular expressions_.
- Regular expressions are a powerful tool to efficiently sift through large amounts of text: record linking, data cleaning, scraping data from website or other data-feed.
- Google `regular expressions` to learn.
# Work with text files
## View/peek text files
- `cat` prints the contents of a file:
```{bash, size='smallsize'}
cat runSim.R
```
----
- `head` prints the first 10 lines of a file:
```{bash}
head runSim.R
```
`head -l` prints the first $l$ lines of a file:
```{bash}
head -15 runSim.R
```
- `tail` prints the last 10 lines of a file:
```{bash}
tail runSim.R
```
`tail -l` prints the last $l$ lines of a file:
```{bash}
tail -15 runSim.R
```
----
- Questions:
- How to see the 11th line of the file and nothing else?
- What about the 11th to the last line?
## Piping and redirection
- `|` sends output from one command as input of another command.
- `>` directs output from one command to a file.
- `>>` appends output from one command to a file.
- `<` reads input from a file.
- Combinations of shell commands (`grep`, `sed`, `awk`, ...), piping and redirection, and regular expressions allow us pre-process and reformat huge text files efficiently.
- See HW1.
## `less` is more; `more` is less
- `more` browses a text file screen by screen (only downwards). Scroll down one page (paging) by pressing the spacebar; exit by pressing the `q` key.
- `less` is also a pager, but has more functionalities, e.g., scroll upwards and downwards through the input.
- `less` doesn't need to read the whole file, i.e., it loads files faster than `more`.
## `grep`
`grep` prints lines that match an expression:
- Show lines that contain string `CentOS`:
```{bash}
# quotes not necessary if not a regular expression
grep 'CentOS' linux.Rmd
```
- Search multiple text files:
```{bash}
grep 'CentOS' *.Rmd
```
- Show matching line numbers:
```{bash}
grep -n 'CentOS' linux.Rmd
```
- Find all files in current directory with `.png` extension:
```{bash}
ls | grep '.png$'
```
- Find all directories in the current directory:
```{bash}
ls -al | grep '^d'
```
## `sed`
- `sed` is a stream editor.
- Replace `CentOS` by `RHEL` in a text file:
```{bash}
sed 's/CentOS/RHEL/' linux.Rmd | grep RHEL
```
## `awk`
- `awk` is a filter and report writer.
- First let's display first lines of the file `/etc/passwd`:
```{bash}
head /etc/passwd
```
Each line contains fields (1) user name, (2) password, (3) user ID, (4) group ID, (5) user ID info, (6) home directory, and (7) command shell, spearated by `:`.
- Print sorted list of login names:
```{bash}
awk -F: '{ print $1 }' /etc/passwd | sort | head -10
```
- Print number of lines in a file, as `NR` stands for Number of Rows:
```{bash}
awk 'END { print NR }' /etc/passwd
```
or
```{bash}
wc -l /etc/passwd
```
or (not displaying file name)
```{bash}
wc -l < /etc/passwd
```
- Print login names with UID in range `1000-1035`:
```{bash}
awk -F: '{if ($3 >= 1000 && $3 <= 1035) print}' /etc/passwd
```
- Print login names and log-in shells in comma-seperated format:
```{bash}
awk -F: '{OFS = ","} {print $1, $7}' /etc/passwd
```
- Print login names and indicate those with UID>1000 as `vip`:
```{bash}
awk -F: -v status="" '{OFS = ","}
{if ($3 >= 1000) status="vip"; else status="regular"}
{print $1, status}' /etc/passwd
```
## Text editors

Source: [Editor War](http://en.wikipedia.org/wiki/Editor_war) on Wikipedia.
## Emacs
- `Emacs` is a powerful text editor with extensive support for many languages including `R`, $\LaTeX$, `python`, and `C/C++`; however it's _not_ installed by default on many Linux distributions.
- Basic survival commands:
- `emacs filename` to open a file with emacs.
- `CTRL-x CTRL-f` to open an existing or new file.
- `CTRL-x CTRX-s` to save.
- `CTRL-x CTRL-w` to save as.
- `CTRL-x CTRL-c` to quit.
- Google `emacs cheatsheet`

`C-` means hold the `control` key, and press ``.
`M-` means press the `Esc` key once, and press ``.
## Vi
- `Vi` is ubiquitous (POSIX standard). Learn at least its basics; otherwise you can edit nothing on some clusters.
- Basic survival commands:
- `vi filename` to start editing a file.
- `vi` is a _modal_ editor: _insert_ mode and _normal_ mode. Pressing `i` switches from the normal mode to insert mode. Pressing `ESC` switches from the insert mode to normal mode.
- `:x` quits `vi` and saves changes.
- `:q!` quits vi without saving latest changes.
- `:w` saves changes.
- `:wq` quits `vi` and saves changes.
- Google `vi cheatsheet`

## IDE (Integrated Development Environment)
- Statisticians write a lot of code. Critical to adopt a good IDE that goes beyond code editing: syntax highlighting, executing code within editor, debugging, profiling, version control, etc.
- R Studio, Eclipse, Emacs, Matlab, Visual Studio, etc.
# Processes
## Cancel a non-responding program
- Press `Ctrl+C` to cancel a non-responding or long-running program.
## Processes
- OS runs processes on behalf of user.
- Each process has Process ID (PID), Username (UID), Parent process ID (PPID), Time and data process started (STIME), time running (TIME), etc.
```{bash}
ps
```
- All current running processes:
```{bash}
ps -eaf
```
- All Python processes:
```{bash}
ps -eaf | grep python
```
- Process with PID=1:
```{bash}
ps -fp 1
```
- All processes owned by a user:
```{bash}
ps -fu huazhou
```
## Kill processes
- Kill process with PID=1001:
```{bash, eval=FALSE}
kill 1001
```
- Kill all R processes.
```{bash, eval=FALSE}
killall -r R
```
## `top`
- `top` prints realtime process information (very useful).
```{bash, eval=FALSE}
top
```
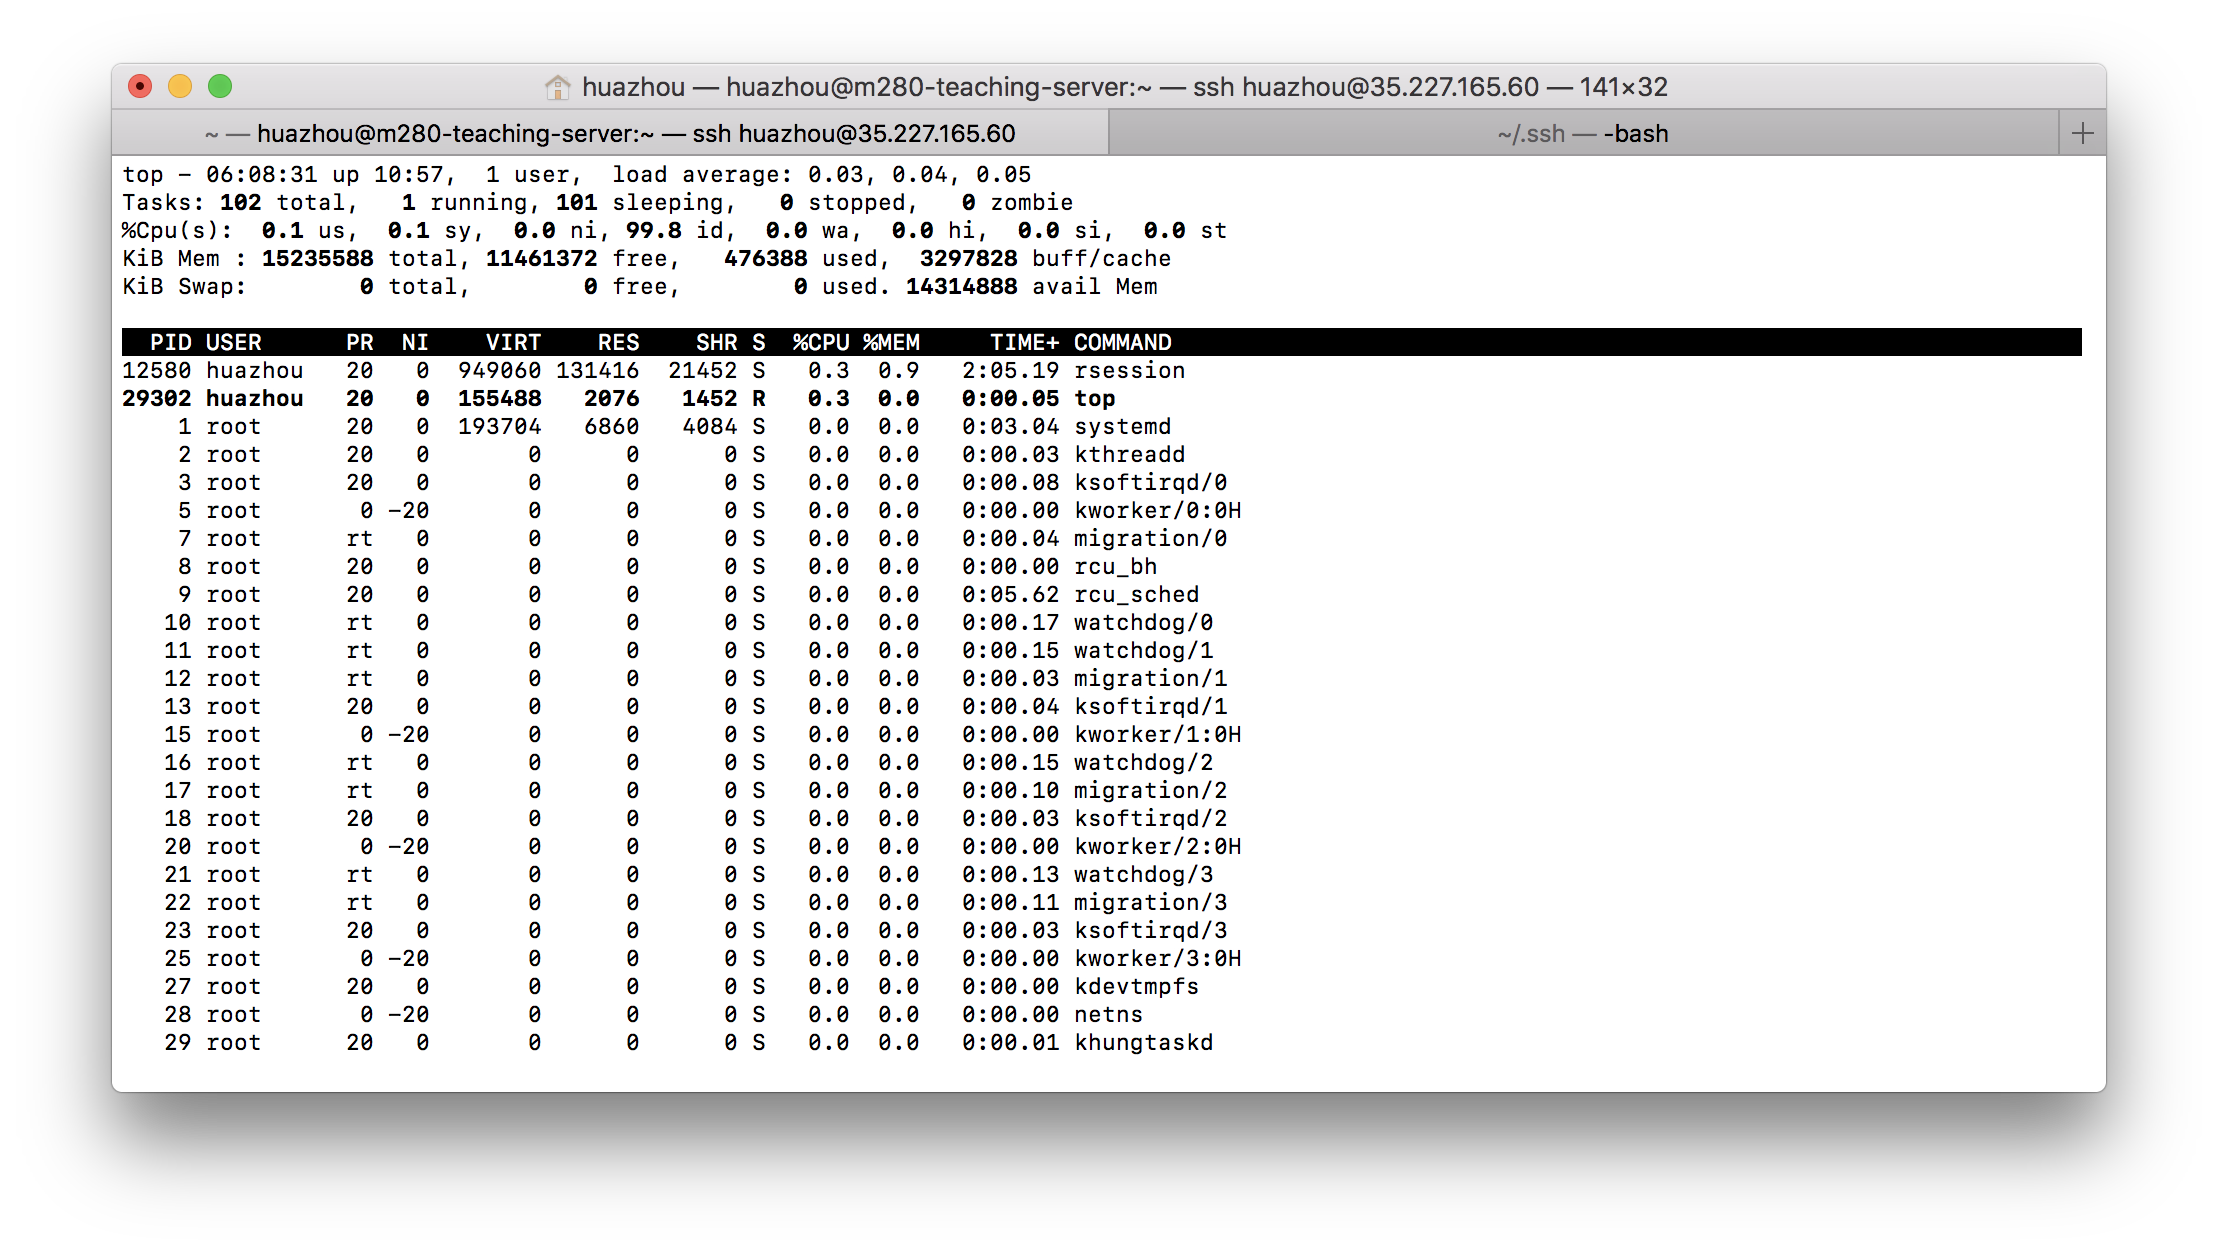
- Exit the `top` program by pressing the `q` key.
# Secure shell (SSH)
## SSH
SSH (secure shell) is the dominant cryptographic network protocol for secure network connection via an insecure network.
- On Linux or Mac ternminal, access the teaching server by
```{bash, eval=FALSE}
ssh username@server.ucla-biostat-203b.com
```
- For Windows users, there are 2 ways: (1) (highly recommended) [Git Bash](git bash commands), (2) (not recommended) [PuTTY](http://www.putty.org) program (free), or (3) (may be an overkill for this class) use WSL for Windows to install a full fledged Linux system within Windows.
## Use keys over password
- Key authentication is more secure than password. Most passwords are weak.
- Script or a program may need to systematically SSH into other machines.
- Log into multiple machines using the same key.
- Seamless use of many services: Git, AWS or Google cloud service, parallel computing on multiple hosts, Travis CI (continuous integration) etc.
- Many servers only allow key authentication and do not accept password authentication.
## Key authentication
----
- _Public key_. Put on the machine(s) you want to log in.
- _Private key_. Put on your own computer. Consider this as the actual key in your pocket; never give to others.
- Messages from server to your computer is encrypted with your public key. It can only be decrypted using your private key.
- Messages from your computer to server is signed with your private key (digital signatures) and can be verified by anyone who has your public key (authentication).
## Steps to generate keys
- On Linux, Mac, or Windows Git Bash, to generate a key pair:
```{bash, eval=FALSE}
ssh-keygen -t rsa -f ~/.ssh/[KEY_FILENAME] -C [USERNAME]
```
- `[KEY_FILENAME]` is the name that you want to use for your SSH key files. For example, a filename of `id_rsa` generates a private key file named `id_rsa` and a public key file named `id_rsa.pub`.
- `[USERNAME]` is the user for whom you will apply this SSH key.
- Use a (optional) paraphrase different form password.
- Set correct permissions on the `.ssh` folder and key files
```{bash, eval=FALSE}
chmod 400 ~/.ssh/[KEY_FILENAME]
```
----
- Append the public key to the `~/.ssh/authorized_keys` file of any Linux machine we want to SSH to, e.g.,
```{bash, eval=FALSE}
ssh-copy-id -i ~/.ssh/[KEY_FILENAME] [USERNAME]@server.ucla-biostat-203b.com
```
- Test your new key.
```{bash, eval=FALSE}
ssh -i ~/.ssh/[KEY_FILENAME] [USERNAME]@server.ucla-biostat-203b.com
```
- Now you don't need password each time you connect from your machine to the teaching server.
----
- If you set paraphrase when generating keys, you'll be prompted for the paraphrase each time the private key is used. Avoid repeatedly entering the paraphrase by using `ssh-agent` on Linux/Mac or Pagent on Windows.
- Same key pair can be used between any two machines. We don't need to regenerate keys for each new connection.
## Transfer files between machines
- `scp` securely transfers files between machines using SSH.
```{bash, eval=FALSE}
## copy file from local to remote
scp [LOCALFILE] [USERNAME]@server.ucla-biostat-203b.com:/[PATH_TO_FOLDER]
```
```{bash, eval=FALSE}
## copy file from remote to local
scp [USERNAME]@server.ucla-biostat-203b.com:/[PATH_TO_FILE] [PATH_TO_LOCAL_FOLDER]
```
- `sftp` is FTP via SSH.
- `Globus` is GUI program for securely transferring files between machines. To use Globus you will have to go to and login through UCLA by selecting your existing organizational login as UCLA. Then you will need to download their Globus Connect Personal software, then set your laptop as an endpoint. Very detailed instructions can be found at .
- GUIs for Windows (WinSCP) or Mac (Cyberduck).
- (My preferred way) Use a **version control system** (git, svn, cvs, ...) to sync project files between different machines and systems.
## Line breaks in text files
- Windows uses a pair of `CR` and `LF` for line breaks.
- Linux/Unix uses an `LF` character only.
- MacOS X also uses a single `LF` character. But old Mac OS used a single `CR` character for line breaks.
- If transferred in binary mode (bit by bit) between OSs, a text file could look a mess.
- Most transfer programs automatically switch to text mode when transferring text files and perform conversion of line breaks between different OSs; but I used to run into problems using WinSCP. Sometimes you have to tell WinSCP explicitly a text file is being transferred.
# Run R in Linux
## Interactive mode
- Start R in the interactive mode by typing `R` in shell.
- Then run R script by
```{r, eval=FALSE}
source("script.R")
```
## Batch mode
- Demo script [`meanEst.R`](https://raw.githubusercontent.com/ucla-biostat203b-2020winter/ucla-biostat203b-2020winter.github.io/master/slides/02-linux/meanEst.R) implements an (terrible) estimator of mean
$$
{\widehat \mu}_n = \frac{\sum_{i=1}^n x_i 1_{i \text{ is prime}}}{\sum_{i=1}^n 1_{i \text{ is prime}}}.
$$
```{bash, echo=FALSE}
cat meanEst.R
```
----
- To run your R code non-interactively aka in batch mode, we have at least two options:
```{bash, eval=FALSE}
# default output to meanEst.Rout
R CMD BATCH meanEst.R
```
or
```{bash, eval=FALSE}
# output to stdout
Rscript meanEst.R
```
- Typically automate batch calls using a scripting language, e.g., Python, Perl, and shell script.
## Pass arguments to R scripts
- Specify arguments in `R CMD BATCH`:
```{bash, eval=FALSE}
R CMD BATCH '--args mu=1 sig=2 kap=3' script.R
```
- Specify arguments in `Rscript`:
```{bash, eval=FALSE}
Rscript script.R mu=1 sig=2 kap=3
```
- Parse command line arguments using magic formula
```{r, eval=FALSE}
for (arg in commandArgs(T)) {
eval(parse(text=arg))
}
```
in R script. After calling the above code, all command line arguments will be available in the global namespace.
----
- To understand the magic formula `commandArgs`, run R by:
```{bash, eval=FALSE}
R '--args mu=1 sig=2 kap=3'
```
and then issue commands in R
```{r, eval=FALSE}
commandArgs()
commandArgs(TRUE)
```
----
- Understand the magic formula `parse` and `eval`:
```{r, error=TRUE}
rm(list=ls())
print(x)
parse(text="x=3")
eval(parse(text="x=3"))
print(x)
```
----
- [`runSim.R`](https://raw.githubusercontent.com/ucla-biostat203b-2020winter/ucla-biostat203b-2020winter.github.io/master/slides/02-linux/runSim.R) has components: (1) **command argument parser**, (2) method implementation, (3) data generator with unspecified parameter `n`, and (4) estimation based on generated data.
```{bash, echo=FALSE}
cat runSim.R
```
----
- Call `runSim.R` with sample size `n=100`:
```{bash}
R CMD BATCH '--args n=100' runSim.R
```
or
```{bash}
Rscript runSim.R n=100
```
## Run long jobs
- Many statistical computing tasks take long: simulation, MCMC, etc. When we exit Linux when the job is unfinished, the job is killed.
- `nohup` command in Linux runs program(s) immune to hangups and writes output to `nohup.out` by default. Logging out will _not_ kill the process; we can log in later to check status and results.
- `nohup` is POSIX standard thus available on Linux and MacOS.
- Run `runSim.R` in background and writes output to `nohup.out`:
```{bash}
nohup Rscript runSim.R n=100 &
```
The `&` at the end of the command instructs Linux to run this command in background, so we gain control of the terminal immediately.
## screen
- `screen` is another popular utility, but not installed by default.
- Typical workflow using `screen`.
0. Access remote server using `ssh`.
0. Start jobs in batch mode.
0. Detach jobs.
0. Exit from server, wait for jobs to finish.
0. Access remote server using `ssh`.
0. Re-attach jobs, check on progress, get results, etc.
## Use R to call R
R in conjuction with `nohup` (or `screen`) can be used to orchestrate a large simulation study.
- It can be more elegant, transparent, and robust to parallelize jobs corresponding to different scenarios (e.g., different generative models) outside of the code used to do statistical computation.
- We consider a simulation study in R but the same approach could be used with code written in Julia, Matlab, Python, etc.
- Python in many ways makes a better _glue_.
- Suppose we have
- [`runSim.R`](https://raw.githubusercontent.com/ucla-biostat203b-2020winter/ucla-biostat203b-2020winter.github.io/master/slides/02-linux/runSim.R) which runs a simulation based on command line argument `n`.
- A large collection of `n` values that we want to use in our simulation study.
- Access to a server with 128 cores.
How do to parallelize the job?
- Option 1: manually call `runSim.R` for each setting.
- Option 2 (smarter): automate calls using R and `nohup`.
- Let's demonstrate using the script [autoSim.R](https://raw.githubusercontent.com/ucla-biostat203b-2020winter/ucla-biostat203b-2020winter.github.io/master/slides/02-linux/autoSim.R)
```{bash}
cat autoSim.R
```
Note when we call bash command using the `system` function in R, we set optional argument `wait=FALSE` so that jobs can be run parallel.
-
```{bash}
Rscript autoSim.R
```
```{bash, echo=FALSE, eval=TRUE}
rm n*.txt *.Rout
```
- Now we just need to write a script to collect results from the output files.
- Later on we learn how to coordinate large scale computation on UCLA Hoffmann2 cluster, using Linux and R scripting.