---
uid: Uno.Tutorials.OpenIDConnect
---
# Authentication using OpenID Connect
OpenID Connect is a layer over OAuth 2.0, allowing a simpler integration into applications, especially when the OpenID Connect Discovery is used.
This article will document the usage of `IdentityModel.OidcClient` into an Uno application using the [`WebAuthenticationBroker`](../features/web-authentication-broker.md). You can find more in [the IdentityModel.OidcClient documentation](https://identitymodel.readthedocs.io/en/latest/native/overview.html).
> The code of this article can be found in the [Uno Samples GitHub repository](https://github.com/unoplatform/Uno.Samples/tree/master/UI/Authentication.OidcDemo).
## Limitations
- **Platforms**: The `WebAuthenticationBroker` is not supported on all platforms yet. For Uno 3.6 it is implemented only on WebAssembly, Android, iOS and macOS.
- **Return URI on WebAssembly**: Because of browser security restrictions, on WebAssembly, the return URL must be on the same origin as the application. On other platforms the best approach is to use a custom protocol scheme (like `my-application:`). For most applications, you may simply use the automatic discovery of return URLs, which will use the [`WebAuthenticationBroker.GetCurrentApplicationCallbackUri()` method](https://learn.microsoft.com/uwp/api/windows.security.authentication.web.webauthenticationbroker.getcurrentapplicationcallbackuri).
- **Browser Anti-Popup Protection**: On WebAssembly, a foreign/public web site is usually used to authenticate the user. Doing this without losing the application context requires the opening of a new browser window. To ensure the window will open on all browsers without being denied, this new window **must be opened using the handling of a user interaction**. For this reason the IdentityModel.OidcClient's *automatic mode* can't be used because it's doing async processing (fetching the discovery endpoint) before opening the authentication browser.
## Demo Endpoint
This code uses the *IdentityServer* demonstration endpoint with the following parameters:
| Field | Value |
| --------- | ----------------------------------------- |
| Authority | `https://demo.duendesoftware.com/` |
| ClientId | `interactive.confidential` |
| Secret | `secret` |
| Scopes | `openid profile email api offline_access` |
> Note: this endpoint allows any return URIs. It's acceptable for demo purposes, but production application will usually requires to register return addresses.
## Step 0 - Install Uno + Create an Application
Please refer to the [Getting Started documentation](../get-started.md) to install Uno and create a new application. For the sample below, an application named `OidcDemo` has been created.
For platforms supporting it, the custom protocol "oidc-auth:" will be used.
## Step 1 - Add Reference to OidcClient package
Add the package [`IdentityModel.OidcClient`](https://www.nuget.org/packages/IdentityModel.OidcClient) to all relevant *head* projects of the solution.
## Step 2 - Prepare for Return Uri
### Android
Add the following class in the project of the Android Head.
```csharp
[Activity(NoHistory = true, LaunchMode = LaunchMode.SingleTop, Exported = true)]
[IntentFilter(
new[] {Android.Content.Intent.ActionView},
Categories = new[] {Android.Content.Intent.CategoryDefault, Android.Content.Intent.CategoryBrowsable},
DataScheme = "oidc-auth")]
public class WebAuthenticationBrokerActivity : WebAuthenticationBrokerActivityBase
{
}
```
Note the `[Activity]` attribute needs to include `Exported = true` if you are targeting Android 12.
This activity will intercept the return URI and forward it to any waiting `WebAuthenticationBroker`.
Note: it's using the system browser. Check the [WebAuthenticationBroker documentation](../features/web-authentication-broker.md) to use another mechanism.
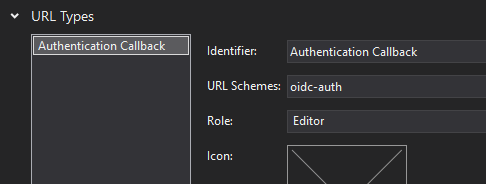
### iOS & macOS
Add the `oidc-auth:` custom scheme in `Info.plist` file.
```xml
CFBundleURLTypesCFBundleURLNameAuthentication CallbackCFBundleURLSchemesoidc-auth
```
Alternatively, you can use the editor integrated in Visual Studio to set it, in the *advanced* tab:
### WinUI
There's nothing special for WinUI. Any return URI will work. You can force it to `oidc-auth:` if you want, but you won't have any special registration to do to support it.
### WebAssembly
There's nothing special for WASM. The default *return Uri* of the platform (`WebAuthenticationBroker.GetCurrentApplicationCallbackUri()`) will work with this sample and will default to `/authentication-callback`. It should be something like `http://localhost:5000/authentication-callback` when running locally using Kestrel.
## Step 3 - Prepare the UI
Add the following lines in your application, in `[Project-name]/MainPage.xaml`:
```xml
xmlns:toolkit="using:Uno.UI.Toolkit"
```
## Step 4 - Prepare the Requesting Code
Add the following code to the main page of your application:
```csharp
//add this namespace on top of the class
using IdentityModel.OidcClient;
// Put this code in the class of MainPage.xaml.cs
private OidcClient _oidcClient;
private AuthorizeState _loginState;
private Uri _logoutUrl;
public MainPage()
{
this.InitializeComponent();
PrepareClient();
}
private async void PrepareClient()
{
var redirectUri = WebAuthenticationBroker.GetCurrentApplicationCallbackUri().OriginalString;
// Create options for endpoint discovery
var options = new OidcClientOptions
{
Authority = "https://demo.duendesoftware.com/",
ClientId = "interactive.confidential",
ClientSecret = "secret",
Scope = "openid profile email api offline_access",
RedirectUri = redirectUri,
PostLogoutRedirectUri = redirectUri,
};
// Create the client. In production application, this is often created and stored
// directly in the Application class.
_oidcClient = new OidcClient(options);
// Invoke Discovery and prepare a request state, containing the nonce.
// This is done here to ensure the discovery mechanism is done before
// the user clicks on the SignIn button. Since the opening of a web window
// should be done during the handling of a user interaction (here it's the button click),
// it will be too late to reach the discovery endpoint.
// Not doing this could trigger popup blocker mechanisms in browsers.
_loginState = await _oidcClient.PrepareLoginAsync();
btnSignin.IsEnabled = true;
// Same for logout url.
_logoutUrl = new Uri(await _oidcClient.PrepareLogoutAsync(new LogoutRequest()));
btnSignout.IsEnabled = true;
}
```
## Step 5 - Proceed to Authentication
Add following button handlers:
```csharp
private async void SignIn_Clicked(object sender, RoutedEventArgs e)
{
var startUri = new Uri(_loginState.StartUrl);
// Important: there should be NO await before calling .AuthenticateAsync() - at least
// on WebAssembly, in order to prevent triggering the popup blocker mechanisms.
var userResult = await WebAuthenticationBroker.AuthenticateAsync(WebAuthenticationOptions.None, startUri);
if (userResult.ResponseStatus != WebAuthenticationStatus.Success)
{
txtAuthResult.Text = "Canceled";
// Error or user cancellation
return;
}
// User authentication process completed successfully.
// Now we need to get authorization tokens from the response
var authenticationResult = await _oidcClient.ProcessResponseAsync(userResult.ResponseData, _loginState);
if (authenticationResult.IsError)
{
var errorMessage = authenticationResult.Error;
// TODO: do something with error message
txtAuthResult.Text = $"Error {errorMessage}";
return;
}
// That's completed. Here you have to token, ready to do something
var token = authenticationResult.AccessToken;
var refreshToken = authenticationResult.RefreshToken;
// TODO: make something useful with the tokens
txtAuthResult.Text = $"Success, token is {token}";
}
private async void SignOut_Clicked(object sender, RoutedEventArgs e)
{
// Important: there should be NO await before calling .AuthenticateAsync() - at least
// on WebAssembly, in order to prevent triggering the popup blocker mechanisms.
await WebAuthenticationBroker.AuthenticateAsync(WebAuthenticationOptions.None, _logoutUrl);
}
```
## Step 6 - Finalize & Compile
> [!IMPORTANT]
> On WebAssembly, it's important to configure the linker to prevent the removal of some important part of the *OIDC Connect* client library:
> `LinkerConfig.xml`:
>
> ```xml
>
>
>
>
>
>
>
>
>
>
>
>
>
>
>
> ```
Now compile & Run!