openapi: '3.1.0'
info:
version: 1.1.0
title: Voiceflow Dialog Management API
description: >
# Overview
The **Dialog Manager API (DM API)** exposes the Voiceflow runtime and allows clients to start a
conversation with a Voiceflow project.
You can design a conversational interface using our [Voiceflow Creator](https://creator.voiceflow.com), then easily
integrate the conversation into a variety of interfaces: chatbot, voice assistant, IVR, web chat,
and more.
**Note**: The Dialog Manager API can only be used to integrate Voiceflow **general projects**, that is,
projects without a pre-existing third-party upload.
Thus, Alexa, Google Actions, and Dialogflow ES projects on Voiceflow are instead accessed through
their associated 3rd party platform, e.g, Alexa projects can be accessed by an Amazon Alexa device.
# Quick Start
To see the DM API in action, follow these steps:
1. **Create a project** - Build a conversational flow on the [Voiceflow Creator](https://creator.voiceflow.com).
2. **Render your project** - Ensure you're on the Designer tab by checking the left side bar. Then, click the
Run button on the top-right corner to compile your project and make it available through the DM API.
3. **Get an API key** - Go to the Integration tab using the left sidebar and copy your project's
API key.
4. **Copy a test call** - Copy one of the "API Call Examples" below and replace the API key variable with the API key
you copied in step 2.
5. **Start the conversation** - Execute the API call to start a conversation and get a response from your Voiceflow app.
6. **Continue the conversation** - Change the user input variable and execute the API call again. The DM API tracks the current state
of the conversation and may produce a different response to advance the conversation.
View API Call ExamplescURL command line
API_KEY='VF.DM.xxxxxxxxxxxxxxxxxxxxxxxx.xxxxxxxxxxxxxxxxxxxxxxxxxxxxxxxxxxxxxxxxxx'
USER_ID='user_123'
USER_INPUT='Hello world!'
curl --request POST "https://general-runtime.voiceflow.com/state/user/$USER_ID/interact" \
--header "Authorization: $API_KEY" \
--header "Content-Type: application/json" \
--header "versionID: 'development'" \
--data-raw "{
\"request\": { \"type\": \"text\", \"payload\": \"$USER_INPUT\" }
}"
Node.js
const axios = require('axios');
const apiKey = 'VF.DM.xxxxxxxxxxxxxxxxxxxxxxxx.xxxxxxxxxxxxxxxxxxxxxxxxxxxxxxxxxxxxxxxxxx';
const userID = 'user_123'; // Unique ID used to track conversation state
const userInput = 'Hello world!'; // User's message to your Voiceflow project
const body = {
action: {
type: 'text',
payload: userInput,
},
};
async function startInteract() {
// Start a conversation
const response = await axios({
method: 'POST',
baseURL: 'https://general-runtime.voiceflow.com',
url: `/state/user/${userID}/interact`,
headers: {
Authorization: apiKey,
versionID: 'development',
},
data: body,
});
// Log the response
console.log(response.data);
}
startInteract().catch((error) => console.error(error));
Python
import requests
api_key = "VF.DM.xxxxxxxxxxxxxxxxxxxxxxxx.xxxxxxxxxxxxxxxxxxxxxxxxxxxxxxxxxxxxxxxxxx"
user_id = "user_123" # Unique ID used to track conversation state
user_input = "Hello world!" # User's message to your Voiceflow project
body = {"action": {"type": "text", "payload": user_input}}
# Start a conversation
response = requests.post(
f"https://general-runtime.voiceflow.com/state/user/{user_id}/interact",
json=body,
headers={
"Authorization": api_key,
"versionID": "development"
},
)
# Log the response
print(response.json())
# Endpoint URL
The standard URL base for all Dialog Management API calls is shown below:
```
https://general-runtime.voiceflow.com
```
*Note: This will be different if you are self-hosting or on a private cloud.*
tags:
- name: API Reference
description: >
The Dialog Manager API (DM API) allows any application to talk with a Voiceflow diagram using HTTP calls
to the **interact endpoint**.
## Conversation State
The DM API automatically creates and manages the conversation state. Identical requests to the
DM API may produce different responses depending on your diagram's logic and the previous request
that the API received.
Note that this means the DM API is **not a REST API** as it does not satisfy the [statelessness
property](https://www.ics.uci.edu/~fielding/pubs/dissertation/rest_arch_style.htm).
The DM API's responses depend not only on the request, but also stored state
within the server. Keep this in mind while working with the DM API.
### Tracking conversation state
All endpoints take in a `userID` parameter, which is used to identify the caller and assign them a unique
conversation state object.
The interact endpoint can also receive updated variables via the `state.variables` body parameter.
#### Multiple conversation sessions
Multiple conversation sessions to the same Voiceflow project can be running simultaneously.
Each session is identified by the `userID` that you specify.
For example, customer A should communicate with `/state/user/customerA/interact` whereas
customer B should communicate with `/state/user/customerB/interact`.
When customer A gives a response, such as "I would like a large pizza", it will advance their
specific conversation session identified by `/state/user/customerA/interact`. For example,
the app might then ask what toppings customer A wants.
Meanwhile, `/state/user/customerB/interact`'s session remains unchanged, e.g, it might be
waiting for customer B to give their order.
#### Format of `userID`
The format of `userID` is up to you. You can choose any string that fits your particular domain such as `user1234`
or `507f191e810c19729de860ea`.
There are a few best practices to defining a `userID` format:
1. **Unique** - The `userID` should be unique to each user. Otherwise, if two users share the same `userID`, the
Voiceflow app may leak information about user A's conversation to user B, which is a potential privacy
violation.
2. **Non-sensitive** - It is not recommended to use sensitive or private information in the `userID` such
as emails, real names, or phone numbers.
## versionID
DM API endpoints also accept a `versionID` header whose value is a **version alias** that points to a
particular version of your Voiceflow project.
The currently supported aliases are:
- `development` - The version displayed on the Voiceflow Creator's canvas
- `production` - The version that has been published
Use the `development` alias whenever you are experimenting with your API and the `production`
version when integrating Voiceflow with your web app.
### Updating your version
To update the `'development'` version exposed by the DM API, you must:
1. Make your changes on the canvas and NLU manager
2. Hit the blue Run button in the Voiceflow canvas to compile the diagram
3. Hit the "Train Assistant" button in the Prototype tool to train the NLU model
To update the `'production'` version exposed by the DM API, you must:
1. Make your changes on the canvas and NLU manager
2. Hit the Publish button at the top-right corner of the Voiceflow canvas
- name: Custom Actions
description: >
### Overview
The **Custom Action step** allows you to perform any kind of integration to a Voiceflow project.
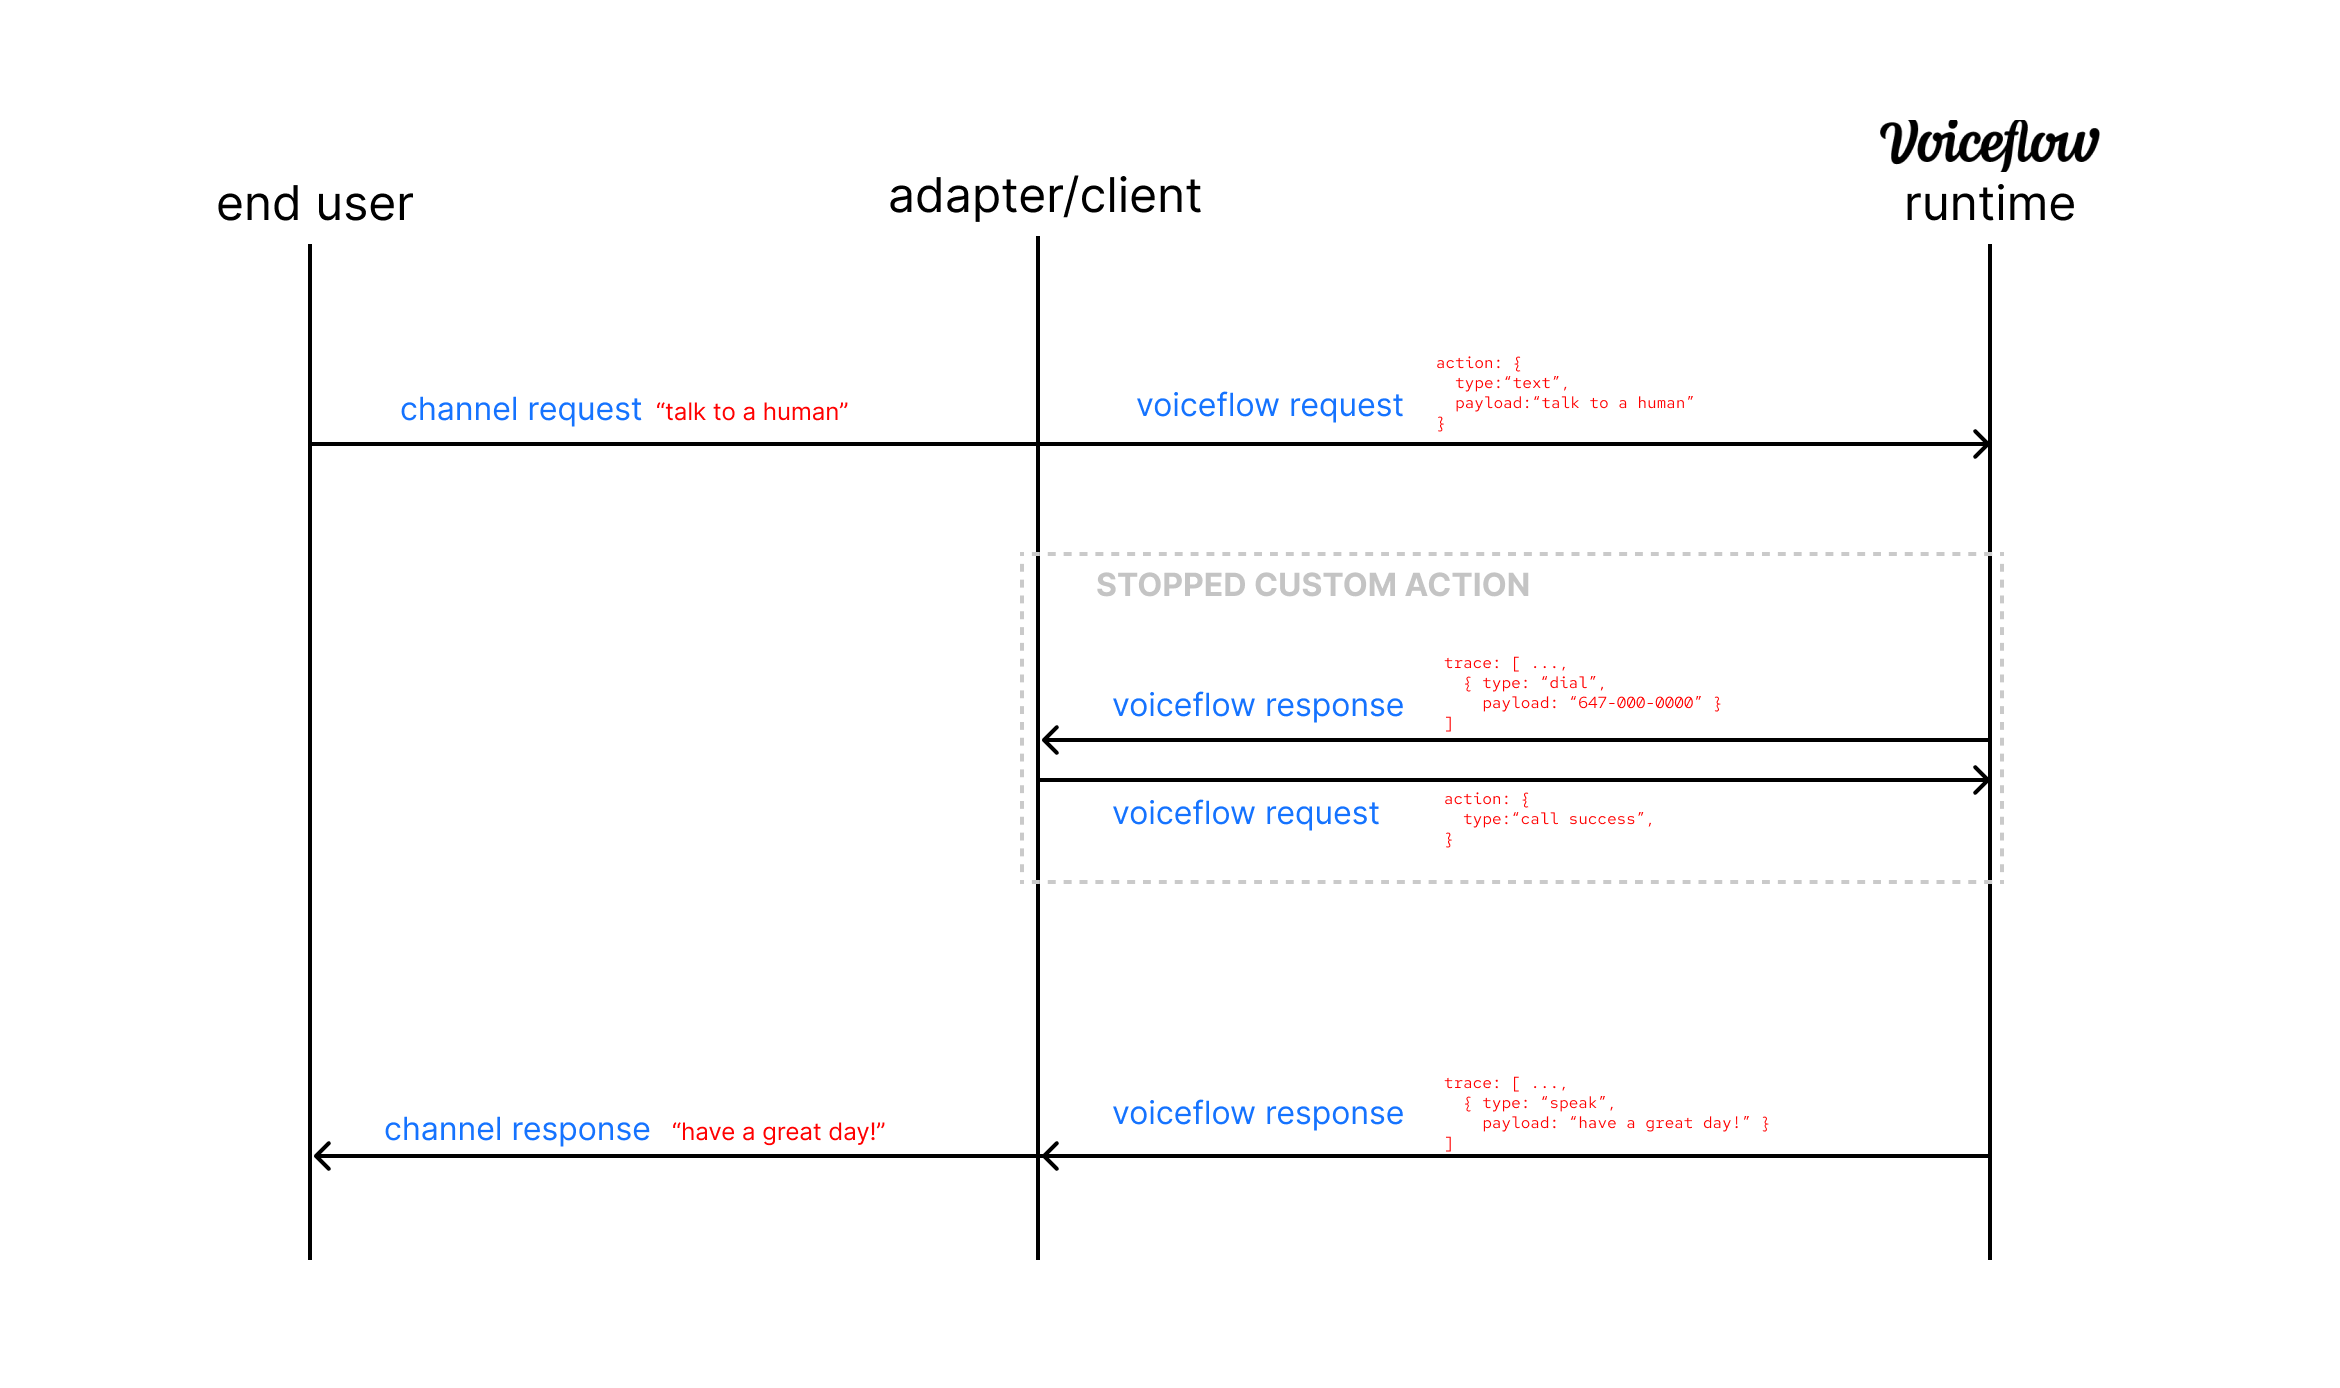
A Custom Action step is similar to an event handler. A Voiceflow application can be commanded to stop on a Custom Action step
and wait for your client application to send back an event, a Custom Action request, telling the Voiceflow diagram which logic
it should execute next.
Before sending back this event, your client application can perform a variety of tasks including, but not limited to:
1. Triggering navigation on your website
2. Processing a credit card payment
3. Opening the windows on a car
4. Handing off the call to a human
### Execution of a Custom Action
Here is how a Custom Action works:
1. Your **user** interacts with your client app, e.g, saying "talk to a human"
2. Your **client** sends an interact request normally, but also specifies the name of Custom Action steps that the Voiceflow diagram should stop on.
3. Our **DM API** executes your diagram normally, but returns early if it encounters one of the Custom Actions specified in Step 1 and sends back a corresponding Custom Action trace, e.g, a `"dial"` type trace defined by your Voiceflow project.
4. Your **client** receives the Custom Action trace. Your code can detect this trace and perform any necessary processing.
5. Your **client** sends a Custom Action request back, e.g, a `"call success"` type request.
6. Our **DM API** follows the path in your diagram chosen by the Custom Action request. It will produce responses as normal, such as a message `"have a great day!"`
7. Your **client** can display the response `"have a great day"` on your application to the user.
### Example - Stripe Integration
As a concrete example, let's look at how we can implement an integration for Stripe to charge our user's credit cards.
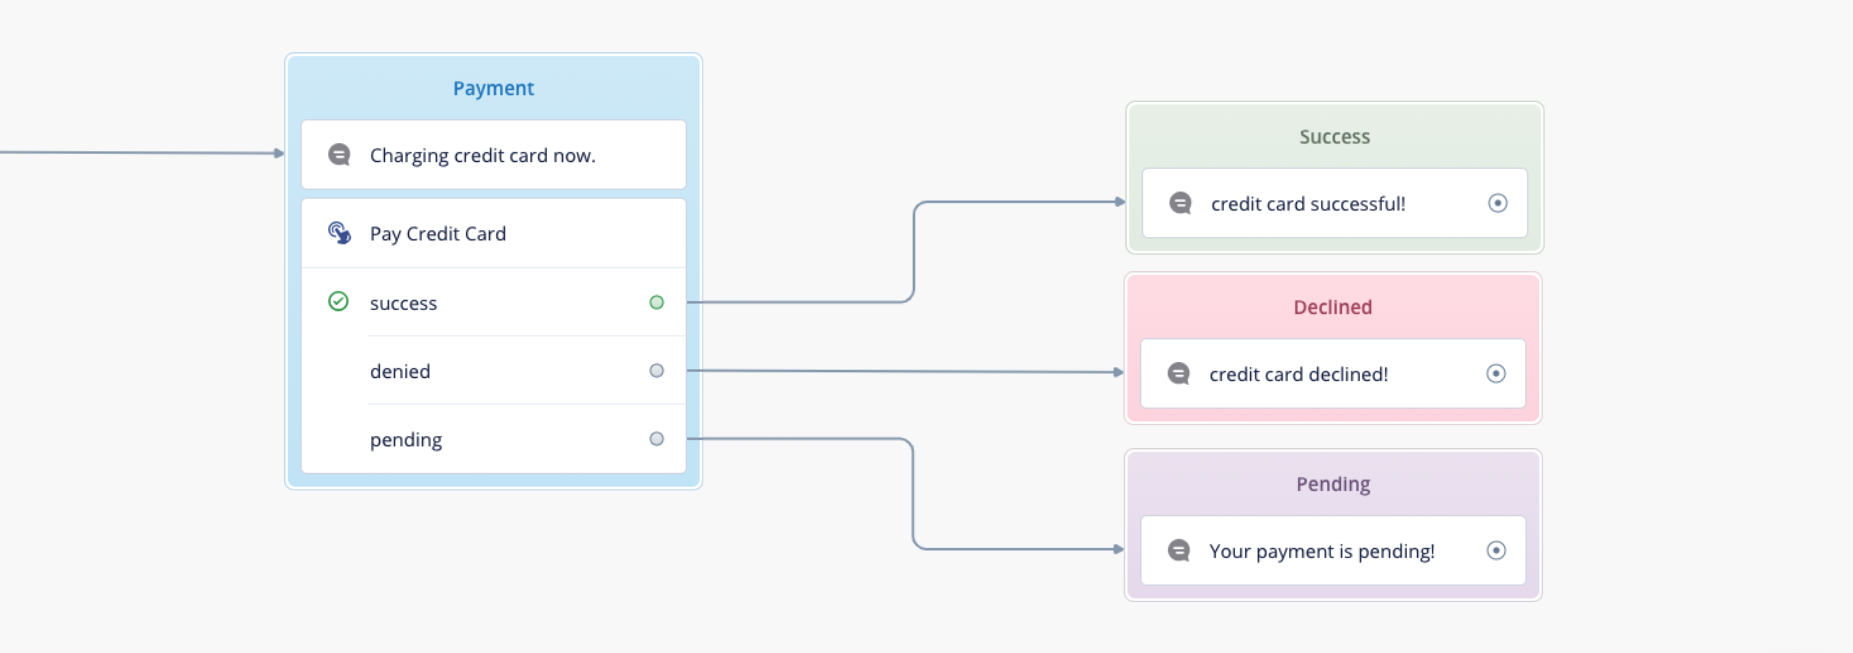
First, on the Voiceflow Creator, add a Custom Action Step to your diagram with the name "Pay Credit Card" and three paths named "success", "denied",
and "pending"
Second, in our client code, we send a normal interact request, but specify in `config.stopTypes` that the Voiceflow
diagram should stop whenever it encounters a Custom Action step named "Pay Credit Card"
```json
{
"action": { "type": "text", "payload": "hello!" } // any request type here,
"config": {
"stopTypes": ["Pay Credit Card"]
}
}
```
Third, the client app will receive a list of traces in the response as usual, but the last trace will be a Custom Action trace
corresponding to the Custom Action step you just defined.
```json
[
...other_traces,
{
"type": "Pay Credit Card",
"payload": "{ 'amount': 25 }",
"defaultPath": 0,
"paths": [
{ "event": { "type": "success" } },
{ "event": { "type": "denied" } },
{ "event": { "type": "pending" } }
]
}
]
```
Your client code might extract this last trace, detect that it is a custom "Pay Credit Card" trace, and then perform some logic
such as calling the Stripe API to charge your user's credit card.
```js
const traces = await dmapiInteract({
"action": { "type": "text", "payload": "hello!" } // any request type here,
"config": {
"stopTypes": ["Pay Credit Card"]
}
});
const customActionTrace = traces[traces.length - 1];
const customActionPayload = JSON.parse(customActionTrace.payload);
if (customActionTrace.type === "Pay Credit Card") {
const ok = await stripeAPI.chargeUserCreditCard(customActionPayload.amount);
await dmapiInteract({
action: {
type: ok ? "success" : "denied"
}
});
} else if (customActionType.trace === "Some Other Custom Action") {
// do something else
}
```
Finally, the client application should send an appropriate response based on the results of the logic in step 3. For example,
if the Stripe API reported that the user's credit card was successfuly charged, we might send back the following:
```json
{
"action": { "type": "success" }
}
```
where a value of `"success"` for `type` might indicate that your Voiceflow diagram should execute the logic corresponding
to a successful credit card payment. Your diagram might then print a confirmation message such as "your order was successful!".
If the `type` field is not one of the path names of your Custom Action (`"success"`, `"denied"`, or `"pending"` in this case),
the Custom Action will behave as though it was a "dead-end" block with no lines connecting to other blocks.
- name: Custom NLP/NLU
description: |
Instead of using the default NLP service (VFNLU) provided by Voiceflow, it's easy to use a preferred custom NLP service.
When making an API request, instead of using a `TextRequest` where the raw string of the user input is provided, use an
`IntentRequest` and the default Voiceflow NLP is skipped.
**Example Text Request:**
```
{
"action": {
"type": "text", "payload": "can I get a pepperoni pizza?"
}
}
```
**NLP Resolved Intent Request:**
```
{
"action": {
"type": "intent",
"payload": {
"query": "can I get a pepperoni pizza?", // (optional) original raw string of user input
"intent": {
"name": "order_pizza_intent" // name of the intent, as specified on Voiceflow
},
"entities": [ // array of matched entities, can be empty
{
"name": "pizza_type", // name of entity
"value": "pepperoni" // value of entity
}
]
}
}
}
```
So long as the intent generated by the custom NLP service is passed in as the `IntentRequest` format,
Voiceflow will be able to generate the appropriate response.
To export the model to use with your NLP service, go to the interaction model modal (M), and select the export option.
Pick your NLP service of choice.
If your current NLP service is not supported you can consider creating a translation layer for the generalized model in the `.vf`, or contact Voiceflow.
### Entity/Slot filling
If the intent on Voiceflow has required entities (i.e `{pizza_size}` for `order_pizza_intent`)
and it is not filled in the initial request, the entity will be prompted for and you can send a subsequent request with the same intent
and the `entities` and Voiceflow will be able to automatically merge the initial entities with the new entities.
For example, on the Voiceflow project for the `order_pizza_intent`, both `{pizza_type}` and `{pizza_size}` are required.
1. The user says "can I get a pepperoni pizza?",
2. This gets resolved through the NLP service and sent to Voiceflow as `order_pizza_intent` with entity `{pizza_type}` equal to `pepperoni`
3. The response will ask "what size pizza do you want?".
4. The user says "small"
5. The next request is `order_pizza_intent` with entity `{pizza_size}` equal to `small`
6. Voiceflow continues the conversation knowing the the user wants a small pepperoni pizza.
*Note: on Step 5 any intent can be sent and resolved, it just needs to be the same intent to continue the entity filling*
- name: No Reply Response
description: |
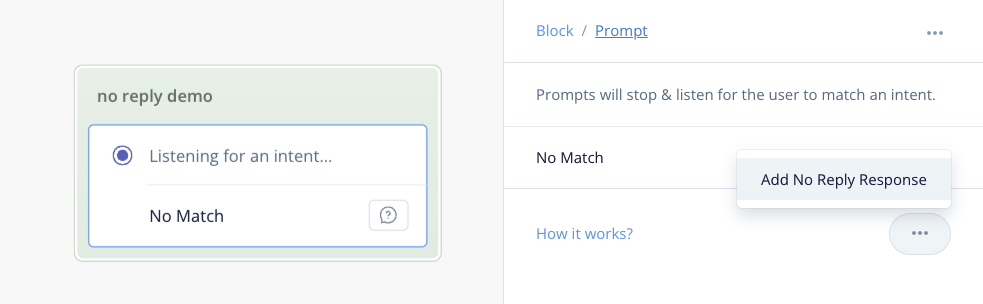
When the user gives no response at all - remaining silent or away from keyboard - we can use no reply feature.
Under any "User Input" type step, there is an option to "Add No Reply Response" and designate a timeout period.
To handle interactions within the Dialog Manager API, we can reference the `no-reply` trace:
```
trace: [
...otherTraces,
{
type: "no-reply",
payload: {
timeout: 5
}
}
]
```
The responsibility of handling this is on your client calling the API.
This would require a timer function of some kind that detects if the user has not responded within the `timeout` number of seconds.
In which case, the next `request` is simply `null` to denote that the user has no replied, and the API will handle the following logic:
```
{
action: {
type: "no-reply" // BaseRequest.RequestType.NO_REPLY
},
// state, config, and other metadata here
}
```
- name: API Key Differences
description: >
It is **required** to use a **Dialog Manager API Key** to access the Dialog Manager API. A DM API key has the prefix
`VF.DM.` and it provides the most up-to-date features such as version aliasing.
- name: Production
description: >
Voiceflow allows to publish a version of your project to a production slot. Publishing "freezes" a version of your project,
so that you have a stable copy of the project to serve to your users.
To publish a project through the Voiceflow Creator, see the following [documentation](https://www.voiceflow.com/docs/documentation-project-versioning#toc-2).
You can access this production version through the DM API, by setting your `versionID` header to the string `'production'`.
Once this is done, you can freely edit the diagram on canvas, without affecting the version that users see on your
live application. If you want to update the production version, click the Publish button on the Voiceflow Creator again as described
in the documentation linked above. This will replace the previous production version with the version displayed on your canvas.
**NOTE**: For the `'development'` alias, you must hit the Run button to compile the version and click the "Train Assistant" button
in the Prototype tool to update the project's NLU. For `'production'`, doing all of this is unneccessary. The Publish button is a one-click
flow that includes the compilation and training steps so that your live app will have the most recent diagram structure and NLU model.
- name: Best Practices
description: >
There are a number of best practices when working with the DM API:
### Use version aliases
In previous iterations of the DM API, you needed to specify the explicit `versionID` to interact
with a particular version of the Voiceflow project. With the introduction of version aliases, this is unnecessary.
A version alias will always refer to whichever version occupies its corresponding slot and you can avoid the hassle of
updating an explicit version ID by simplying pushing a new version into the slot.
For the `production` alias, you can update its slot by pressing the Publish button on the Voiceflow canvas. See the Production
section for further details.
For the `development` alias, the version's diagram is updated as you edit on the canvas and the associated NLU is updated
when you press "Train Assistant" in the Prototyping tool.
### Avoid the Stateless API
Previously, the Dialog Manager API had an older version named the Stateless API. This API is now deprecated in favour of the
current "State API". It is **strongly recommended** to move away from the Stateless API for production code.
### Avoid security violations in `userId`
The `userId` can be used to identify the conversation session of your Voiceflow application with one of your customers. **Resist
the temptation to use identifying information** like real names, emails, telephone numbers, or other identifying
information in the `userId`.
While this may seem convenient, it is a potential security hazard. If your app is compromised by a cyber attack, then it may
be possible for attackers to scrape personal information off of the `userId`.
Additionally, you should **avoid any `userId` collisions**. Since the `userId` identifies a conversation, if
two users have the same `userId`, then their conversation data may become mixed and leak information about one user to another.
If one user gave sensitive information over their conversation, this may lead to a privacy leak.
### Use the `'production'` alias for production apps
The `'development'` alias points to the version on your canvas and this version's data updates in real-time as you modify
it on canvas. Therefore, if you use the `'development'` alias on your live application, users may see your incomplete changes
as you modify the diagram.
Use the `'production'` alias for live apps instead, as this version will only update when you explicitly press the
Publish button on canvas.
servers:
- url: 'https://general-runtime.voiceflow.com'
paths:
'/state/user/{userID}/interact':
parameters:
- $ref: '#/components/parameters/userID'
- $ref: '#/components/parameters/versionID'
post:
tags:
- API Reference
summary: Interact
description: >-
Sends a request to advance the conversation session with your Voiceflow project.
### Requests
There are different types of requests that can be sent. To see a list of all
request types, check out the documentation for the `action` field below.
To start a conversation, you should send a **launch request**. Then, to pass in your
user's response, you should send a **text request**. If you have your own NLU matching,
then you may want to directly send an **intent request**.
See the Request **Examples** on the right panel for more examples of valid request bodies.
### Response Traces
After processing your request, the Dialog Manager API will then respond with an array of "traces" which are pieces of the overall response from the project:
```json
[{
"type": "speak",
"payload": {
"type": "message",
"message": "would you like fries with that?"
}
}, {
"type": "visual",
"payload": {
"image": "https://voiceflow.com/pizza.png"
}
}]
```
In the example above, the Voiceflow project responded by saying "would you like
fries with that?" and an image of a pizza. You can then display the chatbot's
response and the image in your app.
There are many types of response traces. Each trace is produced by a particular
block on your Voiceflow project. Expand the documentation for the 200 OK response
below to see a list of possible response traces.
### Runtime Logs
The `logs` query parameter can be used to enable [debug logging](https://developer.voiceflow.com/reference/logs-reference), which includes `log` traces in the response.
### Legacy responses
For legacy compatibility, you set the `verbose` query parameter to `true` to get a response
similar to our legacy Stateless API.
```json
// <- simplified verbose response body
{
"state": {
"stack": [{
"programID": "home flow",
"nodeID": "yes no choice node"
}],
"storage": {},
"variables": {
"pizza_type": "pepperoni"
}
},
"trace": [{
"type": "speak",
"payload": {
"type": "message",
"message": "would you like fries with that?"
}
}, {
"type": "visual",
"payload": {
"image": "https://voiceflow.com/pizza.png"
}
}]
}
```
operationId: stateInteract
security:
- DialogManagerAPIKey: []
parameters:
- $ref: '#/components/parameters/versionID'
- $ref: '#/components/parameters/userID'
- name: verbose
in: query
description: >
Enables verbose responses similar to the legacy Stateless API.
This parameter exists for legacy compatibility reasons. New projects
should always have this value set to `false`.
required: false
schema:
type: boolean
example: false
- name: logs
in: query
description: configure debug logs
required: false
schema:
allOf:
- $ref: '#/components/schemas/DebugLogsConfig'
- default: 'off'
requestBody:
required: true
content:
application/json:
schema:
type: object
properties:
action:
$ref: '#/components/schemas/Request'
config:
$ref: '#/components/schemas/Config'
state:
$ref: '#/components/schemas/InteractState'
required:
- request
examples:
Text Request:
value:
action:
type: text
payload: Can I order a large pepperoni pizza
state:
variables:
x_var: "hello"
Intent Request:
value:
action:
type: intent
payload:
query: I want a large pepperoni pizza
intent:
name: order_pizza_intent
entities:
- name: size
value: large
- name: type
value: pepperoni
confidence: 0.5
state:
variables:
x_var: 1
Launch Request:
value:
action:
type: launch
state:
variables:
x_var: 2
With Config:
value:
action:
type: text
payload: I would like to order a huge pepperoni pizza
config:
tts: false
stripSSML: true
stopTypes:
- Pay Credit Card
state:
variables:
x_var: true
responses:
'200':
description: A sequential array of response "traces" to display back to the user. They can take a variety of types - common types are defined here.
content:
application/json:
schema:
oneOf:
- title: Verbose Response
type: object
description: Verbose response, only returned if you enabled the `verbose` parameter
properties:
trace:
$ref: '#/components/schemas/Trace'
state:
$ref: '#/components/schemas/State'
action:
$ref: '#/components/schemas/Request'
required:
- trace
- $ref: '#/components/schemas/Trace'
examples:
Dialog Example:
value:
- type: speak
payload:
type: message
message: one large pepperoni pizza is that correct?
- type: speak
payload:
type: audio
src: 'https://voiceflow.com/chime.mp3'
message: ""
- type: visual
payload:
image: 'https://voiceflow.com/splash.mp3'
- type: choice
payload:
choices:
- name: 'yes'
- name: 'no'
Custom Trace:
value:
trace:
- type: speak
payload:
type: message
message: charging payment now!
- type: Pay Credit Card
payload: "{ 'sender': 'user@gmail', 'type': 'visa' }"
paths:
- event:
name: success
- event:
name: denied
- event:
name: pending
defaultPath: 0
'404':
description: >
Model not found. Ensure project is properly rendered.
Attempted to interact with the `'development'` version but the Prototype has not been
rendered by hitting the Run button on the Voiceflow canvas.
content:
application/json:
schema:
$ref: '#/components/schemas/ErrorObject'
examples:
Ensure project is properly rendered:
value:
code: 404
status: 'Not Found'
dateTime: '2022-07-22T15:02:55.882Z'
timestamp: 1658502175882
data: 'Model not found. Ensure project is properly rendered.'
'401':
description: >
Auth Key Required
HTTP request is missing a Dialog Manager API key in the `Authorization` header
content:
application/json:
schema:
$ref: '#/components/schemas/ErrorObject'
examples:
Auth Key Required:
value:
code: 401
status: 'Unauthorized'
dateTime: '2022-07-22T15:02:55.882Z'
timestamp: 1658502175882
data: 'Auth Key Required'
'400':
description: >
Bad Request.
Could refer to a number of possible errors:
1. `'Voiceflow project was not published to production'` - Caller is contacting the production version, but the project did not publish a
production version.
2. `'Cannot resolve project version'` - Caller's provided API key is potentially malformed and could not be used to resolve a
version alias.
3. `'Cannot resolve version alias'` - Caller's provided API key is potentially malformed and could not be used to resolve a
version alias.
4. `'Request is missing a versionID'` - Request is missing a versionID.
content:
application/json:
schema:
$ref: '#/components/schemas/VoiceflowError'
examples:
Not published to production:
value:
name: 'verror'
message: 'Voiceflow project was not published to production'
requestID: 'ud2uASDNx'
Cannot resolve project version:
value:
name: 'verror'
message: 'Cannot resolve project version, please verify that your API key is correct.'
requestID: 'ud2uASDNx'
Cannot resolve version alias:
value:
name: 'verror'
message: 'Cannot resolve version alias, please verify that your API key is correct.'
requestID: 'ud2uASDNx'
Missing versionID:
value:
name: 'verror'
message: 'Missing versionID in request.'
requestID: 'ud2uASDNx'
'/state/user/{userID}':
parameters:
- $ref: '#/components/parameters/versionID'
- $ref: '#/components/parameters/userID'
get:
summary: Fetch state
tags:
- API Reference
security:
- DialogManagerAPIKey: []
responses:
'200':
description: OK
content:
application/json:
schema:
anyOf:
- $ref: '#/components/schemas/State'
- type: object
nullable: true
examples:
Example State:
value:
stack:
- programID: 6062631246b44d80a8a345b4
diagramID: 653fb8df7d32ab70457438f4
nodeID: 60626307fd9a230006a5e289
storage: {}
variables:
pizza_type: pepperoni
sessions: 5
payment: credit
operationId: getState
description: Fetch the user's current state
put:
summary: Update state
tags:
- API Reference
operationId: postState
security:
- DialogManagerAPIKey: []
responses:
'200':
description: successfully updated
content:
application/json:
schema:
$ref: '#/components/schemas/State'
examples:
Example State:
value:
stack:
- programID: 6062631246b44d80a8a345b4
diagramID: 653fb8df7d32ab70457438f4
nodeID: 60626307fd9a230006a5e289
storage: {}
variables:
pizza_type: pepperoni
sessions: 5
payment: credit
description: >-
Update the user's current state.
This is useful for externally updating the user's state or resetting the state.
requestBody:
content:
application/json:
schema:
allOf:
- $ref: '#/components/schemas/State'
properties:
stack:
items:
properties:
diagramID:
description: The ID of the diagram the flow belongs to. This can be retrieve either on the response of the interact call (when called using the verbose flag) or by fetching the current state.
examples:
Example State:
value:
stack:
- programID: 6062631246b44d80a8a345b4
diagramID: 653fb8df7d32ab70457438f4
nodeID: 60626307fd9a230006a5e289
storage: {}
variables:
pizza_type: pepperoni
sessions: 5
payment: credit
Empty State:
value:
stack: []
storage: {}
variables: {}
description: Valid new user state
delete:
summary: Delete state
tags:
- API Reference
operationId: deleteState
security:
- DialogManagerAPIKey: []
responses:
'200':
description: OK
description: Delete all state and session data for user.
'/state/user/{userID}/variables':
parameters:
- $ref: '#/components/parameters/versionID'
- $ref: '#/components/parameters/userID'
patch:
summary: Update variables
tags:
- API Reference
security:
- DialogManagerAPIKey: []
responses:
'200':
description: OK
content:
application/json:
schema:
$ref: '#/components/schemas/State'
examples:
Example State:
value:
stack:
- programID: 6062631246b44d80a8a345b4
diagramID: 653fb8df7d32ab70457438f4
nodeID: 60626307fd9a230006a5e289
storage: {}
variables:
pizza_type: pepperoni
sessions: 5
payment: credit
score: 200
operationId: updateStateVariables
description: Updates the variables in the user's state by merging with the provided properties in the request body
requestBody:
content:
application/json:
schema:
type: object
example:
pizza_type: pepperoni
sessions: 5
description: Contains the variables to update
externalDocs:
description: Find out more about OpenAPI
url: 'https://spec.openapis.org/oas/latest.html'
components:
securitySchemes:
DialogManagerAPIKey:
type: apiKey
in: header
name: Authorization
description: >
All requests made to the Dialog Management API must be validated with a Dialog Manager API Key.
To obtain a Dialog Manager API key, open the project you want to integrate on the Voiceflow Creator,
go to the Integration tab, and click the "Copy API key" button.
parameters:
versionID:
name: versionID
description: >
The version of your Voiceflow project to contact.
Use `'development'` to contact the version on canvas or `'production'` to contact the published version.
in: header
required: false
schema:
type: string
example:
- 'development'
- 'production'
userID:
name: userID
description: >
A unique user ID specified by the caller.
The Dialog Manager API creates an independent conversation session for each user ID,
allowing your app to talk with different users simultaneously.
in: path
required: true
schema:
type: string
example: pizza-app-user-123
schemas:
IntentRequest:
title: Intent Request
type: object
description: Wraps your user's response as an intent and is used to advance the conversation.
x-examples:
Order Pizza:
type: intent
payload:
intent:
name: order_pizza_intent
query: I want a huge pepperoni pizza
entities:
- name: size
value: large
query: huge
- name: topping
value: pepperoni
confidence: 0.5
required:
- type
- payload
properties:
type:
type: string
enum:
- intent
payload:
type: object
required:
- intent
properties:
intent:
type: object
properties:
name:
type: string
example: order_pizza_intent
query:
type: string
example: I want a large pepperoni pizza
entities:
type: array
items:
type: object
required:
- name
- value
properties:
name:
type: string
example: size
value:
type: string
example: large
query:
type: string
verboseValue:
type: array
items:
type: object
required:
- canonicalText
- rawText
- startIndex
properties:
canonicalText:
type: string
rawText:
type: string
startIndex:
type: integer
confidence:
type: number
TextRequest:
title: Text Request
description: Wraps your user's response to your chatbot and is used to advance the conversation.
type: object
required:
- type
- payload
properties:
type:
type: string
enum:
- text
payload:
type: string
example: I would like to order a huge pepperoni pizza
x-examples:
example-1:
type: text
payload: I would like to order a huge pepperoni pizza
TextTrace:
title: Text Trace
description: >
Generated by the Text Step. Wraps a response that the chatbot gives to your user.
Available only on Chat Assistant projects.
type: object
required:
- type
- payload
properties:
type:
type: string
description: The type of trace this is.
enum:
- speak
payload:
type: object
description: The actual data.
required:
- message
- type
properties:
message:
type: string
example: one large pepperoni pizza is that correct?
x-examples:
Pizza Response:
type: text
payload:
message: one large pepperoni pizza is that correct?
SpeakTrace:
title: Speak Trace
description: >
Generated by the Speak Step. Wraps a response that the chatbot gives to your user.
Available only on Voice Assistant projects.
type: object
x-examples:
Pizza Response:
type: speak
payload:
type: message
message: one large pepperoni pizza is that correct?
Audio Speak:
type: speak
payload:
message: ""
src: 'https://voiceflow.com/play.mp3'
type: audio
required:
- type
- payload
properties:
type:
type: string
description: The type of trace this is.
enum:
- speak
payload:
type: object
description: The actual data.
required:
- message
- type
properties:
message:
type: string
example: one large pepperoni pizza is that correct?
type:
type: string
example: message
enum:
- message
- audio
voice:
type: string
src:
type: string
nullable: true
ChoiceTrace:
title: Choice Trace
description: >
Generated by a Choice Step. Wraps a restricted set of expected responses that the chatbot expects
the user to respond with.
type: object
x-examples:
Example Choice:
type: choice
payload:
choices:
- name: 'yes'
- name: 'no'
required:
- type
- payload
properties:
type:
type: string
description: The type of trace this is.
enum:
- choice
payload:
type: object
description: The actual data.
required:
- choices
properties:
choices:
type: array
items:
type: object
properties:
name:
type: string
example: 'yes'
intent:
type: string
example: YesIntent
required:
- name
defaultPath:
type: integer
paths:
type: array
items:
type: object
required:
- event
properties:
event:
type: object
required:
- type
properties:
type:
type: string
VisualTrace:
title: Visual Trace
type: object
description: Generated by the Visuals Step
required:
- type
- payload
properties:
type:
type: string
description: The type of trace this is.
example: visual
enum:
- visual
payload:
type: object
description: The actual data
oneOf:
- required:
- visualType
- image
- device
- dimensions
- canvasVisibility
properties:
visualType:
type: string
image:
type: string
nullable: true
device:
type: string
nullable: true
dimensions:
type: object
nullable: true
required:
- width
- height
properties:
width:
type: integer
height:
type: integer
canvasVisibility:
type: string
enum:
- full
- cropped
- hidden
- required:
- visualType
- aplType
properties:
visualType:
type: string
title:
type: string
aplType:
type: string
enum:
- JSON
- SPLASH
imageURL:
type: string
document:
type: string
datasource:
type: string
aplCommands:
type: string
jsonFileName:
type: string
x-examples:
Visual Trace Example:
type: visual
payload:
image: 'https://voiceflow.com/logo.png'
CarouselTrace:
title: Carousel Trace
description: Generated by the Carousel Step
type: object
properties:
type:
type: string
description: The type of trace this is.
enum:
- 'carousel'
payload:
type: object
description: The actual data.
properties:
layout:
type: string
enum:
- 'carousel'
cards:
type: array
items:
type: object
properties:
id:
type: string
title:
type: string
description: The card's title
description:
type: object
description: The card's description
properties:
text:
type: string
description: The text content of the card's description
imageUrl:
type: string
description: Link to the uploaded image asset of the card
buttons:
type: array
description: >
A set of suggested responses that the client app can
send to the DM API to advance the conversation.
items:
type: object
properties:
name:
type: string
description: Name of the button option
request:
allOf:
- description: A suggested response that can be included in the next DM API interact request.
- $ref: '#/components/schemas/CardRequest'
CustomTrace:
title: Custom Trace
description: Generated by the Trace Step
type: object
x-examples:
Custom Trace Example:
type: Pay Credit Card
payload: "{ 'sender': 'user@gmail', 'body': 'great message' }"
paths:
- event:
name: success
- event:
name: denied
- event:
name: pending
defaultPath: 0
properties:
type:
type: string
minLength: 1
example: Pay Credit Card
payload:
type: string
minLength: 1
example: "{ 'sender': 'user@gmail', 'body': 'great message' }"
paths:
type: array
uniqueItems: true
items:
type: object
properties:
event:
type: object
properties:
name:
type: string
minLength: 1
example: success
required:
- name
defaultPath:
type: number
example: 0
required:
- type
- payload
- paths
- defaultPath
State:
title: State
type: object
x-examples:
Example State:
stack:
- programID: 6062631246b44d80a8a345b4
diagramID: 653fb8df7d32ab70457438f4
nodeID: 60626307fd9a230006a5e289
storage: {}
variables:
pizza_type: pepperoni
sessions: 5
payment: credit
properties:
stack:
type: array
description: Contains all of the user's active flows
items:
type: object
properties:
programID:
type: string
description: The flow that the user has on the stack
example: 6062631246b44d80a8a345b4
diagramID:
type: string
description: The ID of the diagram the flow belongs to
example: 653fb8df7d32ab70457438f4
nodeID:
type: string
nullable: true
description: The current block this flow is on
example: 60626307fd9a230006a5e289
variables:
type: object
description: The flow-scoped variables
storage:
type: object
description: Internal flow parameters used by the runtime
commands:
type: array
items:
type: object
properties:
type:
type: string
enum:
- push
- jump
event:
type: object
required:
- programID
- diagramID
storage:
type: object
variables:
type: object
required:
- stack
- storage
- variables
description: 'user metadata - what block they are currently on, what flow they are on, their variables'
LaunchRequest:
title: Launch Request
type: object
description: Starts the conversation session
properties:
type:
type: string
example: launch
enum:
- launch
required:
- type
CardRequest:
title: Card Request
type: object
properties:
type:
type: string
example: 'card-1,-button-1-504k39k9'
payload:
type: object
properties:
label:
type: string
example: 'Card 2, Button 2'
Request:
title: Request
type: object
nullable: true
oneOf:
- $ref: '#/components/schemas/LaunchRequest'
- $ref: '#/components/schemas/TextRequest'
- $ref: '#/components/schemas/IntentRequest'
description: >
The user's response, e.g, user requests starting a conversation or
advances the conversation by providing some textual response.
Config:
title: Config
type: object
description: Optional settings to configure the response
properties:
tts:
type: boolean
default: false
description: Send back a playable text-to-speech mp3 audio snippet for every speak block
stripSSML:
type: boolean
default: true
description: Remove all SSML tags in the response message.
stopAll:
type: boolean
default: true
description: Stop on all custom traces
stopTypes:
type: array
description: Specifies trace types to prematurely return on. Used to define your own path.
items:
type: string
example: Pay Credit Card
default: []
excludeTypes:
type: array
items:
type: string
default: [block, debug, flow]
description: The trace types to exclude in the response
x-examples:
example-1:
tts: false
stripSSML: true
stopTypes:
- Pay Credit Card
Trace:
title: Trace
type: array
items:
anyOf:
- $ref: '#/components/schemas/TextTrace'
- $ref: '#/components/schemas/SpeakTrace'
- $ref: '#/components/schemas/ChoiceTrace'
- $ref: '#/components/schemas/VisualTrace'
- $ref: '#/components/schemas/CustomTrace'
- $ref: '#/components/schemas/CarouselTrace'
DebugLogsConfig:
# Maps to LogLevelResolvable internally
title: Debug Logs Config
oneOf:
- type: string
description: A specific log level to use
example: 'info'
enum:
- 'error'
- 'warn'
- 'info'
- 'verbose'
- 'off'
- type: boolean
description: A boolean for whether logs should be "info" or "off"
ErrorObject:
type: object
description: An error wrapper
properties:
code:
title: HTTP status code
type: number
status:
title: HTTP status message
type: string
dateTime:
title: Time of when error occurred
type: string
timestamp:
title: Time of when error occurred in UNIX seconds
type: number
data:
title: Additional error details
type: string
VoiceflowError:
type: object
description: A Voiceflow error
properties:
name:
title: Typically the string `"verror"`
type: string
message:
title: Additional error details
type: string
requestID:
type: string
InteractState:
type: object
required:
- variables
properties:
variables:
type: object
example:
variables:
my_var: 1
responses:
Trace:
description: A sequential array of response "traces" to display back to the user. They can take a variety of types - common types are defined here.
content:
application/json:
schema:
type: object
properties:
trace:
$ref: '#/components/schemas/Trace'
examples:
Dialog Example:
value:
trace:
- type: speak
payload:
type: message
message: one large pepperoni pizza is that correct?
- type: speak
payload:
type: audio
src: 'https://voiceflow.com/chime.mp3'
message: ""
- type: visual
payload:
image: 'https://voiceflow.com/splash.mp3'
- type: choice
payload:
choices:
- name: 'yes'
- name: 'no'
Custom Trace:
value:
trace:
- type: speak
payload:
type: message
message: charging payment now!
- type: Pay Credit Card
payload: "{ 'sender': 'user@gmail', 'type': 'visa' }"
paths:
- event:
name: success
- event:
name: denied
- event:
name: pending
defaultPath: 0
-p-1080.png) **Note**: The Dialog Manager API can only be used to integrate Voiceflow **general projects**, that is,
projects without a pre-existing third-party upload.
Thus, Alexa, Google Actions, and Dialogflow ES projects on Voiceflow are instead accessed through
their associated 3rd party platform, e.g, Alexa projects can be accessed by an Amazon Alexa device.
# Quick Start
To see the DM API in action, follow these steps:
1. **Create a project** - Build a conversational flow on the [Voiceflow Creator](https://creator.voiceflow.com).
2. **Render your project** - Ensure you're on the Designer tab by checking the left side bar. Then, click the
Run button on the top-right corner to compile your project and make it available through the DM API.
3. **Get an API key** - Go to the Integration tab using the left sidebar and copy your project's
API key.
4. **Copy a test call** - Copy one of the "API Call Examples" below and replace the API key variable with the API key
you copied in step 2.
5. **Start the conversation** - Execute the API call to start a conversation and get a response from your Voiceflow app.
6. **Continue the conversation** - Change the user input variable and execute the API call again. The DM API tracks the current state
of the conversation and may produce a different response to advance the conversation.
**Note**: The Dialog Manager API can only be used to integrate Voiceflow **general projects**, that is,
projects without a pre-existing third-party upload.
Thus, Alexa, Google Actions, and Dialogflow ES projects on Voiceflow are instead accessed through
their associated 3rd party platform, e.g, Alexa projects can be accessed by an Amazon Alexa device.
# Quick Start
To see the DM API in action, follow these steps:
1. **Create a project** - Build a conversational flow on the [Voiceflow Creator](https://creator.voiceflow.com).
2. **Render your project** - Ensure you're on the Designer tab by checking the left side bar. Then, click the
Run button on the top-right corner to compile your project and make it available through the DM API.
3. **Get an API key** - Go to the Integration tab using the left sidebar and copy your project's
API key.
4. **Copy a test call** - Copy one of the "API Call Examples" below and replace the API key variable with the API key
you copied in step 2.
5. **Start the conversation** - Execute the API call to start a conversation and get a response from your Voiceflow app.
6. **Continue the conversation** - Change the user input variable and execute the API call again. The DM API tracks the current state
of the conversation and may produce a different response to advance the conversation.
 Pick your NLP service of choice.
 If your current NLP service is not supported you can consider creating a translation layer for the generalized model in the `.vf`, or contact Voiceflow.
### Entity/Slot filling
If the intent on Voiceflow has required entities (i.e `{pizza_size}` for `order_pizza_intent`)
and it is not filled in the initial request, the entity will be prompted for and you can send a subsequent request with the same intent
and the `entities` and Voiceflow will be able to automatically merge the initial entities with the new entities.
For example, on the Voiceflow project for the `order_pizza_intent`, both `{pizza_type}` and `{pizza_size}` are required.
1. The user says "can I get a pepperoni pizza?",
2. This gets resolved through the NLP service and sent to Voiceflow as `order_pizza_intent` with entity `{pizza_type}` equal to `pepperoni`
3. The response will ask "what size pizza do you want?".
4. The user says "small"
5. The next request is `order_pizza_intent` with entity `{pizza_size}` equal to `small`
6. Voiceflow continues the conversation knowing the the user wants a small pepperoni pizza.
*Note: on Step 5 any intent can be sent and resolved, it just needs to be the same intent to continue the entity filling*
- name: No Reply Response
description: |
When the user gives no response at all - remaining silent or away from keyboard - we can use no reply feature.
Under any "User Input" type step, there is an option to "Add No Reply Response" and designate a timeout period.

To handle interactions within the Dialog Manager API, we can reference the `no-reply` trace:
```
trace: [
...otherTraces,
{
type: "no-reply",
payload: {
timeout: 5
}
}
]
```
The responsibility of handling this is on your client calling the API.
This would require a timer function of some kind that detects if the user has not responded within the `timeout` number of seconds.
In which case, the next `request` is simply `null` to denote that the user has no replied, and the API will handle the following logic:
```
{
action: {
type: "no-reply" // BaseRequest.RequestType.NO_REPLY
},
// state, config, and other metadata here
}
```
- name: API Key Differences
description: >
It is **required** to use a **Dialog Manager API Key** to access the Dialog Manager API. A DM API key has the prefix
`VF.DM.` and it provides the most up-to-date features such as version aliasing.
- name: Production
description: >
Voiceflow allows to publish a version of your project to a production slot. Publishing "freezes" a version of your project,
so that you have a stable copy of the project to serve to your users.
To publish a project through the Voiceflow Creator, see the following [documentation](https://www.voiceflow.com/docs/documentation-project-versioning#toc-2).
You can access this production version through the DM API, by setting your `versionID` header to the string `'production'`.
Once this is done, you can freely edit the diagram on canvas, without affecting the version that users see on your
live application. If you want to update the production version, click the Publish button on the Voiceflow Creator again as described
in the documentation linked above. This will replace the previous production version with the version displayed on your canvas.
**NOTE**: For the `'development'` alias, you must hit the Run button to compile the version and click the "Train Assistant" button
in the Prototype tool to update the project's NLU. For `'production'`, doing all of this is unneccessary. The Publish button is a one-click
flow that includes the compilation and training steps so that your live app will have the most recent diagram structure and NLU model.
- name: Best Practices
description: >
There are a number of best practices when working with the DM API:
### Use version aliases
In previous iterations of the DM API, you needed to specify the explicit `versionID` to interact
with a particular version of the Voiceflow project. With the introduction of version aliases, this is unnecessary.
A version alias will always refer to whichever version occupies its corresponding slot and you can avoid the hassle of
updating an explicit version ID by simplying pushing a new version into the slot.
For the `production` alias, you can update its slot by pressing the Publish button on the Voiceflow canvas. See the Production
section for further details.
For the `development` alias, the version's diagram is updated as you edit on the canvas and the associated NLU is updated
when you press "Train Assistant" in the Prototyping tool.
### Avoid the Stateless API
Previously, the Dialog Manager API had an older version named the Stateless API. This API is now deprecated in favour of the
current "State API". It is **strongly recommended** to move away from the Stateless API for production code.
### Avoid security violations in `userId`
The `userId` can be used to identify the conversation session of your Voiceflow application with one of your customers. **Resist
the temptation to use identifying information** like real names, emails, telephone numbers, or other identifying
information in the `userId`.
While this may seem convenient, it is a potential security hazard. If your app is compromised by a cyber attack, then it may
be possible for attackers to scrape personal information off of the `userId`.
Additionally, you should **avoid any `userId` collisions**. Since the `userId` identifies a conversation, if
two users have the same `userId`, then their conversation data may become mixed and leak information about one user to another.
If one user gave sensitive information over their conversation, this may lead to a privacy leak.
### Use the `'production'` alias for production apps
The `'development'` alias points to the version on your canvas and this version's data updates in real-time as you modify
it on canvas. Therefore, if you use the `'development'` alias on your live application, users may see your incomplete changes
as you modify the diagram.
Use the `'production'` alias for live apps instead, as this version will only update when you explicitly press the
Publish button on canvas.
servers:
- url: 'https://general-runtime.voiceflow.com'
paths:
'/state/user/{userID}/interact':
parameters:
- $ref: '#/components/parameters/userID'
- $ref: '#/components/parameters/versionID'
post:
tags:
- API Reference
summary: Interact
description: >-
Sends a request to advance the conversation session with your Voiceflow project.
### Requests
There are different types of requests that can be sent. To see a list of all
request types, check out the documentation for the `action` field below.
To start a conversation, you should send a **launch request**. Then, to pass in your
user's response, you should send a **text request**. If you have your own NLU matching,
then you may want to directly send an **intent request**.
See the Request **Examples** on the right panel for more examples of valid request bodies.
### Response Traces
After processing your request, the Dialog Manager API will then respond with an array of "traces" which are pieces of the overall response from the project:
```json
[{
"type": "speak",
"payload": {
"type": "message",
"message": "would you like fries with that?"
}
}, {
"type": "visual",
"payload": {
"image": "https://voiceflow.com/pizza.png"
}
}]
```
In the example above, the Voiceflow project responded by saying "would you like
fries with that?" and an image of a pizza. You can then display the chatbot's
response and the image in your app.
There are many types of response traces. Each trace is produced by a particular
block on your Voiceflow project. Expand the documentation for the 200 OK response
below to see a list of possible response traces.
### Runtime Logs
The `logs` query parameter can be used to enable [debug logging](https://developer.voiceflow.com/reference/logs-reference), which includes `log` traces in the response.
### Legacy responses
For legacy compatibility, you set the `verbose` query parameter to `true` to get a response
similar to our legacy Stateless API.
```json
// <- simplified verbose response body
{
"state": {
"stack": [{
"programID": "home flow",
"nodeID": "yes no choice node"
}],
"storage": {},
"variables": {
"pizza_type": "pepperoni"
}
},
"trace": [{
"type": "speak",
"payload": {
"type": "message",
"message": "would you like fries with that?"
}
}, {
"type": "visual",
"payload": {
"image": "https://voiceflow.com/pizza.png"
}
}]
}
```
operationId: stateInteract
security:
- DialogManagerAPIKey: []
parameters:
- $ref: '#/components/parameters/versionID'
- $ref: '#/components/parameters/userID'
- name: verbose
in: query
description: >
Enables verbose responses similar to the legacy Stateless API.
This parameter exists for legacy compatibility reasons. New projects
should always have this value set to `false`.
required: false
schema:
type: boolean
example: false
- name: logs
in: query
description: configure debug logs
required: false
schema:
allOf:
- $ref: '#/components/schemas/DebugLogsConfig'
- default: 'off'
requestBody:
required: true
content:
application/json:
schema:
type: object
properties:
action:
$ref: '#/components/schemas/Request'
config:
$ref: '#/components/schemas/Config'
state:
$ref: '#/components/schemas/InteractState'
required:
- request
examples:
Text Request:
value:
action:
type: text
payload: Can I order a large pepperoni pizza
state:
variables:
x_var: "hello"
Intent Request:
value:
action:
type: intent
payload:
query: I want a large pepperoni pizza
intent:
name: order_pizza_intent
entities:
- name: size
value: large
- name: type
value: pepperoni
confidence: 0.5
state:
variables:
x_var: 1
Launch Request:
value:
action:
type: launch
state:
variables:
x_var: 2
With Config:
value:
action:
type: text
payload: I would like to order a huge pepperoni pizza
config:
tts: false
stripSSML: true
stopTypes:
- Pay Credit Card
state:
variables:
x_var: true
responses:
'200':
description: A sequential array of response "traces" to display back to the user. They can take a variety of types - common types are defined here.
content:
application/json:
schema:
oneOf:
- title: Verbose Response
type: object
description: Verbose response, only returned if you enabled the `verbose` parameter
properties:
trace:
$ref: '#/components/schemas/Trace'
state:
$ref: '#/components/schemas/State'
action:
$ref: '#/components/schemas/Request'
required:
- trace
- $ref: '#/components/schemas/Trace'
examples:
Dialog Example:
value:
- type: speak
payload:
type: message
message: one large pepperoni pizza is that correct?
- type: speak
payload:
type: audio
src: 'https://voiceflow.com/chime.mp3'
message: ""
- type: visual
payload:
image: 'https://voiceflow.com/splash.mp3'
- type: choice
payload:
choices:
- name: 'yes'
- name: 'no'
Custom Trace:
value:
trace:
- type: speak
payload:
type: message
message: charging payment now!
- type: Pay Credit Card
payload: "{ 'sender': 'user@gmail', 'type': 'visa' }"
paths:
- event:
name: success
- event:
name: denied
- event:
name: pending
defaultPath: 0
'404':
description: >
Model not found. Ensure project is properly rendered.
Attempted to interact with the `'development'` version but the Prototype has not been
rendered by hitting the Run button on the Voiceflow canvas.
content:
application/json:
schema:
$ref: '#/components/schemas/ErrorObject'
examples:
Ensure project is properly rendered:
value:
code: 404
status: 'Not Found'
dateTime: '2022-07-22T15:02:55.882Z'
timestamp: 1658502175882
data: 'Model not found. Ensure project is properly rendered.'
'401':
description: >
Auth Key Required
HTTP request is missing a Dialog Manager API key in the `Authorization` header
content:
application/json:
schema:
$ref: '#/components/schemas/ErrorObject'
examples:
Auth Key Required:
value:
code: 401
status: 'Unauthorized'
dateTime: '2022-07-22T15:02:55.882Z'
timestamp: 1658502175882
data: 'Auth Key Required'
'400':
description: >
Bad Request.
Could refer to a number of possible errors:
1. `'Voiceflow project was not published to production'` - Caller is contacting the production version, but the project did not publish a
production version.
2. `'Cannot resolve project version'` - Caller's provided API key is potentially malformed and could not be used to resolve a
version alias.
3. `'Cannot resolve version alias'` - Caller's provided API key is potentially malformed and could not be used to resolve a
version alias.
4. `'Request is missing a versionID'` - Request is missing a versionID.
content:
application/json:
schema:
$ref: '#/components/schemas/VoiceflowError'
examples:
Not published to production:
value:
name: 'verror'
message: 'Voiceflow project was not published to production'
requestID: 'ud2uASDNx'
Cannot resolve project version:
value:
name: 'verror'
message: 'Cannot resolve project version, please verify that your API key is correct.'
requestID: 'ud2uASDNx'
Cannot resolve version alias:
value:
name: 'verror'
message: 'Cannot resolve version alias, please verify that your API key is correct.'
requestID: 'ud2uASDNx'
Missing versionID:
value:
name: 'verror'
message: 'Missing versionID in request.'
requestID: 'ud2uASDNx'
'/state/user/{userID}':
parameters:
- $ref: '#/components/parameters/versionID'
- $ref: '#/components/parameters/userID'
get:
summary: Fetch state
tags:
- API Reference
security:
- DialogManagerAPIKey: []
responses:
'200':
description: OK
content:
application/json:
schema:
anyOf:
- $ref: '#/components/schemas/State'
- type: object
nullable: true
examples:
Example State:
value:
stack:
- programID: 6062631246b44d80a8a345b4
diagramID: 653fb8df7d32ab70457438f4
nodeID: 60626307fd9a230006a5e289
storage: {}
variables:
pizza_type: pepperoni
sessions: 5
payment: credit
operationId: getState
description: Fetch the user's current state
put:
summary: Update state
tags:
- API Reference
operationId: postState
security:
- DialogManagerAPIKey: []
responses:
'200':
description: successfully updated
content:
application/json:
schema:
$ref: '#/components/schemas/State'
examples:
Example State:
value:
stack:
- programID: 6062631246b44d80a8a345b4
diagramID: 653fb8df7d32ab70457438f4
nodeID: 60626307fd9a230006a5e289
storage: {}
variables:
pizza_type: pepperoni
sessions: 5
payment: credit
description: >-
Update the user's current state.
This is useful for externally updating the user's state or resetting the state.
requestBody:
content:
application/json:
schema:
allOf:
- $ref: '#/components/schemas/State'
properties:
stack:
items:
properties:
diagramID:
description: The ID of the diagram the flow belongs to. This can be retrieve either on the response of the interact call (when called using the verbose flag) or by fetching the current state.
examples:
Example State:
value:
stack:
- programID: 6062631246b44d80a8a345b4
diagramID: 653fb8df7d32ab70457438f4
nodeID: 60626307fd9a230006a5e289
storage: {}
variables:
pizza_type: pepperoni
sessions: 5
payment: credit
Empty State:
value:
stack: []
storage: {}
variables: {}
description: Valid new user state
delete:
summary: Delete state
tags:
- API Reference
operationId: deleteState
security:
- DialogManagerAPIKey: []
responses:
'200':
description: OK
description: Delete all state and session data for user.
'/state/user/{userID}/variables':
parameters:
- $ref: '#/components/parameters/versionID'
- $ref: '#/components/parameters/userID'
patch:
summary: Update variables
tags:
- API Reference
security:
- DialogManagerAPIKey: []
responses:
'200':
description: OK
content:
application/json:
schema:
$ref: '#/components/schemas/State'
examples:
Example State:
value:
stack:
- programID: 6062631246b44d80a8a345b4
diagramID: 653fb8df7d32ab70457438f4
nodeID: 60626307fd9a230006a5e289
storage: {}
variables:
pizza_type: pepperoni
sessions: 5
payment: credit
score: 200
operationId: updateStateVariables
description: Updates the variables in the user's state by merging with the provided properties in the request body
requestBody:
content:
application/json:
schema:
type: object
example:
pizza_type: pepperoni
sessions: 5
description: Contains the variables to update
externalDocs:
description: Find out more about OpenAPI
url: 'https://spec.openapis.org/oas/latest.html'
components:
securitySchemes:
DialogManagerAPIKey:
type: apiKey
in: header
name: Authorization
description: >
All requests made to the Dialog Management API must be validated with a Dialog Manager API Key.
To obtain a Dialog Manager API key, open the project you want to integrate on the Voiceflow Creator,
go to the Integration tab, and click the "Copy API key" button.
parameters:
versionID:
name: versionID
description: >
The version of your Voiceflow project to contact.
Use `'development'` to contact the version on canvas or `'production'` to contact the published version.
in: header
required: false
schema:
type: string
example:
- 'development'
- 'production'
userID:
name: userID
description: >
A unique user ID specified by the caller.
The Dialog Manager API creates an independent conversation session for each user ID,
allowing your app to talk with different users simultaneously.
in: path
required: true
schema:
type: string
example: pizza-app-user-123
schemas:
IntentRequest:
title: Intent Request
type: object
description: Wraps your user's response as an intent and is used to advance the conversation.
x-examples:
Order Pizza:
type: intent
payload:
intent:
name: order_pizza_intent
query: I want a huge pepperoni pizza
entities:
- name: size
value: large
query: huge
- name: topping
value: pepperoni
confidence: 0.5
required:
- type
- payload
properties:
type:
type: string
enum:
- intent
payload:
type: object
required:
- intent
properties:
intent:
type: object
properties:
name:
type: string
example: order_pizza_intent
query:
type: string
example: I want a large pepperoni pizza
entities:
type: array
items:
type: object
required:
- name
- value
properties:
name:
type: string
example: size
value:
type: string
example: large
query:
type: string
verboseValue:
type: array
items:
type: object
required:
- canonicalText
- rawText
- startIndex
properties:
canonicalText:
type: string
rawText:
type: string
startIndex:
type: integer
confidence:
type: number
TextRequest:
title: Text Request
description: Wraps your user's response to your chatbot and is used to advance the conversation.
type: object
required:
- type
- payload
properties:
type:
type: string
enum:
- text
payload:
type: string
example: I would like to order a huge pepperoni pizza
x-examples:
example-1:
type: text
payload: I would like to order a huge pepperoni pizza
TextTrace:
title: Text Trace
description: >
Generated by the Text Step. Wraps a response that the chatbot gives to your user.
Available only on Chat Assistant projects.
type: object
required:
- type
- payload
properties:
type:
type: string
description: The type of trace this is.
enum:
- speak
payload:
type: object
description: The actual data.
required:
- message
- type
properties:
message:
type: string
example: one large pepperoni pizza is that correct?
x-examples:
Pizza Response:
type: text
payload:
message: one large pepperoni pizza is that correct?
SpeakTrace:
title: Speak Trace
description: >
Generated by the Speak Step. Wraps a response that the chatbot gives to your user.
Available only on Voice Assistant projects.
type: object
x-examples:
Pizza Response:
type: speak
payload:
type: message
message: one large pepperoni pizza is that correct?
Audio Speak:
type: speak
payload:
message: ""
src: 'https://voiceflow.com/play.mp3'
type: audio
required:
- type
- payload
properties:
type:
type: string
description: The type of trace this is.
enum:
- speak
payload:
type: object
description: The actual data.
required:
- message
- type
properties:
message:
type: string
example: one large pepperoni pizza is that correct?
type:
type: string
example: message
enum:
- message
- audio
voice:
type: string
src:
type: string
nullable: true
ChoiceTrace:
title: Choice Trace
description: >
Generated by a Choice Step. Wraps a restricted set of expected responses that the chatbot expects
the user to respond with.
type: object
x-examples:
Example Choice:
type: choice
payload:
choices:
- name: 'yes'
- name: 'no'
required:
- type
- payload
properties:
type:
type: string
description: The type of trace this is.
enum:
- choice
payload:
type: object
description: The actual data.
required:
- choices
properties:
choices:
type: array
items:
type: object
properties:
name:
type: string
example: 'yes'
intent:
type: string
example: YesIntent
required:
- name
defaultPath:
type: integer
paths:
type: array
items:
type: object
required:
- event
properties:
event:
type: object
required:
- type
properties:
type:
type: string
VisualTrace:
title: Visual Trace
type: object
description: Generated by the Visuals Step
required:
- type
- payload
properties:
type:
type: string
description: The type of trace this is.
example: visual
enum:
- visual
payload:
type: object
description: The actual data
oneOf:
- required:
- visualType
- image
- device
- dimensions
- canvasVisibility
properties:
visualType:
type: string
image:
type: string
nullable: true
device:
type: string
nullable: true
dimensions:
type: object
nullable: true
required:
- width
- height
properties:
width:
type: integer
height:
type: integer
canvasVisibility:
type: string
enum:
- full
- cropped
- hidden
- required:
- visualType
- aplType
properties:
visualType:
type: string
title:
type: string
aplType:
type: string
enum:
- JSON
- SPLASH
imageURL:
type: string
document:
type: string
datasource:
type: string
aplCommands:
type: string
jsonFileName:
type: string
x-examples:
Visual Trace Example:
type: visual
payload:
image: 'https://voiceflow.com/logo.png'
CarouselTrace:
title: Carousel Trace
description: Generated by the Carousel Step
type: object
properties:
type:
type: string
description: The type of trace this is.
enum:
- 'carousel'
payload:
type: object
description: The actual data.
properties:
layout:
type: string
enum:
- 'carousel'
cards:
type: array
items:
type: object
properties:
id:
type: string
title:
type: string
description: The card's title
description:
type: object
description: The card's description
properties:
text:
type: string
description: The text content of the card's description
imageUrl:
type: string
description: Link to the uploaded image asset of the card
buttons:
type: array
description: >
A set of suggested responses that the client app can
send to the DM API to advance the conversation.
items:
type: object
properties:
name:
type: string
description: Name of the button option
request:
allOf:
- description: A suggested response that can be included in the next DM API interact request.
- $ref: '#/components/schemas/CardRequest'
CustomTrace:
title: Custom Trace
description: Generated by the Trace Step
type: object
x-examples:
Custom Trace Example:
type: Pay Credit Card
payload: "{ 'sender': 'user@gmail', 'body': 'great message' }"
paths:
- event:
name: success
- event:
name: denied
- event:
name: pending
defaultPath: 0
properties:
type:
type: string
minLength: 1
example: Pay Credit Card
payload:
type: string
minLength: 1
example: "{ 'sender': 'user@gmail', 'body': 'great message' }"
paths:
type: array
uniqueItems: true
items:
type: object
properties:
event:
type: object
properties:
name:
type: string
minLength: 1
example: success
required:
- name
defaultPath:
type: number
example: 0
required:
- type
- payload
- paths
- defaultPath
State:
title: State
type: object
x-examples:
Example State:
stack:
- programID: 6062631246b44d80a8a345b4
diagramID: 653fb8df7d32ab70457438f4
nodeID: 60626307fd9a230006a5e289
storage: {}
variables:
pizza_type: pepperoni
sessions: 5
payment: credit
properties:
stack:
type: array
description: Contains all of the user's active flows
items:
type: object
properties:
programID:
type: string
description: The flow that the user has on the stack
example: 6062631246b44d80a8a345b4
diagramID:
type: string
description: The ID of the diagram the flow belongs to
example: 653fb8df7d32ab70457438f4
nodeID:
type: string
nullable: true
description: The current block this flow is on
example: 60626307fd9a230006a5e289
variables:
type: object
description: The flow-scoped variables
storage:
type: object
description: Internal flow parameters used by the runtime
commands:
type: array
items:
type: object
properties:
type:
type: string
enum:
- push
- jump
event:
type: object
required:
- programID
- diagramID
storage:
type: object
variables:
type: object
required:
- stack
- storage
- variables
description: 'user metadata - what block they are currently on, what flow they are on, their variables'
LaunchRequest:
title: Launch Request
type: object
description: Starts the conversation session
properties:
type:
type: string
example: launch
enum:
- launch
required:
- type
CardRequest:
title: Card Request
type: object
properties:
type:
type: string
example: 'card-1,-button-1-504k39k9'
payload:
type: object
properties:
label:
type: string
example: 'Card 2, Button 2'
Request:
title: Request
type: object
nullable: true
oneOf:
- $ref: '#/components/schemas/LaunchRequest'
- $ref: '#/components/schemas/TextRequest'
- $ref: '#/components/schemas/IntentRequest'
description: >
The user's response, e.g, user requests starting a conversation or
advances the conversation by providing some textual response.
Config:
title: Config
type: object
description: Optional settings to configure the response
properties:
tts:
type: boolean
default: false
description: Send back a playable text-to-speech mp3 audio snippet for every speak block
stripSSML:
type: boolean
default: true
description: Remove all SSML tags in the response message.
stopAll:
type: boolean
default: true
description: Stop on all custom traces
stopTypes:
type: array
description: Specifies trace types to prematurely return on. Used to define your own path.
items:
type: string
example: Pay Credit Card
default: []
excludeTypes:
type: array
items:
type: string
default: [block, debug, flow]
description: The trace types to exclude in the response
x-examples:
example-1:
tts: false
stripSSML: true
stopTypes:
- Pay Credit Card
Trace:
title: Trace
type: array
items:
anyOf:
- $ref: '#/components/schemas/TextTrace'
- $ref: '#/components/schemas/SpeakTrace'
- $ref: '#/components/schemas/ChoiceTrace'
- $ref: '#/components/schemas/VisualTrace'
- $ref: '#/components/schemas/CustomTrace'
- $ref: '#/components/schemas/CarouselTrace'
DebugLogsConfig:
# Maps to LogLevelResolvable internally
title: Debug Logs Config
oneOf:
- type: string
description: A specific log level to use
example: 'info'
enum:
- 'error'
- 'warn'
- 'info'
- 'verbose'
- 'off'
- type: boolean
description: A boolean for whether logs should be "info" or "off"
ErrorObject:
type: object
description: An error wrapper
properties:
code:
title: HTTP status code
type: number
status:
title: HTTP status message
type: string
dateTime:
title: Time of when error occurred
type: string
timestamp:
title: Time of when error occurred in UNIX seconds
type: number
data:
title: Additional error details
type: string
VoiceflowError:
type: object
description: A Voiceflow error
properties:
name:
title: Typically the string `"verror"`
type: string
message:
title: Additional error details
type: string
requestID:
type: string
InteractState:
type: object
required:
- variables
properties:
variables:
type: object
example:
variables:
my_var: 1
responses:
Trace:
description: A sequential array of response "traces" to display back to the user. They can take a variety of types - common types are defined here.
content:
application/json:
schema:
type: object
properties:
trace:
$ref: '#/components/schemas/Trace'
examples:
Dialog Example:
value:
trace:
- type: speak
payload:
type: message
message: one large pepperoni pizza is that correct?
- type: speak
payload:
type: audio
src: 'https://voiceflow.com/chime.mp3'
message: ""
- type: visual
payload:
image: 'https://voiceflow.com/splash.mp3'
- type: choice
payload:
choices:
- name: 'yes'
- name: 'no'
Custom Trace:
value:
trace:
- type: speak
payload:
type: message
message: charging payment now!
- type: Pay Credit Card
payload: "{ 'sender': 'user@gmail', 'type': 'visa' }"
paths:
- event:
name: success
- event:
name: denied
- event:
name: pending
defaultPath: 0
If your current NLP service is not supported you can consider creating a translation layer for the generalized model in the `.vf`, or contact Voiceflow.
### Entity/Slot filling
If the intent on Voiceflow has required entities (i.e `{pizza_size}` for `order_pizza_intent`)
and it is not filled in the initial request, the entity will be prompted for and you can send a subsequent request with the same intent
and the `entities` and Voiceflow will be able to automatically merge the initial entities with the new entities.
For example, on the Voiceflow project for the `order_pizza_intent`, both `{pizza_type}` and `{pizza_size}` are required.
1. The user says "can I get a pepperoni pizza?",
2. This gets resolved through the NLP service and sent to Voiceflow as `order_pizza_intent` with entity `{pizza_type}` equal to `pepperoni`
3. The response will ask "what size pizza do you want?".
4. The user says "small"
5. The next request is `order_pizza_intent` with entity `{pizza_size}` equal to `small`
6. Voiceflow continues the conversation knowing the the user wants a small pepperoni pizza.
*Note: on Step 5 any intent can be sent and resolved, it just needs to be the same intent to continue the entity filling*
- name: No Reply Response
description: |
When the user gives no response at all - remaining silent or away from keyboard - we can use no reply feature.
Under any "User Input" type step, there is an option to "Add No Reply Response" and designate a timeout period.

To handle interactions within the Dialog Manager API, we can reference the `no-reply` trace:
```
trace: [
...otherTraces,
{
type: "no-reply",
payload: {
timeout: 5
}
}
]
```
The responsibility of handling this is on your client calling the API.
This would require a timer function of some kind that detects if the user has not responded within the `timeout` number of seconds.
In which case, the next `request` is simply `null` to denote that the user has no replied, and the API will handle the following logic:
```
{
action: {
type: "no-reply" // BaseRequest.RequestType.NO_REPLY
},
// state, config, and other metadata here
}
```
- name: API Key Differences
description: >
It is **required** to use a **Dialog Manager API Key** to access the Dialog Manager API. A DM API key has the prefix
`VF.DM.` and it provides the most up-to-date features such as version aliasing.
- name: Production
description: >
Voiceflow allows to publish a version of your project to a production slot. Publishing "freezes" a version of your project,
so that you have a stable copy of the project to serve to your users.
To publish a project through the Voiceflow Creator, see the following [documentation](https://www.voiceflow.com/docs/documentation-project-versioning#toc-2).
You can access this production version through the DM API, by setting your `versionID` header to the string `'production'`.
Once this is done, you can freely edit the diagram on canvas, without affecting the version that users see on your
live application. If you want to update the production version, click the Publish button on the Voiceflow Creator again as described
in the documentation linked above. This will replace the previous production version with the version displayed on your canvas.
**NOTE**: For the `'development'` alias, you must hit the Run button to compile the version and click the "Train Assistant" button
in the Prototype tool to update the project's NLU. For `'production'`, doing all of this is unneccessary. The Publish button is a one-click
flow that includes the compilation and training steps so that your live app will have the most recent diagram structure and NLU model.
- name: Best Practices
description: >
There are a number of best practices when working with the DM API:
### Use version aliases
In previous iterations of the DM API, you needed to specify the explicit `versionID` to interact
with a particular version of the Voiceflow project. With the introduction of version aliases, this is unnecessary.
A version alias will always refer to whichever version occupies its corresponding slot and you can avoid the hassle of
updating an explicit version ID by simplying pushing a new version into the slot.
For the `production` alias, you can update its slot by pressing the Publish button on the Voiceflow canvas. See the Production
section for further details.
For the `development` alias, the version's diagram is updated as you edit on the canvas and the associated NLU is updated
when you press "Train Assistant" in the Prototyping tool.
### Avoid the Stateless API
Previously, the Dialog Manager API had an older version named the Stateless API. This API is now deprecated in favour of the
current "State API". It is **strongly recommended** to move away from the Stateless API for production code.
### Avoid security violations in `userId`
The `userId` can be used to identify the conversation session of your Voiceflow application with one of your customers. **Resist
the temptation to use identifying information** like real names, emails, telephone numbers, or other identifying
information in the `userId`.
While this may seem convenient, it is a potential security hazard. If your app is compromised by a cyber attack, then it may
be possible for attackers to scrape personal information off of the `userId`.
Additionally, you should **avoid any `userId` collisions**. Since the `userId` identifies a conversation, if
two users have the same `userId`, then their conversation data may become mixed and leak information about one user to another.
If one user gave sensitive information over their conversation, this may lead to a privacy leak.
### Use the `'production'` alias for production apps
The `'development'` alias points to the version on your canvas and this version's data updates in real-time as you modify
it on canvas. Therefore, if you use the `'development'` alias on your live application, users may see your incomplete changes
as you modify the diagram.
Use the `'production'` alias for live apps instead, as this version will only update when you explicitly press the
Publish button on canvas.
servers:
- url: 'https://general-runtime.voiceflow.com'
paths:
'/state/user/{userID}/interact':
parameters:
- $ref: '#/components/parameters/userID'
- $ref: '#/components/parameters/versionID'
post:
tags:
- API Reference
summary: Interact
description: >-
Sends a request to advance the conversation session with your Voiceflow project.
### Requests
There are different types of requests that can be sent. To see a list of all
request types, check out the documentation for the `action` field below.
To start a conversation, you should send a **launch request**. Then, to pass in your
user's response, you should send a **text request**. If you have your own NLU matching,
then you may want to directly send an **intent request**.
See the Request **Examples** on the right panel for more examples of valid request bodies.
### Response Traces
After processing your request, the Dialog Manager API will then respond with an array of "traces" which are pieces of the overall response from the project:
```json
[{
"type": "speak",
"payload": {
"type": "message",
"message": "would you like fries with that?"
}
}, {
"type": "visual",
"payload": {
"image": "https://voiceflow.com/pizza.png"
}
}]
```
In the example above, the Voiceflow project responded by saying "would you like
fries with that?" and an image of a pizza. You can then display the chatbot's
response and the image in your app.
There are many types of response traces. Each trace is produced by a particular
block on your Voiceflow project. Expand the documentation for the 200 OK response
below to see a list of possible response traces.
### Runtime Logs
The `logs` query parameter can be used to enable [debug logging](https://developer.voiceflow.com/reference/logs-reference), which includes `log` traces in the response.
### Legacy responses
For legacy compatibility, you set the `verbose` query parameter to `true` to get a response
similar to our legacy Stateless API.
```json
// <- simplified verbose response body
{
"state": {
"stack": [{
"programID": "home flow",
"nodeID": "yes no choice node"
}],
"storage": {},
"variables": {
"pizza_type": "pepperoni"
}
},
"trace": [{
"type": "speak",
"payload": {
"type": "message",
"message": "would you like fries with that?"
}
}, {
"type": "visual",
"payload": {
"image": "https://voiceflow.com/pizza.png"
}
}]
}
```
operationId: stateInteract
security:
- DialogManagerAPIKey: []
parameters:
- $ref: '#/components/parameters/versionID'
- $ref: '#/components/parameters/userID'
- name: verbose
in: query
description: >
Enables verbose responses similar to the legacy Stateless API.
This parameter exists for legacy compatibility reasons. New projects
should always have this value set to `false`.
required: false
schema:
type: boolean
example: false
- name: logs
in: query
description: configure debug logs
required: false
schema:
allOf:
- $ref: '#/components/schemas/DebugLogsConfig'
- default: 'off'
requestBody:
required: true
content:
application/json:
schema:
type: object
properties:
action:
$ref: '#/components/schemas/Request'
config:
$ref: '#/components/schemas/Config'
state:
$ref: '#/components/schemas/InteractState'
required:
- request
examples:
Text Request:
value:
action:
type: text
payload: Can I order a large pepperoni pizza
state:
variables:
x_var: "hello"
Intent Request:
value:
action:
type: intent
payload:
query: I want a large pepperoni pizza
intent:
name: order_pizza_intent
entities:
- name: size
value: large
- name: type
value: pepperoni
confidence: 0.5
state:
variables:
x_var: 1
Launch Request:
value:
action:
type: launch
state:
variables:
x_var: 2
With Config:
value:
action:
type: text
payload: I would like to order a huge pepperoni pizza
config:
tts: false
stripSSML: true
stopTypes:
- Pay Credit Card
state:
variables:
x_var: true
responses:
'200':
description: A sequential array of response "traces" to display back to the user. They can take a variety of types - common types are defined here.
content:
application/json:
schema:
oneOf:
- title: Verbose Response
type: object
description: Verbose response, only returned if you enabled the `verbose` parameter
properties:
trace:
$ref: '#/components/schemas/Trace'
state:
$ref: '#/components/schemas/State'
action:
$ref: '#/components/schemas/Request'
required:
- trace
- $ref: '#/components/schemas/Trace'
examples:
Dialog Example:
value:
- type: speak
payload:
type: message
message: one large pepperoni pizza is that correct?
- type: speak
payload:
type: audio
src: 'https://voiceflow.com/chime.mp3'
message: ""
- type: visual
payload:
image: 'https://voiceflow.com/splash.mp3'
- type: choice
payload:
choices:
- name: 'yes'
- name: 'no'
Custom Trace:
value:
trace:
- type: speak
payload:
type: message
message: charging payment now!
- type: Pay Credit Card
payload: "{ 'sender': 'user@gmail', 'type': 'visa' }"
paths:
- event:
name: success
- event:
name: denied
- event:
name: pending
defaultPath: 0
'404':
description: >
Model not found. Ensure project is properly rendered.
Attempted to interact with the `'development'` version but the Prototype has not been
rendered by hitting the Run button on the Voiceflow canvas.
content:
application/json:
schema:
$ref: '#/components/schemas/ErrorObject'
examples:
Ensure project is properly rendered:
value:
code: 404
status: 'Not Found'
dateTime: '2022-07-22T15:02:55.882Z'
timestamp: 1658502175882
data: 'Model not found. Ensure project is properly rendered.'
'401':
description: >
Auth Key Required
HTTP request is missing a Dialog Manager API key in the `Authorization` header
content:
application/json:
schema:
$ref: '#/components/schemas/ErrorObject'
examples:
Auth Key Required:
value:
code: 401
status: 'Unauthorized'
dateTime: '2022-07-22T15:02:55.882Z'
timestamp: 1658502175882
data: 'Auth Key Required'
'400':
description: >
Bad Request.
Could refer to a number of possible errors:
1. `'Voiceflow project was not published to production'` - Caller is contacting the production version, but the project did not publish a
production version.
2. `'Cannot resolve project version'` - Caller's provided API key is potentially malformed and could not be used to resolve a
version alias.
3. `'Cannot resolve version alias'` - Caller's provided API key is potentially malformed and could not be used to resolve a
version alias.
4. `'Request is missing a versionID'` - Request is missing a versionID.
content:
application/json:
schema:
$ref: '#/components/schemas/VoiceflowError'
examples:
Not published to production:
value:
name: 'verror'
message: 'Voiceflow project was not published to production'
requestID: 'ud2uASDNx'
Cannot resolve project version:
value:
name: 'verror'
message: 'Cannot resolve project version, please verify that your API key is correct.'
requestID: 'ud2uASDNx'
Cannot resolve version alias:
value:
name: 'verror'
message: 'Cannot resolve version alias, please verify that your API key is correct.'
requestID: 'ud2uASDNx'
Missing versionID:
value:
name: 'verror'
message: 'Missing versionID in request.'
requestID: 'ud2uASDNx'
'/state/user/{userID}':
parameters:
- $ref: '#/components/parameters/versionID'
- $ref: '#/components/parameters/userID'
get:
summary: Fetch state
tags:
- API Reference
security:
- DialogManagerAPIKey: []
responses:
'200':
description: OK
content:
application/json:
schema:
anyOf:
- $ref: '#/components/schemas/State'
- type: object
nullable: true
examples:
Example State:
value:
stack:
- programID: 6062631246b44d80a8a345b4
diagramID: 653fb8df7d32ab70457438f4
nodeID: 60626307fd9a230006a5e289
storage: {}
variables:
pizza_type: pepperoni
sessions: 5
payment: credit
operationId: getState
description: Fetch the user's current state
put:
summary: Update state
tags:
- API Reference
operationId: postState
security:
- DialogManagerAPIKey: []
responses:
'200':
description: successfully updated
content:
application/json:
schema:
$ref: '#/components/schemas/State'
examples:
Example State:
value:
stack:
- programID: 6062631246b44d80a8a345b4
diagramID: 653fb8df7d32ab70457438f4
nodeID: 60626307fd9a230006a5e289
storage: {}
variables:
pizza_type: pepperoni
sessions: 5
payment: credit
description: >-
Update the user's current state.
This is useful for externally updating the user's state or resetting the state.
requestBody:
content:
application/json:
schema:
allOf:
- $ref: '#/components/schemas/State'
properties:
stack:
items:
properties:
diagramID:
description: The ID of the diagram the flow belongs to. This can be retrieve either on the response of the interact call (when called using the verbose flag) or by fetching the current state.
examples:
Example State:
value:
stack:
- programID: 6062631246b44d80a8a345b4
diagramID: 653fb8df7d32ab70457438f4
nodeID: 60626307fd9a230006a5e289
storage: {}
variables:
pizza_type: pepperoni
sessions: 5
payment: credit
Empty State:
value:
stack: []
storage: {}
variables: {}
description: Valid new user state
delete:
summary: Delete state
tags:
- API Reference
operationId: deleteState
security:
- DialogManagerAPIKey: []
responses:
'200':
description: OK
description: Delete all state and session data for user.
'/state/user/{userID}/variables':
parameters:
- $ref: '#/components/parameters/versionID'
- $ref: '#/components/parameters/userID'
patch:
summary: Update variables
tags:
- API Reference
security:
- DialogManagerAPIKey: []
responses:
'200':
description: OK
content:
application/json:
schema:
$ref: '#/components/schemas/State'
examples:
Example State:
value:
stack:
- programID: 6062631246b44d80a8a345b4
diagramID: 653fb8df7d32ab70457438f4
nodeID: 60626307fd9a230006a5e289
storage: {}
variables:
pizza_type: pepperoni
sessions: 5
payment: credit
score: 200
operationId: updateStateVariables
description: Updates the variables in the user's state by merging with the provided properties in the request body
requestBody:
content:
application/json:
schema:
type: object
example:
pizza_type: pepperoni
sessions: 5
description: Contains the variables to update
externalDocs:
description: Find out more about OpenAPI
url: 'https://spec.openapis.org/oas/latest.html'
components:
securitySchemes:
DialogManagerAPIKey:
type: apiKey
in: header
name: Authorization
description: >
All requests made to the Dialog Management API must be validated with a Dialog Manager API Key.
To obtain a Dialog Manager API key, open the project you want to integrate on the Voiceflow Creator,
go to the Integration tab, and click the "Copy API key" button.
parameters:
versionID:
name: versionID
description: >
The version of your Voiceflow project to contact.
Use `'development'` to contact the version on canvas or `'production'` to contact the published version.
in: header
required: false
schema:
type: string
example:
- 'development'
- 'production'
userID:
name: userID
description: >
A unique user ID specified by the caller.
The Dialog Manager API creates an independent conversation session for each user ID,
allowing your app to talk with different users simultaneously.
in: path
required: true
schema:
type: string
example: pizza-app-user-123
schemas:
IntentRequest:
title: Intent Request
type: object
description: Wraps your user's response as an intent and is used to advance the conversation.
x-examples:
Order Pizza:
type: intent
payload:
intent:
name: order_pizza_intent
query: I want a huge pepperoni pizza
entities:
- name: size
value: large
query: huge
- name: topping
value: pepperoni
confidence: 0.5
required:
- type
- payload
properties:
type:
type: string
enum:
- intent
payload:
type: object
required:
- intent
properties:
intent:
type: object
properties:
name:
type: string
example: order_pizza_intent
query:
type: string
example: I want a large pepperoni pizza
entities:
type: array
items:
type: object
required:
- name
- value
properties:
name:
type: string
example: size
value:
type: string
example: large
query:
type: string
verboseValue:
type: array
items:
type: object
required:
- canonicalText
- rawText
- startIndex
properties:
canonicalText:
type: string
rawText:
type: string
startIndex:
type: integer
confidence:
type: number
TextRequest:
title: Text Request
description: Wraps your user's response to your chatbot and is used to advance the conversation.
type: object
required:
- type
- payload
properties:
type:
type: string
enum:
- text
payload:
type: string
example: I would like to order a huge pepperoni pizza
x-examples:
example-1:
type: text
payload: I would like to order a huge pepperoni pizza
TextTrace:
title: Text Trace
description: >
Generated by the Text Step. Wraps a response that the chatbot gives to your user.
Available only on Chat Assistant projects.
type: object
required:
- type
- payload
properties:
type:
type: string
description: The type of trace this is.
enum:
- speak
payload:
type: object
description: The actual data.
required:
- message
- type
properties:
message:
type: string
example: one large pepperoni pizza is that correct?
x-examples:
Pizza Response:
type: text
payload:
message: one large pepperoni pizza is that correct?
SpeakTrace:
title: Speak Trace
description: >
Generated by the Speak Step. Wraps a response that the chatbot gives to your user.
Available only on Voice Assistant projects.
type: object
x-examples:
Pizza Response:
type: speak
payload:
type: message
message: one large pepperoni pizza is that correct?
Audio Speak:
type: speak
payload:
message: ""
src: 'https://voiceflow.com/play.mp3'
type: audio
required:
- type
- payload
properties:
type:
type: string
description: The type of trace this is.
enum:
- speak
payload:
type: object
description: The actual data.
required:
- message
- type
properties:
message:
type: string
example: one large pepperoni pizza is that correct?
type:
type: string
example: message
enum:
- message
- audio
voice:
type: string
src:
type: string
nullable: true
ChoiceTrace:
title: Choice Trace
description: >
Generated by a Choice Step. Wraps a restricted set of expected responses that the chatbot expects
the user to respond with.
type: object
x-examples:
Example Choice:
type: choice
payload:
choices:
- name: 'yes'
- name: 'no'
required:
- type
- payload
properties:
type:
type: string
description: The type of trace this is.
enum:
- choice
payload:
type: object
description: The actual data.
required:
- choices
properties:
choices:
type: array
items:
type: object
properties:
name:
type: string
example: 'yes'
intent:
type: string
example: YesIntent
required:
- name
defaultPath:
type: integer
paths:
type: array
items:
type: object
required:
- event
properties:
event:
type: object
required:
- type
properties:
type:
type: string
VisualTrace:
title: Visual Trace
type: object
description: Generated by the Visuals Step
required:
- type
- payload
properties:
type:
type: string
description: The type of trace this is.
example: visual
enum:
- visual
payload:
type: object
description: The actual data
oneOf:
- required:
- visualType
- image
- device
- dimensions
- canvasVisibility
properties:
visualType:
type: string
image:
type: string
nullable: true
device:
type: string
nullable: true
dimensions:
type: object
nullable: true
required:
- width
- height
properties:
width:
type: integer
height:
type: integer
canvasVisibility:
type: string
enum:
- full
- cropped
- hidden
- required:
- visualType
- aplType
properties:
visualType:
type: string
title:
type: string
aplType:
type: string
enum:
- JSON
- SPLASH
imageURL:
type: string
document:
type: string
datasource:
type: string
aplCommands:
type: string
jsonFileName:
type: string
x-examples:
Visual Trace Example:
type: visual
payload:
image: 'https://voiceflow.com/logo.png'
CarouselTrace:
title: Carousel Trace
description: Generated by the Carousel Step
type: object
properties:
type:
type: string
description: The type of trace this is.
enum:
- 'carousel'
payload:
type: object
description: The actual data.
properties:
layout:
type: string
enum:
- 'carousel'
cards:
type: array
items:
type: object
properties:
id:
type: string
title:
type: string
description: The card's title
description:
type: object
description: The card's description
properties:
text:
type: string
description: The text content of the card's description
imageUrl:
type: string
description: Link to the uploaded image asset of the card
buttons:
type: array
description: >
A set of suggested responses that the client app can
send to the DM API to advance the conversation.
items:
type: object
properties:
name:
type: string
description: Name of the button option
request:
allOf:
- description: A suggested response that can be included in the next DM API interact request.
- $ref: '#/components/schemas/CardRequest'
CustomTrace:
title: Custom Trace
description: Generated by the Trace Step
type: object
x-examples:
Custom Trace Example:
type: Pay Credit Card
payload: "{ 'sender': 'user@gmail', 'body': 'great message' }"
paths:
- event:
name: success
- event:
name: denied
- event:
name: pending
defaultPath: 0
properties:
type:
type: string
minLength: 1
example: Pay Credit Card
payload:
type: string
minLength: 1
example: "{ 'sender': 'user@gmail', 'body': 'great message' }"
paths:
type: array
uniqueItems: true
items:
type: object
properties:
event:
type: object
properties:
name:
type: string
minLength: 1
example: success
required:
- name
defaultPath:
type: number
example: 0
required:
- type
- payload
- paths
- defaultPath
State:
title: State
type: object
x-examples:
Example State:
stack:
- programID: 6062631246b44d80a8a345b4
diagramID: 653fb8df7d32ab70457438f4
nodeID: 60626307fd9a230006a5e289
storage: {}
variables:
pizza_type: pepperoni
sessions: 5
payment: credit
properties:
stack:
type: array
description: Contains all of the user's active flows
items:
type: object
properties:
programID:
type: string
description: The flow that the user has on the stack
example: 6062631246b44d80a8a345b4
diagramID:
type: string
description: The ID of the diagram the flow belongs to
example: 653fb8df7d32ab70457438f4
nodeID:
type: string
nullable: true
description: The current block this flow is on
example: 60626307fd9a230006a5e289
variables:
type: object
description: The flow-scoped variables
storage:
type: object
description: Internal flow parameters used by the runtime
commands:
type: array
items:
type: object
properties:
type:
type: string
enum:
- push
- jump
event:
type: object
required:
- programID
- diagramID
storage:
type: object
variables:
type: object
required:
- stack
- storage
- variables
description: 'user metadata - what block they are currently on, what flow they are on, their variables'
LaunchRequest:
title: Launch Request
type: object
description: Starts the conversation session
properties:
type:
type: string
example: launch
enum:
- launch
required:
- type
CardRequest:
title: Card Request
type: object
properties:
type:
type: string
example: 'card-1,-button-1-504k39k9'
payload:
type: object
properties:
label:
type: string
example: 'Card 2, Button 2'
Request:
title: Request
type: object
nullable: true
oneOf:
- $ref: '#/components/schemas/LaunchRequest'
- $ref: '#/components/schemas/TextRequest'
- $ref: '#/components/schemas/IntentRequest'
description: >
The user's response, e.g, user requests starting a conversation or
advances the conversation by providing some textual response.
Config:
title: Config
type: object
description: Optional settings to configure the response
properties:
tts:
type: boolean
default: false
description: Send back a playable text-to-speech mp3 audio snippet for every speak block
stripSSML:
type: boolean
default: true
description: Remove all SSML tags in the response message.
stopAll:
type: boolean
default: true
description: Stop on all custom traces
stopTypes:
type: array
description: Specifies trace types to prematurely return on. Used to define your own path.
items:
type: string
example: Pay Credit Card
default: []
excludeTypes:
type: array
items:
type: string
default: [block, debug, flow]
description: The trace types to exclude in the response
x-examples:
example-1:
tts: false
stripSSML: true
stopTypes:
- Pay Credit Card
Trace:
title: Trace
type: array
items:
anyOf:
- $ref: '#/components/schemas/TextTrace'
- $ref: '#/components/schemas/SpeakTrace'
- $ref: '#/components/schemas/ChoiceTrace'
- $ref: '#/components/schemas/VisualTrace'
- $ref: '#/components/schemas/CustomTrace'
- $ref: '#/components/schemas/CarouselTrace'
DebugLogsConfig:
# Maps to LogLevelResolvable internally
title: Debug Logs Config
oneOf:
- type: string
description: A specific log level to use
example: 'info'
enum:
- 'error'
- 'warn'
- 'info'
- 'verbose'
- 'off'
- type: boolean
description: A boolean for whether logs should be "info" or "off"
ErrorObject:
type: object
description: An error wrapper
properties:
code:
title: HTTP status code
type: number
status:
title: HTTP status message
type: string
dateTime:
title: Time of when error occurred
type: string
timestamp:
title: Time of when error occurred in UNIX seconds
type: number
data:
title: Additional error details
type: string
VoiceflowError:
type: object
description: A Voiceflow error
properties:
name:
title: Typically the string `"verror"`
type: string
message:
title: Additional error details
type: string
requestID:
type: string
InteractState:
type: object
required:
- variables
properties:
variables:
type: object
example:
variables:
my_var: 1
responses:
Trace:
description: A sequential array of response "traces" to display back to the user. They can take a variety of types - common types are defined here.
content:
application/json:
schema:
type: object
properties:
trace:
$ref: '#/components/schemas/Trace'
examples:
Dialog Example:
value:
trace:
- type: speak
payload:
type: message
message: one large pepperoni pizza is that correct?
- type: speak
payload:
type: audio
src: 'https://voiceflow.com/chime.mp3'
message: ""
- type: visual
payload:
image: 'https://voiceflow.com/splash.mp3'
- type: choice
payload:
choices:
- name: 'yes'
- name: 'no'
Custom Trace:
value:
trace:
- type: speak
payload:
type: message
message: charging payment now!
- type: Pay Credit Card
payload: "{ 'sender': 'user@gmail', 'type': 'visa' }"
paths:
- event:
name: success
- event:
name: denied
- event:
name: pending
defaultPath: 0