- [Ultimate Expansion Board](#ultimate-expansion-board)
- [Using The Expansion Board](#using-the-expansion-board)
- [8x8 LED Matrix](#8x8-led-matrix)
- [16x2 or 20x4 LCD Display](#16x2-or-20x4-lcd-display)
- [Single Stepping and Interrupt capability](#single-stepping-and-interrupt-capability)
- [Expansion ROM/RAM slot](#expansion-romram-slot)
- [CPU Breakout Sandwich Board](#cpu-breakout-sandwich-board)
- [Expansion ROM](#expansion-rom)
- [TEC Magazine Code](#tec-magazine-code)
- [TEC Space Invaders Mark 2](#tec-space-invaders-mark-2)
- [TEC Maze](#tec-maze)
- [TEC LCD Runner game](#tec-lcd-runner-game)
- [Conway's Game of Life](#conways-game-of-life)
- [Magic Square Game](#magic-square-game)
- [Fast Forward utility](#fast-forward-utility)
- [Banger Music demo](#banger-music-demo)
# BMON Expansion
The BMON Expansion completes the BMON experience. The Expansion includes a software and hardware component. The hardware doesn't necessarily need the software ROM to work. But the ROM is designed for the expansion and doesn't do much without the hardware.
## Ultimate Expansion Board
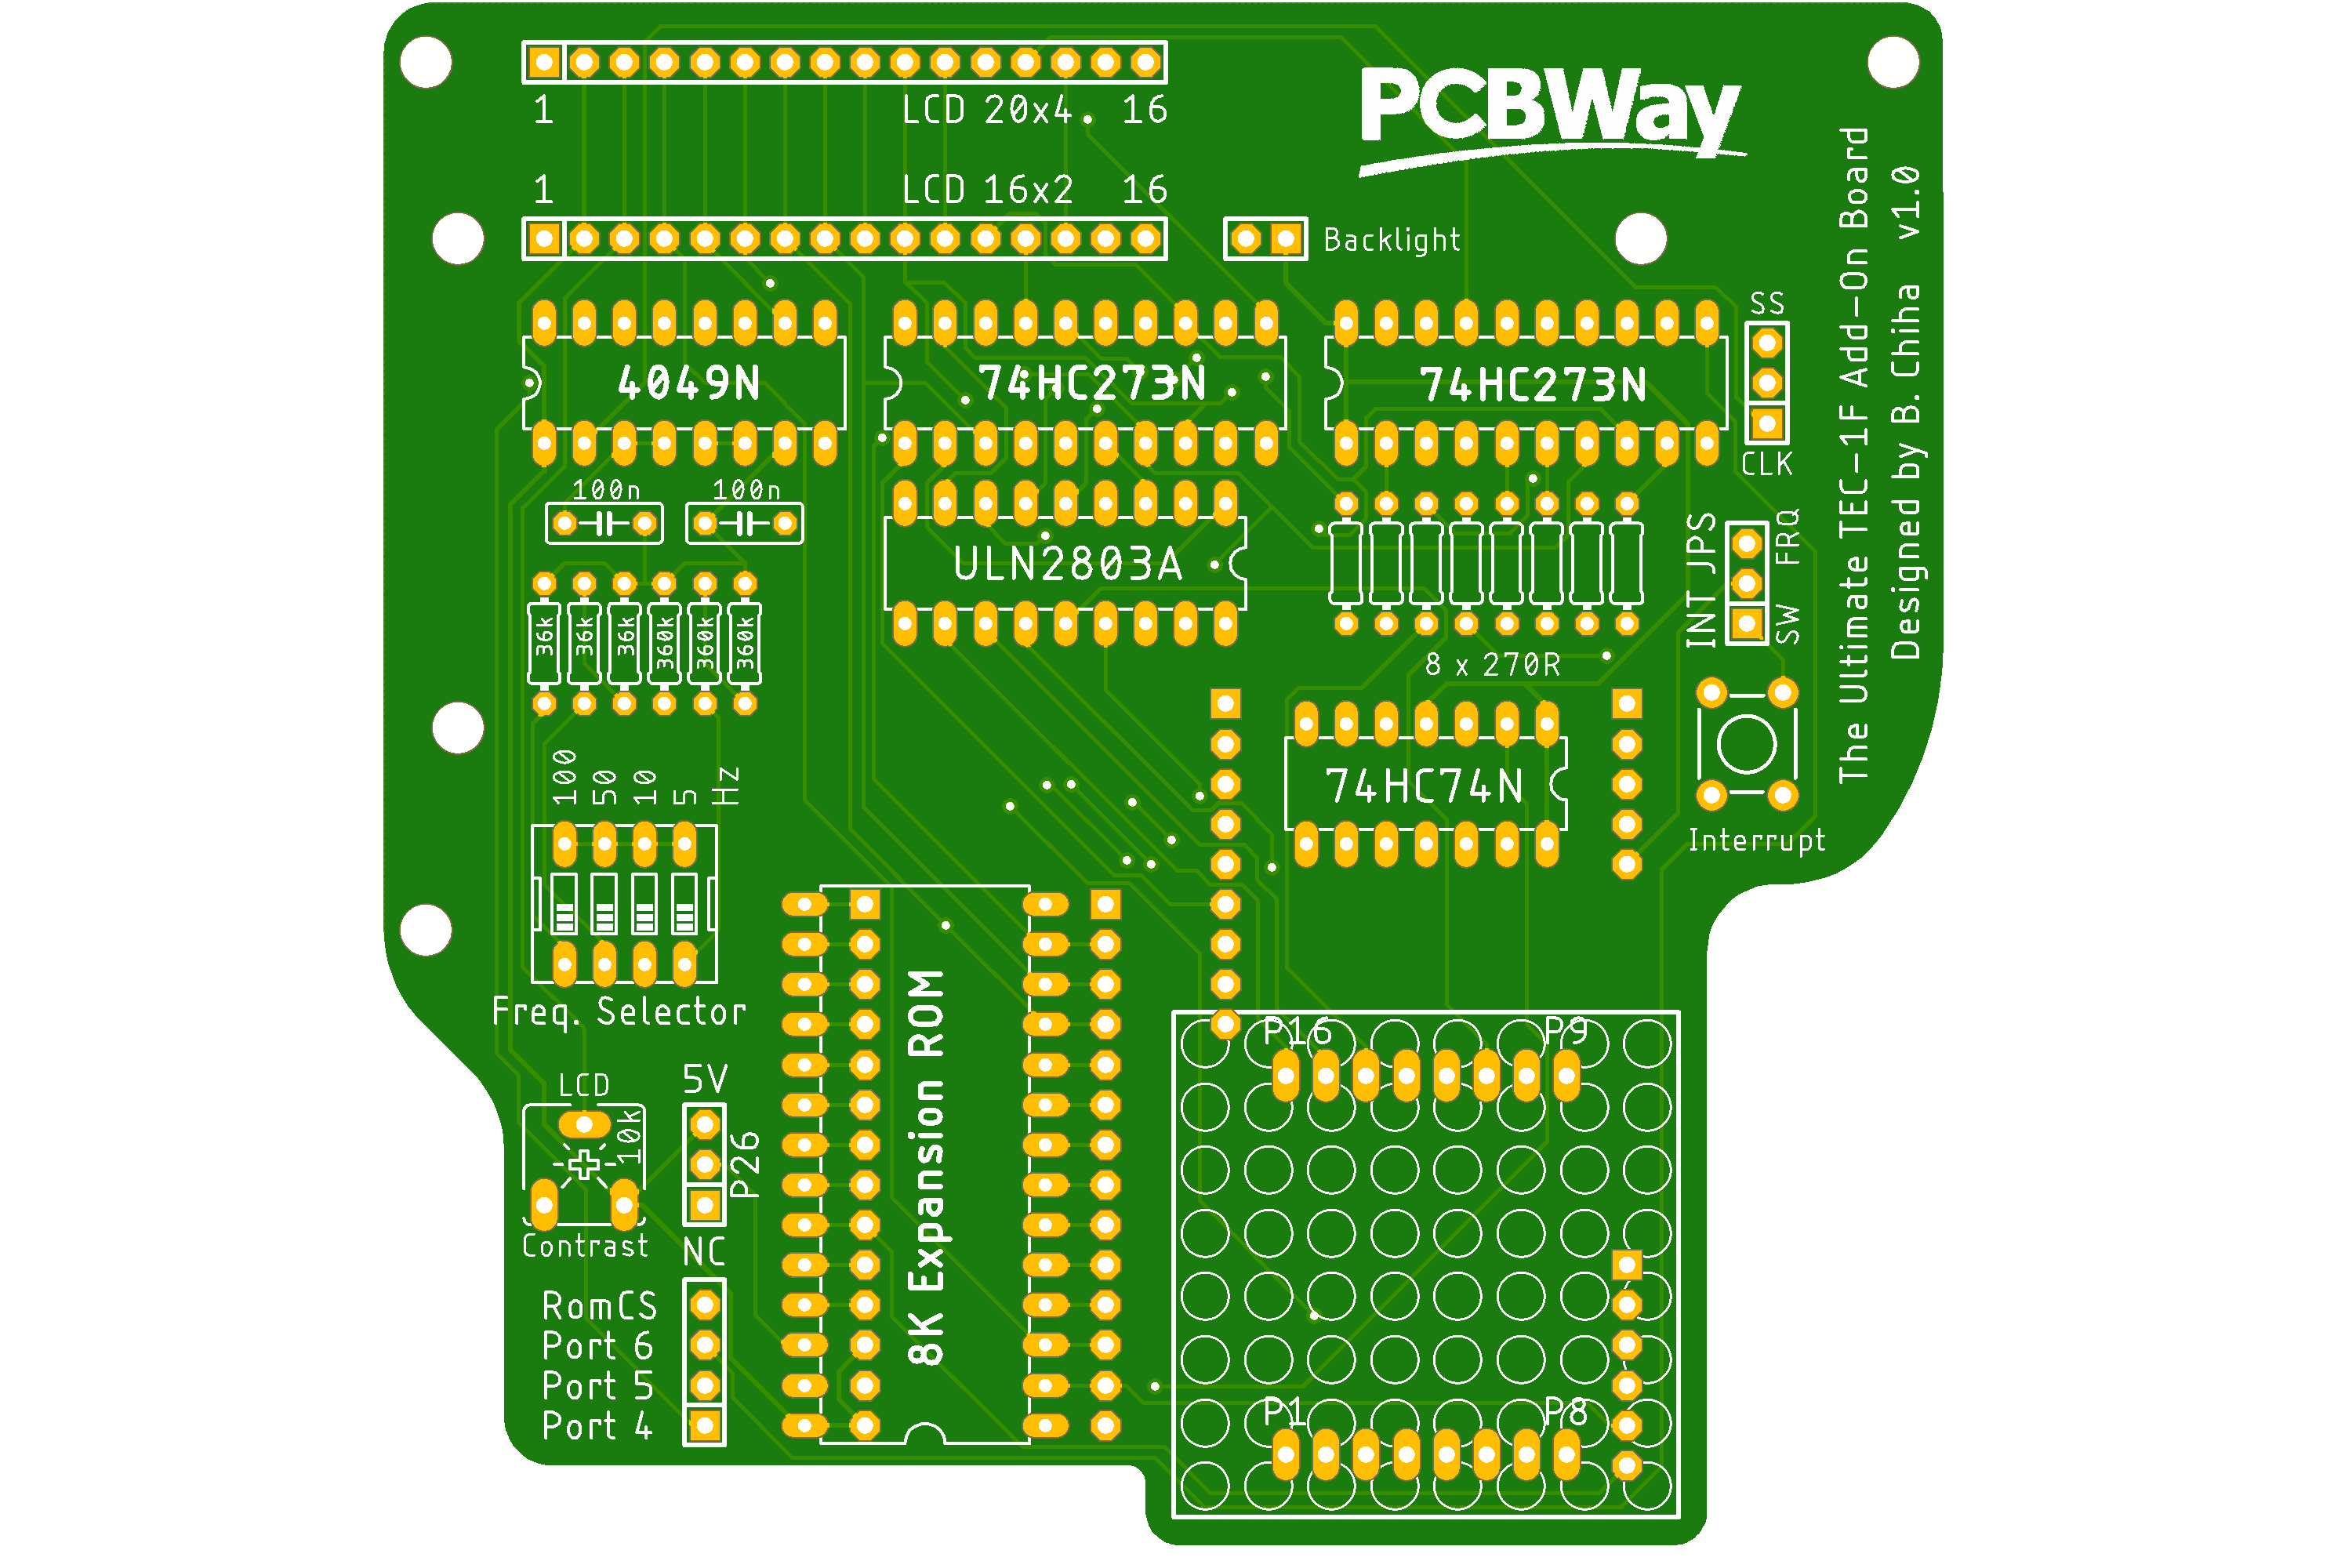 The design of this board was to incorporate all programs and some add-ons developed for the TEC.
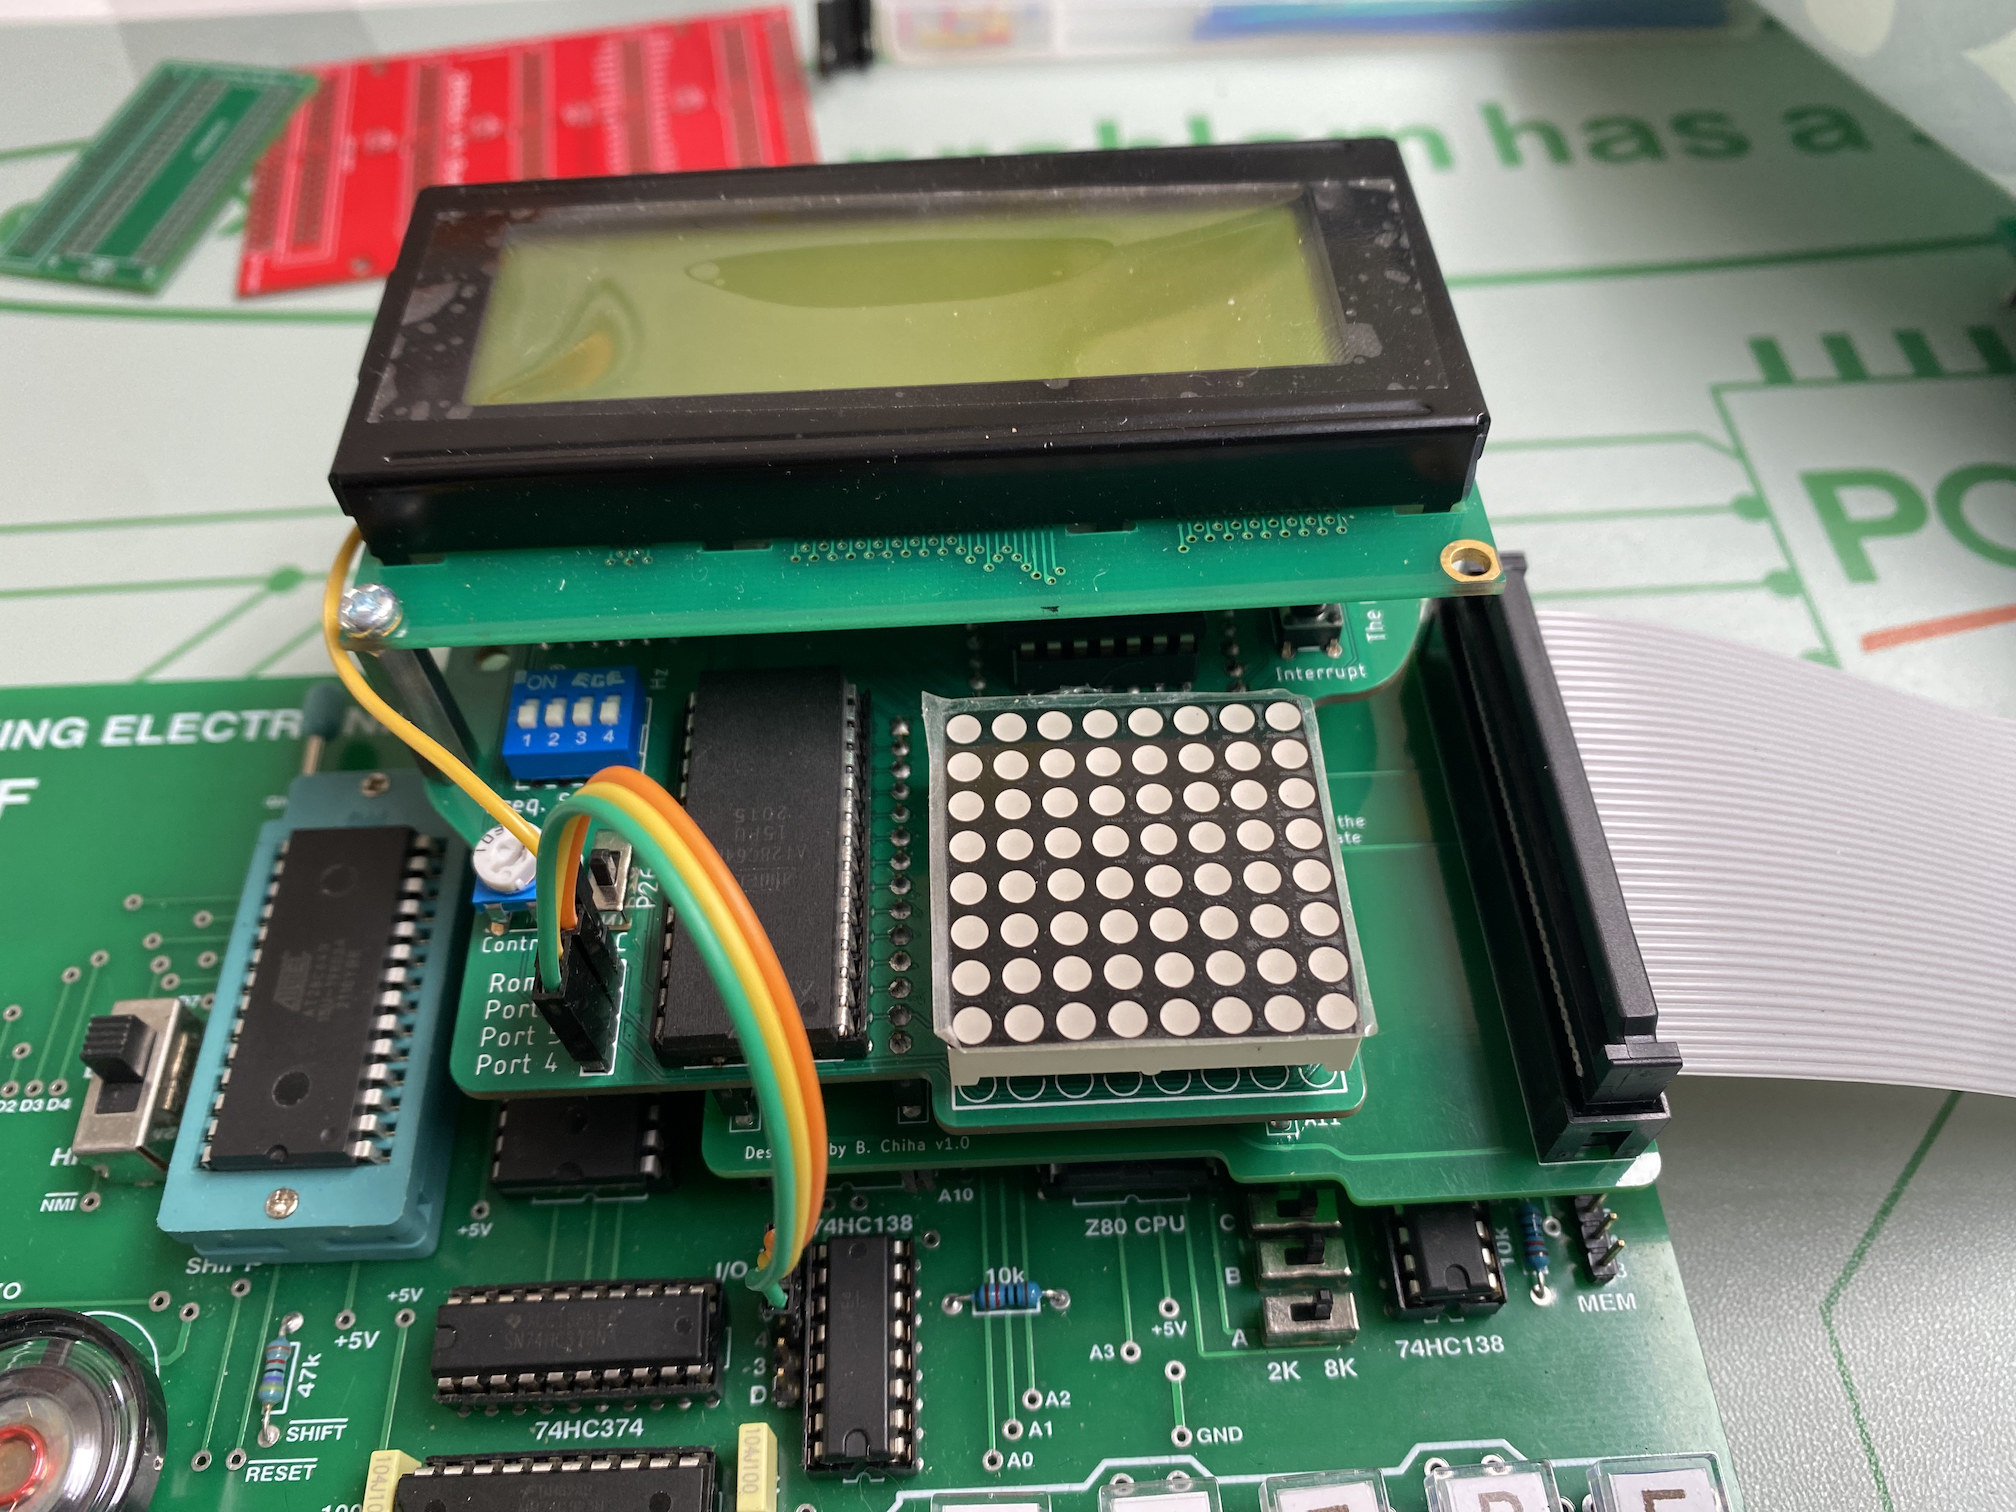
The Expansion board sits on top of the TEC-1F by utilising the exposed CPU / Expansion header pins. Port selection for the LED Matrix and LCD is done off the board and jumper wires are needed to connect Ports 4,5 and 6 to the board. See the picture below
The design of this board was to incorporate all programs and some add-ons developed for the TEC.
The Expansion board sits on top of the TEC-1F by utilising the exposed CPU / Expansion header pins. Port selection for the LED Matrix and LCD is done off the board and jumper wires are needed to connect Ports 4,5 and 6 to the board. See the picture below
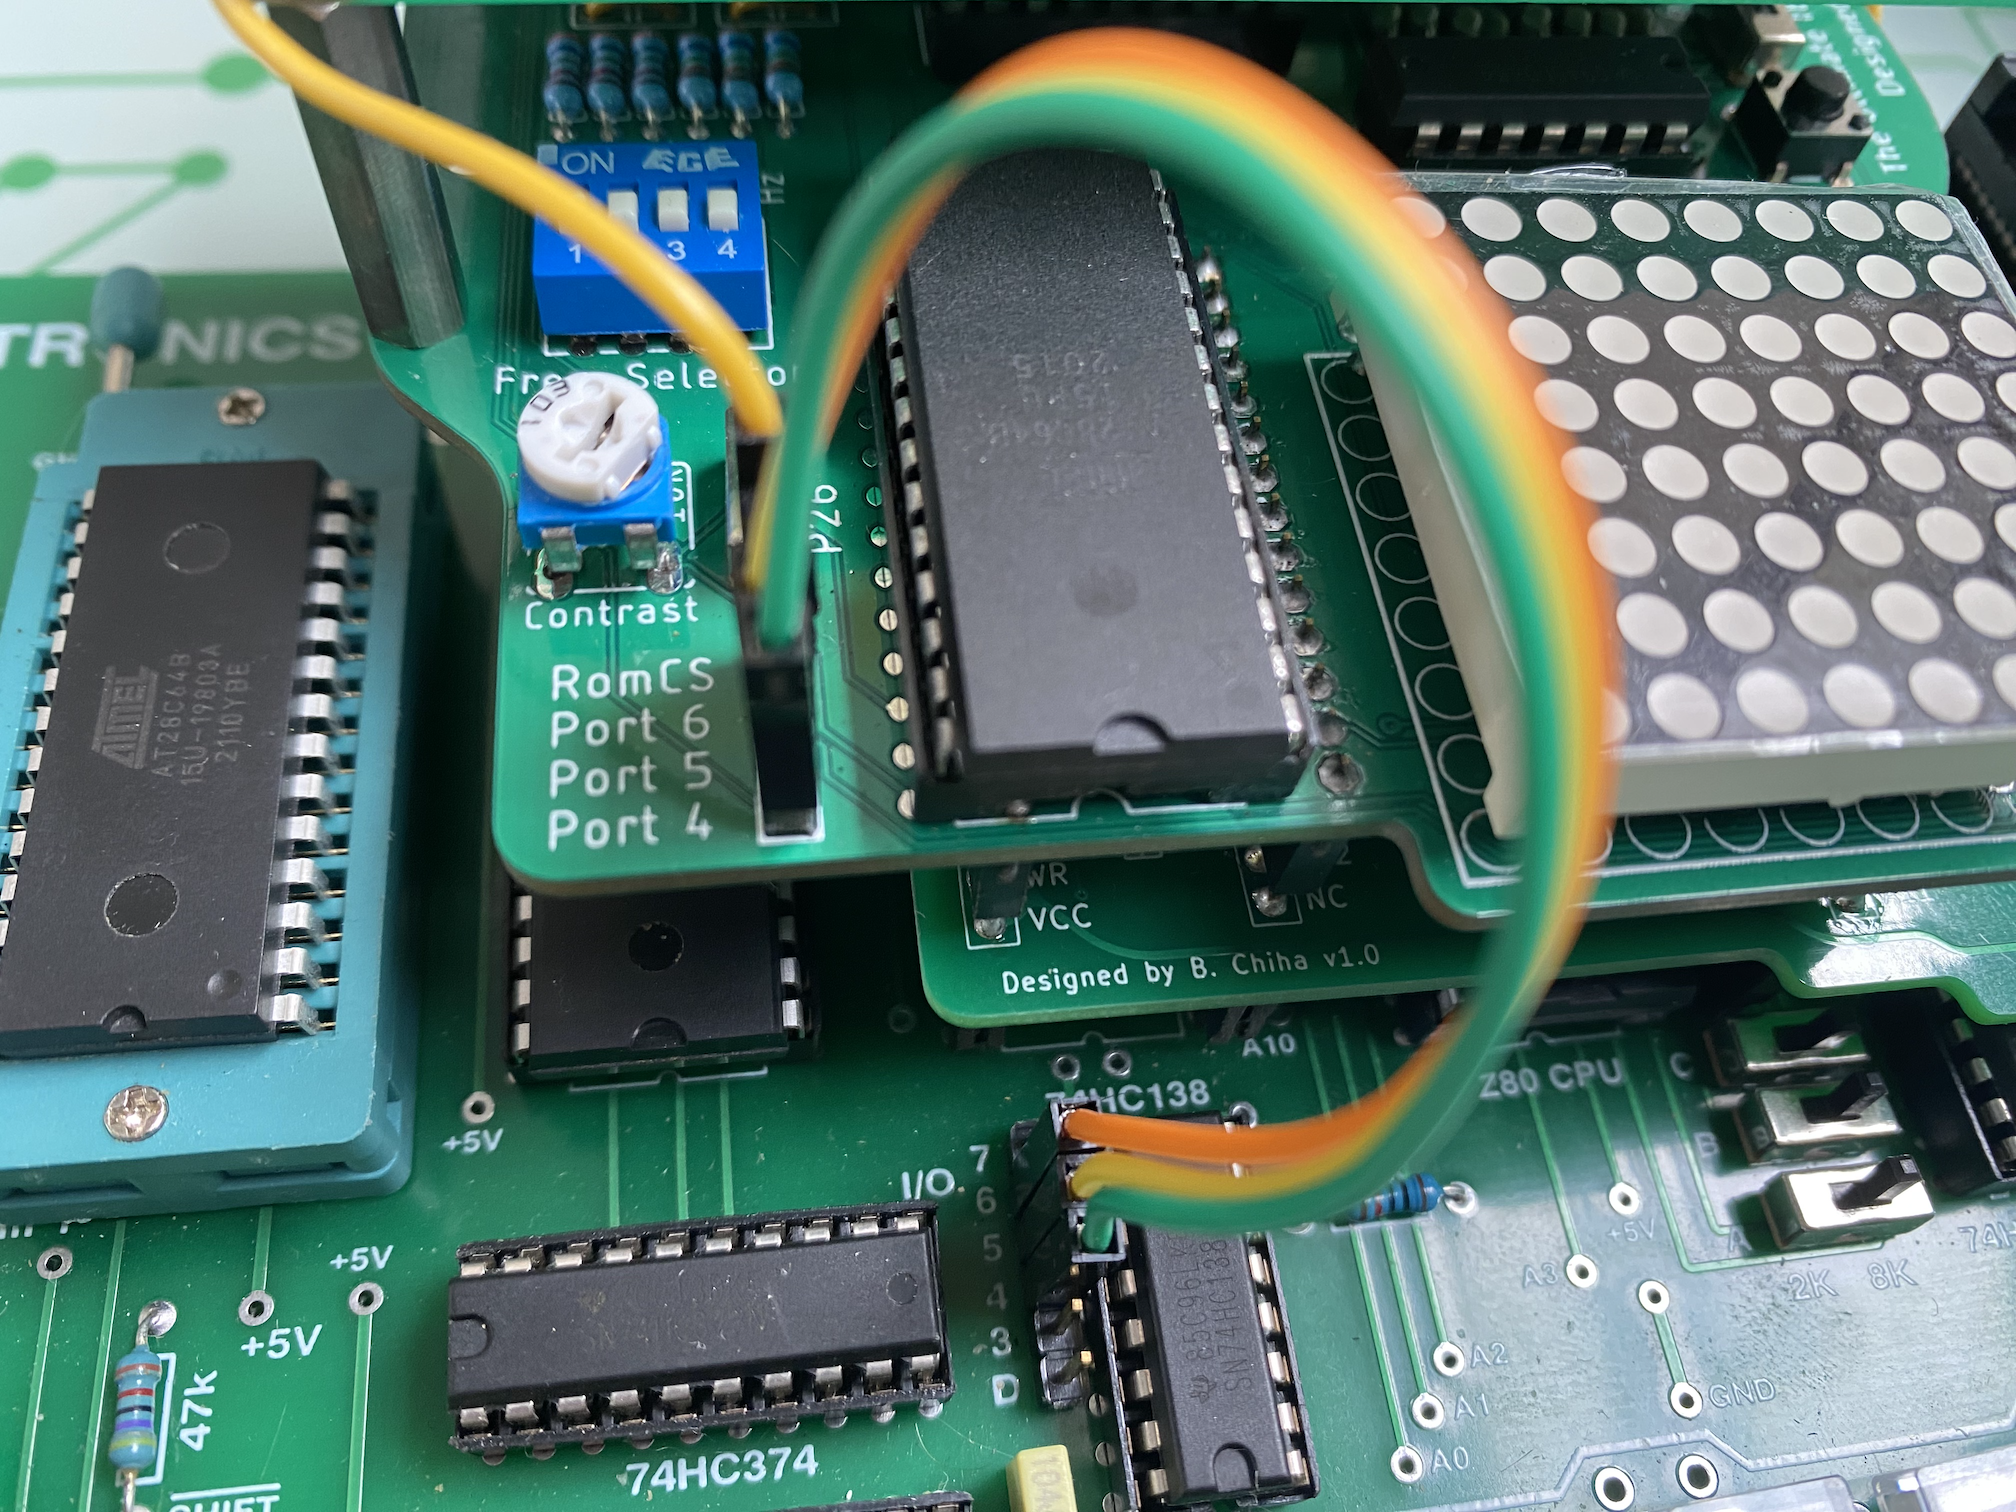 An extra jumper is needed for the ROM Chip Selected line for the Single Stepper. Connect the ROM CS header pin to Pin 15 of the 74HC138 Memory Decoder or Pin 20 of the ROM. This can be wired from underneath the board to a free header spot on the top right of the TEC.
Once all connected. The LCD and Single Stepper features of BMON will automatically start working.
## Using The Expansion Board
The Ultimate Expansion board contains four separate parts.
### 8x8 LED Matrix
The LED Matrix footprint is for a self contained matrix component with 16 pins. Data can be sent to the row of the matrix by using `Port 6`, and column data using `Port 5` from the TEC. For it to display something both ports need to have values.
Have a look at the code designed for the TEC 8x8 Add-on on how it works. When reset is pressed, the LED's will turn off.
### 16x2 or 20x4 LCD Display
The LCD screen is connected as explained in the [Main Features](main_features#lcd-display) page.
`Port 4` is the LCD Instruction port and `Port 84` is the LCD Data port. By default the display shows the current 8 bytes in memory and if connected to the BMon Expansion ROM, it will show disassembler information.
A Trim pot is available on the board to adjust the screen contrast and a switch can be used to turn on or off the backlight of the LCD.
### Single Stepping and Interrupt capability
The Single Stepper is again set up in the same way as described in the [Main Features](main_features##single-stepper) page. It uses a D-Flip Flop that triggers the `INT` line of the CPU when `M1` is low and its not looking at the BMon ROM.
There are some switches that can be set on the right hand side of the board to either set Interrupts to use a Tactile Button, or a timed interrupt. If using the button, when pressed an Interrupt will trigger. If using timed interrupts. Another option can be set to use the Single Stepping interrupt as described above or a clocked interrupt.
The Clocked interrupt uses a 4 way DIP switch. There are Hz rates that can be set, 5Hz, 10Hz, 50Hz, and 100Hz. These rates a additive and setting them all on will trigger an interrupt at around 165Hz. This features isn't being used yet, but is for future expansions.
### Expansion ROM/RAM slot
The Expansion slot has the ability to place a 8k ROM or RAM Chip. It is a direct connection to the Expansion slot on the TEC-1F.
The Memory location of this slot is `0x4000` to `0x5FFF`. To use it effectively, attach the [BMON Expansion ROM](#expansion-rom) using a AT28C64B EEPROM.
It can also handle a 2k CAT28C16A EEPROM. This chip is smaller and is to be placed at the back of the socket. One issue with using a smaller ROM. Pin 24 is VCC, but Pin 26 (maps to 24) is not connected. A Toggle switch is provided on the board to put 5V on Pin 26 to ensure that the Chip is powered.
## CPU Breakout Sandwich Board
More recent additions to the TEC have been designed around a 40 pin CPU IDC connection. For the TEC, an add-on board had been designed to be placed on top of the CPU socket. But with the Ultimate Expansion board connected to the TEC, this add-on cant be used.
An extra jumper is needed for the ROM Chip Selected line for the Single Stepper. Connect the ROM CS header pin to Pin 15 of the 74HC138 Memory Decoder or Pin 20 of the ROM. This can be wired from underneath the board to a free header spot on the top right of the TEC.
Once all connected. The LCD and Single Stepper features of BMON will automatically start working.
## Using The Expansion Board
The Ultimate Expansion board contains four separate parts.
### 8x8 LED Matrix
The LED Matrix footprint is for a self contained matrix component with 16 pins. Data can be sent to the row of the matrix by using `Port 6`, and column data using `Port 5` from the TEC. For it to display something both ports need to have values.
Have a look at the code designed for the TEC 8x8 Add-on on how it works. When reset is pressed, the LED's will turn off.
### 16x2 or 20x4 LCD Display
The LCD screen is connected as explained in the [Main Features](main_features#lcd-display) page.
`Port 4` is the LCD Instruction port and `Port 84` is the LCD Data port. By default the display shows the current 8 bytes in memory and if connected to the BMon Expansion ROM, it will show disassembler information.
A Trim pot is available on the board to adjust the screen contrast and a switch can be used to turn on or off the backlight of the LCD.
### Single Stepping and Interrupt capability
The Single Stepper is again set up in the same way as described in the [Main Features](main_features##single-stepper) page. It uses a D-Flip Flop that triggers the `INT` line of the CPU when `M1` is low and its not looking at the BMon ROM.
There are some switches that can be set on the right hand side of the board to either set Interrupts to use a Tactile Button, or a timed interrupt. If using the button, when pressed an Interrupt will trigger. If using timed interrupts. Another option can be set to use the Single Stepping interrupt as described above or a clocked interrupt.
The Clocked interrupt uses a 4 way DIP switch. There are Hz rates that can be set, 5Hz, 10Hz, 50Hz, and 100Hz. These rates a additive and setting them all on will trigger an interrupt at around 165Hz. This features isn't being used yet, but is for future expansions.
### Expansion ROM/RAM slot
The Expansion slot has the ability to place a 8k ROM or RAM Chip. It is a direct connection to the Expansion slot on the TEC-1F.
The Memory location of this slot is `0x4000` to `0x5FFF`. To use it effectively, attach the [BMON Expansion ROM](#expansion-rom) using a AT28C64B EEPROM.
It can also handle a 2k CAT28C16A EEPROM. This chip is smaller and is to be placed at the back of the socket. One issue with using a smaller ROM. Pin 24 is VCC, but Pin 26 (maps to 24) is not connected. A Toggle switch is provided on the board to put 5V on Pin 26 to ensure that the Chip is powered.
## CPU Breakout Sandwich Board
More recent additions to the TEC have been designed around a 40 pin CPU IDC connection. For the TEC, an add-on board had been designed to be placed on top of the CPU socket. But with the Ultimate Expansion board connected to the TEC, this add-on cant be used.
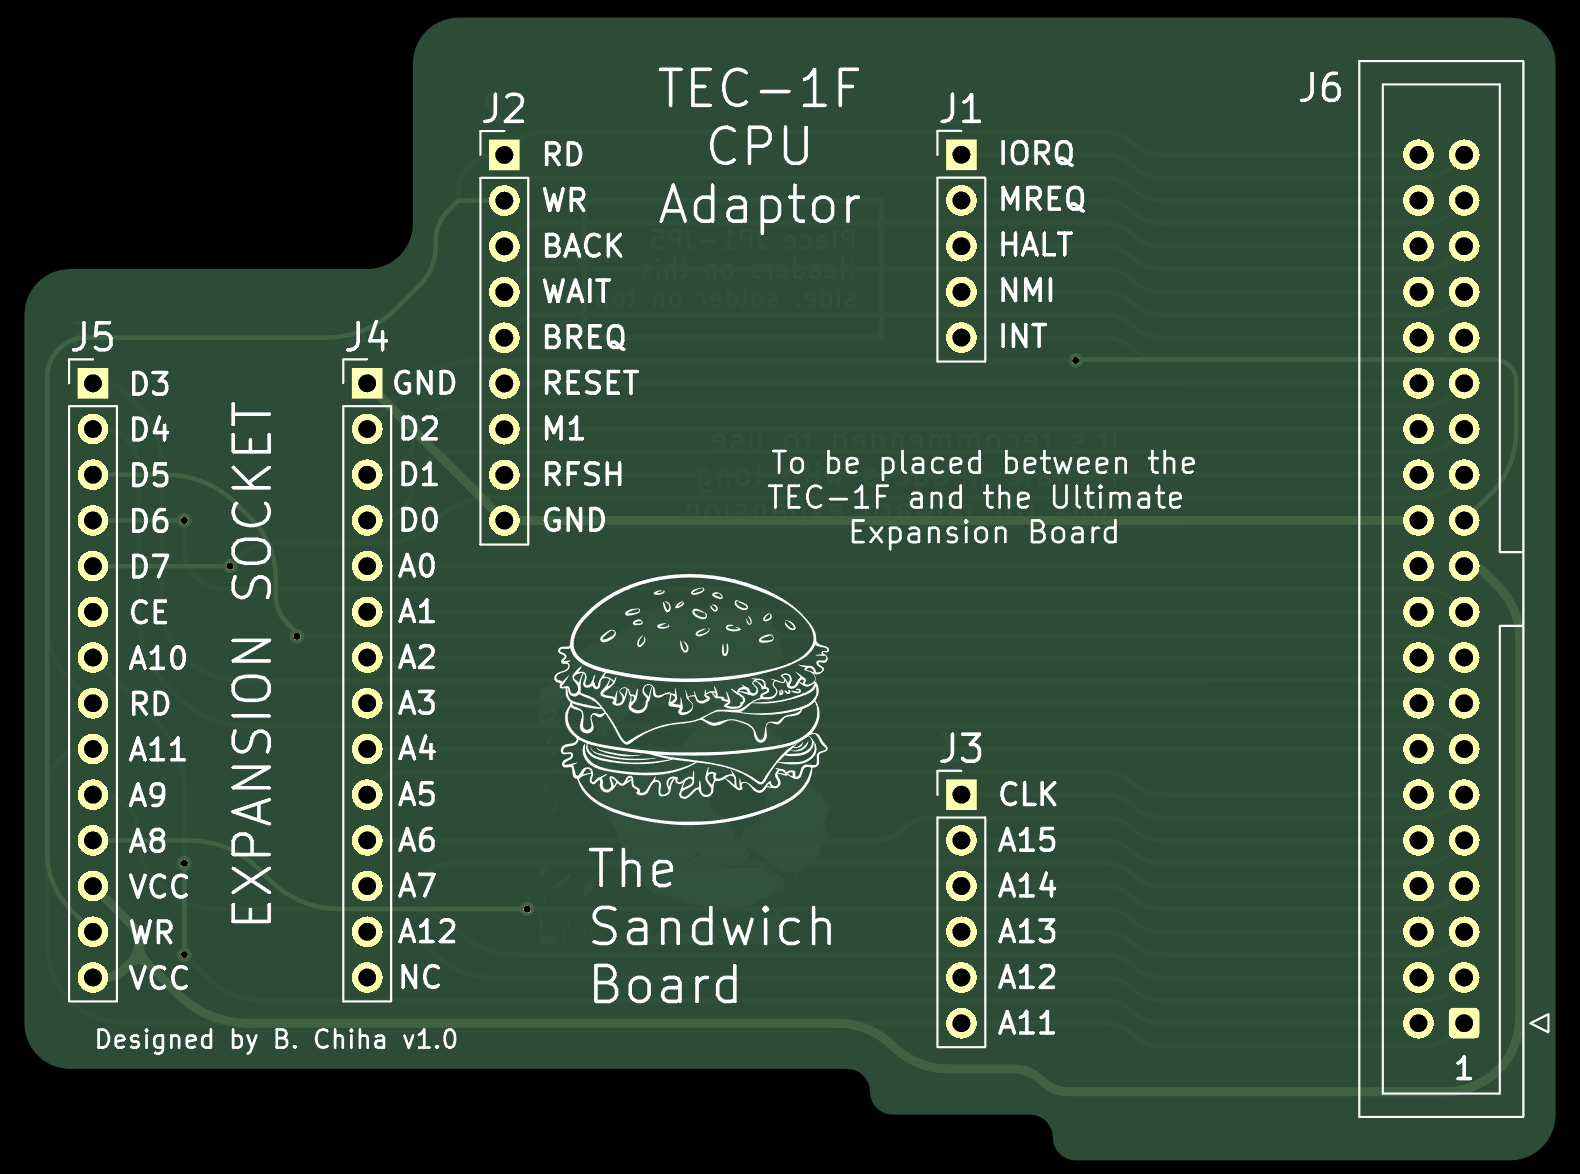 Introducing the Sandwich Breakout board. This board is designed to sit between the TEC and the Ultimate Expansion Board by using 'Long' Female headers. Once connected to the board, a 40 pin IDC cable can be connected for easy expansion additions to the TEC.
When the Sandwich board and Ultimate Expansion board are connected, all other add-ons can be added via the IDC cable. Ideally onto a CPU Bus Board with multiple expansion slots.
Introducing the Sandwich Breakout board. This board is designed to sit between the TEC and the Ultimate Expansion Board by using 'Long' Female headers. Once connected to the board, a 40 pin IDC cable can be connected for easy expansion additions to the TEC.
When the Sandwich board and Ultimate Expansion board are connected, all other add-ons can be added via the IDC cable. Ideally onto a CPU Bus Board with multiple expansion slots.
 ## Expansion ROM
This ROM includes all the lost goodies that the TEC once had. And some extra fun programs that I have developed. It is programmed to be placed at address location `0x4000`, which happens to be the same as the Expansion Socket on the Ultimate Expansion! The ROM contains the following programs.
- Disassembler written by Jim Robertson
- Single Stepper LCD Information
- TEC Magazine Code
- TEC Space Invaders Mark 2
- TEC Maze
- TEC LCD Runner game
- Conway's Game of Life
- Magic Square Game
- Fast Forward utility
- Banger Music demo
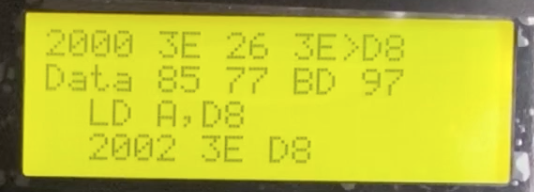
BMON automatically detects the expansion ROM when its connected. If using a 20x4 LCD on the Expansion Board, Disassembler information is displayed on the LCD. It will show the Z80 Assembly for the current editing location on the TEC. It will also show the number of bytes for the instruction. This will help in moving correctly to the next instruction manually.
## Expansion ROM
This ROM includes all the lost goodies that the TEC once had. And some extra fun programs that I have developed. It is programmed to be placed at address location `0x4000`, which happens to be the same as the Expansion Socket on the Ultimate Expansion! The ROM contains the following programs.
- Disassembler written by Jim Robertson
- Single Stepper LCD Information
- TEC Magazine Code
- TEC Space Invaders Mark 2
- TEC Maze
- TEC LCD Runner game
- Conway's Game of Life
- Magic Square Game
- Fast Forward utility
- Banger Music demo
BMON automatically detects the expansion ROM when its connected. If using a 20x4 LCD on the Expansion Board, Disassembler information is displayed on the LCD. It will show the Z80 Assembly for the current editing location on the TEC. It will also show the number of bytes for the instruction. This will help in moving correctly to the next instruction manually.
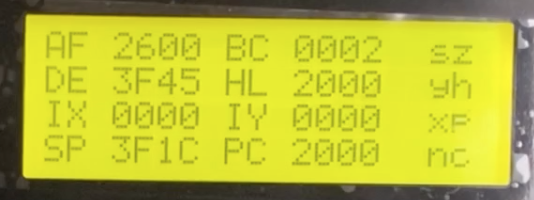
 When the Single Stepper is active. It will also display register information and flag status.
 To access the other programs, press `Shift-3` on the TEC-1F. Here a menu will be given on the seven segment displays. Use + or - to scroll through the menu and `Go` to run the program or `Ad` to quit the menu.
Another way of accessing the programs is by hot key. press `Ad` and `Go` to enter `Fn-3` mode, then press a button from 0 to 8. See [Address - 'GO' Function Mode 3](main_features#address---go-function-mode-3) for more information
Here is a summary of the programs from the menu
### TEC Magazine Code
A collection of almost all the code written for the TEC from issue #10 to #15 of the Talking Electronics Magazine. Use the Segment Menu to select the program. When exiting, press `Shift-GO` to return to the menu. The programs that are on menu are:
| Name | Issue | Name | Issue |
| :---: | ------- | :---: | ------- |
| Segment Move | 11 P 26 | Segment Cycle | 11 P 20 |
| Segment Flash | 11 P 28 | Segment Move Around #1 | 11 P 29 |
| Segment Move Around #2 | 12 P 16 | Segment Move Around #3 | 12 P 17 |
| Segment Back and Fort | 11 P 28 | Segment Keyboard Move | 12 P 17 |
| Segment Keyboard Move w Run | 12 P 18 | Display two Segments at Once | 12 P 18 |
| The Box Animation | 14 P 14 | Aussie Boomerang | 14 P 14 |
| 8x8 LED Around | 11 P 33 | 8x8 LED Back and Forth | 11 P 33 |
| 8x8 LED Fan Out #1 | 11 P 34 | 8x8 LED Fan Out #2 | 12 P 26 |
| 8x8 LED Fan Out #3 | 14 P 15 | 8x8 LED Mystery Effect | 11 P 34 |
| 8x8 LED Key Movement | 11 P 36 | 8x8 LED Ball Bounce | 12 P 26 |
| 8x8 Animation Example | B Chiha | Aliens Attack | 11 P 36 |
| Speaker Oscillator | 12 P 22 | Frequency Sweep | 12 P 22 |
| Space Invaders Sound | 14 P 14 | Quick Draw | 12 P 21 |
| TEC Clock | 12 P 23 | Counter #1 | 13 P 14 |
| Counter #2 | 13 P 15 | Counter #3 | 13 P 16 |
### TEC Space Invaders Mark 2
To access the other programs, press `Shift-3` on the TEC-1F. Here a menu will be given on the seven segment displays. Use + or - to scroll through the menu and `Go` to run the program or `Ad` to quit the menu.
Another way of accessing the programs is by hot key. press `Ad` and `Go` to enter `Fn-3` mode, then press a button from 0 to 8. See [Address - 'GO' Function Mode 3](main_features#address---go-function-mode-3) for more information
Here is a summary of the programs from the menu
### TEC Magazine Code
A collection of almost all the code written for the TEC from issue #10 to #15 of the Talking Electronics Magazine. Use the Segment Menu to select the program. When exiting, press `Shift-GO` to return to the menu. The programs that are on menu are:
| Name | Issue | Name | Issue |
| :---: | ------- | :---: | ------- |
| Segment Move | 11 P 26 | Segment Cycle | 11 P 20 |
| Segment Flash | 11 P 28 | Segment Move Around #1 | 11 P 29 |
| Segment Move Around #2 | 12 P 16 | Segment Move Around #3 | 12 P 17 |
| Segment Back and Fort | 11 P 28 | Segment Keyboard Move | 12 P 17 |
| Segment Keyboard Move w Run | 12 P 18 | Display two Segments at Once | 12 P 18 |
| The Box Animation | 14 P 14 | Aussie Boomerang | 14 P 14 |
| 8x8 LED Around | 11 P 33 | 8x8 LED Back and Forth | 11 P 33 |
| 8x8 LED Fan Out #1 | 11 P 34 | 8x8 LED Fan Out #2 | 12 P 26 |
| 8x8 LED Fan Out #3 | 14 P 15 | 8x8 LED Mystery Effect | 11 P 34 |
| 8x8 LED Key Movement | 11 P 36 | 8x8 LED Ball Bounce | 12 P 26 |
| 8x8 Animation Example | B Chiha | Aliens Attack | 11 P 36 |
| Speaker Oscillator | 12 P 22 | Frequency Sweep | 12 P 22 |
| Space Invaders Sound | 14 P 14 | Quick Draw | 12 P 21 |
| TEC Clock | 12 P 23 | Counter #1 | 13 P 14 |
| Counter #2 | 13 P 15 | Counter #3 | 13 P 16 |
### TEC Space Invaders Mark 2
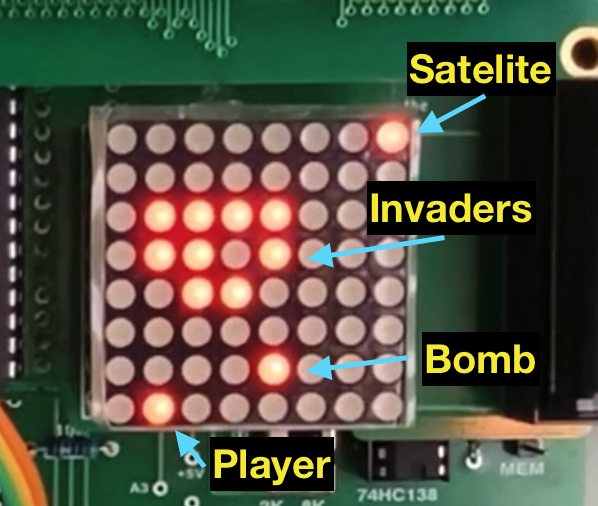 This is my version of the TEC Invaders game. I never saw the game but it was released on Tape back in the '80s by Cameron Sheppard. It came with some notes on how to play the game. I reversed engineered what I read from the notes and this is what I came up with.
To play, press `+` to shoot, and `1` and `9` to move the player from left to right. On the Seven Segment Display, the Address segments display the current score and the Data segments display the number of lives left. If all invaders are destroyed, a new wave of invaders appears. The player loses a life if a Bomb hits them or the Invaders land. Press `Go` to restart the game.
10 points are award for hit Invaders and 50 points for Satellites. Can you hit 1000 points?
### TEC Maze
This is my version of the TEC Invaders game. I never saw the game but it was released on Tape back in the '80s by Cameron Sheppard. It came with some notes on how to play the game. I reversed engineered what I read from the notes and this is what I came up with.
To play, press `+` to shoot, and `1` and `9` to move the player from left to right. On the Seven Segment Display, the Address segments display the current score and the Data segments display the number of lives left. If all invaders are destroyed, a new wave of invaders appears. The player loses a life if a Bomb hits them or the Invaders land. Press `Go` to restart the game.
10 points are award for hit Invaders and 50 points for Satellites. Can you hit 1000 points?
### TEC Maze
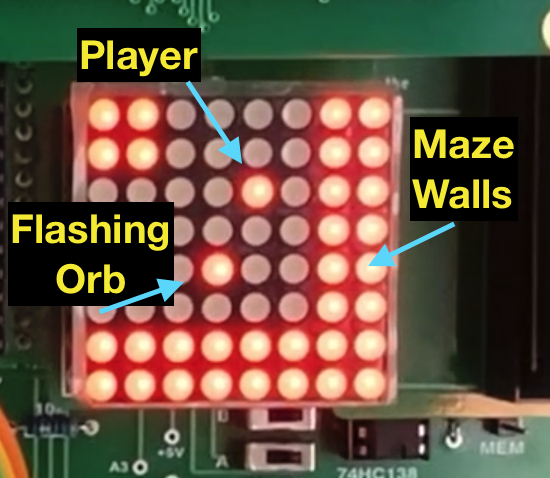 Craig Sheppard also released a Maze game on Tape. I'n not sure of how it worked but again, I came up with a maze game.
To play the game, the player is moved through the maze with the `1`, `6`, `9` and `4` buttons. On some maps, there will be a *"Flashing"* Orb. These Orbs are to be collected. But only when visible. If all Orbs are collected AND the player returns to their starting map position, they win the game. On the Seven Segment Display, the Address segments display the Map Coordinate, 0-7 Across and A-G Down. The Data segments display how many Orbs are still to be collected.
### TEC LCD Runner game
Craig Sheppard also released a Maze game on Tape. I'n not sure of how it worked but again, I came up with a maze game.
To play the game, the player is moved through the maze with the `1`, `6`, `9` and `4` buttons. On some maps, there will be a *"Flashing"* Orb. These Orbs are to be collected. But only when visible. If all Orbs are collected AND the player returns to their starting map position, they win the game. On the Seven Segment Display, the Address segments display the Map Coordinate, 0-7 Across and A-G Down. The Data segments display how many Orbs are still to be collected.
### TEC LCD Runner game
 TEC Runner is a game of skill, It uses the LCD Screen. The runner is on the left, coming towards the runner from the right are walls. By pressing the `4` button, the runner will attempt to jump on a wall. Timing is everything. With a bit of practice the runner can go a long way. Every time the runner jumps, the game gets faster. There is a distance count provided. See how far you can travel without loosing your head.
### Conway's Game of Life
This is a version of Conway's Game of Life using the 8x8 LED Matrix. There are pre-defined patterns installed and they can be loaded by pressing the keypad buttons. Pressing `0` will generate a random pattern. Some interesting patterns can be created. Here is a list of what patterns are linked to which button.
| Key | Pattern | Key | Pattern | Key | Pattern | Key | Pattern |
| :---: | ------- | :---: | ------- | :---: | ------- | :---: | ------- |
| 0 | Random | 1 | Blinkers | 2 | Toad | 3 | Beacon |
| 4 | Pulsar | 5 | Glider | 6 | Why Not | 7 | Boat |
| 8 | Barbers Pole | 9 | Drummer | A | R-pentomino | B | Carnival |
| C | Arrow | D | Square | E | Face to Pulsar | F | Fumarole |
| + | Phoenix | - | Pacman | GO | Octagon | AD | Heart |
### Magic Square Game
(Instructions taken from Issue #15 of the TE Magazine)
This is a fun game for the 8x8 LED Matrix that will have you amused and frustrated for hours.
The object is to light up the outside square of the 8x8. The Game is made up of three 2x2 boxes of LEDs with a space between each. This makes full use of the 8x8 to display a playing field that is actually 3x3.
Nine keys are used to play the game and each key corresponds to a group of LEDs on the display.
After starting the game, a random pattern appears. By pressing the game keys, the playing field will change. Each key has a particular effect that remains constant throughout the game. The effects of each key is for you to work out! The keys used for the game are: 4, 5, 6, 8, 9, A, C, D and E.
As you can see, these make up the 3x3 box pattern on the keyboard. A fair point to add is that it is always possible to win regardless of the starting pattern, - believe it or not!
When or if you complete the game, your effort will be greeted enthusiastically on the 8x8. The game can be restarted by pressing the `GO` key.
### Fast Forward utility
FAST FORWARD is a program written by Jim Robertson. It is designed to automatically step through memory and display the address and data on the TEC LED display.
The purpose of this is to allow you to write down your program without having to hit the increment key all the time.
FAST FORWARD can step through the memory both forwards and backwards at slow speed and also at high speed. It does not, however, have a manual step feature.
Each time FAST FORWARD changes to a new address, a beep is sounded to let you know. This way you can keep in time with the changes.
The following keys are used:
- A is the fast forward key
- B is the fast reverse key
- C is the stop key
- D is the slow reverse key
- ANY other key for slow forward
When the program starts, it will ask you to enter the starting address. Once entered, press `GO` and the program will start moving forward slowly.
### Banger Music demo
This is a little surprise at the end. I received this program from a user on my [YouTube](https://www.youtube.com/@ReadyZ80) channel. I totally can't remember who sent it to me, so sorry for not crediting you :(
Its a great example of what sounds can be produced with simple oscillations of the speaker bit `D7` on `Port 01`. The code is all ROM and can be placed anywhere in memory to run as it only uses relative jumps.
You will have to burn the ROM or type it out on a TEC to work out what it sounds like. But for Research purposes, below is the listing of the program
```
START:
XOR A
LD E, A
LD D, A
LD C, A
INC C
LD A, 06H
SUB C
JR Z, START
INC DE
LD B, A
ADD HL, HL
DJNZ $ - 1
LD H, D
LD L, D
LD B, C
ADD HL, HL
DJNZ $ - 1
LD A, H
OR E
ADD A, A
LD B, A
ADD A, A
ADD A, A
ADD A, B
AND 80H
OUT (01), A
LD A, D
OR E
JR NZ, START + 5
JR START + 4
And in Z80 Machine Code
AF 5F 57 4F 0C 3E 06 91 28 F6
13 47 29 10 FD 62 6A 41 29 10 FD
7C B3 87 47 87 87 80 E6 80 D3 01
7A B3 20 E1 18 DE
```
TEC Runner is a game of skill, It uses the LCD Screen. The runner is on the left, coming towards the runner from the right are walls. By pressing the `4` button, the runner will attempt to jump on a wall. Timing is everything. With a bit of practice the runner can go a long way. Every time the runner jumps, the game gets faster. There is a distance count provided. See how far you can travel without loosing your head.
### Conway's Game of Life
This is a version of Conway's Game of Life using the 8x8 LED Matrix. There are pre-defined patterns installed and they can be loaded by pressing the keypad buttons. Pressing `0` will generate a random pattern. Some interesting patterns can be created. Here is a list of what patterns are linked to which button.
| Key | Pattern | Key | Pattern | Key | Pattern | Key | Pattern |
| :---: | ------- | :---: | ------- | :---: | ------- | :---: | ------- |
| 0 | Random | 1 | Blinkers | 2 | Toad | 3 | Beacon |
| 4 | Pulsar | 5 | Glider | 6 | Why Not | 7 | Boat |
| 8 | Barbers Pole | 9 | Drummer | A | R-pentomino | B | Carnival |
| C | Arrow | D | Square | E | Face to Pulsar | F | Fumarole |
| + | Phoenix | - | Pacman | GO | Octagon | AD | Heart |
### Magic Square Game
(Instructions taken from Issue #15 of the TE Magazine)
This is a fun game for the 8x8 LED Matrix that will have you amused and frustrated for hours.
The object is to light up the outside square of the 8x8. The Game is made up of three 2x2 boxes of LEDs with a space between each. This makes full use of the 8x8 to display a playing field that is actually 3x3.
Nine keys are used to play the game and each key corresponds to a group of LEDs on the display.
After starting the game, a random pattern appears. By pressing the game keys, the playing field will change. Each key has a particular effect that remains constant throughout the game. The effects of each key is for you to work out! The keys used for the game are: 4, 5, 6, 8, 9, A, C, D and E.
As you can see, these make up the 3x3 box pattern on the keyboard. A fair point to add is that it is always possible to win regardless of the starting pattern, - believe it or not!
When or if you complete the game, your effort will be greeted enthusiastically on the 8x8. The game can be restarted by pressing the `GO` key.
### Fast Forward utility
FAST FORWARD is a program written by Jim Robertson. It is designed to automatically step through memory and display the address and data on the TEC LED display.
The purpose of this is to allow you to write down your program without having to hit the increment key all the time.
FAST FORWARD can step through the memory both forwards and backwards at slow speed and also at high speed. It does not, however, have a manual step feature.
Each time FAST FORWARD changes to a new address, a beep is sounded to let you know. This way you can keep in time with the changes.
The following keys are used:
- A is the fast forward key
- B is the fast reverse key
- C is the stop key
- D is the slow reverse key
- ANY other key for slow forward
When the program starts, it will ask you to enter the starting address. Once entered, press `GO` and the program will start moving forward slowly.
### Banger Music demo
This is a little surprise at the end. I received this program from a user on my [YouTube](https://www.youtube.com/@ReadyZ80) channel. I totally can't remember who sent it to me, so sorry for not crediting you :(
Its a great example of what sounds can be produced with simple oscillations of the speaker bit `D7` on `Port 01`. The code is all ROM and can be placed anywhere in memory to run as it only uses relative jumps.
You will have to burn the ROM or type it out on a TEC to work out what it sounds like. But for Research purposes, below is the listing of the program
```
START:
XOR A
LD E, A
LD D, A
LD C, A
INC C
LD A, 06H
SUB C
JR Z, START
INC DE
LD B, A
ADD HL, HL
DJNZ $ - 1
LD H, D
LD L, D
LD B, C
ADD HL, HL
DJNZ $ - 1
LD A, H
OR E
ADD A, A
LD B, A
ADD A, A
ADD A, A
ADD A, B
AND 80H
OUT (01), A
LD A, D
OR E
JR NZ, START + 5
JR START + 4
And in Z80 Machine Code
AF 5F 57 4F 0C 3E 06 91 28 F6
13 47 29 10 FD 62 6A 41 29 10 FD
7C B3 87 47 87 87 80 E6 80 D3 01
7A B3 20 E1 18 DE
```