# GELLO Implementation for Franka FR3 with ROS 2 (Humble)
This folder contains all required ROS 2 packages for using GELLO with a Franka FR3 robot.
## Setup Environment
### Option 1: VS-Code Dev-Container (recommended)
We recommend working inside the provided VS-Code Dev-Container for a seamless development experience. Dev-Containers allow you to use a consistent environment with all necessary dependencies pre-installed.
To start the Dev-Container, open the `ros2` sub-folder of this repository (not the entire `gello_software` folder) in VS Code. If prompted, select **"Reopen in Container"** to launch the workspace inside the Dev-Container. If you are not prompted, open the Command Palette (`Ctrl+Shift+P`) and select **"Dev Containers: Reopen in Container"**. Building the container for the first time will take a few minutes. For more information, refer to the [VS-Code Dev-Containers documentation](https://code.visualstudio.com/docs/devcontainers/containers).
If you choose not to use the Dev-Container, please refer to the [Local Setup](#option-2-local-setup) section below for manual installation instructions.
> 💡 **Hint:**
> The Dev-Container uses specific versions of `libfranka`, `franka_ros2`, and `franka_description` that are compatible with certain robot system versions. Please ensure these versions match your robot's system version by referring to the [compatibility documentation](https://frankarobotics.github.io/docs/compatibility.html). If necessary, you can modify the version arguments in the Dockerfile to match your robot's requirements.
### Option 2: Local Setup
#### Prerequisites
- **ROS 2 Humble Desktop** must be installed.
See the [official installation guide](https://docs.ros.org/en/humble/Installation.html) for instructions.
- **libfranka** and **franka_ros2** must be installed.
Refer to the [Franka Robotics documentation](https://frankarobotics.github.io/docs/index.html) for installation steps and compatibility information.
- **ros2_robotiq_gripper** (if required) must be installed.
See the [ros2_robotiq_gripper GitHub repository](https://github.com/PickNikRobotics/ros2_robotiq_gripper) for installation and usage instructions.
- We recommend using Cyclone DDS as ROS 2 RMW. Refer to [the ROS 2 documentation](https://docs.ros.org/en/humble/Installation/RMW-Implementations/DDS-Implementations/Working-with-Eclipse-CycloneDDS.html) for installation instructions and detailed information.
> 💡 **Hint:**
> You can also find example installation commands for `libfranka`, `franka_ros2`, and `ros2_robotiq_gripper` in the [Dockerfile](./.devcontainer/Dockerfile) located in the `ros2/.devcontainer` directory. These commands can be copy-pasted for your local setup.
#### Further Dependency Installations
After installing the prerequisites, you may need to install additional dependencies required by this workspace. For this you can run the `install_workspace_dependencies.bash` script.
If you add new dependencies to your packages, remember to update the relevant `requirements.txt`, `requirements_dev.txt` or `package.xml` files and re-run the script.
## Getting Started - Pre-assembled Franka GELLO Single with the Franka Hand
- Configure the `com_port` in `franka_gello_single.yaml` and `example_fr3_config_franka_hand.yaml`, and set the `robot_ip` in `example_fr3_config.yaml`. For a complete description, see the [Detailed Launch Routine](#detailed-launch-routine) section.
- Run the following commands:
```bash
# Follow the Setup Environment section. If using Option 2, substitute /workspace/ with the path to the gello_software folder
# Go to the ROS 2 workspace, build it, and source it
cd /workspace/ros2 && colcon build && source install/setup.bash
# Start the GELLO node
ros2 launch franka_gello_state_publisher main.launch.py config_file:=franka_gello_single.yaml
# Start the Franka Hand node
ros2 launch franka_gripper_manager franka_gripper_client.launch.py config_file:=example_fr3_config_franka_hand.yaml
# Hold the GELLO and place it in a comfortable position with some distance from the base pin
# Start the robot node (the robot position will sync directly to the GELLO position. Avoid moving the GELLO abruptly during synchronization)
ros2 launch franka_fr3_arm_controllers franka_fr3_arm_controllers.launch.py robot_config_file:=example_fr3_config.yaml
```
## Getting Started - Pre-assembled Franka GELLO Duo with the Franka Vision and Manipulation Kit
- Configure the `com_port` in `franka_gello_duo.yaml` and `example_fr3_duo_config_robotiq.yaml`, and set the `robot_ip` in `example_fr3_duo_config.yaml`. For a complete description, see the [Detailed Launch Routine](#detailed-launch-routine) section.
- Run the following commands:
```bash
# Follow the Setup Environment section. If using Option 2, substitute /workspace/ with the path to the gello_software folder
# Go to the ROS 2 workspace, build it, and source it
cd /workspace/ros2 && colcon build && source install/setup.bash
# Start the GELLO node
ros2 launch franka_gello_state_publisher main.launch.py config_file:=franka_gello_duo.yaml
# Start the Robotiq gripper node
ros2 launch franka_gripper_manager robotiq_gripper_controller_client.launch.py config_file:=example_fr3_duo_config_robotiq.yaml
# Hold the GELLOs and place them in a comfortable position with some distance from the base pins
# Start the robot node (the robot position will sync directly to the GELLO position. Avoid moving the GELLOs abruptly during synchronization)
ros2 launch franka_fr3_arm_controllers franka_fr3_arm_controllers.launch.py robot_config_file:=example_fr3_duo_config.yaml
```
## Detailed Launch Routine and Configuration
### 1. **Run the GELLO Publisher**
#### Step 1: Determine the port IDs of your communication converters
To proceed, you need to know the port IDs of your communication converters (U2D2 or OpenRB-150).
This can be determined by running:
```bash
ls /dev/serial/by-id
```
Example output:
- U2D2: `usb-FTDI_USB__-__Serial_Converter_FT7WBG6`
- OpenRB-150: `usb-ROBOTIS_OpenRB-150_2B375CB3503059384C2E3120FF053624-if00`
Use the ID to update the `com_port` parameter in your GELLO configuration file located in `/workspace/ros2/src/franka_gello_state_publisher/config/`.
Rebuild the project to ensure the updated configuration is applied:
```bash
cd /workspace/ros2
colcon build
```
#### Step 2: Configure the assembly offsets of your GELLO
> 🚀 **Skip this step for pre-assembled GELLOs:**
> If you are using the pre-assembled "Franka GELLO" (single arm) or "Franka GELLO Duo" variant, or if you assembled it carefully according to the assembly instructions, the default configuration files provided in `franka_gello_state_publisher/config/` should work out of the box. You can proceed directly to **Step 3**.
If you have assembled the GELLO yourself, you need to determine the following parameters for your specific assembly:
- `joint_signs`: Multiplicative signs for each joint. If assembled according to the instructions, this should be `1 -1 1 -1 1 1 1` for the Franka GELLO. If you notice that some joints move in the opposite direction than expected, you may need to change the corresponding sign.
- `assembly_offsets`: Since the Dynamixel flanges allow for 4 possible mounting orientations, the zero position of the joints may be offset by a multiple of pi/2 (= 90°). This parameter allows you to compensate for these offsets.
- `gripper_range_rad`: Similarly, the joint angles corresponding to a fully open and fully closed gripper may differ based on the assembly.
Use the `get_offsets.py` script in `/ros2/src/franka_gello_state_publisher/scripts/` to determine the `assembly_offsets` and `gripper_range_rad` parameters for your specific assembly.
1. Move the GELLO arm(s) to the calibration pose, depending on if it is a single arm or dual arm assembly:
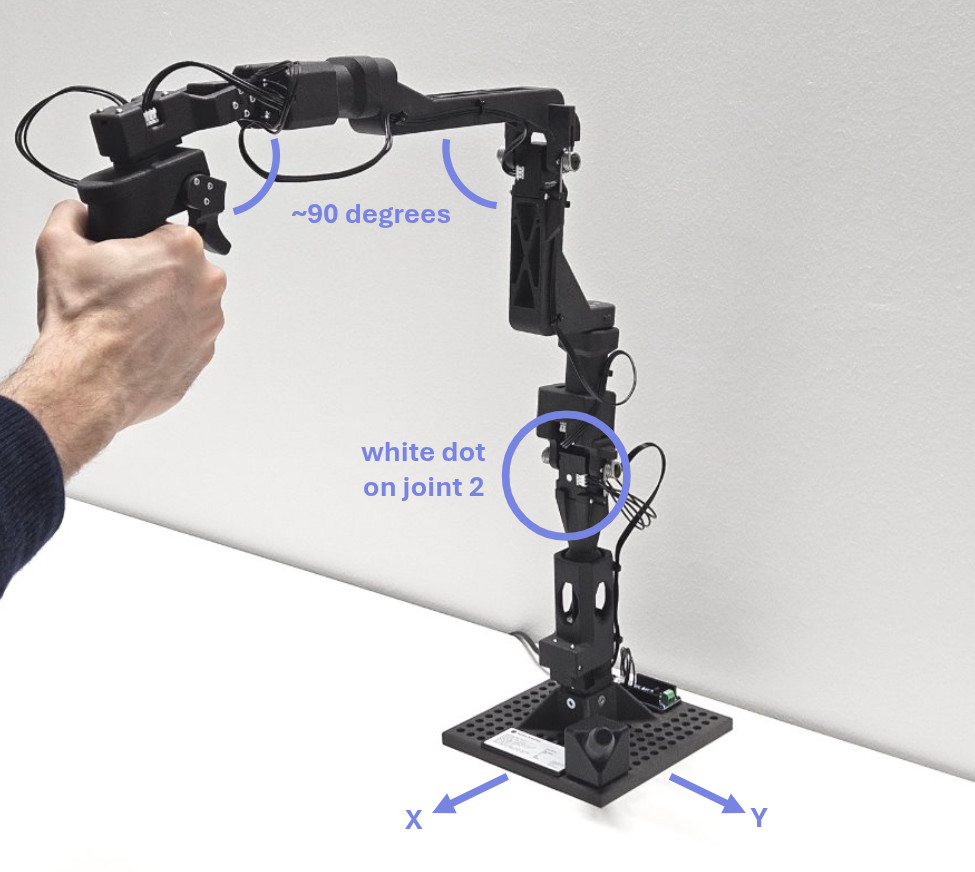
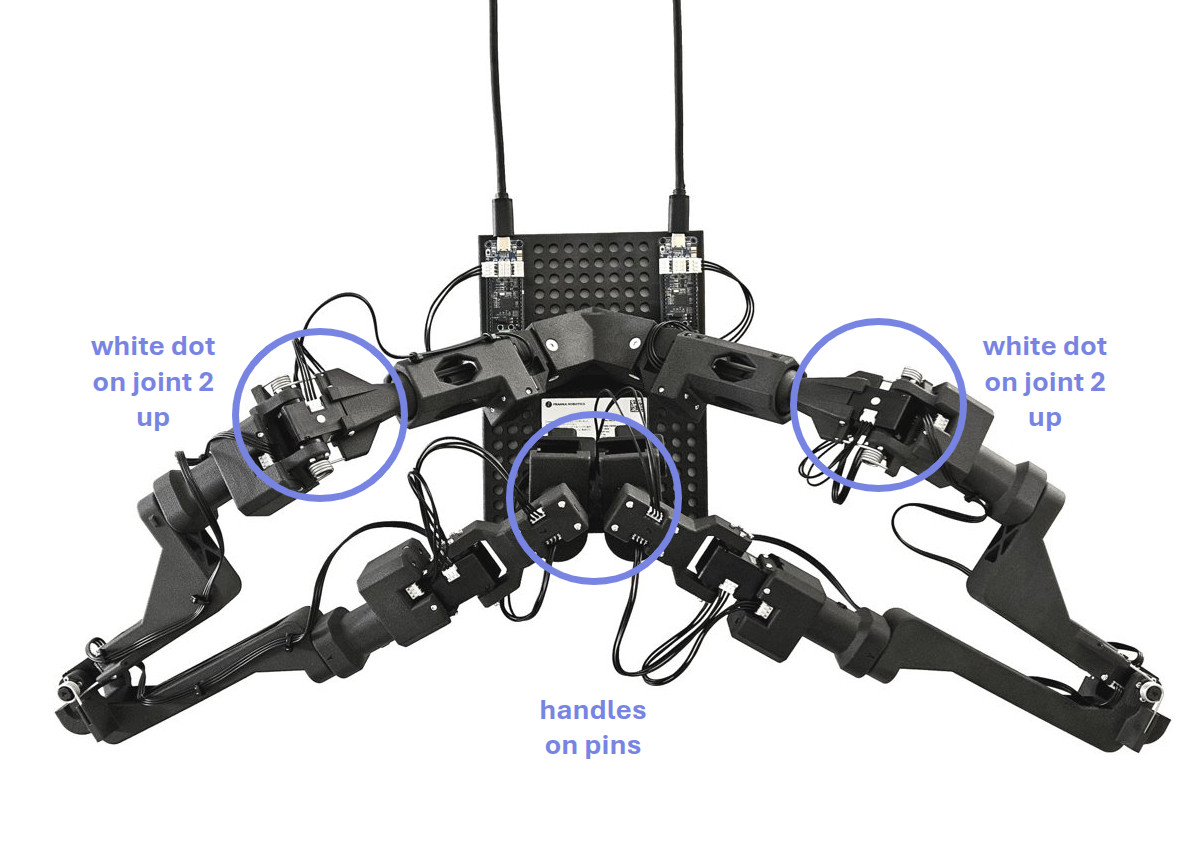
2. Run the script:
> 💡 The `start-joints` argument of the script can be adjusted if you want to use a different calibration pose. The provided values correspond to the recommended poses shown in the images above.
- Single arm:
```bash
cd /workspace/ros2/src/franka_gello_state_publisher/scripts/
python3 get_offsets.py \
--start-joints 0 0 0 -1.57 0 1.57 0 \
--joint-signs 1 -1 1 -1 1 1 1 \
--port /dev/serial/by-id/
```
- Dual arm left:
```bash
cd /workspace/ros2/src/franka_gello_state_publisher/scripts/
python3 get_offsets.py \
--start-joints -1.57 -0.80 1.80 -3.00 1.40 1.50 -2.10 \
--joint-signs 1 -1 1 -1 1 1 1 \
--port /dev/serial/by-id/
```
- Dual arm right:
```bash
cd /workspace/ros2/src/franka_gello_state_publisher/scripts/
python3 get_offsets.py \
--start-joints 1.57 -0.80 -1.80 -3.00 -1.40 1.50 2.10 \
--joint-signs 1 -1 1 -1 1 1 1 \
--port /dev/serial/by-id/
```
Use the output of the `get_offsets.py` script to update the values in your GELLO configuration file located in `/workspace/ros2/src/franka_gello_state_publisher/config/`.
If the Dynamixel chain was provisioned to 115200 (or 1 Mbps), pass `--baudrate 115200` (or `1000000`). The script default is 57600 and does not scan.
Rebuild the project to ensure the updated configuration is applied:
```bash
cd /workspace/ros2
colcon build
```
#### Step 3: Launch the GELLO publisher:
Create a configuration file in `src/franka_gello_state_publisher/config/` or modify one of the provided example configuration files. Then launch the node to read input from the Gello and publish it as ROS 2 messages:
```bash
ros2 launch franka_gello_state_publisher main.launch.py [config_file:=your_config.yaml]
```
The `config_file` argument is **optional**. If not provided, it defaults to `example_single.yaml` in the `franka_gello_state_publisher/config/` directory.
**Configuration parameters:**
- `com_port`: the previously determined port ID of your communication converter
- `namespace`: ROS 2 namespace (must match the robot and the gripper)
- `num_joints`: 7 for Franka FR3
- `joint_signs`: as used for calibration
- `gripper`: true if Gello gripper state shall be used
- `assembly_offsets` and `gripper_range_rad`: as determined with calibration routine
- `baudrate`: XL330 serial baud (`57600` factory, `115200`, or `1000000`). Omitted keys default to `57600`. EEPROM is written only if the live chain baud differs from this value.
- `publishing_rate`: ROS joint-state timer in Hz (any integer ≥ 1). Recommended values in the table below. Omitted keys default to `25`.
- Dynamixel control parameters: `dynamixel_...` (see below)
**Baud rate and publish rate:**
The publisher scans `(desired, 115200, 57600, 1000000)` until every expected ID answers `model_number`. If live baud differs from YAML `baudrate`, it SyncWrites EEPROM `baud_rate` and reopens at the desired rate. Mixed-baud chains abort with no write. Package YAML stays factory `57600` / `25` so stock GELLOs are unchanged.
| `baudrate` | Unique-Hz ceiling | Warn threshold | Recommended `publishing_rate` |
|---|---|---|---|
| `57600` | ~25 | 25 | **25** (factory; no EEPROM write) |
| `115200` | ~55 | 50 | **30** or **50** |
| `1000000` | ~135 | 100 | **100** |
The table is recommended, not an enum. `publishing_rate` may be any integer ≥ 1 (e.g. `115200` → `40`). Above the warn thresholds (25 / 50 / 100) the node still starts and republishes the last sample due to the baudrate speed ceiling. `latency_timer=1` is recommended for 50 Hz at 115200 and 100 Hz at 1 Mbps (Linux FTDI default is 16 ms). See [Troubleshooting](#the-movement-of-the-follower-robot-is-slightly-jerky).
**Virtual Springs and Dampers:**
Each Dynamixel motor has an internal PID controller that can be configured to behave like a virtual spring and damper. Damping is useful to prevent the operator from moving the GELLO arm faster than the real robot can follow. The spring-like behavior allows to support individual joints that could sag to an unwanted position when having 7 degrees of freedom.
This is done by setting the following parameters in the configuration file. Each parameter is an array of integers, where each value corresponds to a GELLO joint in ascending order.
- `dynamixel_torque_enable`: Enable (1) / disable (0) torque of a joint. Must be enabled for the other control parameters to take effect.
- `dynamixel_goal_position`: Goal positions in pulses. 4095 = 360 degrees. Choose values that correspond to the desired joint angles.
- `dynamixel_kp_p`: Proportional gains. Determines the rotary spring-like behavior. Sensible values: 0 to ~1000.
- `dynamixel_kp_i`: Integral gains. Recommended to be 0 for all joints.
- `dynamixel_kd_d`: Derivative gains. Determines the damping behavior. Sensible values: 0 to ~1000.
When the GELLO publisher is started, these parameters are used to configure the Dynamixel motors. The motors then operate in their internal "Current-based Position Control" mode with a current limit set to 600mA. Check the [Dynamixel documentation](https://emanual.robotis.com/docs/en/dxl/x/xl330-m288/) for more information on the control parameters.
> ⚠️ **Warning for OpenRB-150:**
> If using the OpenRB-150 instead of the U2D2 communication converter, do not enable torque until an external 5V power supply is connected to the board's power terminal and the jumper is set to "VIN(DXL)". Using USB power for torque operation may damage your computer's USB port.
> Please refer to the [OpenRB-150 manual](https://emanual.robotis.com/docs/en/parts/controller/openrb-150/#when-running-5v-dynamixel-with-the-usb-power) for more information.
> 💡 **Hint:**
> The example configuration files give a good starting point for these values:
> - springs in joints 1, 2, 4 and gripper.
> - damping in all joints, stronger for lower joints
> - `goal_position` values correspond to the calibration pose.
>
> You can also adjust these ROS2 parameters during runtime, e.g. using rqt with the `rqt_reconfigure` plugin.
> 💡 **How strong are the virtual springs?**
> According to the Dynamixel XL330-M288 datasheet, the stall torque of the motors is 0.52 Nm (at 5.0 V, 1.47 A). However, continuous operation at this current will quickly overload and overheat the motors. Through testing, a current limit of 600 mA was found to be both safe and sufficient for our use case, corresponding to a maximum stall torque of approximately 0.21 Nm. Setting `dynamixel_kp_p` to 280 yields a spring constant of approximately 0.25 Nm/rad, which matches the physical torsion spring (McMaster-Carr 9271K53) used in the GELLO FR3 assembly — up to a deflection of about 48° where the current limit is reached.
### 2. **Launch the Joint Impedance Controller**
Create a configuration file in `src/franka_fr3_arm_controllers/config/` or modify one of the provided example configuration files. Then launch the controller to send torque commands to the Franka robot:
```bash
ros2 launch franka_fr3_arm_controllers franka_fr3_arm_controllers.launch.py [robot_config_file:=your_config.yaml]
```
The `robot_config_file` argument is **optional**. If not provided, it defaults to `example_fr3_config.yaml` in the `franka_fr3_arm_controllers/config/` directory.
**Configuration parameters:**
- The parameters are documented in [`franka.launch.py`](src/franka_fr3_arm_controllers/launch/franka.launch.py) (see line 16 and following).
### 3. **Launch the Gripper Manager**
Create a configuration file in `src/franka_gripper_manager/config/` or modify one of the provided example configuration files. Then launch the gripper manager node to control the gripper:
- **For the Franka Hand**:
```bash
ros2 launch franka_gripper_manager franka_gripper_client.launch.py [config_file:=your_config.yaml]
```
- **For the Robotiq 2F-85**:
```bash
ros2 launch franka_gripper_manager robotiq_gripper_controller_client.launch.py [config_file:=your_config.yaml]
```
The `config_file` argument is **optional**. If not provided, it defaults either to `example_fr3_config_franka_hand.yaml` or `example_fr3_config_robotiq.yaml` in the `franka_gripper_manager/config/` directory.
**Configuration parameters:**
- `namespace`: ROS 2 namespace (must match the robot and the Gello state publisher).
- `com_port`: **(Robotiq only)** The `ROBOTIQ_USB_ID` can be determined by `ls /dev/serial/by-id`
## Packages Overview
### 1. `franka_fr3_arm_controllers`
This package provides a Joint Impedance controller for the Franka FR3. It subscribes to the GELLO joint states and sends torque commands to the robot.
#### Key Features:
- Implements a `JointImpedanceController` for controlling the robot's torques.
- Subscribes to `/gello/joint_states` topic for the GELLO joint states.
#### Launch Files:
- **`franka.launch.py`**: Launches the Franka robot ros interfaces.
- **`franka_fr3_arm_controllers.launch.py`**: Launches the Joint Impedance controller.
### 2. `franka_gello_state_publisher`
This package provides a ROS 2 node that reads input from the GELLO and publishes it as `sensor_msgs/msg/JointState` messages.
#### Key Features:
- Publishes GELLO state to the `/gello/joint_states` topic.
- Optionally sets the internal control parameters of the Dynamixel motors. This allows for [virtual springs and dampers](#virtual-springs-dampers) in the GELLO joints.
#### Launch Files:
- **`main.launch.py`**: Launches the GELLO publisher node.
### 3. `franka_gripper_manager`
This package provides a ROS 2 node for managing the gripper connected to the Franka robot. Supported grippers are either the `Franka Hand` or the `Robotiq 2F-85`. It allows sending commands to control the gripper's width and perform homing actions.
#### Key Features:
- Subscribes to `/gripper/gripper_client/target_gripper_width_percent` for gripper width commands.
- Supports homing and move actions for the gripper.
#### Launch Files:
- **`franka_gripper_client.launch.py`**: Launches the gripper manager node for the `Franka Hand`.
- **`robotiq_gripper_controller_client.launch.py`**: Launches the gripper manager node for the `Robotiq 2F-85`.
## Build and Test
> ⚠️ **Important:**
> All commands for building and testing must be executed from the `ros2` directory of this repository.
### Building the project
To build the project, use the following `colcon` command with CMake arguments, required for clang-tidy:
```bash
colcon build --cmake-args -DCMAKE_EXPORT_COMPILE_COMMANDS=ON -DCHECK_TIDY=ON
```
### Testing the project
The packages come with a set of tests, which can be executed using the following command:
```bash
colcon test
```
## Troubleshooting
### SerialException(msg.errno, "could not open port {}: {}".format(self._port, msg))
The open com port could not be opened. Possible reasons are:
- Wrongly specified, the full path is required, such as: `/dev/serial/by-id/usb-FTDI_***`
- The device was plugged in after the docker container started, re-open the container
### libfranka: Incompatible library version (server version: X, library version: Y).
The libfranka version and robot system version are not compatible. More information can be found [here](https://frankarobotics.github.io/docs/compatibility.html).
Fix this by correcting the `LIBFRANKA_VERSION=0.15.0` in the [Dockerfile](./.devcontainer/Dockerfile) and update the `FRANKA_ROS2_VERSION` and `FRANKA_DESCRIPTION_VERSION` accordingly.
### The movement of the follower robot is slightly jerky
If the movements of the follower robot do not feel smooth or you experience frequent force threshold errors, this may be related to high USB latency on your machine. `latency_timer=1` is required for unique ~50 Hz at 115200 baud (and 100 Hz at 1 Mbps). To fix this, try the following (non-permanent) fix **on your host PC**:
1. Check which `ttyUSBx`/`ttyACMx` is mapped to your U2D2 or OpenRB-150 device: `ls -la /dev/serial/by-id/`
2. Reduce the USB latency from the default 16ms to 1ms: `echo 1 | sudo tee /sys/bus/usb-serial/devices/ttyUSB0/latency_timer` (replace `ttyUSB0` with your actual device)
If this helps, you can add a permanent udev rule:
1. Create a new file `/etc/udev/rules.d/99-gello.rules` **on your host PC**:
```
# Lower latency_timer (1 instead of default 16 ms) & permission fix for U2D2 and OpenRB-150 devices
ACTION=="add", ATTRS{idVendor}=="0403", ATTRS{idProduct}=="6014" MODE="0666", ATTR{device/latency_timer}="1"
ACTION=="add", ATTRS{idVendor}=="2f5d", ATTRS{idProduct}=="2202" MODE="0666", ATTR{device/latency_timer}="1"
```
> Note: This also sets the device permissions (`MODE="0666"`), this part is optional.
2. Reload and trigger the new rules: `sudo udevadm control --reload-rules && sudo udevadm trigger`
3. Unplug and replug your U2D2 or OpenRB-150 devices
## Acknowledgements
The source code for the Robotiq gripper control is based on
[ros2_robotiq_gripper](https://github.com/PickNikRobotics/ros2_robotiq_gripper.git), licensed under the BSD 3-Clause license.