---
title: "Tribal Consulting Program"
subtitle: "Introduction to Git and GitHub with R"
author: "_Yikun Zhang_"
date: ""
output:
xaringan::moon_reader:
css: ["uw.css", "fonts.css"]
lib_dir: libs
nature:
highlightStyle: tomorrow-night-bright
highlightLines: true
countIncrementalSlides: false
titleSlideClass: ["center","top"]
---
```{r setup, include=FALSE, purl=FALSE}
options(htmltools.dir.version = FALSE)
knitr::opts_chunk$set(comment = "##")
library(kableExtra)
```
# Outline
1. Introduction to Git
2. Introduction to GitHub
3. Basic Git Commands
4. Connect Git, GitHub, and Rstudio
* Acknowledgement: Parts of the slides are modified from the web-based resources "Happy Git and GitHub for the useR" by Jennifer Bryan.
* Note: Those slides with (*) can be skipped for a high-level presentation.
---
class: inverse
# Part 1: Introduction to Git
---
# Why Do We Need Git?
When working a research project/paper solely or collaboratively with others, we may end up creating a folder with files as follows:
* draft1.docx
* Draft2.docx
* draft2_profcomments.docx
* draft_final.docx
* Simulation_v1.R
* Simulation_v2.R
* Simulation_v2_asdf.R
* Simulation_v3.R
* actualfinaldraft.tex
* actualfinaldraft.pdf
* paper_bib.bib
* Draft_comments.tex
* Draft_comments.pdf
$\hspace{5em} \vdots$
---
# Why Do We Need Git?
 - Fortunately, [Git](https://git-scm.com/) can help us keep track of changes and comments without creating multiple files.
---
# Why Do We Need Git?
- In short, [Git](https://git-scm.com/) is a **version control system**.
- Fortunately, [Git](https://git-scm.com/) can help us keep track of changes and comments without creating multiple files.
---
# Why Do We Need Git?
- In short, [Git](https://git-scm.com/) is a **version control system**.
 --
- It was created by Linus Torvalds in 2005 for the Linux kernel.
--
- It was originally developed to help groups of developers work collaboratively on big software projects.
--
- It manages the evolution of a set of files called a **repository** in a highly structured way.
--
- The Git-based projects can be hosted on some online services such as [GitHub](https://github.com/), [GitLab](https://about.gitlab.com/), [Bitbucket](https://bitbucket.org/), etc.
- Online Git-based projects are similar to Google Drive or Dropbox but works better for projects with intensive coding and software developments.
---
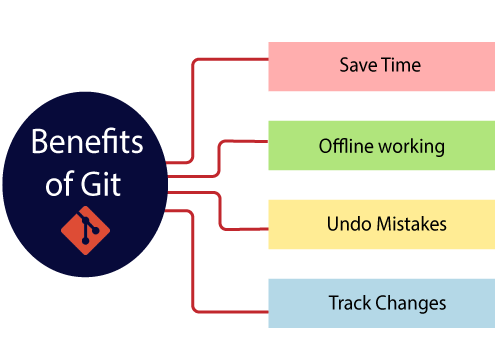
# Some Benefits of Using Git
1. Keep old versions of our files indefinitely (tracking changes so that making any reversions is simple).
--
2. Work with multiple collaborators:
- Keeps track of who changed what and when they changed it.
--
3. Changes are automatically integrated into the most recent version, and conflicts receive warnings.
--
- It was created by Linus Torvalds in 2005 for the Linux kernel.
--
- It was originally developed to help groups of developers work collaboratively on big software projects.
--
- It manages the evolution of a set of files called a **repository** in a highly structured way.
--
- The Git-based projects can be hosted on some online services such as [GitHub](https://github.com/), [GitLab](https://about.gitlab.com/), [Bitbucket](https://bitbucket.org/), etc.
- Online Git-based projects are similar to Google Drive or Dropbox but works better for projects with intensive coding and software developments.
---
# Some Benefits of Using Git
1. Keep old versions of our files indefinitely (tracking changes so that making any reversions is simple).
--
2. Work with multiple collaborators:
- Keeps track of who changed what and when they changed it.
--
3. Changes are automatically integrated into the most recent version, and conflicts receive warnings.
 ---
# Install Git - Mac/Linux
**Mac/Linux:** [Git](https://git-scm.com/) is probably pre-installed for these operating systems.
- Open the `Terminal` app and type `git --version` to confirm which version that has been installed and `which git` to find out where it is.
---
# Install Git - Mac/Linux
**Mac/Linux:** [Git](https://git-scm.com/) is probably pre-installed for these operating systems.
- Open the `Terminal` app and type `git --version` to confirm which version that has been installed and `which git` to find out where it is.
 - If for some reason Git is not pre-installed, we can download it from [here](http://git-scm.com/downloads).
* Ubuntu or Debian Linux: `sudo apt-get install git`
* Fedora or RedHat Linux: `sudo yum install git`
- Other installation instructions can be found [here](https://happygitwithr.com/install-git).
---
# Install Git - Windows
**Windows:** Here is one option of the two listed [here](https://happygitwithr.com/install-git).
* Install [Git for Windows](https://gitforwindows.org/) (also known as `msysgit` or "Git Bash") to get Git in addition to the Bash shell.
* **Important note:** When asked about "Adjusting your PATH environment", make sure to select "Git from the command line and also from 3rd-party software".
* Note that RStudio for Windows prefers for Git to be installed below `C:/Program Files` and this appears to be the default. This implies, for example, that the Git executable on our Windows system is found at `C:/Program Files/Git/bin/git.exe`. Unless we have specific reasons to otherwise, follow this convention.
Hopefully, after following the instructions above, we have a Git Bash shell. To check this, open our shell and type `echo $SHELL`. We should see something like `usr/bin/bash`.
---
class: inverse
# Part 2: Introduction to GitHub
---
# Why GitHub?
[Git](https://git-scm.com/) is a software that can be used locally.
- We don't need to access to the Internet for proper version controls on our computer.
--
However, if we want to share our work or collaborate with others, we need to use some online repository services.
- If for some reason Git is not pre-installed, we can download it from [here](http://git-scm.com/downloads).
* Ubuntu or Debian Linux: `sudo apt-get install git`
* Fedora or RedHat Linux: `sudo yum install git`
- Other installation instructions can be found [here](https://happygitwithr.com/install-git).
---
# Install Git - Windows
**Windows:** Here is one option of the two listed [here](https://happygitwithr.com/install-git).
* Install [Git for Windows](https://gitforwindows.org/) (also known as `msysgit` or "Git Bash") to get Git in addition to the Bash shell.
* **Important note:** When asked about "Adjusting your PATH environment", make sure to select "Git from the command line and also from 3rd-party software".
* Note that RStudio for Windows prefers for Git to be installed below `C:/Program Files` and this appears to be the default. This implies, for example, that the Git executable on our Windows system is found at `C:/Program Files/Git/bin/git.exe`. Unless we have specific reasons to otherwise, follow this convention.
Hopefully, after following the instructions above, we have a Git Bash shell. To check this, open our shell and type `echo $SHELL`. We should see something like `usr/bin/bash`.
---
class: inverse
# Part 2: Introduction to GitHub
---
# Why GitHub?
[Git](https://git-scm.com/) is a software that can be used locally.
- We don't need to access to the Internet for proper version controls on our computer.
--
However, if we want to share our work or collaborate with others, we need to use some online repository services.
 - We target [GitHub](https://github.com/) - not [GitLab](https://about.gitlab.com/) or [Bitbucket](https://bitbucket.org/) - for the sake of specificity and popularity.
- This [blog](https://radixweb.com/blog/github-vs-gitlab) discusses pros and cons of GitHub v.s. Gitlab.
---
# Benefits of Using GitHub
1. Like RStudio with R, GitHub adds many user-friendly features to Git.
* Effective collaboration and code distribution.
* Allow others to comment on our code and suggest changes (pull requests/issues).
* Building our coding portfolio!
--
2. We can benefit from using R and Rstudio with GitHub.
- There is an active R package development community on GitHub.
- Rstudio has Git- and GitHub-related features.
---
# Special features of GitHub (*)
In addition to a well-designed user interface, GitHub offers two especially important features:
- **Issues:** A list of bugs, feature requests, to-dos, etc.
- Issues are tightly integrated with email and allow us to copy/embed important conversations in the associated repo.
- Issues can be assigned to people (e.g., to-dos) and tagged ("bug" or "progress-report").
- Issues are tightly integrated with commits and allow us to record the changes.
- We target [GitHub](https://github.com/) - not [GitLab](https://about.gitlab.com/) or [Bitbucket](https://bitbucket.org/) - for the sake of specificity and popularity.
- This [blog](https://radixweb.com/blog/github-vs-gitlab) discusses pros and cons of GitHub v.s. Gitlab.
---
# Benefits of Using GitHub
1. Like RStudio with R, GitHub adds many user-friendly features to Git.
* Effective collaboration and code distribution.
* Allow others to comment on our code and suggest changes (pull requests/issues).
* Building our coding portfolio!
--
2. We can benefit from using R and Rstudio with GitHub.
- There is an active R package development community on GitHub.
- Rstudio has Git- and GitHub-related features.
---
# Special features of GitHub (*)
In addition to a well-designed user interface, GitHub offers two especially important features:
- **Issues:** A list of bugs, feature requests, to-dos, etc.
- Issues are tightly integrated with email and allow us to copy/embed important conversations in the associated repo.
- Issues can be assigned to people (e.g., to-dos) and tagged ("bug" or "progress-report").
- Issues are tightly integrated with commits and allow us to record the changes.
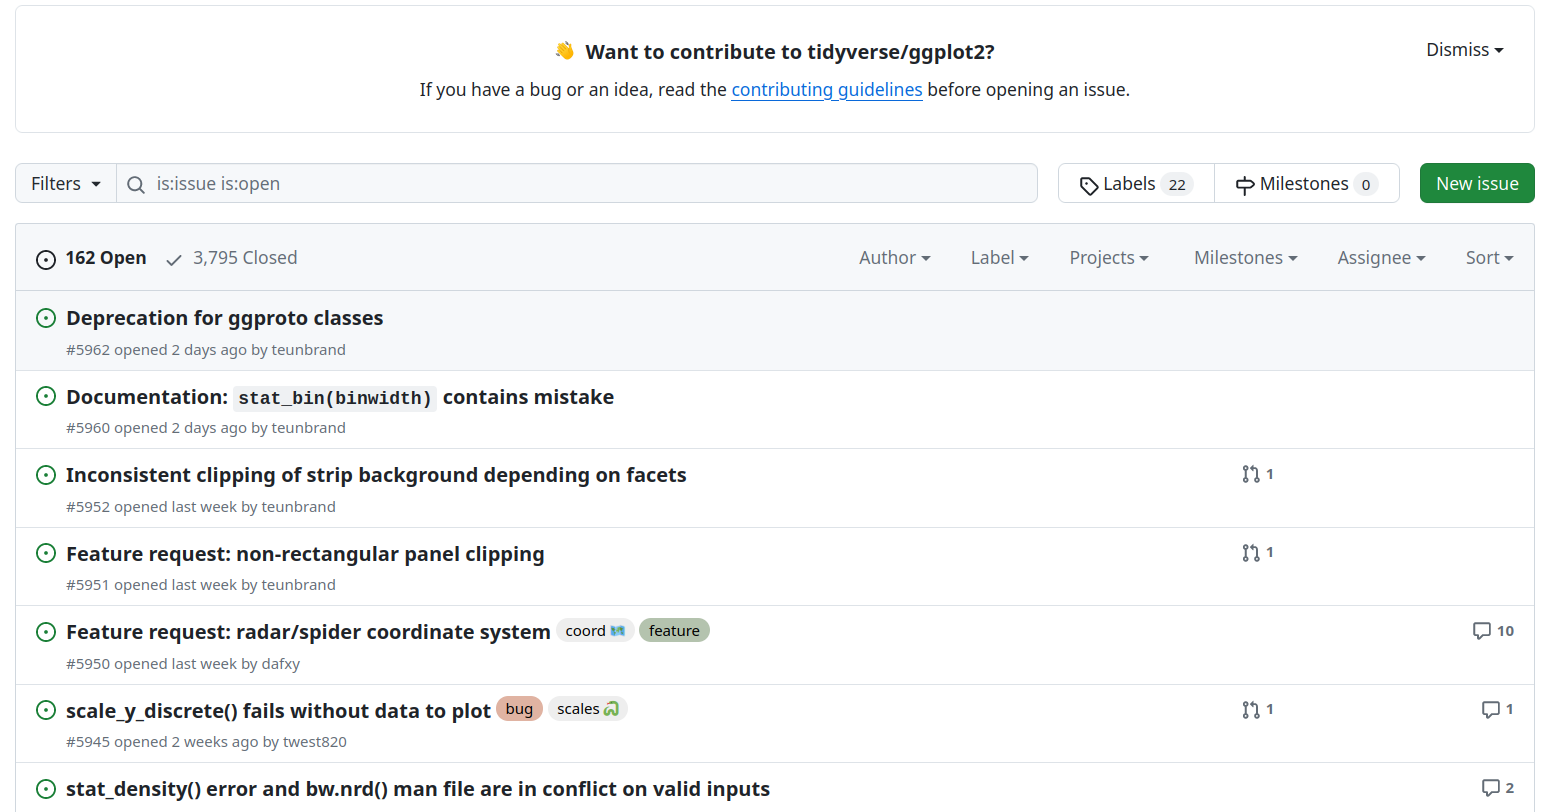
The Issues page of ggplot2.
---
# Special features of GitHub (*)
In addition to a well-designed user interface, GitHub offers two especially important features:
- **Pull Requests:** A formal proposal for making changes on the main development branch.
- Git allows a project to have multiple, independent branches of development, with the notion that some should eventually be merged back into the main development branch.
- GitHub facilitates and preserves the discussion of the [pull requests](https://docs.github.com/en/pull-requests/collaborating-with-pull-requests/proposing-changes-to-your-work-with-pull-requests/about-pull-requests), holistically and line-by-line.
---
# Register A GitHub Account
Go to [https://github.com](https://github.com) and register a free account!
- GitHub can become a part of our professional portfolio, and it is likely that we plan to do any coding as part of our career.
- So choose our username **carefully**! Some rules of thumb:
* Incorporate our actual name to increase visibility and recognizability.
* Reuse our username from other contexts, e.g., Twitter or Slack.
* Shorter is better than longer.
* Make it timeless (don't include the current affiliation, etc.)
* All lowercase is recommended.
---
# Set Up Git (Optional) (*)
Run the following in our shell/terminal (fill in your information):
```{bash, eval = FALSE}
git config --global user.name 'Firstname Lastname'
git config --global user.email 'email@website.com'
git config --global --list
```
**Note:** The email should be the one associated with our GitHub account!
We also suggest setting up our default editor. At some point when we have a merge conflict, Git will push us into an editor to resolve it. (For instance, we can use Sublime Text on a Mac).
Alternatively, we can set our Git username and email within R:
```{r eval=FALSE}
library(usethis)
use_git_config(user.name = "Firstname Lastname", user.email = "email@website.com")
```
Check out [Software Carpentry's guide](https://swcarpentry.github.io/git-novice/02-setup.html) for more examples of what line to run for different editor-operating system combinations.
---
# Install a Git Client (Optional) (*)
Sometimes it could be useful to install a GUI for git.
- For instance, [GitKraken](https://www.gitkraken.com/), which works on all common operating systems.
See [this webpage](https://happygitwithr.com/git-client.html) to see Jenny Bryan's notes for various git clients as well as why they are helpful.
We will discuss more about using Git with Rstudio later. Here is a [summary guideline](https://jennybc.github.io/2014-05-12-ubc/ubc-r/session03_git.html).
---
# Create A New Repository on GitHub
1. Go to GitHub and click the green "New Repository" button.
2. Repository name: `git_intro` or similar, following the [naming conventions](https://github.com/bcgov/BC-Policy-Framework-For-GitHub/blob/master/BC-Gov-Org-HowTo/Naming-Repos.md) here.
3. Description: Whatever you want, but fill in something.
4. Public or Private.
- GitHub offers free unlimited private repositories for all users.
- These free private repositories support up to three external collaborators, making them a perfect place for our personal projects, for job applications, and for testing things out before making our project open source.
5. YES initialize the repository with a README.
6. Choose a license (optional).
---
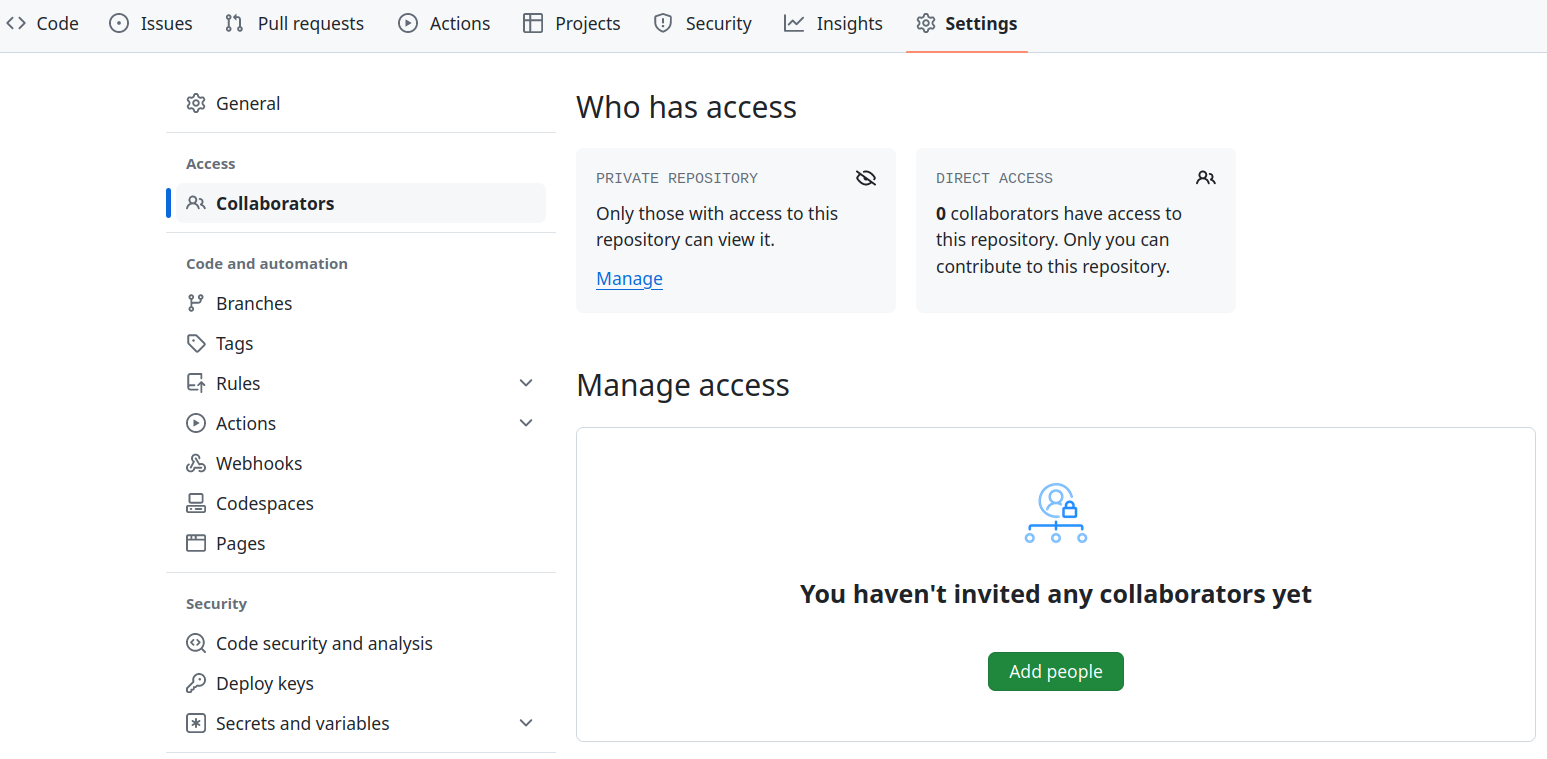
# Add Collaborators to A GitHub Repo (*)
We can always add collaborators to our GitHub repos through their usernames or emails.
---
class: inverse
# Part 3: Basic Git Commands
---
# Commits, Diffs, and Tags
We now connect the fundamental concepts of Git to the data science workflow:
--
- **repository:** A repository or repo is just a directory of files that Git manages holistically.
--
- **commit:** A commit functions like a snapshot of all the files in the repo, at a specific moment.
- We must also write a short **commit message** every time we make a commit.
- Every commit needs a nickname to identify it. Git automatically assigns each commit what is called a SHA (Simple Hashing Algorithm), a seemingly random string of 40 letters and numbers.
- We can also designate certain snapshots as special with a **tag**, which is a name of our choosing.
---
# Commits, Diffs, and Tags

- **diff:** The set of differences between Version A and B of a file is called a "_diff_" and Git users contemplate diffs a lot.
- We can inspect the diffs between any two commits and keep track of the **history** of our project.
---
# Run the Git Commands With the Shell (*)
The **shell** is a program on our computer that runs other programs.
Sometimes, people use the terms `Terminal`, `Console`, `Command Line`, and `Shell` interchangeably.
We can also open a shell within RStudio:
* *Tools > Terminal > New Terminal* to launch a shell within RStudio. This will often be sufficient for our purposes.
* **Windows:** Here, we focus on the **Git Bash** shell, which should have come with our install of Git for Windows.
* Confirm that RStudio detected the presence of Git Bash. This should have happened automatically if we installed in the default location, but check by going to *Tools > Global Options > Terminal* and make sure we see `Git Bash` under "_New terminals open with:_".
---
# Basic Shell Commands (*)
* `pwd` (**p**rint **w**orking **d**irectory). Shows the current working directory of our shell.
* `ls` (**l**ist **f**iles). Shows the files in the current working directory. Use `ls -a` to also list hidden files, such as .Rhistory and .git.
* `cd` (**c**hange **d**irectory). Allows us to navigate through our directories by changing the shell's working directory.
* We can use relative paths such as `..` (parent directory) and `.` (current directory).
* `~` is still your home directory.
* We can drag and drop a file or folder into the shell window to paste the absolute path.
* We can use `Tab` to autocomplete unambiguous directory and file names.
* Navigate previous commands with _arrow-up_ and _arrow-down_.
* Search for previous commands with `ctrl + r`.
$\hspace{5em} \vdots$
---
# Basic Git Commands (*)
These commands are used within the Shell/Terminal, and we will show how to run some of these commands in Rstudio as well.
* New local git repo from a repo on GitHub:
```{bash, eval = FALSE}
git clone https://github.com/zhangyk8/git_intro.git
```
* `git remote -v` lists all remotes and check that the remote was cloned successfully.
* `git remote add origin GITHUB_URL` adds the remote `GITHUB_URL` with nickname origin.
* `git add FILENAME` stages changes to the file. Will add the file to the tracked files if it isn't already. Use `git add .` to add all untracked files (but be careful with this!)
* `git commit -m "COMMIT MESSAGE"` commit all staged changes.
---
# Basic Git Commands (*)
* `git status` informs us of our current branch, any changes or untracked files, and whether we are in sync with our remotes.
* `git log` shows the commit logs.
* `git diff` show changes between commits, commit and working tree, etc.
* `git pull` pulls commits from remote to local copy.
* `git push` pushes from local copy to remote.
* `git fetch` fetches commits.
* `git checkout` switch to a branch.
* `git init` creates an empty git repo within our current directory.
The detailed documentation can be found at [https://git-scm.com/docs](https://git-scm.com/docs).
---
# Clone Our Git Repo from GitHub (*)
.middler-nocent[
1. Open a shell/Terminal window.
2. **Change our working directory to a new folder or desired folder.**
3. Clone the repo by entering (filling in the relevant info):
```{bash, eval = FALSE}
git clone https://github.com/YOUR-USERNAME/YOUR-REPOSITORY.git
```
**Notes:** we can get the direct link by navigating to our repo and clicking the green "<> Code" button and copying the text from the "HTTPS" option.
4. explore our repo by entering (filling in the relevant info):
```{bash, eval = FALSE}
cd YOUR-REPOSITORY
ls
head README.md
git remote show origin
git status
```
]
---
# Commit and Push A Local Change (*)
1. Edit our README within shell by using the following line.
```{bash, eval = FALSE}
echo "A line I wrote using the shell on my local computer" >> README.md
```
2. Check the status
```{bash, eval = FALSE}
git status
```
3. Stage our commit and check the status
```{bash, eval = FALSE}
git add .
git status
```
4. Commit and push and check the status
```{bash, eval = FALSE}
git commit -m "A commit from my local computer"
git push
git status
```
Now check the repository online at GitHub. What changed?
---
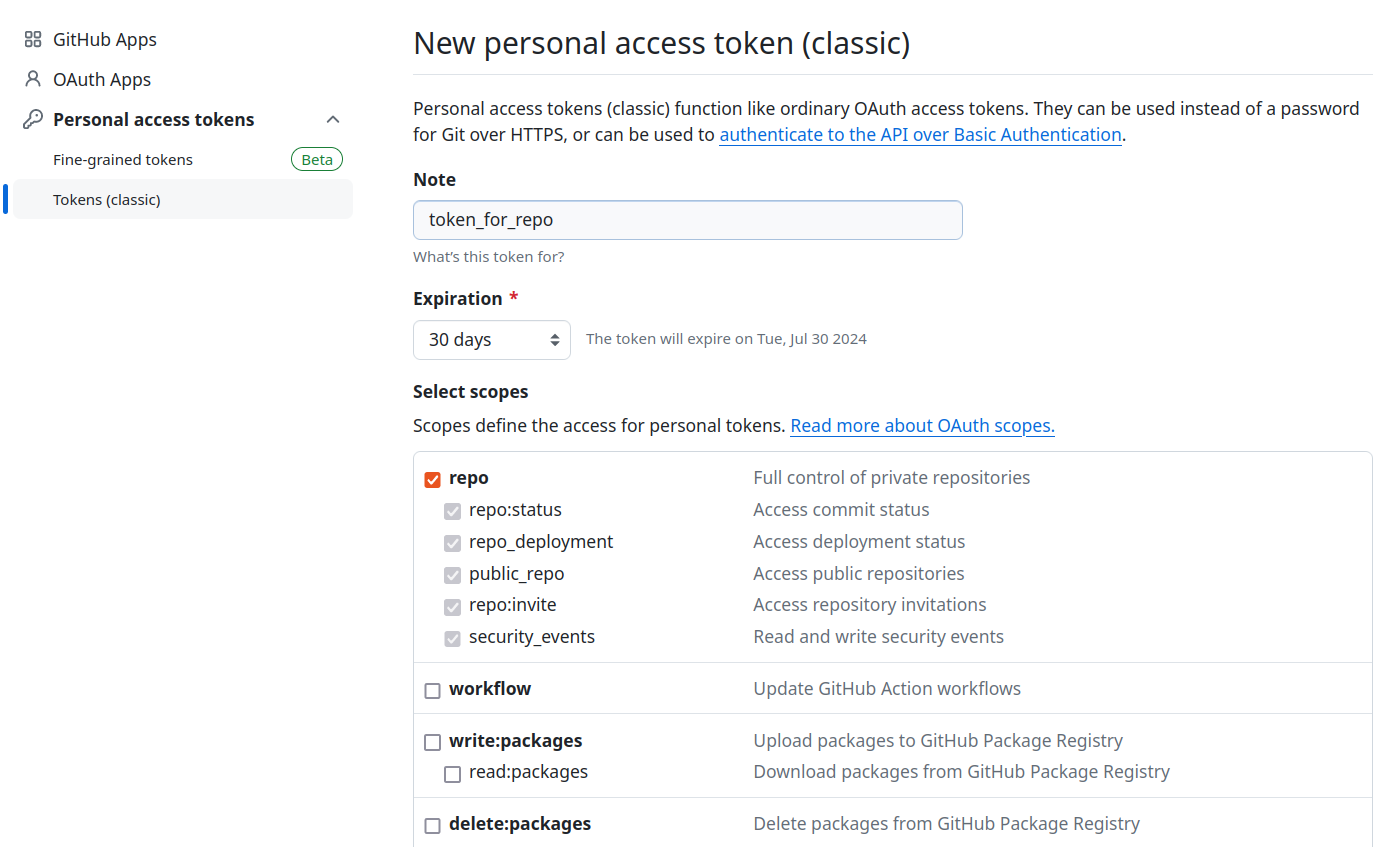
# Notes on GitHub Credentials (*)
When we interact with GitHub, we have to include credentials in the request.
- Unfortunately, GitHub no longer accepts the password when we talk to GitHub as a Git server.
With HTTPS, we will use a **personal access token (PAT)**.
- Alternatively, we can also [set up keys for the SSH credential](https://happygitwithr.com/ssh-keys).
On [GitHub](https://github.com/), after signing in, we can manage our personal access tokens from [https://github.com/settings/tokens](https://github.com/settings/tokens).
- It is also reachable via "Settings > Developer settings > Personal access tokens".
We could click on "Generate new token" here, or call `usethis::create_github_token()` from R.
---
# Notes on GitHub Credentials (*)
Read more detailed instructions [here](https://docs.github.com/en/authentication/keeping-your-account-and-data-secure/managing-your-personal-access-tokens).
---
# Collaboration on Repo Through Branches (*)
Branching allows one or many people to work in parallel without overwriting each other's work.
- Create a new branch:
```{bash, eval=FALSE}
git branch BRANCH-NAME
# Switch to the new branch
git checkout BRANCH-NAME
```
- Once we have done our work and committed it to the feature branch, you can switch back to `main` and merge the feature branch.
```{bash, eval=FALSE}
git checkout main
git merge BRANCH-NAME
```
---
# Dealing With Conflicts in Merging (*)
Most of the time, the merge will go smoothly. However if both the branches we are merging changed the same part of the same file, we will get a merge conflict.
```{bash, eval=FALSE}
git merge BRANCH-NAME
# Auto-merging index.html
# CONFLICT (content): Merge conflict in index.html
# Automatic merge failed; fix conflicts and then commit the result.
```
- To solve a merge conflict, we should determine which files are in conflict, which we can do with `git status`:
```{bash, eval=FALSE}
git status
# On branch main
# You have unmerged paths.
# (fix conflicts and run "git commit")
#
# Unmerged paths:
# (use "git add ..." to mark resolution)
#
# both modified: index.html
#
# no changes added to commit (use "git add" and/or "git commit -a")
```
---
# Dealing With Conflicts in Merging (*)
- This shows only `index.html` is unmerged and needs to be resolved. We can open the file using any editor to see what lines are in conflict.
```{bash, eval=FALSE}
<<<<<<< HEAD:index.html
=======
>>>>>>> issue-5:index.html
```
- In this conflict, the lines between `<<<<<< HEAD:index.html` and `======` are the content from the branch we are currently on. The lines between `=======` and `>>>>>>> issue-5:index.html` are from the feature branch we are merging.
---
# Dealing With Conflicts in Merging (*)
- To resolve the conflict, edit this section until it reflects the state we want in the merged result. Pick one version or the other or create a hybrid. Also remove the conflict markers `<<<<<<`, `======`, and `>>>>>>`.
```{bash, eval=FALSE}
```
- Now run `git add index.html` and `git commit` to finalize the merge. CONFLICTS RESOLVED.
**Notes:** If, during the merge, we get confused about the state of things or make a mistake, use `git merge --abort` to abort the merge and go back to the state prior to running `git merge`.
---
class: inverse
# Part 4: Connect Git, GitHub, and Rstudio
---
# Version Control of R Projects With Git
For new or existing projects, we recommend doing the followings:
- Dedicate a local directory or folder to it.
- Make it an Rstudio Project (Optional but recommended; obviously only applies to projects involving R and users of RStudio).
- Make it a Git repository.
We will discuss
1. how to create a new Rstudio project based on our existing GitHub repo;
2. how to connect our existing project with a GitHub repo.
---
# Create Rstudio Project From GitHub Repo
We present two ways to do this:
**Option 1:** We can execute this command in any R session.
```{r, eval=FALSE}
usethis::create_from_github(
"https://github.com/YOU/YOUR_REPO.git",
destdir = "~/path/to/where/you/want/the/local/repo/"
)
```
**Option 2:** We can start a new Project in Rstudio:
1. *File > New Project > Version Control > Git*. In the "repository URL", paste the HTTPS URL for our GitHub repository.
2. Choose a desired directory and click "Open in new session".
**This is the recommended set up for all of our R projects!** That is, first create on GitHub, then clone through RStudio.
**Notes:** For the GitHub password, use [our personal access tokens](https://github.com/settings/tokens)!!
---
# Edit Our Repo Through RStudio
We should associate an R project with our GitHub repo.
- If it is not already open, open that R project by double clicking on the project file.
**We should now see a `Git` pane within RStudio!**
1. Within the `Files` pane of RStudio, open `README.md`.
2. Add a new line of text "A commit from RStudio" to `README.md` and save.
3. Click `Diff` within the `Git` pane.
4. Click the box under `Staged` for the changed file (top left box).
5. Add a commit message within the box (top right).
6. Click `Commit` (top right).
7. Click `push` (top right).
- Confirm the local change propagated to the GitHub remote
---
# Connect Existing R Project to GitHub Repo
- Make or verify that our existing project is an RStudio Project.
- Make or verify a Git repo. If not, we can use either of the following three options:
1. In the R Console, call `usethis::use_git()`.
2. In RStudio, go to "Tools > Project Options > Git/SVN". Under "Version control system", select "Git". Confirm New Git Repository? Yes!
3. In the shell, with working directory set to the project's directory, do `git init`.
---
# Connect Existing R Project to GitHub Repo
- Create and connect a GitHub repo. We can use either of the following three options:
1. In the R console, call `usethis::use_github()`.
2. Use the RStudio IDE:
- Create a GitHub repo on [GitHub](https://github.com/) as before.
- Click on the "two purple boxes and a white square" in the Git pane of Rstudio.
- Click "Add remote".
- Paste the GitHub repo's URL here and pick a remote name, almost certainly origin. Now "Add".
3. In a shell, do this after creating a GitHub repo, substituting your URL:
```{bash, eval=FALSE}
git remote add origin https://github.com/jennybc/myrepo.git
```
---
# Summary
- Git is a version control system that facilitates project managements and collaborations.
- GitHub is an online repository service for hosting Git projects.
- Git has its own commands and vocabulary.
- We can work collaboratively through branching and resolve conflicts when merging a branch to the `main` branch.
- We can run Git commands and keep track of changes of our R projects through Rstudio.
Check out [Happy Git and GitHub for the useR](https://happygitwithr.com/) by Jenny Bryan for more details on much of what we went over.