# About
We provide a set of object detection neural network training and evaluation functions.
We currently support Faster-RCNN, SSD and YOLO(v5). An infant funuds image object detection application is provided. This application combined the general-purposed object dection and domain-specific morphological rules. The rule-filtering and ROP zone segmentatin functions are provided in the annotation class of the fundus.py file.
NOTE: Faster-RCNN and SSD require tf 1.x. SSD can run under tf 2.x using 'import tensorflow.compat.v1 as tf'. FRCNN may be painful to get running. We recommend using the latest YOLO v5.
Cite our paper if you use the odn package or the dataset:
> Y. Zhang et al., "Morphological Rule-Constrained Object Detection of Key Structures in Infant Fundus Image," in IEEE/ACM Transactions on Computational Biology and Bioinformatics, 2023, doi: 10.1109/TCBB.2023.3234100.
The dataset is also available in [Mendeley data](http://doi.org/10.17632/9kvk7nkhx6).
# Credit
The following 3rd-party packages are used:
1. The Faster-RCNN module is based on https://github.com/kentaroy47/frcnn-from-scratch-with-keras. We have updated the code according to the latest keras API change (K..image_dim_ordering () -> K.image_data_format()).
2. Data augmentation package (https://github.com/Paperspace/DataAugmentationForObjectDetection).
3. SSD (Single Shot MultiBox Detector) by tensorflow. We took lots of efforts to integrate tensorflow's objection detection and slim source, mainly revising the relative importing. https://github.com/tensorflow/models/research/object_detection and https://github.com/tensorflow/models/research/slim
4. The darkflow framework (https://github.com/thtrieu/darkflow)
5. The pytorch_yolov5 project (https://github.com/ultralytics/yolov5). The main changes are in utils/datasets.py (we added filelist.txt support) and utils/plots (we added fundus_zones()).
# Install
pip install torch==1.8.2 torchvision==0.9.2 torchaudio===0.8.2 --extra-index-url https://download.pytorch.org/whl/lts/1.8/cu111 (use LTS version)
pip install tensorflow-gpu == 1.14.0
pip install tf-slim
pip install odn
For tf_ssd, we need to add odn\tf_ssd\protoc-3.4.0-win32\bin to PATH, then run:
cd tf_ssd
protoc object_detection/protos/*.proto --python_out=.
# How to use - FRCNN
1. Output images with annotations
from odn.fundus import dataset
dataset.synthesize_anno(label_file = '../data/fundus/all_labels.csv',
dir_images = '../data/fundus/images/',
dir_output = '../data/fundus/ground_truth/',
verbose = True,
display = 5 )
The labe file should be in this format:
seq,class,cx,cy,filename,height,laterality,width,xmax,xmin,ymax,ymin
259,Macula,384,293,00569c080bf51c7f182cbe4c76f1823a.jpg,480,L002,720,436,332,345,241
668,OpticDisk,191,275,00569c080bf51c7f182cbe4c76f1823a.jpg,480,L002,720,224,158,308,242
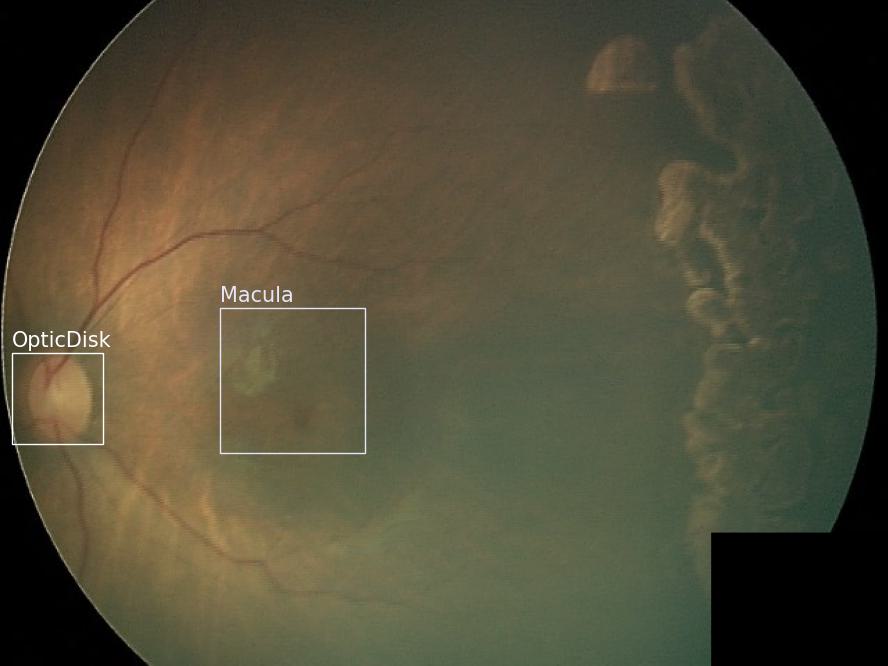
The generated image is like this:
 2. Split dataset
dataset.split(label_file = '../data/fundus/all_labels.csv',
dir_images = '../data/fundus/images/',
train_output = '../data/fundus/train.txt',
test_output = '../data/fundus/test.txt',
test_size = 0.2, verbose = True)
3. Train a new model by transfer learning uing pre-trained PRN weigths
cmd and cd to the the odn folder:
> python -m odn.train_frcnn -o simple -p ../../data/fundus/train.txt --network vgg16 --rpn ./models/rpn/pretrained_rpn_vgg_model.36-1.42.hdf5 --hf true --num_epochs 20
or if using github source,
> python train_frcnn.py -o simple -p ../../data/fundus/train.txt --network vgg16 --rpn ./models/rpn/pretrained_rpn_vgg_model.36-1.42.hdf5 --hf true --num_epochs 20
from odn import utils
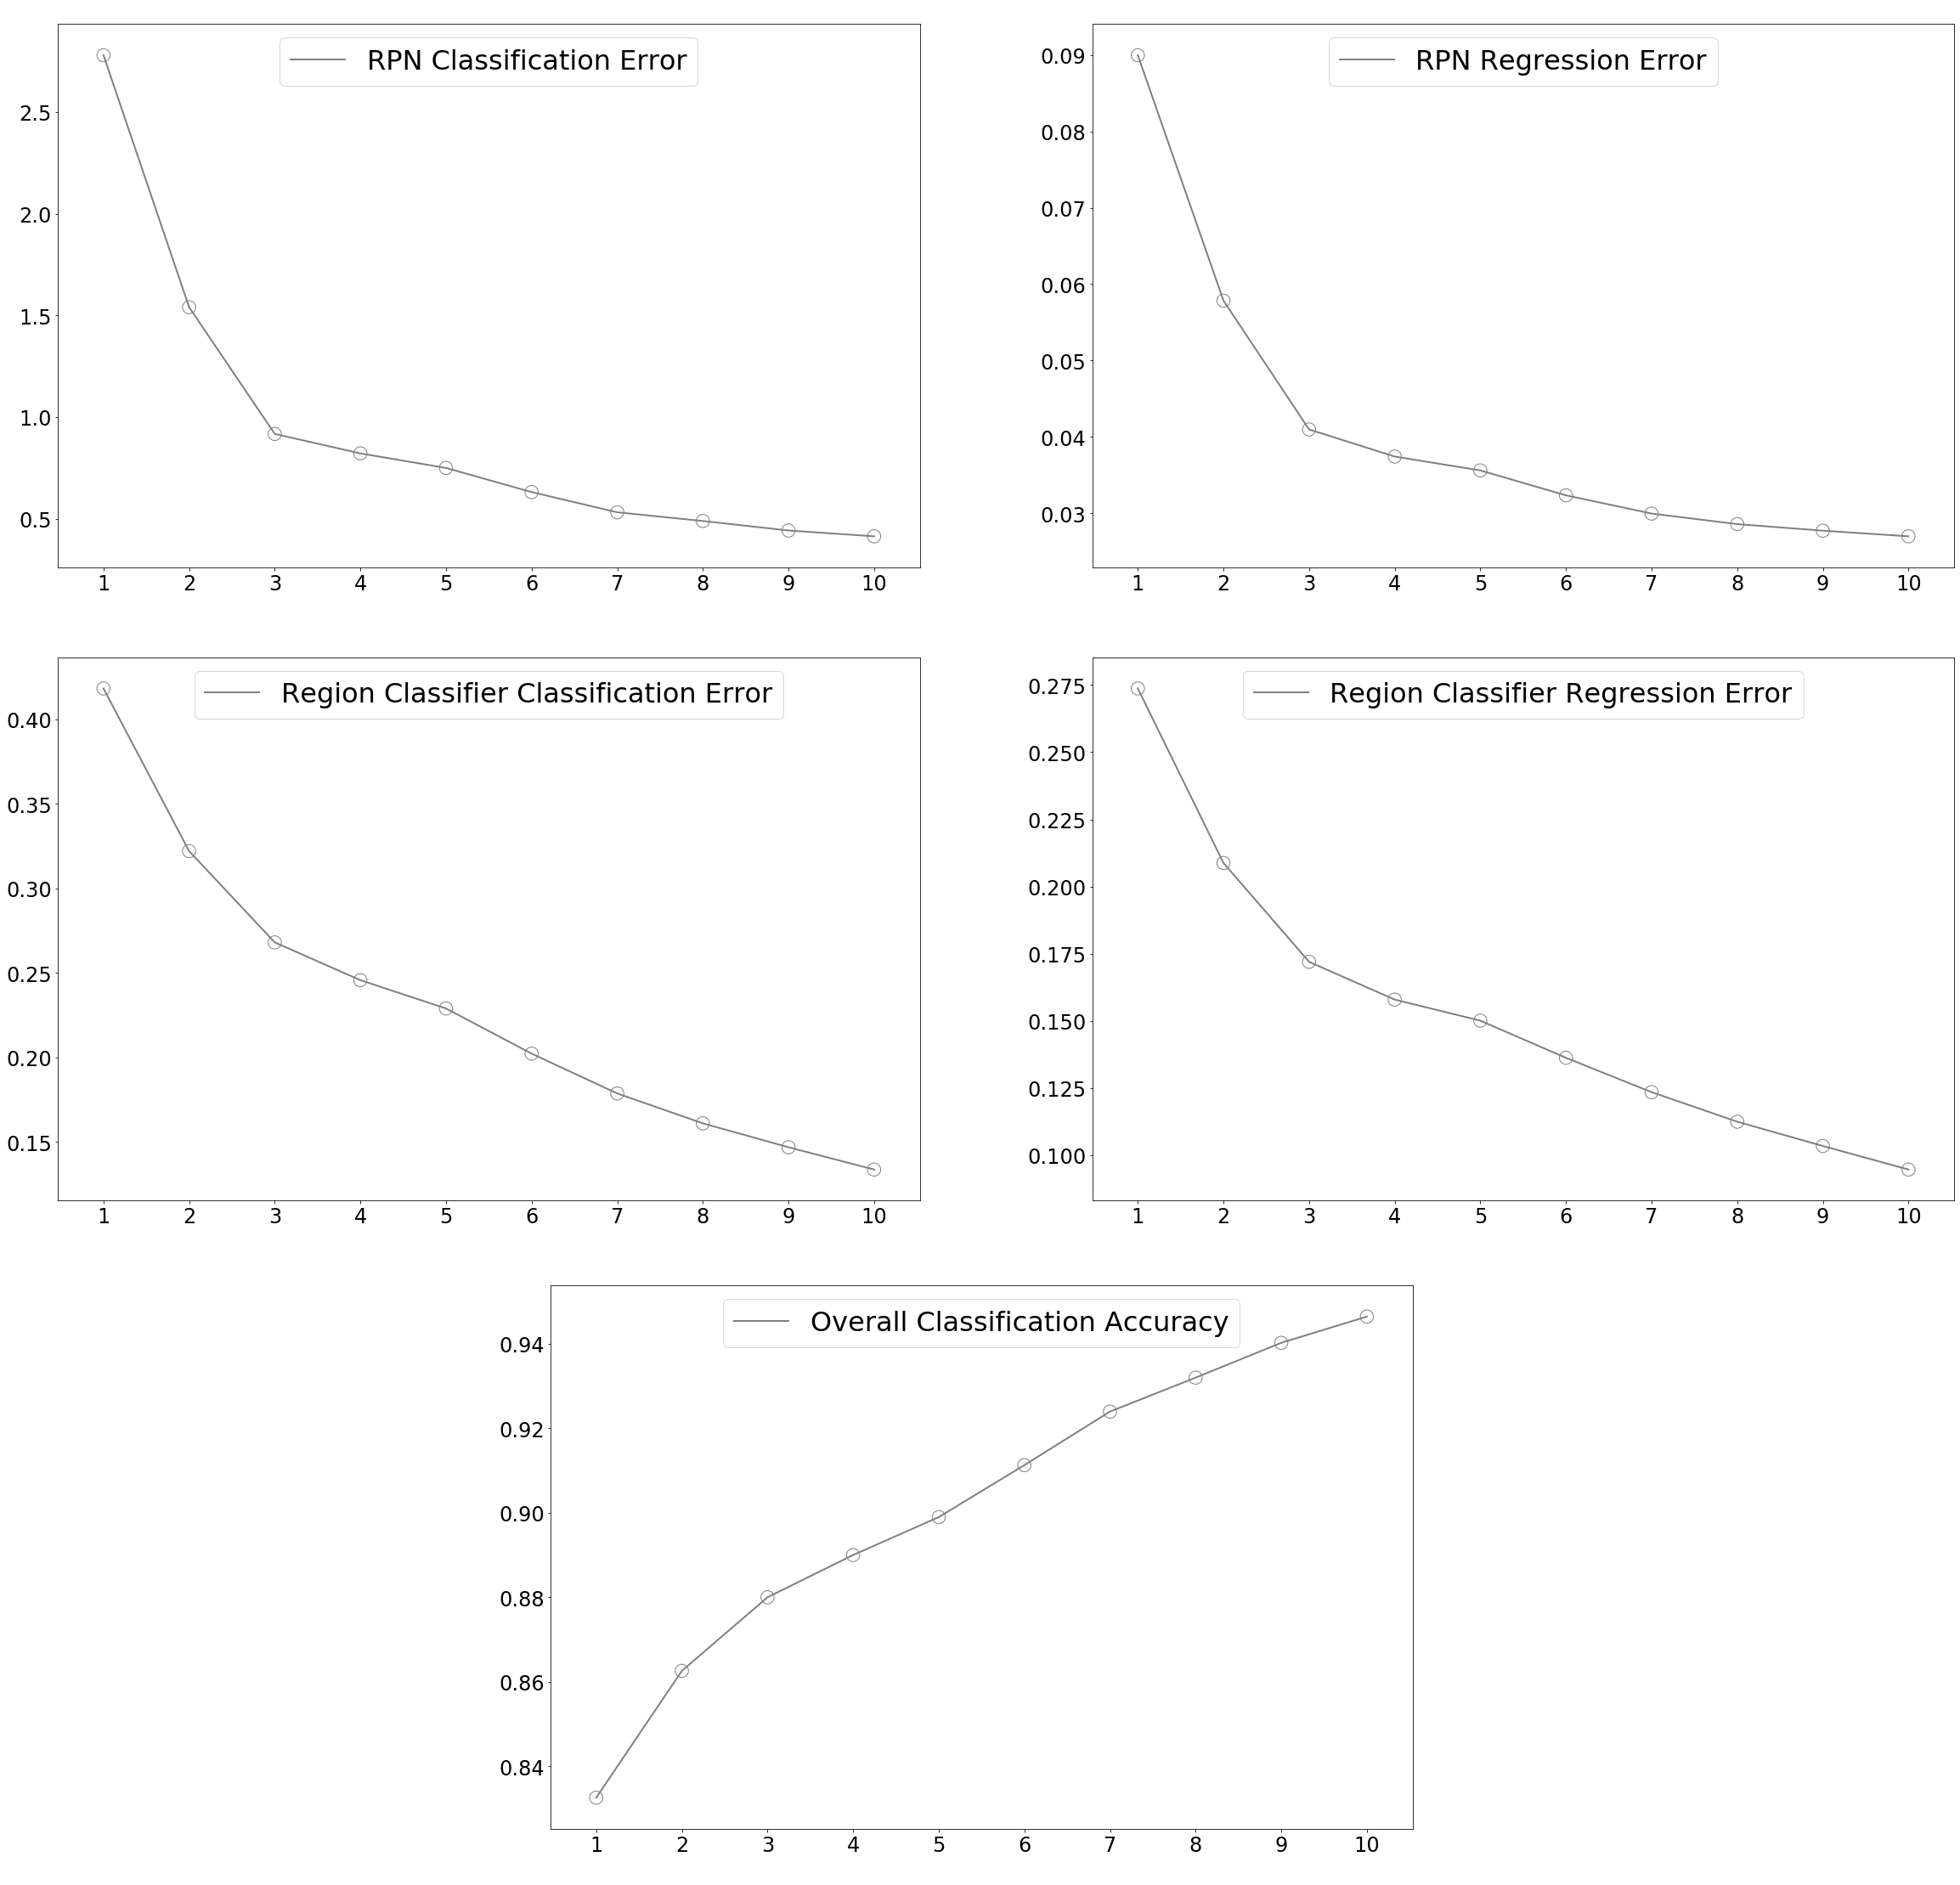
utils.plot_training_curves(input_file = '../src/odn/training_log.txt', output_file = '../src/odn/training_curves.png')
 4. Test
> python -m odn.test_frcnn --network vgg16 -p ../../data/fundus/test_public.txt --load models/vgg16/19e.hdf5 --num_rois 32 --write
or if using github source,
> python test_frcnn.py --network vgg16 -p ../../data/fundus/test_public.txt --load models/vgg16/19e.hdf5 --num_rois 32 --write
A candidate_rois.txt with all candidate ROIs will be generated.
5. ROI filtering
from odn.fundus import annotation, dataset
annotation.rule_filter_rois(input_file = '../src/odn/candidate_rois.txt',
output_file = '../src/odn/rois.txt',
verbose = True)
dataset.synthesize_anno('../src/odn/rois.txt',
dir_images = '../data/fundus/images_public/',
dir_output = '../data/fundus/odn_19e/',
drawzones = True, # set true if you want to draw ROP zones
verbose = True,
display = 5 )
or output annotated images in place:
dataset.synthesize_anno('../src/odn/rois.txt',
dir_images = '../data/fundus/images_public/',
dir_output = 'inplace',
drawzones = True,
verbose = True,
suffix = '_FRCNN', # inplace image name suffix
display = 5 )
6. Evaluation
6.1 Output a single comparison plot
from odn import metrics
metrics.fundus_compare_metrics(gt = '../data/fundus/all_labels.csv',
pred = '../src/odn/rois.txt',
output_file = './comparison_with_metrics.jpg',
image_dirs = [
'../data/fundus/ground_truth_public',
'../data/fundus/odn_19e_raw',
'../data/fundus/odn_19e_naive',
'../data/fundus/odn_19e'], verbose = True )
 6.2 Output image-wise comparison plot
fundus_compare_metrics_separate(input_file = '../src/odn/rois.txt',
output_dir = './comparison_separate/',
image_dirs = [
'../data/fundus/ground_truth_public',
'../data/fundus/odn_19e_raw',
'../data/fundus/odn_19e'], verbose = True )
6.3 Only output comparison results that are differents between different detection algorithms
fundus_compare_metrics_html(gt = '../data/fundus/all_labels.csv', pred = '../src/odn/rois_naive.txt')
fundus_compare_metrics(gt = '../data/fundus/all_labels.csv',
pred = '../src/odn/rois.txt',
output_file = './comparison_with_metrics_diff.jpg',
image_dirs = [
'../data/fundus/ground_truth_public',
'../data/fundus/odn_19e_raw',
'../data/fundus/odn_19e_naive',
'../data/fundus/odn_19e'], image_subset = image_subset, verbose = True )
 # How to use - TF-SSD
1. Follow our notebook (8.4 Object Detection - Fundus - TF-SSD ) to build the tfrecord.
2. Training
cmd > cd to '/odn/tf_ssd' > run:
python train.py --logtostderr --train_dir=training --pipeline_config_path=ssd_mobilenet_v1_fundus.config
To use a pretrained model, revise ssd_mobilenet_v1_fundus.config:
fine_tune_checkpoint: "../tf/export/model.ckpt"
If the training runs correctly, should output something like:
```
INFO:tensorflow:global step 1906: loss = 4.3498 (3.848 sec/step)
I0610 11:49:51.364413 13848 learning.py:512] global step 1906: loss = 4.3498 (3.848 sec/step)
INFO:tensorflow:global step 1907: loss = 3.9057 (3.903 sec/step)
I0610 11:49:55.267028 13848 learning.py:512] global step 1907: loss = 3.9057 (3.903 sec/step)
INFO:tensorflow:global step 1908: loss = 3.4026 (3.856 sec/step)
```
3. Export model as tf graph
python export_inference_graph.py --input_type image_tensor --pipeline_config_path ssd_mobilenet_v1_fundus.config --trained_checkpoint_prefix training/model.ckpt-1945 --output_directory ./export2002206
4. Prediction
```
from odn.fundus import annotation
# get image file list to predict
FILES = utils.get_all_images_in_dir(folder = '../data/fundus/images_public/')
# load tf graph model
detection_graph, category_index = annotation.load_tf_graph(ckpt_path = '../src/odn/tf_ssd/export/frozen_inference_graph.pb',
label_path = '../src/odn/tf_ssd/fundus_label_map.pbtxt',
num_classes = 2)
# object detection
annotation.tf_batch_object_detection(detection_graph, category_index, FILES,
'../data/fundus/ssd/',
'../data/fundus/ssd_202206.txt',
new_img_width = 300, fontsize = 12)
Or output annotated images in place:
annotation.tf_batch_object_detection(detection_graph, category_index, FILES,
'inplace',
'../data/fundus/ssd_202206.txt',
new_img_width = 900, fontsize = None, suffix = '_SSD')
```
The annotated images will be generated in the ssd folder. A sample image is as follows,
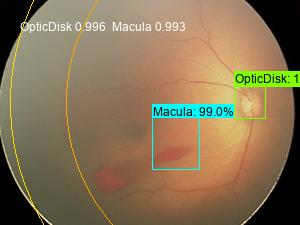 We draw ROP Zone I, Posterior Zone II and Zone II.
# How to use - Darflow Yolo
1. Prerequisie: Install darkflow from source
```
src\odn\darkflow_yolo>pip install -e .
Obtaining file:///C:/Users/eleve/Documents/codex/py/keras/8.%20Object%20Detection/github/src/odn/darkflow_yolo
Installing collected packages: darkflow
Running setup.py develop for darkflow
Successfully installed darkflow
```
2. Load yolo model and make prediction
```
from odn import dark_yolo
tfnet = dark_yolo.load_tfnet(options = {
'model': '../src/odn/darkflow_yolo/cfg/yolo.cfg', # 'bin/yolov1.cfg',
'load': '../src/odn/darkflow_yolo/bin/yolov2.weights', # 'bin/yolov1.weights',
'config': '../src/odn/darkflow_yolo/cfg/',
'threshold': 0.3,
'gpu': 0.7
})
yolo.predict(tfnet, '../data/generic/image2.jpg')
```
# How to use - pytorch YOLO
1. Train by transfer learning
cd to src\odn\torch_yolo, run (download the yolov5m pretrained model first):
python train.py --data data/fundus.yaml --cfg models/yolov5m.yaml --weights models/yolov5m.pt --batch-size 16 --epochs 30 --img 640
The training results and models are saved to runs/train/exp/
2. Predict a folder
python detect.py --source ../../../data/fundus/test --weights runs/train/exp/weights/best.pt
3. Inplace prediction (i.e., )
from odn.fundus import annotation
%matplotlib inline
annotation.torch_batch_object_detection(model_path = '../src/odn/torch_yolo/runs/train/exp15/weights/best.pt',
input_path = 'filelist.txt',
conf_thres=0.3, iou_thres=0.5, max_det=2,
anno_pil = True, colors = [(200,100,100),(55,125,125)],
suffix = '_YOLO5', display = True, verbose = False
)
Inside torch_batch_object_detection(), we have extended the original torch yolov5 with these functions to support in-place prediction:
datasets.py - LoadImages(input_path) - input_path can now be a filelist.txt of image paths
plots.py - Annotation.fundus_zones(self, cx, cy, radius) - draw zone 1, posterior zone 2 and zone 2
# How to use - Camera App
from odn import camera
camera.realtime_object_detection(ckpt_path = '../src/odn/models/ssd_mobilenet_v2_coco_2018_03_29/frozen_inference_graph.pb',
label_path = '../src/odn/models/mscoco_label_map.pbtxt',
num_classes = 90)
# How to use - tkInter GUI
python -m odn.gui
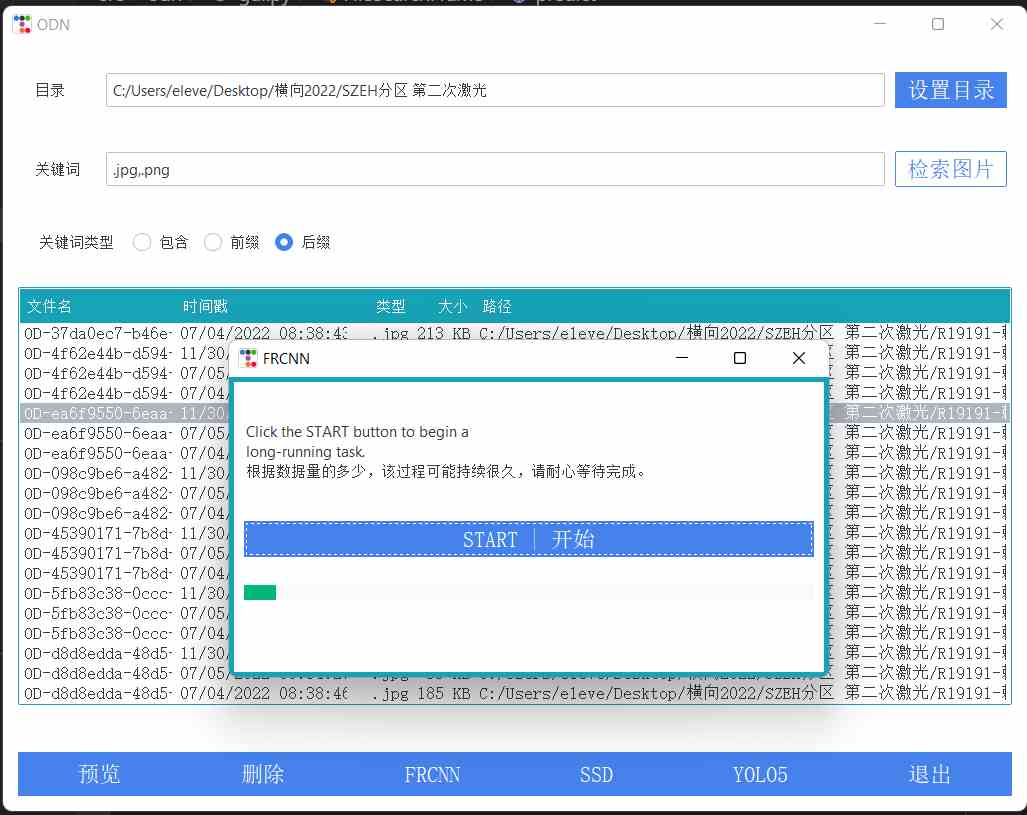 1. 设置目录:设置包含眼底照片的目标目录
2. 检索图片:默认将按照后缀名规则(*.jpg,*.png)搜素该目录下所有图片(包括子目录)
3. 列表将列出所有图片。选中某个图片,可以“预览”或“删除”
4. "FRCNN","SSD","YOLO5"点击其中一个将弹出对话框,点击"Start | 开始"将使用响应的目标检测模型对所有图片进行处理。其中,FRCNN需要额外下载19e.h5模型文件(大小500MB),SSD和YOLO5的模型已经打包在安装文件中。
5. 处理完毕后,将在图片原位置生成后缀"_FRCNN"、"_SSD"、"_YOLO5"的文件,包含检测到的关键生理结构及眼底分区
# Jupyter notebooks
Under /notebooks, we provide several examples for both general-purposed and fundus image object detection.
# Dataset
data/fundus/images : a fundus image set in courtesy of SZEH (Shenzhen Eye Hospital)
data/fundus/ground_truth_public : images with ground truth annotations
data/fundus/frcnn_19e_zones : object detection results by FRCNN (trained 19 epochs)
data/fundus/ssd : object detection results by SSD (Single Shot MultiBox Detector)
# Deployment
After training, you will get a keras h5 model file. You can further convert it to tflite format, or tfjs format.
Then you can deploy on mobile device or browser-based apps.
# Functions added since first publication
One-exam zone segmentation:
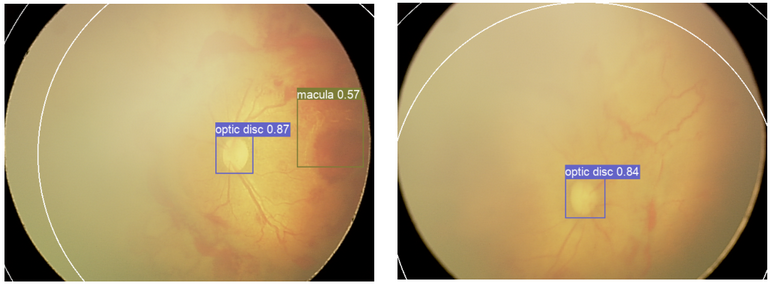
`odn.fundus.annotation.torch_batch_object_detection_for_one_exam()`
The basic idea is to use images with both optic disc and macula to get the zone 1 radius (left). Later use this radius for images of the same exam only with the optic disc (right).
 2. Split dataset
dataset.split(label_file = '../data/fundus/all_labels.csv',
dir_images = '../data/fundus/images/',
train_output = '../data/fundus/train.txt',
test_output = '../data/fundus/test.txt',
test_size = 0.2, verbose = True)
3. Train a new model by transfer learning uing pre-trained PRN weigths
cmd and cd to the the odn folder:
> python -m odn.train_frcnn -o simple -p ../../data/fundus/train.txt --network vgg16 --rpn ./models/rpn/pretrained_rpn_vgg_model.36-1.42.hdf5 --hf true --num_epochs 20
or if using github source,
> python train_frcnn.py -o simple -p ../../data/fundus/train.txt --network vgg16 --rpn ./models/rpn/pretrained_rpn_vgg_model.36-1.42.hdf5 --hf true --num_epochs 20
from odn import utils
utils.plot_training_curves(input_file = '../src/odn/training_log.txt', output_file = '../src/odn/training_curves.png')
 4. Test
> python -m odn.test_frcnn --network vgg16 -p ../../data/fundus/test_public.txt --load models/vgg16/19e.hdf5 --num_rois 32 --write
or if using github source,
> python test_frcnn.py --network vgg16 -p ../../data/fundus/test_public.txt --load models/vgg16/19e.hdf5 --num_rois 32 --write
A candidate_rois.txt with all candidate ROIs will be generated.
5. ROI filtering
from odn.fundus import annotation, dataset
annotation.rule_filter_rois(input_file = '../src/odn/candidate_rois.txt',
output_file = '../src/odn/rois.txt',
verbose = True)
dataset.synthesize_anno('../src/odn/rois.txt',
dir_images = '../data/fundus/images_public/',
dir_output = '../data/fundus/odn_19e/',
drawzones = True, # set true if you want to draw ROP zones
verbose = True,
display = 5 )
or output annotated images in place:
dataset.synthesize_anno('../src/odn/rois.txt',
dir_images = '../data/fundus/images_public/',
dir_output = 'inplace',
drawzones = True,
verbose = True,
suffix = '_FRCNN', # inplace image name suffix
display = 5 )
6. Evaluation
6.1 Output a single comparison plot
from odn import metrics
metrics.fundus_compare_metrics(gt = '../data/fundus/all_labels.csv',
pred = '../src/odn/rois.txt',
output_file = './comparison_with_metrics.jpg',
image_dirs = [
'../data/fundus/ground_truth_public',
'../data/fundus/odn_19e_raw',
'../data/fundus/odn_19e_naive',
'../data/fundus/odn_19e'], verbose = True )
 6.2 Output image-wise comparison plot
fundus_compare_metrics_separate(input_file = '../src/odn/rois.txt',
output_dir = './comparison_separate/',
image_dirs = [
'../data/fundus/ground_truth_public',
'../data/fundus/odn_19e_raw',
'../data/fundus/odn_19e'], verbose = True )
6.3 Only output comparison results that are differents between different detection algorithms
fundus_compare_metrics_html(gt = '../data/fundus/all_labels.csv', pred = '../src/odn/rois_naive.txt')
fundus_compare_metrics(gt = '../data/fundus/all_labels.csv',
pred = '../src/odn/rois.txt',
output_file = './comparison_with_metrics_diff.jpg',
image_dirs = [
'../data/fundus/ground_truth_public',
'../data/fundus/odn_19e_raw',
'../data/fundus/odn_19e_naive',
'../data/fundus/odn_19e'], image_subset = image_subset, verbose = True )
 # How to use - TF-SSD
1. Follow our notebook (8.4 Object Detection - Fundus - TF-SSD ) to build the tfrecord.
2. Training
cmd > cd to '/odn/tf_ssd' > run:
python train.py --logtostderr --train_dir=training --pipeline_config_path=ssd_mobilenet_v1_fundus.config
To use a pretrained model, revise ssd_mobilenet_v1_fundus.config:
fine_tune_checkpoint: "../tf/export/model.ckpt"
If the training runs correctly, should output something like:
```
INFO:tensorflow:global step 1906: loss = 4.3498 (3.848 sec/step)
I0610 11:49:51.364413 13848 learning.py:512] global step 1906: loss = 4.3498 (3.848 sec/step)
INFO:tensorflow:global step 1907: loss = 3.9057 (3.903 sec/step)
I0610 11:49:55.267028 13848 learning.py:512] global step 1907: loss = 3.9057 (3.903 sec/step)
INFO:tensorflow:global step 1908: loss = 3.4026 (3.856 sec/step)
```
3. Export model as tf graph
python export_inference_graph.py --input_type image_tensor --pipeline_config_path ssd_mobilenet_v1_fundus.config --trained_checkpoint_prefix training/model.ckpt-1945 --output_directory ./export2002206
4. Prediction
```
from odn.fundus import annotation
# get image file list to predict
FILES = utils.get_all_images_in_dir(folder = '../data/fundus/images_public/')
# load tf graph model
detection_graph, category_index = annotation.load_tf_graph(ckpt_path = '../src/odn/tf_ssd/export/frozen_inference_graph.pb',
label_path = '../src/odn/tf_ssd/fundus_label_map.pbtxt',
num_classes = 2)
# object detection
annotation.tf_batch_object_detection(detection_graph, category_index, FILES,
'../data/fundus/ssd/',
'../data/fundus/ssd_202206.txt',
new_img_width = 300, fontsize = 12)
Or output annotated images in place:
annotation.tf_batch_object_detection(detection_graph, category_index, FILES,
'inplace',
'../data/fundus/ssd_202206.txt',
new_img_width = 900, fontsize = None, suffix = '_SSD')
```
The annotated images will be generated in the ssd folder. A sample image is as follows,
 We draw ROP Zone I, Posterior Zone II and Zone II.
# How to use - Darflow Yolo
1. Prerequisie: Install darkflow from source
```
src\odn\darkflow_yolo>pip install -e .
Obtaining file:///C:/Users/eleve/Documents/codex/py/keras/8.%20Object%20Detection/github/src/odn/darkflow_yolo
Installing collected packages: darkflow
Running setup.py develop for darkflow
Successfully installed darkflow
```
2. Load yolo model and make prediction
```
from odn import dark_yolo
tfnet = dark_yolo.load_tfnet(options = {
'model': '../src/odn/darkflow_yolo/cfg/yolo.cfg', # 'bin/yolov1.cfg',
'load': '../src/odn/darkflow_yolo/bin/yolov2.weights', # 'bin/yolov1.weights',
'config': '../src/odn/darkflow_yolo/cfg/',
'threshold': 0.3,
'gpu': 0.7
})
yolo.predict(tfnet, '../data/generic/image2.jpg')
```
# How to use - pytorch YOLO
1. Train by transfer learning
cd to src\odn\torch_yolo, run (download the yolov5m pretrained model first):
python train.py --data data/fundus.yaml --cfg models/yolov5m.yaml --weights models/yolov5m.pt --batch-size 16 --epochs 30 --img 640
The training results and models are saved to runs/train/exp/
2. Predict a folder
python detect.py --source ../../../data/fundus/test --weights runs/train/exp/weights/best.pt
3. Inplace prediction (i.e., )
from odn.fundus import annotation
%matplotlib inline
annotation.torch_batch_object_detection(model_path = '../src/odn/torch_yolo/runs/train/exp15/weights/best.pt',
input_path = 'filelist.txt',
conf_thres=0.3, iou_thres=0.5, max_det=2,
anno_pil = True, colors = [(200,100,100),(55,125,125)],
suffix = '_YOLO5', display = True, verbose = False
)
Inside torch_batch_object_detection(), we have extended the original torch yolov5 with these functions to support in-place prediction:
datasets.py - LoadImages(input_path) - input_path can now be a filelist.txt of image paths
plots.py - Annotation.fundus_zones(self, cx, cy, radius) - draw zone 1, posterior zone 2 and zone 2
# How to use - Camera App
from odn import camera
camera.realtime_object_detection(ckpt_path = '../src/odn/models/ssd_mobilenet_v2_coco_2018_03_29/frozen_inference_graph.pb',
label_path = '../src/odn/models/mscoco_label_map.pbtxt',
num_classes = 90)
# How to use - tkInter GUI
python -m odn.gui
 1. 设置目录:设置包含眼底照片的目标目录
2. 检索图片:默认将按照后缀名规则(*.jpg,*.png)搜素该目录下所有图片(包括子目录)
3. 列表将列出所有图片。选中某个图片,可以“预览”或“删除”
4. "FRCNN","SSD","YOLO5"点击其中一个将弹出对话框,点击"Start | 开始"将使用响应的目标检测模型对所有图片进行处理。其中,FRCNN需要额外下载19e.h5模型文件(大小500MB),SSD和YOLO5的模型已经打包在安装文件中。
5. 处理完毕后,将在图片原位置生成后缀"_FRCNN"、"_SSD"、"_YOLO5"的文件,包含检测到的关键生理结构及眼底分区
# Jupyter notebooks
Under /notebooks, we provide several examples for both general-purposed and fundus image object detection.
# Dataset
data/fundus/images : a fundus image set in courtesy of SZEH (Shenzhen Eye Hospital)
data/fundus/ground_truth_public : images with ground truth annotations
data/fundus/frcnn_19e_zones : object detection results by FRCNN (trained 19 epochs)
data/fundus/ssd : object detection results by SSD (Single Shot MultiBox Detector)
# Deployment
After training, you will get a keras h5 model file. You can further convert it to tflite format, or tfjs format.
Then you can deploy on mobile device or browser-based apps.
# Functions added since first publication
One-exam zone segmentation:
`odn.fundus.annotation.torch_batch_object_detection_for_one_exam()`
The basic idea is to use images with both optic disc and macula to get the zone 1 radius (left). Later use this radius for images of the same exam only with the optic disc (right).
