Safe Exam Browser 2.4.1 for Windows
Note: This is the manual for the legacy version of Safe Exam Browser for Windows. Until the manual is updated for SEB 3.x, please check tool tips (hover mouse cursor over new controls) for new options in the Configuration Tool.
Safe Exam Browser – SEB for Windows opens a web browser window without navigation elements and locks the computer into a kiosk mode, which prevents from switching to other applications or quitting SEB untimely. SEB enables secure exams on unmanaged computers like students' own laptops as well as in managed environments. Currently SEB integrates with the wide spread learning management systems (LMS) Moodle, ILIAS and OpenOlat and several commercial and non-commercial exam systems, as for example Inspera Assessment. Generally it can easily be used with most web-based online quiz and e-assessment systems.
The following manual explains how to configure and use SEB for Windows from the perspective of exam administrators. SEB is a very flexible and modular tool, therefore documentation for examinees on how to use SEB with individual exam setups and the various exam systems it works with should be provided by the institution using SEB or their e-assessment provider.
Features
SEB disables the options of the Windows Security Screen (invoked by pressing Ctrl+Alt+Del), namely Lock (this Computer), Switch User, Sign out (Log off), Change a password, (Start) Task Manager, Shut down, Restart and Ease of Access. It disables the Windows Task Bar and the Start Menu (button in the lower left corner of the screen), the App/Task/Window Switcher (invoked by Alt-Tab and Windows-Tab), printing. It can also be set whether users can quit SEB and if it is required to enter a quit password to do so.
Its possible to configure SEB to quit after the exam is submitted without having to enter a quit password by specifying a quit link and placing this on the summary page displayed by the LMS after submitting the exam.
In the browser window there is no right mouse (or Shift-F10) click popup window available. Besides that, the browser is supporting Java and Flash content (as long as the required plugins are installed on the system).
SEB detects when it was started in a virtual instead of a native environment and refuses to run. This virtual machine detector hinders manipulating SEB further when used in unmanaged environments.
SEB for Windows is based on the Mozilla Firefox/Gecko engine (in contrast to the WebKit browser engine used by SEB for macOS, which is also used by Safari and some open source browsers).
SEB for Windows can be used together with additional (third party) applications during an exam. You can download and open files linked in your online exam, edit it in a third party application and then upload the results to your online quiz/LMS again.
From version 2.0 SEB uses encrypted .seb setting files which allow to individually configure SEB per exam. Also see the how to use SEB 2.0 document explaining the concept behind SEB 2.x.
Please understand that you also have to configure your exam system correctly to be locked down securely. SEB is generally locking down exam client computers only, not the exam system or the quiz module of a learning management system. Check documentation for your exam/learning management system on how to lock it down correctly.
Using SEB with Supported LMS
Some learning management systems require plugins to be installed to fully support secure exams taken with SEB, others have built-in support.
Using SEB with Moodle
SEB support in Moodle has the following objectives:
- Don't display any links during an exam which would allow to navigate to other sections of Moodle or even other websites. This means the course navigation, link to the user's Moodle profile, logout, link to the University homepage etc. needs to be disabled/hidden. Only the quiz navigation (to navigate to other questions) and the "Finish attempt..." link should be visible
- Make sure a quiz can only be taken using Safe Exam Browser, display an error message if trying to open the quiz in another web browser.
- Check if legitimate SEB settings or optionally if the correct version of SEB are used.
Since Moodle 3.9, there is very comfortable support for Safe Exam Browser directly available in Moodle's quiz settings. The new "deeper integration" is also available as plugin for Moodle 3.7 and 3.8. If possible, use this new SEB support in Moodle. Refer to the official Moodle documentation for details. Please note that our SEB support cannot answer specific Moodle questions, use the documentation on moodle.org and the Moodle community forums.
See below the two older options how to activate SEB support in Moodle, which are no longer available (or don't make sense) in current Moodle versions:
- Enable the "classic" SEB support in Moodle: How to activate the SEB secure browser mode in a Moodle quiz. Then configure the quiz at Administration / Quiz administration / Edit settings / Extra restrictions on attempts / Browser security / Require the use of Safe Exam Browser. This option uses only a basic, not very secure check for the used browser. This may be safe enough if students can only access the exam from centrally managed university computers inside a computer lab/exam room. For other scenarios like BYOD you should use the second option.
- Use the Browser Exam Key authentication in Moodle for the connecting SEB version and its settings by installing the quiz access rule plugin in Moodle. In addition you will have to copy the Browser Exam Key hash code string into the quiz settings (Administration / Quiz administration / Edit settings / Extra restrictions on attempts / Allowed browser keys). This key is generated by SEB when you save the settings you intend to use for the exam. As this key includes a hash (checksum) of both the saved exam settings and the code signature of the used SEB version, you may have to generate and copy several Browser Exam Keys into the Moodle quiz settings, for example one for the Windows version of SEB and one for the Mac version.
- As an alternative, you may use the Config Key instead of the Browser Exam key. Basically, the Config Key works like the Brwoser Exam Key, but without including the SEB version string in the hash key. This way you would at best only have to copy one key to your Moodle settings, even if you are using different versions of SEB (e.g. Mac/Windows).
Sometimes hiding course navigation, link to the user's Moodle profile, logout etc. doesn't work as expected because some custom Moodle themes don't support the secure browser mode of Moodle correctly, they display links with which students can get out of the quiz during an exam. If this happens only with your customized theme and not the standard Moodle theme, then your theme is not implemented correctly. In that case you should fix the problem in your custom Moodle theme. You may also create URL filter rules which only allow to access the exam and no other parts of Moodle, but this is not trivial and we cannot provide you with any support on that.
You may find additional information and help in the discussion boards for SEB and Moodle.
Using SEB with ILIAS
You can find information about how to install the ILIAS plugin for SEB support here.
Please note that currently support for Safe Exam Browser in ILAS can only be switched on for some roles of a whole installation, not a single exam/course.
Using SEB with OpenOlat
An assessment mode has been added to the OpenOlat standard with the 10.2 release. The assessment mode allows course authors to limit the functionality and access of OpenOlat courses for exam settings. An exam setting is not limited to online tests however, IMS QTI assessments, SCORM modules, external LTI 1.1 tools and all other OpenOlat course elements can be configured for such an exam setting.
One of the many security features is the enforced usage of Safe Exam Browser. An exam setting can be configured with multiple Browser Exam Key keys.
No additional software needs to be installed in order to use the assessment mode together with Safe Exam Browser. The assessment mode is globally enabled / disabled in Administration -> Modules -> Assessment mode. Within the courses the configuration is done in the course menu.
More information and a video tutorial about the assessment mode.
Download/Installation
You can download the SEB for Windows Installation setup program (also containing the SEB Windows configuration tool) here. Just start SafeExamBrowserInstaller.exe and follow the steps in the installation program.
SEB for Windows containing the main application executable SafeExamBrowser.exe and the configuration tool SebWindowsConfig.exe are placed in the SEB application folder named SafeExamBrowser which will be installed into the standard program folder of your computer (usually C:\Program Files or C:\Program Files (x86), depending on whether you have a 32-bit or 64-bit machine). Also a Safe Exam Browser program entry will be placed into your Start Menu.
If you require an MSI package for installing SEB using a deployment system, then you can extract it from the SafeExamBrowserInstaller.exe bundle using the following command (in cmd.exe):
SafeExamBrowserInstaller.exe /s /x /b"C:\FolderInWhichMSIWillBeExtracted" /v"/qn"
(replace C:\FolderInWhichMSIWillBeExtracted with the folder path you want the MSI file to be extracted to)
We are not proving the SEB installer as an MSI file, because the current versions require the .NET 4.5 framework to be installed on the Windows machine. The installer bundle can automatically download and install this .NET version if it isn't yet installed, an MSI package cannot. We also can't provide any support regarding packaging of the SEB application together with the client config file (that's a task for Windows deployment specialists).
Updating: In most cases you can just run the installer of the new SEB version and it will automatically update from the previous to the new version. The client configuration (see below) will not be removed or replaced, as it is compatible with any new SEB version. If you were using a significantly older SEB version (2.1.x, especially 2.1 or older) or the older SEB installation got corrupted, you should uninstall the old SEB version using the Windows Control Panel(or likewise Settiings - Apps & features). As the Windows Installer usually leaves some files behind, you should afterwards delete the SEB application directory in C:\Program Files (x86)\ manually (IMPORTANT: Always FIRST UNINSTALL, then delete). Then install the new SEB version.
Uninstalling: Use the Windows Control Panel (or likewise Settiings - Apps & features) to uninstall SEB. As the Windows Installer usually leaves some files behind, you can delete the SEB application directory in C:\Program Files (x86)\ manually (IMPORTANT: Always FIRST UNINSTALL, then delete). If uninstalling using the Windows Control Panel doesn't work, then you can try to use the installer of the exact same SEB version you had installed (contact us if you don't have that installer version anymore and it's no longer available for download). Just start it and select the remove/uninstall option. If this still doesn't work, then your Windows system got corrupted. SEB is using the standard Windows Installer procedures for installing and uninstalling and those can fail in some cases, which is not connected to SEB itself. You can also remove the directory C:\Users\<username>\AppData\Roaming\SafeExamBrowser\ (exact path using Windows path variables: %APPDATA%\SafeExamBrowser\), where the SebClientConfig.seb client config file, log and browser session data files are saved.
Starting and Quitting SEB
When you start SEB, all currently running applications, the Windows Task Bar and the desktop are hidden. On the main screen SEB opens its web browser window filling the whole screen (optionally the window can be resized and moved or switched to fullscreen). SEB opens the webpage at the preset Start URL, which might take some seconds. As default, as long as you don't set another Start URL (see Configuration), SEB for Windows opens this page with initial instructions.
SEB doesn't have any navigation buttons, but the optional reload button in the SEB taskbar, the browser toolbar (if activated) or the key F5 can be used to reload the current page.
To quit SEB (while it's using the default settings), just press the Quit button in the SEB taskbar, keys Ctrl-Q or the red close button in the browser window. Quitting SEB can optionally be switched off or password protected, also the function key exit sequence which was used in former SEB versions is still supported optionally. When SEB quits, the applications which were running before starting it will get unhidden again (as long as settings didn't force to quit those applications).
Configuration
SEB for Windows has a comfortable configuration tool which should be used for configuring SEB. You can find SEBConfigTool.exe in the SEB application folder SafeExamBrowser which is placed in the standard program folder of your computer (usually C:\Program Files or C:\Program Files (x86), depending on whether you have a 32-bit or 64-bit machine).
In the SEB configuration tool window, settings are grouped in several panes. There you can set the parameters described below.
- In the General pane you'll find basic settings like the URL which SEB opens and the passwords to open a config file for editing and to quit/restart SEB. When first time using SEB, you might only have to change these general settings, as the default values for all other settings should reflect the more "secure" option.
- Config File contains details about encryption of the SEB .seb configuration files plus all functions to deal with opening, saving, reverting, duplicating and applying settings. These commands can also be accessed in the menu bar above the tab bar.
- User Interface contains general SEB user interface settings;
- Browser all detail settings for the built-in SEB web browser.
- Down/Uploads refers to file downloads and uploads;
- Exam handles the connection to exam systems and exam specific settings.
- Application is for handling permitted and prohibited processes;
- Additional Resources is for adding webpages, websites or documents which can be opened during the exam;
- Network about the URL filter, certificates and proxies;
- Security contains detail settings about how SEB locks down security relevant system features.
- Registry allows to control options in the Windows Security Screen invoked by Ctrl-Alt-Del and an option when using VMware Horizon View while SEB is running.
- Hooked Keys controls blocking key and mouse commands.
Settings in the General Pane
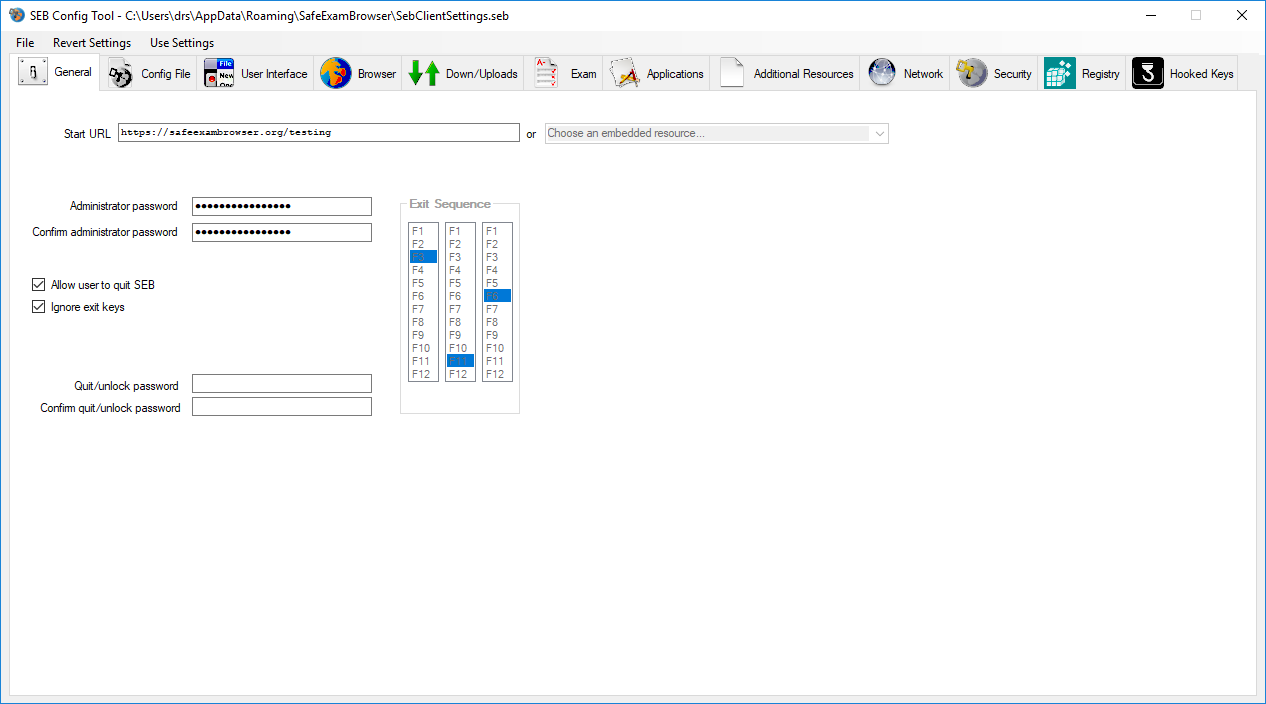
- Start URL: Full URL (starting with http:// or https://) of the page to open when SEB is started.
- Administrator password: Password required to open a config file for editing in the config tool. You should set an administrator password if you don't want that someone could open and examine a .seb configuration file, after knowing the encryption credentials (for example after an exam).
If you're using macOS SEB clients for exams as well, you definitely should set an administrator password, as otherwise students could open the preferences window (which is build into SEB for macOS) and change settings during the exam. - Confirm administrator password: Retype the administrator password. As long as it's not matching the administrator password typed in the field above, "Please enter correct confirm password" is displayed below and you cannot save the configuration file.
- Allow user to quit SEB: If selected, Users can quit SEB with the Quit button in the SEB taskbar, by pressing the keys Ctrl-Q or by clicking the main browser window (the one that displays the exam) close button. Otherwise you can shutdown or reboot the computer. In a computer room in a university or school you could for example use some tool to shutdown or reboot all computers after a exam and therefore not allow students to quit SEB themselves at all. This setting has no influence on a Quit Link (if one is set, see Exam Pane).
- Ignore exit keys: If selected, SEB ignores the exit keys and can only be quit manually by entering the quit password after clicking the Quit button in the SEB taskbar, by pressing the keys Ctrl-Q or by clicking the main browser window close button.
- Quit/unlock password: This password is prompted when users try to quit SEB with the Quit button, Ctrl-Q or the red close button in the main browser window (if not in full screen mode). If no quit password is set, then SEB just prompts "Are you sure you want to quit SEB?". The password is not prompted when using a Quit Link.
This password is also prompted if the restart exam button is used (if activated and configured to be password protected, see Exam Pane). - Confirm quit/unlock password: Retype the quit password. As long as it's not matching the quit/unlock password typed in the field above, "Please enter correct confirm password" is displayed below and you cannot save settings.
- Exit sequence: Function keys which have to be pressed and held down together to exit SEB. This works only if ignore exit keys is not selected. Some combinations don't work as Windows doesn't allow to use some keys/combinations, this also differs depending on hardware and key map, so you should test the exit key combination on all the clients you use. We recommend to no longer use exit keys, this feature will probably be removed in future SEB versions. Note: SEB for macOS doesn't support exit keys, so in mixed environments you should anyways prefer using a quit password for manually quitting SEB.
Settings in the Config File Pane
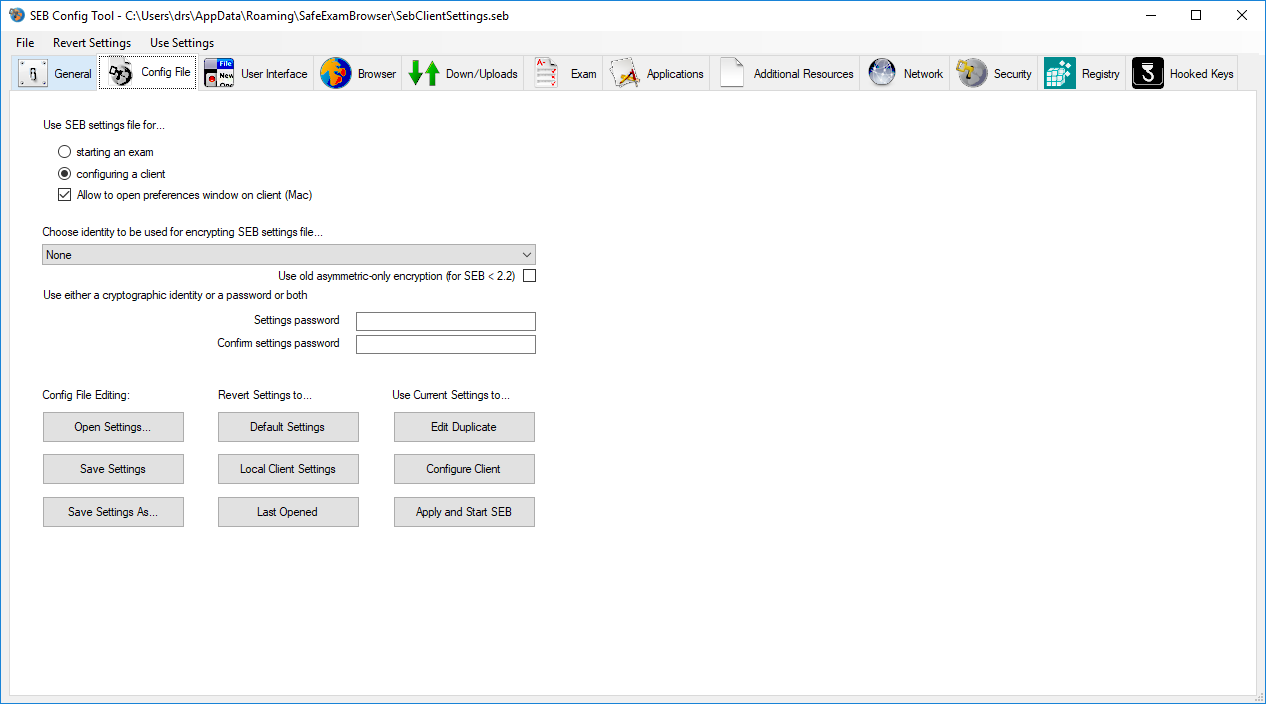
- Use SEB settings file for ... starting an exam: A configuration file saved with this option will start the exam with the according settings, but won't change local SEB settings.
- Use SEB settings file for ... configuring a client: A SEB settings file saved with this option is used to change persistent settings of a SEB client. This means, next time SEB is started by double clicking its shortcut from the desktop (or opening SafeExamBrowser.exe from the Program Files folder), it will use these settings.Usually you should encrypt it with the same password which is set as administrator password on the SEB client or none if there is no administrator password set on the SEB client yet (using an empty password prevents people from having to enter a password just when SEB is starting, unless you want this to prevent SEB being started unintentionally for example in a computer lab when there is no exam happening).
When this .seb file is opened, for example by double clicking it in Windows Explorer, then SEB is started and settings from this file are copied into the file SebClientSettings.seb which is placed in the hidden Application Data folder of the current user (see below for exact path).
You can also copy this file manually or with a deployment system to one of the following directories:C:\ProgramData\SafeExamBrowser\
Exact path using Windows path variables:
%PROGRAMDATA%\SafeExamBrowser\SebClientSettings.seb
                    C:\Users\<username>\AppData\Roaming\SafeExamBrowser\
Exact path using Windows path variables:
%APPDATA%\SafeExamBrowser\SebClientSettings.sebPlease note: On a managed exam computer you probably should copy the default client settings file SebClientSettings.seb to the \ProgramData\SafeExamBrowser\ directory. If such a file exists in this location, this will be read by SEB with first priority and another file at the Local Application Data folder of the current user will be ignored. As the PROGRAMDATA directory usually is writable only with administrator rights, regular users cannot change the exam computer's default settings, which is the desired case on a managed computer.
You should only use a client settings fileSebClientSettings.seb in the \ProgramData\SafeExamBrowser\ directory on deployed exam client machines, not on your admin workstation, as SEB will ignore all local client settings which you configure in the Config Tool ("Use Current Settings to Configure Client", "Revert Settings to Local Client Settings" and "Apply and Restart SEB" won't work as expected, see also below)! - Allow to open preferences window on client (Mac only): Usually you should disable the preference window on exam clients besides for debugging purposes.
- Choose identity to be used for encrypting SEB settings file ... In this popup menu all identities (X.509 certificates with RSA public key and associated private key) in the Windows Certificate Store (stored in Current User/Personal and Current User/Trusted People) are listed, which can be used for encrypting and decrypting. Install that identity on your SEB clients, then they can decrypt .seb files encrypted with this certificate/key. You can also make identities available to specific computers in a network zone over the LAN without placing them physically onto the exam clients (ask your Windows network administrators about that). You can install identities on client computers using deployment systems or by embedding them into a .seb config file for configuring the client (see Network / Certificates pane). If the identity certificates are installed into Local Machine/Trusted People, then they are available for all users on that machine (as Windows makes them available for all users in their Current User/Trusted People stores).
- Use old asymmetric-only encryption (for SEB < 2.2): Starting in SEB 2.2, a new encryption method for identity-encrypted config files can be used, which can decrypt large settings much faster. This is especially important if you embed large additional resources into config files. But if you need to save config files compatible to earlier SEB versions (before 2.2, also current macOS versions of SEB) then you should use this setting.
- Settings password: Password to decrypt the settings file, if one is set then it will be prompted when SEB reads the settings. Local client settings (saved on every exam client, at one of the two possible standard paths, see above) should be saved with the option "Use SEB settings file for ... configuring a client", so you (and examinees when starting SEB) don't have to enter any settings password. Then a standard password is used for encrypting these settings. This is not very safe, but you should anyways not store any really secret information (like critical admin and quit passwords or a secret exam URL) in the local client settings, for that you should use separate settings files saved with the option "Use SEB settings file for ... starting an exam".
- Confirm settings password: Retype the settings password.
- Open Settings... Lets you choose a .seb settings file which will be loaded into memory, so you can edit the settings.
- Save Settings (As...) Saves the SEB settings using the same file name or lets you choose a file name and location for the SEB settings file. You have to either enter a password or choose a cryptographic identity with which the SEB settings file will be encrypted. Use the saved encrypted settings file to either start the exam in SEB or to change the local settings of a SEB client, depending on the Use SEB settings file for ... option.
Revert Settings to…
- Default Settings: After the user confirms, settings are reset to the default settings. The options for default settings are in general set to a safe, most common value, so usually you can start using the default settings and just customize options which you need for your exam scenario.
- Local Client Settings: After the user confirms, revert to the local client settings.
- Last Saved: After the user confirms, settings are reverted to the last ones saved or loaded.
Use Current Settings to…
- Edit Duplicate: Creates a duplicate of the current settings and continues editing those.
- Configure Client: Configures the client using settings from the .seb file which is currently being edited (overwriting current local client settings) and SEB switches to editing local client settings.
- Apply and Restart SEB: Saves current settings, closes the SEB Config Tool and starts SEB. If local client settings were edited, then SEB is started and loads those (same as when double clicking the SEB icon). If some config file was edited, then SEB is started as when double clicking that .seb config file.
Note: If you're editing client settings (at %APPDATA%\SafeExamBrowser\SebClientSettings.seb) and there is also a client settings fileSebClientSettings.seb in the \ProgramData\SafeExamBrowser\ directory, then Apply and Restart SEB does not apply the currently edited file, as this function simulates what will happen when you start SEB either by clicking its icon (starting the application directly, then client settings are used) or by opening another SEB config file (then SEB is started opening those settings inside that config file). You should only use a client settings fileSebClientSettings.seb in the \ProgramData\SafeExamBrowser\ directory on deployed exam client machines, not on your admin workstation!
Settings in the User Interface Pane
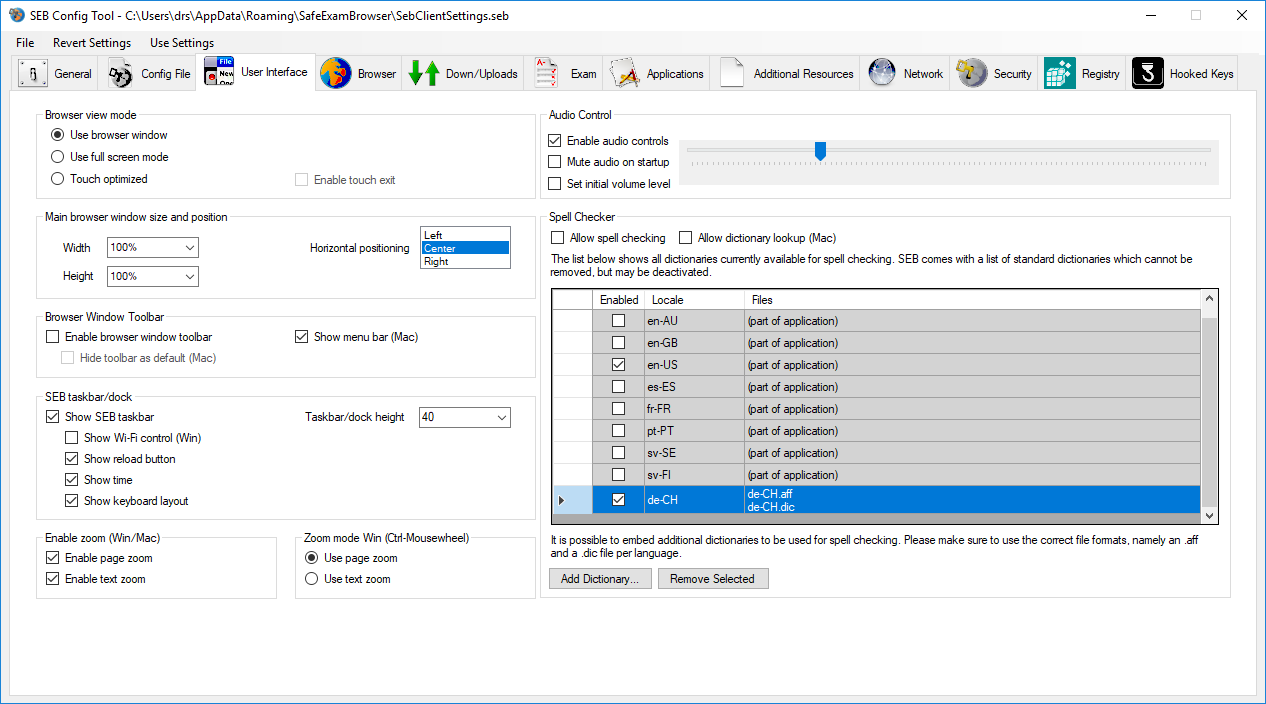 Browser view mode
- Use browser window: Use a window for the SEB browser which can be scaled and moved around, also to another screen when available. One advantage of using a browser window is that if you're using a large wide screen display, some web pages may not be ergonomic to read. With the scalable browser window you can adjust the width of displayed web pages.
- Use full screen mode: Display the SEB browser full screen. Full screen browser mode should mainly be used with exam systems which display everything in one main window and don't open auxiliary windows: When a web page opens in a new window, this will be hidden behind the full screen main browser window when the user clicks into that. From SEB 2.1 you can access single windows in the SEB taskbar (click on the SEB icon) or with Alt-Tab.
- Touch optimized: Enables the touch optimized mode for Windows tablet computers (for Windows 8.1 and 10). In current versions of Windows 10 you need to enable the Windows 10 "Tablet Mode" as well before starting SEB in touch optimized mode. Select the Action Center icon on the Windows taskbar (next to the date and time), and then select Tablet mode to turn it on.
The Windows on-screen keyboard is not working with the Create New Desktop kiosk mode, that's why you have to use the Disable Explorer Shell kiosk mode. You cannot just use exam settings with Disable Explorer Shell, you also have to reconfigure SEB client settings to this mode.
The SEB setting option "Automatic on-screen keyboard behavior" from previous SEB versions was removed from SEB 2.2, as now always the former option "Detect physical keyboard" is active. This means, if a physical keyboard is connected, SEB doesn't show the on-screen keyboard. Touch optimized mode features:- Larger buttons in the SEB taskbar
- Touch optimized message boxes (alerts, dialogs) with larger buttons
- The Windows on-screen keyboard is displayed when the user touches a text field on a browser page or when SEB asks to enter a password. If a physical keyboard is connected, SEB doesn't show the on-screen keyboard.
- New web pages open in full screen 'windows', switch between open pages with the open windows chooser popup menu invoked by tapping the SEB icon in the SEB taskbar. With the close button below each window in this window chooser you can close open browser full screen 'windows'.
- Enable touch exit: When enabled, SEB can be quit in touch optimized mode with a swipe down from the upper display edge (helpful when the SEB taskbar with the quit button is not used).
- You can set the width and height of the main SEB browser window as absolute pixel values or a percentage of the screen width or height. You can enter the dimensions (in pixels or percent values) in the text field or select one of the predefined values in the pop down menu.
- Horizontal positioning: You can choose how the window will be positioned horizontally if it doesn't fill the full screen width: Left, Center, Right.
- Enable browser window toolbar: Indicates if a toolbar is displayed on top of the browser window, with back/forward buttons (if navigation is enabled) and a reload button.
- Hide toolbar as default (Mac only): After SEB starts, the browser window toolbar is hidden. Users can unhide the toolbar in the view menu or the contextual menu on the browser window title bar.
- Show menu bar (Mac only): The menu bar can be used in SEB for macOS to access menu bar widgets like changing keyboard layouts, re-connecting to a WiFi network etc.
- Show SEB taskbar: Usually to be used when you permit third party applications, which are displayed as icons. Clicking on the icon of an application starts it (if it wasn't running yet), brings the application to foreground or maximizes its window if it was minimized before. The taskbar is not required, users can also switch to third party applications using the task switcher with keys Alt-Tab. But if users quit a third party application, they can restart it only by using its taskbar icon (or by opening a file which is linked in an exam and gets opened by that application).
- Taskbar/dock height: Taskbar height in pixels can be changed for high resolution displays (display DPI settings are now also taken in account, in touch optimized mode taskbar is scaled up in addition).
- Show Wi-Fi control: Allows to reconnect to Wi-Fi networks which have previously been connected to.
- Show reload button: This button in the SEB taskbar reloads the current web page. Shows warning if enabled in Browser settings tab.
- Show time: Displays current time in SEB taskbar: This is for example helpful if you decide to ban personal watches in exams (because of smartwatches).
- Show keyboard layout: Shows current keyboard layout and allows to switch to other keyboard layouts which have been enabled in Windows.
- Enable page zoom: Pages can be zoomed with Ctrl-Mousewheel (Win) or cmd +/- or the commands in the view menu and buttons in browser window toolbar (Mac)
- Enable text zoom: Text in browser windows can be zoomed with Ctrl-Mousewheel (Win) or ctrl - cmd +/- or the commands in the view menu and buttons in browser window toolbar (Mac)
- Zoom Mode (Win): Zoom whole web pages or just text using Ctrl-Mousewheel (only in Windows version)
- Enable audio controls: Show the audio control icon in the SEB taskbar which can be used to mute or change audio volume.
- Mute audio on startup: Mute audio initially (when starting SEB or an exam).
- Set initial audio volume: Set an initial value for the audio volume.
- Allow spell checking: Spell checking in the SEB browser underlines incorrectly spelled words and displays word suggestions (right mouse button needs to be enabled in Hooked Keys tab).
- Allow dictionary look up (Mac): Allow looking up text elements on a web site using the 3-finger tap on a trackpad or ctrl-cmd-D
The list underneath these options shows all dictionaries currently available for spell checking. SEB comes with a list of standard dictionaries which cannot be removed, but may be deactivated. The dictionaries contained in SEB have a license which is compatible with SEB's MPL license. Many other dictionaires are using the GPL license, which isn't compatible with SEB's license and therefore we cannot distribute these dictionaries together with SEB. But it is possible to embed additional dictionaries to be used for spell checking. Please make sure to use the correct file formats, namely a .aff and a .dic file per language. You can download compatible dictionaries for many languages on this Mozilla Thunderbird page.
- Add Dictionary: Displays a file dialog where you have to select both dictionary files with the file extensions .aff and .dic.
- Remove Selected: Removes the selected dictionary from the SEB config.
Settings in the Browser Pane
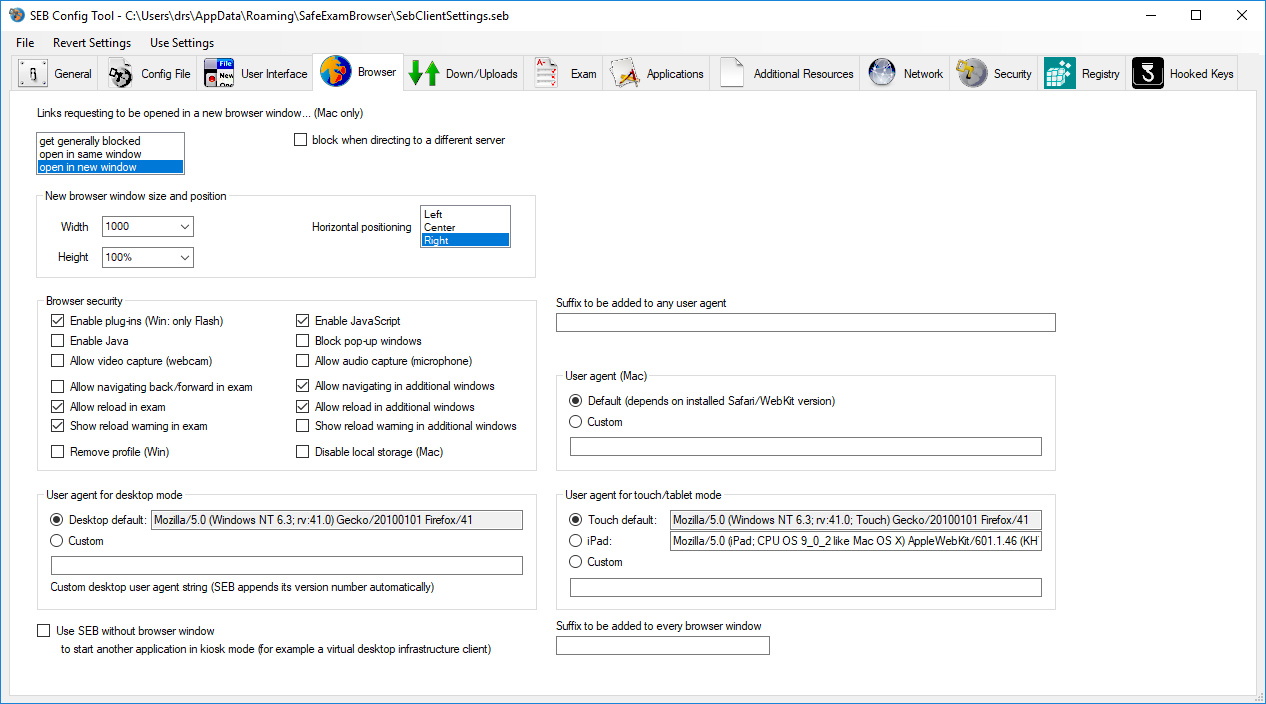
- Links requesting to be opened in a new browser window... (Mac only): This popup list offers three policies:
- get generally blocked
- open in same window
- open in new window
- Block when directing to a different server: Hyperlinks which direct to a different host than the one of the current page will be ignored.
- New browser window size: You can set the width and height of new browser windows as absolute pixel values or a percentage of the screen width or height. You can enter the dimensions (in pixels or percent values) in the text field or select one of the predefined values in the pop down menu.
- New browser window horizontal positioning: You can choose how the window will be positioned horizontally if it doesn't fill the full screen width: Left, Center, Right.
- Block when directing to a different server: Hyperlinks which direct to a different host than the one of the current page will be ignored. This can also filter unwanted cross-site content on a page, but redirections might also not work. Test this option carefully with your exam before using it!
- Enable plug-ins: Enables web plugins like Flash. For security reasons it's recommended to disable this option if you don't use any plugin content.
- Enable JavaScript: Please note that most modern websites need JavaScript for full functionality.
- Enable Java: Enables Java Applets. Starting SEB 2.0 this option is disabled by default because Java applets are considered a potential security risk. Note: Only applets with the highest Java security level will run in SEB for Windows.
- Block pop-up windows: Disables pop-up windows (often advertisement) opened by JavaScript without an user action such as a button click.
- Allow video capture (webcam): Allow web applications to access camera (using HMTL 5 APIs).
- Allow audio capture (microphone): Allow web applications to access microphone (using HMTL 5 APIs).
- Allow navigating back/forward in exam: Disabling browsing to previously visited pages (by Ctrl-Cursor left) increases security, because it might be possible to leave an exam by browsing back to an external start page.
- Allow navigating in additional windows: Disabling browsing to previously visited pages (by Ctrl-Cursor left) might not be desired for additional resources and other content opening in additional browser windows, therefore this separate setting.
- Allow reload in exam: You can disable reload completely (reload button in taskbar, browser tool bar, iOS side slider menu, keyboard shortcut F5/cmd+R) with this setting, as offline caching in some e-assessment systems might break when the user tries to reload a page without internet connection.
- Allow reload in additional windows: For additional resources and other content opening in additional browser windows reload can be enabled/disabled separately with this setting.
- Show reload warning in exam: SEB shows a warning asking the user to confirm reloading the main browser containing the exam.
- Show reload warning in additional windows: You can disable/enable the reload warning for additional resources and other content opening in additional browser windows separately.
- Remove profile (Win only): Deletes contents of the seb XULRunner embedded browser profile directory (cache, cookies, local browser storage etc.) when quitting SEB.
- Suffix to be added to any user agent: Enter a string here which will be appended to any user agent string (independent from the other user agent settings below).
- User agent for desktop mode: Allows to switch between the default and a custom browser user agent string for SEB Windows running in desktop mode. SEB appends its version number automatically to the selected user agent string.
- User agent for touch/tablet mode: Allows to switch between the default, an iPad-like and a custom browser user agent string for SEB Windows running in the touch optimized mode (on tablet computers). SEB appends its version number automatically to the selected user agent string.
- iPad: Use an iPad-like user agent string for the touch optimized/tablet mode, as many mobile optimized websites recognize this user agent, but not the Windows tablet touch user agent.
- User agent (Mac): Allows to switch between the default and a custom browser user agent string in SEB for macOS running in desktop mode. The default string depends on the installed Safari/WebKit version and therefore can differ on exam clients. SEB for macOS also appends its version number automatically to the selected user agent string.
- Use SEB without browser window: If you intend to use another application for an exam and don't need to display any web content on the exam client, you can switch off the SEB browser with this option. Don't try to disable XULRunner in the Application -> Permitted Processes tab, that isn't necessary when using this option.
- Suffix to be added to every browser window: Enter a string to append to every browser window title.
Settings in the Down/Uploads Pane
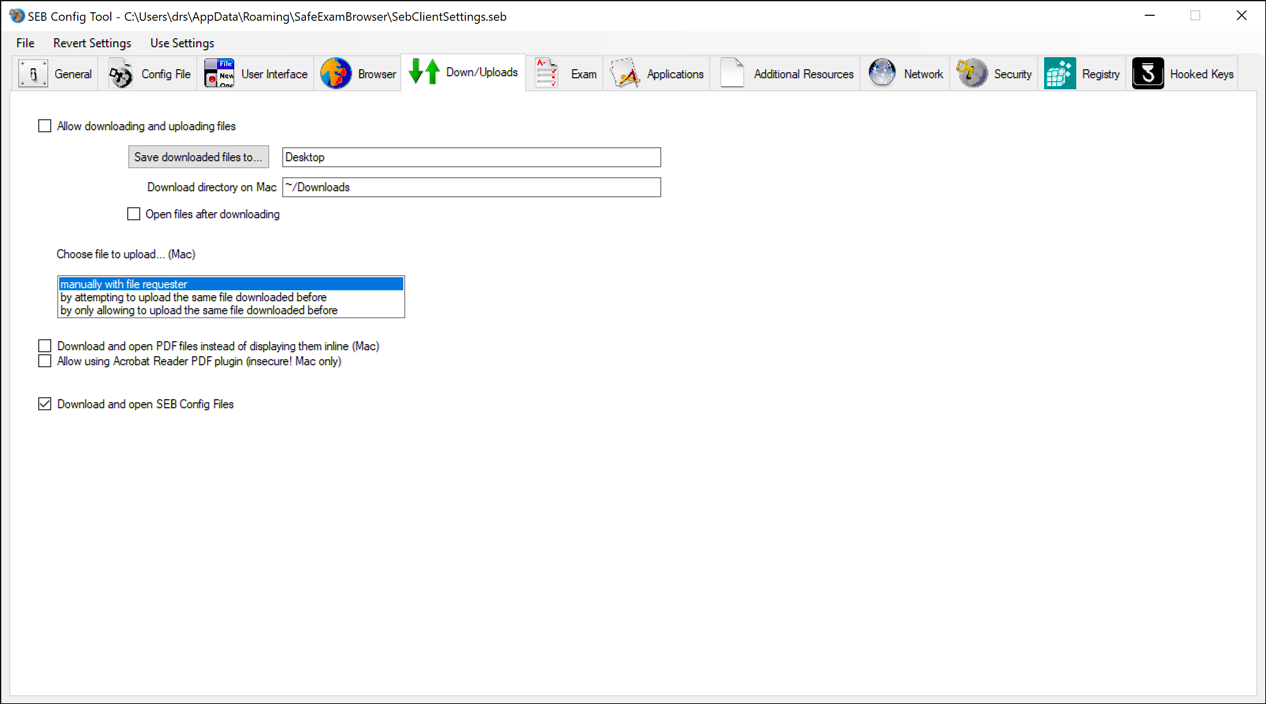
- Allow downloading and uploading files: Usually to be used with permitted third party applications for which you want to provide files to be downloaded. Starting SEB 2.3, this option also works on Windows. Uploading can only be blocked by SEB when the website is using standard form elements (this is a restriction of the used Firefox browser engine).
- Save downloaded files to: Choose the download directory with this button, which displays a file/directory chooser dialog. In the path displayed afterwards righthand of the button, SEB automatically replaces sections with a Windows environment variable, so paths are portable to other computers, for instance with another user account name (if you for example select your Documents folder, the path becomes %USERPROFILE%\Documents). An empty path means SEB uses the Download folder.
- Open files after downloading: Downloaded files will be opened with the according application, which has to be set correctly in the system for each used file type. In SEB for Windows starting version 2.3, when this setting is disabled, then the dialog "Open File With... Safe Exam Browser" isn't displayed (files are directly saved to the configured download directory).
- Choose file to upload… (Mac only): SEB can let the user choose the file to upload manually (as usual) or automatically choose the same file which was downloaded before. There are three possible policies to choose the file to upload:
- manually with file requester
- by attempting to upload same file downloaded before: If the file is not found, a file requester is presented and the user can choose some other file manually.
- by only allowing to upload the same file downloaded before:
If the file is not found, an error message is presented. This setting might bring additional security, because only files which have been downloaded before (in the same browser session, means since SEB was started) can be uploaded. If several files have been downloaded, pressing the choose file (or similarly named) button in the browser window will first choose the file most recently downloaded, pressing the button several times will cycle through all the files downloaded in this session.
- Download and open PDF files instead of displaying them inline (Mac only): PDF files will not be displayed by SEB but downloaded and opened (if Open files after downloading is active!) by the application set in Finder (usually Preview or Adobe Acrobat). This option is useful when you allow to switch to third party applications and want to use some PDF forms which have to be filled out by the examinees/users.
- Allow using Acrobat Reader PDF plugin (insecure): The Adobe Acrobat Reader browser plugin should only be used on secured managed Mac computers, as it allows to access the file system and cloud services.
- Download and open SEB config files: Controls if .seb config files are downloaded and opened (regardless if downloading and opening other file types is allowed) and if SEB can be started with opening seb(s):// config links and SEB config files.
Settings in the Exam Pane
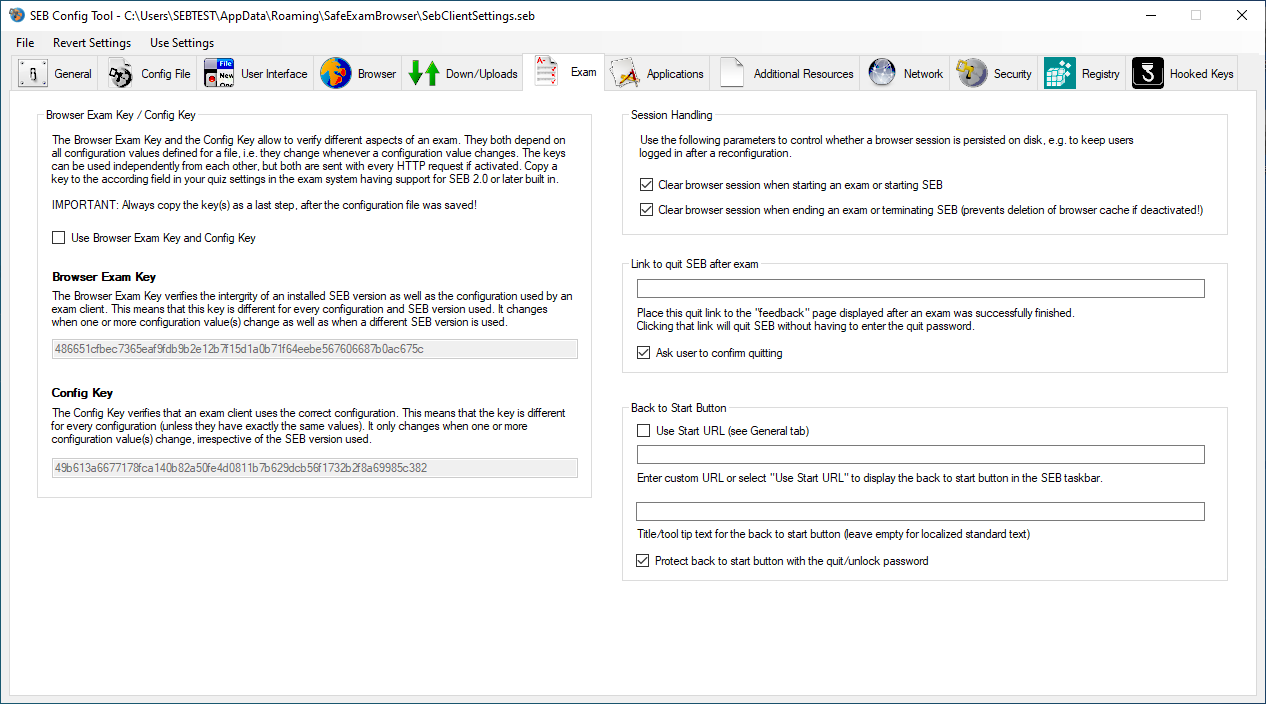
Browser Exam Key / Config Key
The Browser Exam Key and the Config Key allow to verfify different aspects of an exam. They both depend on all configuration values defined for a file, i.e. they change whenever a configuration value changes. The keys can be used independently from each other, but both are sent with every HTTP request if activated. Copy a key to the according field in your quiz settings in the exam system having support for SEB 2.0 or later built in.
IMPORTANT: Always copy the (key(s) as a last step, after the configuration file was saved!
- Use Browser Exam Key and Config Key: Enables using the Browser Exam Key or Config Key. The key is sent in an HTTP header to authenticate the SEB client and its settings to a compatible exam system.
- Browser Exam Key: Copy the Exam Key string (which depends on your SEB configuration and the SEB version/application signature) to the according field in your quiz settings in the exam system having support for SEB 2.0 or later built in. Plug-ins offering this functionality have been released for the learning management systems Moodle, ILIAS and OpenOlat. These have a built-in SEB support.
Important: First save your final exam settings in a .seb settings file and then copy the browser exam key to your exam system's quiz settings as the Browser Exam Key changes when you change any setting.
Please note that if you want to use the same .seb file with Windows and Mac clients, you should not alter the file anymore when you're copying the Browser Exam Key hashes to your exam settings in your quiz module. Re-saving it will change the Browser Exam Key of that file also in the SEB version on the other platform. The keys for the Mac and the Windows version will in any case be different, so you have to load the final .seb file into both versions and copy both keys to your quiz settings.
PLEASE NOTE: Every new SEB version generates a different Browser Exam Key (as code and configuration option changes are reflected in the key, this is the idea of the request header check using this key together with compatible exam systems). If you want to use an existing exam configuration with a new SEB version, you have to re-calculate the Browser Exam Key with the new version and copy the new key to the quiz settings in your SEB compatible examination system (Moodle, ILIAS and OpenOlat allow you to specify several keys in case you want to allow your examinees to use for example the current and previous SEB version). - Config Key: Copy the Config Key string (which depends on your SEB configuration only, the SEB version is not included!) to the according field in your quiz settings in the exam system having support for SEB 2.0 or later built in. Plug-ins offering this functionality have been released for the learning management systems Moodle, ILIAS and OpenOlat. These have a built-in SEB support.
Important: First save your final exam settings in a .seb settings file and then copy the browser exam key to your exam system's quiz settings as the Config Key changes when you change any setting.
Use the Config key instead of the Exam Key in sceanrios where mroe than one verdsion of SEB (e.g. Mac an Windows) are used, or your exam settings should be tolerant to a future update of SEB (to e certain extend).
Session Handling
Use the following parameter to control whether a browser session shall be persited on disk, e.g. to keep users logged in after a reconfiguration.
- Clear browser session when starting an exam or starting SEB
- Clear browser session when ending an exam or terminating SEB (prevents deletion of browser cache if deactivated)
Link to quit SEB after exam
It is possible to configure SEB to quit after the exam is submitted without having to enter a quit password by specifying a quit link (full URL starting with http:// or https://) and placing this on the summary page displayed by the LMS after submitting the exam.- Ask user to confirm quitting: If not selected, then SEB quits immediately after a Quit Link is detected, without users having to confirm.
Back to Start Button
- Back to Start button: Either check the "Use Start URL" option or enter a link to which the exam is redirected when the Back to Start button is pressed. The browser session is not restarted using this feature (session cookies are not cleared; a logged in user isn't logged out). The Back to Start button is displayed in the SEB taskbar when either the "Use Start URL" option is selected or a link is entered.
- Title/tool tip text for the Back to Start button: This text is displayed as the title of the confirmation alert and as tool tip on the icon. Leave empty for a standard text (which is localized to the SEB user interface languages).
- Protect Back to Start button with the quit/restart password: The quit/restart password (if set, see General pane) must be entered when the Back to Start button was tapped. Exam support/invigilators should be told this password to be able to return to the start of the exam if there is a problem.
Settings in the Applications Pane
You can allow third party applications to be used while SEB is running. Usually you would enable the SEB taskbar, then for each allowed application (with the setting "Icon in taskbar" enabled) an application icon will be displayed in the SEB taskbar. Clicking on the icon starts the application when it's not yet running or brings its window(s) to the foreground. If a running application has several windows open, SEB displays a window chooser. You can switch between open windows with keys Alt-Tab as well.
SEB allows only applications to run which are configured in "Permitted Processes" (as long as the "Monitor processes" setting below is active). But SEB cannot prevent these applications from:
• Accessing the file system (local or network drives). So if you use an application which can open and save files and displays a file dialog, students can access local and network drives on the exam computer.
• Accessing the internet. SEB only has a URL filter for the built-in browser, other applications and the system are not blocked from accessing the internet. So any third party software with a built-in help browser or similar can be used to cheat during an exam.
Therefore using such applications requires additional measures, as for example a drive which is cleaned before every exam on a managed computer and a firewall (either hardware or firewall filter rules in a virtual desktop, see below). If you intend to use SEB with third party applications on unmanaged computers (BYOD, student owned machines), you should run the exam including those third party applications in a secured virtual machine, usually this would be a virtual desktop. This technical paper describes the virtual desktop infrastructure (VDI) environment ETH Zurich (the top ranked university in continental Europe which is the driving force behind the development of SafeExamBrowser) is using for such exams. For other (less technical) papers on our exam environment, see our publications page. Our environment runs on managed computers and uses the VMware View Client software secured by SEB on the local machine and another instance of SEB running inside the virtual desktop, allowing to use the configured permitted third party applications in addition to an exam displayed by the SEB browser. In a bring-your-own-device scenario you would ideally use VDI with a technology like VMware Horizon View HTML Access. Then students just need to install/run SEB on their Windows or Mac laptops. SEB would be configured to only load and display the HTML Access portal page in a full screen browser window (ideally without displaying the SEB taskbar/dock). The entire exam takes place in the virtual desktop, which can be perfectly secured. You also don't have to worry about distributing, configuring and licensing those third party applications you want to use in exams to students, as you just have to install and configure these applications once on the master image for the VDI exam pool. If an exam computer breaks down during the exam, no data is lost, as everything is running inside the virtual desktop on your server infrastructure. Usually such exams would have a browser-based part, where you place the questions and maybe template files, which students then can open in the permitted third party applications. After they finish working on those documents, they can save the results and upload them into the exam, using a file upload question type. Students can only interact with the empty file system inside the virtual desktop, they also cannot access the local file systems or connected USB sticks on their BYOD exam computers.
Setting options:
- Monitor processes while SEB is running: If enabled, SEB prevents non-permitted processes to display any windows (including alerts, message boxes etc.) by hiding them immediately. If SEB cannot hide such a process (because it is running with the rights of another user, for example SYSTEM) SEB terminates it. For the "Disable Explorer Shell" kiosk mode (see Security pane), "Monitor processes..." should always be activated (which was implicitly the case in former SEB versions), but from SEB 2.1 you can (and should in most cases) use this feature also with the "Create new desktop" kiosk mode.
Besides the live process monitoring while running, when SEB is started, an alert/dialogue window is displayed to tell the user to quit the currently running applications (which are in the list of permitted and prohibited processes) and to restart SEB afterwards or to let SEB kill the applications risking that there could be data loss. Applications which have the Force quit parameter set are automatically terminated (without asking the user).
Permitted Processes Section
Third party applications and processes which are permitted to run during an exam. Permitted applications show up in the application chooser with their icon and their application name set with the parameter title, they can be used during an exam in addition to the SEB browser.
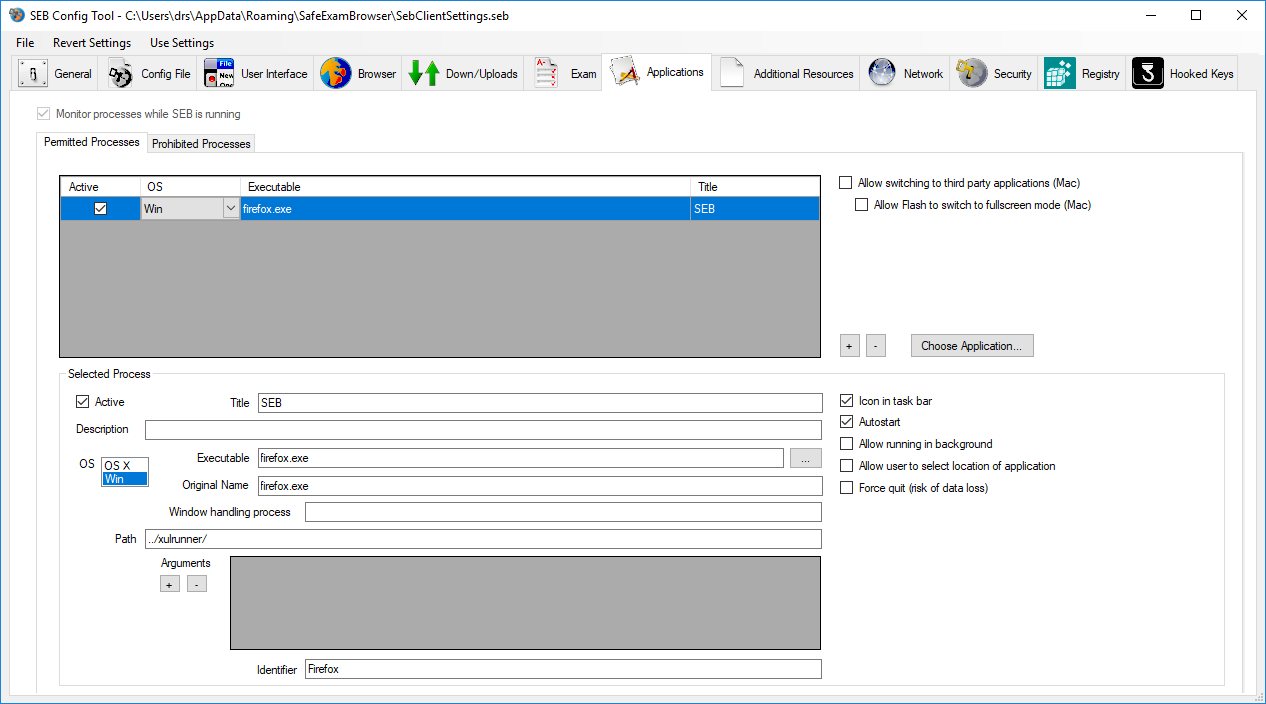
- Allow switching to third party applications (Mac only): If this option is activated, the kiosk mode induced by SEB will be reduced one level. The process switcher (Cmd-Tab) will work, so it's possible to switch to other running applications.
Use this option only when running SEB in a user account managed by parental controls, with only SEB and the desired applications allowed. Also you should switch on Simple Finder and don't give users access to other accounts with administrator rights on that computer (see SEB for macOS manual: Secure Environment).
- Allow Flash to switch to full screen mode (Mac only): Playing videos with Flash in full screen mode is a security problem. That's why it is strongly recommended to use HTML5 video (there full screen mode is no problem) instead of Flash whenever possible. Depending on the Flash video player and the Mac used, it can be difficult to switch back from full screen mode (best is to use the Esc key), so if you don't need full screen mode, don't enable it here.
When switching to third party applications is disabled, Flash fullscreen mode isn't possible at all. - Click +/- to add/remove permitted process
- Choose Application... In general you should use this button to choose a permitted application from your drive. SEB will automatically fill in title, executable and path of the application. You can change the title if you want (which is displayed in the SEB taskbar). Path will usually be empty, as for applications which have been installed and properly registered in Windows App Paths you don't need to (and should not, as it can be different on another client system) specify the path.
Selected Process details:
- Active: Indicates if this permitted process item is active (can be used while testing).
- Title: Application title which is displayed in the application chooser.
- Description: Optional, should explain what kind of process this is, because this might not be obvious only from the executable's name.
- OS: Indicates on which operating system the permitted process runs (currently only the option Win works).
- Executable: File name of the executable, which should not contain any parts of a file system path, only the filename of the exe file (like calc.exe).
- Original Name: Original file name of the executable. Some files don't have this metadata information. If it is available, SEB will prioritize this string over the Executable file name string.
- Window Handling Process: Process executable which is actually handling the main window, this is necessary to indicate for Java and some other applications (for example OpenOffice, Eclipse, Adobe Acrobat).
- Path: Optional filesystem path (formatted system specific) to the process executable's directory excluding the filename, see field executable. If the path is not given or relative, then SEB searches the system provided paths for applications. For applications which have been installed and properly registered in Windows App Paths you don't need to specify the path. If the executable for an application is placed in a subdirectory of the path registered in Windows App Paths, then you usually can indicate just the relative path. SEB also is able to expand environment variables in path of permitted processes. This allows to configure applications to run as permitted process, which need to be installed in subdirectories of the user directory, for example %AppData%.
- Arguments to append to the executable of the application when starting it. You can select if an argument is active or not (for testing). You can add and remove arguments using the +/- buttons.
- Icon in taskbar: Disabling this option is mainly useful for background processes (not requiring user interaction) which you want to autostart when SEB is run.
- Autostart: Start the process automatically together with SEB.
- Identifier: String of the process identifier in reverse domain notation (Mac) or the string or substring of the main window title of a process which doesn't have a MainWindow handle (Win), this is usually the case with Java applications (use for example "OpenOffice" for OpenOffice Calc).
- Allow running in background: Permitted processes with this option set are allowed to already be running when starting SEB. In this case SEB doesn't ask the user if the process can be terminated before continuing to start SEB. Processes with the option "Allow running in background" don't have an icon in the SEB taskbar. They can nevertheless have the option "Autostart" set, in this case SEB attempts to start the permitted process regardless if it was already running or not (and the option "Icon in taskbar" is considered in this case).
If you need some background process running together with SEB and this process might display some window or alert/message box, you have to add this process's executable to permitted processes with the option "Allow running in background" set, otherwise SEB will hide the window of the background process when "Monitor processes" is selected (or even terminate that process, in case it cannot be hidden). - Allow user to select location of application: The user is presented a file dialog window allowing to locate the third party application's executable if it cannot be found at the path specified and paths provided by the system (instead of just displaying an error message). Only applications matching the executable string specified are accepted.
- Force quit: Indicates whether an application/process may be terminated in a not-nice way, what may cause data loss if the application had unsaved data in memory or was just writing to a persistent memory/drive. If this application is safe to be terminated anytime, then enabling this setting helps to avoid bothering users: Because if this setting is disabled and the application is running when SEB is started, then an alert/dialogue window is displayed to ask the user to quit this permitted application together with other permitted and the prohibited applications and to restart SEB afterwards (or to let SEB terminate the applications risking that there could be data loss).
Disabling this setting does not mean that processes are not killed: Depending on the platform's capabilities, SEB first tries to terminate prohibited processes and applications nicely or asking the user to do it themselves, if this doesn't work then it terminates them anyways (as long as monitor processes is enabled). But enabling Force quit will speed up this process.
This flag should not be set for macOS applications which allow to be terminated nicely (they are anyways automatically terminated, without asking the user).
Java applications (like OpenOffice) can be used as permitted processes, but require specific settings: The title of their main window must be defined in the field Permitted Processes -> Identifier (for example "OpenOffice Calc"), the required main executable in Permitted Processes -> Executable ("scalc.exe") and the process which is actually handling the main window in Permitted Processes -> Window Handling Process(es) ("soffice.bin"). For this example the executable path should be entered as "program" in Permitted Processes -> Path, as that is the relative path to the main executable from the OpenOffice main directory, which is registered in Windows App Paths.
Prohibited Processes Section
List of processes which are prohibited to run during an exam. With the prohibited processes list, you can prevent some specific applications and background processes from running together with SEB. Don't use this on system processes or only with care (test if the system continues to run safely when the prohibited processes are killed by SEB). SEB will always ask the user first to quit the applications in the prohibited processes list manually when starting up or before starting an exam using an SEB link (if exam settings contain different prohibited processes than SEB client settings and SEB was started directly, not by opening a SEB link from another browser).
Since SEB 2.1.7, some default processes are blocked by SEB automatically, as they could be used for cheating and should not be running during exams. These default prohibited processes are added automatically to any SEB settings both when editing these settings in the SEB Config Tool and when starting the SEB client. They cannot be removed from the prohibited processes list (if you try, the SEB client will automatically add them again). But you can deactivate SEB checking for them by unchecking the "Active" checkbox for that prohibited process in your SEB settings. So if you change parameters like "Active" for such processes, SEB will use your preference.
For processes for which it doesn't matter if they are terminated by SEB (like applications implementing proper autosave or if they don't contain any user inputed data which might be lost if they are terminated), you can set the parameter "Force quit". Then SEB doesn't ask the user to quit the process, but just terminates it silently.
It might be an inconvenience having to quit running applications before starting an exam, but this is the only possible way for SEB to prevent that some specific applications could be used for cheating. The safest exam environment would be if students would quit ALL applications before the exam.
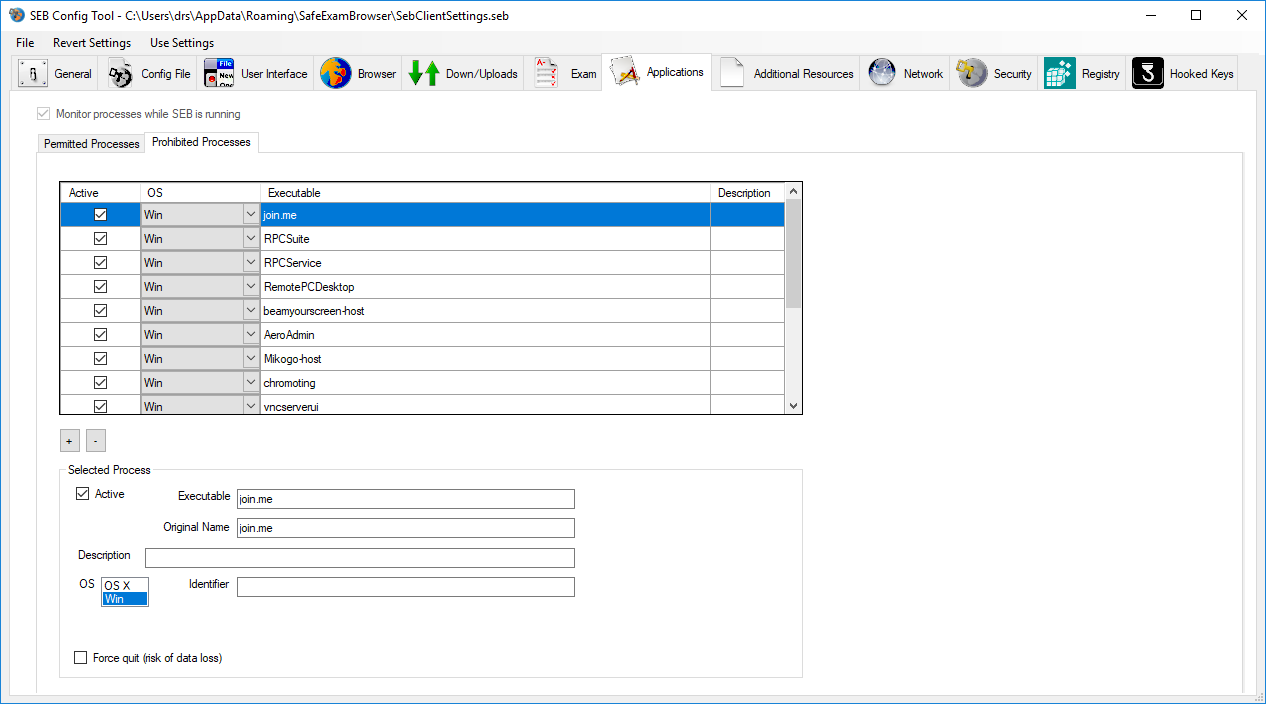
Selected Process details:
- Active: Indicates if this prohibited process item is active.
- Executable: Process name, usually the filename of the executable.
- Description: Optional, should explain what kind of process this is, because this might not be obvious only from the executable's name.
- Original Name: Original file name of the executable. Some files don't have this metadata information. If it is available, SEB will prioritize this string over the Executable file name string.
- OS: Indicates on which operating system SEB should watch for the prohibited process (currently only Win works).
- Identifier: String of the process identifier in reverse domain notation (Mac) or the string or substring of the main window title of a process which doesn't have a MainWindow handle (Win), this is usually the case with Java applications (use for example "OpenOffice" for OpenOffice Calc).
- Force quit: Indicates whether an application/process may be terminated in a not-nice way, what may cause data loss if the application had unsaved data in memory or was just writing to a persistent memory/drive. If this application is safe to be terminated anytime, then enabling this setting helps to avoid bothering users: Because if this setting is disabled and the application is running when SEB is started, then an alert/dialogue window is displayed to ask the user to quit this prohibited application together with permitted applications and to restart SEB afterwards (or to let SEB terminate the applications risking that there could be data loss).
Disabling this setting does not mean that processes are not killed: Depending on the platform's capabilities, SEB first tries to terminate prohibited processes nicely or asking the user to do it themselves, if this doesn't work then it terminates them anyways (as long as monitor processes is enabled). But enabling Force quit will speed up this process.
This flag should not be set for macOS applications which allow to be terminated nicely (they are anyways automatically terminated, without asking the user).
Settings in the Additional Resources Pane
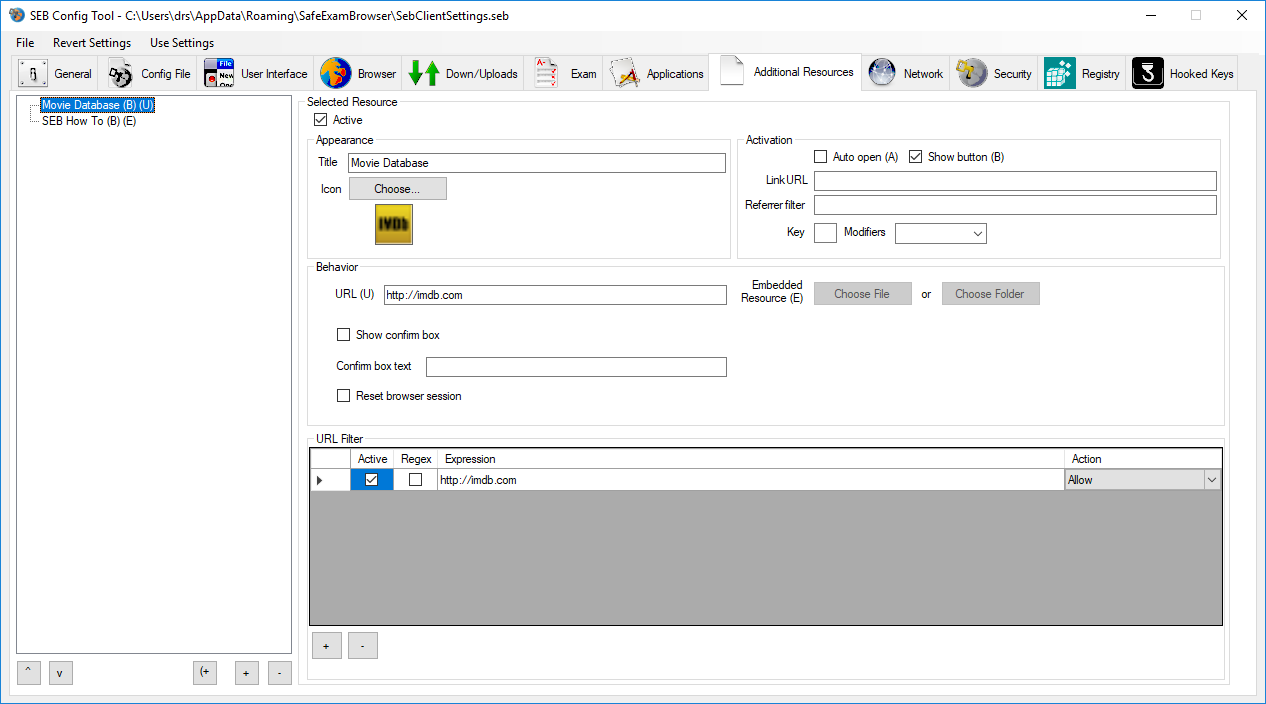
Using the powerful new feature Additional Resources, you can configure SEB to access specific webpages, full or partial websites and documents securely and easily in exams. These resources can be located
- on an external server and linked using an URL. External Additional Resources use the improved URL filter to only allow displaying specific webpages, documents or sections of websites
- embedded into the SEB configuration file. Using this method, resources like for example like PDF files or HTML documents can be deployed ahead of the exam to SEB exam clients. Even full HTML5 web apps can be added as embedded Additional Resources, which allows to use web content in a fully offline exam scenario.
Additional resources can be opened:
- Automatically, when SEB/the exam is started
- Manually, using icons in the SEB taskbar (similar to permitted applications) or with hierarchical popup menus
- Triggered by a Link URL, similar to the Quit URL which triggers quitting SEB
See below the desciption of all Additional Resources settings grouped by sections:
Hierarchical list of resource items- "+": Add a resource item
- "-": Remove the selected resource item
- "(+": Add a sub or child resource. By creating an "empty" resource just with a title and a custom icon if desired, you can add sub/child resources to this root/parent resource. Resources on the root level are displayed as icons in the SEB taskbar, the next level is displayed as a popup menu on the root level icon. You can add another (third) level, which is displayed as a sub-menu in this popup menu.
- "^": Move a resource item up in the list
- "v": Move a resource item down in the list
- Active: Indicates if this resource item is active. By deactivating a resource, it won't be displayed, also its child resources (if some exist) won't be visible. URL filter rules (see below) defined for the deactivated resource also won't be active.
- Title: Will be displayed either as a tool tip when hovering over the additional resource icon in the SEB taskbar or as a menu entry in the additional resource popup menu if the resource is placed on the second or third hierarchy level.
- Icon: You can select a image file used as an icon for the resource. If you define an external resource using its URL (see section Behavior), then the SEB Config Tool tries to load the Favicon of the website at that URL and uses it as the icon for the resource.
- Auto open: SEB opens the resource after starting automatically.
- Show button: Shows the icon for the resource or its pop-up menu entry. If you're using a activation link URL to open the resource, you might not want users to be able to manually open the resource.
- Link URL: SEB opens the resource when it detects the URL entered here. You can place a link with this URL inside your exam, which the examinees can click to open that resource. Or you use the URL of a specific page of the exam (or a page displayed after the exam was finished) to automatically trigger opening the resource.
- Referrer filter: The activation link URL works only on a web page with this referrer filter URL. You can also use the '*' wildcard character in this referrer filter.
- Key: This key shortcut can be used to open the resource.
- Modifier: This modifier key has to be pressed together with the key.
- URL: Enter the URL of an external resource here. SEB will create a matching URL filter rule (see below) and activate URL filtering in the Network / Filter Pane. Usually you may need to alter that URL filter rule or add additional rules so that all the web pages and resources belonging to the external web resource are allowed by the URL filter.
- Show confirm box: Before opening the resource, the user has to confirm this in a message box.
- Confirm box text: Custom text for the confirm message box.
- Reset browser session: When opening the resource, the browser session is reset, which for example logs our users.
- Embedded Resource – Choose File: Select a single file to embed into the SEB Config File. After choosing a file, the filename and the setting Lauch with is displayed. In the popup list you can select SEB (the internal SEB browser will be used to display the resource, this has to have a document type which can be displayed by the browser) or one of the permitted third party applications if there are some defined in the Permitted Processes Pane.
- Embedded Resource – Choose Folder: Select a folder to be embedded into the SEB Config File. After choosing a folder, a setting called Filename/File to launch and the setting Lauch with is displayed. In the File to launch popup list, all files in the embedded folder (and its subfolders) are listed, you have to select one (for example an index.html file) which then is loaded by SEB or the permitted third party application selected in the Lauch with popup list.
You could deploy complex HTML based documents consisting of many files or a self-contained HTML5/JavaScript exam player onto mobile devices and then perform an offline e-assessment.
Settings in the Network Pane
Filter Section

- Activate URL filtering: Filter URLs when loading web pages using the filter set defined below and in additional resources.
- Filter also embedded content: If selected, also all embedded resources will be filtered using the filter set. Note that there can be hundreds of resources such as images and other media per page, so filtering all content may slow down page loading.
The table contains URL filter rules, consisting of an allow or block action. The URL filter always first processes rules with the block action, if one matches, then the according http request is discarded. If no block rule matched, then rules with an allow action are processed. If one matches, then the request is loaded. If no allow rule matched, then the request is discarded.
Discarding a http request means that a link with the URL is not followed and the user is notified with an alert. When content filtering is enabled, an embedded resource with the according URL is not loaded, in this case there's no notification about that, but it is written to the log. Create a new rule by clicking the'+' button below the table. Remove a rule by selecting it in the table and clicking the '-' button.
SEB automatically creates an allow filter rule for the exact address of the Start URL defined in these settings. This means that if your Start URL is example.com, then all pages and resources in the domain example.com will be allowed. If your Start URL is example.com/exams/engineering2015-1.html, then only the pages with this exact address will be allowed. In this case you have to manually add an allow filter rule so all pages and resources your exam uses will be allowed (like example.com/exams/*).
If you defined URL filter rules in SEB 2.1.x for Windows, then you'll have to re-enter those in the current SEB Config Tool (SEB for Windows >= 2.2), following the new filter rule scheme. URL filter rules created and saved with SEB for macOS are already compatible with SEB >= 2.2 for Windows.
Rules
- Active: Indicates if the rule is active.
- Regex:
Indicates if the rule is a regular expression.
If Regex is not checked, then the rule can be formatted using the wildcard '*', which stands for an arbitrary string of any length. - Action to process if the corresponding expression matches. Possible actions:
- block
If the URL matches the expression, then it is rejected and processing of the remaining rules is stopped. - allow
If the URL matches the expression, then it is accepted and processing of the remaining rules is stopped.
If the URL filter reaches the last rule (means there was no matching block or allow expression found), then the URL is discarded. If you want the URL to be accepted if no matching block (or allow) expression was found, then add an 'allow *' expression. - block
- Expression:
A Text field which contains the filtering expression or pattern, either in a regular expression (Regex) format or a simpler filter expression containing the wildcard char '*'. A filter expression can filter against all elements of a URL/URI according to RFC 3986:
scheme://user:password@host:port/path?query#fragment
Format for a filter expression in the non-regex format:
- Scheme is optional, and must be followed by '://'.
- The host field is required (besides when filtering against a protocol like about:blank or data:), and is either a partial or full hostname or an IP address. It can also contain or be replaced completely with the wildcard '*' char, see below for details. The URL filter doesn't resolve hostnames itself, so if you allow everything and only block 'hostname.com', then that host could still be reached using its IP address. You should therefore mainly use whitelisting to allow accessing only specific sites during an exam.
- An optional '.' (dot) can prefix the host field to disable subdomain matching, see below for details.
- An optional port can come after the host and always has to start with the character ':'. It must be a valid port value from 1 to 65535.
- An optional path can come after the host or after the port and always has to start with the character '/'. Parts of the path can be replaced with the wildcard char '*'. If a path ends with a '/', that trailing '/' is removed (as the filter doesn't distinguish paths with or without trailing '/').
- URL parameters like a query string can be indicated and always have to start with the character '?'. Parts of the query can be replaced with the wildcard char '*'.
- Filtering against a fragment usually doesn't make sense, as the content can be reached by scrolling the loaded page. Allowing specific fragments could force people to use a link to a particular anchor on a page (other links would not work).
Examples for filter expressions: - 'example.com' matches 'example.com', 'www.example.com' and 'www.mail.example.com' (internally processed as a host name search for 'example.com' and a search for '*.example.com')
- '.www.example.com' matches exactly '*://www.example.com' (no other subdomains)
- 'mail.*' matches all hosts having a subdomain or domain 'mail', like 'mail.ethz.ch', 'www.mail.gov.to', 'mail.com'
- '*:8088' matches all requests to port 8088
- 'example.com/stuff/*' matches all requests to any subdomain of 'example.com' that have 'stuff' as the first segment of the path
- 'example.com/images/*.png' matches all requests to any subdomain of 'example.com' that have '/images/' as the first segment of the path and '.png' as the path extension of an file URL (means it matches all PNG images in the '/images/' directory or its subdirectories)
- '*.net' matches all host with any kind of subdomains in the .net top level domain like 'example.net', 'www.example.net', 'www.mail.example.net'
- '*/*.net' matches all files with a '.net' file extension on any host
You should consider using a regular expression if performing complex filtering (when a simple filter doesn't cover all possible cases how that complex URL could be formatted) or split the expression into several filter rules. The order of filter rules is not relevant.
- Scheme is optional, and must be followed by '://'.
Certificates Section
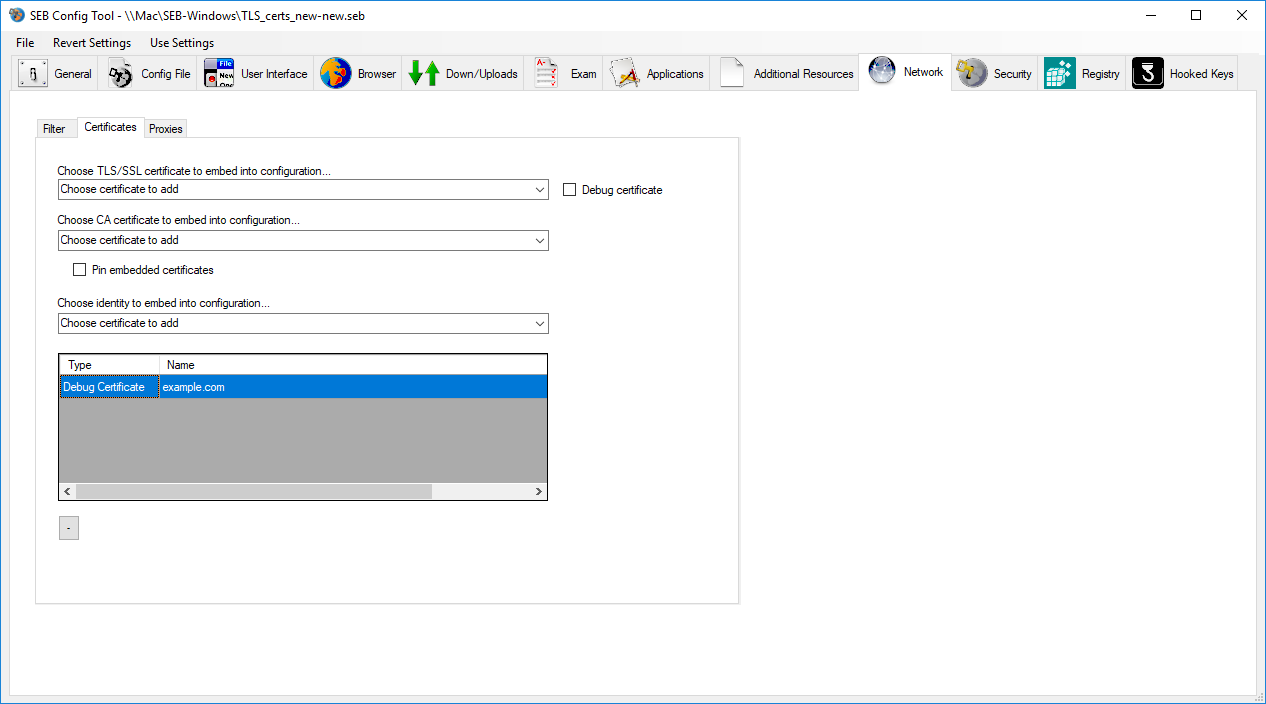
- Choose TLS/SSL certificate to embed into configuration... Here you can choose SSL server certificates which are stored in the Windows Certificate Store (if you have a certificate file, usually in the .cer format, you first need to import it to the Windows Certificate Store, depending on the format you can just double click such a certificate file to invoke the Windows certificate import assistant). The certificates added to this table will be embedded into a .seb settings file when it is saved and used on the SEB clients which are started up with that .seb exam configuration. Users then won't be presented a warning then when connecting to https servers with those self-signed certificates and you don't need to distribute SSL certificates manually to the exam client computers.
- Debug certificate: Debug certificates allow changing the DNS name (you can overwrite the certificate name in the certificate list), so a server with a wrong domain name is accepted if its domain is entered in the certificate name field. Expired certificates are also accepted. If not using this option, the URLs of the accessed secure server have to match the 'Subject Common Name' or 'Subject Alternative Name' properties of the certificate.
- Choose identity to embed into configuration... You can also choose cryptographic identities stored in the Windows Certificate Store (stored in Current User/Personal and Current User/Trusted People) which are suitable for decrypting .seb files on SEB exam clients (X.509 certificates with RSA public key and associated private key). If you have a .p12 or .pfx certificate archive file, you first need to import it into the Windows Certificate Store (usually you can just double click such a certificate file to invoke the Windows certificate import assistant). When importing the .p12/.pfx identity file, the included private key must be marked as "exportable". The identities added to this table will be embedded into the .seb settings file. Use this feature for creating a .seb file for configuring a client and add the identity or identities you like to use for encrypting/decrypting .seb files for starting exams later. When opening this .seb file on your exam clients, the embedded identities will be imported into the Windows Certificate Store (or Keychain on Macs), so that they can be used for decrypting exam settings later. Please note that during this process the private keys imported into the Windows Certificate Store of the exam clients will be flagged as non-exportable for increased security. If you don't use a client config file with embedded identities to distribute the identity to the exam client devices, but a deployment system, you can deploy the identity certificates into Local Machine/Trusted People. Then they are available for all users on that machine (as Windows makes them available for all users in their Current User/Trusted People stores).
- Pin embedded certificates: Bypasses the browser's built-in certificate store, you have to embed TLS or CA certificates into SEB settings which establish trust for the secure servers you want SEB to connect to.
In SEB problems with SSL certificates can occur:
- Even if your secured site is using certificates which are generally trusted by
browsers like Firefox, there might be a problem with the SEB XULRunner browser. The
problem occurs when your server certificate is signed by an intermediate
certificate of any trusted certification authority. In that case the whole
issuer chain must be provided to the browser for validation. You might have
to ask your server administrator to change their settings to solve the
problem.
For further information please consult the documentation of your web server: Apache 2.2, IIS. There is a discussion about this problem in our forum too.
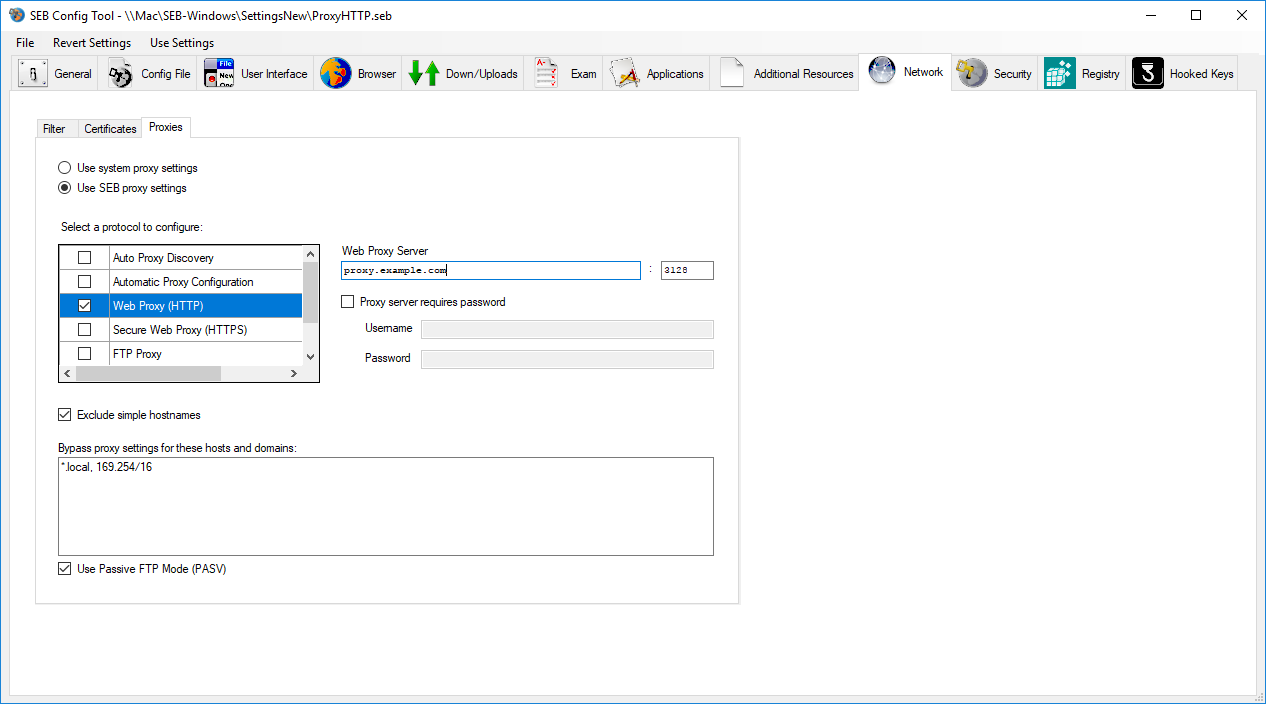
Proxies Section
In this pane you can configure proxy settings for the exam client computers which override the system's proxy settings on the clients. You can currently specify a proxy server address and port manually for HTTP, HTTPS, FTP and SOCKS proxies (without authentication), use auto proxy discovery and automatic proxy configuration. You can also add host/domain addresses to the bypass/exception list.
Settings in the Security Pane
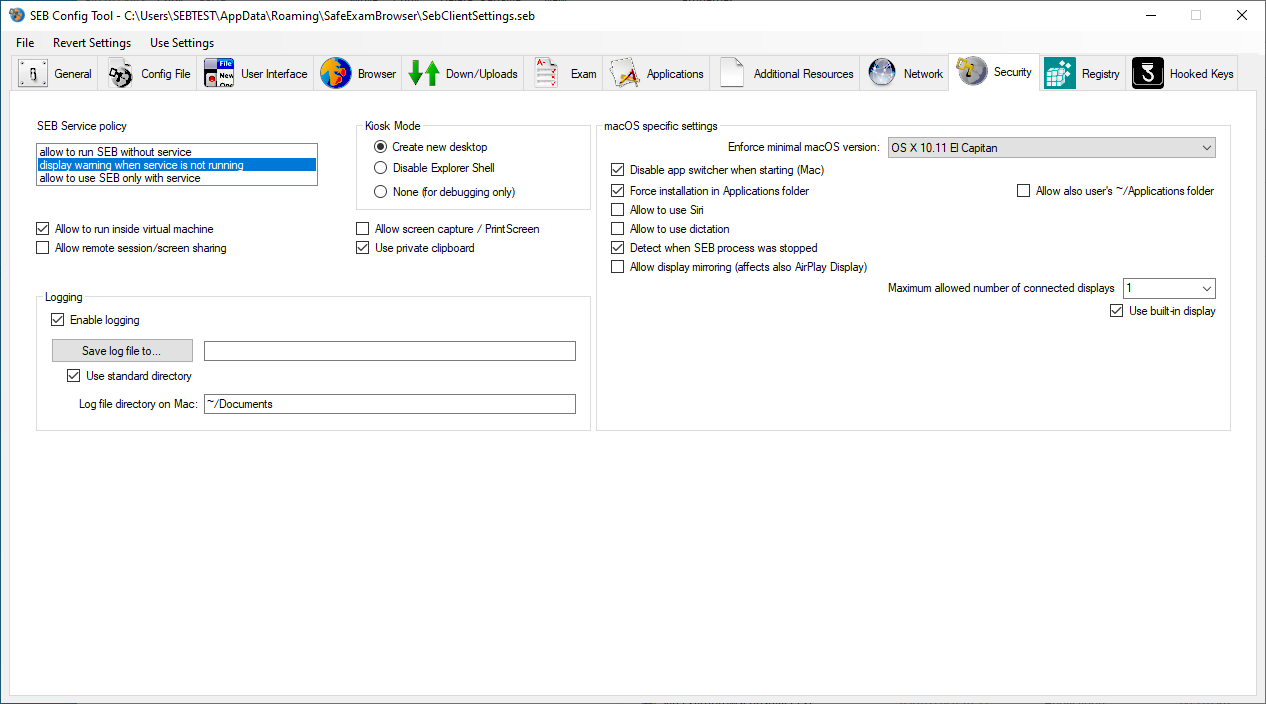
- SEB Service policy: The SEB Service is a background process running with elevated privileges (as administrator), which is necessary to block and unblock some system features (the options in the Windows Security Screen invoked by Ctrl-Alt-Del) and pausing Windows Update. SEB Windows Service is installed automatically together with the SEB application and started afterwards, but it might happen in rare cases that the service gets stopped. After a reboot of the computer it should get started again, also you could use Windows Task Manager to restart the service manually (in the Services tab).
You can define the policy that applies when an exam client doesn't have the SEB Service running: - allow to use SEB without service: SEB is allowed to run without the SEB Service running, it will only be noted in the log that the service was not securing the computer during the exam.
- warn when service is not running: A warning is displayed when the service is not running, but the exam can be started.
- allow to use SEB only with service: SEB is only allowed to run when the SEB Service is running.
- Allow SEB to run inside virtual machine: Indicates if SEB is allowed to run in a virtual machine (e.g. for exams in virtual desktop environments) or not (in order to prevent potential manipulation).
- Allow screen capture / PrintScreen: Controls PrintScreen and macOS screen capture (invoked with cmd-3 and cmd-4), this setting corresponds with Enable PrintScreen in the Hooked Keys pane. If users have the DropBox client installed and activated to upload screen shots directly to their DropBox, then this will also be stopped when PrintScreen is disabled.
- Allow remote session/screen sharing: Allows Windows remote sessions and macOS screen sharing to be used.
- Use private clipboard: When enabled, cut/copy/paste works only with content inside the SEB browser, the private clipboard doesn't accept content from other applications or tools. This prevents utilities running in the background and cloud clipboard features to be used to copy-paste contents into or out of exams. Private clipboard should always be used besides when working with third party applications in a managed user account.
-
Enable logging: The log can help in debugging SEB (if you send it to the developers) and to find out about possible manipulations. There are three log files:
SafeExamBrowser main application, located at
                    %APPDATA%\SafeExamBrowser\SebClient.log
usually:
C:\Users\<username>\AppData\Roaming\SafeExamBrowser\SebClient.log
SafeExamBrowser browser, located at
                    %APPDATA%\SafeExamBrowser\seb.log
usually:
C:\Users\<username>\AppData\Roaming\SafeExamBrowser\seb.log
SEB Windows Service, located at
                    %INSTALLDIR%\SafeExamBrowser\SebWindowsServiceWCF\sebwindowsservice.log
usually:
C:\Program Files (x86)\SafeExamBrowser\SebWindowsServiceWCF\sebwindowsservice.log - Kiosk mode: This setting reflects how the computer is locked down into SEB.
- Create new desktop: SEB and all permitted applications are started on a new desktop. Switching to the standard desktop is not possible, so other applications are invisible and cannot be reached during the exam. This kiosk mode may prevent specific third party software to run correctly together with SEB, like some screen recording software or the Windows on-screen keyboard (this is why this kiosk mode cannot be used with touch optimized mode).
- Disable Explorer Shell: The Windows Explorer is closed when the exam starts and restarted afterwards. All other applications running on the computer are hidden, prohibited applications are closed. Windows of all not permitted applications/processes are hidden (or if that's not possible those applications are killed) when they open or try to come to the foreground. This kiosk mode is compatible with some screen recording/proctoring software (like ObserveIt) and the Windows on-screen keyboard.
- None: SEB runs without kiosk mode, switching to other applications is possible. Use this for debugging purposes only.
Note: The kiosk mode is a SEB environment setting. This means it is not possible to change the kiosk mode when starting an exam or reconfiguring SEB. An alert window will inform users that the local client settings of SEB need to be reconfigured with the correct kiosk mode settings if they try to start an exam with another kiosk mode than the one set in the current local SEB client settings. SEB will have to be quit and manually restarted when the kiosk mode is reconfigured in local client settings.
Settings in the Registry Pane
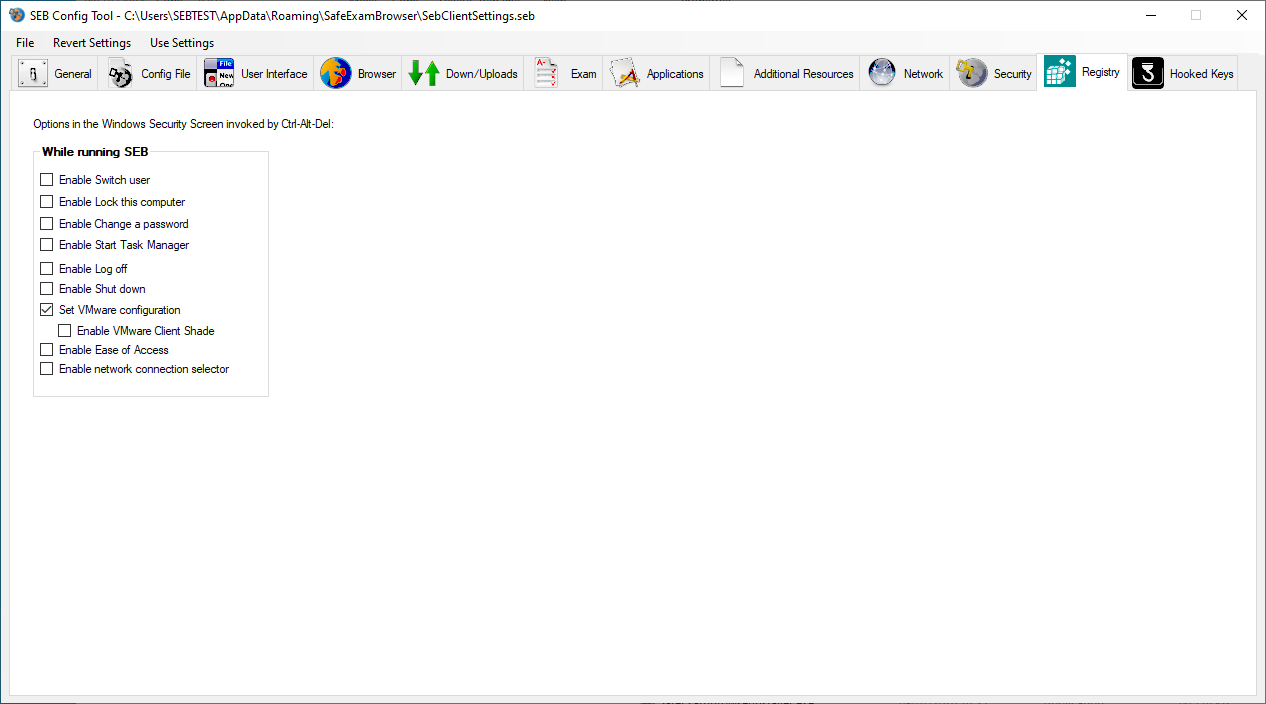
Options in the Windows Security Screen invoked by Ctrl-Alt-Del:
- Enable Switch User:
Activates the button "Switch User" or "Benutzer wechseln", respectively.
- Enable Lock this computer:
Activates the button "Lock this computer" or "Computer sperren", respectively.
- Enable Change a password:
Activates the button "Change a password..." or "Kennwort ändern...", respectively.
- Enable Start Task Manager: Activates the button "Start Task Manager" or "Task-Manager starten", respectively.
Note: Normally it makes no sense to permit the Task Manager inside SEB (thus during an online exam). Furthermore SEB is usually started in a new desktop (see option CreateNewDesktop in the Security Pane), which would cover an eventual Task Manager window and make it invisible. In case you want to permit the Task Manager in SEB anyhow, CreateNewDesktop and Monitor processes must be disabled. An alternative possibility is to add the Task Manager as a third-party application TaskManager,taskmgr.exe; to the PermittedApplications (see below).
- Enable Log off:
Activates the button "Log off" or "Abmelden", respectively.
- Enable Shut down:
Activates the button "Shutdown" or "Herunterfahren" in the lower right corner.
- Set VMware configuration: Determines whether the configuration value for VMware Client Shade will be set by SEB
- Enable VMware Client Shade: Activates the "Shade" bar at the upper edge of a virtual desktop, if existent. If you're not using VMware, this setting doesn't have any effect.
- Enable Ease of Access:
Activates the button "Ease of Access" or "Erleichterter Zugriff" in the lower left corner, which offers help e.g. to visually or aurally handicapped persons, like the Magnifier Glass.
- Enable network connection selector:
Activates the button which allows to connect to WiFi networks, introduced in Windows 10.
These Windows Registry options define the values while SEB is running. SEB remembers the settings which were active on the exam client computer before running SEB and resets them to the original values when exiting regularly. In case SEB would crash or the user would enforce a reset of the machine while SEB was running, these options are reset to the original values:
- when SEB is restarted once again and properly quit;
- or when uninstalling SEB.
There is also a command line tool which can be used to reset those values for the unlikely case that the SEB Windows Service didn't work properly or was damaged and can't be run anymore. This tool can be found at the following directory path in your Program Files directory:
SafeExamBrowser\SebWindowsServiceWCF\SebRegistryResetter.exe
You need to execute this tool as administrator (right mouse button context menu "Run as administrator"). In case the original values for the Registry Settings aren't found anymore, they will be reset to the Windows default values (all enabled). In this latter unlikely case you would also need to enter the short user name of the user in which account SEB was run, when the problem occurred. If you were running SEB in your administrator account, the short user name you have to enter usually isn't "Admin" or similar. It is the user name of the account which has the administrator role. The short user name is the same as the name of the user's home directory (if you go to C:\Users\ in a Windows Explorer window, you can see all user account names on this computer). If you have spaces in your short user name, enter it as it is, without quotes.
Settings in the Hooked Keys Pane
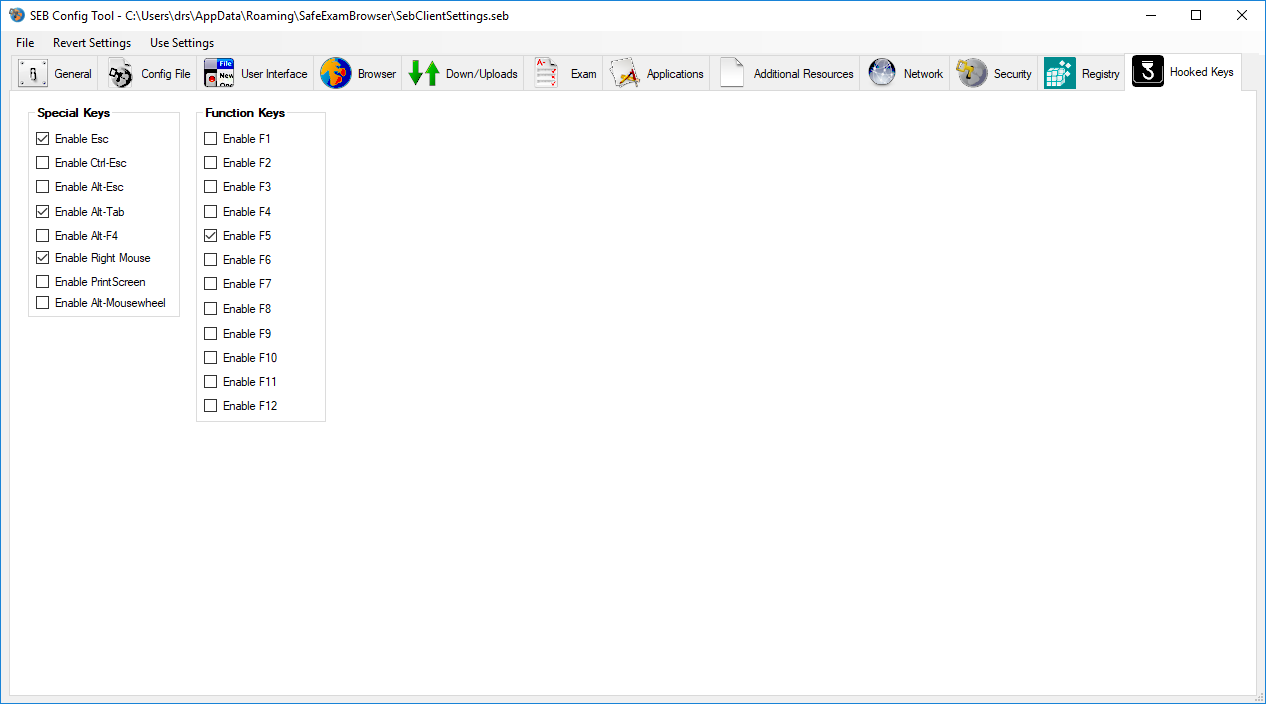
- Special Keys: Settings to enable or block (hook) keys, key combinations and mouse buttons.
- Enable Right Mouse: The right mouse button has to be enabled for users to be able to use the context menu for spell checking.
- Enable PrintScreen: Controls PrintScreen and macOS screen capture (invoked with cmd-3 and cmd-4), this setting corresponds with Enable screen capture / PrintScreen in the Security pane. If users have the DropBox client installed and activated to upload screen shots directly to their DropBox, then this will also be stopped when PrintScreen is disabled.
- Enable Alt-Mousewheel: Disabling browsing to previously visited pages (by Alt-Mousewheel or Ctrl-Cursor left on Mac) increases security, because it might be possible to leave an exam by browsing back to an external start page. This setting corresponds with the setting "Allow browsing back/forward" in Browser pane.
- Function Keys: Enable or block function keys. This doesn't have any effect on the SEB exit sequence. Depending on specific keyboards some function keys cannot be blocked.
Operating System
SEB for Windows 2.4.1 is running on 32-bit and 64-bit PCs with the following operating systems:
- Windows 7
- Windows 8/8.1
- Window 10
License
Safe Exam Browser for Windows: © 2010-2023 Damian Büchel, Daniel R. Schneider, Dirk Bauer, ETH Zurich, Educational Development and Technology (LET), Pascal Wyss, Viktor Tomas, Stefan Schneider, Oliver Rahs, based on the original idea of Safe Exam Browser by Stefan Schneider, University of Giessen
Project concept: Dr. Thomas Piendl, Daniel R. Schneider, Dr. Dirk Bauer, Kai Reuter, Tobias Halbherr, Karsten Burger, Marco Lehre, Brigitte Schmucki, Oliver Rahs. French localization: Nicolas Dunand
Safe Exam Browser is released as freeware. The source code is subject to the Mozilla Public License Version 1.1 (the "License"); you may only use these files in compliance with the License. You may obtain a copy of the License at http://www.mozilla.org/MPL/ .
Important parts of this project have been carried out as part of the program "AAA/SWITCH –
e-Infrastructure for e-Science" led by SWITCH, the Swiss National Research and Education Network and the cooperative project "Learning Infrastructure" (part of the CRUS program "Information scientifique: accès, traitement et sauvegarde") coordinated by SWITCH, and was supported by funds from the ETH Board and the State Secretariat for Education, Research and Innovation (SERI).