Using Git within RStudio
You only have to do this once per machine.
Make sure RStudio can find Git
If everything installed correctly…
- File > New Project. Do you see an option to create from Version Control? If yes, good.
- Select New Directory > Empty Project. Do you see a checkbox “Create a git repository”? If yes, good. Check it.
- Give this test project a name and click “Create Project”. Do you see a “Git” tab in the upper right pane, the same one that has “Environment” and “History”? If yes, good.
- If this worked, you can delete the project. You’ve set everything up correctly.
If this didn’t work…
RStudio can only act as a GUI front-end for Git if Git has been successfully installed AND RStudio can find it.
A basic test for successful installation of git is to simply enter git in the shell. If you get a complaint about git not being found, it means installation was unsuccessful or that it is not being found, i.e. it is not on your PATH.
If you are not sure where the git executable lives, try this in a shell:
which git(Mac, Linux)where git(most versions of Windows)
If Git appears to be installed and findable, launch RStudio and try again. If it still doesn’t work, quit and re-launch RStudio if there’s any doubt in your mind about whether you opened RStudio before or after installing Git.
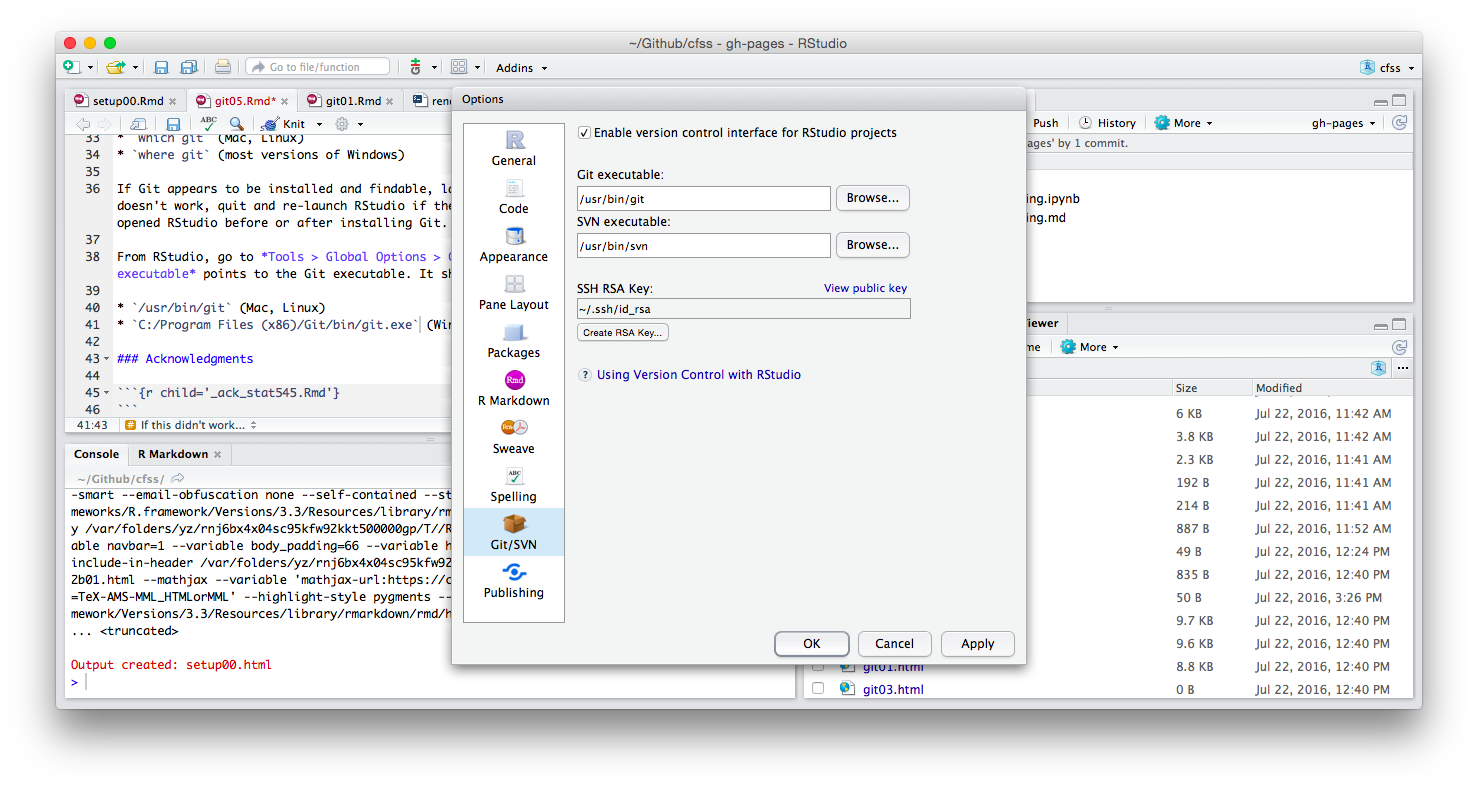
From RStudio, go to Tools > Global Options > Git/SVN and make sure that the box Git executable points to the Git executable. It should read something like:
/usr/bin/git(Mac, Linux)C:/Program Files (x86)/Git/bin/git.exe(Windows)
On my computer, it looks like this:
If you make any changes, restart RStudio and try the steps at the top of the page again.
Still not working? Try googling your problem or speak with myself or the TA.
Test Drive RStudio and GitHub
Prerequisites
Step 1: Make a new repo on GitHub
- Go to GitHub.com and login.
- Click the green “New Repository” button
- Repository name:
myrepo - Public
- Check Initialize this repository with a README
- Click the green “Create repository” button
- Repository name:
- Copy the HTTPS clone URL to your clipboard via the green “Clone or Download” button.
Step 2: Clone the new GitHub repository to your computer via RStudio
In RStudio, start a new Project:
- File > New Project > Version Control > Git. In the “repository URL” paste the URL of your new GitHub repository. It will be something like
https://github.com/bensoltoff/myrepo.git.- Do you NOT see an option to get the Project from Version Control? Make sure RStudio can find Git.
- Decide where to store the local directory for the Project. Don’t scatter everything around your computer - have a central location, or some meaningful structure. For repositories you create in this course, you can setup a
/cfssdirectory and clone all your repos there. - I suggest you check “Open in new session”, as that’s what you’ll usually do in real life.
- Click “Create Project” to create a new sub-directory, which will be all of these things:
- a directory on your computer
- a Git repository, linked to a remote GitHub repository *an RStudio Project
- Whenever possible, this will be the preferred route for setting up your R projects.
This should download the README.md file that we created on GitHub in the previous step. Look in RStudio’s file browser pane for the README.md file.
Why setup your R projects this way? There’s a big advantage to the “Github first, then RStudio”" workflow: the remote GitHub repo is now the “upstream” remote for your local repo. In essence, you are already setup to push and pull commits to GitHub. There is no need to set anything else up through the shell or a Git client.
Step 2 plan B: Connect a local RStudio project to a GitHub repo
Sometimes you cannot always setup the GitHub repo first, or you already have an RStudio project you need to connect to a GitHub repo. This workflow is the reverse of the above and cannot be executed from within RStudio.
- Create a new RStudio project: File > New Project > New Directory > Empty Project.
- Directory name:
myrepo(or whatever you named the GitHub repo) - Decide where to store the local directory for the Project.
- YES check “Create a git repository”.
- Do you NOT see an option to get the Project from Version Control? Make sure RStudio can find Git.
- I suggest you check “Open in new session”, as that’s what you’ll usually do in real life.
- Click “Create Project” to create a new sub-directory, which will be all of these things:
- a directory on your computer
- a Git repository, –linked to a remote GitHub repository– no, this isn’t automatic. We still need to link it up *an RStudio Project
- Initiate the “upstream” or “tracking” relationship by adding a remote. Go to Tools > Shell and do this, substituting the HTTPS URL for your GitHub repo.
git remote add origin https://github.com/bensoltoff/myrepo.git
- Download all the files from the online GitHub repository (possibly just README.md, at this point).
git pull origin master
- Cement the tracking relationship between your GitHub repository and the local repo by pushing and setting the “upstream” remote:
git push -u origin master
- It is possible you will be challenged for username and password here; if so, you will want to setup credential storing on your machine.
Step 3: Make local changes, save, commit
Do this every time you finish a valuable chunk of work, probably many times a day.
- From RStudio, modify the
README.mdfile by adding the line “This is a line from RStudio”. Save your changes. - Commit these changes to your local repo. How?
- From RStudio:
- Click the “Git” tab in the upper right pane.
- Check the “Staged” box for any files whose existence or modifications you want to commit.
- To see more detail on what’s changed in file since the last commit, click on “Diff” for a Git pop-up.
- If you’re not already in the Git pop-up, click “Commit”
- Type a message in “Commit message”. This should describe for a human what modifications you’ve made to the staged files.
- Click “Commit”.
Step 4: Push your local changes online to GitHub
Do this a few times a day, but possibly less often than you commit.
You have new work in your local Git repository, but the changes are not online yet.
Before you push your changes to GitHub, first you should pull from GitHub. Why? If you make changes to the repo in the browser or from another machine or (one day) a collaborator has pushed, you will be happier if you pull those changes in before you attempt to push.
- Click the blue “Pull” button in the “Git” tab in RStudio. I doubt anything will happen, i.e. you’ll get the message “Already up-to-date”. This is just to establish a habit.
- Now click the green “Push” button to send your local changes to GitHub. You should see some message along these lines.
[master dc671f0] blah
 3 files changed, 22 insertions(+)
 create mode 100644 .gitignore
 create mode 100644 myrepo.Rproj
The end
Now just rinse and repeat. Do work somewhere. Commit it. Push it or pull it depending on where you did it, but get local and remote “synced up”.
Acknowledgments
- This page is derived in part from “UBC STAT 545A and 547M”, licensed under the CC BY-NC 3.0 Creative Commons License.
This work is licensed under the CC BY-NC 4.0 Creative Commons License.