Menu Path : Notifications>Watchlists |
Write Access Rights:
|
Watchlists provide a method for logically grouping components together and providing a visual indicator of any alerts occurring on one of the components. They also provide a scheduling mechanism that allows the redirection of notifications to different users based on their defined shifts. The status of all watchlists is displayed on the Engine Monitor page.
The Watchlists page displays a list of components being monitored.
If you want to... |
Then... |
|---|---|
Delete a watchlist |
Click the Remove icon next to a watchlist in the table. |
Add a watchlist |
Enter the name of the watchlist in the text box and click the Add icon . Watchlist names are case-insensitive and no two watchlists can have the same name. |
View a list of components in a watchlist or to make changes to a watchlist |
Click the watchlist name to view the watchlist's details. Refer to Watchlist Details. |
Watchlist Details
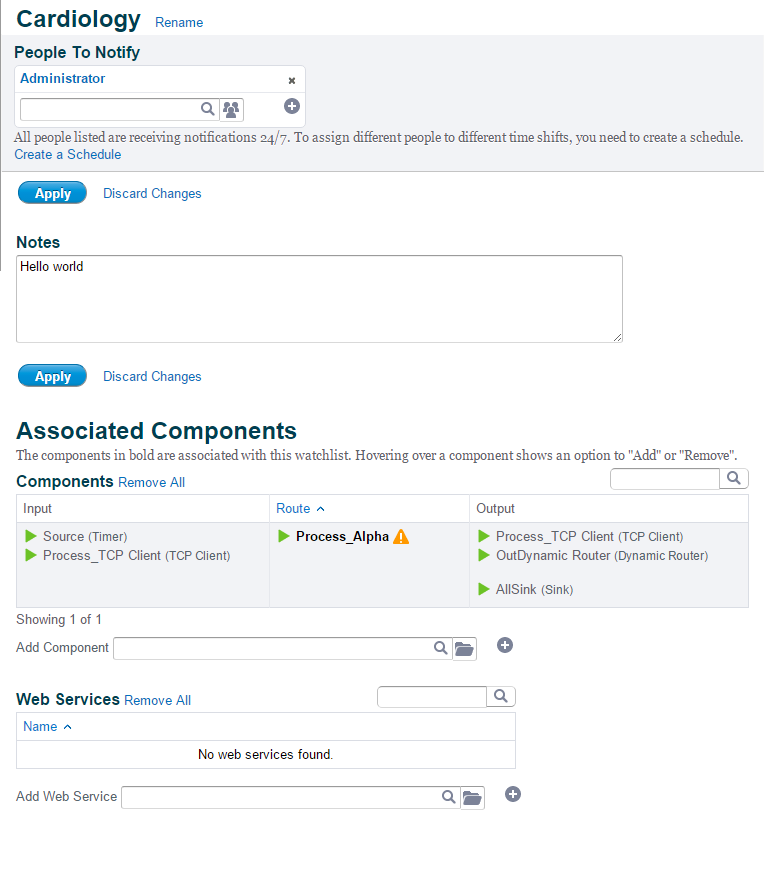
When you select a watchlist name, you are presented with a list of components in the watchlist and enable you to set up notification schedules:
Click the Rename link to rename the watchlist.
People to Notify
The People to Notify section allows you to add and remove users who would receive notifications for the watchlist.
- To remove a user from the watchlist, select the Remove icon next to a users name.
To add a user to the watchlist, enter a name in the text box and select the Add icon , or select the Users icon and select users from the Select User dialog.
When a watchlist is viewed for the first time, the Schedule and Shift sections are hidden. To view the Schedule and Shift sections, click the Create a Schedule link. Refer to Scheduling for details.
When assigning People to Notify, it is possible to assign a user who cannot view all the lockers for all associated components on the watchlist. In this instance, a warning is shown on the watchlist page. It is still possible to configure and save the watchlist in this state if required. All users receive all notifications of watchlists they are assigned to, irrespective of their ability to view some, or all, of the components. However, this may result in users receiving notifications for problems they are unable to resolve.
Scheduling
By default, all users on a watchlist receive notifications 24x7. However, users can customize schedules if needed.
To configure a schedule:
- Click the Create a Schedule link to display the user schedules and shifts sections.
- Under the Shifts section, enter a From time in the textbox for the Daytime Shift 1 or After Hours.
The shifts starting time must be in an ascending order otherwise notifications will be sent to wrong recipients.
Valid Shifts |
Invalid Shifts |
|---|---|
Daytime Shift 1 : 06:00 - 14:00 |
Daytime Shift 1 : 09:00 - 17:00 |
- Select the Apply button to save the changes. Click the Discard Changes link to discard your changes.
- To add a second shift, click the Add Second Shift link in the Daytime Shift 1 column. The Daytime Shift 2 column is added to the table and to the schedule causing new checkboxes to appear on the schedule:
If you click the Remove Schedule link, all people listed will receive notifications 24x7. The schedule will not be remembered.
If there are gaps in the schedule, notifications will be sent to recipients defined to receive notifications for unmonitored components. Refer to Notifications for Unmonitored Components for details.
Upcoming Leave
This section is only displayed if there are upcoming scheduled leaves.
The Upcoming Leave section displays the following information:
Column |
Description |
|---|---|
Person |
The name of the person taking leave. |
Start Date |
The date the leave commences. This is the date the user has entered in the My Leave (Don't Send Me Notifications) section on the Notifications page. |
End Date |
The date the leave ends. This is the date the user has entered in the My Leave (Don't Send Me Notifications) section on the Notifications page. |
Redirect Notification To |
Name of the person the user had entered in the My Leave (Don't Send Me Notifications) section on the Notifications page to redirect their notifications to. Click the Change link to redirect notifications to another user. |
Notes
The Notes section enables you to add support notes for a watchlist.
Associated Components
The Associated Components section displays routes and communication points associated with the selected watchlist.
Only the components in bold are associated with the watchlist, while the others are shown to give the user a complete overview of related routes and communication points.
Column |
Description |
|---|---|
Input |
Shows input communication points related to the route shown in the Route column. |
Route |
Shows route that includes communication points visible in the Input and Output columns. |
Output |
Shows output communication points related to the route shown in the Route column. |
Web Services
The Web Services section displays a list of web services assigned to the watchlist.
- To add a web service, enter the name of the watchlist in the Add Web Service text box and select the Add icon or select the Folder icon and select components from the Select Component dialog.
- To remove a web service, hover your mouse over the webs service name to display the Remove link. Click the Remove link to remove the web service.


