 This example embodies the main stages of building a spreadsheet using FsExcel:
1) Build a list using a list comprehension: `[ ... ]`
2) In the list make cells using `Cell`
3) Each cell gets a list of properties, in this case just the cell content, which here is a string: `String "Hello world!"`
If you've used `Fable.React`, or a similar library, you'll already be familiar with the concepts so far.
4) Send the resulting list to `FsExcel.Render.AsFile`, providing a path.
#!markdown
## Multiple Cells
#!fsharp
open System.IO
open FsExcel
[
for i in 1..10 do
Cell [ Integer i ]
]
|> Render.AsFile (Path.Combine(savePath, "MultipleCells.xlsx"))
#!markdown
This example embodies the main stages of building a spreadsheet using FsExcel:
1) Build a list using a list comprehension: `[ ... ]`
2) In the list make cells using `Cell`
3) Each cell gets a list of properties, in this case just the cell content, which here is a string: `String "Hello world!"`
If you've used `Fable.React`, or a similar library, you'll already be familiar with the concepts so far.
4) Send the resulting list to `FsExcel.Render.AsFile`, providing a path.
#!markdown
## Multiple Cells
#!fsharp
open System.IO
open FsExcel
[
for i in 1..10 do
Cell [ Integer i ]
]
|> Render.AsFile (Path.Combine(savePath, "MultipleCells.xlsx"))
#!markdown
 Here we use a `for...` comprehension to build multiple cells. (Don't panic: we could have used `List.map` instead!)
By default each new cell is put on the right of its predecessor.
#!markdown
## Vertical Movement
If you want the next cell to be rendered below instead of to the right, you can add a `Next(DownBy 1)` property to the cell:
#!fsharp
open System.IO
open System.Globalization
open FsExcel
[
for m in 1..12 do
let monthName = CultureInfo.GetCultureInfoByIetfLanguageTag("en-GB").DateTimeFormat.GetMonthName(m)
Cell [
String monthName
Next(DownBy 1)
]
]
|> Render.AsFile (Path.Combine(savePath, "VerticalMovement.xlsx"))
#!markdown
Here we use a `for...` comprehension to build multiple cells. (Don't panic: we could have used `List.map` instead!)
By default each new cell is put on the right of its predecessor.
#!markdown
## Vertical Movement
If you want the next cell to be rendered below instead of to the right, you can add a `Next(DownBy 1)` property to the cell:
#!fsharp
open System.IO
open System.Globalization
open FsExcel
[
for m in 1..12 do
let monthName = CultureInfo.GetCultureInfoByIetfLanguageTag("en-GB").DateTimeFormat.GetMonthName(m)
Cell [
String monthName
Next(DownBy 1)
]
]
|> Render.AsFile (Path.Combine(savePath, "VerticalMovement.xlsx"))
#!markdown
 #!markdown
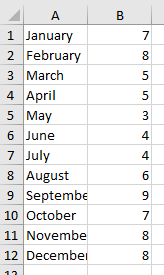
The `Next` property overrides the default behaviour of rendering each successive cell one to the right. In this case we override it with a 'go down by 1' behaviour.
But what if you want a table of cells? Use the default behaviour for each cell in a row except the last. In the last cell use `Next NewRow`. This causes the next cell to be rendered in column 1 of the next row.
#!fsharp
open System.IO
open System.Globalization
open FsExcel
[
for m in 1..12 do
let monthName = CultureInfo.GetCultureInfoByIetfLanguageTag("en-GB").DateTimeFormat.GetMonthName(m)
Cell [
String monthName
]
Cell [
Integer monthName.Length
Next NewRow
]
]
|> Render.AsFile (Path.Combine(savePath, "Rows.xlsx"))
#!markdown
#!markdown
The `Next` property overrides the default behaviour of rendering each successive cell one to the right. In this case we override it with a 'go down by 1' behaviour.
But what if you want a table of cells? Use the default behaviour for each cell in a row except the last. In the last cell use `Next NewRow`. This causes the next cell to be rendered in column 1 of the next row.
#!fsharp
open System.IO
open System.Globalization
open FsExcel
[
for m in 1..12 do
let monthName = CultureInfo.GetCultureInfoByIetfLanguageTag("en-GB").DateTimeFormat.GetMonthName(m)
Cell [
String monthName
]
Cell [
Integer monthName.Length
Next NewRow
]
]
|> Render.AsFile (Path.Combine(savePath, "Rows.xlsx"))
#!markdown
 #!markdown
Maybe you don't like the idea of saying where to go next in the properties of a cell. No problem, you can have standalone position-control with the `Go` instruction:
#!fsharp
open System.IO
open System.Globalization
open FsExcel
[
for m in 1..12 do
let monthName = CultureInfo.GetCultureInfoByIetfLanguageTag("en-GB").DateTimeFormat.GetMonthName(m)
Cell [ String monthName ]
Cell [ Integer monthName.Length ]
Go NewRow
]
|> Render.AsFile (Path.Combine(savePath, "RowsGo.xlsx"))
#!markdown
#!markdown
Maybe you don't like the idea of saying where to go next in the properties of a cell. No problem, you can have standalone position-control with the `Go` instruction:
#!fsharp
open System.IO
open System.Globalization
open FsExcel
[
for m in 1..12 do
let monthName = CultureInfo.GetCultureInfoByIetfLanguageTag("en-GB").DateTimeFormat.GetMonthName(m)
Cell [ String monthName ]
Cell [ Integer monthName.Length ]
Go NewRow
]
|> Render.AsFile (Path.Combine(savePath, "RowsGo.xlsx"))
#!markdown
 #!markdown
## Indentation
Maybe you want a series of rows that don't start in column 1. Use `Indent`:
#!fsharp
open System.IO
open System.Globalization
open FsExcel
[
Go(Indent 2)
for m in 1..12 do
let monthName = CultureInfo.GetCultureInfoByIetfLanguageTag("en-GB").DateTimeFormat.GetMonthName(m)
Cell [ String monthName ]
Cell [ Integer monthName.Length ]
Go NewRow
]
|> Render.AsFile (Path.Combine(savePath, "Indentation.xlsx"))
#!markdown
#!markdown
## Indentation
Maybe you want a series of rows that don't start in column 1. Use `Indent`:
#!fsharp
open System.IO
open System.Globalization
open FsExcel
[
Go(Indent 2)
for m in 1..12 do
let monthName = CultureInfo.GetCultureInfoByIetfLanguageTag("en-GB").DateTimeFormat.GetMonthName(m)
Cell [ String monthName ]
Cell [ Integer monthName.Length ]
Go NewRow
]
|> Render.AsFile (Path.Combine(savePath, "Indentation.xlsx"))
#!markdown
 Now each row begins at column 2.
Indents apply to all `NewRow` operations until some other indent value is set using `Go(Indent n)`. Specify no indenting with `Go(Indent 1)`.
You can specify indents relative to the current indent level using `Go(IndentBy n)` where _n_ can be a positive or negative integer.
#!markdown
## Border and Font Styling
You can add border styling and font emphasis (bold, italic, underline or strikethrough) styling using `Border (...)` and `FontEmphasis ...` cell properties.
The border style values are in `ClosedXML.Excel.XLBorderStyleValues` and the underline values are in `ClosedXML.Excel.XLFontUnderlineValues`.
#!fsharp
open System.IO
open System.Globalization
open FsExcel
open ClosedXML.Excel
[
for heading in ["Month"; "Letter Count"] do
Cell [
String heading
Border (Border.Bottom XLBorderStyleValues.Medium)
FontEmphasis Bold
FontEmphasis Italic
]
Go NewRow
for m in 1..12 do
let monthName = CultureInfo.GetCultureInfoByIetfLanguageTag("en-GB").DateTimeFormat.GetMonthName(m)
Cell [
String monthName
FontEmphasis (Underline XLFontUnderlineValues.DoubleAccounting)
if monthName = "May" then
FontEmphasis StrikeThrough
]
Cell [ Integer monthName.Length ]
Go NewRow
]
|> Render.AsFile (Path.Combine(savePath, "Styling.xlsx"))
#!markdown
Now each row begins at column 2.
Indents apply to all `NewRow` operations until some other indent value is set using `Go(Indent n)`. Specify no indenting with `Go(Indent 1)`.
You can specify indents relative to the current indent level using `Go(IndentBy n)` where _n_ can be a positive or negative integer.
#!markdown
## Border and Font Styling
You can add border styling and font emphasis (bold, italic, underline or strikethrough) styling using `Border (...)` and `FontEmphasis ...` cell properties.
The border style values are in `ClosedXML.Excel.XLBorderStyleValues` and the underline values are in `ClosedXML.Excel.XLFontUnderlineValues`.
#!fsharp
open System.IO
open System.Globalization
open FsExcel
open ClosedXML.Excel
[
for heading in ["Month"; "Letter Count"] do
Cell [
String heading
Border (Border.Bottom XLBorderStyleValues.Medium)
FontEmphasis Bold
FontEmphasis Italic
]
Go NewRow
for m in 1..12 do
let monthName = CultureInfo.GetCultureInfoByIetfLanguageTag("en-GB").DateTimeFormat.GetMonthName(m)
Cell [
String monthName
FontEmphasis (Underline XLFontUnderlineValues.DoubleAccounting)
if monthName = "May" then
FontEmphasis StrikeThrough
]
Cell [ Integer monthName.Length ]
Go NewRow
]
|> Render.AsFile (Path.Combine(savePath, "Styling.xlsx"))
#!markdown
 #!markdown
As they are just list items, styles can be composed and applied together as a list. You'll need a `yield!` to include these multiple elements in your cell property list.
#!fsharp
open System.IO
open System.Globalization
open FsExcel
open ClosedXML.Excel
let headingStyle =
[
Border(Border.Bottom XLBorderStyleValues.Medium)
FontEmphasis Bold
FontEmphasis Italic
]
[
for heading in ["Month"; "Letter Count"] do
Cell [
String heading
yield! headingStyle
]
Go NewRow
for m in 1..12 do
let monthName = CultureInfo.GetCultureInfoByIetfLanguageTag("en-GB").DateTimeFormat.GetMonthName(m)
Cell [ String monthName ]
Cell [ Integer monthName.Length ]
Go NewRow
]
|> Render.AsFile (Path.Combine(savePath, "ComposedStyling.xlsx"))
#!markdown
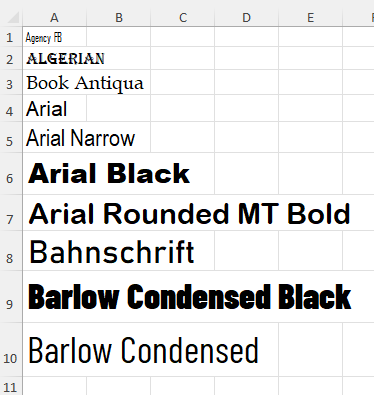
## Font Name and Size
You can set the font name using `FontName` and the size using `FontSize`:
#!fsharp
open System.IO
open System.Globalization
open FsExcel
open ClosedXML.Excel
// ClosedXml currently depends on SixLabors.Fonts -
// we use that to enumerate fonts so this code works cross-platform:
let fontNames =
SixLabors.Fonts.SystemFonts.Collection.Families
|> Seq.map (fun font -> font.Name)
|> Seq.sort
|> Seq.truncate 20
[
for i, fontName in fontNames |> Seq.indexed do
Cell [
String fontName
FontName fontName
FontSize (10 + (i * 2) |> float)
]
Go NewRow
]
|> Render.AsFile (Path.Combine(savePath, "FontNameSize.xlsx"))
#!markdown
#!markdown
As they are just list items, styles can be composed and applied together as a list. You'll need a `yield!` to include these multiple elements in your cell property list.
#!fsharp
open System.IO
open System.Globalization
open FsExcel
open ClosedXML.Excel
let headingStyle =
[
Border(Border.Bottom XLBorderStyleValues.Medium)
FontEmphasis Bold
FontEmphasis Italic
]
[
for heading in ["Month"; "Letter Count"] do
Cell [
String heading
yield! headingStyle
]
Go NewRow
for m in 1..12 do
let monthName = CultureInfo.GetCultureInfoByIetfLanguageTag("en-GB").DateTimeFormat.GetMonthName(m)
Cell [ String monthName ]
Cell [ Integer monthName.Length ]
Go NewRow
]
|> Render.AsFile (Path.Combine(savePath, "ComposedStyling.xlsx"))
#!markdown
## Font Name and Size
You can set the font name using `FontName` and the size using `FontSize`:
#!fsharp
open System.IO
open System.Globalization
open FsExcel
open ClosedXML.Excel
// ClosedXml currently depends on SixLabors.Fonts -
// we use that to enumerate fonts so this code works cross-platform:
let fontNames =
SixLabors.Fonts.SystemFonts.Collection.Families
|> Seq.map (fun font -> font.Name)
|> Seq.sort
|> Seq.truncate 20
[
for i, fontName in fontNames |> Seq.indexed do
Cell [
String fontName
FontName fontName
FontSize (10 + (i * 2) |> float)
]
Go NewRow
]
|> Render.AsFile (Path.Combine(savePath, "FontNameSize.xlsx"))
#!markdown
 #!markdown
## Wrap Text
You can wrap text in cells with long sentences/many words using `WrapText true`:
#!fsharp
open System.IO
open FsExcel
open ClosedXML.Excel
[
Cell [ String "Without wrap text:"
HorizontalAlignment Center
VerticalAlignment Middle
CellSize (ColWidth 16) ]
Cell [ String "The quick brown fox jumps over the lazy dog."
HorizontalAlignment Center
VerticalAlignment Middle ]
Go NewRow
Cell [ String "With wrap text:"
HorizontalAlignment Center
VerticalAlignment Middle
CellSize (ColWidth 16) ]
Cell [ String "The quick brown fox jumps over the lazy dog."
HorizontalAlignment Center
VerticalAlignment Middle
WrapText true ]
]
|> Render.AsFile (Path.Combine(savePath, "WrapText.xlsx"))
#!markdown
#!markdown
## Wrap Text
You can wrap text in cells with long sentences/many words using `WrapText true`:
#!fsharp
open System.IO
open FsExcel
open ClosedXML.Excel
[
Cell [ String "Without wrap text:"
HorizontalAlignment Center
VerticalAlignment Middle
CellSize (ColWidth 16) ]
Cell [ String "The quick brown fox jumps over the lazy dog."
HorizontalAlignment Center
VerticalAlignment Middle ]
Go NewRow
Cell [ String "With wrap text:"
HorizontalAlignment Center
VerticalAlignment Middle
CellSize (ColWidth 16) ]
Cell [ String "The quick brown fox jumps over the lazy dog."
HorizontalAlignment Center
VerticalAlignment Middle
WrapText true ]
]
|> Render.AsFile (Path.Combine(savePath, "WrapText.xlsx"))
#!markdown
 #!markdown
## Text Rotation
You can rotate text between -90° and +90° with `TextRotation n`.
#!fsharp
open System
open FsExcel
let p, m, g = "⏺", "◑", "⭘"
let performances =
[|
[| p; m; g; g; p; p; g; p; p; g |]
[| g; m; g; m; g; p; g; p; p; g |]
[| g; m; m; g; g; p; g; g; p; g |]
[| m; m; m; p; p; p; g; m; p; g |]
[| p; p; p; p; g; g; m; m; p; g |]
[| p; g; p; g; g; g; p; g; m; m |]
[| g; p; g; p; m; p; m; p; p; g |]
[| p; p; m; g; p; p; p; m; p; m |]
|]
let getPerformance (categoryIndex : int) (supplierIndex : int) =
performances[supplierIndex-1][categoryIndex-1]
[
Go (RC(1, 2))
for category in 1..10 do
Cell [String $"Category {category}"; TextRotation 45; CellSize (RowHeight 45)]
Go NewRow
for supplier in 1..8 do
Cell [String $"Supplier {supplier}"; CellSize (ColWidth 10)]
Go NewRow
Go (RC(2, 2))
Go (Indent 2)
for supplier in 1..8 do
for category in 1..10 do
Cell [ String (getPerformance category supplier); HorizontalAlignment Center]
Go NewRow
]
|> Render.AsFile (System.IO.Path.Combine(savePath, "TextRotation.xlsx"))
#!markdown
#!markdown
## Text Rotation
You can rotate text between -90° and +90° with `TextRotation n`.
#!fsharp
open System
open FsExcel
let p, m, g = "⏺", "◑", "⭘"
let performances =
[|
[| p; m; g; g; p; p; g; p; p; g |]
[| g; m; g; m; g; p; g; p; p; g |]
[| g; m; m; g; g; p; g; g; p; g |]
[| m; m; m; p; p; p; g; m; p; g |]
[| p; p; p; p; g; g; m; m; p; g |]
[| p; g; p; g; g; g; p; g; m; m |]
[| g; p; g; p; m; p; m; p; p; g |]
[| p; p; m; g; p; p; p; m; p; m |]
|]
let getPerformance (categoryIndex : int) (supplierIndex : int) =
performances[supplierIndex-1][categoryIndex-1]
[
Go (RC(1, 2))
for category in 1..10 do
Cell [String $"Category {category}"; TextRotation 45; CellSize (RowHeight 45)]
Go NewRow
for supplier in 1..8 do
Cell [String $"Supplier {supplier}"; CellSize (ColWidth 10)]
Go NewRow
Go (RC(2, 2))
Go (Indent 2)
for supplier in 1..8 do
for category in 1..10 do
Cell [ String (getPerformance category supplier); HorizontalAlignment Center]
Go NewRow
]
|> Render.AsFile (System.IO.Path.Combine(savePath, "TextRotation.xlsx"))
#!markdown
 #!markdown
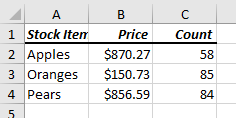
## Number Formatting and Alignment
Number styling can be applied using standard Excel format strings. You can also apply horizontal alignment.
#!fsharp
open System
open System.IO
open FsExcel
open ClosedXML.Excel
module PseudoRandom =
let mutable state = 1u
let mangle (n : UInt64) = (n &&& (0x7fffffff |> uint64)) + (n >>> 31)
let nextDouble() =
state <- (state |> uint64) * 48271UL |> mangle |> mangle |> uint32
(float state) / (float Int32.MaxValue)
let headingStyle =
[
Border(Border.Bottom XLBorderStyleValues.Medium)
FontEmphasis Bold
FontEmphasis Italic
]
[
for heading, alignment in ["Stock Item", Left; "Price", Right ; "Count", Right] do
Cell [
String heading
yield! headingStyle
HorizontalAlignment alignment
]
Go NewRow
for item in ["Apples"; "Oranges"; "Pears"] do
Cell [
String item
]
Cell [
Float ((PseudoRandom.nextDouble()*1000.))
FormatCode "$0.00"
]
Cell [
Integer (int (PseudoRandom.nextDouble()*100.))
FormatCode "#,##0"
]
Go NewRow
]
|> Render.AsFile (Path.Combine(savePath, "NumberFormatAndAlignment.xlsx"))
#!markdown
#!markdown
## Number Formatting and Alignment
Number styling can be applied using standard Excel format strings. You can also apply horizontal alignment.
#!fsharp
open System
open System.IO
open FsExcel
open ClosedXML.Excel
module PseudoRandom =
let mutable state = 1u
let mangle (n : UInt64) = (n &&& (0x7fffffff |> uint64)) + (n >>> 31)
let nextDouble() =
state <- (state |> uint64) * 48271UL |> mangle |> mangle |> uint32
(float state) / (float Int32.MaxValue)
let headingStyle =
[
Border(Border.Bottom XLBorderStyleValues.Medium)
FontEmphasis Bold
FontEmphasis Italic
]
[
for heading, alignment in ["Stock Item", Left; "Price", Right ; "Count", Right] do
Cell [
String heading
yield! headingStyle
HorizontalAlignment alignment
]
Go NewRow
for item in ["Apples"; "Oranges"; "Pears"] do
Cell [
String item
]
Cell [
Float ((PseudoRandom.nextDouble()*1000.))
FormatCode "$0.00"
]
Cell [
Integer (int (PseudoRandom.nextDouble()*100.))
FormatCode "#,##0"
]
Go NewRow
]
|> Render.AsFile (Path.Combine(savePath, "NumberFormatAndAlignment.xlsx"))
#!markdown
 #!markdown
## Formulae
You can add a formula to a cell using `FormulaA1(...)`.
Currently only the `A1` style of cell referencing is supported, meaning that you will need to keep track of the column letter and row number you want to refer to:
#!fsharp
open System
open System.IO
open FsExcel
open ClosedXML.Excel
module PseudoRandom =
let mutable state = 1u
let mangle (n : UInt64) = (n &&& (0x7fffffff |> uint64)) + (n >>> 31)
let nextDouble() =
state <- (state |> uint64) * 48271UL |> mangle |> mangle |> uint32
(float state) / (float Int32.MaxValue)
let headingStyle =
[
Border(Border.Bottom XLBorderStyleValues.Medium)
FontEmphasis Bold
FontEmphasis Italic
]
[
for heading, alignment in ["Stock Item", Left; "Price", Right ; "Count", Right; "Total", Right] do
Cell [
String heading
yield! headingStyle
HorizontalAlignment alignment
]
Go NewRow
for index, item in ["Apples"; "Oranges"; "Pears"] |> List.indexed do
Cell [
String item
]
Cell [
Float (PseudoRandom.nextDouble()*1000.)
FormatCode "$0.00"
]
Cell [
Integer (int (PseudoRandom.nextDouble()*1000.))
FormatCode "#,##0"
]
Cell [
FormulaA1 $"=B{index+2}*C{index+2}"
FormatCode "$#,##0.00"
]
Go NewRow
]
|> Render.AsFile (Path.Combine(savePath, "Formulae.xlsx"))
#!markdown
#!markdown
## Formulae
You can add a formula to a cell using `FormulaA1(...)`.
Currently only the `A1` style of cell referencing is supported, meaning that you will need to keep track of the column letter and row number you want to refer to:
#!fsharp
open System
open System.IO
open FsExcel
open ClosedXML.Excel
module PseudoRandom =
let mutable state = 1u
let mangle (n : UInt64) = (n &&& (0x7fffffff |> uint64)) + (n >>> 31)
let nextDouble() =
state <- (state |> uint64) * 48271UL |> mangle |> mangle |> uint32
(float state) / (float Int32.MaxValue)
let headingStyle =
[
Border(Border.Bottom XLBorderStyleValues.Medium)
FontEmphasis Bold
FontEmphasis Italic
]
[
for heading, alignment in ["Stock Item", Left; "Price", Right ; "Count", Right; "Total", Right] do
Cell [
String heading
yield! headingStyle
HorizontalAlignment alignment
]
Go NewRow
for index, item in ["Apples"; "Oranges"; "Pears"] |> List.indexed do
Cell [
String item
]
Cell [
Float (PseudoRandom.nextDouble()*1000.)
FormatCode "$0.00"
]
Cell [
Integer (int (PseudoRandom.nextDouble()*1000.))
FormatCode "#,##0"
]
Cell [
FormulaA1 $"=B{index+2}*C{index+2}"
FormatCode "$#,##0.00"
]
Go NewRow
]
|> Render.AsFile (Path.Combine(savePath, "Formulae.xlsx"))
#!markdown
 #!markdown
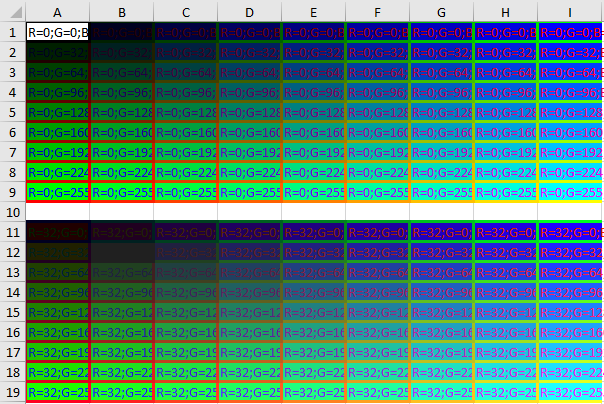
## Color
Set the font color with `FontColor` and the background color with the `BackgroundColor` property. Set the border color with `BorderColor`.
The color values and color creation functions are in `ClosedXml.Excel.XLColor`.
#!fsharp
open System.IO
open FsExcel
open ClosedXML.Excel
[
let values = [0..32..224] @ [255]
for r in values do
for g in values do
for b in values do
// N.B. the API refuses to fill a cell with black if its font is black
// so the very first cell won't be colored.
let backgroundColor = ClosedXML.Excel.XLColor.FromArgb(0, r, g, b)
let fontColor = ClosedXML.Excel.XLColor.FromArgb(0, b, r, g)
let borderColor = ClosedXML.Excel.XLColor.FromArgb(0, g, b, r)
Cell [
String $"R={r};G={g};B={b}"
FontColor fontColor
BackgroundColor backgroundColor
Border (Border.Top XLBorderStyleValues.Thick)
Border (Border.Right XLBorderStyleValues.Thick)
Border (Border.Bottom XLBorderStyleValues.Thick)
Border (Border.Left XLBorderStyleValues.Thick)
// Could also have used Border.All:
// Border (Border.All XLBorderStyleValues.Thick)
BorderColor (BorderColor.Top borderColor)
BorderColor (BorderColor.Right borderColor)
BorderColor (BorderColor.Bottom borderColor)
BorderColor (BorderColor.Left borderColor)
// Could also have used BorderColor.All:
// BorderColor (BorderColor.All borderColor)
]
Go NewRow
Go NewRow
]
|> Render.AsFile (Path.Combine(savePath, "Color.xlsx"))
#!markdown
#!markdown
## Color
Set the font color with `FontColor` and the background color with the `BackgroundColor` property. Set the border color with `BorderColor`.
The color values and color creation functions are in `ClosedXml.Excel.XLColor`.
#!fsharp
open System.IO
open FsExcel
open ClosedXML.Excel
[
let values = [0..32..224] @ [255]
for r in values do
for g in values do
for b in values do
// N.B. the API refuses to fill a cell with black if its font is black
// so the very first cell won't be colored.
let backgroundColor = ClosedXML.Excel.XLColor.FromArgb(0, r, g, b)
let fontColor = ClosedXML.Excel.XLColor.FromArgb(0, b, r, g)
let borderColor = ClosedXML.Excel.XLColor.FromArgb(0, g, b, r)
Cell [
String $"R={r};G={g};B={b}"
FontColor fontColor
BackgroundColor backgroundColor
Border (Border.Top XLBorderStyleValues.Thick)
Border (Border.Right XLBorderStyleValues.Thick)
Border (Border.Bottom XLBorderStyleValues.Thick)
Border (Border.Left XLBorderStyleValues.Thick)
// Could also have used Border.All:
// Border (Border.All XLBorderStyleValues.Thick)
BorderColor (BorderColor.Top borderColor)
BorderColor (BorderColor.Right borderColor)
BorderColor (BorderColor.Bottom borderColor)
BorderColor (BorderColor.Left borderColor)
// Could also have used BorderColor.All:
// BorderColor (BorderColor.All borderColor)
]
Go NewRow
Go NewRow
]
|> Render.AsFile (Path.Combine(savePath, "Color.xlsx"))
#!markdown
 #!markdown
## Range Styles
You can apply any properties to all cells from a point in your code using `Style [ prop; prop...]`. Don't forget to reset style with `Style []` afterwards.
#!fsharp
open System
open System.IO
open FsExcel
open ClosedXML.Excel
module PseudoRandom =
let mutable state = 1u
let mangle (n : UInt64) = (n &&& (0x7fffffff |> uint64)) + (n >>> 31)
let nextDouble() =
state <- (state |> uint64) * 48271UL |> mangle |> mangle |> uint32
(float state) / (float Int32.MaxValue)
[
Style [
Border(Border.Bottom XLBorderStyleValues.Medium)
FontEmphasis Bold
FontEmphasis Italic
]
for heading in ["Stock Item"; "Price"; "Count"] do
Cell [ String heading ]
Style []
Go NewRow
for item in ["Apples"; "Oranges"; "Pears"] do
Cell [
String item
]
Style [ FontEmphasis Italic ]
Cell [
Float ((PseudoRandom.nextDouble()*1000.))
FormatCode "$0.00"
]
Cell [
Integer (int (PseudoRandom.nextDouble()*100.))
FormatCode "#,##0"
]
Style []
Go NewRow
]
|> Render.AsFile (Path.Combine(savePath, "RangeStyle.xlsx"))
#!markdown
#!markdown
## Range Styles
You can apply any properties to all cells from a point in your code using `Style [ prop; prop...]`. Don't forget to reset style with `Style []` afterwards.
#!fsharp
open System
open System.IO
open FsExcel
open ClosedXML.Excel
module PseudoRandom =
let mutable state = 1u
let mangle (n : UInt64) = (n &&& (0x7fffffff |> uint64)) + (n >>> 31)
let nextDouble() =
state <- (state |> uint64) * 48271UL |> mangle |> mangle |> uint32
(float state) / (float Int32.MaxValue)
[
Style [
Border(Border.Bottom XLBorderStyleValues.Medium)
FontEmphasis Bold
FontEmphasis Italic
]
for heading in ["Stock Item"; "Price"; "Count"] do
Cell [ String heading ]
Style []
Go NewRow
for item in ["Apples"; "Oranges"; "Pears"] do
Cell [
String item
]
Style [ FontEmphasis Italic ]
Cell [
Float ((PseudoRandom.nextDouble()*1000.))
FormatCode "$0.00"
]
Cell [
Integer (int (PseudoRandom.nextDouble()*100.))
FormatCode "#,##0"
]
Style []
Go NewRow
]
|> Render.AsFile (Path.Combine(savePath, "RangeStyle.xlsx"))
#!markdown
 #!markdown
## Adding a Border to Merged Cells
To add a border to all cells in an Item list that includes *merged cells*, use:
`BorderMergedCell [ BorderType (Border.x XLBorderStyleValues.[......]); ColorBorder (BorderColor.x (XLColor.FromArgb(0, 68, 114, 196)))]`
where *x* = [All, Top, Right, Bottom, Left]. Include this border styling *after* any merged cells.
Other styling such as background color, font emphasis, font style etc. can be applied to all cells (including merged cells) using `Style [prop; prop...]` at the *start* of the Item list as outlined above. These styling propeties are retained when a cell is merged, unlike with cell borders.
#!fsharp
open System.IO
open System
open ClosedXML.Excel
open FsExcel
[ Go NewRow
for heading, colWidth in ["ID", 3.22; "Car Name", 10.33; "Car Description", 49.33; "Car Regestration", 16.89 ] do
Cell [
String heading
FontEmphasis Bold
FontName "Calibri"
FontSize 11
HorizontalAlignment Center
FontColor (XLColor.FromArgb(0, 255, 255, 255))
BackgroundColor (XLColor.FromArgb(0, 68, 114, 196))
Border (Border.All XLBorderStyleValues.Thin)
CellSize (ColWidth colWidth)
]
Go NewRow
Style [ HorizontalAlignment Center
VerticalAlignment Middle
BackgroundColor (XLColor.FromArgb(0, 240, 240, 210))]
Cell [ Integer 1
//HorizontalAlignment Left
//VerticalAlignment TopMost
Name "ID" ]
Cell [ String "Ford Fiesta" ]
//HorizontalAlignment Center
//VerticalAlignment Middle ]
Cell [ String "Car Technical Details:"
Next (DownBy 1) ]
Cell [ String "Technical Detail 1"
Next (DownBy 1) ]
Cell [ String "Technical Detail 2"
Next (DownBy 1)]
Cell [ String "Technical Detail 3"
Name "LastL" ]
Go (RC (3, 4))
Cell [ String "AB12 CDE"
//HorizontalAlignment Right
//VerticalAlignment Base
Name "Reg" ]
Go (RC (6, 4))
Cell [Name "RegEnd"]
Go (RC (7, 3))
Cell [ String "Another Technical Detail"
FontEmphasis Italic
//VerticalAlignment Middle
Name "TD"
Next Stay]
Go (DownBy 1)
Cell [ Name "info"]
// Merging between named and specific cells
MergeCells (ColRowLabel ("B", 3), ColRowLabel ("B", 6))
MergeCells (NamedCell "ID", ColRowLabel ("A", 6))
MergeCells (ColRowLabel ("C", 7), NamedCell "info")
MergeCells (NamedCell "Reg", NamedCell "RegEnd")
// Adding a border to merged cells - any original border around a single cell is lost post merging cells
BorderMergedCell [ BorderType (Border.All XLBorderStyleValues.Thin)
ColorBorder (BorderColor.All (XLColor.FromArgb(0, 68, 114, 196)))]
]
|> Render.AsFile (Path.Combine(savePath, "BorderMergedCells.xlsx"))
#!markdown
#!markdown
## Adding a Border to Merged Cells
To add a border to all cells in an Item list that includes *merged cells*, use:
`BorderMergedCell [ BorderType (Border.x XLBorderStyleValues.[......]); ColorBorder (BorderColor.x (XLColor.FromArgb(0, 68, 114, 196)))]`
where *x* = [All, Top, Right, Bottom, Left]. Include this border styling *after* any merged cells.
Other styling such as background color, font emphasis, font style etc. can be applied to all cells (including merged cells) using `Style [prop; prop...]` at the *start* of the Item list as outlined above. These styling propeties are retained when a cell is merged, unlike with cell borders.
#!fsharp
open System.IO
open System
open ClosedXML.Excel
open FsExcel
[ Go NewRow
for heading, colWidth in ["ID", 3.22; "Car Name", 10.33; "Car Description", 49.33; "Car Regestration", 16.89 ] do
Cell [
String heading
FontEmphasis Bold
FontName "Calibri"
FontSize 11
HorizontalAlignment Center
FontColor (XLColor.FromArgb(0, 255, 255, 255))
BackgroundColor (XLColor.FromArgb(0, 68, 114, 196))
Border (Border.All XLBorderStyleValues.Thin)
CellSize (ColWidth colWidth)
]
Go NewRow
Style [ HorizontalAlignment Center
VerticalAlignment Middle
BackgroundColor (XLColor.FromArgb(0, 240, 240, 210))]
Cell [ Integer 1
//HorizontalAlignment Left
//VerticalAlignment TopMost
Name "ID" ]
Cell [ String "Ford Fiesta" ]
//HorizontalAlignment Center
//VerticalAlignment Middle ]
Cell [ String "Car Technical Details:"
Next (DownBy 1) ]
Cell [ String "Technical Detail 1"
Next (DownBy 1) ]
Cell [ String "Technical Detail 2"
Next (DownBy 1)]
Cell [ String "Technical Detail 3"
Name "LastL" ]
Go (RC (3, 4))
Cell [ String "AB12 CDE"
//HorizontalAlignment Right
//VerticalAlignment Base
Name "Reg" ]
Go (RC (6, 4))
Cell [Name "RegEnd"]
Go (RC (7, 3))
Cell [ String "Another Technical Detail"
FontEmphasis Italic
//VerticalAlignment Middle
Name "TD"
Next Stay]
Go (DownBy 1)
Cell [ Name "info"]
// Merging between named and specific cells
MergeCells (ColRowLabel ("B", 3), ColRowLabel ("B", 6))
MergeCells (NamedCell "ID", ColRowLabel ("A", 6))
MergeCells (ColRowLabel ("C", 7), NamedCell "info")
MergeCells (NamedCell "Reg", NamedCell "RegEnd")
// Adding a border to merged cells - any original border around a single cell is lost post merging cells
BorderMergedCell [ BorderType (Border.All XLBorderStyleValues.Thin)
ColorBorder (BorderColor.All (XLColor.FromArgb(0, 68, 114, 196)))]
]
|> Render.AsFile (Path.Combine(savePath, "BorderMergedCells.xlsx"))
#!markdown
 #!markdown
## Absolute Positioning
FsExcel is designed to save you from having to keep track of absolute row- and column-numbers. However sometimes you might want to position a cell at an absolute row or column position - or both.
After the explicitly-positioned cell, subsequent cells are by default rendered to the right again.
#!fsharp
open System.IO
open FsExcel
open ClosedXML.Excel
[
Go (Col 3)
Cell [ String "Col 3"]
Go (Row 4)
Cell [ String "Row 4"]
Go (RC(6, 5))
Cell [ String "R6C5"]
Cell [ String "R6C6"]
]
|> Render.AsFile (Path.Combine(savePath, "AbsolutePositioning.xlsx"))
#!markdown
#!markdown
## Absolute Positioning
FsExcel is designed to save you from having to keep track of absolute row- and column-numbers. However sometimes you might want to position a cell at an absolute row or column position - or both.
After the explicitly-positioned cell, subsequent cells are by default rendered to the right again.
#!fsharp
open System.IO
open FsExcel
open ClosedXML.Excel
[
Go (Col 3)
Cell [ String "Col 3"]
Go (Row 4)
Cell [ String "Row 4"]
Go (RC(6, 5))
Cell [ String "R6C5"]
Cell [ String "R6C6"]
]
|> Render.AsFile (Path.Combine(savePath, "AbsolutePositioning.xlsx"))
#!markdown
 #!markdown
Remember that, by default, successive cells are placed to the right of their predecessors? Sometimes (rarely) you might want to suppress that behaviour completely. To do that use `Next Stay`.
#!fsharp
open System.IO
open FsExcel
[
for i in 1..5 do
Cell [
Integer i
Next Stay
]
Go(DownBy i)
]
|> Render.AsFile (Path.Combine(savePath, "Stay.xlsx"))
#!markdown
#!markdown
Remember that, by default, successive cells are placed to the right of their predecessors? Sometimes (rarely) you might want to suppress that behaviour completely. To do that use `Next Stay`.
#!fsharp
open System.IO
open FsExcel
[
for i in 1..5 do
Cell [
Integer i
Next Stay
]
Go(DownBy i)
]
|> Render.AsFile (Path.Combine(savePath, "Stay.xlsx"))
#!markdown
 #!markdown
## Named cells
To create worksheet scoped name use
`
Name "Username"
`
or
`
ScopedName ("Email", NameScope.Worksheet)
`
To create workbook scoped name use
`
ScopedName ("Email", NameScope.Workbook)
`
#!fsharp
open System.IO
open FsExcel
[
Cell [
String "JohnDoe"
Name "Username" ]
Cell [
String "john.doe@company.com"
ScopedName ("Email", NameScope.Workbook) ]
]
|> Render.AsFile (Path.Combine(savePath, "NamedCells.xlsx"))
#!markdown
## Worksheets (Tabs)
By default, all cells are placed into a worksheet (tab) called "Sheet1". You can override this, and create additional worksheets, using `Worksheet ...`.
If you do not want a "Sheet1" tab you'll need to use `Worksheet` to create an explicitly named sheet - before creating any cells.
Each new worksheet starts at the top-left cell, has an indent setting of 1 (no indent), and has an empty list as its current `Style [...]` value.
If you use `Worksheet` with the name of a worksheet that already exists, that worksheet becomes active with a current position of `RC(1, 1)`, no indent and an empty `Style [...]` value.
#!fsharp
open System.IO
open FsExcel
let britishCultureNativeName = "English (United Kingdom)"
let ukrainianCultureNativeName = "українська"
let britishCultureDateTimeFormatGetMonthName =
[ "January"; "February"; "March"; "April"; "May"; "June"; "July";
"August"; "September"; "October"; "November"; "December" ]
let britishCultureDateTimeFormatAbbreviatedMonthNames =
[ "Jan"; "Feb"; "Mar"; "Apr"; "May"; "Jun"; "Jul"; "Aug"; "Sep"; "Oct";
"Nov"; "Dec" ]
let ukrainianCultureDateTimeFormatGetMonthName =
[ "січень"; "лютий"; "березень"; "квітень"; "травень"; "червень";
"липень"; "серпень"; "вересень"; "жовтень"; "листопад"; "грудень" ]
let ukrainianCultureDateTimeFormatAbbreviatedMonthNames =
[ "січ"; "лют"; "бер"; "кві"; "тра"; "чер"; "лип"; "сер"; "вер"; "жов";
"лис"; "гру" ]
[
Worksheet britishCultureNativeName
for m in 0..11 do
let monthName = britishCultureDateTimeFormatGetMonthName.[m]
Cell [ String monthName ]
Cell [ Integer monthName.Length ]
Go NewRow
Worksheet ukrainianCultureNativeName
for m in 0..11 do
let monthName = ukrainianCultureDateTimeFormatGetMonthName.[m]
Cell [ String monthName ]
Cell [ Integer monthName.Length ]
Go NewRow
Worksheet britishCultureNativeName // Switch back to the first worksheet
Go (RC(13, 1))
for m in 0..11 do
let monthAbbreviation = britishCultureDateTimeFormatAbbreviatedMonthNames.[m]
Cell [ String monthAbbreviation ]
Cell [ Integer monthAbbreviation.Length ]
Go NewRow
Worksheet ukrainianCultureNativeName // Switch back to the second worksheet
Go (RC(13, 1))
for m in 0..11 do
let monthAbbreviation = ukrainianCultureDateTimeFormatAbbreviatedMonthNames.[m]
Cell [ String monthAbbreviation ]
Cell [ Integer monthAbbreviation.Length ]
Go NewRow
]
|> Render.AsFile (Path.Combine(savePath, "Worksheets.xlsx"))
#!markdown
#!markdown
## Named cells
To create worksheet scoped name use
`
Name "Username"
`
or
`
ScopedName ("Email", NameScope.Worksheet)
`
To create workbook scoped name use
`
ScopedName ("Email", NameScope.Workbook)
`
#!fsharp
open System.IO
open FsExcel
[
Cell [
String "JohnDoe"
Name "Username" ]
Cell [
String "john.doe@company.com"
ScopedName ("Email", NameScope.Workbook) ]
]
|> Render.AsFile (Path.Combine(savePath, "NamedCells.xlsx"))
#!markdown
## Worksheets (Tabs)
By default, all cells are placed into a worksheet (tab) called "Sheet1". You can override this, and create additional worksheets, using `Worksheet ...`.
If you do not want a "Sheet1" tab you'll need to use `Worksheet` to create an explicitly named sheet - before creating any cells.
Each new worksheet starts at the top-left cell, has an indent setting of 1 (no indent), and has an empty list as its current `Style [...]` value.
If you use `Worksheet` with the name of a worksheet that already exists, that worksheet becomes active with a current position of `RC(1, 1)`, no indent and an empty `Style [...]` value.
#!fsharp
open System.IO
open FsExcel
let britishCultureNativeName = "English (United Kingdom)"
let ukrainianCultureNativeName = "українська"
let britishCultureDateTimeFormatGetMonthName =
[ "January"; "February"; "March"; "April"; "May"; "June"; "July";
"August"; "September"; "October"; "November"; "December" ]
let britishCultureDateTimeFormatAbbreviatedMonthNames =
[ "Jan"; "Feb"; "Mar"; "Apr"; "May"; "Jun"; "Jul"; "Aug"; "Sep"; "Oct";
"Nov"; "Dec" ]
let ukrainianCultureDateTimeFormatGetMonthName =
[ "січень"; "лютий"; "березень"; "квітень"; "травень"; "червень";
"липень"; "серпень"; "вересень"; "жовтень"; "листопад"; "грудень" ]
let ukrainianCultureDateTimeFormatAbbreviatedMonthNames =
[ "січ"; "лют"; "бер"; "кві"; "тра"; "чер"; "лип"; "сер"; "вер"; "жов";
"лис"; "гру" ]
[
Worksheet britishCultureNativeName
for m in 0..11 do
let monthName = britishCultureDateTimeFormatGetMonthName.[m]
Cell [ String monthName ]
Cell [ Integer monthName.Length ]
Go NewRow
Worksheet ukrainianCultureNativeName
for m in 0..11 do
let monthName = ukrainianCultureDateTimeFormatGetMonthName.[m]
Cell [ String monthName ]
Cell [ Integer monthName.Length ]
Go NewRow
Worksheet britishCultureNativeName // Switch back to the first worksheet
Go (RC(13, 1))
for m in 0..11 do
let monthAbbreviation = britishCultureDateTimeFormatAbbreviatedMonthNames.[m]
Cell [ String monthAbbreviation ]
Cell [ Integer monthAbbreviation.Length ]
Go NewRow
Worksheet ukrainianCultureNativeName // Switch back to the second worksheet
Go (RC(13, 1))
for m in 0..11 do
let monthAbbreviation = ukrainianCultureDateTimeFormatAbbreviatedMonthNames.[m]
Cell [ String monthAbbreviation ]
Cell [ Integer monthAbbreviation.Length ]
Go NewRow
]
|> Render.AsFile (Path.Combine(savePath, "Worksheets.xlsx"))
#!markdown
 #!markdown
## Working with an existing workbook
You can update an existing workbook by using `Workbook ...` as the first item in the list. By default, this will set the first worksheet in the workbook as the active sheet.
Typically, you will want to immediately follow with a `Worksheet ...` to either move to the worksheet you want to update or create a new worksheet.
`Workbook` requires you to pass in a reference to a valid `ClosedXML.Excel.XLWorkbook` object. See [Inserting blank rows](#insertingblankrows) below for an example.
#!markdown
## Working with an existing workbook
You can update an existing workbook by using `Workbook ...` as the first item in the list. By default, this will set the first worksheet in the workbook as the active sheet.
Typically, you will want to immediately follow with a `Worksheet ...` to either move to the worksheet you want to update or create a new worksheet.
`Workbook` requires you to pass in a reference to a valid `ClosedXML.Excel.XLWorkbook` object. See [Inserting blank rows](#insertingblankrows) below for an example.
 #!markdown
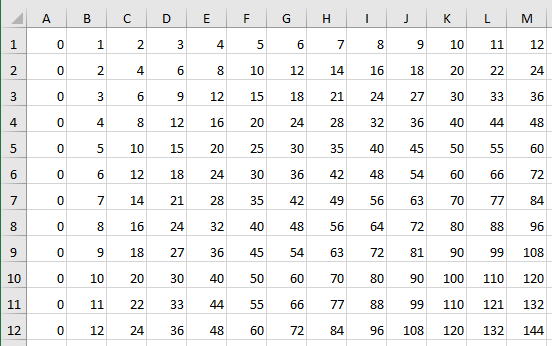
## Column Widths and Row Heights for All Cells
You can set a specific width for *all* columns and a specific height for *all* rows with `SizeAll (ColWidth x)` and `SizeAll (RowHeight x)`.
Excel and ClosedXml documentation is not clear on what units are used. The width unit correlates with ~10% of the width given number of pixels. For example, if you need a cell to be ~50 pixels wide, then you would set the ColWidth to ~5. The width unit appears to be, roughly, average character width. The height unit is 60% of the pixel height. For example, if you want the height to be 45 pixels, then you would set the RowHeight to 27.
#!fsharp
open System.IO
open System.Globalization
open FsExcel
[
for x in 1..12 do
for y in 0..12 do
Cell [ Integer (x * y) ]
Go NewRow
SizeAll (ColWidth 5)
SizeAll (RowHeight 20)
]
|> Render.AsFile (Path.Combine(savePath, "ColumnWidthRowHeight.xlsx"))
#!markdown
#!markdown
## Column Widths and Row Heights for All Cells
You can set a specific width for *all* columns and a specific height for *all* rows with `SizeAll (ColWidth x)` and `SizeAll (RowHeight x)`.
Excel and ClosedXml documentation is not clear on what units are used. The width unit correlates with ~10% of the width given number of pixels. For example, if you need a cell to be ~50 pixels wide, then you would set the ColWidth to ~5. The width unit appears to be, roughly, average character width. The height unit is 60% of the pixel height. For example, if you want the height to be 45 pixels, then you would set the RowHeight to 27.
#!fsharp
open System.IO
open System.Globalization
open FsExcel
[
for x in 1..12 do
for y in 0..12 do
Cell [ Integer (x * y) ]
Go NewRow
SizeAll (ColWidth 5)
SizeAll (RowHeight 20)
]
|> Render.AsFile (Path.Combine(savePath, "ColumnWidthRowHeight.xlsx"))
#!markdown
 #!markdown
## Individual Cell Sizing
To size individual cells within an Item list (e.g. `[ Cell [....]; Go NewRow; Cell [...]; Go NewRow etc.`]`)`, use `CellSize (ColWidth 10)` and `CellSize (RowHeight 10)` as part of a Cell's list of properties.
#!fsharp
open System.IO
open System
open ClosedXML.Excel
open FsExcel
[ Go NewRow
for heading, colWidth in ["ID", 3.22; "Car Name", 10.33; "Car Description", 49.33; "Car Registration", 16.89 ] do
Cell [
String heading
FontEmphasis Bold
FontName "Calibri"
FontSize 11
HorizontalAlignment Center
FontColor (XLColor.FromArgb(0, 255, 255, 255))
BackgroundColor (XLColor.FromArgb(0, 68, 114, 196))
Border(Border.All XLBorderStyleValues.Thin)
CellSize (ColWidth colWidth)
]
Go NewRow
Cell [ Integer 1
HorizontalAlignment Center ]
Cell [ String "Ford Fiesta" ]
Cell [ String "Car Technical Details..."]
Cell [ String "AB12 CDE"
HorizontalAlignment Center]
]
|> Render.AsFile (Path.Combine(savePath, "IndividualCellSize.xlsx"))
#!markdown
#!markdown
## Individual Cell Sizing
To size individual cells within an Item list (e.g. `[ Cell [....]; Go NewRow; Cell [...]; Go NewRow etc.`]`)`, use `CellSize (ColWidth 10)` and `CellSize (RowHeight 10)` as part of a Cell's list of properties.
#!fsharp
open System.IO
open System
open ClosedXML.Excel
open FsExcel
[ Go NewRow
for heading, colWidth in ["ID", 3.22; "Car Name", 10.33; "Car Description", 49.33; "Car Registration", 16.89 ] do
Cell [
String heading
FontEmphasis Bold
FontName "Calibri"
FontSize 11
HorizontalAlignment Center
FontColor (XLColor.FromArgb(0, 255, 255, 255))
BackgroundColor (XLColor.FromArgb(0, 68, 114, 196))
Border(Border.All XLBorderStyleValues.Thin)
CellSize (ColWidth colWidth)
]
Go NewRow
Cell [ Integer 1
HorizontalAlignment Center ]
Cell [ String "Ford Fiesta" ]
Cell [ String "Car Technical Details..."]
Cell [ String "AB12 CDE"
HorizontalAlignment Center]
]
|> Render.AsFile (Path.Combine(savePath, "IndividualCellSize.xlsx"))
#!markdown
 #!markdown
## Autofitting
You can set the widths of columns to fit their contents using ``AutoFit AllCols``. You can auto fit a range of columns with ``AutoFit (ColRange(
#!markdown
## Autofitting
You can set the widths of columns to fit their contents using ``AutoFit AllCols``. You can auto fit a range of columns with ``AutoFit (ColRange(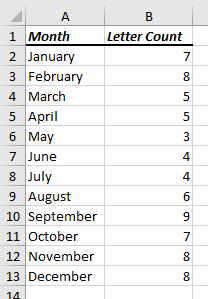 #!markdown
## Merging Cells and Vertical Alignment
You can merge cells by using `MergeCells (CellLabel , CellLabel)` where a `CellLabel` can be a:
* specific cell - `ColRowLabel ("
#!markdown
## Merging Cells and Vertical Alignment
You can merge cells by using `MergeCells (CellLabel , CellLabel)` where a `CellLabel` can be a:
* specific cell - `ColRowLabel (" #!markdown
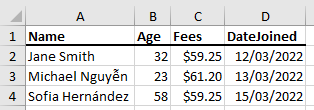
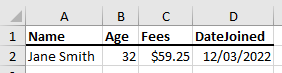
## Tables from Records
You can create a table of cells from an F# record or a sequence of F# records.
*The tables created using this approach are not proper Excel tables, simply grids of cells with potentially a little formatting. To create true Excel tables, see [Excel Table Tutorial](https://github.com/misterspeedy/FsExcel/blob/main/ExcelTableTutorial.md).*
Use `Table.fromInstance` or `Table.fromSeq` and provide
- an orientation (`Table.Direction.Horizontal` or `Table.Direction.Vertical`)
- a function which, given an index and a field name, returns a list of properties for styling. (This style can be an empty list.)
- the instance or sequence.
In horizontal tables, the values for each record appear beside one another. In vertical tables the values for a record appear below one another.
Calls to the cell style function are given 0 for the header, 1 for the first (or only) data row, 2 for the next and so on.
Tables don't automatically autofit - you'll have to do that (if you want) after the table is built.
Regardless of table orientation, the 'current cell' (i.e. the address at which any further new cell is rendered) is always just below the bottom-left corner of the table that was just created.
#!fsharp
open System
open System.IO
open ClosedXML.Excel
open FsExcel
type JoiningInfo = {
Name : string
Age : int
Fees : decimal
DateJoined : string
}
// This works just as well if these are anonymous record instances,
// eg. {| Name = "..."; ... |}
let records = [
{ Name = "Jane Smith"; Age = 32; Fees = 59.25m; DateJoined = "2022-03-12" } // Excel will treat these strings as dates
{ Name = "Michael Nguyễn"; Age = 23; Fees = 61.2m; DateJoined = "2022-03-13" }
{ Name = "Sofia Hernández"; Age = 58; Fees = 59.25m; DateJoined = "2022-03-15" }
]
let cellStyleVertical index name =
if index = 0 then
[ FontEmphasis Bold ]
elif name = "Fees" then
[ FormatCode "$0.00" ]
else
[]
let cellStyleHorizontal index name =
if index = 0 then
[
Border(Border.Bottom XLBorderStyleValues.Medium)
FontEmphasis Bold
]
elif name = "Fees" then
[ FormatCode "$0.00" ]
else
[]
records
|> Table.fromSeq Table.Direction.Vertical cellStyleVertical
|> fun cells -> cells @ [ AutoFit All ]
|> Render.AsFile (Path.Combine(savePath, "RecordSequenceVertical.xlsx"))
records
|> Table.fromSeq Table.Direction.Horizontal cellStyleHorizontal
|> fun cells -> cells @ [ AutoFit All ]
|> Render.AsFile (Path.Combine(savePath, "RecordSequenceHorizontal.xlsx"))
records
|> Seq.tryHead
|> Option.iter (fun r ->
r
|> Table.fromInstance Table.Direction.Vertical cellStyleVertical
|> fun cells -> cells @ [ AutoFit All ]
|> Render.AsFile (Path.Combine(savePath, "RecordInstanceVertical.xlsx"))
r
|> Table.fromInstance Table.Direction.Horizontal cellStyleHorizontal
|> fun cells -> cells @ [ AutoFit All ]
|> Render.AsFile (Path.Combine(savePath, "RecordInstanceHorizontal.xlsx")))
#!markdown
#!markdown
## Tables from Records
You can create a table of cells from an F# record or a sequence of F# records.
*The tables created using this approach are not proper Excel tables, simply grids of cells with potentially a little formatting. To create true Excel tables, see [Excel Table Tutorial](https://github.com/misterspeedy/FsExcel/blob/main/ExcelTableTutorial.md).*
Use `Table.fromInstance` or `Table.fromSeq` and provide
- an orientation (`Table.Direction.Horizontal` or `Table.Direction.Vertical`)
- a function which, given an index and a field name, returns a list of properties for styling. (This style can be an empty list.)
- the instance or sequence.
In horizontal tables, the values for each record appear beside one another. In vertical tables the values for a record appear below one another.
Calls to the cell style function are given 0 for the header, 1 for the first (or only) data row, 2 for the next and so on.
Tables don't automatically autofit - you'll have to do that (if you want) after the table is built.
Regardless of table orientation, the 'current cell' (i.e. the address at which any further new cell is rendered) is always just below the bottom-left corner of the table that was just created.
#!fsharp
open System
open System.IO
open ClosedXML.Excel
open FsExcel
type JoiningInfo = {
Name : string
Age : int
Fees : decimal
DateJoined : string
}
// This works just as well if these are anonymous record instances,
// eg. {| Name = "..."; ... |}
let records = [
{ Name = "Jane Smith"; Age = 32; Fees = 59.25m; DateJoined = "2022-03-12" } // Excel will treat these strings as dates
{ Name = "Michael Nguyễn"; Age = 23; Fees = 61.2m; DateJoined = "2022-03-13" }
{ Name = "Sofia Hernández"; Age = 58; Fees = 59.25m; DateJoined = "2022-03-15" }
]
let cellStyleVertical index name =
if index = 0 then
[ FontEmphasis Bold ]
elif name = "Fees" then
[ FormatCode "$0.00" ]
else
[]
let cellStyleHorizontal index name =
if index = 0 then
[
Border(Border.Bottom XLBorderStyleValues.Medium)
FontEmphasis Bold
]
elif name = "Fees" then
[ FormatCode "$0.00" ]
else
[]
records
|> Table.fromSeq Table.Direction.Vertical cellStyleVertical
|> fun cells -> cells @ [ AutoFit All ]
|> Render.AsFile (Path.Combine(savePath, "RecordSequenceVertical.xlsx"))
records
|> Table.fromSeq Table.Direction.Horizontal cellStyleHorizontal
|> fun cells -> cells @ [ AutoFit All ]
|> Render.AsFile (Path.Combine(savePath, "RecordSequenceHorizontal.xlsx"))
records
|> Seq.tryHead
|> Option.iter (fun r ->
r
|> Table.fromInstance Table.Direction.Vertical cellStyleVertical
|> fun cells -> cells @ [ AutoFit All ]
|> Render.AsFile (Path.Combine(savePath, "RecordInstanceVertical.xlsx"))
r
|> Table.fromInstance Table.Direction.Horizontal cellStyleHorizontal
|> fun cells -> cells @ [ AutoFit All ]
|> Render.AsFile (Path.Combine(savePath, "RecordInstanceHorizontal.xlsx")))
#!markdown


 #!markdown
## Rendering in Fable Elmish and similar web applications
You can use `Render.AsStream
#!markdown
## Rendering in Fable Elmish and similar web applications
You can use `Render.AsStream 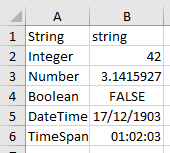 #!markdown
## Rendering as HTML
You can render a workbook as a set of HTML tables. You will get one table per worksheet.
This feature is primarily for use in Dotnet Interactive Notebooks, where you can use the `HTML()` helper method to display the resulting HTML. This can be useful when experimenting with cell layouts, to avoid having to view an Excel file on every iteration.
The styling representation is approximate:
- Bold and italic font emphasis should show correctly. (Note that VS Code does not default to representing `
#!markdown
## Rendering as HTML
You can render a workbook as a set of HTML tables. You will get one table per worksheet.
This feature is primarily for use in Dotnet Interactive Notebooks, where you can use the `HTML()` helper method to display the resulting HTML. This can be useful when experimenting with cell layouts, to avoid having to view an Excel file on every iteration.
The styling representation is approximate:
- Bold and italic font emphasis should show correctly. (Note that VS Code does not default to representing `Some of the above issues may be related to one of these: * [Setting AutoFilter EqualTo on Date Column Doesn't Display Values When Spreadsheet Is Opened Until Filters Are Reapplied #701](https://github.com/ClosedXML/ClosedXML/issues/701) * [Text to number coercion doesn't work correctly #1891](https://github.com/ClosedXML/ClosedXML/issues/1891) #!markdown ### Enable Only In the example below and `AutoFilter` is enabled for the `RangeUsed`, but no filter is applied. #!fsharp open System open System.IO open FsExcel let headings = [ Cell [ String "StringCol"; HorizontalAlignment Center ] Cell [ String "IntCol"; HorizontalAlignment Center ] Cell [ String "FloatCol"; HorizontalAlignment Center ] Cell [ String "DateTimeCol"; HorizontalAlignment Center ] Cell [ String "BooleanCol"; HorizontalAlignment Center ] Go NewRow ] let rows = [ 1 .. 5 ] |> Seq.map(fun i -> [ Cell [ String $"String{i}" ] Cell [ Integer i ] Cell [ Float ((i |> float) + 0.1) ] Cell [ DateTime (DateTime.Parse("15-July-2017 05:33:00").AddMinutes(i)) ] Cell [ Boolean (i % 2 |> Convert.ToBoolean) ] Go NewRow ]) |> Seq.collect id |> List.ofSeq headings @ rows @ [ AutoFit All; AutoFilter [ EnableOnly RangeUsed ] ] |> Render.AsFile (Path.Combine(savePath, "AutoFilterEnableOnly.xlsx")) #!markdown
 #!markdown
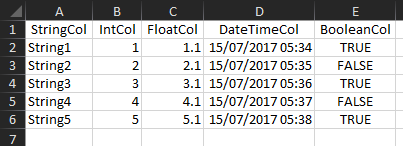
### Apply AutoFilter
In the example below `AutoFilter` is enabled (this is automatic if you create a filter).
The following compound filter is created:
* `RangeUsed`, column 2 is filtered for greater than 3
* and `RangeUsed`, column 5 is filtered to equal `true`
#!fsharp
open System
open System.IO
open FsExcel
let headings =
[ Cell [ String "StringCol"; HorizontalAlignment Center ]
Cell [ String "IntCol"; HorizontalAlignment Center ]
Cell [ String "FloatCol"; HorizontalAlignment Center ]
Cell [ String "DateTimeCol"; HorizontalAlignment Center ]
Cell [ String "BooleanCol"; HorizontalAlignment Center ]
Go NewRow ]
let rows =
[ 1 .. 5 ]
|> Seq.map(fun i ->
[ Cell [ String $"String{i}" ]
Cell [ Integer i ]
Cell [ Float ((i |> float) + 0.1) ]
Cell [ DateTime (DateTime.Parse("15-July-2017 05:33:00").AddMinutes(i)) ]
Cell [ Boolean (i % 2 |> Convert.ToBoolean) ]
Go NewRow ])
|> Seq.collect id
|> List.ofSeq
headings @ rows @ [ AutoFit All; AutoFilter [ GreaterThanInt (RangeUsed, 2, 3); EqualToBool (RangeUsed, 5, true) ] ]
|> Render.AsFile (Path.Combine(savePath, "AutoFilterCompound.xlsx"))
#!markdown
No AutoFilter:
#!markdown
### Apply AutoFilter
In the example below `AutoFilter` is enabled (this is automatic if you create a filter).
The following compound filter is created:
* `RangeUsed`, column 2 is filtered for greater than 3
* and `RangeUsed`, column 5 is filtered to equal `true`
#!fsharp
open System
open System.IO
open FsExcel
let headings =
[ Cell [ String "StringCol"; HorizontalAlignment Center ]
Cell [ String "IntCol"; HorizontalAlignment Center ]
Cell [ String "FloatCol"; HorizontalAlignment Center ]
Cell [ String "DateTimeCol"; HorizontalAlignment Center ]
Cell [ String "BooleanCol"; HorizontalAlignment Center ]
Go NewRow ]
let rows =
[ 1 .. 5 ]
|> Seq.map(fun i ->
[ Cell [ String $"String{i}" ]
Cell [ Integer i ]
Cell [ Float ((i |> float) + 0.1) ]
Cell [ DateTime (DateTime.Parse("15-July-2017 05:33:00").AddMinutes(i)) ]
Cell [ Boolean (i % 2 |> Convert.ToBoolean) ]
Go NewRow ])
|> Seq.collect id
|> List.ofSeq
headings @ rows @ [ AutoFit All; AutoFilter [ GreaterThanInt (RangeUsed, 2, 3); EqualToBool (RangeUsed, 5, true) ] ]
|> Render.AsFile (Path.Combine(savePath, "AutoFilterCompound.xlsx"))
#!markdown
No AutoFilter:
 AutoFilter applied:
 #!markdown
## Freeze Panes
You can `Freeze Panes` for a WorkSheet.
* [Freeze Panes](#freeze-panes)
* [Freeze Top Row](#freeze-top-row)
* [Freeze First Column](#freeze-first-column)
* [Unfreeze Columns](#unfreeze-panes)
> Note: There is an issue with `Freeze Panes`. If it is disabled in Excel `Split` is left enabled. If you disable `Freeze Panes` in Excel, you will also have to disable `Split`.
> `ClosedXml` issue: [Distorted Header when Scrolling](https://github.com/ClosedXML/ClosedXML/issues/1681#issuecomment-1129045199)
### Freeze Panes
In the example below cell `B2` is selected. `Freeze Panes` is set to `Freeze Panes`.
#!fsharp
open System
open System.IO
open FsExcel
let headings =
[ Cell [ String "StringCol"; HorizontalAlignment Center ]
Cell [ String "IntCol"; HorizontalAlignment Center ]
Cell [ String "FloatCol"; HorizontalAlignment Center ]
Cell [ String "DateTimeCol"; HorizontalAlignment Center ]
Cell [ String "BooleanCol"; HorizontalAlignment Center ]
Go NewRow ]
let rows =
[ 1 .. 5 ]
|> Seq.map(fun i ->
[ Cell [ String $"String{i}" ]
Cell [ Integer i ]
Cell [ Float ((i |> float) + 0.1) ]
Cell [ DateTime (DateTime.Parse("15-July-2017 05:33:00").AddMinutes(i)) ]
Cell [ Boolean (i % 2 |> Convert.ToBoolean) ]
Go NewRow ])
|> Seq.collect id
|> List.ofSeq
headings @ rows @ [ AutoFit All; FreezePanes (Panes (1, 1)) ]
|> Render.AsFile (Path.Combine(savePath, "FreezePanes.xlsx"))
#!markdown
Cursor at `B2` > `Freeze Panes`:
#!markdown
## Freeze Panes
You can `Freeze Panes` for a WorkSheet.
* [Freeze Panes](#freeze-panes)
* [Freeze Top Row](#freeze-top-row)
* [Freeze First Column](#freeze-first-column)
* [Unfreeze Columns](#unfreeze-panes)
> Note: There is an issue with `Freeze Panes`. If it is disabled in Excel `Split` is left enabled. If you disable `Freeze Panes` in Excel, you will also have to disable `Split`.
> `ClosedXml` issue: [Distorted Header when Scrolling](https://github.com/ClosedXML/ClosedXML/issues/1681#issuecomment-1129045199)
### Freeze Panes
In the example below cell `B2` is selected. `Freeze Panes` is set to `Freeze Panes`.
#!fsharp
open System
open System.IO
open FsExcel
let headings =
[ Cell [ String "StringCol"; HorizontalAlignment Center ]
Cell [ String "IntCol"; HorizontalAlignment Center ]
Cell [ String "FloatCol"; HorizontalAlignment Center ]
Cell [ String "DateTimeCol"; HorizontalAlignment Center ]
Cell [ String "BooleanCol"; HorizontalAlignment Center ]
Go NewRow ]
let rows =
[ 1 .. 5 ]
|> Seq.map(fun i ->
[ Cell [ String $"String{i}" ]
Cell [ Integer i ]
Cell [ Float ((i |> float) + 0.1) ]
Cell [ DateTime (DateTime.Parse("15-July-2017 05:33:00").AddMinutes(i)) ]
Cell [ Boolean (i % 2 |> Convert.ToBoolean) ]
Go NewRow ])
|> Seq.collect id
|> List.ofSeq
headings @ rows @ [ AutoFit All; FreezePanes (Panes (1, 1)) ]
|> Render.AsFile (Path.Combine(savePath, "FreezePanes.xlsx"))
#!markdown
Cursor at `B2` > `Freeze Panes`:
 ### Freeze Top Row
In the example below `Freeze Panes` is set to `Freeze Top Row`.
#!fsharp
open System
open System.IO
open FsExcel
let headings =
[ Cell [ String "StringCol"; HorizontalAlignment Center ]
Cell [ String "IntCol"; HorizontalAlignment Center ]
Cell [ String "FloatCol"; HorizontalAlignment Center ]
Cell [ String "DateTimeCol"; HorizontalAlignment Center ]
Cell [ String "BooleanCol"; HorizontalAlignment Center ]
Go NewRow ]
let rows =
[ 1 .. 5 ]
|> Seq.map(fun i ->
[ Cell [ String $"String{i}" ]
Cell [ Integer i ]
Cell [ Float ((i |> float) + 0.1) ]
Cell [ DateTime (DateTime.Parse("15-July-2017 05:33:00").AddMinutes(i)) ]
Cell [ Boolean (i % 2 |> Convert.ToBoolean) ]
Go NewRow ])
|> Seq.collect id
|> List.ofSeq
headings @ rows @ [ AutoFit All; FreezePanes TopRow ]
|> Render.AsFile (Path.Combine(savePath, "FreezePanesTopRow.xlsx"))
#!markdown
`Freeze Panes` > `Freeze Top Row`:
### Freeze Top Row
In the example below `Freeze Panes` is set to `Freeze Top Row`.
#!fsharp
open System
open System.IO
open FsExcel
let headings =
[ Cell [ String "StringCol"; HorizontalAlignment Center ]
Cell [ String "IntCol"; HorizontalAlignment Center ]
Cell [ String "FloatCol"; HorizontalAlignment Center ]
Cell [ String "DateTimeCol"; HorizontalAlignment Center ]
Cell [ String "BooleanCol"; HorizontalAlignment Center ]
Go NewRow ]
let rows =
[ 1 .. 5 ]
|> Seq.map(fun i ->
[ Cell [ String $"String{i}" ]
Cell [ Integer i ]
Cell [ Float ((i |> float) + 0.1) ]
Cell [ DateTime (DateTime.Parse("15-July-2017 05:33:00").AddMinutes(i)) ]
Cell [ Boolean (i % 2 |> Convert.ToBoolean) ]
Go NewRow ])
|> Seq.collect id
|> List.ofSeq
headings @ rows @ [ AutoFit All; FreezePanes TopRow ]
|> Render.AsFile (Path.Combine(savePath, "FreezePanesTopRow.xlsx"))
#!markdown
`Freeze Panes` > `Freeze Top Row`:
 ### Freeze First Column
In the example below `Freeze Panes` is set to `Freeze First Column`.
#!fsharp
open System
open System.IO
open FsExcel
let headings =
[ Cell [ String "StringCol"; HorizontalAlignment Center ]
Cell [ String "IntCol"; HorizontalAlignment Center ]
Cell [ String "FloatCol"; HorizontalAlignment Center ]
Cell [ String "DateTimeCol"; HorizontalAlignment Center ]
Cell [ String "BooleanCol"; HorizontalAlignment Center ]
Go NewRow ]
let rows =
[ 1 .. 5 ]
|> Seq.map(fun i ->
[ Cell [ String $"String{i}" ]
Cell [ Integer i ]
Cell [ Float ((i |> float) + 0.1) ]
Cell [ DateTime (DateTime.Parse("15-July-2017 05:33:00").AddMinutes(i)) ]
Cell [ Boolean (i % 2 |> Convert.ToBoolean) ]
Go NewRow ])
|> Seq.collect id
|> List.ofSeq
headings @ rows @ [ AutoFit All; FreezePanes FirstColumn ]
|> Render.AsFile (Path.Combine(savePath, "FreezePanesFirstColumn.xlsx"))
#!markdown
`Freeze Panes` > `Freeze First Column`:
### Freeze First Column
In the example below `Freeze Panes` is set to `Freeze First Column`.
#!fsharp
open System
open System.IO
open FsExcel
let headings =
[ Cell [ String "StringCol"; HorizontalAlignment Center ]
Cell [ String "IntCol"; HorizontalAlignment Center ]
Cell [ String "FloatCol"; HorizontalAlignment Center ]
Cell [ String "DateTimeCol"; HorizontalAlignment Center ]
Cell [ String "BooleanCol"; HorizontalAlignment Center ]
Go NewRow ]
let rows =
[ 1 .. 5 ]
|> Seq.map(fun i ->
[ Cell [ String $"String{i}" ]
Cell [ Integer i ]
Cell [ Float ((i |> float) + 0.1) ]
Cell [ DateTime (DateTime.Parse("15-July-2017 05:33:00").AddMinutes(i)) ]
Cell [ Boolean (i % 2 |> Convert.ToBoolean) ]
Go NewRow ])
|> Seq.collect id
|> List.ofSeq
headings @ rows @ [ AutoFit All; FreezePanes FirstColumn ]
|> Render.AsFile (Path.Combine(savePath, "FreezePanesFirstColumn.xlsx"))
#!markdown
`Freeze Panes` > `Freeze First Column`:
 ### Unfreeze Panes
In the example below `Freeze Panes` is set to `Unfreeze Panes`.
> Not that in the code below I first `Freeze Panes` prior to unfreezing them. This is for demonstration purposes only.
#!fsharp
open System
open System.IO
open FsExcel
let headings =
[ Cell [ String "StringCol"; HorizontalAlignment Center ]
Cell [ String "IntCol"; HorizontalAlignment Center ]
Cell [ String "FloatCol"; HorizontalAlignment Center ]
Cell [ String "DateTimeCol"; HorizontalAlignment Center ]
Cell [ String "BooleanCol"; HorizontalAlignment Center ]
Go NewRow ]
let rows =
[ 1 .. 5 ]
|> Seq.map(fun i ->
[ Cell [ String $"String{i}" ]
Cell [ Integer i ]
Cell [ Float ((i |> float) + 0.1) ]
Cell [ DateTime (DateTime.Parse("15-July-2017 05:33:00").AddMinutes(i)) ]
Cell [ Boolean (i % 2 |> Convert.ToBoolean) ]
Go NewRow ])
|> Seq.collect id
|> List.ofSeq
headings @ rows @ [ AutoFit All; FreezePanes TopRow; FreezePanes UnfreezePanes ]
|> Render.AsFile (Path.Combine(savePath, "FreezePanesUnfreezePanes.xlsx"))
#!markdown
`Freeze Panes` > `Unfreeze Panes`:
### Unfreeze Panes
In the example below `Freeze Panes` is set to `Unfreeze Panes`.
> Not that in the code below I first `Freeze Panes` prior to unfreezing them. This is for demonstration purposes only.
#!fsharp
open System
open System.IO
open FsExcel
let headings =
[ Cell [ String "StringCol"; HorizontalAlignment Center ]
Cell [ String "IntCol"; HorizontalAlignment Center ]
Cell [ String "FloatCol"; HorizontalAlignment Center ]
Cell [ String "DateTimeCol"; HorizontalAlignment Center ]
Cell [ String "BooleanCol"; HorizontalAlignment Center ]
Go NewRow ]
let rows =
[ 1 .. 5 ]
|> Seq.map(fun i ->
[ Cell [ String $"String{i}" ]
Cell [ Integer i ]
Cell [ Float ((i |> float) + 0.1) ]
Cell [ DateTime (DateTime.Parse("15-July-2017 05:33:00").AddMinutes(i)) ]
Cell [ Boolean (i % 2 |> Convert.ToBoolean) ]
Go NewRow ])
|> Seq.collect id
|> List.ofSeq
headings @ rows @ [ AutoFit All; FreezePanes TopRow; FreezePanes UnfreezePanes ]
|> Render.AsFile (Path.Combine(savePath, "FreezePanesUnfreezePanes.xlsx"))
#!markdown
`Freeze Panes` > `Unfreeze Panes`:
 #!markdown
## Excel Tables
To create [Excel Tables](https://support.microsoft.com/en-us/office/overview-of-excel-tables-7ab0bb7d-3a9e-4b56-a3c9-6c94334e492c), see the separate [Excel Table Tutorial](https://github.com/misterspeedy/FsExcel/blob/main/ExcelTableTutorial.md).
#!markdown
## Excel Tables
To create [Excel Tables](https://support.microsoft.com/en-us/office/overview-of-excel-tables-7ab0bb7d-3a9e-4b56-a3c9-6c94334e492c), see the separate [Excel Table Tutorial](https://github.com/misterspeedy/FsExcel/blob/main/ExcelTableTutorial.md).