page header
 
Cloudy radiance data assimilation

References:

Source code

Get the pre-compiled code, if you have not yet done so.

WRFDA/var/build/da_wrfvar.exe is the executable that will be used in this session.

Choice of your working directory

You should run each lesson in a separate directory, so that it will be easier to check for the necessary input files and look for what output files are created after a successful run.

We recommend you create /classroom/users/${USER}/DA/cloudy_radiance to be your working directory for this session.

mkdir -p /classroom/users/${USER}/DA/cloudy_radiance
cd /classroom/users/${USER}/DA/cloudy_radiance

Input files

This cloudy radiance exercise will be using its own test case, which can be found in /classroom/wrfhelp/DATA/WRFDA/allsky_radiance_case. This is a case from Hurricane Sandy which impacted the east coast of the United States in late October, 2012. The domain for this case is plotted at right.

Cloudy radiance assimilation is much the same procedure as the basic radiance tutorial case, but it requires some extra entries in the "radiance_info" files (included in the source code) and some namelist changes.

Currently, the all-sky radiance capability is only available for the JAXA GCOM-W1 AMSR2 instrument. These observations are available in HDF5 format. In addition, an extra file "leapsec.dat" is required for AMSR2 assimilation specifically: this contains information about leap seconds.

To begin this exercise, link or copy the basic necessary files from the WRFDA package and the test directory:

ln -sf /classroom/users/${USER}/DA/WRFDA/run/LANDUSE.TBL .
ln -sf /classroom/wrfhelp/DATA/WRFDA/allsky_radiance_case/be.dat .
ln -sf /classroom/wrfhelp/DATA/WRFDA/allsky_radiance_case/fg .
ln -sf /classroom/wrfhelp/DATA/WRFDA/allsky_radiance_case/ob.ascii .
cp -p /classroom/wrfhelp/DATA/WRFDA/allsky_radiance_case/namelist.input .

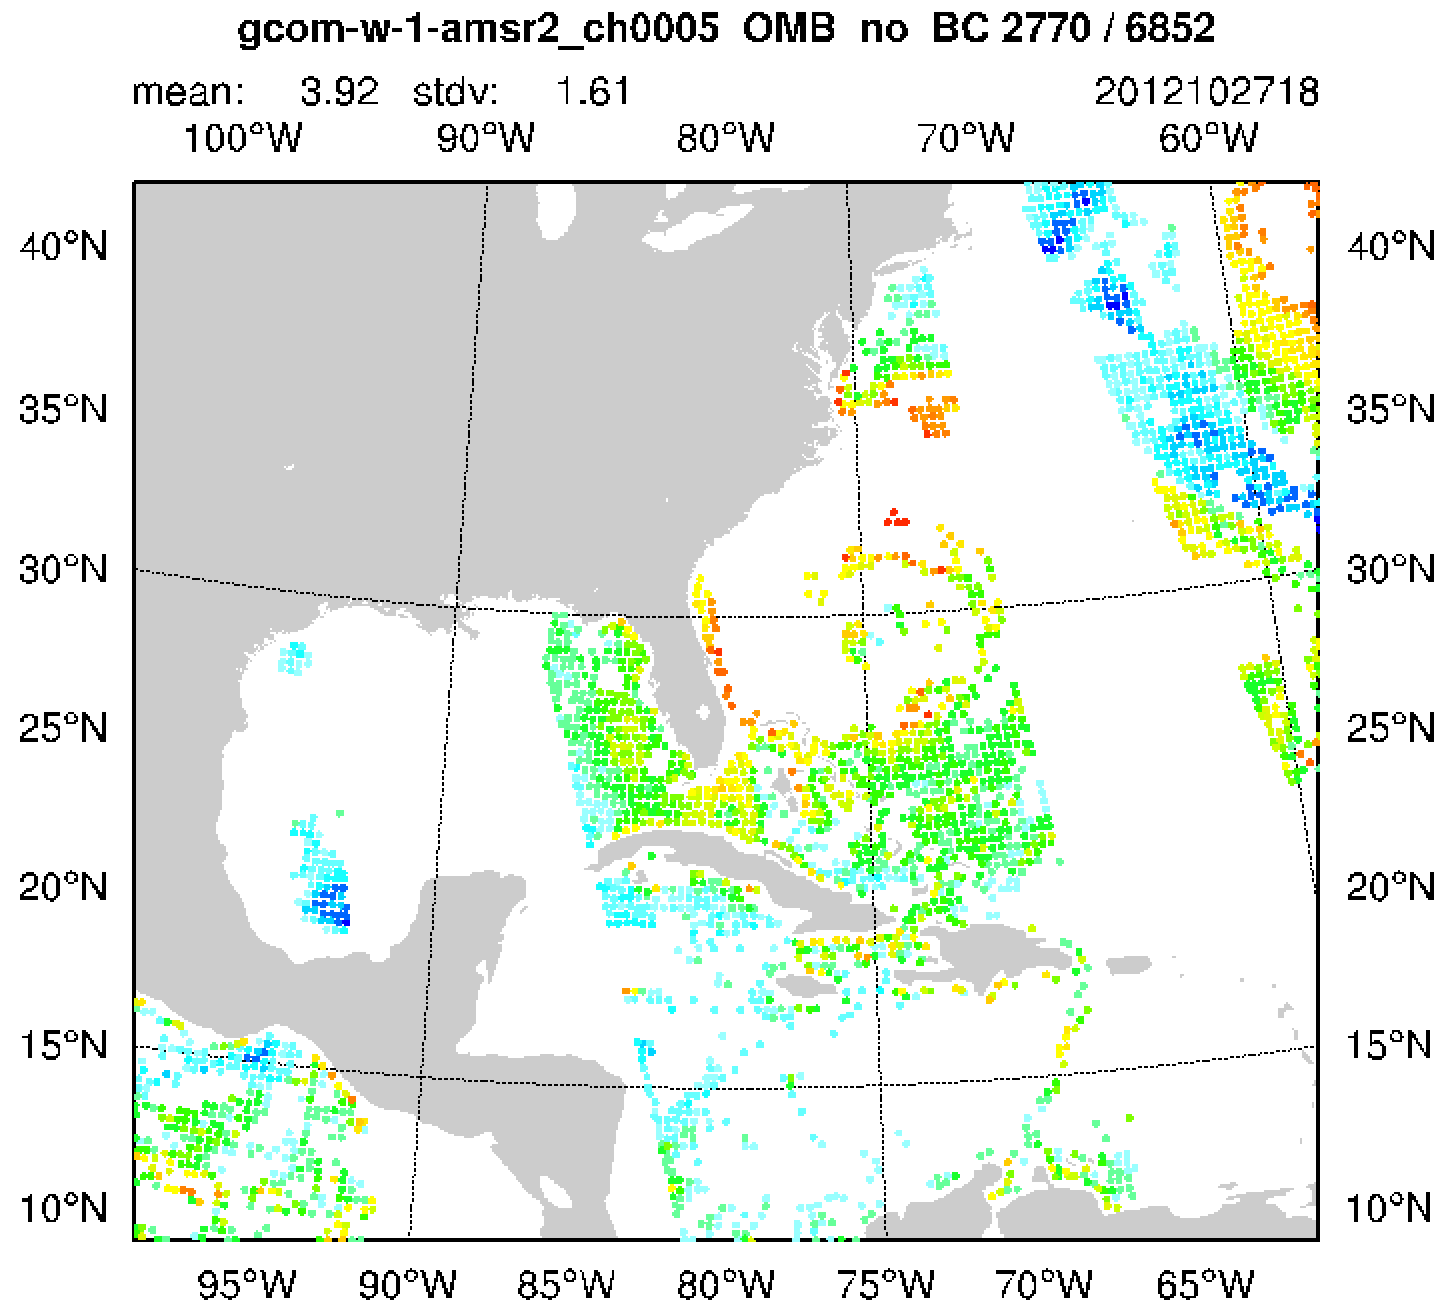
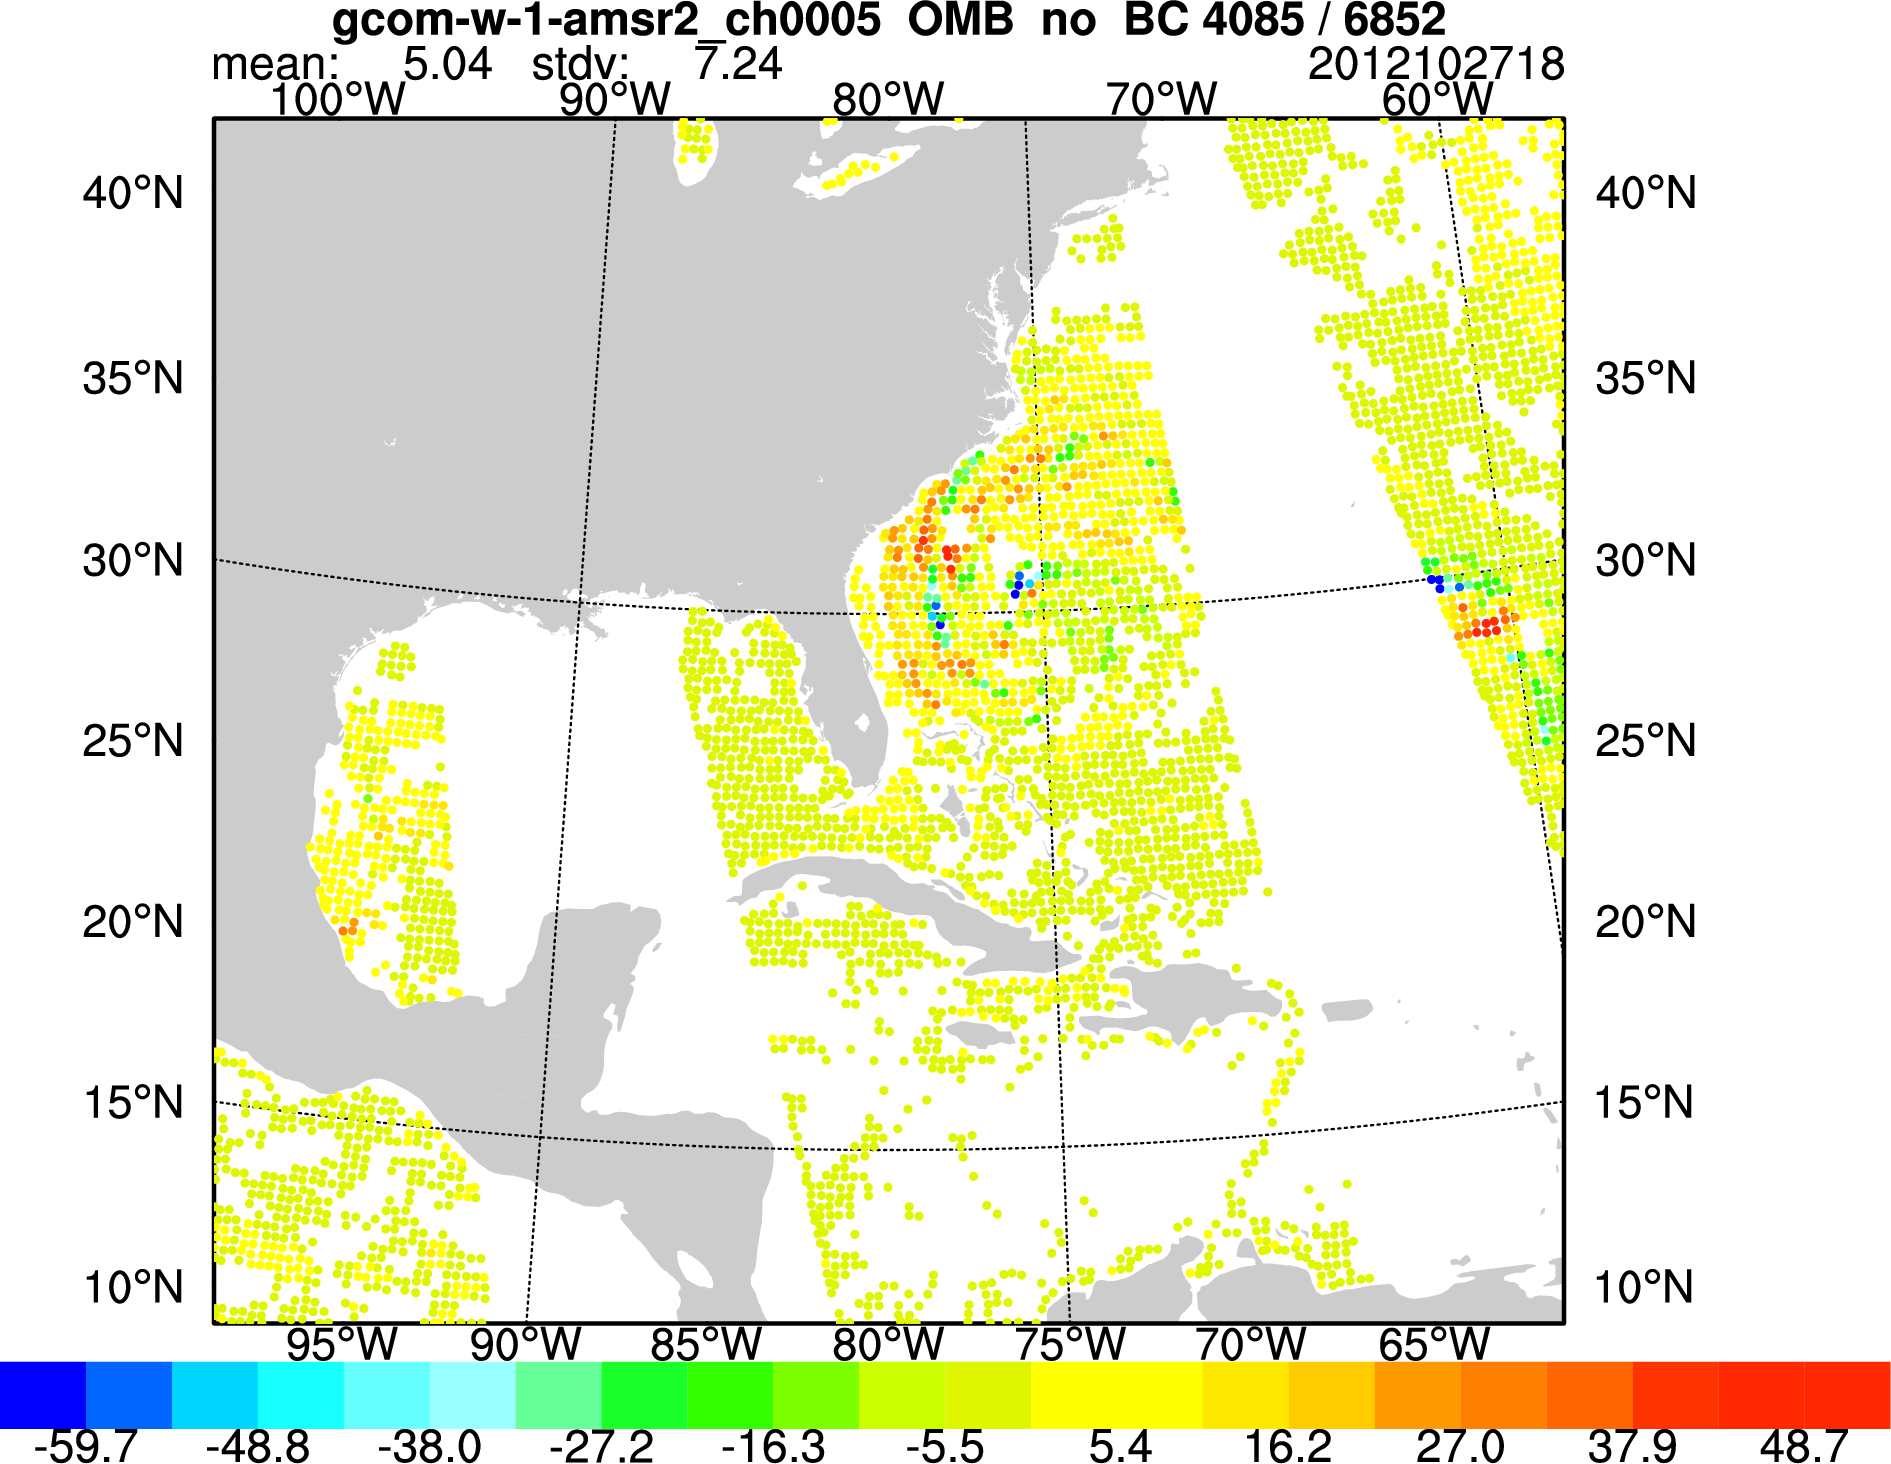
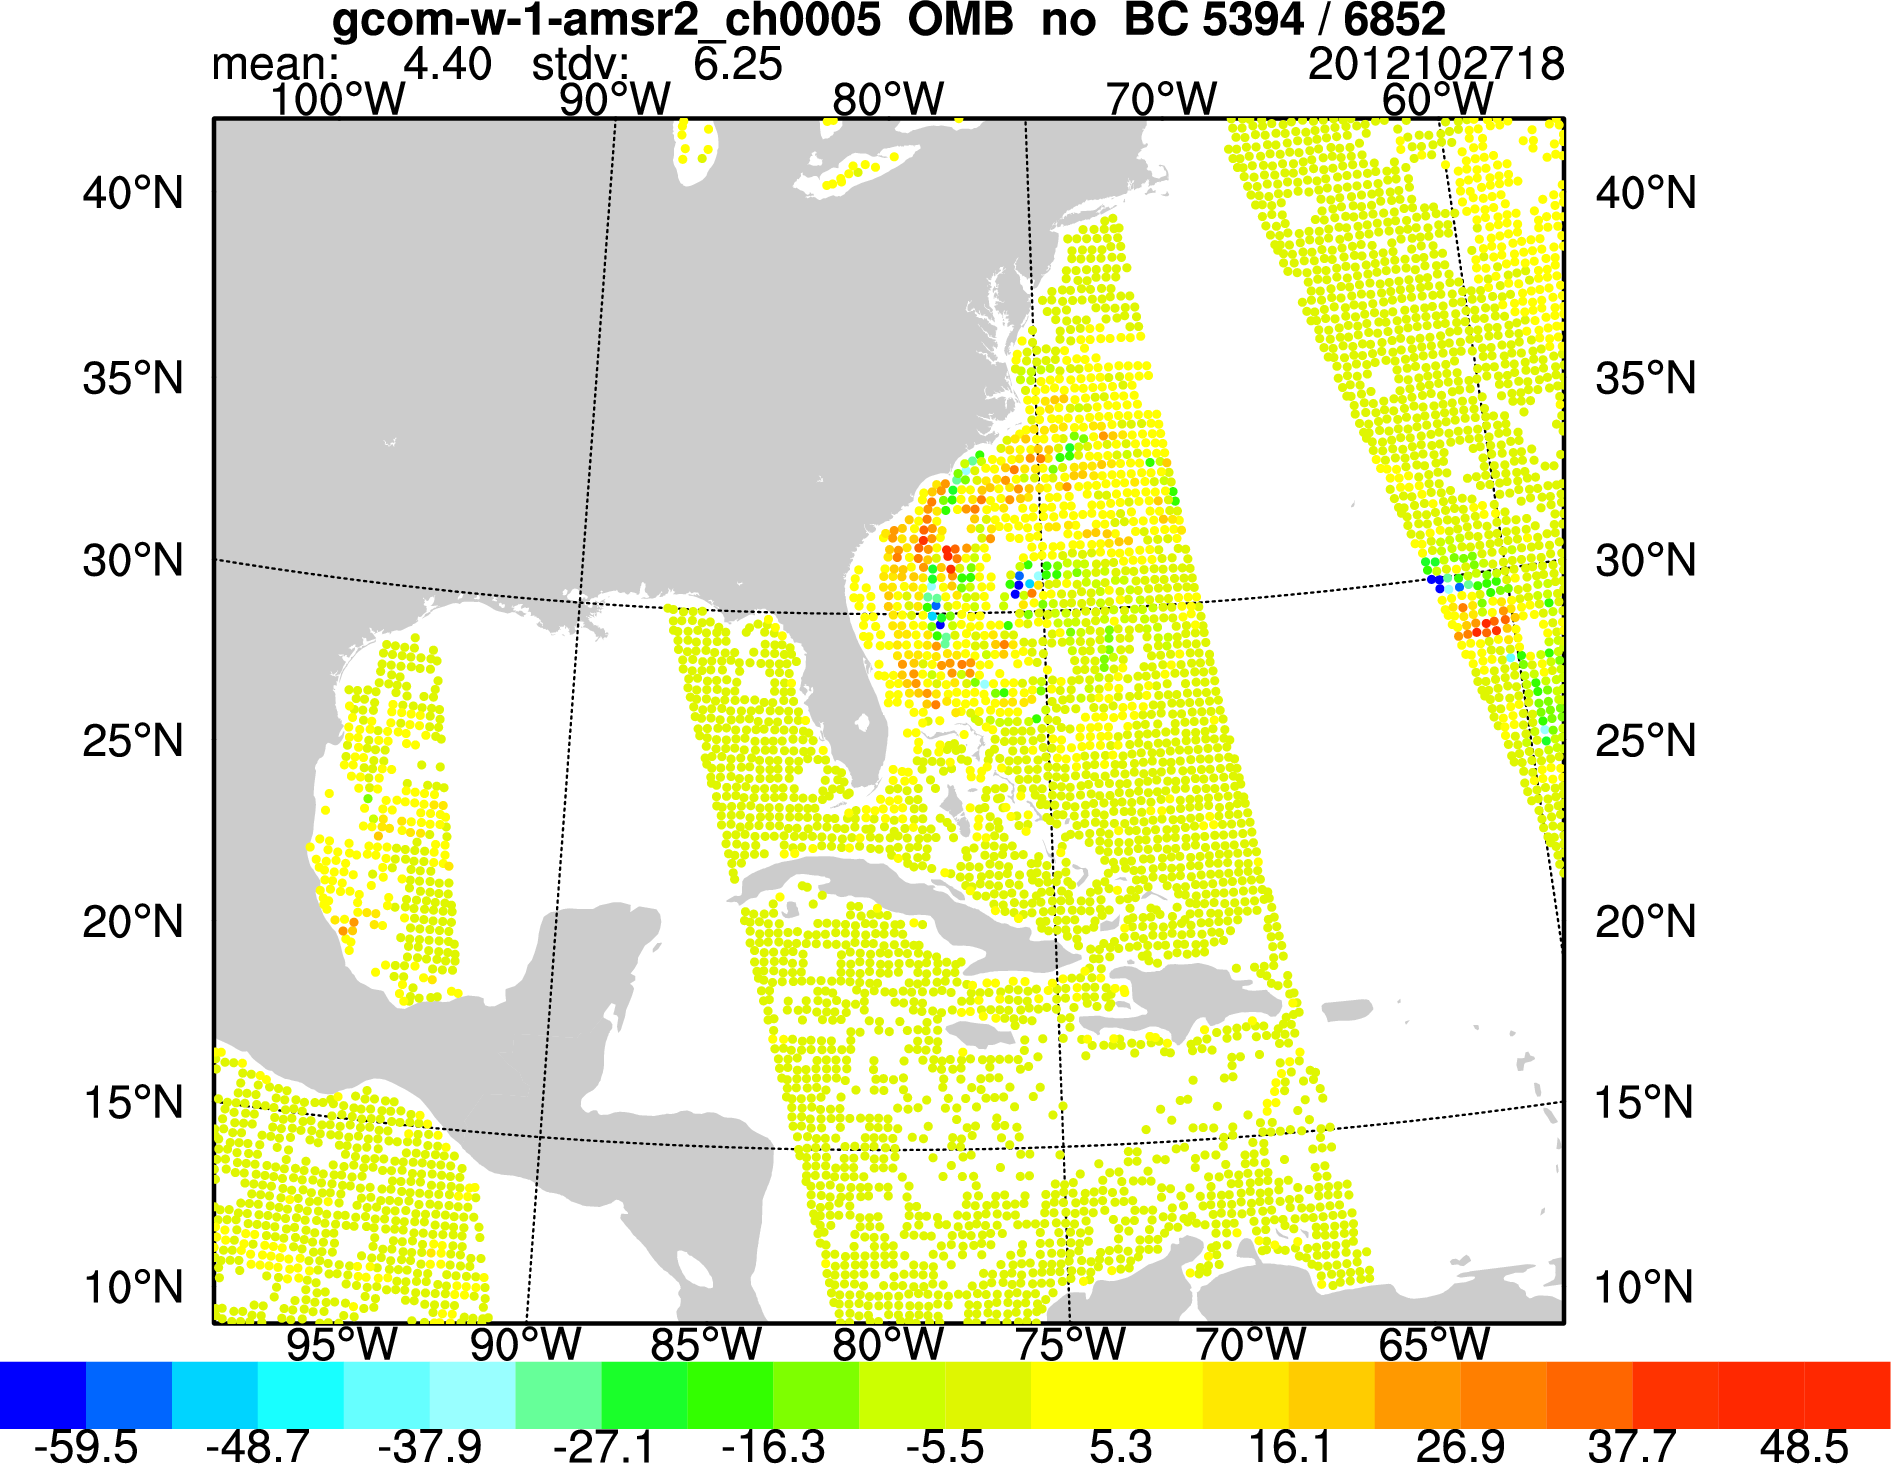
View the namelist file in the text editor of your choice: note the relevant options which are enabled (use_amsr2obs=true to read in AMSR2 observations, crtm_cloud=true to use cloudy radiance observations for CRTM).

 &wrfvar4
  use_amsr2obs=true,
 /
...
 &wrfvar14
  rtminit_nsensor=1,
  rtminit_platform=29,
  rtminit_satid=1,
  rtminit_sensor=63,

  thinning_mesh=30.0,
  thinning=true,
  qc_rad=true,
  write_iv_rad_ascii=true,
  write_oa_rad_ascii=true,
  rtm_option=2,
  crtm_cloud=true,
  only_sea_rad=.true,
  use_varbc=.true.
  varbc_factor=1.0,
  varbc_nbgerr=5000,
  varbc_nobsmin=500,
 /

Now get the data/coefficient files specific to radiance assimilation, including the above-mentioned "leapsec.dat". Note that currently the all-sky radiance capability is only available with CRTM, it is not yet available for RTTOV.

ln -sf /classroom/users/${USER}/DA/WRFDA/var/run/radiance_info ./radiance_info
ln -sf /classroom/users/${USER}/DA/WRFDA/var/run/crtm_coeffs ./crtm_coeffs
ln -sf /classroom/users/${USER}/DA/WRFDA/var/run/leapsec.dat .
cp -p /classroom/wrfhelp/DATA/WRFDA/allsky_radiance_case/VARBC.in .

Finally, get the AMSR2 observation files. These files are in HDF5 format, and have a different naming scheme from BUFR radiance observation files. There are two types of AMSR2 observation files which are used by WRFDA: brightness temperature (L1SGRTBR*.h5) and cloud water (L2SGCLWLD*.h5). Brightness temperature observations are assimilated in WRFDA; cloud water information is used for quality control.

ln -fs /classroom/wrfhelp/DATA/WRFDA/allsky_radiance_case/L1SGRTBR*.h5 .
ln -fs /classroom/wrfhelp/DATA/WRFDA/allsky_radiance_case/L2SGCLWLD*.h5 .

Note that the above linking commands get you multiple files through use of the wildcard (*). For more information on the naming scheme and why multiple files are used, see slide 14 of the Observations talk, or the relevant section of the user's guide.

Run WRFDA

mpirun -np 6 /classroom/users/${USER}/DA/WRFDA/var/build/da_wrfvar.exe

The execution of this test case should take about 3 minutes to complete on classroom computers.

Check output

Check analysis increments.

Check statistics.

There are extra diagnostic files when assimilating radiance data:

  • *oma_gcom-w-1-amsr2*: Observation minus analysis statistics for the AMSR2 instrument. Notice that there are two sets of files: starting "01_oma" and "02_oma". This is because we ran this case with two outer loops.
  • *oma_gcom-w-1-amsr2*: Observation minus background (innovation) statistics for the AMSR2 instrument
  • 01_qcstat_gcom-w-1-amsr2, 02_qcstat_gcom-w-1-amsr2: Quality control statistics for AMSR2; one file for each outer loop
  • VARBC.out: Output file for Variational Bias Correction (see User's Guide for more info). Note that the process was done for each outer loop: the VARBC.out statistics for the first outer loop is saved in the file "VARBC.out_01"

Graphics

The script /classroom/wrfhelp/DATA/WRFDA/TOOLS/scripts/da_rad_diags.ksh can be used to generate a number of helpful plots and graphs for visualizing radiance assimilation statistics.

/classroom/wrfhelp/DATA/WRFDA/TOOLS/scripts/da_rad_diags.ksh
export START_DATE=2012102718
export END_DATE=2012102718
#
export NUM_PROCS=6 # number of processors used in running WRFDA
export WRFVAR_DIR=/classroom/users/${USER}/DA/WRFDA
export BUILD_DIR=${WRFVAR_DIR}/var/build
export TOOLS_DIR=/classroom/wrfhelp/DATA/WRFDA/TOOLS
export EXP_DIR=/classroom/users/${USER}/DA/cloudy_radiance
export VAR_RUN_DIR1=$EXP_DIR

...
export FGFILE=$VAR_RUN_DIR1/fg
...
export FILE_PREFIX=02_oma
set -A INSTIDS gcom-w-1-amsr2
...
export $FULL_FILE_PREFIX=$VAR_RUN_DIR1/$FILE_PREFIX
...
export OUT_TYPE=pdf

Using the above settings, a PDF document with several plots will be created in the "diag" directory. The plot at right shows the observed values for AMSR2 Channel 5 on GCOM-W1 (after thinning was applied); you should see many plots like this for other channels, as well as plots related to bias correction.

If you would like to see the impact of cloudy radiance vs. clear-sky radiance only, you can run the case again with "crtm_cloud=false" under &wrfvar14. The plots at right show one of the plots made with and without cloudy radiance observations.

You can also try running the above script with FILE_PREFIX=01_oma. This will show you the data for the second outer loop rather than the first. Notice that more observations are assimilated in the second outer loop!


Plot of OMB with only clearsky radiance, Channel 5


Same plot as above but with allsky (clear and cloudy) radiance


Same plot as above but for the second outer loop


You have completed the cloudy radiance tutorial! You can now move on to the next exercise.


back to top
 
practice_page_header