This lesson teaches you to
The v7
appcompat support library Toolbar provides several
different ways for users to interact with your app. Previous lessons
described how to define an action, which can be either a button or a
menu item. This lesson describes how to add two versatile components:
- An action view is an action that provides rich functionality within the app bar. For example, a search action view allows the user to type their search text in the app bar, without having to change activities or fragments.
- An action provider is an action with its own customized layout. The action initially appears as a button or menu item, but when the user clicks the action, the action provider controls the action's behavior in any way you want to define. For example, the action provider might respond to a click by displaying a menu.
The Android support libraries provide several specialized action view and
action provider widgets. For example, the SearchView widget implements an action view for
entering search queries, and the ShareActionProvider widget implements an action
provider for
sharing information with other apps. You can also define your own action
views and action providers.
Add an Action View
To add an action view, create an <item>
element in the toolbar's menu resource, as Add Action
Buttons describes. Add one of the following two
attributes to the <item>
element:
-
actionViewClass: The class of a widget that implements the action. -
actionLayout: A layout resource describing the action's components.
Set the showAsAction attribute to either
"ifRoom|collapseActionView" or
"never|collapseActionView". The collapseActionView
flag indicates how to display the widget when the user is not interacting with
it: If the widget is on the app bar, the app should display the widget as an
icon. If the widget is in the overflow menu, the app should display the widget
as a menu item. When the user interacts with the action view, it
expands to fill the app bar.
For example, the following code adds a SearchView widget to the app bar:
<item android:id="@+id/action_search"
     android:title="@string/action_search"
     android:icon="@drawable/ic_search"
     app:showAsAction="ifRoom|collapseActionView"
     app:actionViewClass="android.support.v7.widget.SearchView" />
If the user is not interacting with the widget, the app displays the widget
as the icon specified by android:icon. (If there is not enough
room in the app bar, the app adds the action to the overflow menu.) When the
user taps the icon or menu item, the widget expands to fill the toolbar,
allowing the user to interact with it.
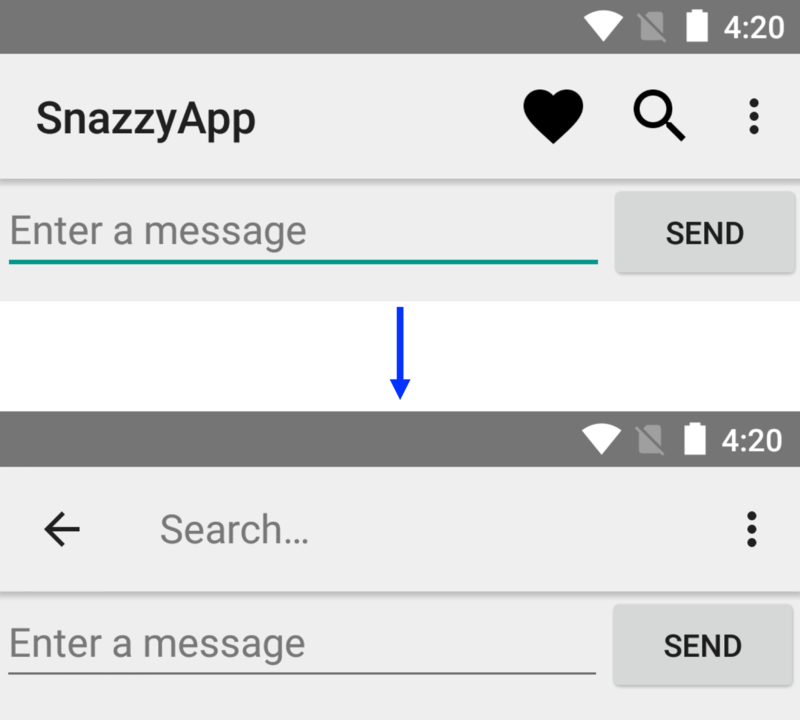
Figure 1. When the user clicks an action view's icon, the view's UI fills the toolbar.
If you need to configure the action, do so in your activity's onCreateOptionsMenu() callback. You
can get the action view's object reference by calling the static getActionView() method.
For example, the following code gets the object reference for the SearchView widget defined in the previous code
example:
@Override
public boolean onCreateOptionsMenu(Menu menu) {
    getMenuInflater().inflate(R.menu.main_activity_actions, menu);

    MenuItem searchItem = menu.findItem(R.id.action_search);
    SearchView searchView =
            (SearchView) MenuItemCompat.getActionView(searchItem);

    // Configure the search info and add any event listeners...

    return super.onCreateOptionsMenu(menu);
}
Responding to action view expansion
If the action's <item>
element has a collapseActionView flag, the app displays the action
view as an icon until the user interacts with the action view.
When the user clicks on the icon, the built-in handler for onOptionsItemSelected() expands
the action view. If your activity subclass overrides the onOptionsItemSelected() method,
your override method must call super.onOptionsItemSelected() so the superclass can expand the action view.
If you want to do something when the action is expanded or collapsed, you can
define a class that implements
MenuItem.OnActionExpandListener, and pass a member of
that class to
setOnActionExpandListener(). For example, you might want to update the
activity based on whether an action view is expanded or collapsed. The
following snippet shows how to define and pass a listener:
@Override
public boolean onCreateOptionsMenu(Menu menu) {
    getMenuInflater().inflate(R.menu.options, menu);
    // ...

    // Define the listener
    OnActionExpandListener expandListener = new OnActionExpandListener() {
        @Override
        public boolean onMenuItemActionCollapse(MenuItem item) {
            // Do something when action item collapses
            return true;  // Return true to collapse action view
        }

        @Override
        public boolean onMenuItemActionExpand(MenuItem item) {
            // Do something when expanded
            return true;  // Return true to expand action view
        }
    };

    // Get the MenuItem for the action item
    MenuItem actionMenuItem = menu.findItem(R.id.myActionItem);

    // Assign the listener to that action item
    MenuItemCompat.setOnActionExpandListener(actionMenuItem, expandListener);

    // Any other things you have to do when creating the options menu…

    return true;
}
Add an Action Provider
To declare an action provider, create an <item>
element in the toolbar's menu resource, as described in Add Action Buttons. Add an
actionProviderClass attribute, and set it to the fully qualified
class name for the action provider class.
For example, the following code declares a ShareActionProvider, which is a widget defined in
the support library that allows your app to share data with other apps:
<item android:id="@+id/action_share"
    android:title="@string/share"
    app:showAsAction="ifRoom"
    app:actionProviderClass="android.support.v7.widget.ShareActionProvider"/>
In this case, it is not necessary to declare an icon for the widget, since ShareActionProvider provides its own graphics. If
you are using a custom action, declare an icon.
For information about creating a custom action provider, see the ActionProvider reference. For information about
configuring a ShareActionProvider, see the
reference for that class.