


# 設置
## 安裝模組
```bash
python3 -m pip install EdgeGPT --upgrade
```
## 要求
- python 3.8+
- 一個可以訪問必應聊天的微軟帳戶 (可選,取決於所在地區)
- 需要在 New Bing 支持的國家或地區(中國大陸需使用VPN)
- [Selenium](https://pypi.org/project/selenium/) (對於需要自動配置cookie的情況)
## 認證
基本上不需要了。
**在某些地區**,微軟已將聊天功能**開放**給所有人,或許可以**省略這一步**了。您可以使用瀏覽器進行檢查(將 UA 設置為能表示為 Edge 的),**嘗試能否在不登錄的情況下開始聊天**。
可能也得**看當前所在 IP 位址**。例如,如果試圖從一個已知**屬於數據中心範圍**的 IP 來訪問聊天功能(虛擬伺服器、根伺服器、虛擬專網、公共代理等),**可能就需要登錄**;但是要是用家裡的 IP 位址訪問聊天功能,就沒有問題。
如果收到這樣的錯誤,可以試試**提供一個 cookie** 看看能不能解決:
`Exception: Authentication failed. You have not been accepted into the beta.`
### 收集 cookie
1. 獲取一個看著像 Microsoft Edge 的瀏覽器。
* a) (簡單) 安裝最新版本的 Microsoft Edge
* b) (高級) 或者, 您可以使用任何瀏覽器並將用戶代理設置為Edge的用戶代理 (例如 `Mozilla/5.0 (Windows NT 10.0; Win64; x64) AppleWebKit/537.36 (KHTML, like Gecko) Chrome/111.0.0.0 Safari/537.36 Edg/111.0.1661.51`). 您可以使用像 "User-Agent Switcher and Manager" [Chrome](https://chrome.google.com/webstore/detail/user-agent-switcher-and-m/bhchdcejhohfmigjafbampogmaanbfkg) 和 [Firefox](https://addons.mozilla.org/en-US/firefox/addon/user-agent-string-switcher/) 這樣的擴展輕鬆完成此操作.
2. 打開 [bing.com/chat](https://bing.com/chat)
3. 如果您看到聊天功能,就接著下面的步驟...
4. 安裝 [Chrome](https://chrome.google.com/webstore/detail/cookie-editor/hlkenndednhfkekhgcdicdfddnkalmdm) 或 [Firefox](https://addons.mozilla.org/en-US/firefox/addon/cookie-editor/) 的 cookie editor 擴展
5. 轉到 [bing.com](https://bing.com)
6. 打開擴展程式
7. 單擊右下角的「匯出」,然後按「匯出為 JSON」(這會將您的 cookie 保存到剪貼簿)
8. 將您剪貼簿上的 cookie 粘貼到檔 `bing_cookies_*.json` 中
* 注意:**cookie 檔名必須遵循正則表示式 `bing_cookies_*.json`**,這樣才能讓本模組的 cookie 處理程式識別到。
### 在代碼中使用 cookie:
```python
cookies = json.loads(open("./path/to/cookies.json", encoding="utf-8").read()) # 可能会忽略 cookie 选项
bot = await Chatbot.create(cookies=cookies)
```
# 如何使用聊天機器人
## 從命令列運行
```
$ python3 -m EdgeGPT.EdgeGPT -h
EdgeGPT - A demo of reverse engineering the Bing GPT chatbot
Repo: github.com/acheong08/EdgeGPT
By: Antonio Cheong
!help for help
Type !exit to exit
usage: EdgeGPT.py [-h] [--enter-once] [--search-result] [--no-stream] [--rich] [--proxy PROXY] [--wss-link WSS_LINK]
[--style {creative,balanced,precise}] [--prompt PROMPT] [--cookie-file COOKIE_FILE]
[--history-file HISTORY_FILE] [--locale LOCALE]
options:
-h, --help show this help message and exit
--enter-once
--search-result
--no-stream
--rich
--proxy PROXY Proxy URL (e.g. socks5://127.0.0.1:1080)
--wss-link WSS_LINK WSS URL(e.g. wss://sydney.bing.com/sydney/ChatHub)
--style {creative,balanced,precise}
--prompt PROMPT prompt to start with
--cookie-file COOKIE_FILE
path to cookie file
--history-file HISTORY_FILE
path to history file
--locale LOCALE your locale (e.g. en-US, zh-CN, en-IE, en-GB)
```
(中/美/英/挪具有更好的本地化支援)
## 在 Python 運行
### 1. 使用 `Chatbot` 類和 `asyncio` 類以進行更精細的控制
使用 async 獲得最佳體驗,例如:
```python
import asyncio, json
from EdgeGPT.EdgeGPT import Chatbot, ConversationStyle
async def main():
bot = await Chatbot.create() # 導入 cookie 是“可選”的,如前所述
response = await bot.ask(prompt="Hello world", conversation_style=ConversationStyle.creative, simplify_response=True)
print(json.dumps(response, indent=2)) # 返回如下
"""
{
"text": str,
"author": str,
"sources": list[dict],
"sources_text": str,
"suggestions": list[str],
"messages_left": int
}
"""
await bot.close()
if __name__ == "__main__":
asyncio.run(main())
```
### 2) `Query` 和 `Cookie` 助手類
創建一個簡單的必應聊天 AI 查詢(預設情況下使用“精確”對話樣式),這樣可以僅查看主要文本輸出,而不是整個 API 回應:
注意按照特定格式儲存 cookie: ```bing_cookies_*.json```。
```python
from EdgeGPT.EdgeUtils import Query, Cookie
q = Query("你是誰?用python代碼給出回答")
print(q)
```
儲存 Cookie 檔的預設目錄是 `HOME/bing_cookies`,但您可以通過以下方式更改它:
```python
Cookie.dir_path = Path(r"...")
```
或者更改要使用的對話風格或 Cookie 檔:
```python
q = Query(
"你是誰?用python代碼給出回答",
style="creative", # 或者平衡模式 'balanced' 或者精確模式 'precise'
cookies="./bing_cookies_alternative.json"
)
# 使用 `help(Query)` 查看其他支持的參數。
```
使用以下屬性快速提取文字輸出、代碼片段、來源/參考清單或建議的後續問題:
```python
q.output # 或者: print(q)
q.sources
q.sources_dict
q.suggestions
q.code
q.code_blocks
q.code_block_formatsgiven)
```
抓取原始 prompt 與您指定的對話風格:
```python
q.prompt
q.ignore_cookies
q.style
q.simplify_response
q.locale
repr(q)
```
通過 import `Query` 獲取進行的先前查詢:
```python
Query.index # 一个查詢物件的串列;是動態更新的
Query.image_dir_path
```
最後,`Cookie` 類支援多個 cookie 檔,因此,如果您使用命名約定 `bing_cookies_*.json` 創建其他 cookie 檔,則如果您的請求數已超出每日配額(當前設置為 200),您的查詢將自動嘗試使用下一個檔(按字母順序)。
以下是您可以獲得的主要屬性:
```python
Cookie.current_file_index
Cookie.current_file_path
Cookie.current_data
Cookie.dir_path
Cookie.search_pattern
Cookie.files
Cookie.image_token
Cookie.import_next
Cookie.rotate_cookies
Cookie.ignore_files
Cookie.supplied_files
Cookie.request_count
```
---
## 使用 Docker 運行
假設在當前工作目錄中有一個檔 `cookies.json`
```bash
docker run --rm -it -v $(pwd)/cookies.json:/cookies.json:ro -e COOKIE_FILE='/cookies.json' ghcr.io/acheong08/edgegpt
```
可以像這樣添加任意參數
```bash
docker run --rm -it -v $(pwd)/cookies.json:/cookies.json:ro -e COOKIE_FILE='/cookies.json' ghcr.io/acheong08/edgegpt --rich --style creative
```
# 如何使用圖像生成器
## 從命令列運行
```bash
$ python3 -m ImageGen.ImageGen -h
usage: ImageGen.py [-h] [-U U] [--cookie-file COOKIE_FILE] --prompt PROMPT [--output-dir OUTPUT_DIR] [--quiet] [--asyncio]
optional arguments:
-h, --help show this help message and exit
-U U Auth cookie from browser
--cookie-file COOKIE_FILE
File containing auth cookie
--prompt PROMPT Prompt to generate images for
--output-dir OUTPUT_DIR
Output directory
--quiet Disable pipeline messages
--asyncio Run ImageGen using asyncio
```
## 在 Python 運行
### 1) `ImageQuery` 助手類
根據一個簡單的提示產生圖像並下載到目前工作目錄:
```python
from EdgeGPT.EdgeUtils import ImageQuery
q=ImageQuery("Meerkats at a garden party in Devon")
```
在此工作階段中修改所有後續圖像的下載目錄:
```
Query.image_dirpath = Path("./to_another_folder")
```
### 2) 使用 `ImageGen` 類和 `asyncio` 類以進行更精細的控制
```python
from EdgeGPT.ImageGen import ImageGen
import argparse
import json
async def async_image_gen(args) -> None:
async with ImageGenAsync(args.U, args.quiet) as image_generator:
images = await image_generator.get_images(args.prompt)
await image_generator.save_images(images, output_dir=args.output_dir)
if __name__ == "__main__":
parser = argparse.ArgumentParser()
parser.add_argument("-U", help="來自瀏覽器的身份驗證 cookie", type=str)
parser.add_argument("--cookie-file", help="包含身份驗證 cookie 的檔", type=str)
parser.add_argument(
"--prompt",
help="用于產生圖像的 prompt",
type=str,
required=True,
)
parser.add_argument(
"--output-dir",
help="輸出目錄",
type=str,
default="./output",
)
parser.add_argument(
"--quiet", help="禁用管道消息", action="store_true"
)
parser.add_argument(
"--asyncio", help="使用 asyncio 運行 ImageGen", action="store_true"
)
args = parser.parse_args()
# 載入身份驗證 cookie
with open(args.cookie_file, encoding="utf-8") as file:
cookie_json = json.load(file)
for cookie in cookie_json:
if cookie.get("name") == "_U":
args.U = cookie.get("value")
break
if args.U is None:
raise Exception("找不到身份驗證 Cookie")
if not args.asyncio:
# 創建圖片生成器
image_generator = ImageGen(args.U, args.quiet)
image_generator.save_images(
image_generator.get_images(args.prompt),
output_dir=args.output_dir,
)
else:
asyncio.run(async_image_gen(args))
```
# Star 歷史
[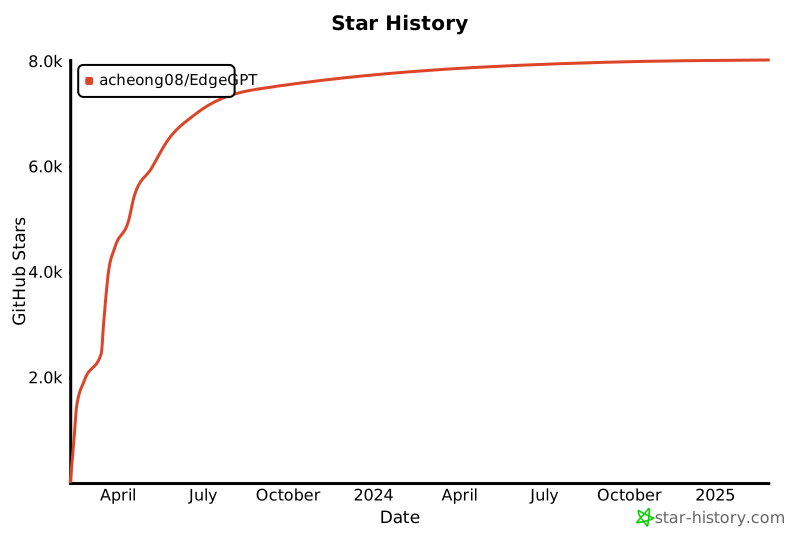](https://star-history.com/#acheong08/EdgeGPT&Date)
# 貢獻者
這個專案的存在要歸功於所有做出貢獻的人。
 # Edge GPT
_新必應聊天功能的逆向工程_
English -
简体中文 -
繁體中文 -
Español -
日本語
# Edge GPT
_新必應聊天功能的逆向工程_
English -
简体中文 -
繁體中文 -
Español -
日本語