使用案例 · 自定义业务域本体
用团队协作本体(Team Graph)建一张图
本页用一个真实可运行的例子演示 ArchGraph 最核心的一条路径: 定义你自己的业务本体 → 建元素 → 建关系 → 建视图 → 校验并做语义召回。 所有内容都对应仓库里的 custom-schema/ 示例,你可以直接照抄。
业务域:一个「团队 + 服务」的小场景。我们关心三件事 —— 谁在哪个团队、团队依赖哪些服务、服务之间谁依赖谁。 围绕这个业务,我们定义自己的元素和关系类型,而不是套用通用的 ArchiMate 词表。
写下你的建模语言(本体包 / schema bundle)
在项目根目录放一个 .argo/schema/,ARGO 就会只对这个项目使用你的本体;
其它项目仍用默认的 ArchiMate 3.2。这个目录就是一个本体包(schema bundle)。
哪些文件必需、哪些可选
| 文件 | 是否必需 | 作用 |
|---|---|---|
.argo/schema/SystemArchitecture.schema.json |
独立本体包必需 | 图谱的 JSON Schema:结构 + 元素/关系类型枚举。若本体包用 "extends": "default" 继承内置默认,则本文件可省略(自动继承基座 schema)。 |
.argo/schema/schema-bundle.config.json |
独立本体包必需;extends 时唯一必需 |
打包描述:语言名、actorElementType、不变量、rules 指针等。独立本体包必须在这里把 actorElementType 设为你的某个元素类型(或显式 null 表示无 actor),否则加载/校验 fail-closed;声明 extends 时,只放这一个 config 就够。 |
.argo/schema/schema-bundle.rules.json |
可选 | 类型元数据 + 关系端点合法性矩阵。省略时端点校验变为宽松(任意已知类型可互连)。 |
.argo/schema/GUIDE.md |
可选 | 给人看的指南与推荐视点。 |
两条起步路线:继承默认 vs. 完全自定义
| 起步方式 | 你要写的东西 | 适用场景 |
|---|---|---|
extends: "default" + config |
只加 .argo/schema/schema-bundle.config.json,用 addElementTypes / addRelationships(可选 overrideMatrix)在默认之上追加自己的类型;无需自带 schema 文件。 |
大部分类型沿用 ArchiMate 3.2 + ARGO 扩展,只想加几个业务域类型。 |
| 独立全量 schema | 放完整的 .argo/schema/SystemArchitecture.schema.json,编辑它的两个 $defs 枚举数组;同时必须用 schema-bundle.config.json 声明 actorElementType(取你的某个元素类型,或显式 null),否则加载/校验 fail-closed。schema-bundle.rules.json 可选(省略则端点校验宽松)。 |
完全自定义词表,不需要 ArchiMate 类型。 |
要建模一个不是 Team Graph 的领域,就改下面这两个 $defs 枚举数组里的字符串:
本案例的 SystemArchitecture.schema.json 与内置默认相比,唯一的结构性差异就是
$defs 里的两个 enum 数组(title / description 只是文案,属于非结构差异)。
把 Agent Node / Team Node / Service Node 换成你的元素类型、把
Depends On / Assigned To 换成你的关系类型即可;数组里每个名字都会成为可用的类型。
类型枚举默认从这两把键读取(也可在 config 里用
elementTypeEnumPath / relationshipTypeEnumPath 指定别的键):
"$defs": {
  "archimateElementType": {
    "type": "string",
    "enum": ["Agent Node", "Team Node", "Service Node"]
  },
  "archimateRelationshipType": {
    "type": "string",
    "enum": ["Depends On", "Assigned To"]
  }
}
即:archimateElementType.enum 换成你的元素类型列表,
archimateRelationshipType.enum 换成你的关系类型列表。
schema-bundle.rules.json 的 relationshipTargetMatrix 里声明「谁能连谁」,
要么把 schema-bundle.config.json 的 invariants.endpointMatrix 设为 false
走宽松校验。元素类型则必须让 actorElementType 落在枚举里(或显式设为 null)。
步骤 1a:把本体包拷进你的项目
# 只拷 schema 本体包,不要连 .argo/temp/ 这类运行时临时文件一起拷(Windows 用 Copy-Item -Recurse)
mkdir -p <your-repo>/.argo
cp -r custom-schema/.argo/schema <your-repo>/.argo/schema
步骤 1b:自己创建图谱文件(自定义本体下必需)
argo init 不会自动生成初始图谱 ——
因为打包的默认图不匹配你的本体。你必须先自己创建 design/KG/SystemArchitecture.json,
否则初始化会明确失败(NO_DEFAULT_GRAPH)。这一步必须在任何 MCP 写入之前完成,也是唯一被允许手写图谱文件的一步;图谱建立后,后续修改一律走 MCP(见步骤 2)。
直接照抄示例内容(与 custom-schema/design/KG/SystemArchitecture.json 一致):
{
  "name": "Team Graph",
  "description": "Example graph validated against the custom-schema bundle (Team Graph ontology).",
  "elements": [
    {
      "id": "agent-001",
      "name": "Agent 001",
      "type": "Agent Node",
      "description": "An agent (business actor) assigned to a team."
    },
    {
      "id": "team-a",
      "name": "Team A",
      "type": "Team Node",
      "description": "A team of agents."
    },
    {
      "id": "svc-a",
      "name": "Service A",
      "type": "Service Node",
      "description": "A service Team A depends on."
    },
    {
      "id": "svc-b",
      "name": "Service B",
      "type": "Service Node",
      "description": "An upstream service Service A depends on."
    }
  ],
  "relationships": [
    {
      "id": "rel-1",
      "name": "Agent 001 assigned to Team A",
      "type": "Assigned To",
      "source_id": "agent-001",
      "target_id": "team-a",
      "source_name": "Agent 001",
      "target_name": "Team A",
      "statement": "Agent 001 --(Assigned To)--> Team A"
    },
    {
      "id": "rel-2",
      "name": "Team A depends on Service A",
      "type": "Depends On",
      "source_id": "team-a",
      "target_id": "svc-a",
      "source_name": "Team A",
      "target_name": "Service A",
      "statement": "Team A --(Depends On)--> Service A"
    },
    {
      "id": "rel-3",
      "name": "Service A depends on Service B",
      "type": "Depends On",
      "source_id": "svc-a",
      "target_id": "svc-b",
      "source_name": "Service A",
      "target_name": "Service B",
      "statement": "Service A --(Depends On)--> Service B"
    }
  ],
  "views": [
    {
      "view_id": "view-root",
      "view_name": "SystemArchitecture",
      "description": "Root view holding the example team graph.",
      "included_elements": ["agent-001", "team-a", "svc-a", "svc-b"],
      "included_relationships": ["rel-1", "rel-2", "rel-3"]
    }
  ]
}
写好后就可以让 agent 执行 argo init(initializeWorkspace):它会用你的本体校验这张图、
做第一次 JSON → Neo4j 同步、初始化语义生命周期。之后所有写入都通过 MCP(applySystemArchitectureMutation 等)。
本体定义(本案例)
元素类型三种、关系类型两种,以及「谁能连谁」的端点矩阵:
| 种类 | 名称 | 说明 / 合法端点 |
|---|---|---|
| 元素类型 | Agent Node | 一个 agent(业务执行者)。actorElementType = Agent Node,唤醒门禁用它识别「我是谁」。 |
| 元素类型 | Team Node | 一个由 agent 组成的团队。 |
| 元素类型 | Service Node | 团队所依赖的能力 / 服务。 |
| 关系类型 | Assigned To | 合法端点:Agent Node → Team Node;Team Node → Agent Node。 |
| 关系类型 | Depends On | 合法端点:Team Node → {Service Node, Team Node};Service Node → Service Node;Agent Node → {Team Node, Service Node}。 |
另外两个不变量:根视图必须叫 SystemArchitecture;每个视图最多容纳 12 个元素
(maxElementsPerView: 12)。
schema-bundle.config.json
{
  "$schema": "https://json-schema.org/draft/2020-12/schema",
  "title": "Team Graph schema bundle descriptor",
  "language": "Team Graph",
  "actorElementType": "Agent Node",
  "guide": "GUIDE.md",
  "rules": "schema-bundle.rules.json",
  "deliveryDependencies": {
    "sourceDependsOnTarget": ["Depends On", "Assigned To"],
    "targetDependsOnSource": []
  },
  "invariants": {
    "statementGrammar": true,
    "endpointMatrix": true,
    "rootViewName": "SystemArchitecture",
    "maxElementsPerView": 12
  }
}
schema-bundle.rules.json(端点矩阵)
{
  "elementTypeMetadata": {
    "Agent Node":   { "layer": "Organization", "aspect": "Active Structure" },
    "Team Node":    { "layer": "Organization", "aspect": "Active Structure" },
    "Service Node": { "layer": "Organization", "aspect": "Behavior" }
  },
  "relationshipCategoryByType": {
    "Depends On": "Dependency",
    "Assigned To": "Assignment"
  },
  "relationshipTargetMatrix": {
    "Depends On": {
      "Team Node":    ["Service Node", "Team Node"],
      "Service Node": ["Service Node"],
      "Agent Node":   ["Team Node", "Service Node"]
    },
    "Assigned To": {
      "Agent Node": ["Team Node"],
      "Team Node":  ["Agent Node"]
    }
  }
}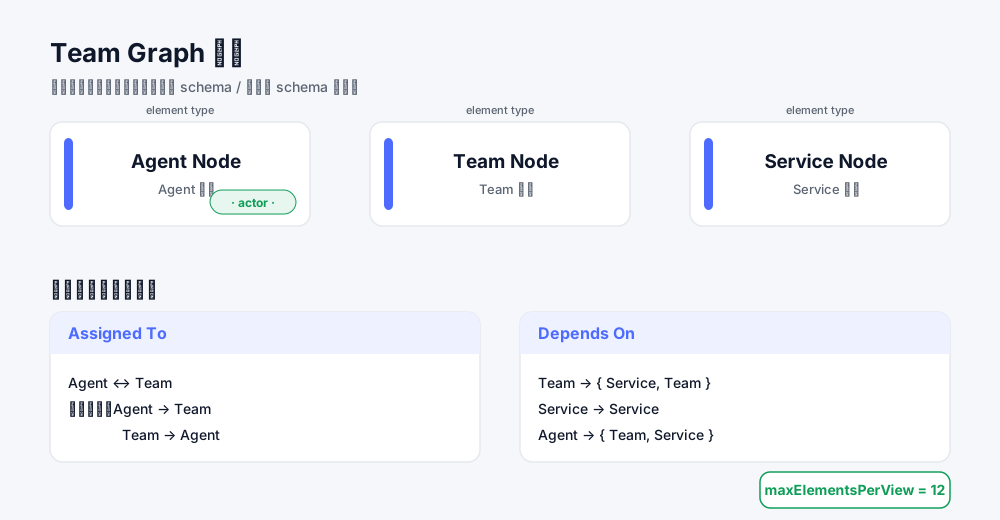
Agent Node 标为 actor、Team Node、Service Node);
右侧是两种关系类型(Assigned To、Depends On),箭头即合法端点;角落标注 maxElementsPerView=12。
视图、元素、关系一次提交
图谱建立之后,所有写入都通过 MCP,不要手改 JSON 文件(步骤 1b 的初始 bootstrap 是唯一例外)。让 agent 调用
applySystemArchitectureMutation,传入下面这个真正可运行的批次(它不是 shell 命令):
把根视图、4 个元素、3 条关系放进同一次调用,
由服务端按依赖关系做拓扑排序、原子写入。注意 mutations 的第一项是 addView:
先把根视图 view-root 建出来,后面的元素再用 view_ids: ["view-root"] 挂进去 ——
绝不出现「元素引用了还不存在的视图」。
{
  "mutations": [
    {
      "type": "addView",
      "view": {
        "view_id": "view-root",
        "view_name": "SystemArchitecture",
        "description": "Root view holding the example team graph."
      }
    },
    {
      "type": "addElement",
      "element": {
        "id": "agent-001",
        "name": "Agent 001",
        "type": "Agent Node",
        "description": "An agent (business actor) assigned to a team."
      },
      "view_ids": ["view-root"]
    },
    {
      "type": "addElement",
      "element": {
        "id": "team-a",
        "name": "Team A",
        "type": "Team Node",
        "description": "A team of agents."
      },
      "view_ids": ["view-root"]
    },
    {
      "type": "addElement",
      "element": {
        "id": "svc-a",
        "name": "Service A",
        "type": "Service Node",
        "description": "A service Team A depends on."
      },
      "view_ids": ["view-root"]
    },
    {
      "type": "addElement",
      "element": {
        "id": "svc-b",
        "name": "Service B",
        "type": "Service Node",
        "description": "An upstream service Service A depends on."
      },
      "view_ids": ["view-root"]
    },
    {
      "type": "addRelationship",
      "relationship": {
        "id": "rel-1",
        "name": "Agent 001 assigned to Team A",
        "type": "Assigned To",
        "source_id": "agent-001",
        "target_id": "team-a",
        "source_name": "Agent 001",
        "target_name": "Team A",
        "statement": "Agent 001 --(Assigned To)--> Team A"
      },
      "view_ids": ["view-root"]
    },
    {
      "type": "addRelationship",
      "relationship": {
        "id": "rel-2",
        "name": "Team A depends on Service A",
        "type": "Depends On",
        "source_id": "team-a",
        "target_id": "svc-a",
        "source_name": "Team A",
        "target_name": "Service A",
        "statement": "Team A --(Depends On)--> Service A"
      },
      "view_ids": ["view-root"]
    },
    {
      "type": "addRelationship",
      "relationship": {
        "id": "rel-3",
        "name": "Service A depends on Service B",
        "type": "Depends On",
        "source_id": "svc-a",
        "target_id": "svc-b",
        "source_name": "Service A",
        "target_name": "Service B",
        "statement": "Service A --(Depends On)--> Service B"
      },
      "view_ids": ["view-root"]
    }
  ]
}applySystemArchitectureMutation / previewSystemArchitectureMutation
会在批次内建依赖图并按拓扑顺序应用,所以一个 mutation 可以引用同批次里稍后才创建的对象
(addElement 加入同批次的视图、addRelationship 的端点同时新增、addView 由同批次元素做父级)。
真正的环会被拒绝并给出 id 链;preview 与 apply 走同一条路径,最终整份文档仍会被整体校验。
四个元素分别是:Agent 001(Agent Node)、Team A(Team Node)、
Service A 与 Service B(Service Node)。每个元素都必须至少属于一个视图,因此都带 view_ids。
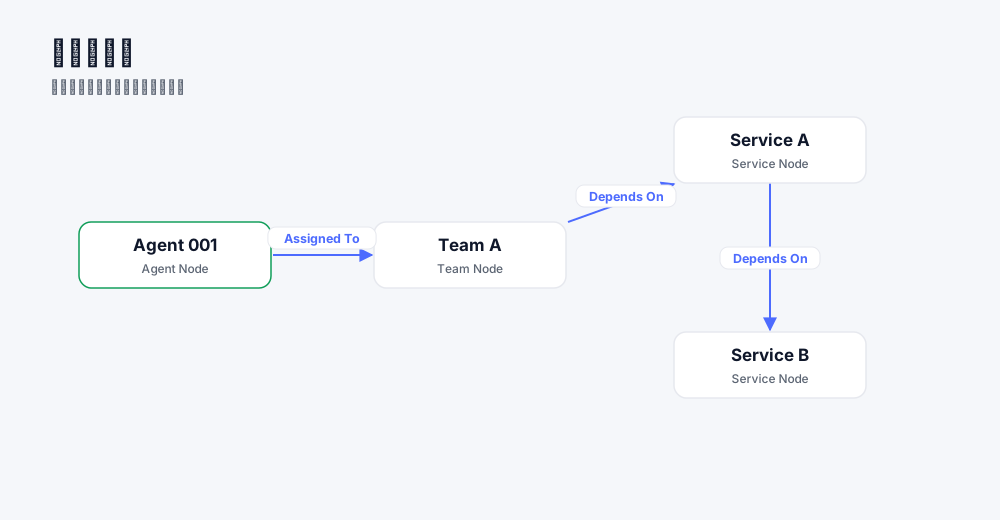
Agent 001、Team A、Service A、Service B)
与三条有向边:Agent 001 --(Assigned To)--> Team A、
Team A --(Depends On)--> Service A、Service A --(Depends On)--> Service B。
三条关系(上面同一批次里的片段)
关系也走同样的方式:让 agent 调用 applySystemArchitectureMutation(或单独调用
addArchitectureRelationship)。每条关系的 statement 必须符合
<source> --(<type>)--> <target> 语法,且端点要落在端点矩阵允许的范围里。
下面是上面那个批次里三条关系的片段(是调用参数,不是 shell):
// 关系 1:Agent 001 --(Assigned To)--> Team A
{
  "type": "addRelationship",
  "relationship": {
    "id": "rel-1",
    "name": "Agent 001 assigned to Team A",
    "type": "Assigned To",
    "source_id": "agent-001",
    "target_id": "team-a",
    "source_name": "Agent 001",
    "target_name": "Team A",
    "statement": "Agent 001 --(Assigned To)--> Team A"
  },
  "view_ids": ["view-root"]
}
// 关系 2:Team A --(Depends On)--> Service A
{ "type": "addRelationship",
"relationship": { "id": "rel-2", "name": "Team A depends on Service A",
"type": "Depends On", "source_id": "team-a", "target_id": "svc-a",
"source_name": "Team A", "target_name": "Service A",
"statement": "Team A --(Depends On)--> Service A" }, "view_ids": ["view-root"] }
// 关系 3:Service A --(Depends On)--> Service B
{ "type": "addRelationship",
"relationship": { "id": "rel-3", "name": "Service A depends on Service B",
"type": "Depends On", "source_id": "svc-a", "target_id": "svc-b",
"source_name": "Service A", "target_name": "Service B",
"statement": "Service A --(Depends On)--> Service B" }, "view_ids": ["view-root"] }
图 2 已经画出了这三条关系。注意:如果端点不合法(比如让 Service B 去 Assigned To
Agent 001),写入会被端点矩阵拒绝 —— 这正是自定义本体的价值。
根视图与成员纳入
根视图在批次的第一项就已创建(view-root / SystemArchitecture)。
批次里的每个元素和关系都通过自己的 view_ids 纳入其中;等价地,你也可以让 agent 单独调用
addArchitectureView,在创建视图时直接写出
included_elements 与 included_relationships:
{
  "type": "addView",
  "view": {
    "view_id": "view-root",
    "view_name": "SystemArchitecture",
    "description": "Root view holding the example team graph.",
    "included_elements": ["agent-001", "team-a", "svc-a", "svc-b"],
    "included_relationships": ["rel-1", "rel-2", "rel-3"]
  }
}subdiagram_views 挂到父元素上,用于表达「一个团队自己的视图」这类层次。
自定义本体的根视图名必须与 rootViewName(这里是 SystemArchitecture)一致;
一个视图最多 12 个元素,本例共 4 个,远在限制内。
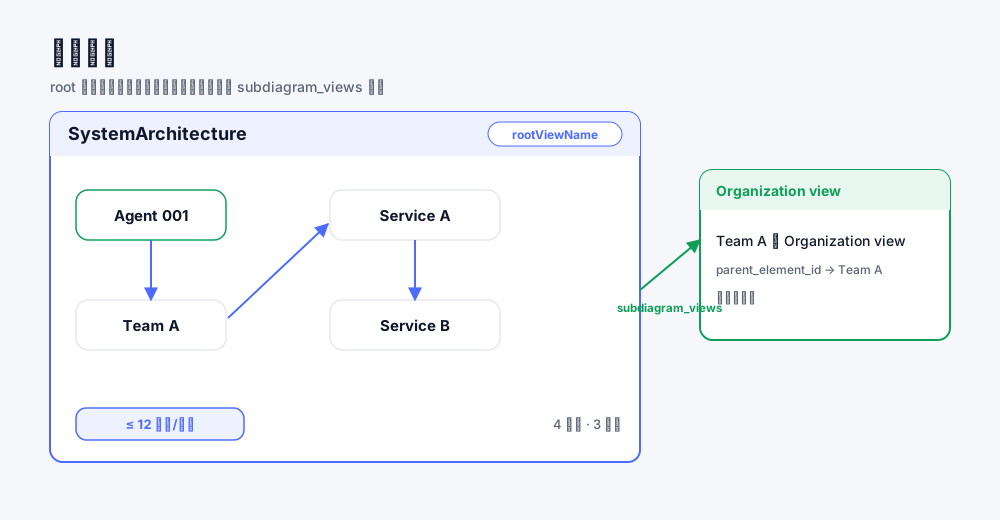
SystemArchitecture 内含 4 个元素 + 3 条关系,
并标注 rootViewName 与「≤ 12 元素/视图」;可另有一个经 subdiagram_views 挂载的子视图。
确认本体生效,并验证召回
先做整体校验,再用只读查询确认「当前生效的是哪套 schema」,最后用语义检索验证 agent 真能按意思找到东西。
① 校验图谱
让 agent 调用 validateSystemArchitecture(无参数,校验当前工作区图谱)。
② 报告激活的本体包
让 agent 调用 queryNeo4jGraph,参数:
{ "schema": true }schemaKind: "workspace" ·
schemaLanguage: "Team Graph" ·
actorElementType: "Agent Node" ·
bundleValidation.status: "passed" ·
archimateElementTypes: ["Agent Node","Team Node","Service Node"]。
其中 schemaKind: workspace 表示用的是项目自定义本体,而不是内置默认(default)。
③ 语义检索 / 上下文召回
让 agent 调用 memory_search 按意思找,参数:
{ "query": "which team depends on Service B?" }或让 agent 调用 getSystemArchitecture 语义检索图谱内容,参数:
{ "query": { "purpose": "general", "intent": "team dependencies and agent assignments" } }
召回结果应命中 Team A / Service A / Service B 这条依赖链,
以及 Agent 001 --(Assigned To)--> Team A 的归属关系。命中卡片会带一个
matchedSnippet,告诉你「为什么它匹配」,必要时再用
getIntentElementContext 读取完整内容。
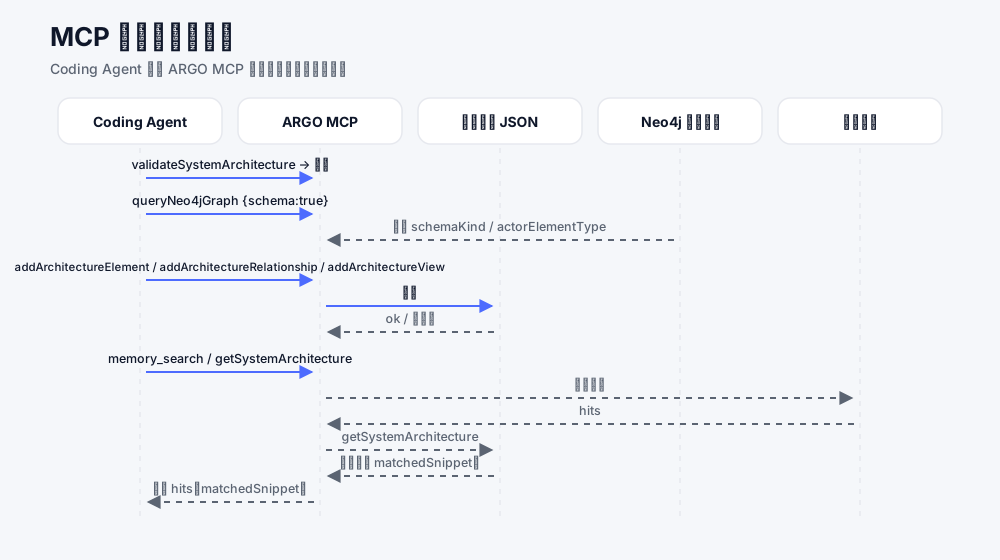
validateSystemArchitecture、queryNeo4jGraph {schema:true}、
写入 addArchitectureElement / Relationship / View,
以及最终带 matchedSnippet 的召回结果。
继续往下
- 想了解安装与日常使用:使用介绍。
- 想一次看全部能力:能力总览。
- 想读机制设计:docs/schema-bundle-decoupling.md。
- 想直接照抄示例:仓库里的 custom-schema/。