
Back | Next | Contents
System Setup
# Building the Project from Source
Once your Jetson has has been [flashed with JetPack](jetpack-setup-2.md) or setup with the latest [SD card image](https://developer.nvidia.com/embedded/learn/get-started-jetson-nano-devkit#write), you should be able to either run the pre-built [Docker container](aux-docker.md), or compile jetson-inference from source. Either option is also able to install PyTorch for you.
## Quick Reference
If you aren't using the [Docker container](aux-docker.md), here's a condensed form of the commands to build/install the project directly on your Jetson:
``` bash
sudo apt-get update
sudo apt-get install git cmake libpython3-dev python3-numpy
git clone --recursive --depth=1 https://github.com/dusty-nv/jetson-inference
cd jetson-inference
mkdir build
cd build
cmake ../
make -j$(nproc)
sudo make install
sudo ldconfig
```
Below we will go through each step and discuss various build options along the way.
## Cloning the Repo
To download the code, navigate to a folder of your choosing on the Jetson. First, make sure git and cmake are installed:
``` bash
$ sudo apt-get update
$ sudo apt-get install git cmake
```
Then clone the `jetson-inference` project:
``` bash
$ git clone https://github.com/dusty-nv/jetson-inference
$ cd jetson-inference
$ git submodule update --init
```
Remember to run the `git submodule update --init` step (or clone with the `--recursive` flag).
### Python Development Packages
The Python functionality of this project is implemented through Python extension modules that provide bindings to the native C++ code using the Python C API. While configuring the project, the repo searches for versions of Python that have development packages installed on the system, and will then build the bindings for each version of Python that's present (e.g. Python 2.7, 3.6, 3.8).
``` bash
$ sudo apt-get install libpython3-dev python3-numpy
```
Then after the `sudo make install` step, the [`jetson_inference`](https://rawgit.com/dusty-nv/jetson-inference/master/docs/html/python/jetson.inference.html) and [`jetson_utils`](https://rawgit.com/dusty-nv/jetson-inference/master/docs/html/python/jetson.utils.html) modules should be able to be imported in Python.
### Configuring with CMake
Next, create a build directory within the project and run `cmake` to configure the build. When `cmake` is run, a script is launched ([`CMakePreBuild.sh`](../CMakePreBuild.sh)) that will install any required dependencies and download DNN models for you.
``` bash
$ cd jetson-inference # omit if working directory is already jetson-inference/ from above
$ mkdir build
$ cd build
$ cmake ../
```
> **note**: this command will launch the [`CMakePreBuild.sh`](../CMakePreBuild.sh) script which asks for sudo privileges while installing some prerequisite packages on the Jetson. The script also downloads pre-trained networks from web services.
## Installing PyTorch
If you are using JetPack 4.2 or newer, another tool will now run that can optionally install PyTorch on your Jetson if you want to re-train networks with [transfer learning](pytorch-transfer-learning.md) later in the tutorial. This step is optional, and if you don't wish to do the transfer learning steps, you don't need to install PyTorch and can skip this step.
If desired, select the PyTorch package versions for Python 2.7 and/or Python3 that you want installed and hit `Enter` to continue. Otherwise, leave the options un-selected, and it will skip the installation of PyTorch.
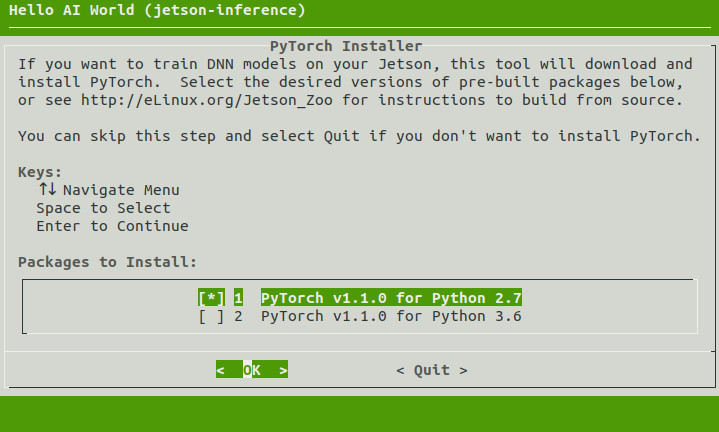 > **note**: the automated PyTorch installation tool requires JetPack 4.2 (or newer)
> for other versions, see [`http://eLinux.org/Jetson_Zoo`](https://elinux.org/Jetson_Zoo#PyTorch_.28Caffe2.29) to build from source.
You can also run this tool again later if you decide that you want to install PyTorch at another time:
``` bash
$ cd jetson-inference/build
$ ./install-pytorch.sh
```
Running these commands will prompt you with the same dialog as seen above.
## Compiling the Project
Make sure you are still in the `jetson-inference/build` directory, created above in step #3.
Then run `make` followed by `sudo make install` to build the libraries, Python extension bindings, and code samples:
``` bash
$ cd jetson-inference/build # omit if working directory is already build/ from above
$ make
$ sudo make install
$ sudo ldconfig
```
The project will be built to `jetson-inference/build/aarch64`, with the following directory structure:
```
|-build
\aarch64
\bin where the sample binaries are built to
\networks where the network models are stored
\images where the test images are stored
\include where the headers reside
\lib where the libraries are build to
```
In the build tree, you can find the binaries residing in `build/aarch64/bin/`, headers in `build/aarch64/include/`, and libraries in `build/aarch64/lib/`. These also get installed under `/usr/local/` during the `sudo make install` step.
The Python bindings for the [`jetson.inference`](https://rawgit.com/dusty-nv/jetson-inference/master/docs/html/python/jetson.inference.html) and [`jetson.utils`](https://rawgit.com/dusty-nv/jetson-inference/master/docs/html/python/jetson.utils.html) modules also get installed during the `sudo make install` step under `/usr/lib/python*/dist-packages/`. If you update the code, remember to run it again.
## Digging Into the Code
See the **[API Reference](../README.md#api-reference)** documentation for the vision primitives available in `libjetson-inference`, including `imageNet` for image recognition, `detectNet` for object localization, and `segNet` for semantic segmentation. Familiarize yourself with the C++ or Python versions of these objects, depending on which language you prefer to use.
#### C++
Below is a partial listing of the [`imageNet`](../c/imageNet.h) C++ class that we'll use in upcoming steps of the tutorial:
``` c++
class imageNet : public tensorNet
{
public:
/**
* Network choice enumeration.
*/
enum NetworkType
{
CUSTOM, /**< Custom model provided by the user */
ALEXNET, /**< AlexNet trained on 1000-class ILSVRC12 */
GOOGLENET, /**< GoogleNet trained 1000-class ILSVRC12 */
GOOGLENET_12, /**< GoogleNet trained on 12-class subset of ImageNet ILSVRC12 from the tutorial */
RESNET_18, /**< ResNet-18 trained on 1000-class ILSVRC15 */
RESNET_50, /**< ResNet-50 trained on 1000-class ILSVRC15 */
RESNET_101, /**< ResNet-101 trained on 1000-class ILSVRC15 */
RESNET_152, /**< ResNet-50 trained on 1000-class ILSVRC15 */
VGG_16, /**< VGG-16 trained on 1000-class ILSVRC14 */
VGG_19, /**< VGG-19 trained on 1000-class ILSVRC14 */
INCEPTION_V4, /**< Inception-v4 trained on 1000-class ILSVRC12 */
};
/**
* Load a new network instance
*/
static imageNet* Create( NetworkType networkType=GOOGLENET, uint32_t maxBatchSize=DEFAULT_MAX_BATCH_SIZE,
precisionType precision=TYPE_FASTEST,
deviceType device=DEVICE_GPU, bool allowGPUFallback=true );
/**
* Load a new network instance
* @param prototxt_path File path to the deployable network prototxt
* @param model_path File path to the caffemodel
* @param mean_binary File path to the mean value binary proto (can be NULL)
* @param class_labels File path to list of class name labels
* @param input Name of the input layer blob.
* @param output Name of the output layer blob.
* @param maxBatchSize The maximum batch size that the network will support and be optimized for.
*/
static imageNet* Create( const char* prototxt_path, const char* model_path,
const char* mean_binary, const char* class_labels,
const char* input=IMAGENET_DEFAULT_INPUT,
const char* output=IMAGENET_DEFAULT_OUTPUT,
uint32_t maxBatchSize=DEFAULT_MAX_BATCH_SIZE,
precisionType precision=TYPE_FASTEST,
deviceType device=DEVICE_GPU, bool allowGPUFallback=true );
/**
* Determine the maximum likelihood image class.
* This function performs pre-processing to the image (apply mean-value subtraction and NCHW format), @see PreProcess()
* @param rgba float4 input image in CUDA device memory.
* @param width width of the input image in pixels.
* @param height height of the input image in pixels.
* @param confidence optional pointer to float filled with confidence value.
* @returns Index of the maximum class, or -1 on error.
*/
int Classify( float* rgba, uint32_t width, uint32_t height, float* confidence=NULL );
/**
* Retrieve the number of image recognition classes (typically 1000)
*/
inline uint32_t GetNumClasses() const { return mOutputClasses; }
/**
* Retrieve the description of a particular class.
*/
inline const char* GetClassDesc( uint32_t index ) const { return mClassDesc[index].c_str(); }
};
```
All of the DNN objects in the repo inherit from the shared [`tensorNet`](../c/tensorNet.h) object, which contains the common TensorRT code.
#### Python
Below is the abbreviated pydoc output of the Python [`imageNet`](https://rawgit.com/dusty-nv/jetson-inference/master/docs/html/python/jetson.inference.html#imageNet) object from the [`jetson.inference`](https://rawgit.com/dusty-nv/jetson-inference/master/docs/html/python/jetson.inference.html) package:
```
jetson.inference.imageNet = class imageNet(tensorNet)
| Image Recognition DNN - classifies an image
|
| __init__(...)
| Loads an image recognition model.
|
| Parameters:
| network (string) -- name of a built-in network to use
| values can be: 'alexnet', 'googlenet', 'googlenet-12', 'resnet-18`, ect.
| the default is 'googlenet'
|
| argv (strings) -- command line arguments passed to imageNet,
| for loading a custom model or custom settings
|
| Classify(...)
| Classify an RGBA image and return the object's class and confidence.
|
| Parameters:
| image (capsule) -- CUDA memory capsule
| width (int) -- width of the image (in pixels)
| height (int) -- height of the image (in pixels)
|
| Returns:
| (int, float) -- tuple containing the object's class index and confidence
|
| GetClassDesc(...)
| Return the class description for the given object class.
|
| Parameters:
| (int) -- index of the class, between [0, GetNumClasses()]
|
| Returns:
| (string) -- the text description of the object class
|
| GetNumClasses(...)
| Return the number of object classes that this network model is able to classify.
|
| Parameters: (none)
|
| Returns:
| (int) -- number of object classes that the model supports
----------------------------------------------------------------------
```
Next, we'll use the `imageNet` object to perform image recognition in Python or C++.
##
Next | Classifying Images with ImageNet
Back | Running the Docker Container
© 2016-2019 NVIDIA | Table of Contents