

Back | Next | Contents
Image Classification
 The [`imageNet`](../c/imageNet.h) object accepts an input image and outputs the probability for each class. Having been trained on the ImageNet ILSVRC dataset of **[1000 objects](../data/networks/ilsvrc12_synset_words.txt)**, the GoogleNet and ResNet-18 models were automatically downloaded during the build step. See [below](#downloading-other-classification-models) for other classification models that can be downloaded and used as well.
As an example of using the [`imageNet`](../c/imageNet.h) class, we provide sample programs for C++ and Python:
- [`imagenet.cpp`](../examples/imagenet/imagenet.cpp) (C++)
- [`imagenet.py`](../python/examples/imagenet.py) (Python)
These samples are able to classify images, videos, and camera feeds. For more info about the various types of input/output streams supported, see the [Camera Streaming and Multimedia](aux-streaming.md) page.
### Using the ImageNet Program on Jetson
First, let's try using the `imagenet` program to test imageNet recognition on some example images. It loads an image (or images), uses TensorRT and the `imageNet` class to perform the inference, then overlays the classification result and saves the output image. The project comes with sample images for you to use located under the `images/` directory.
After [building](building-repo-2.md) the project, make sure your terminal is located in the `aarch64/bin` directory:
``` bash
$ cd jetson-inference/build/aarch64/bin
```
Next, let's classify an example image with the `imagenet` program, using either the [C++](../examples/imagenet/imagenet.cpp) or [Python](../python/examples/imagenet.py) variants. If you're using the [Docker container](aux-docker.md), it's recommended to save the classified output image to the `images/test` mounted directory. These images will then be easily viewable from your host device in the `jetson-inference/data/images/test` directory (for more info, see [Mounted Data Volumes](aux-docker.md#mounted-data-volumes)).
``` bash
# C++
$ ./imagenet images/orange_0.jpg images/test/output_0.jpg # (default network is googlenet)
# Python
$ ./imagenet.py images/orange_0.jpg images/test/output_0.jpg # (default network is googlenet)
```
> **note**: the first time you run each model, TensorRT will take a few minutes to optimize the network.
The [`imageNet`](../c/imageNet.h) object accepts an input image and outputs the probability for each class. Having been trained on the ImageNet ILSVRC dataset of **[1000 objects](../data/networks/ilsvrc12_synset_words.txt)**, the GoogleNet and ResNet-18 models were automatically downloaded during the build step. See [below](#downloading-other-classification-models) for other classification models that can be downloaded and used as well.
As an example of using the [`imageNet`](../c/imageNet.h) class, we provide sample programs for C++ and Python:
- [`imagenet.cpp`](../examples/imagenet/imagenet.cpp) (C++)
- [`imagenet.py`](../python/examples/imagenet.py) (Python)
These samples are able to classify images, videos, and camera feeds. For more info about the various types of input/output streams supported, see the [Camera Streaming and Multimedia](aux-streaming.md) page.
### Using the ImageNet Program on Jetson
First, let's try using the `imagenet` program to test imageNet recognition on some example images. It loads an image (or images), uses TensorRT and the `imageNet` class to perform the inference, then overlays the classification result and saves the output image. The project comes with sample images for you to use located under the `images/` directory.
After [building](building-repo-2.md) the project, make sure your terminal is located in the `aarch64/bin` directory:
``` bash
$ cd jetson-inference/build/aarch64/bin
```
Next, let's classify an example image with the `imagenet` program, using either the [C++](../examples/imagenet/imagenet.cpp) or [Python](../python/examples/imagenet.py) variants. If you're using the [Docker container](aux-docker.md), it's recommended to save the classified output image to the `images/test` mounted directory. These images will then be easily viewable from your host device in the `jetson-inference/data/images/test` directory (for more info, see [Mounted Data Volumes](aux-docker.md#mounted-data-volumes)).
``` bash
# C++
$ ./imagenet images/orange_0.jpg images/test/output_0.jpg # (default network is googlenet)
# Python
$ ./imagenet.py images/orange_0.jpg images/test/output_0.jpg # (default network is googlenet)
```
> **note**: the first time you run each model, TensorRT will take a few minutes to optimize the network.  ``` bash
# C++
$ ./imagenet images/strawberry_0.jpg images/test/output_1.jpg
# Python
$ ./imagenet.py images/strawberry_0.jpg images/test/output_1.jpg
```
``` bash
# C++
$ ./imagenet images/strawberry_0.jpg images/test/output_1.jpg
# Python
$ ./imagenet.py images/strawberry_0.jpg images/test/output_1.jpg
```
 In addition to loading single images, you can also load a directory or sequence of images, or a video file. For more info, see the [Camera Streaming and Multimedia](aux-streaming.md) page or launch the application with the `--help` flag.
### Downloading Other Classification Models
The following pre-trained image classification models are available to use and will be automatically downloaded (the default is `googlenet`):
| Network | CLI argument | NetworkType enum |
| --------------|----------------|------------------|
| AlexNet | `alexnet` | `ALEXNET` |
| GoogleNet | `googlenet` | `GOOGLENET` |
| GoogleNet-12 | `googlenet-12` | `GOOGLENET_12` |
| ResNet-18 | `resnet-18` | `RESNET_18` |
| ResNet-50 | `resnet-50` | `RESNET_50` |
| ResNet-101 | `resnet-101` | `RESNET_101` |
| ResNet-152 | `resnet-152` | `RESNET_152` |
| VGG-16 | `vgg-16` | `VGG-16` |
| VGG-19 | `vgg-19` | `VGG-19` |
| Inception-v4 | `inception-v4` | `INCEPTION_V4` |
Generally the more complex networks can have greater classification accuracy, with increased runtime.
### Using Different Classification Models
You can specify which model to load by setting the `--network` flag on the command line to one of the corresponding CLI arguments from the table above. By default, GoogleNet is loaded if the optional `--network` flag isn't specified.
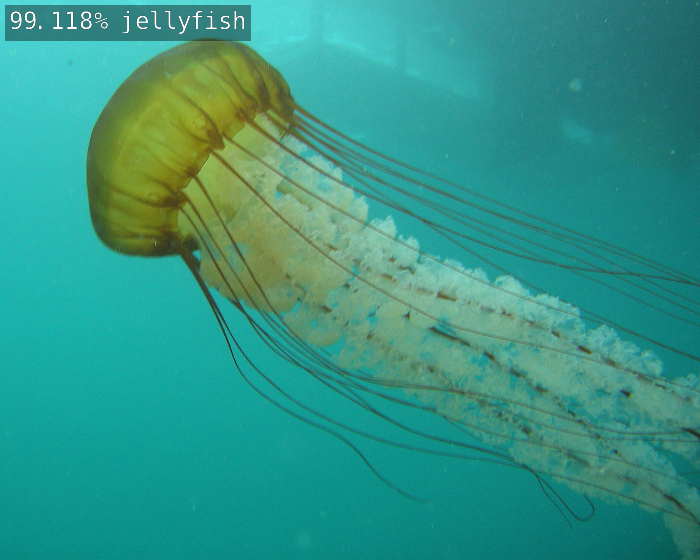
Below are some examples of using the ResNet-18 model:
``` bash
# C++
$ ./imagenet --network=resnet-18 images/jellyfish.jpg images/test/output_jellyfish.jpg
# Python
$ ./imagenet.py --network=resnet-18 images/jellyfish.jpg images/test/output_jellyfish.jpg
```
In addition to loading single images, you can also load a directory or sequence of images, or a video file. For more info, see the [Camera Streaming and Multimedia](aux-streaming.md) page or launch the application with the `--help` flag.
### Downloading Other Classification Models
The following pre-trained image classification models are available to use and will be automatically downloaded (the default is `googlenet`):
| Network | CLI argument | NetworkType enum |
| --------------|----------------|------------------|
| AlexNet | `alexnet` | `ALEXNET` |
| GoogleNet | `googlenet` | `GOOGLENET` |
| GoogleNet-12 | `googlenet-12` | `GOOGLENET_12` |
| ResNet-18 | `resnet-18` | `RESNET_18` |
| ResNet-50 | `resnet-50` | `RESNET_50` |
| ResNet-101 | `resnet-101` | `RESNET_101` |
| ResNet-152 | `resnet-152` | `RESNET_152` |
| VGG-16 | `vgg-16` | `VGG-16` |
| VGG-19 | `vgg-19` | `VGG-19` |
| Inception-v4 | `inception-v4` | `INCEPTION_V4` |
Generally the more complex networks can have greater classification accuracy, with increased runtime.
### Using Different Classification Models
You can specify which model to load by setting the `--network` flag on the command line to one of the corresponding CLI arguments from the table above. By default, GoogleNet is loaded if the optional `--network` flag isn't specified.
Below are some examples of using the ResNet-18 model:
``` bash
# C++
$ ./imagenet --network=resnet-18 images/jellyfish.jpg images/test/output_jellyfish.jpg
# Python
$ ./imagenet.py --network=resnet-18 images/jellyfish.jpg images/test/output_jellyfish.jpg
```
 ``` bash
# C++
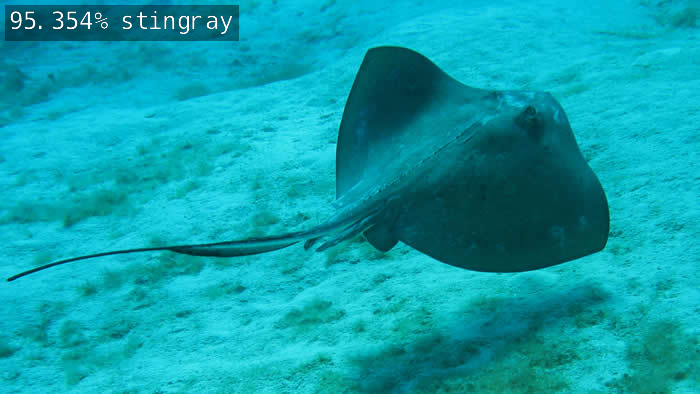
$ ./imagenet --network=resnet-18 images/stingray.jpg images/test/output_stingray.jpg
# Python
$ ./imagenet.py --network=resnet-18 images/stingray.jpg images/test/output_stingray.jpg
```
``` bash
# C++
$ ./imagenet --network=resnet-18 images/stingray.jpg images/test/output_stingray.jpg
# Python
$ ./imagenet.py --network=resnet-18 images/stingray.jpg images/test/output_stingray.jpg
```
 ``` bash
# C++
$ ./imagenet --network=resnet-18 images/coral.jpg images/test/output_coral.jpg
# Python
$ ./imagenet.py --network=resnet-18 images/coral.jpg images/test/output_coral.jpg
```
``` bash
# C++
$ ./imagenet --network=resnet-18 images/coral.jpg images/test/output_coral.jpg
# Python
$ ./imagenet.py --network=resnet-18 images/coral.jpg images/test/output_coral.jpg
```
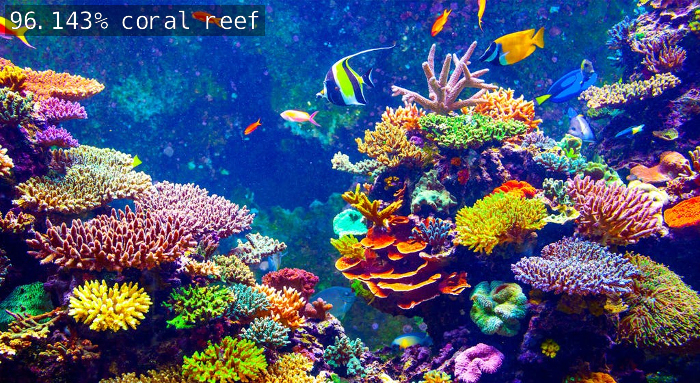 Feel free to experiment with using the different models and see how their accuracies and performance differ - you can download more models with the [Model Downloader](building-repo-2.md#downloading-models) tool. There are also various test images found under `images/`
### Processing a Video
The [Camera Streaming and Multimedia](aux-streaming.md) page shows the different types of streams that the `imagenet` program can handle.
Here is an example of running it on a video from disk:
``` bash
# Download test video (thanks to jell.yfish.us)
$ wget https://nvidia.box.com/shared/static/tlswont1jnyu3ix2tbf7utaekpzcx4rc.mkv -O jellyfish.mkv
# C++
$ ./imagenet --network=resnet-18 jellyfish.mkv images/test/jellyfish_resnet18.mkv
# Python
$ ./imagenet.py --network=resnet-18 jellyfish.mkv images/test/jellyfish_resnet18.mkv
```
Next we'll go through the steps to code your own image recognition program from scratch, first in Python and then C++.
##
Feel free to experiment with using the different models and see how their accuracies and performance differ - you can download more models with the [Model Downloader](building-repo-2.md#downloading-models) tool. There are also various test images found under `images/`
### Processing a Video
The [Camera Streaming and Multimedia](aux-streaming.md) page shows the different types of streams that the `imagenet` program can handle.
Here is an example of running it on a video from disk:
``` bash
# Download test video (thanks to jell.yfish.us)
$ wget https://nvidia.box.com/shared/static/tlswont1jnyu3ix2tbf7utaekpzcx4rc.mkv -O jellyfish.mkv
# C++
$ ./imagenet --network=resnet-18 jellyfish.mkv images/test/jellyfish_resnet18.mkv
# Python
$ ./imagenet.py --network=resnet-18 jellyfish.mkv images/test/jellyfish_resnet18.mkv
```
Next we'll go through the steps to code your own image recognition program from scratch, first in Python and then C++.
##
Next | Coding Your Own Image Recognition Program (Python)
Back | Building the Repo from Source
© 2016-2019 NVIDIA | Table of Contents