Menu Path: View>REST Clients |
Read Access Rights :
|
Write Access Rights :
|
The Rhapsody configuration can store details for multiple servers that host REST services. You can use the REST Clients Manager to add, modify or delete REST clients:
Viewing REST Clients
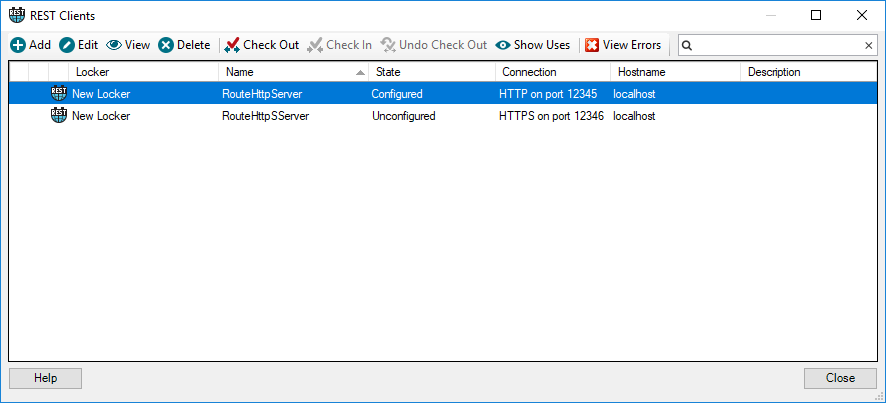
To launch the REST Clients Manager, select REST Clients from the View menu (or press Ctrl+Shift+T):
The REST Clients Manager displays the following information:
| Column | Description |
|---|---|
| Name | The unique user-defined name for the REST client within a locker. |
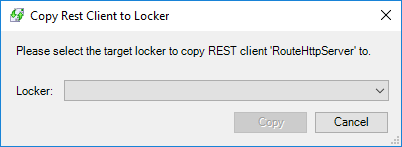
| Locker | The locker the REST client belongs to. You can use the right-click menu to copy the REST client to another locker using the Copy REST Client to Locker dialog: |
| State | Indicates whether the REST client is in If improperly configured, a REST client is set to |
| Connection | The protocol and port number. |
| Hostname | The hostname of the server the REST requests are to be sent to. |
| Description | A user-defined description of the REST client configuration. |
Managing REST Clients
The REST Clients Manager enables you to perform the following actions:
|
Action
|
Description
|
|---|---|
| Add | Add a REST client using the REST Client Properties dialog. |
| Edit | Edit a selected REST client using the REST Client Properties dialog. |
| View | View a REST client using the REST Client Properties dialog in read-only mode. |
| Delete | Delete a selected REST client. |
| Check Out | Check out a selected REST client. |
| Check In | Check in a selected REST client using the Check-in dialog. Any mandatory or improperly configured fields trigger a warning before you can check in your changes. Refer to Checking In for details. |
| Undo Check Out | Undo the changes in a checked out REST client. |
| Show Uses | Display the components a REST client is being used in. |
| View Errors | Determine why any REST clients are unconfigured. |
| Filter | Perform text-based filtering to filter the list of displayed REST clients. |
Adding a REST Client
To add a new REST client:
- In Rhapsody IDE, navigate to View>REST Clients (or press Ctrl+Shift+T) to display the REST Clients Manager.
- Select the Add button to open the REST Client Properties dialog.
- Enter the appropriate values in the fields. Refer to REST Client Properties for details.
- Select the OK button to add the REST client, or the Cancel button to abort.
Deleting a REST Client
To delete a REST client:
- In Rhapsody IDE, navigate to View>REST Clients (or press Ctrl+Shift+T) to display the REST Clients Manager.
- Select the REST client you want to delete.
- Select the Delete button to display a confirmation dialog.
- Select the Yes button to delete the REST client, or the No button to abort.
Editing a REST Client's Properties
To edit a REST client's properties:
- In Rhapsody IDE, navigate to View>REST Clients (or press Ctrl+Shift+T) to display the REST Clients Manager.
- Select the REST client you want to edit.
- Select the Edit button to open the REST client Properties dialog.
- Edit the appropriate properties. Refer to REST Client Properties for details.
- Select the OK button to save your changes, or the Cancel button to discard them.
Viewing a REST Client's Properties
To view a REST client's properties:
- In Rhapsody IDE, navigate to View>REST Clients (or press Ctrl+Shift+T) to display the REST Clients Manager.
- Select the REST client you want to view.
- Select the View button to view the REST client's properties in the REST Client Properties dialog. Refer to REST Client Properties for details.
- When you are finished, click the OK button to close the REST Client Properties dialog.
Showing Uses for a REST Client
To show where a REST client is being used:
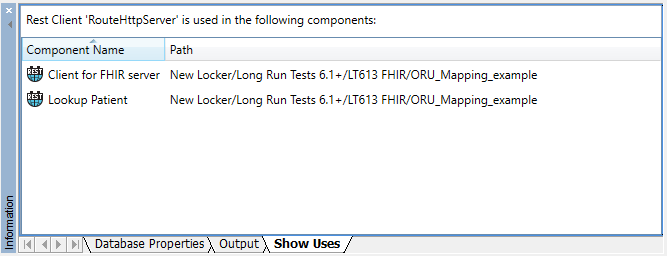
In the REST Clients manager, select a REST client and then select the Show Uses button (or right-click on the REST client and select Show Uses). The name and path of all components using the selected REST client are displayed in the Show Uses tab in the Information panel of Rhapsody IDE:
- To view or edit the configuration properties of a component using the shared JavaScript library:
- Double-click on the component path.
- Or alternatively, from the right-click menu, select Open Properties.
- Select the Close button to close the dialog.
Viewing Errors
To determine why any REST clients are unconfigured:
- In Rhapsody IDE, navigate to View>REST Clients (or press Ctrl+Shift+T) to display the REST Clients Manager.
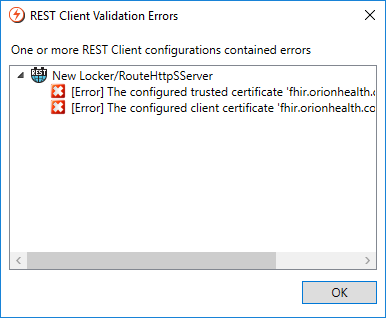
Select the View Errors button to display the REST Client Validation Errors dialog:
Review the configuration errors displayed in the REST Client Validation Errors dialog.
Select the OK button to close the dialog.
REST Client Properties
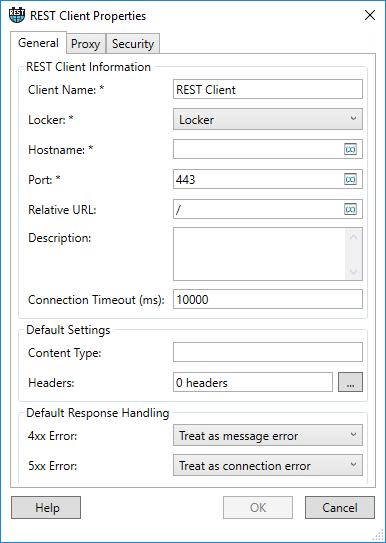
The REST Client Properties dialog allows you to configure the following properties for a REST client:
General Properties
The General Properties tab of the REST Client Properties dialog enables you to configure the following general properties:
| Property | Description |
|---|---|
| Client Name | The unique user-defined name for the REST client within a locker. |
| Locker | The locker the REST client belongs to. |
| Hostname | The hostname of the server the REST requests are to be sent to. |
| Port | The port on which the REST requests are to be sent. |
| Relative URL | The URL path that all REST requests will be relative to. |
| Description | A user-defined description of the REST client configuration. |
| Connection Timeout ( ms ) | How long to wait (in milliseconds) when trying to connect to the server. A value of zero is treated as an infinite timeout. |
| Content Type | The content type to set in the HTTP request headers. The value can be overridden when the HTTP request is sent. |
| Headers | A set of HTTP headers to include with every REST request. |
4xx Error |
Sets an action for when a 4xx Client Error response is received:
These options can be overridden by updating the code defined in the JavaScript Request property of the JavaScript REST communication point to set the request option: |
5xx Error |
Sets an action for when a 5xx Server Error response is received:
These options can be overridden by updating the code defined in the JavaScript Request property of the JavaScript REST communication point to set the request option: |
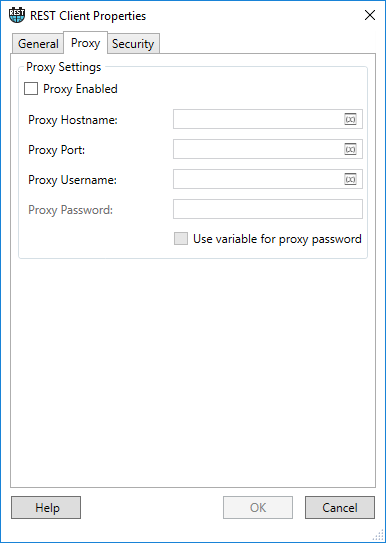
Proxy Properties
The Proxy Properties tab of the REST Client Properties dialog enables you to configure the following proxy-related properties:
| Property | Description |
|---|---|
| Proxy Enabled | Whether the REST client should connect via a proxy. |
| Proxy Hostname | The hostname for the proxy server. |
| Proxy Port | The port for the proxy server. |
| Proxy Username | The username to authenticate with the proxy server, if required. |
| Proxy Password | The password to authenticate with the proxy server, if required. |
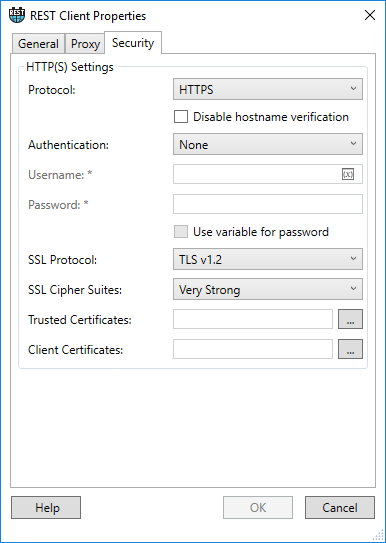
Security Properties
The Security Properties tab of the REST Client Properties dialog enables you to configure the following security-related properties:
| Property | Description |
|---|---|
| Protocol | The protocol to use to send REST requests: HTTP or HTTPS. |
| Disable hostname verification | Whether to disable or enable hostname verification. Hostname verification is a server authentication security mechanism. It ensures that the hostname specified in the certificate presented by the server is the same as the hostname specified in the URL property above. If the hostnames are different, the connection attempt will fail. The exception to this is where the remote server is, in fact, the localhost. Setting this property to Check means that the hostname used to connect to the HTTPS server is not verified against the expected hostnames included in the server's SSL certificate, however, the server's certificate is still authenticated against the Trusted Certificates configuration property. This is a weakening of the security provided by server-authenticated SSL. We strongly recommend being fully aware of the risks involved before making the decision to disable hostname verification. If you are unsure of the potential consequences, we recommend leaving verification unchecked. This option cannot be disabled if the trusted certificate authorities are being used to validate the certificate presented by the server (in other words, the Trusted Certificates configuration property has not been explicitly set). |
| Authentication | The method of authentication with the server: None, Basic or Digest. |
| Username | The username to authenticate yourself with the server. It is required with Basic or Digest authentication. It cannot be edited without authentication. |
Password |
The password to authenticate yourself with the server. It is required with Basic or Digest authentication. It cannot be edited without authentication. |
| Use variable for password | Select this option if you want to be able to use a variable for the password. It cannot be selected without authentication. |
| SSL Protocol | The SSL protocol to use with the connection. It is required when using HTTPS. It cannot be edited when using HTTP. Refer to TLS/SSL Support in Rhapsody for details. |
| SSL Cipher Suites | The SSL cipher suite to use for the connection. Refer to TLS/SSL Support in Rhapsody for details. |
| Trusted Certificates | List of trusted certificates to use for authenticating the HTTPS server. This option is only available when using HTTPS. If one or more certificates are configured in this property then the certificate presented by the server must either match one of the configured certificates, or have been signed by one of the configured certificates. If no certificates are configured in this property then the certificate presented by the server must have been signed by a trusted certificate authority. It is not possible to disable hostname verification using the Disable hostname verification configuration property if no certificates are configured here. Refer to Server Authentication for details. |
| Client Certificates | The certificates to authenticate yourself with. It is optional when using HTTPS. It cannot be edited when using HTTP. |
Configuring REST Client Manager
The following properties can be configured in the rhapsody.properties file:
| Property Name | Description | Default Value |
|---|---|---|
RestClients.ConnectionIdleTimeoutMinutes |
The time, in minutes, a REST client can be idle before its held resources are released. | 30 |
Changes made to the rhapsody.properties file take effect after the Rhapsody engine is restarted.

