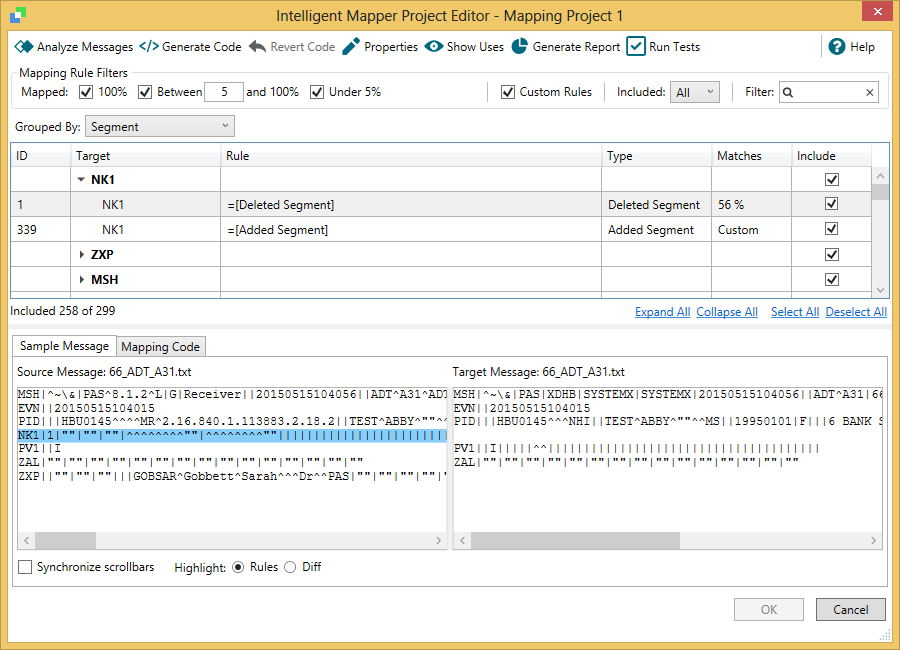
Mapping Project Editor displays a list of mapping rules for your review.
The Mapping Project Editor provides the following information:
| Panel/Tab | Description |
|---|---|
| Mapping Rules | Displays mapping rules according to the applied mapping rules filter. |
| Sample Message | Displays the sample source and target messages in the Source Message and Target Message panels, respectively. Messages are displayed using HL7 escape sequences where applicable. You can customize how messages are displayed in the Sample Message tab as follows:
You can copy a source or target message by right-clicking on the Source Message or Target Message panel, respectively, and selecting the Copy Message option. |
| Mapping Code | Displays the generated mapping code. When you select a mapping rule, the Mapping Code panel displays the line in the generated code that relates to the mapping rule. |
Mapping rules are displayed in the following format:
| Column | Description |
|---|---|
| ID | The unique identifier for the mapping rule. |
| Target | The target element (segment or composite) in the mapping rule. |
| Rule | The transformation applied to the target element. |
| Type | The mapping rule type. |
| Occurrence | The proportion of matched messages as a percentage of the total number of matched messages, where incidences of the mapping rule have been found. Displays
|
| Include | Whether to include the mapping rule in the generated mapping code. When checked, a mapping rule is included; when unchecked the mapping rule is excluded. In tree view, a solid square character in the checkbox against a segment or component indicates that at least one of its child mapping rules is selected.
To select for inclusion all mapping rules displayed by your mapping rule filters, select the Select All link. To deselect all filtered mapping rules for inclusion, select the Deselect All link. |
| Mapping Rule Count | The number of mapping rules marked for inclusion for generating mapping code out of the total number of mapping rules. |
Displaying Mapping Rules
You can display mapping rules individually or in a tree view which includes the target element path. Select one of the following options in the Grouped by dropdown list:
- No Grouping - display mapping rules individually
- Segment - display mapping rules in tree view grouped by segment.
- Field - display mapping rules in tree view grouped by field.
- Component - display mapping rules in tree view grouped by component.
- Subcomponent - display mapping rules in tree view grouped by subcomponent.
To expand all target paths, click the Expand All link. To collapse all target paths, select the Collapse All link.
Mapping Rule Types
Mapping rules are used by the Intelligent Mapper filter to generate output messages from input messages. In effect, mapping rules reflect how elements in target (output) messages differ from corresponding elements in source (input) messages in matched message pairs. A mapping rule can be regarded as the inverse of a transformation acting upon a source message:
| Mapping Rule Type | Description | Example |
|---|---|---|
| Constant Rule | Maps a constant to a target composite. |
|
| Field Rule | Maps a source composite to target composite. | MSH.5.1.1 = PID.3.1.1 |
| Delete Field Rule | Deletes a target composite. | MSH.5.1.1 = [Deleted] |
| Delete Segment Rule | Deletes a target segment. | PID = [Deleted Segment] |
| Add Segment Rule | Adds a target segment. | PID = [Added Segment] |
| No Match | Displayed for a mapping rule that occurs in 10% or fewer of the matched messages or only in a single matched message. | MSH.5.1.1 = [No Match] |
Custom Rules
The Custom Rules right-click menu enables you to specify custom mapping rules. When selected for inclusion, custom mapping rules are added to the generated code in addition to the automatically generated mapping rules. Every custom mapping rules requires the target (and its path) and the type of mapping to be specified.
You can perform the following actions through the right-click menu having selected a mapping rule:
| Action | Description |
|---|---|
| Add Custom Rule | Add a custom mapping rule directly below the selected mapping rule. |
| Edit Custom Rule | Edit a selected custom mapping rule. |
| Delete Custom Rule | Delete a selected custom mapping rule. |
| Copy Rule | Copy a selected rule to create a new custom rule |
| Paste Rule | Paste a rule to create a new custom rule. |
Adding a Custom Rule
To add a custom mapping rule:
- Select a mapping rule or path under which you would like to add a custom rule.
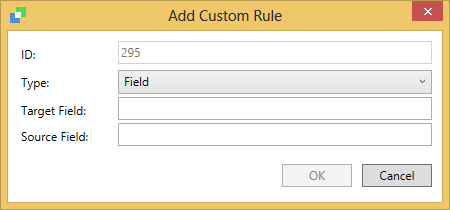
Select the Add Custom Rule option in the right-click menu to display the Add Custom Rule dialog:
Enter the appropriate details:
Field Description ID The identifier for the mapping rule (automatically added and uneditable). Type The type of mapping rule:
- Field
- Constant
- Delete Segment
- Add Segment
- Delete Field
Target Field/Target Segment The name of target segment or composite in the mapping rule. Source Field/Constant The name of the source composite or the value of the constant in the mapping rule. Only available when the Type is FieldorConstant.- Select the OK button to save your new custom rule, or the Cancel button to abort.
Alternatively, to copy and paste a mapping rule:
- Select an existing mapping rule to copy.
- Select the Copy Rule option in the right-click menu to copy the mapping rule.
- Select a mapping rule or path under which you would like to paste a custom rule.
- Select the Paste Rule option in the right-click menu to display the Add Custom Rule dialog.
- Edit the relevant details.
- Select the OK button to paste your new custom rule, or the Cancel button to abort.
Editing a Custom Rule
To edit a custom mapping rule:
- Select the custom mapping rule you want to modify.
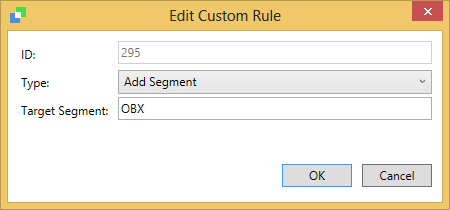
Select the Edit Custom Rule option in the right-click menu to display the Edit Custom Rule dialog:
- Edit the appropriate details.
- Select the OK button to save your changes, or the Cancel button to abort.
Deleting a Custom Rule
To delete a custom mapping rule:
- Select the custom mapping rule you want to delete.
- Select the Delete Custom Rule option in the right-click menu button to display the Delete Custom Rule confirmation dialog.
- Select the Yes button to proceed with the deletion, or the No button to abort.
Filtering Mapping Rules
You can filter the mapping rules to display using the following mapping filters:
| Mapping Rule Filter | Description |
|---|---|
| Occurrence | Select the range of matched messages within which mapping rules occur:
|
| Threshold | Enter the threshold as a percentage that divides non-100% mapped rules into two groups. |
| Custom Rules | Select the checkbox to display custom rules. |
| Included Rules | Select mapping rules on the basis of whether or not they are included for generating mapping code:
|
| Target Filter | Enter search criteria to filter the mapping rules by target field. |
Segment Notation
The Intelligent Mapper uses a specific notation to display segment repeats in mapping rules, which is based on the source (input) message. Sequential repeats are denoted by an appended index enclosed in curved brackets whereas non-sequential repeats are denoted by an appended index enclosed in square brackets.
For example, in the sample source message:
OBX|1|NM|150001^HIV-1 ABS-O.D. RATIO^L|||||||N|X
OBX|2|CE|001719^HIV-1 ABS, SEMI-QN^L||HTN|||||N|F|19910123|| 19980729155700|BN
NTE|1|L|Result: NEGATIVE by EIA screen.
NTE|2|L|No antibodies to HIV-1 detected.
OBX|3|CE|169999^.^L||SPRCS|||||N|F|||19980728130600|BN
NTE|1|L|NOTE: Submission of serum
NTE|2|L|separator tube recommended
NTE|3|L|for this test. Thank you
NTE|4|L|for your cooperation if you
NTE|5|L|are already doing so.
OBX|4|CE|169998^.^L||SPRCS|||||N|F|||19980728130600|BN
the segments, in order, are displayed as follows:
OBXOBX(1)NTENTE(1)OBX[2]NTE[2]NTE[2](1)NTE[2](2)NTE[2](3)NTE[2](4)OBX[3]


