Main menu
User login
Syndicate
You are here
Charcoal
| Attachment | Size |
|---|---|
| 227.38 KB | |
| 80.22 KB |
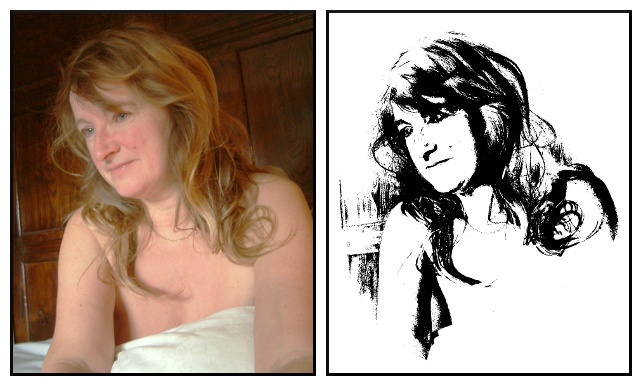
Script-Fu Charcoal v1.0 Tested with Gimp 2.6
A Gimp script which turns a photograph into a black and white image which can look quite like a charcoal drawing. Works with RGB, Indexed and Greyscale images.
Results can be variable and are dictated by the tonal values of the photo used. Although small adjustments can cause quite large differences, the default settings should provide a reasonable starting point but do be prepared to experiment.
To install (Linux): Download and un-zip the archive which contains the script, some examples and a description in text and PDF formats. Move the script file charcoal.scm to /yourhome/.gimp-2.x/scripts. Charcoal will be available the next time you start the Gimp and can be found in the menu <IMAGE><FILTERS><ARTISTIC>.
- Log in to post comments
Comments
Charcoal in G'MIC 1.4.8.3+
Hi,
I tried to convert your code into a G'MIC script, making the filter available directly from the G'MIC plug-in interface (so, with a preview)
More details should appear on :
http://www.flickr.com/groups/gmic/discuss/72157626175779086/#comment7215...
Let me know if you find it close to the original script, or if you think there have been misunderstanding from my side.
Cheers,
David.
Charcoal in G'MIC 1.4.8.3+
Hi David,
Many apoloogies for not replying sooner - it's showing the last post as 20th Feb (for some reason which I don't understand) so I haven't been checking.
I'm really glad you've done this conversion and I was wanting to try it out but I can't get it to run on my system. I'm using Gimp 2.6 on Ubuntu 9.10 Linux. The filter shows in the GMIC menu but returns a GMIC engine error "compose_channels" command not found. As an experiment, I downloaded a few others, none of which run for various reasons except for the "My First Filter rotate image" tutorial which does so at least I must be putting them in the right place!
I'm new to the world of GMIC so any help will be gratefully received.
Weird but better you try
Weird
but better you try with the latest Gmic (was uploaded few hours ago for Unix and Win)
PS the filter is for theGmic plugin, should be somehow adapted to run with the GMIC command line version
Weird but better you try
Hi PhotoComix,
Thanks for the comment.
I'll be on holiday for a few days from tonight but I'll give it a go as soon as i get back.
Could you list the manual
Could you list the manual steps that your script automatize?
(i would like have something similar in gmic, i love the results of your script but i miss
the preview and the flexibility of gmic I/O options...a pity that script fu don't allow previews )
Could you list the manual
Yep I agree - the lack of pre-views in script-fu is annoying. I need to learn how to write proper plug-ins.
The script as it stands is a bit tricky to follow, in part because I removed a couple of steps before I uploaded it but left some redundant lines in situ.
It seems to have generated some interest so I've re-written it as a layer effect after removing all the unnecessary code. It's better commented now so you should find it much easier to follow. I'll upload it in a day or two as soon as I'm sure it's bug free and I'll be happy to provide any explanations you need.
Comment lines
thank
scripting is not exactly my piece of cake, i did try to look to the code but with no any luck
maybe you may add some comment lines in the code of the next version you are going to upload- ?
Comment lines
OK photocomix - this is how both my "Charcoal" scripts work. The new version is easier to follow but both produce exactly the same result; the new one makes a layer rather than an image. There"s a whole bunch of comment lines in the new one which should hit the streets in a day or so - as soon as it comes back from my tester(s) - so it should be pretty easy to follow. Meanwhile here are the manual steps you'd need to follow:
First make a copy of either the active layer or the visible as a "charcoal" layer and insert it above existing layers.
If the "boost contrast" box has been checked, I use gimp-levels-stretch to increase the dynamic range of the "charcoal" layer.
The grainy texture is created by over sharpening the "charcoal" layer using "plug-in-sharpen", the degree being a user choice but it has to be high (over 50) to do anything useful.
If the "add chalk" box has been checked, I create a second copy layer to strip out to white highlights using the threshold tool set to 50, 75. I select by colour 255 255 255 and copy the highlights to a new transparent chalk layer above the charcoal layer, then remove the copy layer.
NB: There may be an easier way to do it but this works for me.
Now I resume work on "charcoal" layer:
I apply the threshold tool taking the user selected high and lowlight points.
I set the opacity to 50% and then I invert the layer unless the "invert to negative" box has been checked.
Lastly the blacks are de-saturated to a very dark grey using the levels tool, unless the "contrast boost" box has been checked, in which case they are left black.
That's about it.
I have found that the script will fail if you try to work on an empty layer or a totally black image - not managed to trap that one so far. Apart from this, it seems to be fairly reliable and can produce some beautiful and often unexpected effects if you're prepared to experiment.
I'm glad you like it. I've been using your "copy-visible-paste-as-new-image" script and it's good to be able to give something back once in a while.
thank micomicon apparently
thank micomicon
apparently all the steps may be replicated by equivalent or almost equivalent gmic commands,so in theory the script could be ported as filter for gmic,( and so with a advanced preview and more flexible I/O options )
In pratice the task may well be beyond my skills, but...who knows maybe i will get some help, or somebody more skilled then me in coding may get interested
of course i will let you know the progress (if any...no promises )
thank again for the script and the details
thank micomicon apparently
You're very welcome.
I don't understand gmic so look forward to seeing what, if anything, you can do with it.
Pages