Main menu
User login
Syndicate
You are here
Line Width
Line Width -- a Python-fu plugin for GIMP
v. 1.5 -- Aug 14, 2013, under Gnu Public Licence current
at that date.
CHANGES in v. 1.4:
New user-setting for Temporary-Enlargement size.
That is the size the image gets enlarged-to while being blurred.
Size of threshold for speed-of-line-change has been tweaked.
# CHANGES in v. 1.5:
# Now operates on a new layer that is a copy of the visible image.
# So now you can compare old and new line widths by clicking
# on-and-off visibility of the new layer, and you can simply
# dump the new layer if you don't like what you got.
# Also, the undo is now grouped and there is better error checking.
___________________________________________________
"Line Width," v. 1.0, 1.2, 1.3, 1.4: Python-fu GIMP plugin.Tested in GIMP 2.8. May not run on earlier versions.
Use RGB or RGBA line-art images. Scanned images that are
near black (0,0,0) and white(255,255,255) are OK after
conversion to RGB or RGBA.
2013. Under Gnu Public License.
Python-fu Gimp script by Michael B. Stevens
___________________________________________________
WHAT THIS PLUGIN IS
:
This plugin makes the lines in line artwork heavier or lighter.
It appears in GIMP here:
/Filters/Line Width
Original artwork: 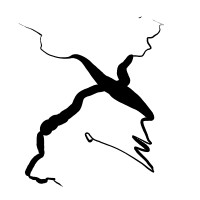
Narrowed lines: 
Widened lines: 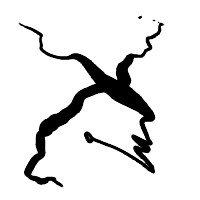
This kind of manipulation is needed when trying to match line width of pasted
digital cutouts (many cartoonists and commercial artists do this),
or if you just want a different line width.
A cartoonist, for instance, may have his stock characters in many poses saved to disk.
When combining these in a scene the line widths would usually need tweaking.
Or perhaps you feel that you've just had too heavy or light a hand in some drawing.
When you call the plugin a dialog appears. It asks the temporary image enlargement,
speed of change, and number of repeats you want to run over the image, and whether you
want to increase or decrease the line width.
--------------------------------------------------------------------------------------------
# TIPS:
#
# Try starting with low settings of speed of change and repeats.
# The image in use will have its own requirements.
# Running plug-in multiple times is OK. Experiment.
#
# A LOW temporary-enlargement multiplier
# ("Temp. enlargement multiplier") allows a run with
# large images in available memory
# and in a reasonable amount of time.
# HIGHER enlargement settings give somewhat better line quality
# at the expense of program speed.
# High enlargement settings with large image use a _lot_ of memory.
# I suggest you crank down the enlargement multiplier setting for
# large images.
# But you can also go to GIMP's settings menus at
# /Edit/Preferences/Environment, and increase the
# cache and undo level memory.
Tested in GIMP 2.8. May not run on earlier versions.
Use RGB or RGBA line-art images. Scanned images that are
near black (0,0,0) and white(255,255,255) are OK after
conversion to RGB or RGBA.
--------------------------------------------------------------------------------------
The script uses some other plugins distributed by default
with GIMP 2.8:
Antialias
Blur
---------------------------------------------------------------------------------------
HOW TO INSTALL:
Python must be on your system.
Put linewidth.py into ".gimp-2.8" folder's "plug-ins" folder.
Make sure the file has executable permissions.
(Under most systems you can right-click on a file to bring
up a preferences dialog that lets you change
its security permissions.)
Restart GIMP. The plugin will appear under the
"/Filters" menu as "Line Width".
-------------------------------------------------------------------------------------
USUAL BOILERPLATE:
This software is provided free under GNU public license without
any guarantee: Use at your own risk.
Recent comments